Welcome to RennTech.org Community, Guest
There are many great features available to you once you register at RennTech.org
You are free to view posts here, but you must log in to reply to existing posts, or to start your own new topic. Like most online communities, there are costs involved to maintain a site like this - so we encourage our members to donate. All donations go to the costs operating and maintaining this site. We prefer that guests take part in our community and we offer a lot in return to those willing to join our corner of the Porsche world. This site is 99 percent member supported (less than 1 percent comes from advertising) - so please consider an annual donation to keep this site running.
Here are some of the features available - once you register at RennTech.org
- View Classified Ads
- DIY Tutorials
- Porsche TSB Listings (limited)
- VIN Decoder
- Special Offers
-
OBD II P-Codes - Paint Codes
- Registry
- Videos System
- View Reviews
- and get rid of this welcome message
It takes just a few minutes to register, and it's FREE
Contributing Members also get these additional benefits:
(you become a Contributing Member by donating money to the operation of this site)
- No ads - advertisements are removed
- Access the Contributors Only Forum
- Contributing Members Only Downloads
- Send attachments with PMs
- All image/file storage limits are substantially increased for all Contributing Members
- Option Codes Lookup
- VIN Option Lookups (limited)


Uwon
-
Posts
219 -
Joined
-
Last visited
-
Days Won
1
Content Type
Profiles
Events
Forums
External Paint Colors
Downloads
Tutorials
Links Directory
Collections
Store
Posts posted by Uwon
-
-
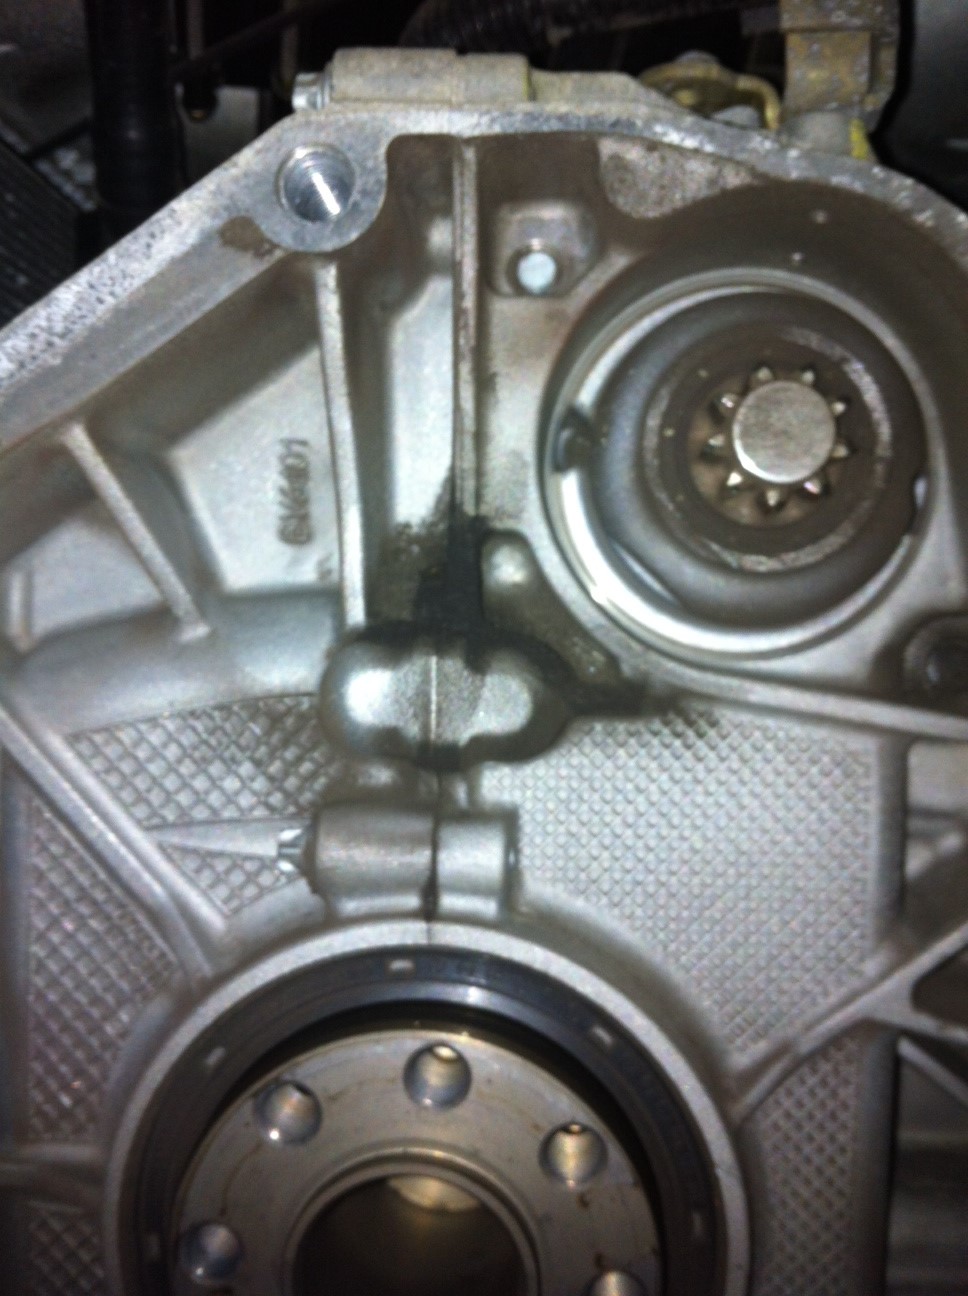
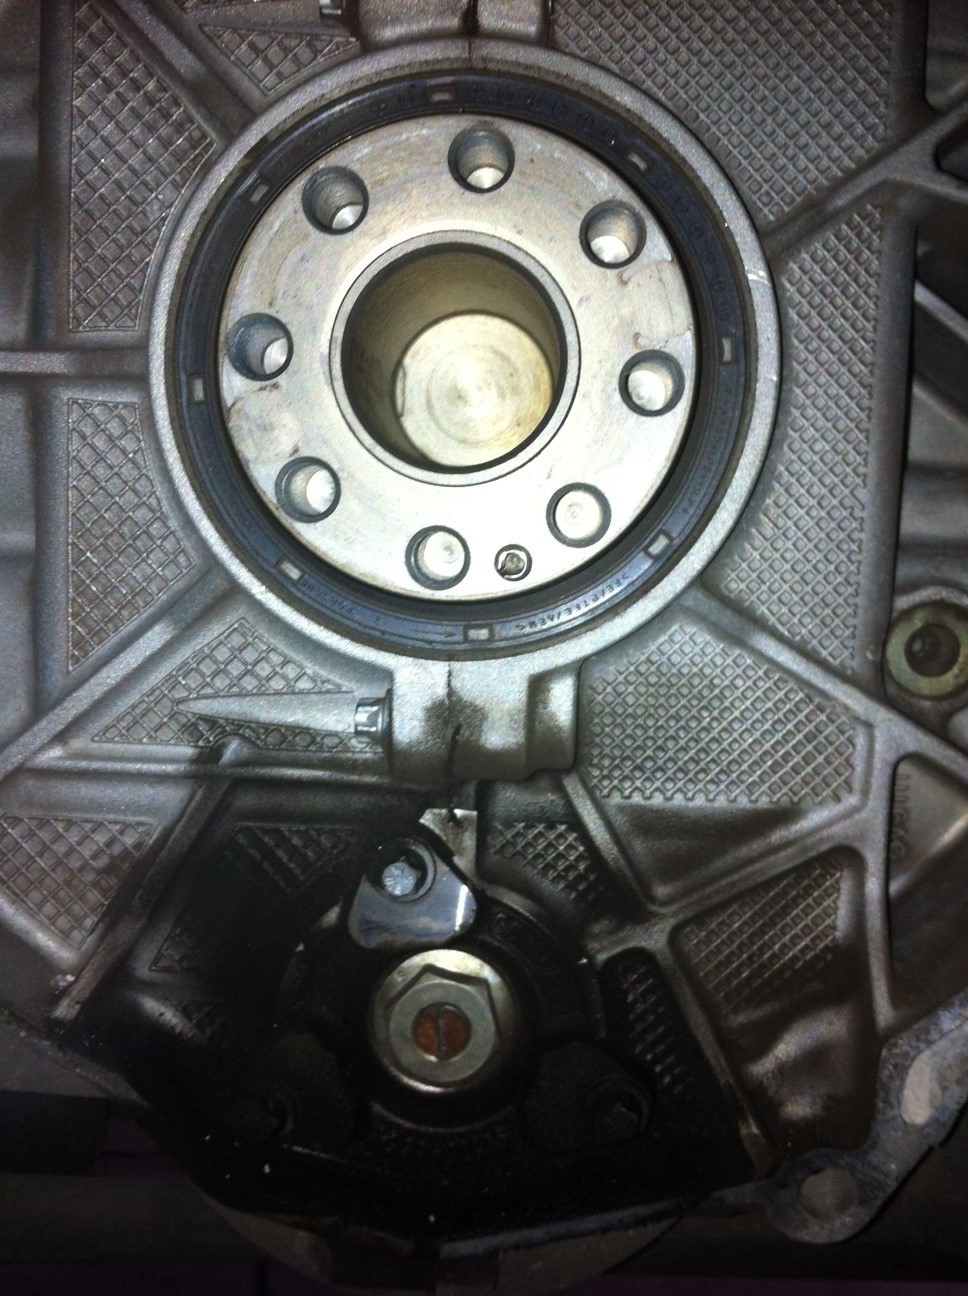
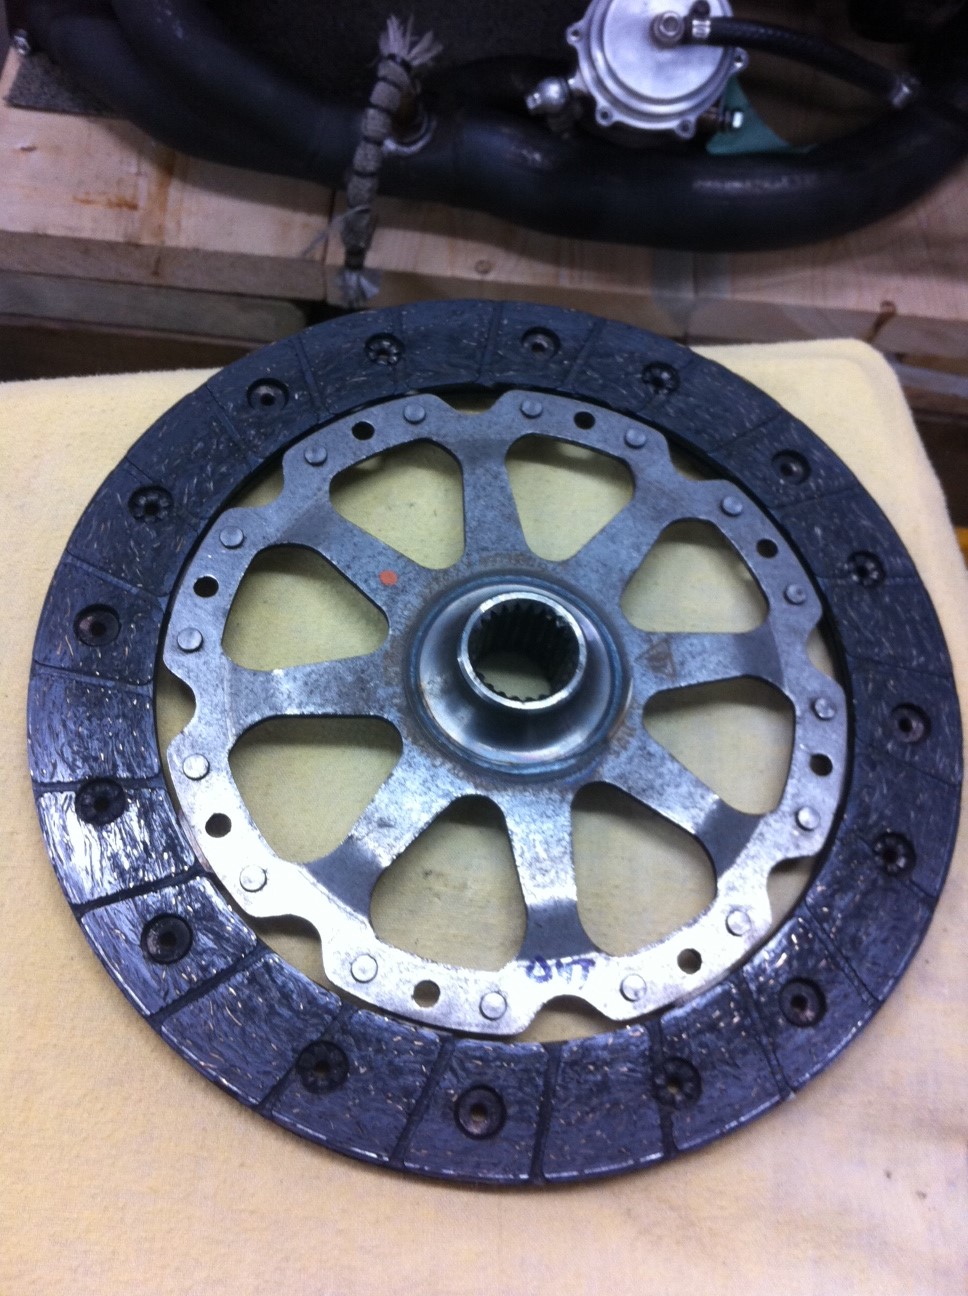
So here are some relevant pics.
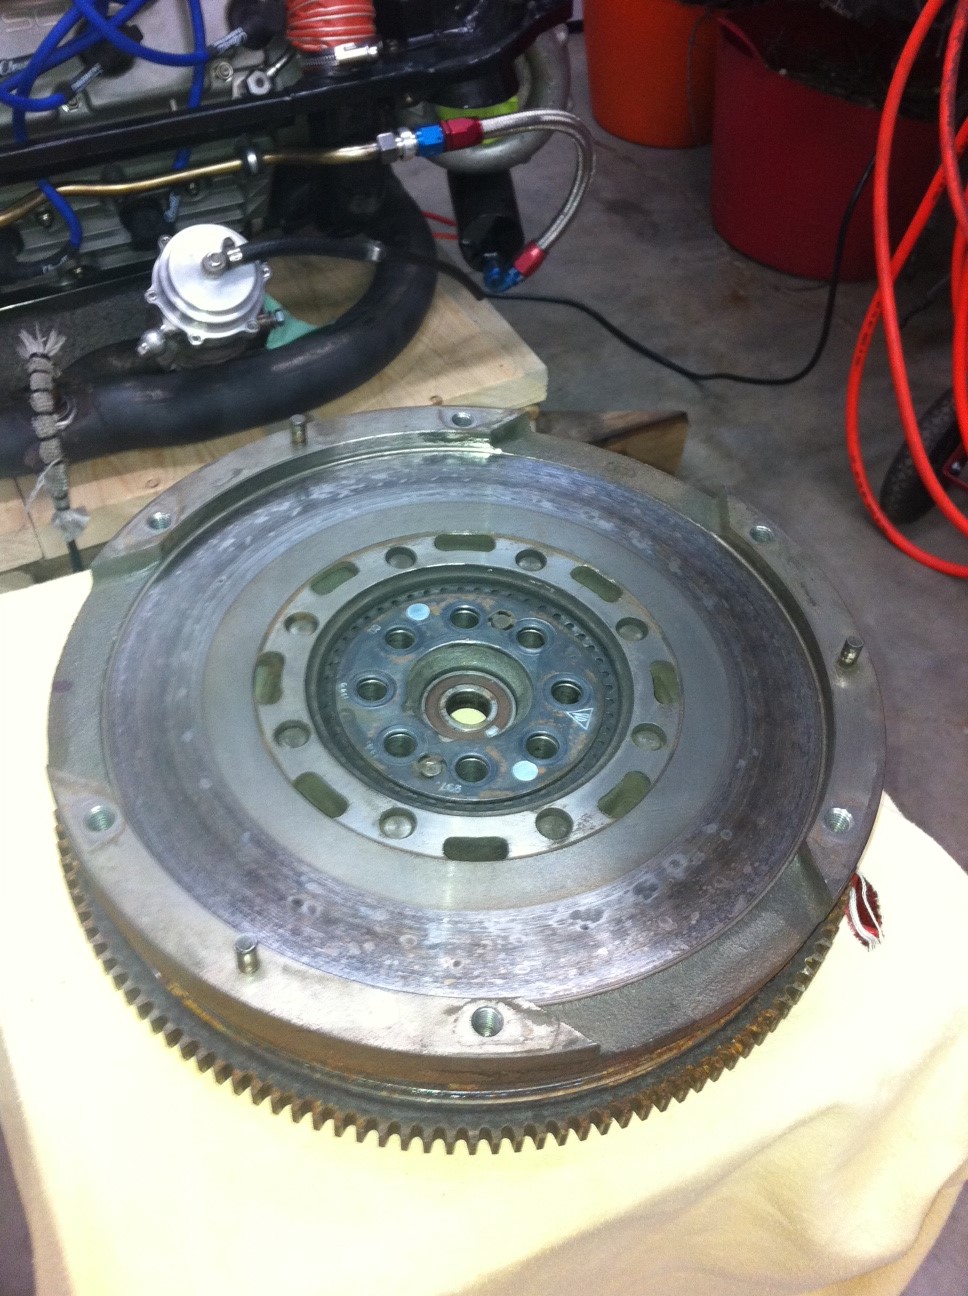
Bolts above RMS are slightly dirty.
RMS looks really clean.
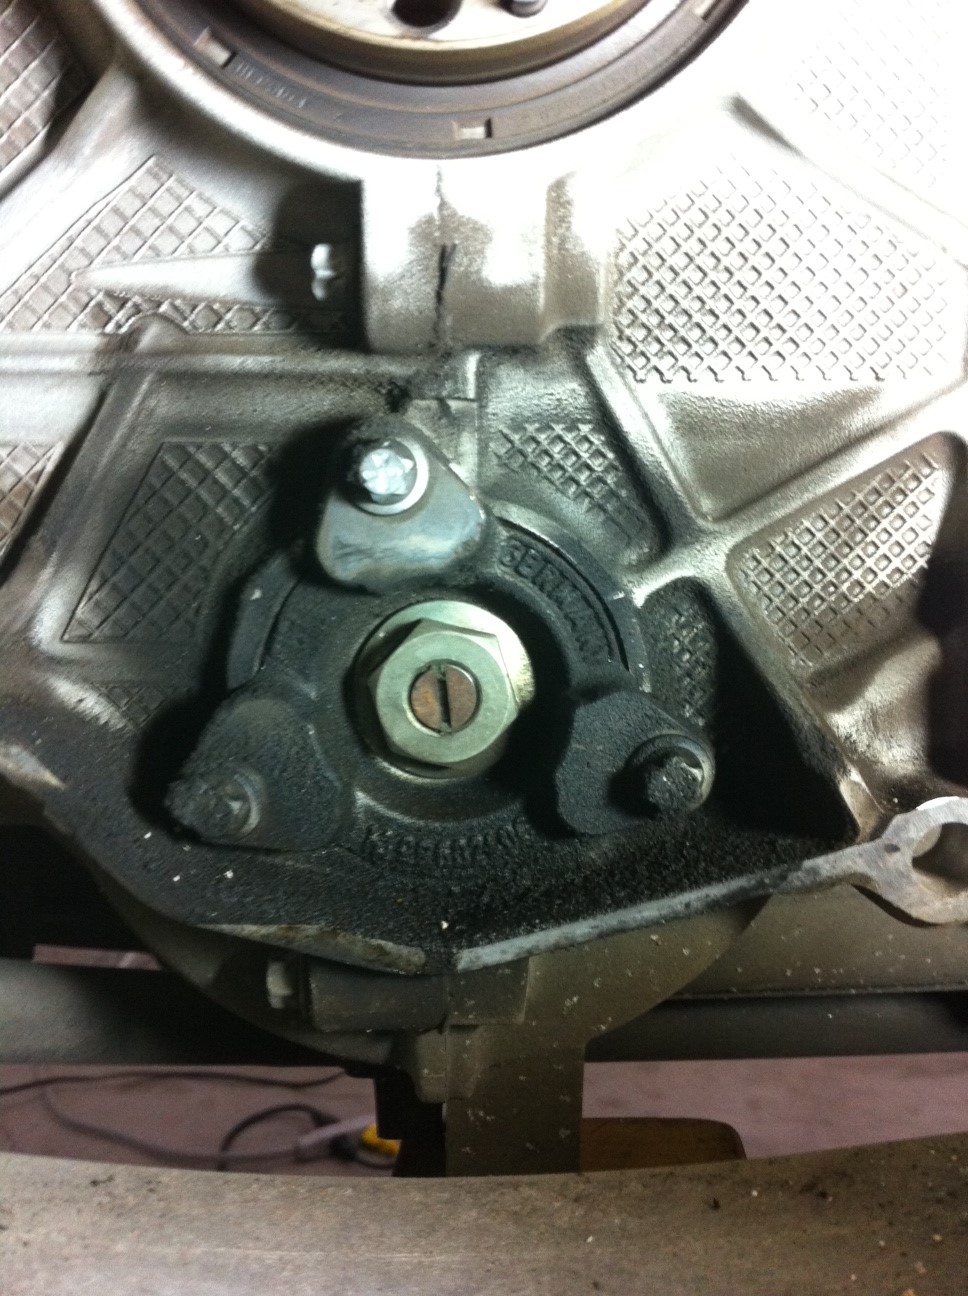
IMS flange is dirty.
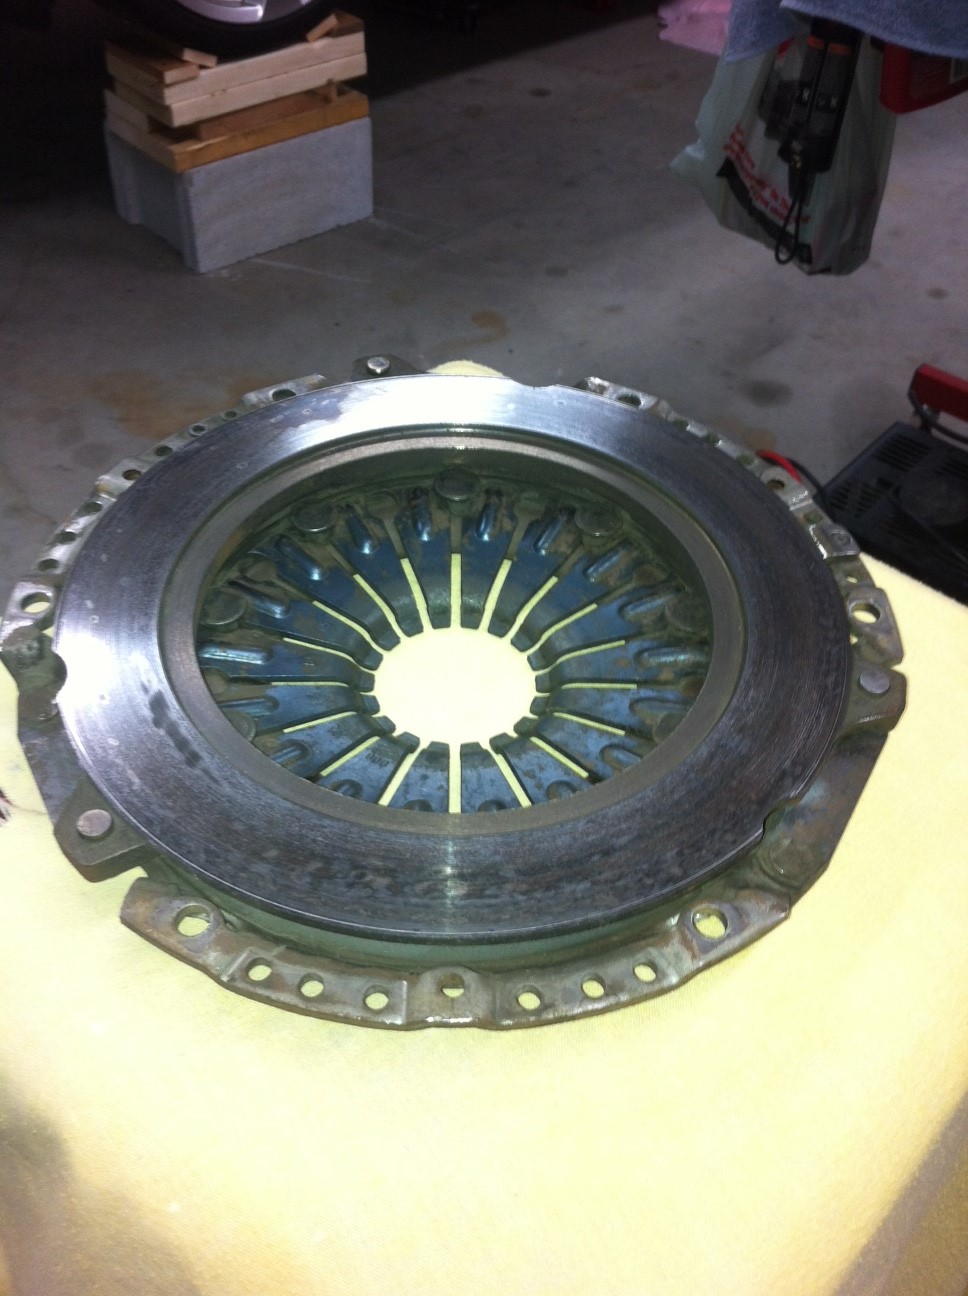
Clutch disk is evenly worn. Measures 8.39 mm total thickness. all rivets are at least 2 mm deep.
Clutch assembly is smooth as new.
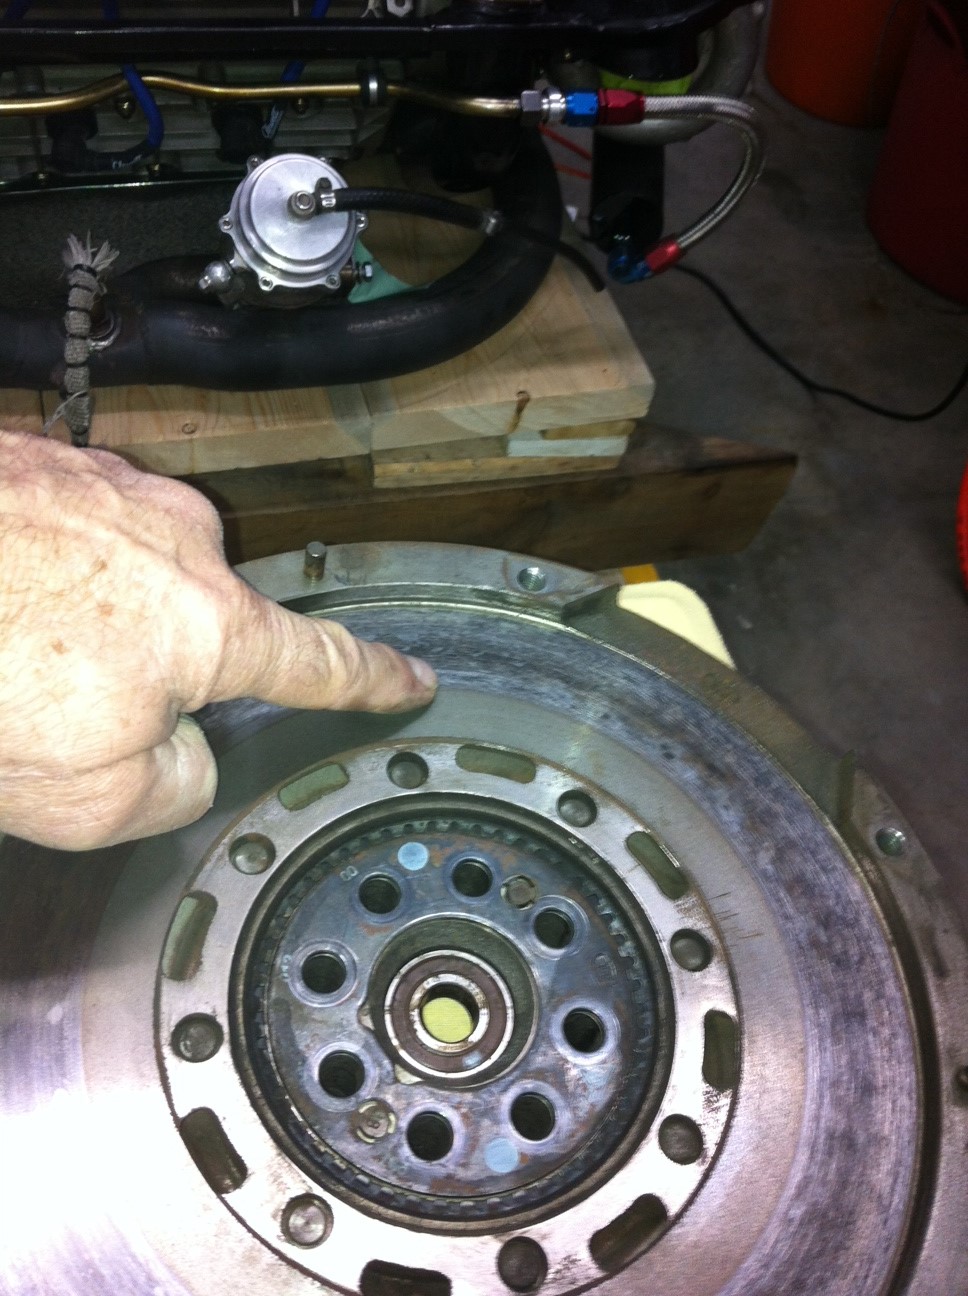
Flywheel is smooth as new. there is no ridge where my finger is pointing.
My first thought is that I will not replace the clutch. Traditionally, I have never been hard on them even at the track. I learned to double clutch on a Model A that I restored in my teenage years and a continue to double clutch to this day.
However, I do not know how to read the dirt and slight moisture around the IMS flange.
Any thoughts?

-
I do remember now that I saw a video, which I cannot find now, on locking the cams, etc. I think, but I am not sure, that it was posted by LN Engineering but may have been pulled as they appear to have changed their web site. The link http://www.lnengineering.com/imsretrofit.pdf is not descriptive enough for someone like me that has only worked on air cooled Porsche motors.
I'll only pull the clutch/flywheel and inspect today. Then I will have a better idea whether I have to learn about locking the cams, etc.
Keep you guys posted. Thanks for all the advice.
-
Hi logray,
Reference your third paragraph. Are you saying that if I open the IMS cover, I first have to lock the cams and release tension on the chains? Looks like it's a 22mm nut on the end of the IMS cover, consistent with the 2006 C2S.
-
Well, 8 bolts on the bench and 9 in the picture. I get the dummy award this weekend. Must have got distracted and not retreived the top bolt . Back to mechanics 101. LOL trani slid out without much effort.
Tomorrow, the clutch and flywheel comes out. Can already see trace of oil inside the bell housing.....
Keep you posted. Thanks for your help JFP and logray.
-
Thanks JFP for those specs.
Well, it is now Saturday evening hoping that I would have the transaxle/trani out but no such luck. The assembly comes out about 3/4" and no more in spite rocking the assembly gently, changing the angle of the trani and motor and even pushing the trani back in. I have disconnected and moved out of the way the plug on top of the trani, the slave cylinder, the half shafts, two shifter cables, electrical wires on top right and front right of trani, and the 9 bell housing bolts. The bell housing is clearing the suspension cross member. Front horseshoe trani mount and lateral braces have been removed been. I have rechecked my steps and have run my hands over and under without any obstruction. I am now at my wits end.
How much prodding/ force should I use? Crow bar? Any suggestions would be welcomed.
-
Thanks JFP, death and Loren.
I searched and found all the torque specs here except for the bolts that hold the transaxle to the motor.
Can anyone help?
Also, if I R&R the AOS from the trani side, I do not touch the P/S reservoir, right?
-
I am presently in the disassembly stage to replace the clutch, AOS, water pump and thermostat on my 2006 C2S. I am having real trouble finding good accurate DIY instructions on the parting of the trans-axle/transmission from the bell housing for the 997.1. All that I can find are DIY bits and pieces on the 996 which are often inaccurate (one refers to the IMS as the "balance shaft"...hmmm..) or they refer to the 996 GT3's and 996tt's which appear to be different from the 997.1.
I have already removed much of the bolt-ons and connections from the trans-axle/trani. I have also loosened the all bolts to the bell housing except the top one which will require dropping the front of the motor just a bit. Man, these bolts needed over 100 ft/lb to loosen. Hopefully the top one will be easier!
I have a number of questions for our member experts out there that I would appreciate answers on:
1. If I am not replacing the RMS (which was done 3 1/2 years ago on warranty), do I need to replace the casing bolts above and below the RMS?
2. The coolant capacity from "dry" is 8.45 gallons according to the manual. Dealer says that I will need two gallons of coolant and another 2 of distilled water which means that half the old coolant will remain in the car-kind off unacceptable. How much could I reasonably be able to drain as a result of opening up the water pump, thermostat, the bottom drains on the motor, the tubes around the trani and the bottom hoses on the two front rads?
3. What would be a good replacement transmission oil (other than what Porsche supplies)?
4. I am only familiar with the old style clutch fork/release bearing from the pre-hydraulic Porsche era. Is there a specific trick to lining up the clutch release lever and release bearing on re-assembly of the 997.1?
5.There is a big variance in values in DIY threads on the web and none that I could find specific to the 997.1.
I would welcome factory torque values for the following bolts:a. Water pump
b. Thermostat
c. Bell housing to trans-axle
d. Fly-wheel
e. Clutch housing to flywheel
f. IMS bearing cover
g. Case bolts around RMS
I would appreciate any help, past experience, threads and suggestions.
Thanks in advance.
-
 1
1
-
-
My experience is that the Rossos are pretty bad and really noisy. Surprised that you have 15k on the rears and still going.
See this for previous discussions.
http://www.renntech.org/forums/topic/42849-summer-tire-recommendations/
I am now a firm Super Sports believer. Great in the wet, reasonable wear and quiet. And much cheaper than the Rossos.
Hope this helps.....Cheers.
-
Moosey I would not bother replacing the calipers if they still work without dragging of pulling. In any event, you should just have them rebuilt rather than purchase new ones.
The dampers are only there to reduce vibration and noise. Operation and function would not be affected without the use of these dampers. On tracked cars especially, we in our club do not bother with the dampers at all.
The dampers are supposed to be glued to the back of the brake pads but usually the glue dries up and separates with time and heat recycling.
While on a call with my dealership on another matter, I spoke to my parts friend and he told me that their service guys try to save the dampers and plugs and usually re-glue them to new brake pads. By the way, the replacement brake pads from Porsche do have damper plates already glued on them (without plugs) and they apparently take these off and re-glue the ones with the plugs, if re-usable. Otherwise they give the customer the alternative to simply not replace the damper/plugs or just go with the new pads.
If I were you, I would leave the plug(s) that you cannot get out and either;
(1) re-install the brake pads without the dampers and see if you get any noise. I would carefully put some copper anti seize on the back of the pads and on the sliding pins. I did this on my rear brakes, driven from Ontario Canada to California and back without so much as a squeak.
(2) re-install the dampers using some anti seize on the remaining plug and between the plate and the back of the brake pads. I did this on my fronts again without any squeaking of vibration issues on my trip. Next time i need to service the fronts, I will not bother with the plates-I'll try as per #1, above or simply install new pads with dampers already glued on (no plugs).
Hope this helps. Cheers.......
-
To add. I use the PEL-0100 and it works really well. Wife quit!http://www.pelicanparts.com/cgi-bin/ksearch/PEL_search.cgi?command=show_part_page&please_wait=N&make=POR&model=997M§ion=BRKhyd&page=2&bookmark=12&part_number=PEL-0100Cheers,.....
-
Moosey, I think that you mean what I call the anti squeal plates. I've gone through the same issue. I would imagine that the plugs are also rusted into the caliper pistons. You should get them out- I used some Rust Off but make sure it does not get onto the paint. I unscrewed the plate and reinstalled the screw and used them as a puller by canterlevering against the caliper edge (protected). Clean everything up, replace the plates which I believe come with the plugs. Use anti seize on the plugs.Bleeding is as per usual. Start with the corner furthest from the furthest away from the reservoir. Your better half will not like all the pumping so enlist a strong friend to keep the piece. Do both sides of each caliper starting with the furthest from the brake line. Don't forget to also bleed the clutch which is on the same network. Or, spend $60 an buy a power bleeder. It is full proof an easy to use.Good luck.http://www.pelicanparts.com/cgi-bin/ksearch/pel_search.cgi?SUPERCAT_FLAG=&make=&please_wait=N&forumid=&threadid=&command=DWsearch&description=Bleeder&I1.x=0&I1.y=0#
-
Seeing that nobody has yet weighed in on your issue, perhaps the next thing would be to fire her up again and see if the warning comes back. Never seen not heard about the computer sensing a clutch problem. For us curious ones, do post an update. Cheers.....
-
-
Henrik, before we go any further, perhaps you could tell us where you are driving at 270 kph-windy road, straight road or high speed track or track? Big difference for tire pressure settings. Also, what tires are you on?
-
Hej Henrik, Ahh... the thrill of 270 kph.There are many potential reasons why you may experience front end lift. Did you set the wheel alignment to standard Porsche or more aggressively (a must)? Consider changing the rear uppers to something more solid-seem to eliminate the rear end jerking which sometimes gets mistaken for front end lift. My own experience sitting in the passanger seat as a PCA instructor and in my own cars is that most unmodified rear engined Porsches will be somewhat unstable at 270kph (GT3 excepted) which we can readily hit on the the back straight at Mosport, if you have enough power, balls and skill. Also experiment with tire pressures and consider installing a front end splitter. You can make one yourself out of aluminum. Hope this helps. Good luck. Cheers from a fellow Swede living in Canada.
-
Have had Super Sports and they have held up well except that the 295 rears houled ever since new (apparently not common). I then swithed to 305's for the rears as the front were less than half warn (typical Porsche no matter what model or year you have) and the houling disappeared. Now a very happy camper-really good in wet weather so long as it is above 42F. If you are going to track you will kiss either tire goodby pretty quick for road use. Suggest buying used set of rims and installing the Super Sports (try used first if you can) as they work prety well no matter how bald they are. N.B. my experience is primarily at Mosport, which is a high speed track.
Hope this helps. Cheers,Uwon
-
Many thanks, Loren
Cheers......
-
Would appreciate the part numbers for the above. Note that this is for the "S" model with the latest large bearing.
Thanks in advance.
Cheers.......
-
I installed H&R 7 and 14 mm on my '06 C2S about 80,000 km ago. Ii have both the19" lobster claws and Tire rack winter rims. I am running 305's in the rear which stick out about 1/4" with no rubbing issues whenfully loaded or driven aggresively. Car is not lowered.. No apparent change in handling but gives it an agreessive stance. Make sure that new bolts are long enough and have the same domed collar as factory. Hope this helps. Cheers...
-
Hi folks. For those interested, there is more discussion to my question in the Renntech 996 and the pelican 996/997 forums. Similar heading.
Grendel, we in Canada cannot get the 10 year warranty, 6 is max. and I'm well past that.
-
Tanny02, Many thanks for the additional info. Seems to me to be a reasonable preventive measure which I anticipate undertaking this winter on my '06 997 C2s which has the later, largest and unfortunately non removable IMS bearing.
Charles is very helpful and knowledgeable, I agree. He did a fantastic on my 930 top end refurbishing and has provided lots of insight into my iMS bearing concerns.
I would encourage others who have removed the seal to post with their results and mileage since removal.
Cheers....
-
Tanny02, many thanks for your response. You appear to be the only one who has so far reported on the removal of the outer seal. May I ask how many miles you have driven since the removal of the IMS bearing outer seal?
-
As an alternative to retrofitting the IMS bearing, has anybody removed the outside IMS bearing seal? If so, please share your experience as I am contemplating doing this over the winter. Cheers.....
-
I am really surprised that nobody has reported on their experience with removing the outside seal from the bearing (facing the flywheel). I am going to post the question in the 996 section and in Pelican.
Clutch, AOS, Water Pump, Thermostat DIY Questions
in 997-1 Series (Carrera, Carrera 4, Carrera 2S, Carrera 4S)
Posted
Thanks logray and JFP for the link and blunt advice. I have now had a chance to review and I understand the seriousness of not following to a tee, if indeed I open up the IMS flange.I forgot to add in my previous post that the motor and clutch have 58,000 miles.Any thoughts on the prognosis of my IMS flange would be welcome.