Welcome to RennTech.org Community, Guest
There are many great features available to you once you register at RennTech.org
You are free to view posts here, but you must log in to reply to existing posts, or to start your own new topic. Like most online communities, there are costs involved to maintain a site like this - so we encourage our members to subscribe or donate. All subscriptions and donations go to the costs operating and maintaining this site. We prefer that guests take part in our community and we offer a lot in return to those willing to join our corner of the Porsche world. This site is 99 percent member supported (less than 1 percent comes from advertising) - so please consider an annual subscription or donation to keep this site running.
Here are some of the features available - once you subscribe RennTech.org
- View Classified Ads
- DIY Tutorials
- Porsche TSB Listings (limited)
- VIN Decoder
- Special Offers
- Paint Codes
- Registry
- Videos System
- View Reviews
- and get rid of this welcome message
It takes just a few minutes to register, and it's quality Porsche information at a low cost.
Contributing Members also get these additional benefits:
(you become a Contributing Member by subscribing or donating money to the operation of this site)
- No ads - advertisements are removed
- Access the Contributors Only Forum
- Contributing Members Only Downloads
- Send attachments with PMs
- All image/file storage limits are substantially increased for all Contributing Members
- Option Codes Lookup
- VIN Option Lookups (limited)


rsq911
-
Posts
23 -
Joined
-
Last visited


rsq911's Achievements
Member (1/1)
1
Reputation
-
99’ replacing the ICV question/help
rsq911 replied to rsq911's topic in 996 Series (Carrera, Carrera 4, Carrera 4S, Targa)
Thanks everyone. Pinch release worked like a charm! -
99’ replacing the ICV question/help
rsq911 replied to rsq911's topic in 996 Series (Carrera, Carrera 4, Carrera 4S, Targa)
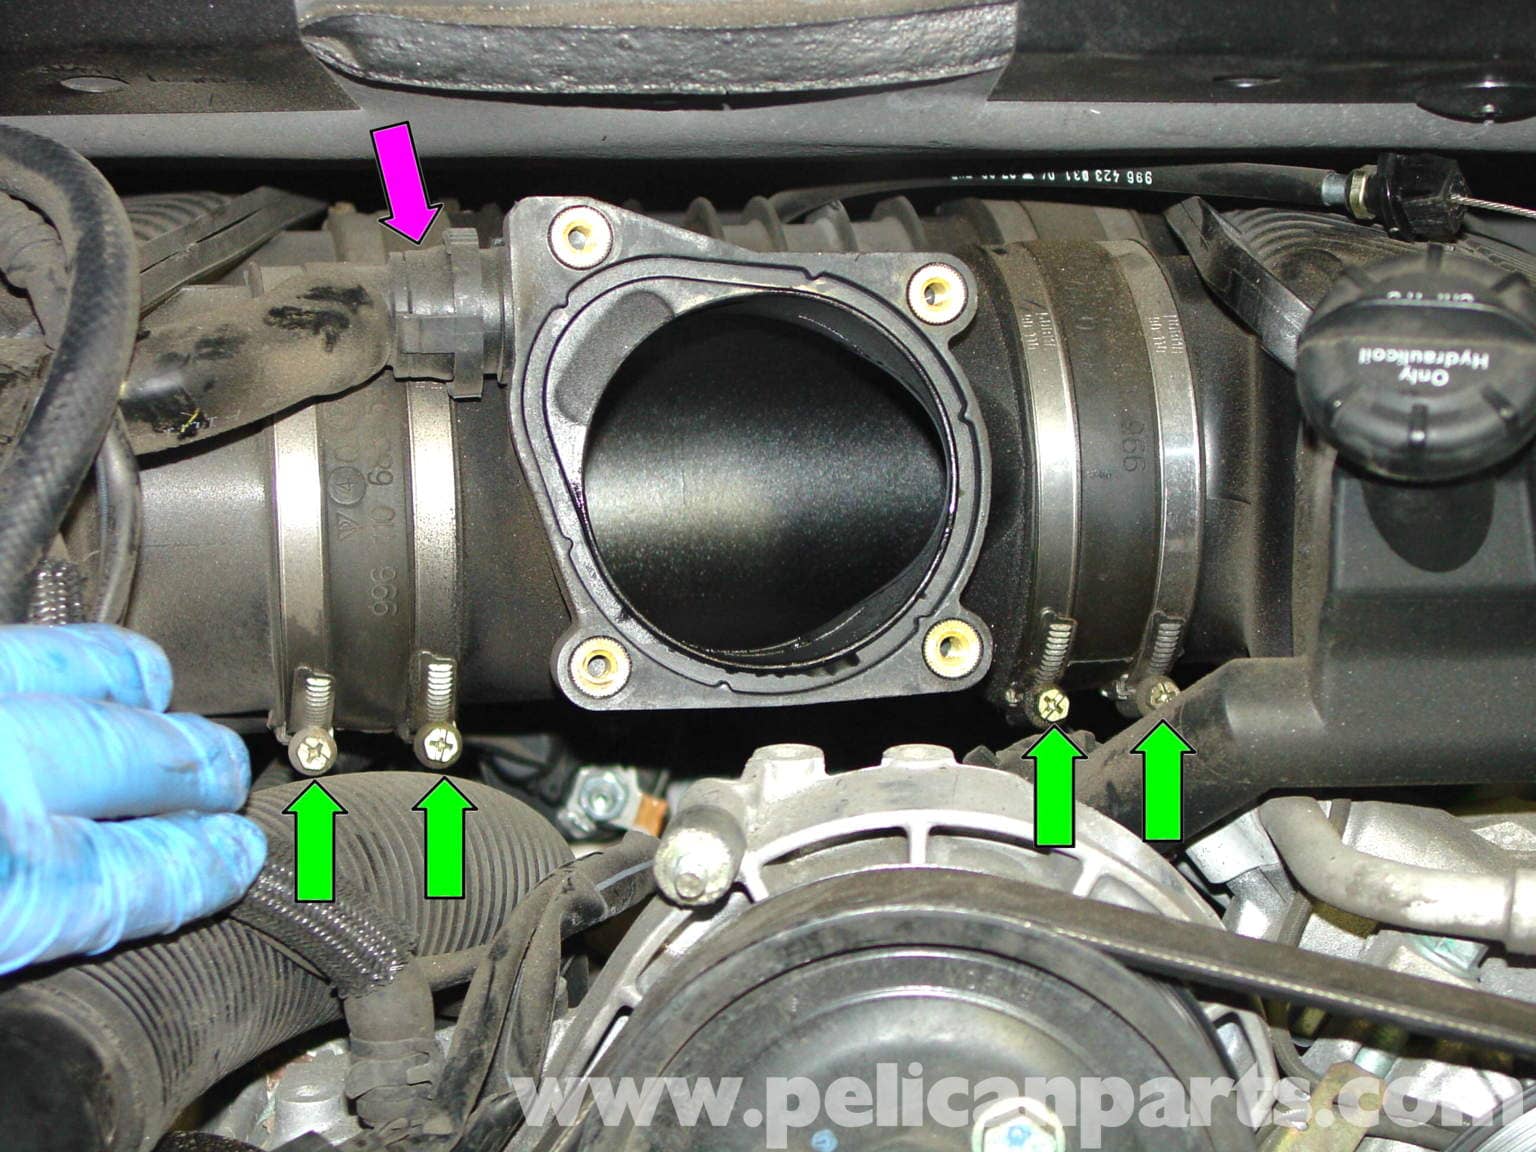
Thanks! How do you remove the aos pipe? The purple arrow from Pelican Parts tech.
-
Replacing the ICV on my 99 and my question is this, can you replace it without removing the throttle body? The t30 socket I have will not clear the plastic pipe on the one bolt. This plastic pipe “S” curves in front of the back bolt. Thanks!
-
Hi everyone: Has anyone just replaced the stock bulbs with led bulbs in the tail lights? I know you can get the can-bus versions now. Thinking about this more for longevity than brightness. Thanks!
-
996 starting issues
rsq911 replied to rsq911's topic in 996 Series (Carrera, Carrera 4, Carrera 4S, Targa)
Got the Bosch crankshaft position sensor, and after dealing with a stripped pan head bolt, installed, and that seems to have. fixed the problem! Thanks again! -
996 starting issues
rsq911 replied to rsq911's topic in 996 Series (Carrera, Carrera 4, Carrera 4S, Targa)
Thank you! I was thinking that, and hoping not the fuel pump. -
Hi everyone: Hope all of you are well and safe. I have a 99' 996, and recently it did not want to start, only after being driven. Runs great and smooth when running. Starter and ignition switch have been replaced a year or two ago. The other day, after being parked for 30 minutes, and at operating temperature, it did not start, but turned over fine. After waiting another 20 minutes, it started fine, and ran great. Today, it died at a stoplight. Waited 20 minutes, started and ran fine. No codes thrown, she has 127k on the odometer. Fuel pump? Fuel pump relay? CPS? Help!
-
Hi everyone: Question... I have a 99' C2, with stock headlights, and part numbers on them correspond to the "Porsche E Katalog" that says they are 98's? They are being replaced, due to an accident, and the dealership is telling my bodyshop that I "have to use" the 98' lights. I thought that 97-01 Boxster and 996 lights were interchangeable (with the exception of the xenon/litronics). Is there something different about the one year only 98' lights? And the bigger problem is that Porsche is completely out of these lights in the US and Germany, and will not have any until early 2018! Thanks in advance for your help!
-
Hi everyone- 99' 996, both remotes need to be reprogrammed, battery is good, and when I manually locked it, something happened to the key tumbler to locking mechanism. So, the alarm is on, car is locked, and I can't get in. options? will opening the "frunk" with the emergency release, and disconnecting the battery reset the alarm and unlock the doors? thanks in advance
-
Fabspeed or Fister?
rsq911 replied to dyerhaus's topic in 996 Series (Carrera, Carrera 4, Carrera 4S, Targa)
I had Tubi and Mille Miglia. I currently run the Mille Miglias and am very happy. Both offer a different sound in addition to Fabspeed and Fister. For me, the Tubi's were higher pitched and had the Italian "crackle". The Mille Miglia's were lower in pitch, with more "growl". Sort of comparing a Ferrari to a Corvette. The Mille Miglia's are louder than Tubi, but not bypass loud. The Fister's sound good, sort of a subdued blend of straight pipe crackle and lower volume aftermarket, until you get on it. They are all good. Like dporto said: "apples to oranges." Just depends on what you want. Another option is to have your stock ones modified. Have the Fister done, and then have the internal baffles reworked. The inside is a maze that would drive a mouse crazy! Also look into M&M, FVD sells them. Some very cool exhausts. But, since your original question was to Fabspeed or Fister, for a deeper sound, why not try the Fister and the other "Gundo" where it bypasses from the top capped area of the stock muffler, sort of "double." Don't get me wrong, Fabspeed makes a great product, what about the Supercuts? Best of luck, Paul This is the M&M from FVD, which has no side mufflers, basically an X pipe with cats and mufflers, or quad mufflers for the cat delete. -
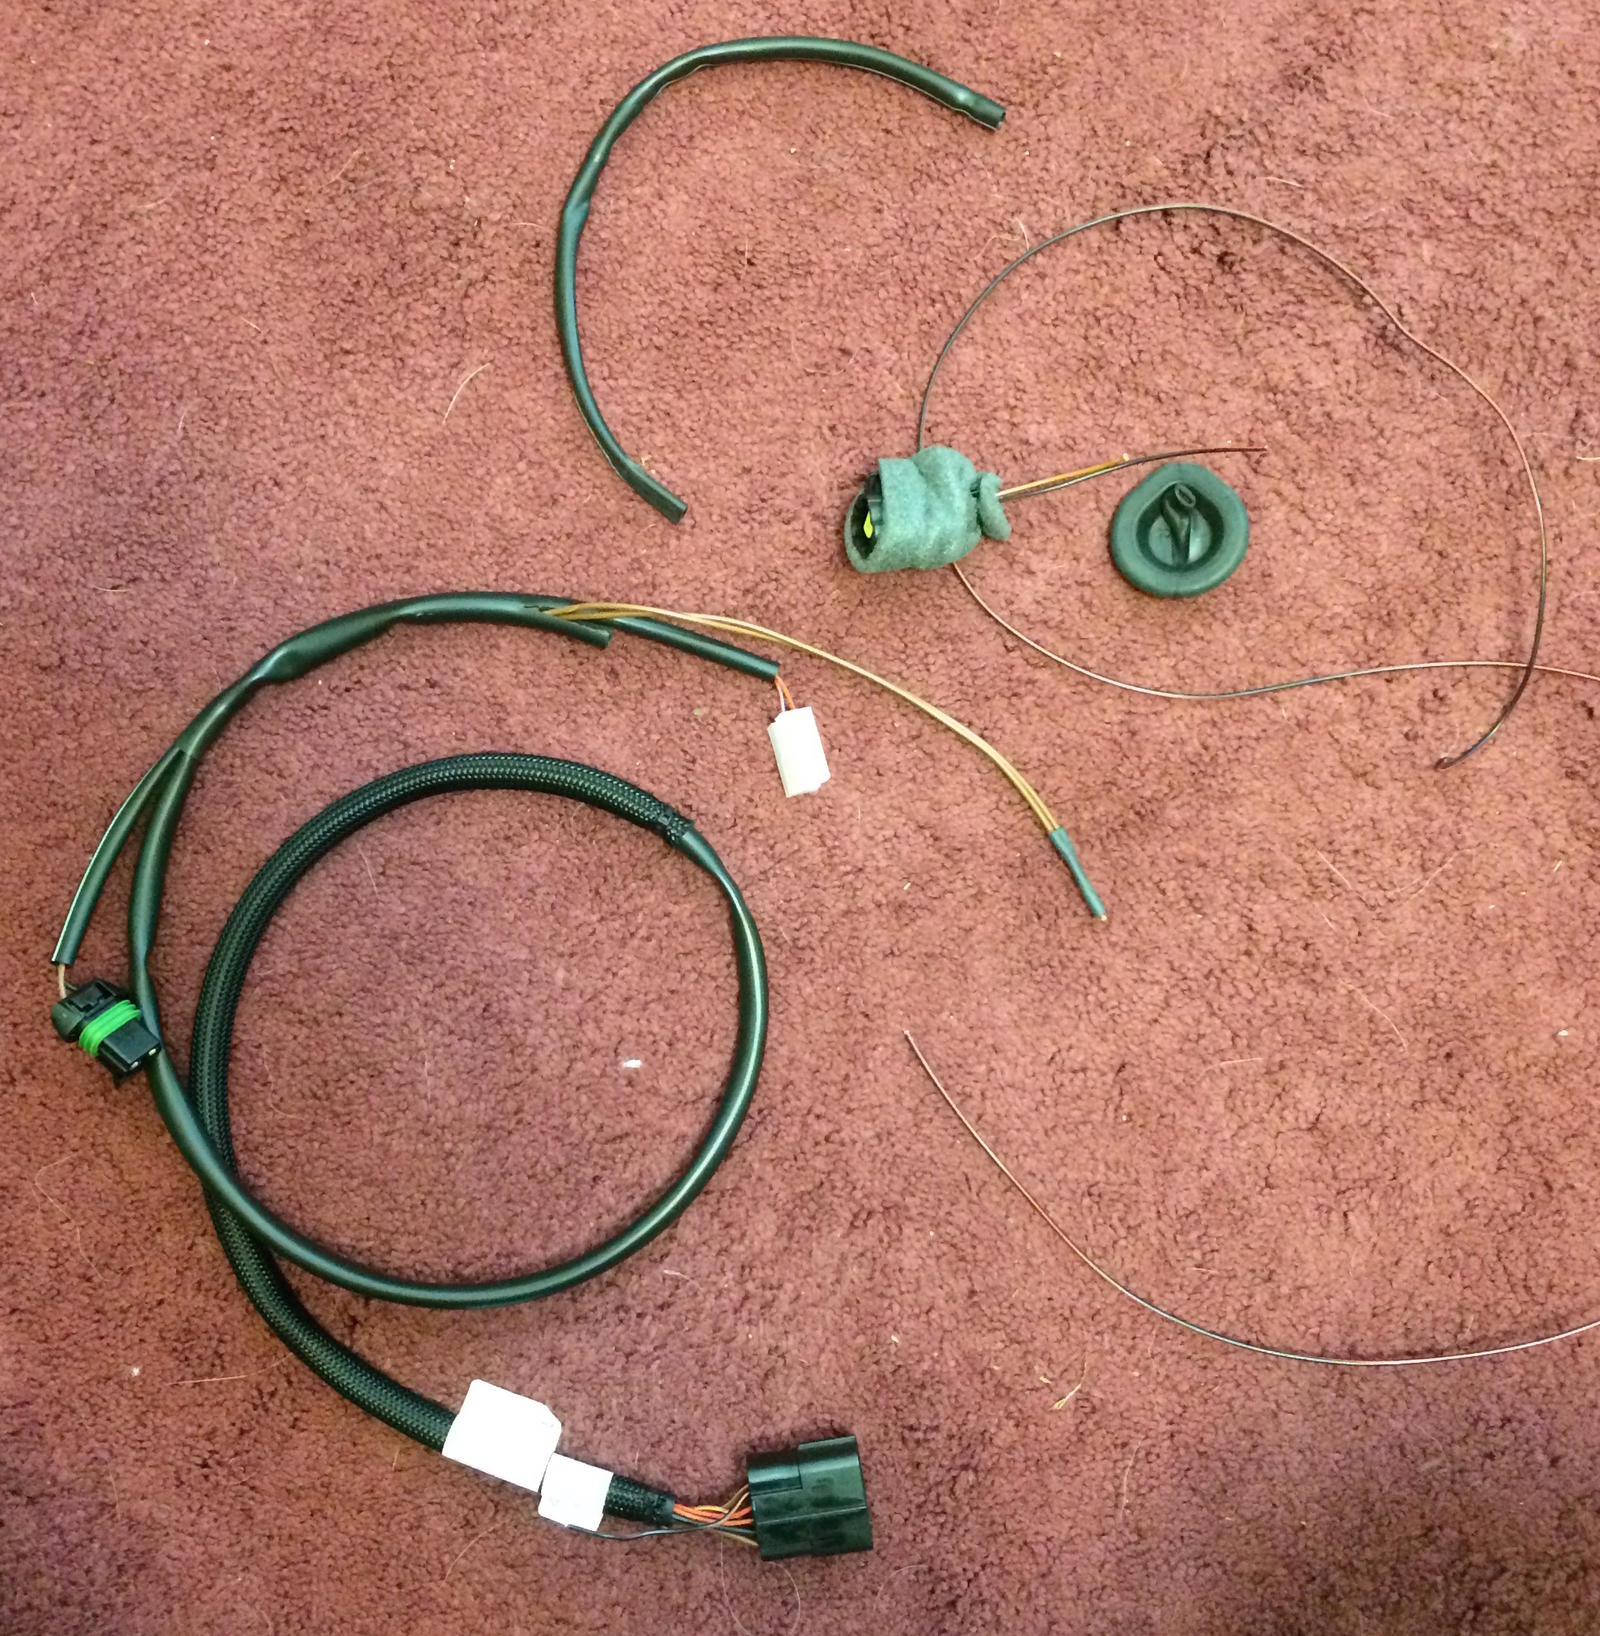
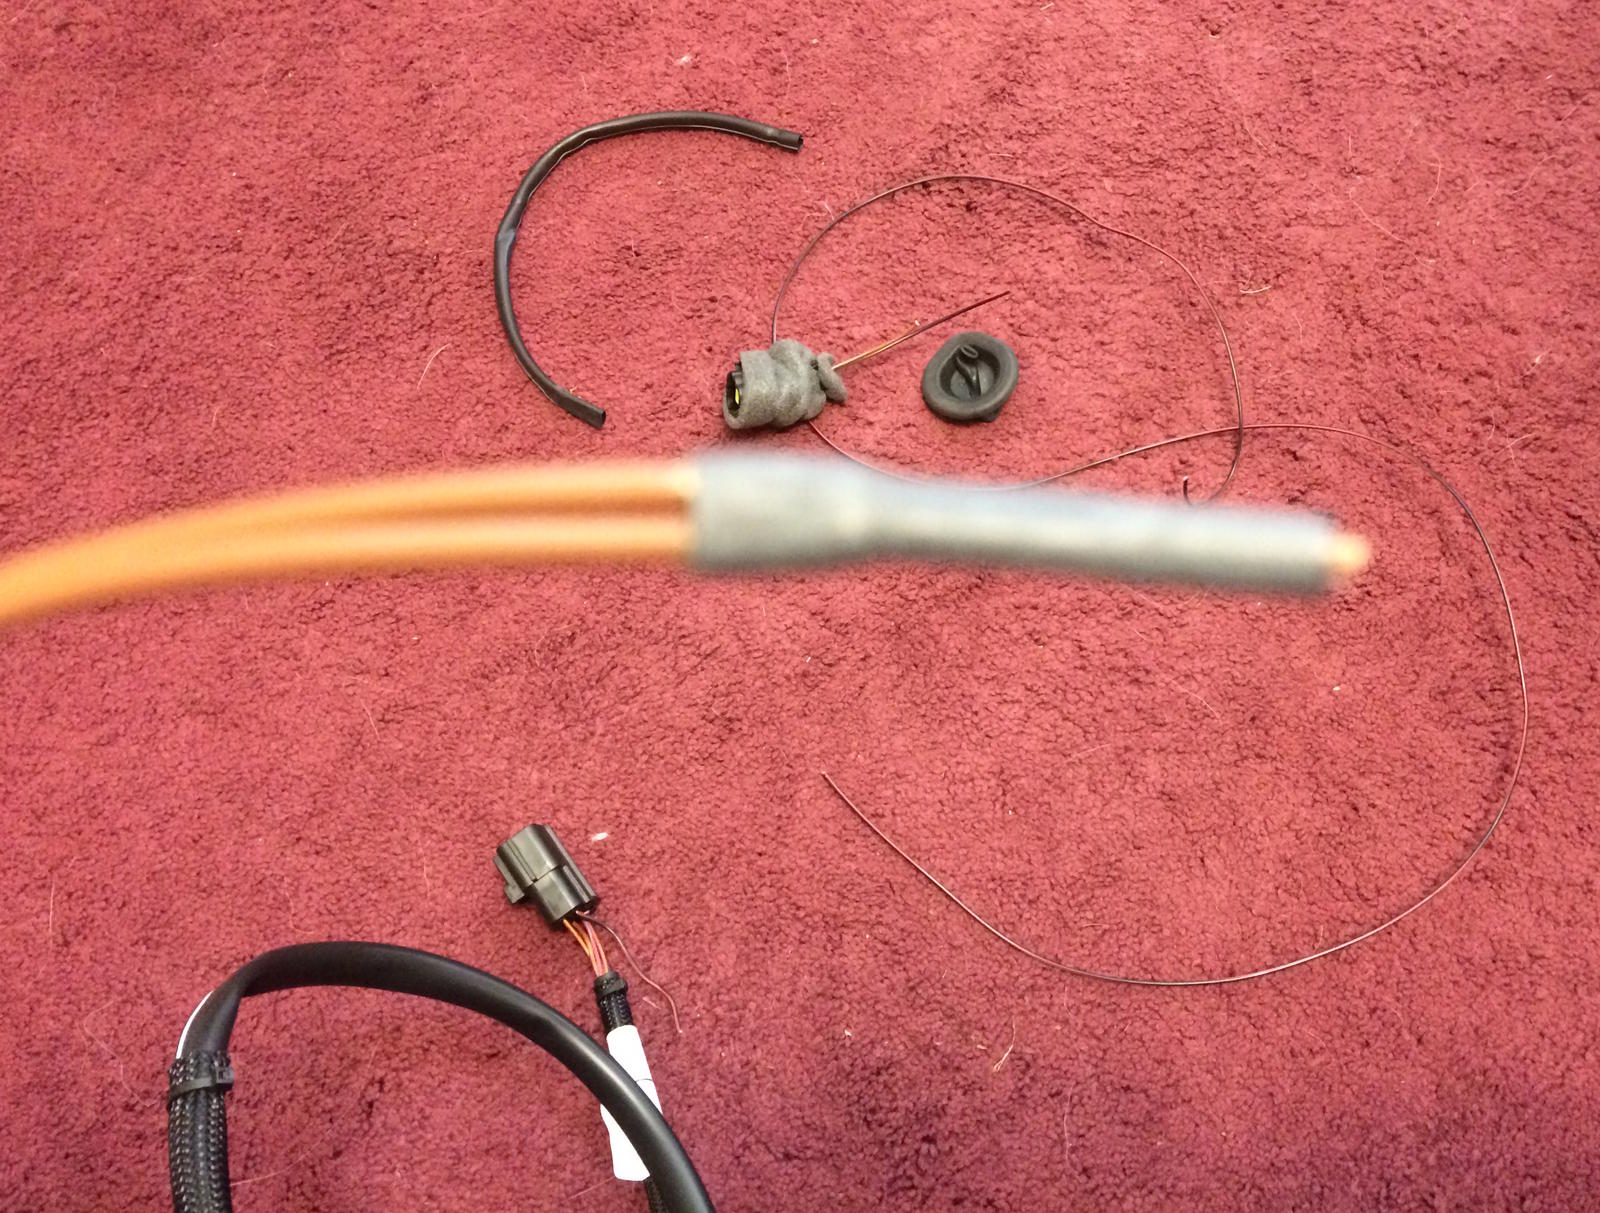
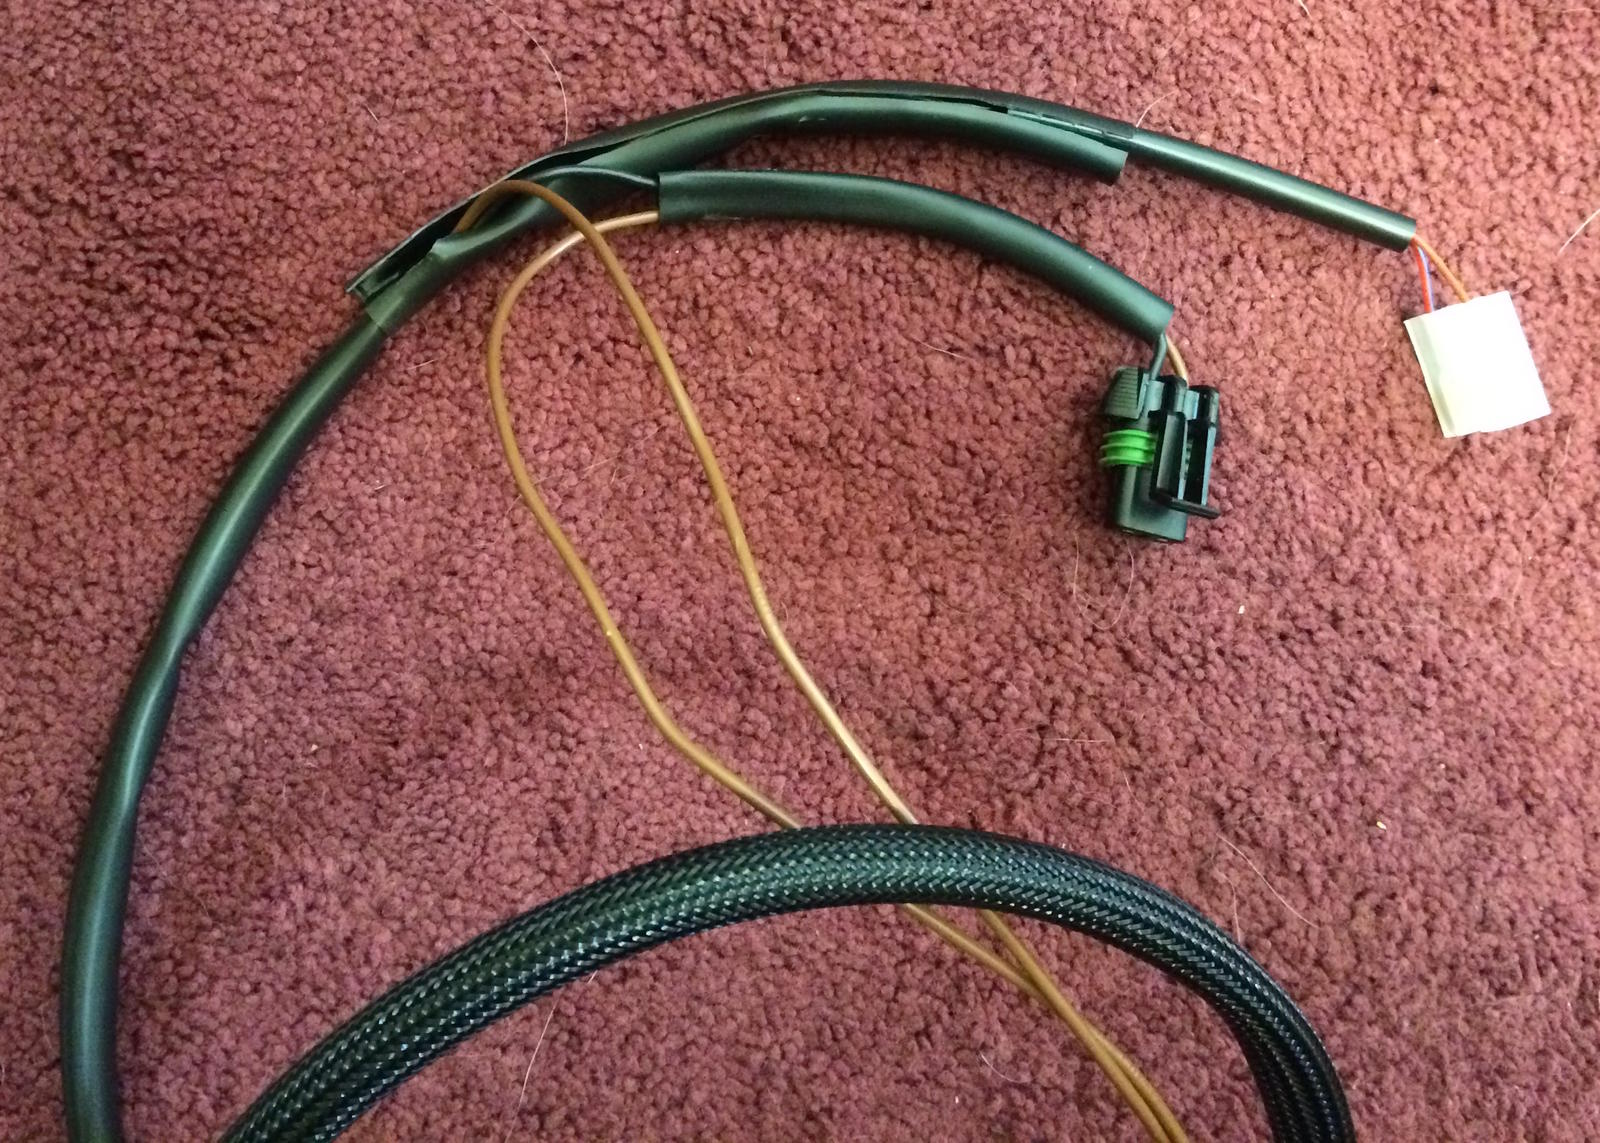
996 fixed wing wiring harness how-to As posted in another thread, my wonderful wife got me an early Christmas/Birthday present of a GT3/Aerokit 2 style wing (from another forum member).The top three areas to address (after choosing a wing), based on forum threads, are the following:wiring harnessrear emblem/badgefront lip/spoiler/splitterIf one does a search on “996 fixed wing wiring harness”, you will find a great deal of posts, some dating back to the point of harnesses being $50!There have usually been two choices, modify/hack t Author rsq911 Category Carrera (996) - Mods Submitted 03/22/2017 11:46 AM
-
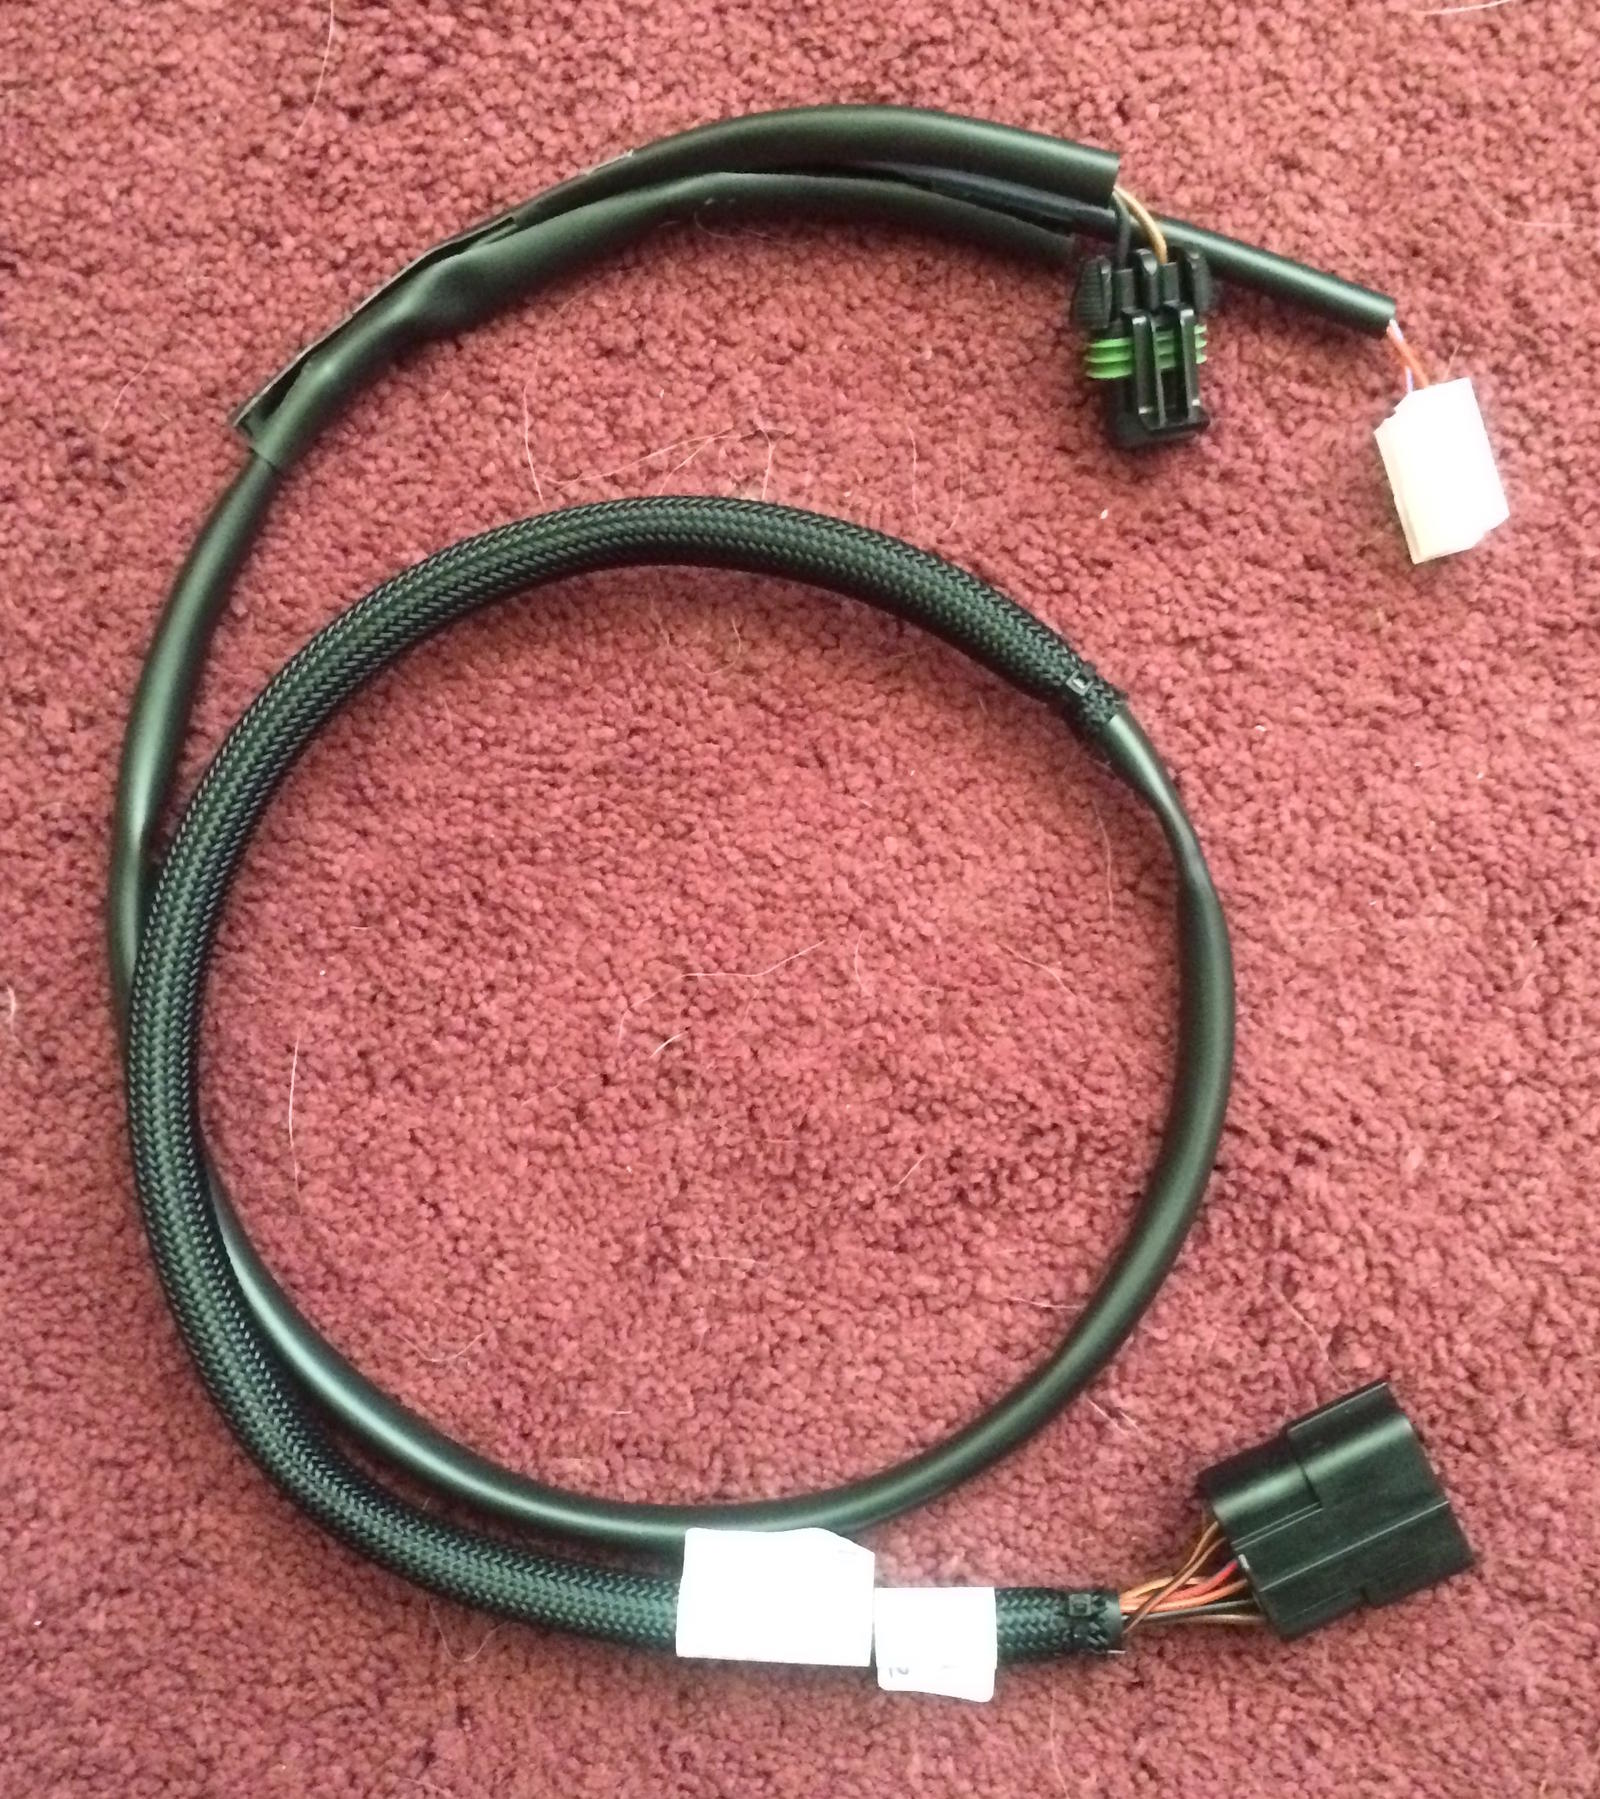
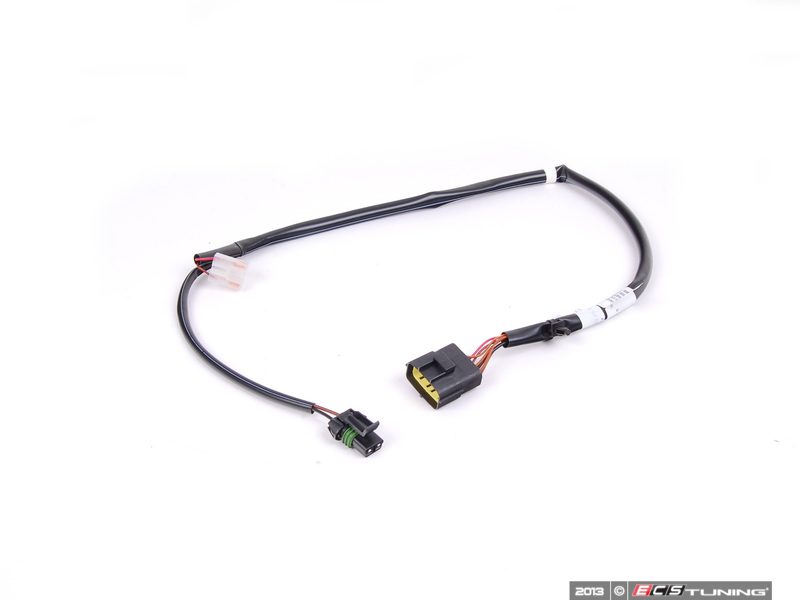
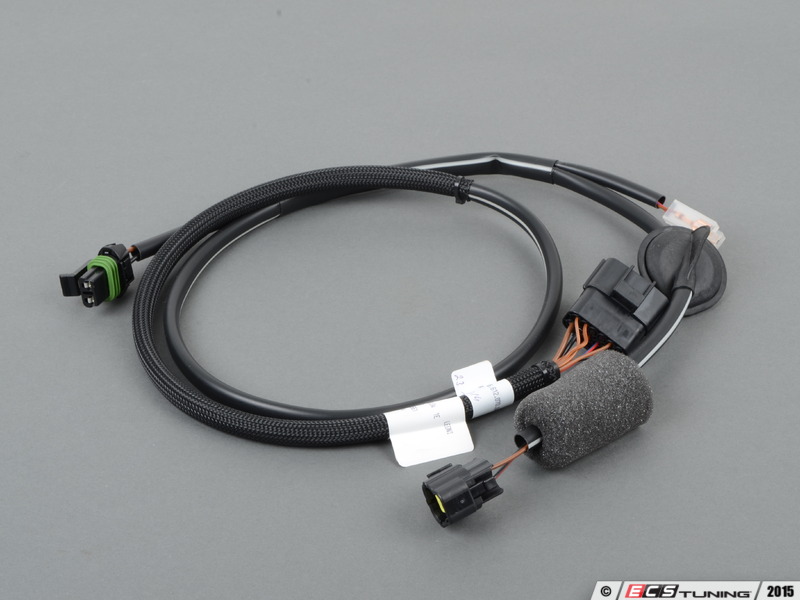
As posted in another thread, my wonderful wife got me an early Christmas/Birthday present of a GT3/Aerokit 2 style wing (from another forum member).The top three areas to address (after choosing a wing), based on forum threads, are the following:wiring harnessrear emblem/badgefront lip/spoiler/splitterIf one does a search on “996 fixed wing wiring harness”, you will find a great deal of posts, some dating back to the point of harnesses being $50!There have usually been two choices, modify/hack the stock pop-up wiring harness, or purchase a new fixed wing version.I decided to purchase a new/purpose made harness. Well, there seems to be confusion which one fits. The following two oem part numbers fit 1999-2004 996, non turbo:996.612.070.51 (fixed wing without 4th brake light)996.612.070.04 (fixed wing WITH 4th brake light)Yes, I know that “technically” the parts say “third brake light”, but “technically” the third brake light is just below the rear window in the body.Once I confirmed the part numbers, pricing has “flip-flopped” over the last decade, and the fixed wing without the brake light used to be around $50, and the brake light version was around $110. Well…….. today, the brake light version is around $120, and the non brake light version is $350-390!So, the more expensive harness comes with less wiring, one less plug and grommet, and costs three times as much! As my wife pointed out to me, most fixed wings do NOT have a fourth brake light, so the demand is higher for part 51, “justifying” the supply and demand pricing.I opted to go with part 04, with the brake light, modify it, and save $250.You will need electrical tape, wire cutters/snips, and small tip scissors.Once you unravel the harness, you will notice four plugs: main connector, fan, work light, brake light. The brake light plug has a foam sock over it and the harness loom also has a rubber grommet, the wire color coding is red/black and brown. The tubing or loom has a sheathed main body that has three separate sections that are brought together in the middle by a fourth tube.Take the brake light plug and cut the wire tubing just down to where it meets the main split exposing the wires and a ground wire (brown) “Y” shaped connector of three brown wires. Cut the power wire (red/black), just above where it goes into the main loom, and then cut the brown wire where it is attached at the “Y”. Next, pull the red/black all the way through the main loom where it is attached at the main plug/connector. At this point, you can cut it where it attaches to the main plug, or what I did which was to leave a couple of inches that I tucked back into the loom just in case I wanted to reattach anything.If you notice from the pictures of the two different wiring harnesses, the 51 has the fan and work light plugs going the same direction, the 04 has them going opposite directions with the brake light and fan going the same.After removing the brake light plug, you will need to cut the center or “fourth” tubing that used to join the three plugs together. This is just a split so the fan plug can flip over to the work light plug, forming a straight line from the main plug/connector. You will notice after splitting/cutting the fourth tubing, that the black wire from the fan is bent in a “U”, straighten this out. Now you will gently push the brown wire “Y” connector down into the main body tubing towards the main plug/connector. Lay the fan and work light plugs side by side, use electrical tape, and neatly close the tubing splits, and you are done! The new fixed wing harness has a heat braiding from the main plug up about a third of the way to protect the wiring and tubing from heat and opening and closing. Note: your spoiler check light will still come on at start up, and shuts off when pulling away, this is normal, and you will not get the light after that.If you have any questions, let me know, if I forgot something sorry, and there are a couple of pictures from the internet from ECS Tuning's site, the rest are mine. I am not affiliated with them, did not purchase anything from them, but want to give credit.
-
Hi: Porsche front aero lip/spoiler part numbers: 996.505.986.00 and 996.505.986.00 M100. What is the difference between the two besides price? They look very similar in the photos? I was not sure if the "M100" was a code for something. Thanks, Paul
-
Thanks again!