Welcome to RennTech.org Community, Guest
There are many great features available to you once you register at RennTech.org
You are free to view posts here, but you must log in to reply to existing posts, or to start your own new topic. Like most online communities, there are costs involved to maintain a site like this - so we encourage our members to subscribe or donate. All subscriptions and donations go to the costs operating and maintaining this site. We prefer that guests take part in our community and we offer a lot in return to those willing to join our corner of the Porsche world. This site is 99 percent member supported (less than 1 percent comes from advertising) - so please consider an annual subscription or donation to keep this site running.
Here are some of the features available - once you subscribe RennTech.org
- View Classified Ads
- DIY Tutorials
- Porsche TSB Listings (limited)
- VIN Decoder
- Special Offers
- Paint Codes
- Registry
- Videos System
- View Reviews
- and get rid of this welcome message
It takes just a few minutes to register, and it's quality Porsche information at a low cost.
Contributing Members also get these additional benefits:
(you become a Contributing Member by subscribing or donating money to the operation of this site)
- No ads - advertisements are removed
- Access the Contributors Only Forum
- Contributing Members Only Downloads
- Send attachments with PMs
- All image/file storage limits are substantially increased for all Contributing Members
- Option Codes Lookup
- VIN Option Lookups (limited)


Ricky1
-
Posts
72 -
Joined
-
Last visited
Recent Profile Visitors

Ricky1's Achievements
-
Which fuse number was that? My driver's side additional high beam is not working... thanks in advance.
-
Thanks Loren... good to know that there is just one part number for both sides... means I can swap them for testing... currently passenger side low beam not working. Drivers side is good. I am afraid though if I swap the headlight control unit that some wiring fault on the left side may fry the good unit out. Not to rush you, but do you know the answer to the second question regarding PIWIS and the headlight control unit? I am on the west coast too and fortunately its a quiet evening for me... thank you.
-
2005 Cayenne S That part number was given to me by Porsche Dealership... Thanks Loren.
-
Porsche says I need a new Headlight Control Unit: 955-631-193-01. Around USD$170 for one, online. Much more expensive from Porsche. Question: 1. Is there right or left one? 2. Is it simply install and headlights works properly or is there programming, ie. Is PIWIS needed? Thanks for your help.
-
Hi Jagman1, Thanks for your description that resolved your problem with door alignment. When you have a moment please post some pics... The front passenger door's bottom trailing edge is about 1/2 an inch further out than the right rear doors leading edge on my 2005 CS. Everything seems to be aligned... as in up/down, left/right. When I push in the bottom of the door, somehow it seems the seals are to bulky now and pushes the door bottom out. One significant note though, I took the door apart to change the bowden cable from the interior door latch to the door lock. Everything seems to line up during reassembly. The door closes fine with the exception of the bottom corner of the door jutting out about 1/2 inch. I am suspecting I did not properly reinstall a seal that goes all the way around the door, on the door. I've checked it twice though and the seal seems to match the "good" drivers side... I am baffled at the moment. Thanks in advance.
-
Always wanted to add a backup camera. Can you provide details on what you purchased? I've seen a few on ebay (Toureg camera I think). Thanks.
-
The next picture shows the bowden cable going through the inside metal panel. So my question is: do I have to drill the four rivets out to remove the inside metal panel "to get to the other side"? Another picture: the retaining clips. The one of the right has the broken base.

-
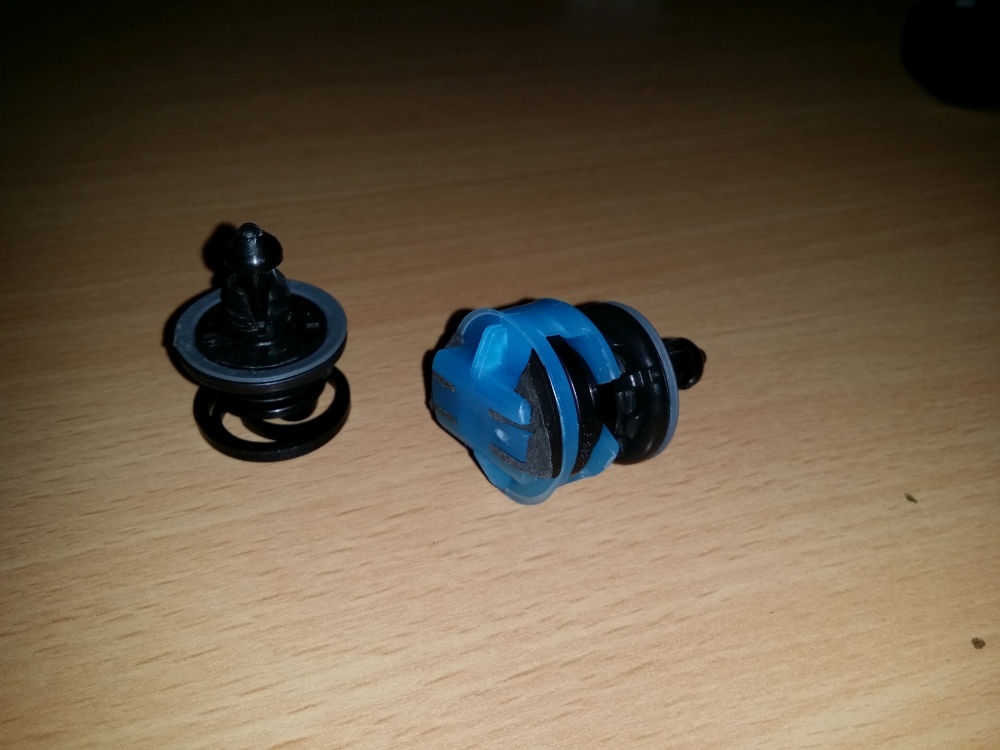
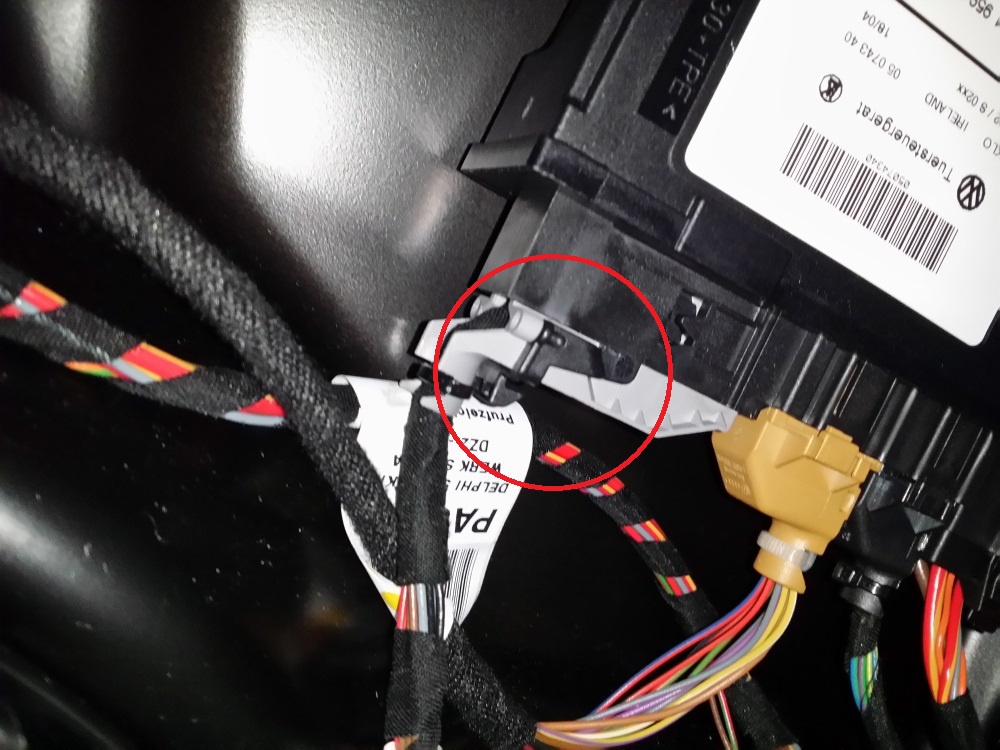
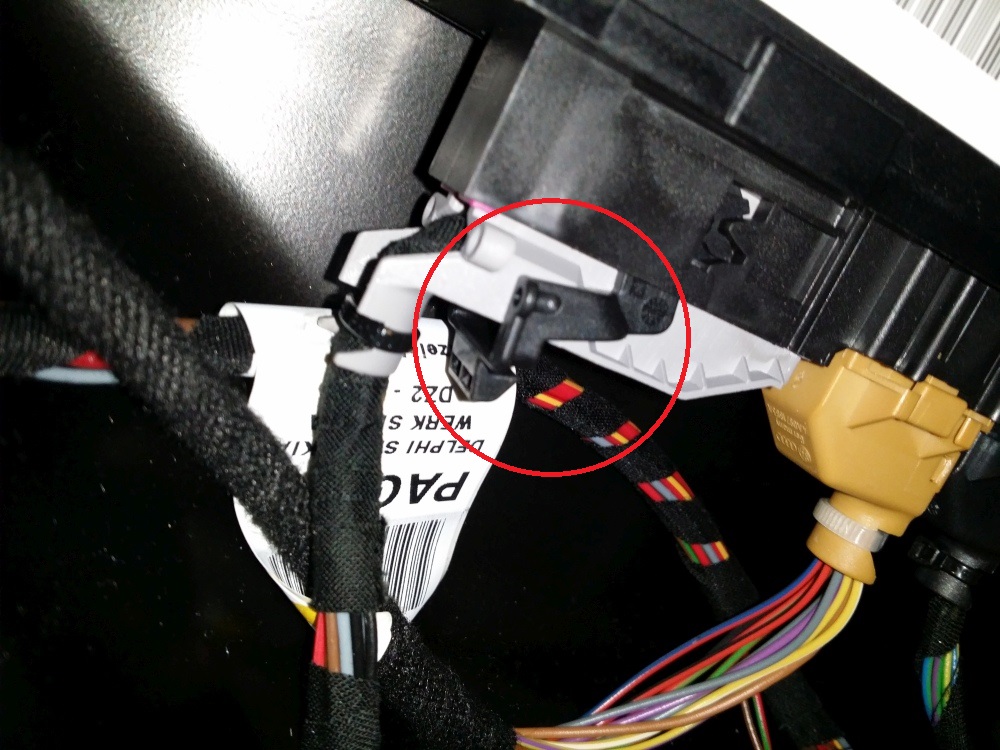
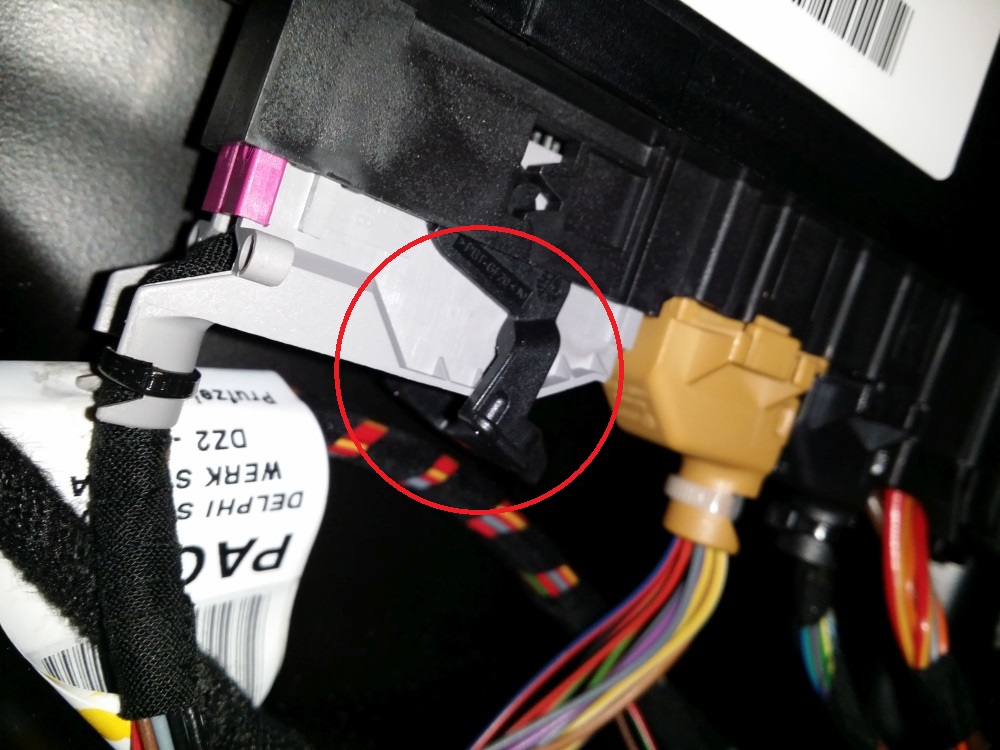
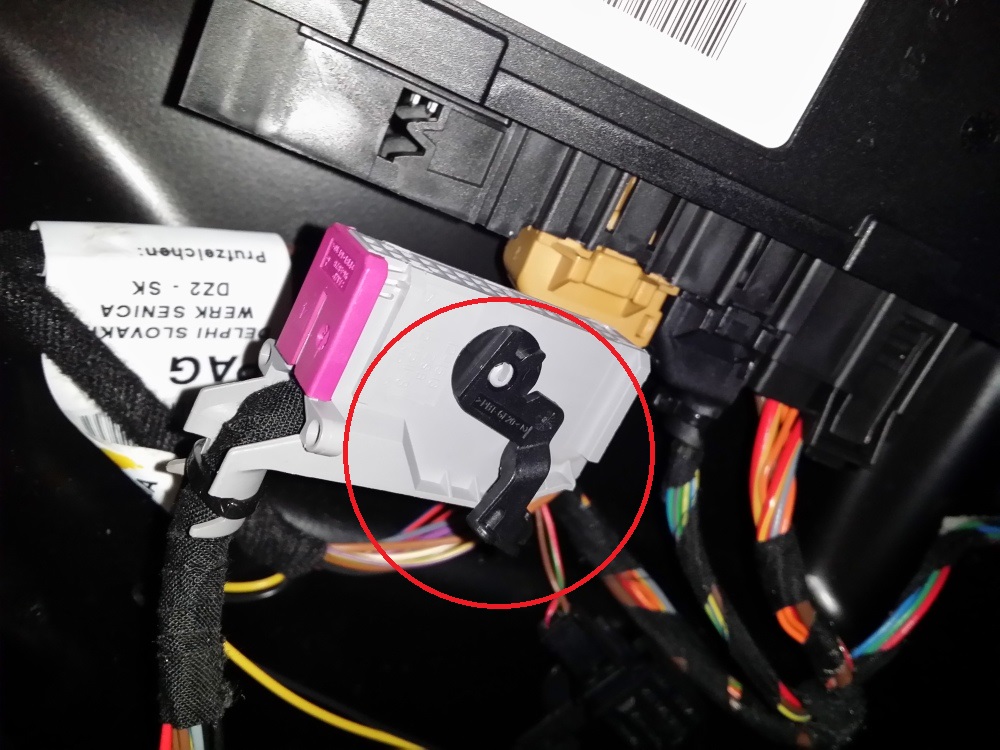
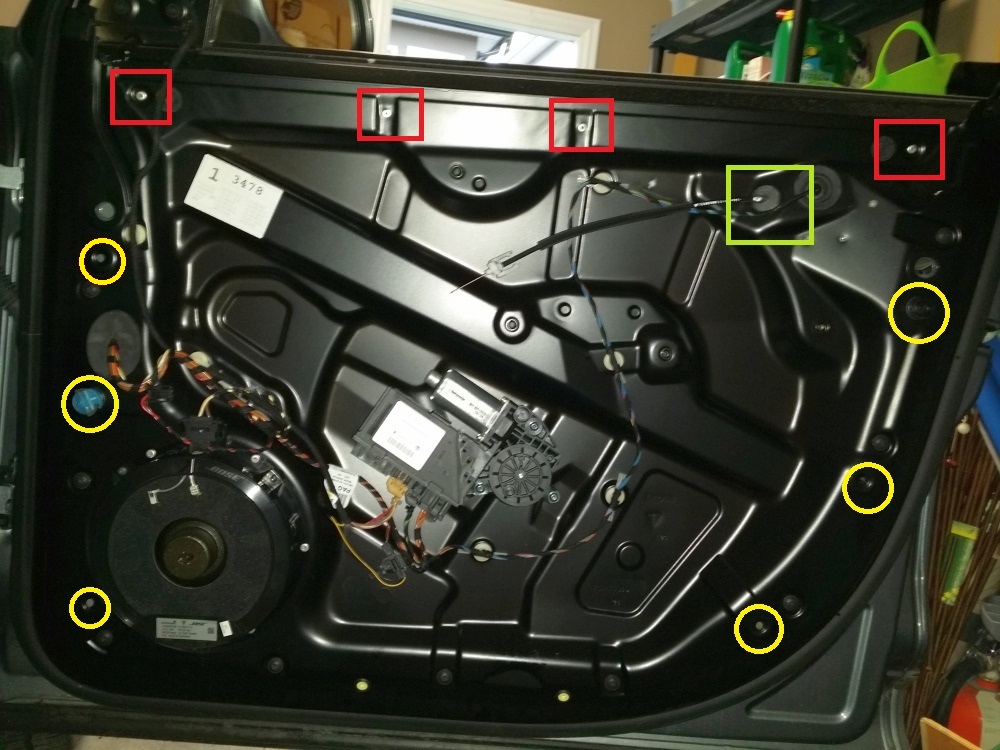
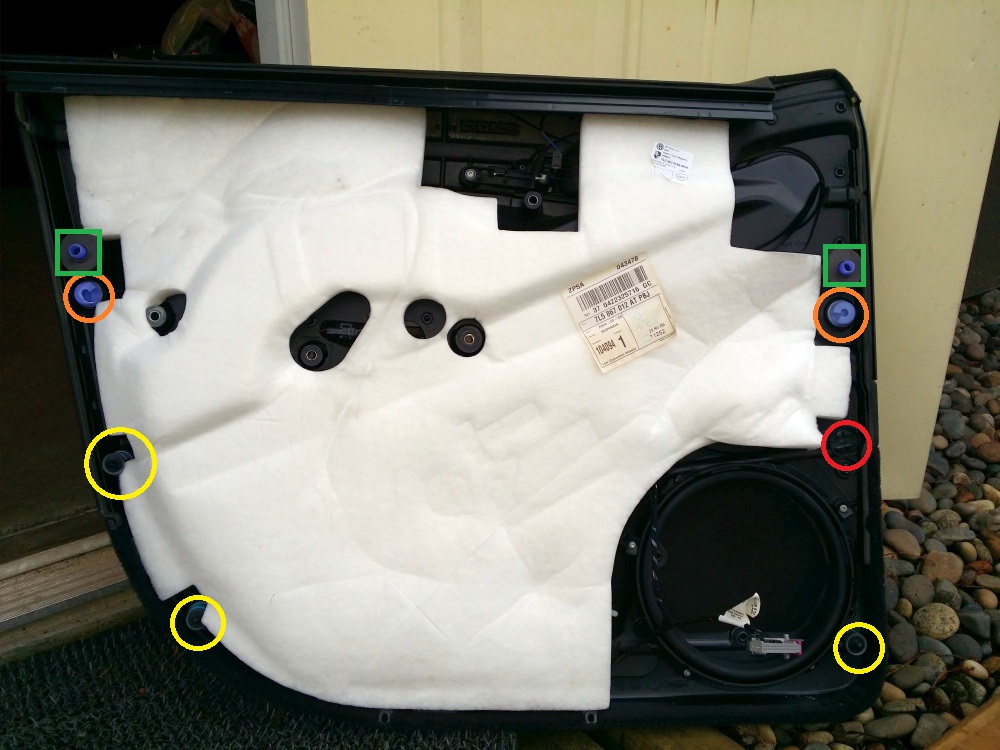
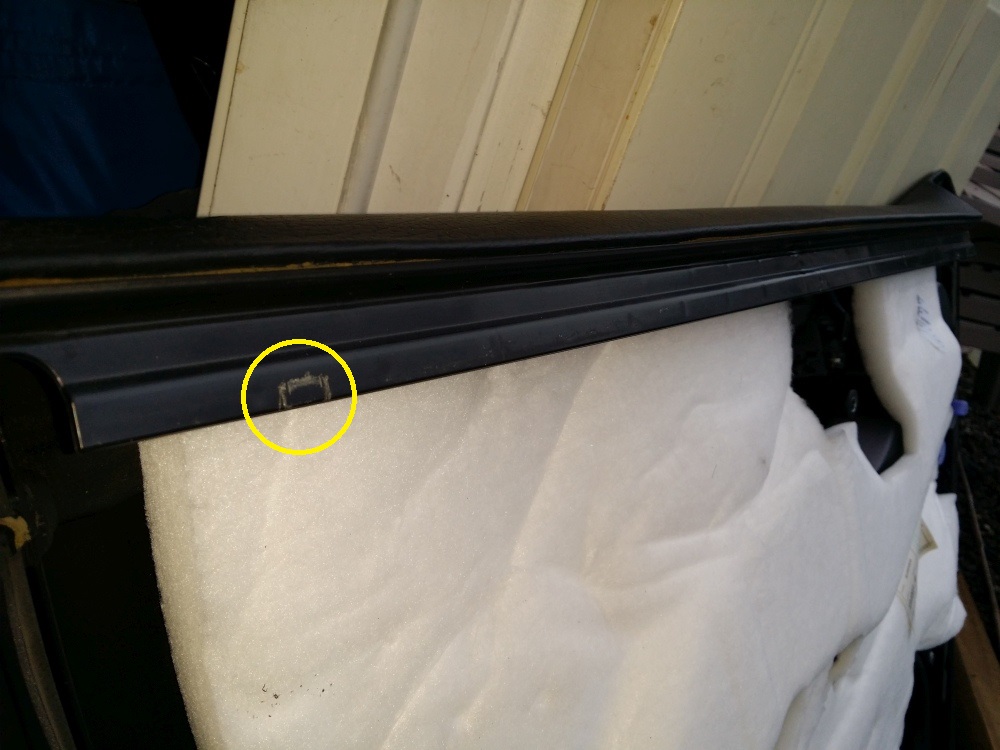
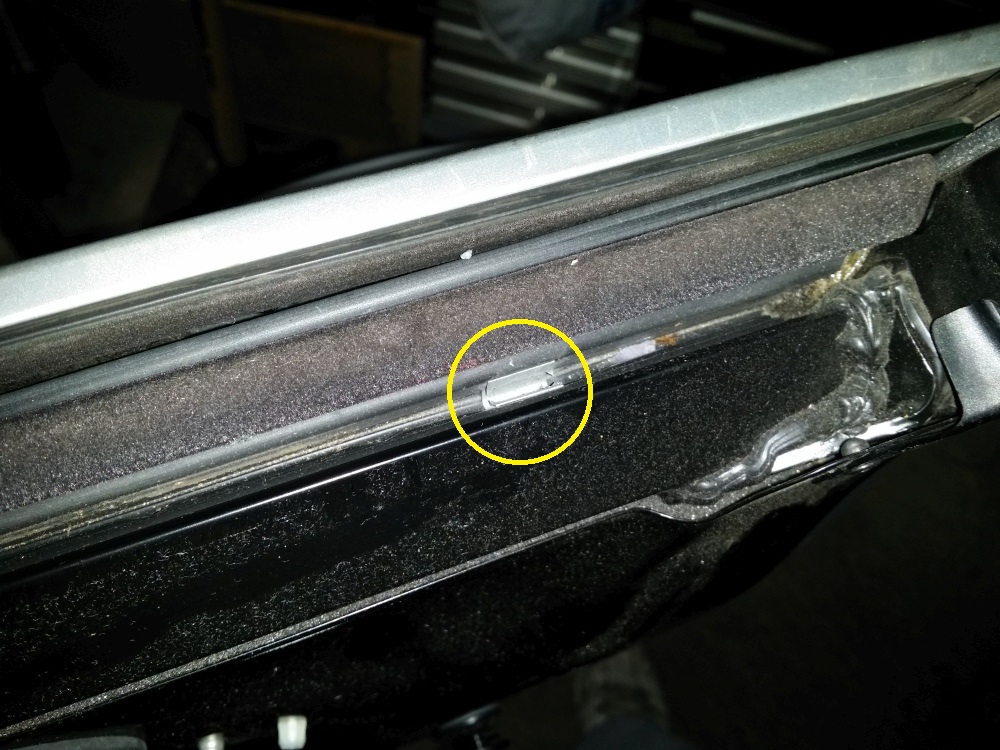
I've proceeded with removing the trim panel. Hopefully recording what I have done can help others. But I still need to know whether or not I have to drill out 4 rivets at the top of the inner metal panel that holds everything, eg. regulator and speaker, etc.. (looks like I will have to remove the rivets). Pull off the inner panel. It has six retaining clips, what Porsche calls "fixing clips". The locations are marked on the picture. Knowing the locations would help you pull of the panel with minimal damage. One of the six retaining clip base broke off and can't be used again. Two others sort of cracked but can still be used. The red boxes are rivets. The green box locates the bowden cable where it enters into the other side of the inside metal panel. The six yellow circles are where the retaining clips are. Backside of the inner panel. The 3 yellow circles show the retaining clips that were undamaged when I pulled off the panel. The 2 orange circles are where the retaining clips stayed on the metal panel. The one on left shows the base is a bit damaged but still can be used I think. The 1 red circle shows where a retaining clip base broke off, like can't be reused. The 2 green boxes shows plastic blue alignment pins. They fit into two holes on the metal inside panel... so to pull the trim panel off, one has to pull it out from the bottom first (so the alignment pins are out of their holes), then pull the panel up. Across on the top of the inner panel is a strip that runs practically the whole length of the panel. It hooks into a grove that runs the width of the door. There are 3 clips that help retain the inner panel at the top. The yellow circle shows the marks left on the strip by one of the clips. The clips are small and not very strong... so to pull the inner panel off, like described above, pull the bottom out first then just jiggle and lift upwards. The following picture show one of three small clips in a groove at the top of the door. I don't know if it was necessary, but I lowered the window all the way first before pulling the inner panel off. Disconnect the speaker connector (tweeter I think). Then disconnect the bigger multi connector (controls the window and another speaker and power locks I think). The following pictures shows a lever that needs to be "moved" that helps pull out the connector. I will continue with the next post (due to total picture size upload restrictions).
-
2005 Cayenne S front passenger bowden cable broke so passenger cannot open door from the inside using the inner door release lever... have to open door from the outside. Part number for bowden cable is 95553102400 I think. Followed "Door Panel Removal" instructions. Inner panel almost all off, just have to remove the top part of the panel thats still "stuck" to the door... have to figure out how to "pop" it off without breaking anything. Stuck my hand behind panel and felt bowden cable is broken. The "door panel removal" instructions were helpful. Is there instructions to replace the bowden cable? The cable runs into the door panel to the other side of the door. Do I have to remove the lock actuator? I have no idea right now. Thanks in advance.
-
Good to know... fortunately my remaining 3rd party warranty covered replacement of a starter... but not everything... eg. Charged for manifold seal, coolant refill. CLARSONGLI, when was the last time you replaced the starter? Where did u buy yours and how much if you dont mind me asking... thanks.
-
2005 CS: Just got starter replaced. Factory Porsche Service changed me time for "disconnecting the coolant pipes under manifold for access to starter" and also charged me for "vacuum fill cooling system" and charged me for the coolant itself. But maybe they could of done it without removing the coolant pipes, ie. just want to make more money off of me. (For what its worth). Yes, I too am curious Sgearyman replaced the starter without removing the coolant pipes.
-
Starting problem '08 CTT
Ricky1 replied to vchris's topic in 9PA, 9PA1 (Cayenne, Cayenne S, Cayenne Turbo, Cayenne Turbo S)
2005 Cayenne S: Compelled to post this since I just went through the same problem: Cold, starts properly... warmed up, may take 2 to 5 tries to start. Even when cold, its a slow arduous start. Finally, about two weeks ago, the starter just went "click" and wouldn't start again. Towed into Porsche Service, replaced starter, and all is well. Starts properly now. Before starter finally failed: - replaced battery about 7 months ago... no change. - starter gradually got worst and worst... ie. more and more tries before engine started - when engine cold, started on first or second try but still "slow turning" of engine/fly wheel - maybe one out of 30 starts would result in starter "free wheeling", ie. engine starts but starter makes a loud screeching noise for about a second, starter gear/solenoid not retracting? - other times when car started, 4 wheel drive warning would come on, and on a few occaisions, the radio would not work with an amplifier warning. I am guessing the starter draws so much current that the automatic systems check systems doesn't work properly. (With new starter, problem hasn't arisen yet). I've been told when the starter heats up it would draw more current. Any reading under 300 Amps is normal. Anything over 300 Amps indicates a starter problem. About 3.5 hrs of labor to put in new starter. Hope this helps. -
Intial problem with new rotors and pads ==> horendous sqealling while trying to stop from slow speeds. Solution: Find a long downhill stretch of road with little or no traffic and bed the pads until you smell "brake". As per clarksongli's recommendation... "really stick it to the pads". Well that seemed to have work with two bedding runs on a lengthy stretch of downhill road. Currently, once in a while there is a "quiet squeal" when stopping from a slow speed, but is like 99.99% less noise than before the harsh bedding. I may bed it again soon to try to get rid of all the noise. Pad or rotor manufactures should add to their bedding instructions that propper bedding should bring about "brake smell".
-
I have a 2055 CS and want to install a back up camera. Like you said, a bunch of the ones on sale on ebay doesn't exactly fit the license plate light cutout. Can you tell me which one you purchased? Thanks for the info. I am going to take a look at the Alpine W920R. Want to change the PCM also... thanks.
-
Thanks for the reply Clarksongli. "Btw...I bought a set of wheels with the same tires back in the day." are you referring to the Michelins or were they Kumhos? Anyways, I bought the 20" wheels to replace the 22" TecArt wheels for "a while" before I get another Pirelli Scorpion Zero Asymetrico tire for it, sized 295/30/22. Why another set of wheels? In the year and a half that I've owned the 2005 CS, I have replaced three tires already. Tire 1: Pulled the passenger front tire off to inspect brake pads and rotors... rolled the tire away and heard what sounded like gravel in the tire, lots of gravel. Turns out the previous driver had driven on that tire flat and damaged the inside of the tire and all that "gravel" was rubber pieces rolling around. Tire 2: Drove into a gas station and the drivers side front tire popped at the side wall. Didn't see any pieces of metal or anything lying around. Tire 3: Drove out of McDonalds and just caught the edge of the curb. Sidewall split. Getting tired (no pun intended) of this. The 295/30/22 are so low profile and I believe, load value too low for the CS (load value 103 I believe) that I think this is just going to go on and on. The TecArt wheels look really good but I don't want an SUV that can't behave like a SUV, ie. at least have the ability to go on and off a curb. Anyways, I am going to buy another 295/30/22 because the other three are good. As for the 20" wheel set, I am looking at the Kumho STXs now, relying upon your experience. At Americaswheels.com: KUMHO - ECSTA STX KL12 275/40-20 106W, they are $123.51. Anyways, the 20" wheels with the 275/40/20 has more sidewall and takes the "bite" out of the rough roads since I think the original owner changed the springs and shocks to stiffer ones... too rough for me with the 22" wheels.