Welcome to RennTech.org Community, Guest
There are many great features available to you once you register at RennTech.org
You are free to view posts here, but you must log in to reply to existing posts, or to start your own new topic. Like most online communities, there are costs involved to maintain a site like this - so we encourage our members to donate. All donations go to the costs operating and maintaining this site. We prefer that guests take part in our community and we offer a lot in return to those willing to join our corner of the Porsche world. This site is 99 percent member supported (less than 1 percent comes from advertising) - so please consider an annual donation to keep this site running.
Here are some of the features available - once you register at RennTech.org
- View Classified Ads
- DIY Tutorials
- Porsche TSB Listings (limited)
- VIN Decoder
- Special Offers
-
OBD II P-Codes - Paint Codes
- Registry
- Videos System
- View Reviews
- and get rid of this welcome message
It takes just a few minutes to register, and it's FREE
Contributing Members also get these additional benefits:
(you become a Contributing Member by donating money to the operation of this site)
- No ads - advertisements are removed
- Access the Contributors Only Forum
- Contributing Members Only Downloads
- Send attachments with PMs
- All image/file storage limits are substantially increased for all Contributing Members
- Option Codes Lookup
- VIN Option Lookups (limited)

sstamnes
-
Posts
6 -
Joined
-
Last visited
Content Type
Profiles
Events
Forums
External Paint Colors
Downloads
Tutorials
Links Directory
Collections
Store
Everything posted by sstamnes
-
 Was just looking through some old posts and never followed up on this. My issue was a timing chain issue. $10k later I had a new timing chain and hydraulic tensioners. Needless to say I no longer own this vehicle. Moved on to a 2013 Cayenne S. Much nicer.....
 -
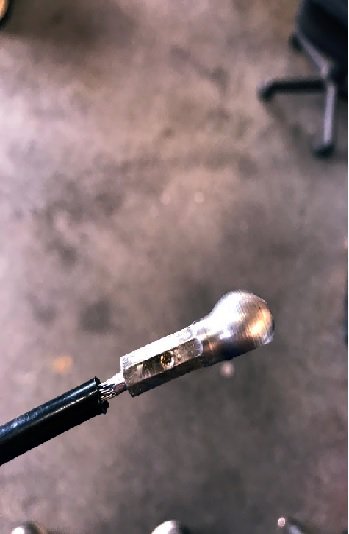
Sorry if this has been posted before but I have not found a post on this specific issue. I recently had one of my top tension cables break again. These are the single cables on each side of the top that hold tension on it when it's closed and give it a good shape when the top is closed. Not wanting to spend $60 to replace a single broken cable I decided to attempt a repair. So far the results are looking good. The total length of the cable, not including the ends, is 9 inches. There is 8 inches of exposed cable and 1/2 inch inside each ball connector. The cable thickness is approximately 1/8 inch. Rather than spend extra money for stainless cable, I purchased regular galvanized cable. We shall see how it works out. Tools & Supplies needed: -Dremel with cut-off wheel or similar tool -Grinding wheel or Scotchbrite wheel -Drill Press or power drill and steady hands! - 1/8" cable either Stainless or Galvanized - 9/64 drill bit -3/32 drill bit -Propane Torch -Electronics Solder and Flux. I used solder that was a little less than 3/32" thick. -Container with water for cooling the connections. 1. Remove the broken cable and the broken end. Save the plastic tube that the old cable slide through. Grind down the bits of cable that are sticking out of the broken end. 2. Placed the broken end in a Drill Press vice or bench Vice if using a hand power drill. As carefully as possible, drill out the broken cable with the 9/64" bit trying to stay as close to the center as possible. Drill down 1/2". Make sure there are no bit of broken cable left in the hole. 3. Turn the connector on it's side and drill a 3/32" hole perpendicular to the cable opening and just above the bottom of the cable opening. I drilled all the way through but it can probably go just into the cable opening you just drilled out. 4. Cut a 9" long piece of replacement cable. 5. Flux one end of the replacement cable and twist into the open end of the connector making sure to follow the existing twist of the cable. Twist the cable in until it hits the bottom of the connector. 6. With you propane torch lit, hold the cable with the connector end in the flame until the flux starts to bubble. Take your solder and stick it into the 3/32" hole you drilled. Once it starts to melt and fill in the cable, remove the connector from the flame. The solder will continue to melt for a little bit. When you see solder come out of the end of the connector around the cable you can stop adding solder if you wish. 7. Dunk the soldered end in the water to cool it and check your handy work. Grind off and rough spots or excess solder. 8. Take the other part of the broken cable with the connection that is not broken off and using your Dremel or cutting wheel, cut off the remaining original cable as close to the end of the connector and the repeat from Step #2. (Remember to place the plastic tube over the new cable before you solder the second end in place!) 9. Make sure both connectors are facing the same way before you solder the second connector in place. As you can see the plastic tube does not melt if you are careful. The total cost for the cable, (30 feet), and the drill bits was $10. The cable is very secure and we'll see how long it lasts since there is not a lot of pull on these cables.

-
So the other day I was driving an noticed that my engine didn't seem right but it was nothing I could put my finger on. Later when I started it, it was "chugging" very badly but ran fine at higher RPM. When I got home I plugged in my Durmetric and pulled a P0020 Fault Code: "B Camshaft position-system performance bank 1 No signal/communication, test conditions not completed, fault is currently active and causing a DTC light" I cleared the code and started the engine and it ran better but a subsequent scan showed a P0023 code: "Crankshaft-camshaft position correlation bank 1 sensor b - Value below lower limit, test conditions are not complete, fault is currently active causing a DTC light". Today I replaced both camshaft position sensors and I still get the code and the engine seems to idle worse than before but again smooths out at higher RPM. I do have decreased performance with it shifting into higher gears sooner than normal as well. Before I throw a crankshaft sensor at the problem I figured I'd see if anyone had any experience with this fault code. Seems like everything I find online deals with the V8. Thanks Shaun
-
I'd be interested in how you did it through your Durametric. I was just working with mine today to see if there was a way to do it. I'll start looking again tomorrow, PM me if you have any tips. Thanks Shaun
-
Thanks. The diagram really didn't help much. I was hoping for a relay so I can mod it like I did on my 986. I live in the country and having the ability to keep the fog lights on with high beams really helps this time of the year when the deer are moving at night. The extra light in the ditches will pick them up better than just the high beams.
-
So has anyone found the location for the fog light relay yet on a Cayenne? I have checked everywhere I can think of and still no joy. I have an '09 Base but I would assume they wouldn't have changed the location too much between years.