Welcome to RennTech.org Community, Guest
There are many great features available to you once you register at RennTech.org
You are free to view posts here, but you must log in to reply to existing posts, or to start your own new topic. Like most online communities, there are costs involved to maintain a site like this - so we encourage our members to donate. All donations go to the costs operating and maintaining this site. We prefer that guests take part in our community and we offer a lot in return to those willing to join our corner of the Porsche world. This site is 99 percent member supported (less than 1 percent comes from advertising) - so please consider an annual donation to keep this site running.
Here are some of the features available - once you register at RennTech.org
- View Classified Ads
- DIY Tutorials
- Porsche TSB Listings (limited)
- VIN Decoder
- Special Offers
-
OBD II P-Codes - Paint Codes
- Registry
- Videos System
- View Reviews
- and get rid of this welcome message
It takes just a few minutes to register, and it's FREE
Contributing Members also get these additional benefits:
(you become a Contributing Member by donating money to the operation of this site)
- No ads - advertisements are removed
- Access the Contributors Only Forum
- Contributing Members Only Downloads
- Send attachments with PMs
- All image/file storage limits are substantially increased for all Contributing Members
- Option Codes Lookup
- VIN Option Lookups (limited)


Domiac
-
Posts
121 -
Joined
-
Last visited
Content Type
Profiles
Events
Forums
External Paint Colors
Downloads
Tutorials
Links Directory
Collections
Store
Everything posted by Domiac
-
 After I had my 996 (Carrera 4, 2004, 86k miles) raised in jack stands for multiple months, I assume my suspension took a hit. All tires are in a really good condition, pressures are good. Just changed my engine mounts. When I drive around 50mph to a curve, accelerating hard but still without losing traction, the car rolls considerably and my front feels really really light. Doing quick steering movements on a 40+ mph speeds is scary. The difference is drastic when compared to the time just before I put my car on jack stands. Could it be that my spring coils took a hit? I'd be happy to start another thread, just let me know. Otherwise, please throw any ideas how to check or measure my suspension. I'd also like to inspect it myself before I drive my car to Porsche shop. I know engines reasonably good but I am a newbie to suspension. Thank you!
 -
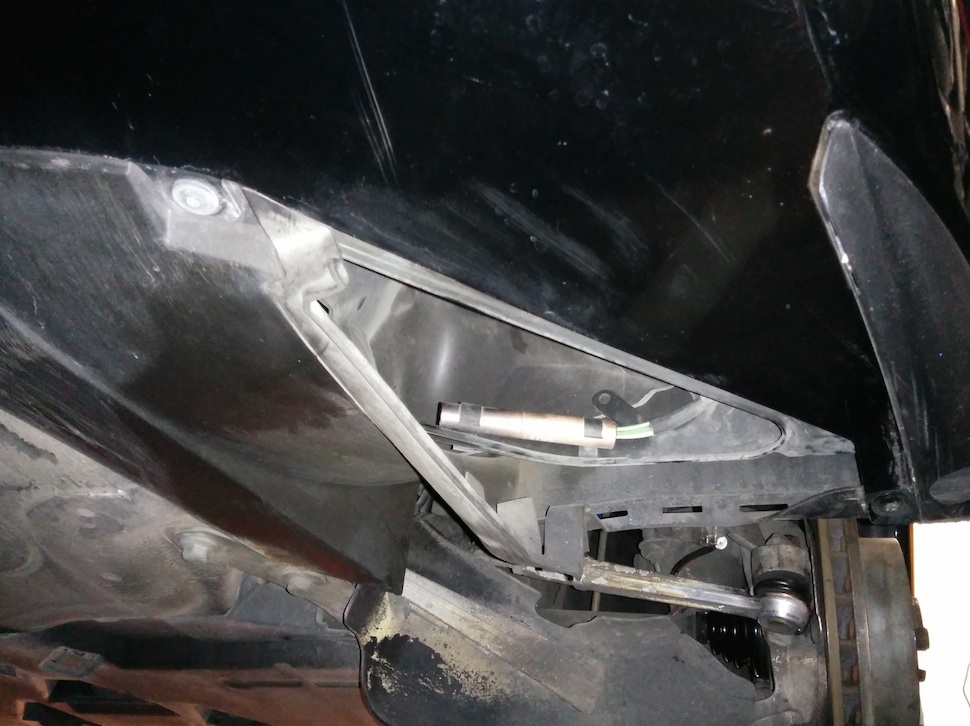
Hello, Please have a look at my picture, undercarriage area left front wheel. I suppose I am missing a plastic piece here? Situation is identical both left and right side on my wheels. I wonder if this is a mod that previous owner did..

-
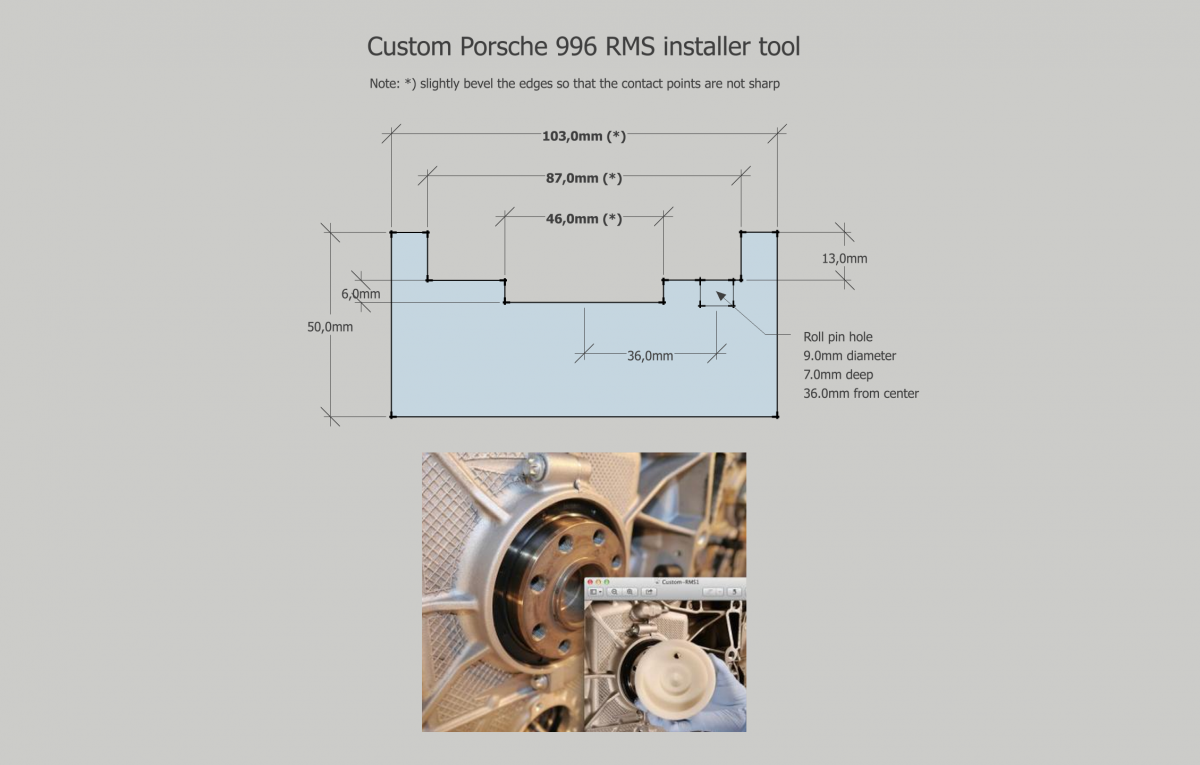
Thanks to Coloradocurt, he sent me new dimensions that worked well for his RMS installation. Here's an updated picture in case anyone wishes to request similar part from a shop. 996-rms-model-dimensions.pdf
-
Water pump install
Domiac replied to moosey's topic in 996 Series (Carrera, Carrera 4, Carrera 4S, Targa)
The metal pipes under the engine are trivial to set loose, simply take out a few screws under the engine near the oil pan and then separate it from either plastic tube. You should now have a bit more space to work with. You can also drop your engine a bit (less than 2" though!) by loosening engine mounts if you think that helps, but I doubt it. I changed my water pump and thermostat when I had my engine out. Have fun and take your time :beer: I assume with the metal pipe, you mean the pipe that is visible right left from the pump on my first image?
-
Let me know your dimensions and I'll create another image with Sketchup.
-
Thanks John! Shared a quick video of my last run: I'll add some more images later regarding my paper journey :jump:
-
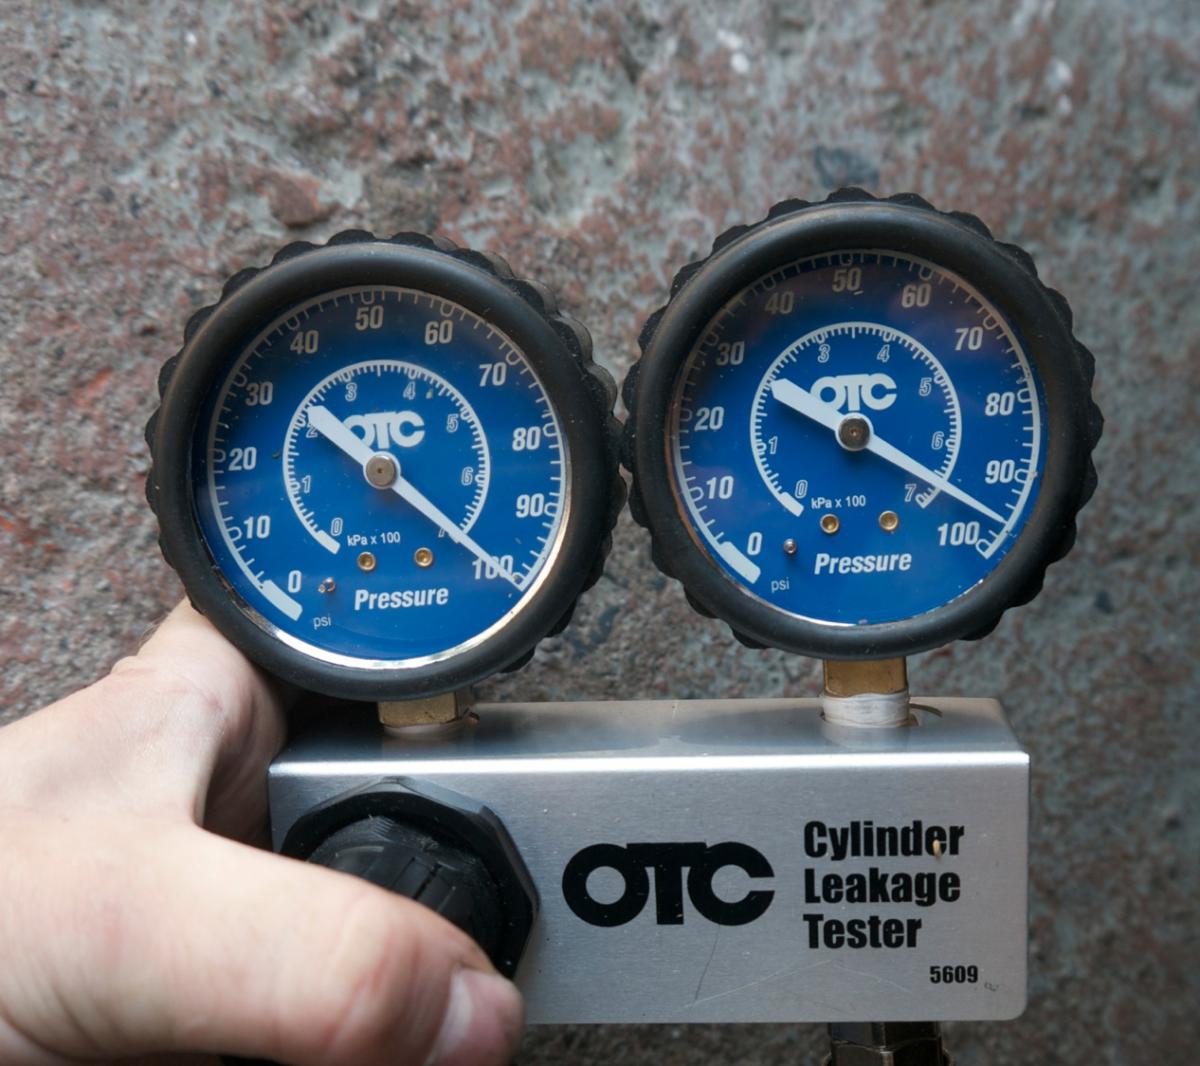
Gentlemen, we are go! :thumbup: Made some adjustments and started my engine again. Everything worked beautifully right from the start, knock was completely gone. Took a nice short test drive. Leak down test 100 / 95+ PSI per each cylinder and I did not even trouble to find TDC exactly which is important to get best values. Engine sound really good and identical for both banks. Durametric values looked good. Poking upper and lower head parts with stethoscope produced smooth sounds, just like it should. I did the following since my last run: 1. retightened my exhaust parts - I do not believe knock was caused by this. However, my cats were quite loose from the chassis and these vibrated quite a bit last time 2. Added more oil - last time after I shut down my engine, I was on the lower end of my stick, only one bar on cockpit Last time even my bank 1 knocked just a bit, now both banks sound smooth. I believe that my camshaft parts simply did not get enough oil. In any case, all this cleaning job produced good results. After each cleanup, engine sounded always better. Too bad that my previous run was plagued by low oil volume. What a way to start 5 week summer vacation :cheers:
-
After I got to op temp, MAF sticks between 17.8 to 18.6 on 700RPMs.
-
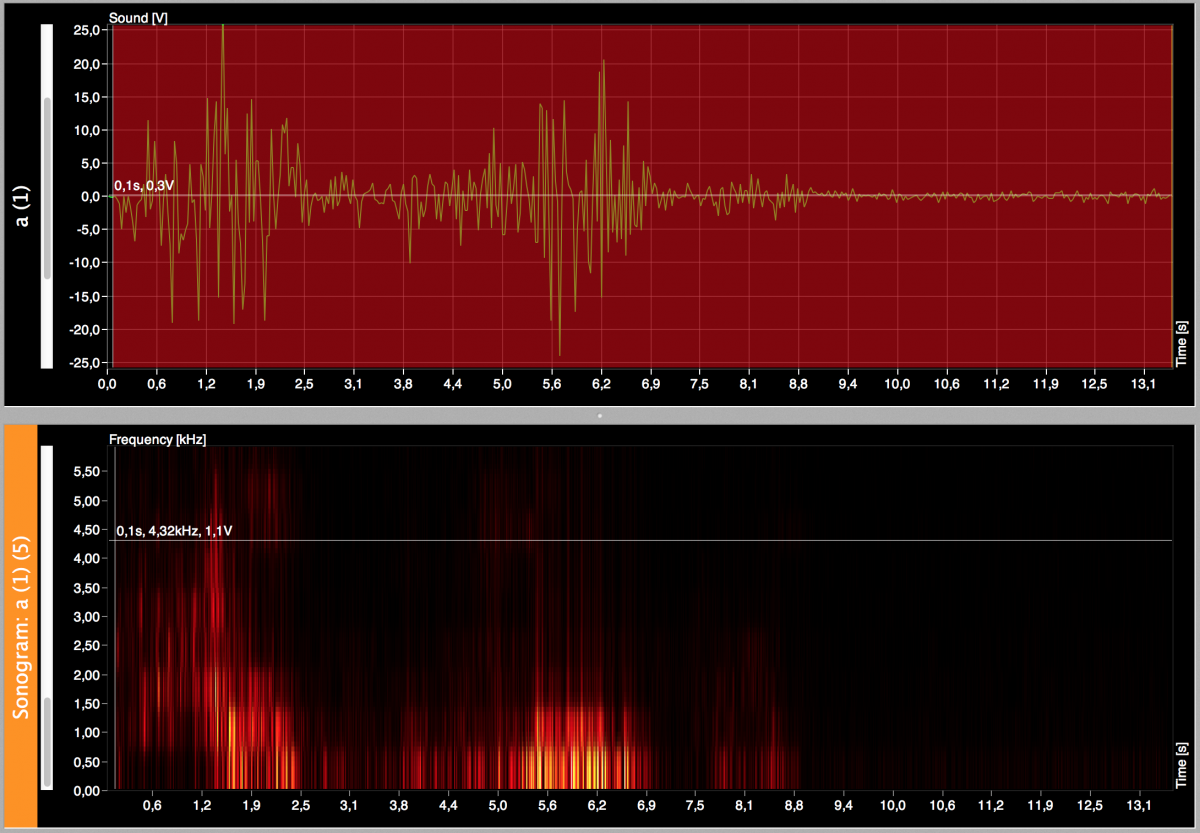
BTW, here's a sample spectrogram of my 996 start with old tensioners. The rattle can be "seen" in between 5,0 and 6,9 second interval. You can see that after around 9 seconds (cranking included), the engine is running smooth. First few second spikes are due to cranking, the following ones due to "rattling" which occurs with any 996 engine to some extent. Requires some tweaking with software to filter out normal engine sound but quite easy to do. After I changed my tensioners and oil, the rattle is easier. Then again, the rattle was quite OK even before. Anyway, to do this properly, one needs to repeat recording and analysis in exact same manner before and after changing parts. This is just for the fun of it, not that scientific :king: I could let someone else drive the car so that I can do some Durametric testing and ensure that knocking is not getting much louder, also with the help of spectrogram.
-
Thanks for checking my data out. Right now I know that bank 2 is louder than bank 1 but I do not know if it comes from Cyl #4. I am reasonably confident that my bank 2 did not have such a loud sound previously, the video shows that bank 2 is louder than bank 1. Perhaps I should just drive the car for multiple hours and see how it goes. The engineer in me says I should trust DME and just drive it as there are no error codes. However the geek in me says insane things like I should attach a digital stethoscope to my bank 2 and let my computer show spectrogram and RPM while I am driving, it would be trivial to do. Next time when I run my engine, I'll use my digital stethoscope to diagnose where the noise is most audible. Any ideas what to log with Durametric?
-
Also, since last run I changed my injector o-rings (12 pcs), re-attached intake and exhaust parts again and moved across the following parts between bank 1 and 2: - fuel injectors - spark plugs - coils
-
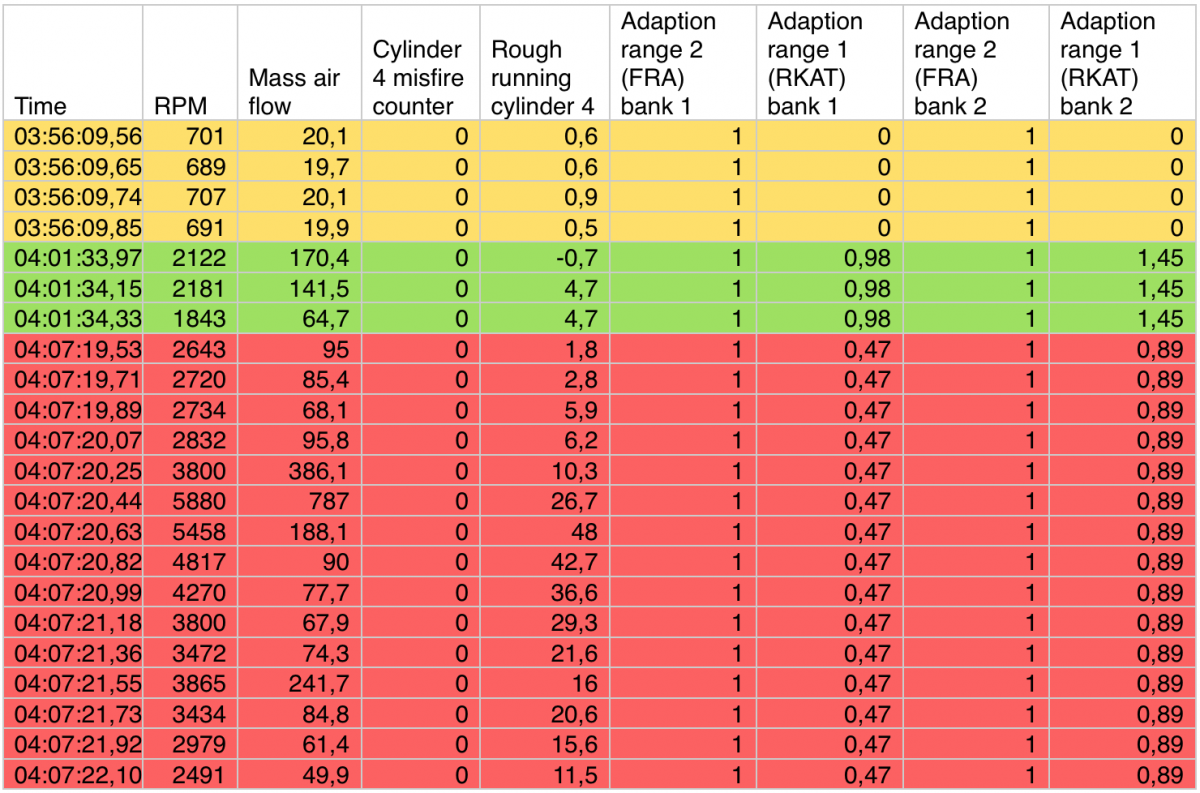
Forgot that I did log some Durametric values, here's a simplified version of it, small snapshots from three different time periods. First soon after the start (yellow), three minutes after (yellow) and finally over 10 minutes from the start (red). Rough running on cyl #4 gets quite high values, are those OK? Camshaft position deviations are good: worst values are 0.66 and 2.05 I'd be happy to know which values I should log to diagnose this further, suggestions are welcome.
-
A warm leak down is the best test for this. Huge cleaning work behind for cylinder #4. Today I managed to get my engine and transmission back, started my engine, warmed it up to op temperature, took a short 5 minute drive. No error codes. After shutdown, I performed a leak down test for cylinder #4. Result was 100 / 96 PSI, which is excellent news (most likely worst case scenario no longer applies) :clapping: While running, after idle dropped to 700 RPM, bank 2 is still giving out a nasty knocking / pinging sound, not as bad as previously but noticeable still. Any suggestions what to do next? :) What fields should I log using Durametric? My schedule is hectic but I have free time this Tuesday evening. I plan to warm it up again and perform leak down test for all cylinders. I suspect all my other cyls are good as the paper was stuck on cyl #4. It can be that some parts on my camshaft (valve lifters or such) did not like paper getting stuck. Please see a quick 30 sec video here: https://www.youtube.com/watch?v=uLSUKtKnlkk
-
Question: Coolant and Overflow Tank
Domiac replied to bcrdukes's topic in 996 Series (Carrera, Carrera 4, Carrera 4S, Targa)
Ahsai, to my knowledge latest coolant cap is still blue. About six months ago I ordered 996-106-447-04-M100 and it is blue. See http://www.pelicanparts.com/cgi-bin/ksearch/PEL_search_2014.cgi?command=show_part_page&please_wait=N&make=POR&model=996J§ion=WATRAD&page=4&bookmark=11&part_number=996-106-447-04-M100 Bcrdukes, should you wish to do this yourself, have a look at http://www.renntech.org/forums/topic/46584-how-to-drain-all-coolant-and-refill-with-a-simple-shop-vacuum/?hl=%2Bcoolant+%2Bdrain . Then again, it wont cost much to let someone else to do it with proper equipment. -
Lets keep this thread for IMSB but one tip I wish to mention.. As your car is 11 years old, be sure to add 996-106-226-52 to your list. Cost $8 and dead simple to change. Located right from the alternator / oil filler tube. Connects cooling tubes into AOS. My connection piece literally disintegrated to my hands when I accidentally touched it during my engine drop. Use screwdriver or such to separate tubes a bit from the connector piece and spray some silicon inside there, then the connector piece comes out a lot easier and without fear that it breaks and you get plastic pieces in your cooling system. See http://www.pelicanparts.com/cgi-bin/ksearch/pel_search.cgi?SUPERCAT_FLAG=&make=&please_wait=N&forumid=&threadid=&command=DWsearch&description=996-106-226-52
-
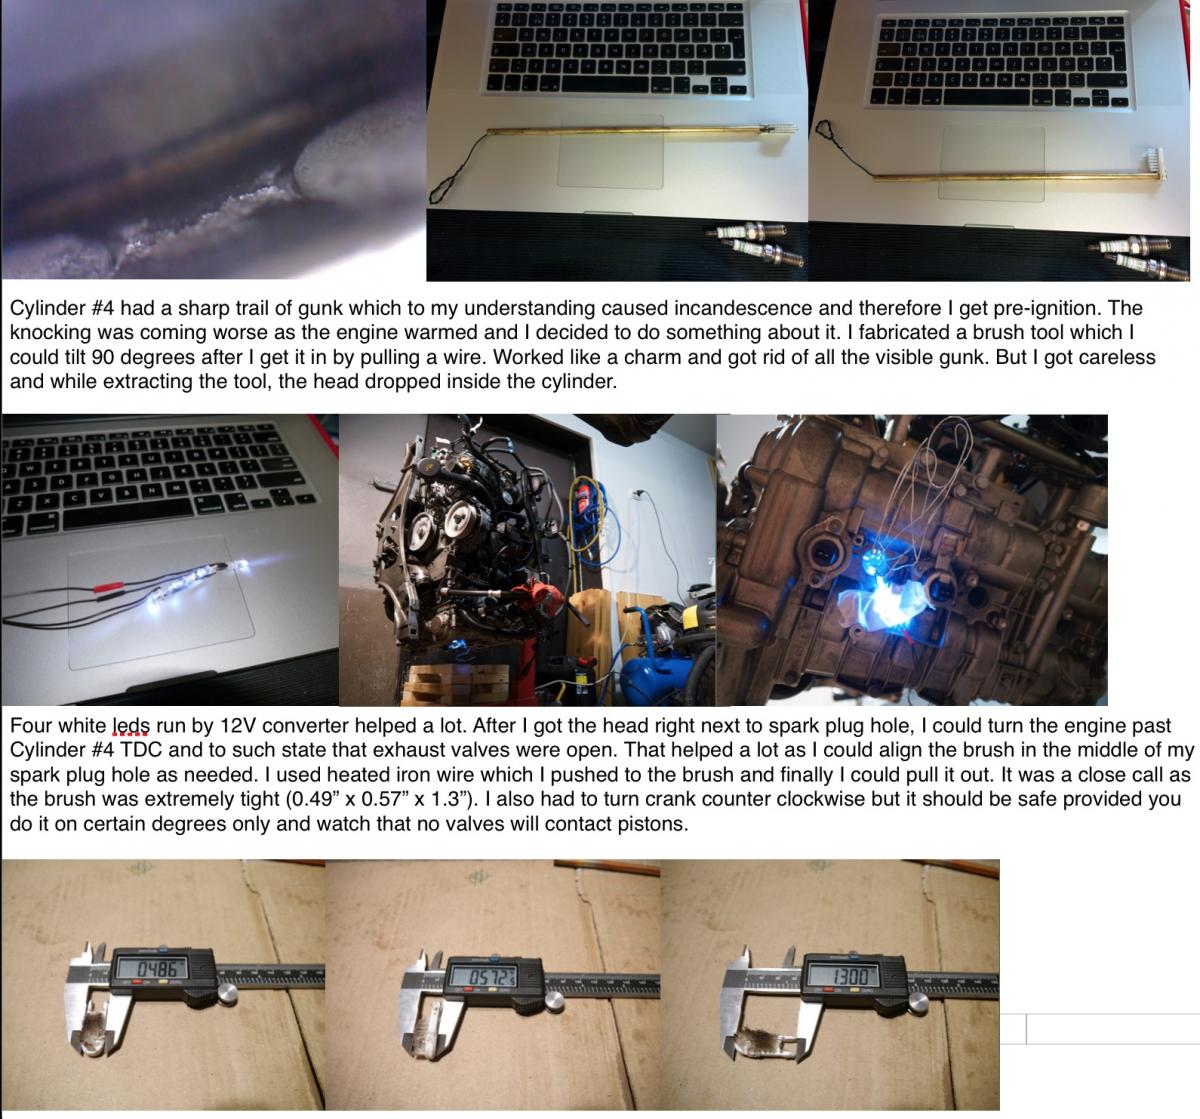
Breaking news... I decided to take one more borescope run with a better mirror alignment and noticed that the area between my exhaust valves contained a sharp trail of gunk. I suspect that this causes incandescence and therefore pre-ignition. The sound of my bank 2 just kept getting worse as my engine warmed up. I fabricated a brush tool which I could tilt >90 degrees after one pushes it through the spark plug hole, when I pull the wire the brush part tilts >90 degrees. Worked like a charm and I got rid all of the visible gunk. However, I got careless and while extracting the tool, the brush head dropped inside my cylinder. Game over. (I now know how to do it right though). Next I soldered some white leds togethers which I could insert through the exhaust valves and see the battle area. Using wires I could align the brush to the only position in two axis that I could extract it. With the help of pushing down the cylinder, I got it jammed inside the spark plug cylinder and finally using hot iron and copper, pull it out. The piece was 0.49" x 0.57"x 1.3" but the brush part compresses somewhat. Should you be interested of this insane journey, see the ludicrous pictures on my attachment :P Hopefully I have the time to put my engine back soon and fire it up. If this does not help then I'll give up, extract bank 2 head and ship it to a shop for proper maintenance.
-
FYI: Loaned my RMS tool for a fellow 996 owner, he told me that he was very happy with the outcome. Another tip for you guys. If you are unsure of the dimensions, ask your shop to create two different prototypes, e.g. with two different dimensions for the crankcase dimension. Cost is negligible as the driller already has the setup for the first part ready it is trivial to do another one with a bit larger dimension. Then, try out both, repeat for the one that feels better :cheers:
-
Thanks, your image is great (although that wooden pallet looks a bit scary B) ). Actually, after you have done this once, the next time is a walk in the park. Through the path which you marked red, it is reasonably easy to push your socket and extension to the bolt. Some kind of swivel is needed but the required degree difference is small, only 10 or so.
-
Nope, that site has problems already when displaying the shopping cart. Let alone when you try to purchase anything. It has been quite some time like that :-(
-
I'm reading into your comments that the tight fit you mention was between the crankshaft's diameter and the tool, and not necessarily between the tool and the crankcase (although I haven't yet measured the crankcase). Working on my back under the car and using my calipers, I measured the diameter of the crankshaft to be 3.340", leaving only about a 0.014" clearance to your 85.2mm dimension. Might be a bit too tight for easy (yet still error-free) use. 0.01433" or 0.364mm clearance is tight but that is what my caliper says to me. In any case please use your own judgement here, measuring with a caliper is somewhat error prone. I does not hurt to use a bit more clearance. Also, you can always bring the first version back to the shop and ask them to take another 0.1 - 0.2mm off, but that of course takes more time.. There is also the matter of thermal expansion to think of (metal vs nylon).
-
Help with a rattle.
Domiac replied to Dario Campolattaro's topic in 996 Series (Carrera, Carrera 4, Carrera 4S, Targa)
How about trying to record the sound of this rattle and posting it to youtube or such. I understand it might be challenging but if you manage to do it then experts and enthusiastics here might provide you solid tips. A sound is worth of a thousand words (or something similar :-) ) -
If someone does another tool, please post updated dimensions. In my case the fit was a bit loose at first but once I got it in, it felt quite tight. It might be tempting to optimise the fit into as snug as possible but I'd beware getting it too tight, you do not want to get it stuck. Dennis, for a metalworking shop fabricating this tool really is a no brainer. You can use an old skool shop for this as the tolerances here are fine even for over 30 year old machine drills. Even nicer option would be to drill holes to this tool and use bolts to draw it in. Still, I think tapping it gently works fine too. Then again, who I am to tell, I'll drop my transmission for the fun of it next year and see how my RMS and LN Engineering IMS upgrade is doing, hopefully not leaking :blush:
-
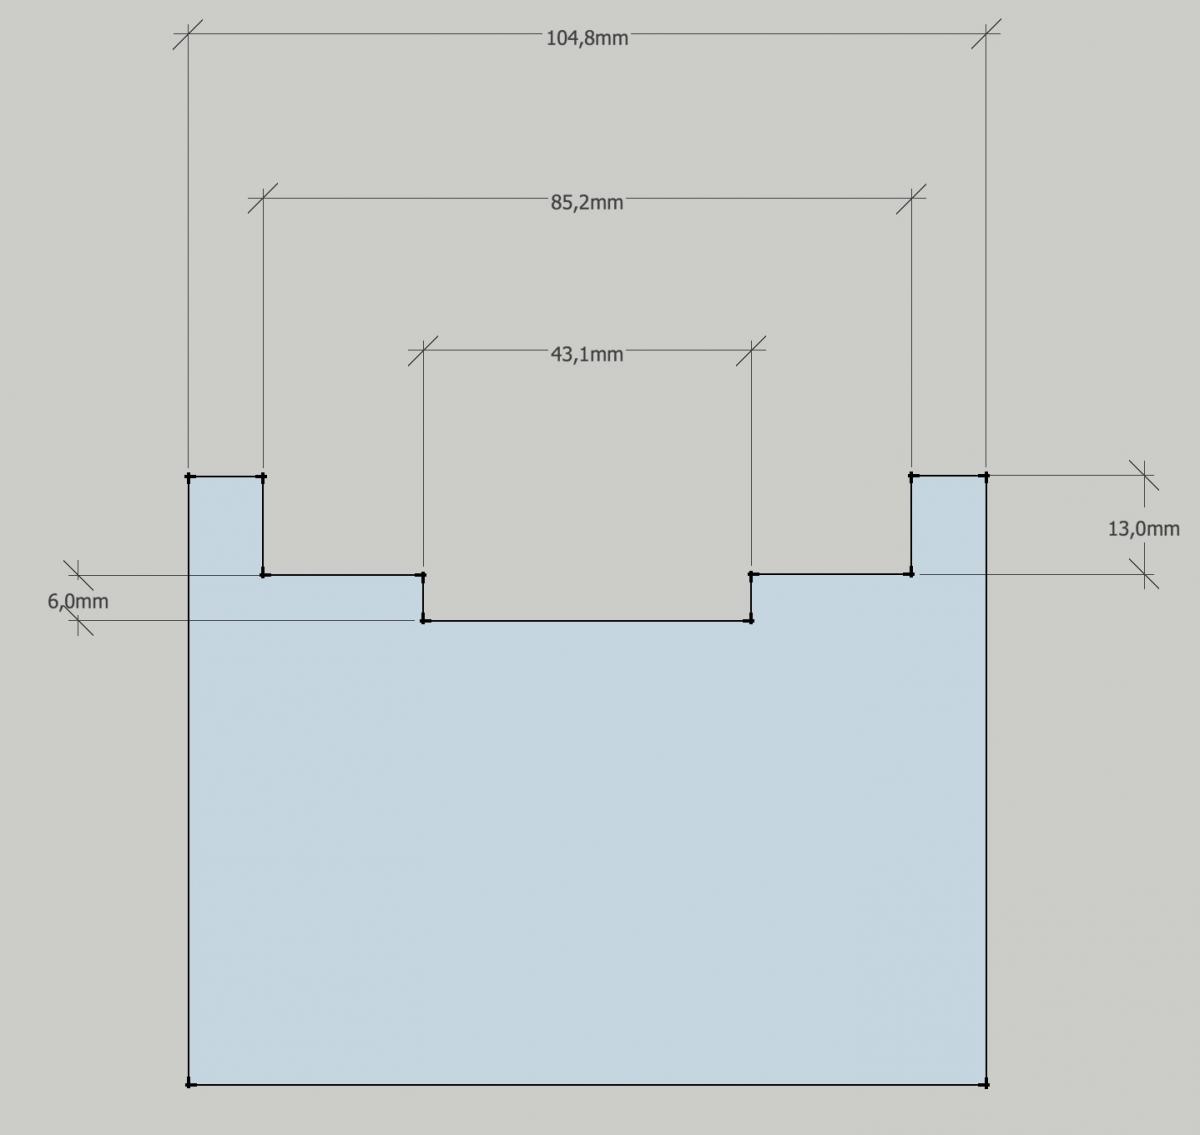
I got a PM where someone asked the dimensions of my tool, here it is. Print the image and give it to a person who can drill the tool out of nylon or something similar (strong but softer than metal). First check my image and then when fabricating the tool, make sure that the - first dimension is <105mm - second dimension is >85mm - third dimension is >43mm - first depth is 13mm - second depth is at least 13mm + 6mm You also have to drill a hole for the pin, paint pin and then try to fit the tool and you'll see which place to drill. How much over or under you wish to go depends on how good drill you have, but I'd use 0.2mm difference to ensure it fits reasonably easy and that the extraction is also easy. When using such tool, I'd advise using clean gloves and clean crankcase surfaces with isopropyl alcohol. Do not apply anything else, e.g. grease or such, latest RMS itself has PTFE coating and you should not touch it with bare hands. Correct installation depth is 13mm from the face of the crankshaft where the flywheel mates to the crank when using latest model of RMS (in my case I used 997-101-212-01-M17) as of the date when this message was written. Before you start tapping RMS in with this custom tool, try to set it as level as possible to the crank with your both hands (use gloves) and push it as deep as it goes with ease. Then tap it in from the center. I'd suggest you check how it goes in by using caliper every now and then. At least I had to tap a bit to non center position to get it in level to 13mm depth. (edited wording on correct installation depth, thanks JFP) Best of luck!
-
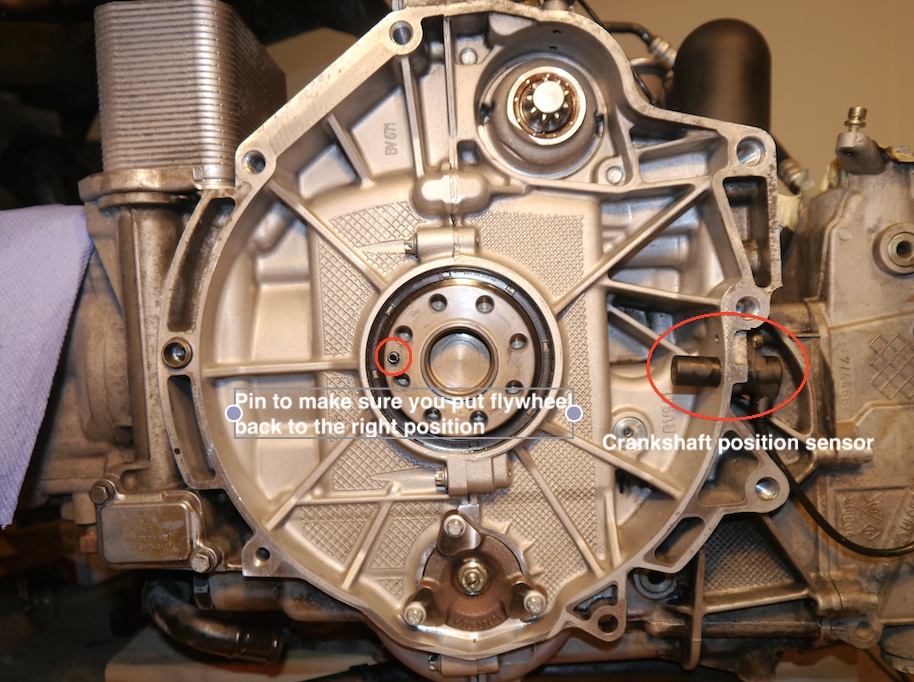
I'd think that one needs to install the flywheel back just in the correct position so that engine timing is kept right or in synch with the "flywheel" sensor. ECU is constantly reading how flywheel (read crank) is turning and therefore it is using this information to execute fuel injectors and spark plugs just at the right moment. Notice that there is a sensor on the engine, right next to flywheel, which reads how the crank rotates per each power stroke. I am sure JFP, Ahsai or many others can offer even better answer than me :-)
-
Am I too hot?!
Domiac replied to dinicor's topic in 996 Series (Carrera, Carrera 4, Carrera 4S, Targa)
In case you wish to completely drain, flush and refill your system, use the excellent tool which RD996 mentioned or a simple shop vacuum which is a bit more involving, see "instructions" from here: http://www.renntech.org/forums/topic/46584-how-to-drain-all-coolant-and-refill-with-a-simple-shop-vacuum/