Welcome to RennTech.org Community, Guest
There are many great features available to you once you register at RennTech.org
You are free to view posts here, but you must log in to reply to existing posts, or to start your own new topic. Like most online communities, there are costs involved to maintain a site like this - so we encourage our members to donate. All donations go to the costs operating and maintaining this site. We prefer that guests take part in our community and we offer a lot in return to those willing to join our corner of the Porsche world. This site is 99 percent member supported (less than 1 percent comes from advertising) - so please consider an annual donation to keep this site running.
Here are some of the features available - once you register at RennTech.org
- View Classified Ads
- DIY Tutorials
- Porsche TSB Listings (limited)
- VIN Decoder
- Special Offers
-
OBD II P-Codes - Paint Codes
- Registry
- Videos System
- View Reviews
- and get rid of this welcome message
It takes just a few minutes to register, and it's FREE
Contributing Members also get these additional benefits:
(you become a Contributing Member by donating money to the operation of this site)
- No ads - advertisements are removed
- Access the Contributors Only Forum
- Contributing Members Only Downloads
- Send attachments with PMs
- All image/file storage limits are substantially increased for all Contributing Members
- Option Codes Lookup
- VIN Option Lookups (limited)


Cassiebox
-
Posts
315 -
Joined
-
Last visited
Content Type
Profiles
Events
Forums
External Paint Colors
Downloads
Tutorials
Links Directory
Collections
Store
Posts posted by Cassiebox
-
-
Not sure if it's spec or not, but I recall reading somewhere (and used on mine) something like:
-use a piece of tape 15.25" long, and measure down from the bottom of the door striker following the contour of the jamb to locate the position for the rear edge of sill
also, using the contoured shape of the rear edge of sill, you will be able to locate where it should go w/ ease as the jamb is beveled to fit.
Good luck and enjoy your new sills!
-
subwiz - can't answer all your questions, but I'll take a stab at some of them:
As far as I understand, since I have an 04 Boxster S with the 490 audio package I already have the six channel amp, so adding the rear speakers is a bit of a breeze connecting to the unused channels.Correct - just run them thru the firewall, add the wires/pins to the open slots in the harness and you're good to go. Very easy to do.
The speakers that I would like to use are made by Dynaudio (MD102 one inch tweeter and MD142 three inch mid range) and was looking for feedback on the Ohm rating of the amp as according to Dynaudio's web site their tweeter and mid range are rated at 8 Oms...Might have a problem here w/ too much resistance for amp to handle. Stock speakers were:
4Ohm in the dash
4 Ohm in my rear kit - PNP
2 Ohm in the doors
at least on my '99 w/ M490
I am also a little confused about the crossover filter built into the factory amp, would I also need to buy the Dynaudio crossover for the rear?The stock amp does have a low pass filter built in for the door channels. Don't think it has one in either the dash or rears, but don't know for sure.
Last comment... I don't think their three inch mid-range produces sound lower than 500hz so not sure how well they would sound back there, has anyone else used this set of speakers in their car?I have the PNP kit w/ has 2 sets of 3.5" speakers which are supposed rated to 100-20K Hz, 50W R-M-S/100W peak. Some people with these kits have also added a tweeter to enhance the sound. The rears really are just for fill - not necessarily for clarity. They help pull the sound stage from directly behind the windsheild to more where your ears are - in the middle of the car.
Good luck and hopefully some others have more info for you! Also, do a search in the archives for rear speakers and you'll get more info than you could possibly ever need.
-
Hi y'all, can someone tell me if this amp fit my boxster? ( 6x40w dsp 986 m680)
I have 4x40w 986 cabrio m490 amp in my car. thanks
It'll fit, but it won't work.
The 680 system is completely different than the M490. M680 has the "batwing" control unit for the DSP (Digital Sound Processing) and requires extra wires running back into the cabin to the DSP controller (at the batwing).
If you get the batwing controller and harness, then it is possible. But as is, it's not plug-n-play and will NOT work.
You'll need to find a 6x40 amp from and M490 system to fit (There's been some debate whether you need one from a cabrio or a coupe to make it work - sorry I never heard the final answer to this one but I think Tool Pants might know.) Also, you'll need to trim off 2 of the alignment tabs on the 6x40amp to properly accept the wiring harness from your 4x40. Then it's simply a matter of plugging in your rear speaker leads in to the open slots (5/15 and 6/16 IIRC) on the harness and bolting it to the bracket in the trunk.
Keep looking and good luck!
-
thanks! I'll try this out first see if that works...
That should cure most of it. You can also add in a GLI (ground loop isolator) available at Radio Shack or Best Buy to your RCA leads from the H/U.
-
Hey - Hate to jump into this thread, but I'm in the process of hooking up a sat radio in my 2001 Boxster S. How do you remove the console cover(s) to get access to the phone harness. (Good illustration for the hookup by the way, even if you need to edit the size some.)
Alan
Just for that, I'm not gonna tell you how to access it.
J/K. All you have to do is pull on the carpeted panel on the side furthest into footwell (both driver's and passenger side panels come off so take your choice). It'll click right out (about 2-3 inches or so). Then slide the whole panel further into the footwell until the rear tabs unhook from the console. Reach around in there for the plug.
Good luck. Now thank me for not needing your reading glasses to see the wire colors ;)
-
what did you guys use to clean it up?
i installed a intake on my box the other day, and while i had the MAF out to trasfer into the new tubing, i whiped it off with a soft tissue, there was a lot of black stuff around there.
with new intake, cleaned maf, and desanorkel, i absolutely love it
Glad it worked out for you but you should avoid touching / wiping off the MAF w/ anything as it could easily cause damage to the wires, etc. Just go to any parts store and get some electrical contact cleaner. Spray it on, in, and through out. Let dry thoroughly before reinstalling. You can also spend a few more $ and get some MAF cleaner (said to be the same thing just repackaged as MAF cleaner instead). Look about 1/2 way down on the mikefocke page referenced above. There are pictures of different varieties.
-
Westcoaster-
I don't think there is one in the 987. However, you could either run a line over to the fuse panel, or tap off of the existing cig lighter lines - depending on what you want to power. I have a 986 so I'm not sure if the 987's cig lighter is keyed w/ the ignition or not. Sorry can't help you much other than that.
-
Nice diagram. Thanks that is a great start. So the green and black one will give me my ignition on pulse - is that correct?
Its a nice idea to run straight from the battery but it might look a little messy - I'd prefer to tap off of something that is already on the cab side of the firewall. Maybe somewhere near the fuse box. There doesn't seem to be any documentation anywhere...
(Actually, hold on, I've just looked again isn't that ignition switched 12V+ only for the phone and consquently only about 500mA?)
Can't tell you for sure, but for some reason I thought it was on a 7A fuse. If it's just a trigger (for a relay within) as you suggested, it won't need whole lot of power. Anyhow, I guess just crack out your fuse panel diagram or Bentley manual and find some places to tap off of the block. Also, if run a search in the archives on carputer and you'll get some hits as others have done what you're trying to.
Good luck.
-
I'm not sure where you can get the 'pulsed' line from, but the ignition on can be run off the phone power hook up behind the center consol. It's a plug that looks somewhat like a 4pin trailer wiring harness. Here's a color code/description I did after I hooked up my sat radio using it.

As for the full power line, why not just run a dedicated line to the battery? Do a search on the rear speaker kit or 6x40 amp swap and you'll see there is a plug (about 6" above the gas pedal) that leads right behind the battery.
Good luck and post some pics after you install.
** note to self - edit the picture size someday
-
I think most of us bought them from A2Rinc.
Use the link (in the first above) and just click on "Seller's Other Items".
I'd bet they might just have a few posted.
Good luck!
-
Here's a link to the B&M short shift install directions that has what you need.
-
This is a problem. The inside diameter of one of the cup bushings is too large. The other bushing is ok, a snug fit like it should be. Strange that they are not both machined the same. If I was to put the shift in a car with that bushing the way it is the lever would rock.
Thanks, I'll take a look at mine and let you know what I find. Any idea how much it would cost to have bushings made (if need be) to fit the tolerances? Seems like a fair # of people have purchased this kit so as mentioned above, maybe we can get a group buy going on this.
TIA
-
That is ok. I thought they were reversed due to the color and machining marks.
Right now, I have a problem with doing a comparison. The diameter of the 2 cup bushings are not the same on the ebay special....
TP-
Can you confirm the measurements are 15.7 and 16.2 (appears to be a reflection on one)? Did you measure the pivot arms of the shifter too? Curious to those #s. If not, do you think the .5mm difference will affect function all that much? The variance between them is just under 3.2% so I suspect not, but then again I have no idea what the tolerance should be on this item. Did anyone measure the shifter bushing on the stock shifter they took out?
I'm curious b/c I too bought this shifter from ebay. I haven't installed it yet, but mine seems pretty tight. Let me know your thoughts.
-
Yeah, I'd certainly put a freeze on that check ASAP until the diagnosis is made.
-
you may also want to put some loc-tite on the screws so they don't come loose
-
Ben
are you talking about this thread:Top fail to close properly
If this is the issue you are talking about, your problem is a leaf spring that has become to loose and does not pull the roof fabric sufficiently.
Here is the picture of the spring
What you need to do according to the TSB is remove it and flip it other before installing it back
you should also apply lubricant to the place the spring pushes on the roof
Hey, you owe me royalties for my picture :( - just kidding. Glad it's helping someone out :)
-
Is there an easy way to connect the headlight switch to the ignition switch -- so that the lights get turned on/off with the ignition, i.e., making it possible to just leave the headlights on all the time without worrying about a drained battery.
-- peer
don't know for sure, but an easier way is to do the DRL hack. Do a search on daytime running lights in the archives and you'll find the hack which requires all of:
2 inches of wire
2 fuse taps
2 female connectors (for fuse taps)
-
2 other things come to mind as well - alternator (but seems like it might be okay) and your ignition switch. Eventhough you are taking out your key, your switch may be bad and is getting the car to 'think' the key is still in there. Ignition switch is pretty inexpensive (about $25 or so) and a known weak link in the boxster. As long as you're a contortionist, you can DIY it. Does your dash (i.e odometer) stay lit well after you remove the key (i.e. 10 minutes)? Do your accessories still work as well? After checking the trunk lights, I'd take a look at this as well. Good luck and let us know.
-
Do you leave the key in the ignition when parked? If so, that'll do it.
-
Wupe,
He probably either reversed the polarity (and thus the phasing of the rears is fighting w/ the dash & doors) or spliced them into either the dash or door speaker wires - which could cause a # of problems:
- rears are only meant for mid to high notes, feeds for doors have a filter in the amp which allows them only to get low (bass notes). think of it as trying to squeeze and egg thru the opening on a wine bottle (not a screw top either
). It just ain't gonna work.- changing the impedence/resistance now placed on the amp if spliced into either the doors or dash speakers. Door speakers are 2ohm - rears as set up by PNP are 2, and dash are 4 ohm. If he spliced them into the doors, they are now have a combined rating of 3+ ohm (thus reducing the 'effectiveness' of the amp and the speakers ability to produce sound - reduced by 1/3 to 1/2) . If spliced into dash feeds, same thing but impedence is now 5+ (vs 4 originally) again reducing the 'effectiveness' of the amp and the speakers ability to produce sound.
I'd either pull the amp and see what the installer did or contact harvey at PNP for help. He is a great guy and glad to help out. You can email him directly - harveypnp at comcast dot net (delete spaces, change @, and dot to .) I think he frequents this board too so maybe he'll see this??
Or, if you can take a picture of the wiring harness at the amp and post here, we might be able to help understand what the installer did. The good news is, most of the hard part is done. Now we just need to help you clean it up and get it all 100%.
Let us know and good luck
-
Badcow-
Not sure if you've solved your problem yet or not, but apparently there is an adjustement you can make to the in/out of the window w/in the frame. I just picked this up on another board and thought it might help you.
"Underneath the door, there is a plug. Remove it and there is a set-screw in there that loosens the window in-out. You only get a few centimeters of play. "
I think I saw something here similar but was posted as part of a message regarding a window regulator.
http://www.renntech.org/forums/index.php?s...l=rivet++window
Scroll about 1/4 down for a post from Mitty on 8/31/04. Thought this might help.
-
post yesterday was fine. see answer below in your original post:
-
I'm trying to upgrade from my 4 X 40 Haes amp to a 6 X 40 Haes amp to power rear speakers. Is there a difference between M490 996-645-321-00 and M680 986-645-312-00? Or does that only mean one came from a 996 and the other from a Boxster. Will either one work equally as well? Thanks.
The M490 and M680 systems are very different. M680 was the DSP processing system. To use an M680 amp, you'll need the DSP (Digital Sound Processing) control panel (where the batwing is) in order for it to work - along w/ the harness.
You need to match the type of amp w/ what you have currently for as close to plug-n-play as you can get. Also, when upgrading from the 4x40 to the 6x40, you'll need to trip a few key tabs from the connector, but that's very easy to do.
I presume you're refrencing the M680 amp that was advertised on Ebay? I saw it too and sent an email to the seller mentioning that they should clarify what systems it will work with. No response, but I'm not surprised. If I recall, their feedback rating was 1. After this sale their postive feedback rating will probably be 50% unless they clarify.
Good luck finding the correct amp. There are plenty out there but I wouldn't pay over $75 for one. You'll
enjoy the extra power to the rears.
-
Badcow-
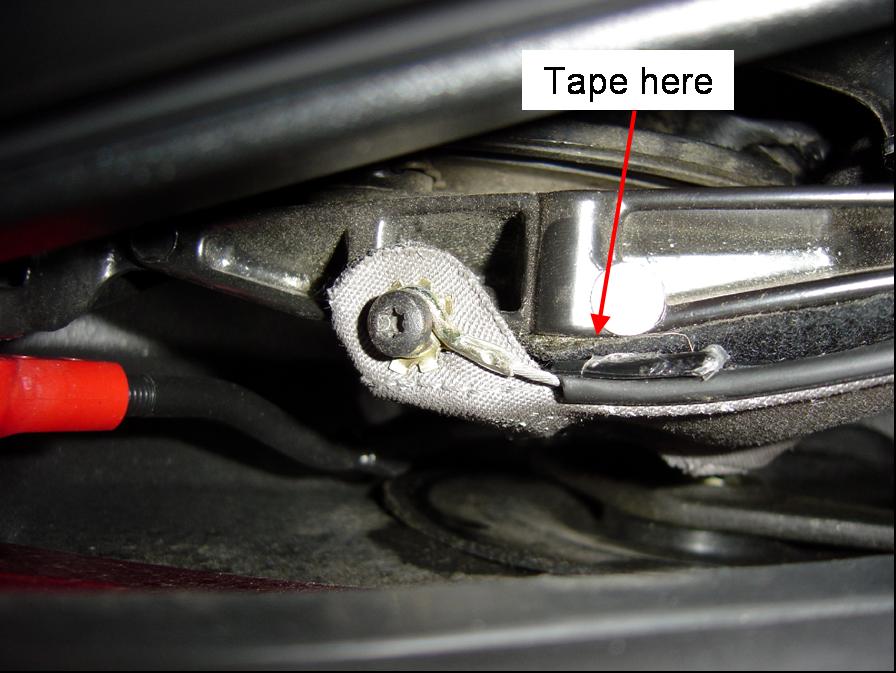
Per the PM, here are pictures from driver's side of vehichle w/ top opened all but about 12". The torx screw, cable and metal piece are almost dead even w/ the slide tab for the clamshell.
Close up of red circle. You can see the clear packing tape I put on LY is starting to show signs of where. At least next time, I'll know right away where to look and replace. Your existing piece of clear tape is probably just flapping away right there.
Take a look and let me know if this solves your problem


 ). It just ain't gonna work.
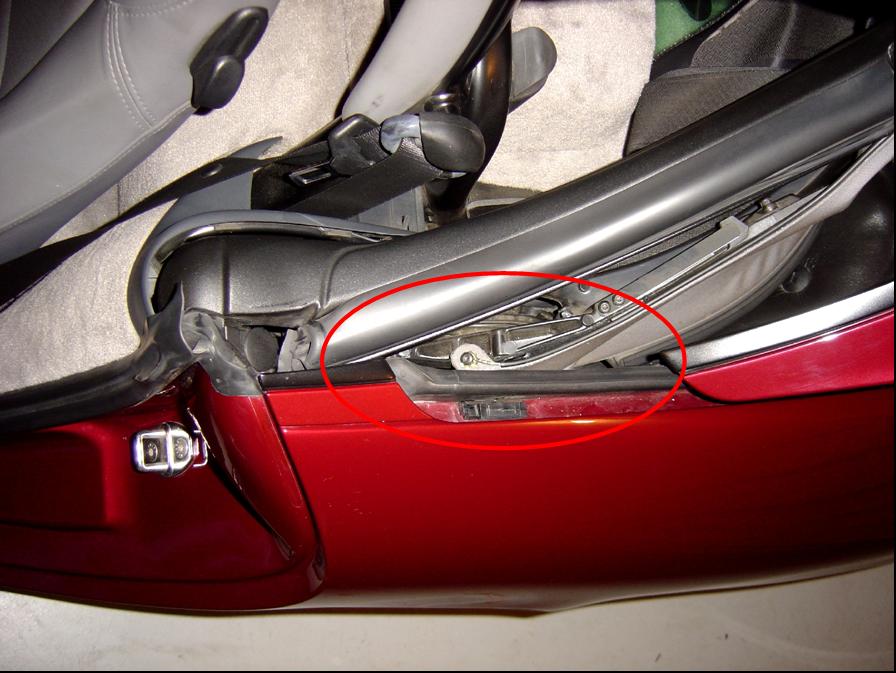
Sunday Question
in 986 Series (Boxster, Boxster S)
Posted
I think you are asking if this would be a good place to get power for the ipod you plan to run thru your CD220's AUX In? If so, yes this is the spot and is much easier than running a 'fuse extender'. Becker sells whats called a telephone power harness/cable and this is where it plugs in. As you can see, there is no need to buy it. Just use the wiring schematic from above to get the power (switched w/ ignition or constant) and ground for your add-on item (ipod).
Good luck and enjoy your new tunes!