Welcome to RennTech.org Community, Guest
There are many great features available to you once you register at RennTech.org
You are free to view posts here, but you must log in to reply to existing posts, or to start your own new topic. Like most online communities, there are costs involved to maintain a site like this - so we encourage our members to donate. All donations go to the costs operating and maintaining this site. We prefer that guests take part in our community and we offer a lot in return to those willing to join our corner of the Porsche world. This site is 99 percent member supported (less than 1 percent comes from advertising) - so please consider an annual donation to keep this site running.
Here are some of the features available - once you register at RennTech.org
- View Classified Ads
- DIY Tutorials
- Porsche TSB Listings (limited)
- VIN Decoder
- Special Offers
-
OBD II P-Codes - Paint Codes
- Registry
- Videos System
- View Reviews
- and get rid of this welcome message
It takes just a few minutes to register, and it's FREE
Contributing Members also get these additional benefits:
(you become a Contributing Member by donating money to the operation of this site)
- No ads - advertisements are removed
- Access the Contributors Only Forum
- Contributing Members Only Downloads
- Send attachments with PMs
- All image/file storage limits are substantially increased for all Contributing Members
- Option Codes Lookup
- VIN Option Lookups (limited)


Cassiebox
-
Posts
315 -
Joined
-
Last visited
Content Type
Profiles
Events
Forums
External Paint Colors
Downloads
Tutorials
Links Directory
Collections
Store
Posts posted by Cassiebox
-
-
Hello all,
My 98 Boxster has recently developed a problem with fueling at the gas station. While pumping gas I get a back pressure that stops the nozzle. I can only fill the tank by very slowly metering the gas flow. Is there a vent that is blocked?
Things I have tried:
checked fuse E6 and it's ok
taped the phone connector under the console
tried different gas stations
All suggestion are appreciated.
Regards,
Khoov
Unfortunately, sounds like your issue is the one in the tank. What happens is the flexible tubes of the fuel sending unit move and block the flapper valve from the filler neck. If you're a contributing member here at renntech.org (which is a good idea BTW ;)), check out TSB 3/99 2015
The fix per the TSB is:
"Affix the two flexible hoses in the fuel tank exactly as shown in Figure 1, using two tiestraps."
It involves pulling the fuel sending unit from the tank.
-
call sunset or suncoast for the part # - they sell at cost plus x% (usually 15-20% - not a triple digit % like your local dealer might/will). Sometimes the microswitch can be repaired by soldering the contacts again or just a good cleaning so try that route first.
Anyhow, to remove the piece, use a fingernail and gently pry out the 2 black shiny eyes. Then loosen the T-30 torx screws in each eye. It'll pop right out then. There are 3 plugs behind it - light, microswitch and motion sensor.
HINT - do not over tighten the screws when reinstalling. The retaining nuts split easily. To see what's all entailed to replace the nuts (without having the windshield removed :(), take a look at this write up I did (Mike Focke has been kind enough to host it - copy also attached). It also explains how how to pull down the housing on pg2. Again - use it as a reminder to not over tighten the screws when you put them back in ;)
Repairing the Broken Retainer Nuts in Windshield Header - Hosted by Mike Focke
-

[hijack]
are those blue or black mats w/ silver thread? I was looking for a picture just like that somewhere else. They look great (and clean ;)) :D
[/hijack]
-
Most people just cut / modify the existing bracket to house new speakers.
Certainly there are "replacement" bracket kits out there and to each his own but.....
- why spend that much $ when you can easily modify the bracket for free?
- you'll never ever go back to stock once you pull out the stock speakers and see how really pathetic they are!
- replacement brackets (the add-on kind like vfbox) will reduce the available mounting depth for replacement speakers and on some MYs there is already a clearance issue on the passenger side speaker ;)
So..... I'd just modify the existing bracket like others are suggesting.
Here's a link to the instructions I used
Good luck and congrats on your new to you Boxster. They're truly great cars.
Enjoy and post some pics of your ride soon :)
-
Hahahahha...That is great man!
BTW, I gave it a try today... Jacked the car up through the alternative jack point (pic below) on the left side, but as I raised the jack to get enough clearance to put the stands, the jack felt very unstable (pulling towards the car!) Is this normal? Well, I didnt think so... So I had the beers and came back in!
Is my jack too short for my stands, or is the load capacity too low? Could it be the surface of my garage? This is my jack Craftsman 2-1/2 Ton Floor Jack, Low Profile and these are my stands Craftsman 2-1/4 ton Jack Stands....
Well, the owner manuals state that the jack (2.5 ton load) will go as high as 14.2 inches (360.68 mm) and the stands as low as 10-5/8 inches (270mm). I am using the stands at their lowest.
Yes perfectly normal (the lifting arm is not variable in length so the higher you go, the closer the base needs to get to the vehicle). This is the main reason it's on wheels too. Otherwise as it lifted, it'd try and pull the car towards the jack - not good if the other side were up on stands, huh? B)
Jacks are always "upredictable" and a little unstable - thus why you should never ever ever work under a car unless it's supported by stands. As an extra safety precaution (when pulling wheels) is to lay them on their side underneath the rails.
-
Hey All,
Just wondering if anyone had any info on the Xenonmods site? I placed an order back in mid February for a couple of items, paid for it with Paypal, Paypal show the payment was sent - but i still haven't received the stuff. I have sent a couple of emails but not heard anything back. The website states that stuff is shipped within 24-48 hours and could take upto 5 business days, but i placed the order on February 14th (happy valentines day to my car!)
Are they still in business? Has anyone had any recent experience with them?
I am sure there is a logical explanation but i am a little annoyed that i haven't heard back from them if there was a delay in shipping.
Thanks
Martin
Martin-
Sorry to hear of your troubles and unfortunately there are a # of bad apples out there trying to make a few bux. I bought a kit from www.xenondepot.com (now called KB car stuff IIRC) for another car. Shipped ASAP, quality is great and price was fair. Steve the owner answered a # of questions I had before hand and communicated every step of the way w/ tracking info, etc. They are a board sponsor for a few non P-car sites I visit and everyone has given them good reviews. Might want to give him a shout if you're still going to do the mod. (PS - I know in the past he's helped people out in the past who bought kits of lesser quality and got stiffed). Top notch guy in my experience..... Good luck :)
-
Any ideas on maybe polishing it clear again? Dremel tool maybe?Sorry, but I think you are out of luck. Porsche does not sell them separately.
You might try someone with a bad knob and good shift pattern or a salvage yard.
That should work but might try using some meguiars plastx on it first (or novus or another type of plastic polish by hand). If those don't work, try lightly wet sanding w/ a super fine grit and then polish w/ a dremel buffing pad. Good luck and let us know how it goes.
-
I think I follow u Cassiebox. However, If the previous owner never hooked up the rear channels from the H/U to the amp, I would be getting no sound at all out of the door, right? I guess my question is, how many sets of speaker leads should be going from the H/U to the amp? I would assume 4. If there are 4 channel outputs from the amp and they are all wired to their respective speakers, how could it be possible for the doors not to get 40 watts? Nothing was done between the amp and the dash or the doors so my problem then must exist between the H/U and the amp. There are no rear speaker additions. Anyway, I'm gonna pull the H/U after work and see what I can find.
Matt
Definitely pull the h/u to see how many pre-amp leads go from there to the amp - it should be 4 (FL, FR, RL, RR). Might be hard to trace b/c in the OEM set up Porsche used a common ground for all 4 channels from the h/u (splits out into 4 separate - leads before the amp). None the less, it should be 4 + leads.
If the rear channel is not hooked up, you would still hear some sound. Again, the doors are driven by combining the low level leads from both front and rear channels from h/u in the amp. If only the front is hooked up, then the doors are still being fed the same power by the amp but only 1/2 the signal is sound. Simplistically, think along the lines using an iPod w/ only one earphone for 2 ears I guess.
Anyhow, here's a quick scan of the schematic from the Bentley manual on the M490 system in a '97 showing radio (top) and amp (bottom) which should help you reverse trace what's connected and what's not.
-
bet the key was a little harder to pull out or insert too huh? sounds like ignition switch is going bad. Easy DIY for under $20....
the p/n needed is here in the archives - just search on ignition switch and look for a post by Tool Pants or Loren. Good luck :)
-
I think your answer is in the fade.........
Regarding fade and the stock system............
OEM door speakers are driven by the amp obviously, but it's by combining the front and rear channels from the h/u. In a stock system if you faded 100% to either front or rear, the doors are even more non-existent. (It's tough to tell if the stock door speakers are working even w/ everything hooked up correctly). This is the case regardless if you have rear speakers or not. If you don't have rears, maybe the previous owner decided not to hook up the rear channel from the new h/u to the amp? I'd check as it seems most likely the source of your problem.
Assuming you bought the Infinity Kappa 62.7i, the specs are.....
Sensitivity 95 dB
Frequency Response 45 - 25k Hz
RMS Power Range (Watts) 2-75
Peak Power Handling (Watts) 225
Impedance (Ohms) 2
I used Kappa 652.7i (6 3/4") which have identical specs:
Sensitivity 95 dB
Frequency Response 45 - 25k Hz
RMS Power Range (Watts) 2-75
Peak Power Handling (Watts) 225
Impedance (Ohms) 2
Mine are driven by a stock amp as well and sound supremely better than OEM. With the RMS of 2-75W, the stock amp (40W max) has enough power to drive them - obviously not to peak but enough to sound good - especially w/ the 95dB response and 2Ohm rating of these speakers.
Polarity (hooking up the + / - in reverse) could also be a minor issue as the phasing would "fighting" w/ the dash but I'm not sure that's your issue. I bet it has to do w/ no signal from the rear channel of the h/u to the amp. Pull it and take a look.
-
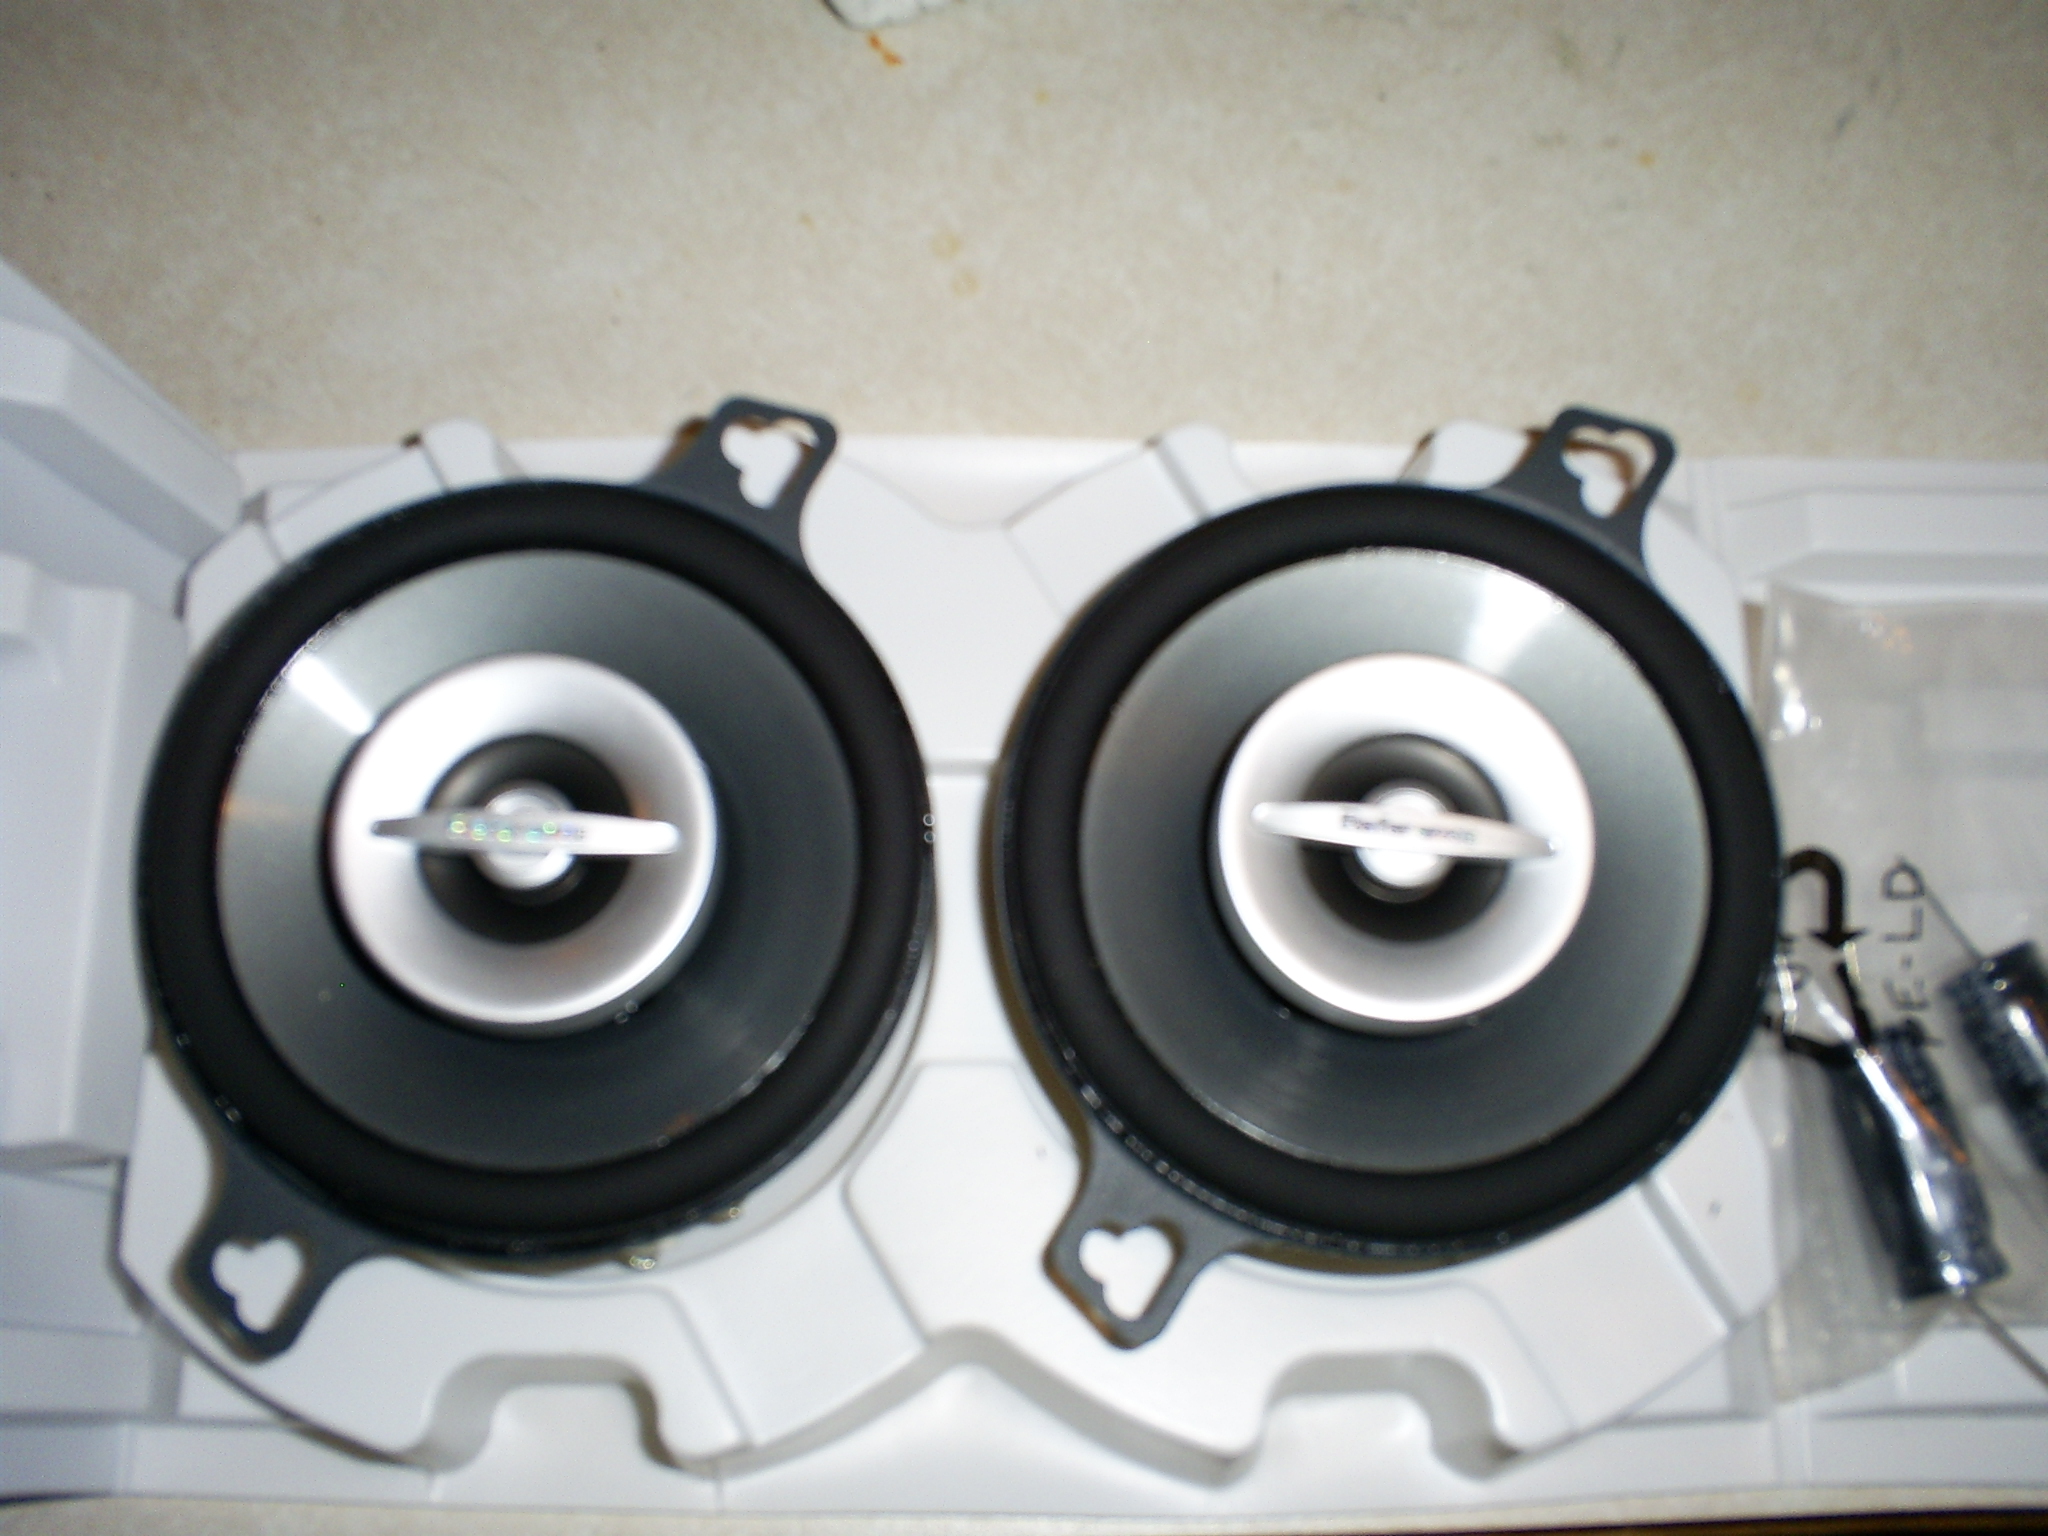
Hey guys, finally changed out my door speakers yesterday. The install went fine but I'm sort of bummed out with the sound. I did the left door first and put it back together so I could compare it to the stock right side. After using the balance feature to listen to them independently I honestly could not tell the difference between the stock and the brand new Infinity Kappa 6.5" 2-way that I put in. Maybe I expected too much or maybe I just need more juice. The dash speakers (also Kappas) sound great but they still sound like they completely overpower the doors. Another thing is that the speakers came with there own independent crossover unit which I used. Probably don't need it though because the doors only get lows from the amp anyway. WOndering if any of you guys have swapped in 6.5's in the doors and if u had very noticable improvement over the stock. I'm no audiophile but I really can't tell that its any better. My only other theory is maybe that channel on the amp is either not functioning or not putting out the full 40 watts. It is a '97 and that amp is 11 years old. Is there any sort of testing device for checking the output (wattage) of an amp? Thanks in advance for any help.
Matt
Couple of things....
Are you sure fader is set in the middle? Alos, I'd be more inclined to hook up the other side too before making a "call on their ability" so the system runs balance. Some OEM door speakers are 4Ohm - others 2 and the Kappa's IIRC are 2.
How did you mount them? If in the stock tuned port that might explain why b/c they aren't getting sufficient air flow. I put Kappa 6.75" (basically same as 6.5") on a wood baffle in the doors and couldn't be more pleased w/ how dramatically better the sound is. I did not use the crossover - just wired up the woofers only and all powered by a stock amp.
-
Cassiebox, do you have any idea what the part no. is for them?? Thx, Jon
try Sunset Porsche in OR or Suncoast in FL. They usually have the best prices.
Here you go for the 986 (I might have the sides mixed up but don't think so):
Driver side: 986.504.393.0001c
Pass side: 986.504.394.0001c
For reference....
Pelican shows at $57.75 ea
Suncoast shows $44.95 ea (I swear this just went up as I recall getting p/n for someone else recently)
Don't know what Sunset (in OR) is but I've found, even w/ shipping, they are usually a couple $ cheaper. Just email them from their site http://www.sunsetimports.com/porscheparts.php or Jeff Clark Directly at JeffClark@sunsetimports.com
I've also found that if the back flaps are mashed, the front ones (in front of wheels) probably are too. So, you might want think about what other parts/upgrades/maint you can order at the same time to save on frt ($7-10 flat fee based on zip). For instance, do you have the (OEM) Euro cig lighter which allows US plugs to fall out? For $13 you can change it out. How about filters (cabin & engine) and serp belt? Plugs? Is your AOS starting to go bad?
Good luck :)
-
Where can you get the rear mud guards?
try Sunset Porsche in OR or Suncoast in FL. They usually have the best prices.
-
I'm looking for a site or info where I can find the complete codes for a 99 boxster. I have gone to the 986 forum but I still can't find the codes. These are the codes I can't find 032, 218, 232 ,429, 434, 584 and 912. Thank You
Mother list of option codes...
Confirmed ones I know......
232 - 17" alloy wheels
584 - rear storage box/shelf (above engine)
Unconfirmed ones I found here ....
218 - front/rear license plate brackets
429 - fog headlamp white
434 - instructions for export market
912 - vehicle w/out ID plate
Could it be this was a Euro delivery by original owner? Where are you located if I might ask (says he w/ a '99 that might be for sale ;)) Hope this helps and good luck in your Boxster search. There are lots of good ones out there :)
-
To answer you both.......
The 6x40 amp is really only beneficial to those w/ rear speakers so they can be powered by the amp equally w/ the rest of the system. Otherwise people run the rears off the h/u which is only 18W. Basically, it's the same as the 4x40 stock amp just 2 extra channels. Still has the crossover for the door speakers (only sends them lows) and is only 40W. To transplant, yes all you need to do is trim off 2 tabs in the 6x40 amp (very easy) so it accepts the 4x40 harness in the car and run the rear speaker leads to the harness.
M490 and M680 are based on different architectures. In a nutshell, the M680 is the DSP (Digital Sound Processing - IIRC) set up which includes the 'batwing' controller (in console) to create different "accoustics". If you're still unsure which you have, you can either unbolt your existing amp from the front trunk wall and read the label or look at your options sticker - both are clearly marked as either M490 or M680.
Now, having said all that remember..... the weakest link in most OEM sound sytems (believe me Porsche is not an exception but more like epitome of the rule) are speakers. Then the amp and finally components. Simply put, the stock speakers Porsche uses are C-R-A-P. The speaker from a Days Inn alarm clock could put them to shame..... small magnets, paper cones, little range.
If your serious about upgrading your sound system without spending a fortune, change out the speakers - dash and doors. Dash will take 4.25" and require some quick/easy mods to fit as the OEM is a molded basket (much info in the archives here - especially under DIY Section - Upgrading Boxsters Sound Sytem post by Andy M).
The door OEM "tuned" port takes 5.25". You can take the long route, like I did, and try to find better sounding 5.25". Almost all fit.... none sounded better (2 sets were worse, 1 was same as OEM). Hold up here is power and range. 5.25" speakers, by their very nature (b/c of size), can't produce low end w/out lots of power. Lots of power takes takes you back to the amp - 40W peak is not considered lots. So..... the alternative is to upgrade to 6.5" or 6.75" (plenty of room too). 6.5 or 6.75s can produce lower frequencies w/ out nearly as much power. Make sure you get efficient speakers (high sensitivity rating 92dB+ and low resistance - 2ohm w/ a range below 50kHz) so you can maximize the 40W you have available from the amp. Using some plywood and sound deadner (Dynamat et al) make a baffle to mount them on and install in OEM location - even using only the OEM mounting holes if you like. Again, much info in the archives here - especially under DIY Section - Upgrading Boxsters Sound Sytem post by Andy M. There's even a template for the baffle there ;)
With only a few hours (and seriously I mean only a few) and for under $300 you can have a sound system in your Boxster that looks stock but sounds great. Who would of thunk hearing bass w/ the top down at hwy speeds was even possible :o .
Good luck and very rewarding :)
-
Matt-
As an FYI, make sure the amp you buy matches the system you have (i.e. M490 or M680) as they are not cross compatible. FWIW, I have a transplanted 996 6x40 amp in my '99 986. It's nice to have and the swap was easy but in reality don't over pay for one. They truly aren't worth more than $50-$60 delivered. I've seen people bid them up over $100 and at that price, you can easily get something aftermarket which will fit your needs much better. Good luck ;)
-
P.S. I'm subscribing here cause my remote doesn't' work on the trunk.
Same w/ both keys? Do you hear the actuator clicking when you hit the button? If so, your issue is a frayed cable not w/ the key remote. Easy fix if that's the case.
-
Hey guys, anyone know of anyone whos looking to sell a HAES 6-channel amp? If theres none out there anyone know of a decent 6 channel amp I could throw in the boxster that's not gonna require any crazy mods. Not looking for a ton of juice either. 40 to 50 watts per channel would be fine. Thanks in advance.
Matt
there was one on ebay last weekend that ended w/ 0 bidders and a price of $.99 + like $20 shipping. Might search on recently ended auctions and contact the seller directly. Good luck :)
-
I saw some of these on ebay but was wondering if any of you had them on your boxsters? I need a set because here in Texas they are needed. Any suggestions of were else I can find them? I have a speed yellow 2004 boxster. Thanks in advance
Most people just make their own using either plastic or wire mesh from a local home improvement store and hot glue or epoxy them on the back side. You can pull the bumper cover off easliy and trace for a custom fit (search "radiator cleaning" or "bumper cover" for instructions). Remember though, since you're in a warm climate, if is you use too tight of a weave you will affect the air flow and cooling capacity of the radiators.
-
Try the search function as there are lots of threads on this subject...
Here's a great DIY write up by Andy M on a general overhauling the Boxster's sound system. There are more specifics in the archives on how to mount new dash speakers to the OEM baskets (a couple of choices - whichever you're more comfortable with)
http://www.renntech.org/forums/index.php?showtopic=9613
Good luck and enjoy your new system when finished.
-
at almost 4 yrs old..... which in "most" car's lifetime = 60K.... not a bad move especially if they were fouled.
-
I have a 2001 Boxster. When I use the fog lights my left turn signal does not function. There are no other symptoms that I can see. Is there a relay or something that needs replacing?
are you sure it's only when you use the fogs? Or does it happen when you use the headlights or parking lights too? Is so, then your side indicator bulb is probably burnt out. Pull out the side marker and check the bulb or swap the bulb w/ the other side to test.
-
Glad that u got her back working. What u should've ordered is really M490 6 CH amp with your PNP kit.
I would check your polarity. something is not right , probably PNP adapter terminal I'm thinking.
please don't take this in a wrong way, after all that hassle + $ your system isn't even working? My personal opinion is any leading 3 1/2" round speaker will sound 100 times better than a PNP kit . Perhaps this handsome INFINITY,,,
OK, cheers. Actually, my system is all working. From what I understand, the stock door base speakers are very quiet indeed (can anyone confirm this?). My new amp (same as blown one) actually is a Becker 6 Channel amp. I just need to connect the new PNP rear speakers to it and look forward to sound behind me...
stock door bass speakers are very quiet. They're only 5.25" which is severly undersized for trying to get low end - especially when only powered by 40W. I'm not 100% about the most system, but I know in pre '03 MY, the doors are driven off a combined signal of the front and rear channels from the h/u. Therefore if you fade to either all front or all rear - you'll get next to nothing out of the doors. To get the most possible from the stock door speakers, it's best to set the fade to the middle.
-
Did you use a relay when installing your lits in the high beam? I suspect not (plus I checked out the link you posted and looks like the kits don't include a relay - just the ballast and ignitors) ;) .
Although the OEM wiring harness might be able to handle the increases needed (when igniting the xenons) it's best to still power the ballast/ignitors directly from the battery thru a relay. This will not only protect the OEM harness, but also isolate their circuitry. On the low beams, the ground is isolated within the circuit so it's not a big deal. On the high beam though, the ground is shared and tied in with the fog (see pic below). Since most warning/idiot lights in the car are triggered by grounds (brake pad wear, e-brake, etc.) I presume the high beam indicator is too. So, w/out a relay in the kit, and assuming your ballast/transformer in the kit is grounded (as it should be), your indicator light is being triggered by the false high beam circuitry. Meaning, once you turn on the fogs, it's going directly thru the "false" high beam circuit to the ignitor, back to the ballast and then to ground. I'd add a relay to one side and disconnect the other to see if it fixes like I think it should.
On another note, I'm not so sure converting your high beams to lits is the best choice. Most retrofit mfgs even recommend agains this because:
1) HIDs do take more than "a second" to fully ignite and reach their desired light output. In situations where you need to flash someone your HID hid high beams will not be very functional.
2) It is strenuous on the components to have them turned on/off repeatedly ie: needing to flashing people.
Anyhow, here's the schematic showing the shared ground which I think is causing the problem. Obviously it's a little more complicated than my brief explanation above, but hopefully you understand the concept. Good luck :)


Much smoke on start up and run - AOS or worst?
in 986 Series (Boxster, Boxster S)
Posted
The part # on it will tell.
Original OEM on '97 had a .00 ending (not sure when 1st revision was released but it may have been for early '99s ???). They are currently (as of last summer when I R&R'd mine) on part # .04 part (so 4th revisions to original design). Easiest visual difference b/w the .00 and .01 (along w/ all subsequent revisions) is the orientation of the "centrifuge". On the .00 it was horizontal as shown in this pic (looking down into engine compartment from bird's eye view):
In later versions, it is vertical (as shown here comparing the .01 to .04 parts)
Hope this helps. :)