Welcome to RennTech.org Community, Guest
There are many great features available to you once you register at RennTech.org
You are free to view posts here, but you must log in to reply to existing posts, or to start your own new topic. Like most online communities, there are costs involved to maintain a site like this - so we encourage our members to subscribe or donate. All subscriptions and donations go to the costs operating and maintaining this site. We prefer that guests take part in our community and we offer a lot in return to those willing to join our corner of the Porsche world. This site is 99 percent member supported (less than 1 percent comes from advertising) - so please consider an annual subscription or donation to keep this site running.
Here are some of the features available - once you subscribe RennTech.org
- View Classified Ads
- DIY Tutorials
- Porsche TSB Listings (limited)
- VIN Decoder
- Special Offers
- Paint Codes
- Registry
- Videos System
- View Reviews
- and get rid of this welcome message
It takes just a few minutes to register, and it's quality Porsche information at a low cost.
Contributing Members also get these additional benefits:
(you become a Contributing Member by subscribing or donating money to the operation of this site)
- No ads - advertisements are removed
- Access the Contributors Only Forum
- Contributing Members Only Downloads
- Send attachments with PMs
- All image/file storage limits are substantially increased for all Contributing Members
- Option Codes Lookup
- VIN Option Lookups (limited)


markthis
-
Posts
5 -
Joined
-
Last visited
Content Type
Profiles
Events
Forums
Exterior Paint Colors
Downloads
Tutorials
Links Directory
Collections
Classifieds
Store
Everything posted by markthis
-
 Sorry for the late reply, but what if the door buttons are not original? And your module is? I think you should find the Kessy module with the Durametric software first. In my case the module is identified as KESSY. By the way, the KESSY module is not working if all depending other parts are installed too, like antenna's, the right CAN bus, wires.. name it... And if the car is prepared, and you are able to switch the module for an other KESSY, then you need to re-program the KESSY for your keys as well.. :oops: :wrench:
 -
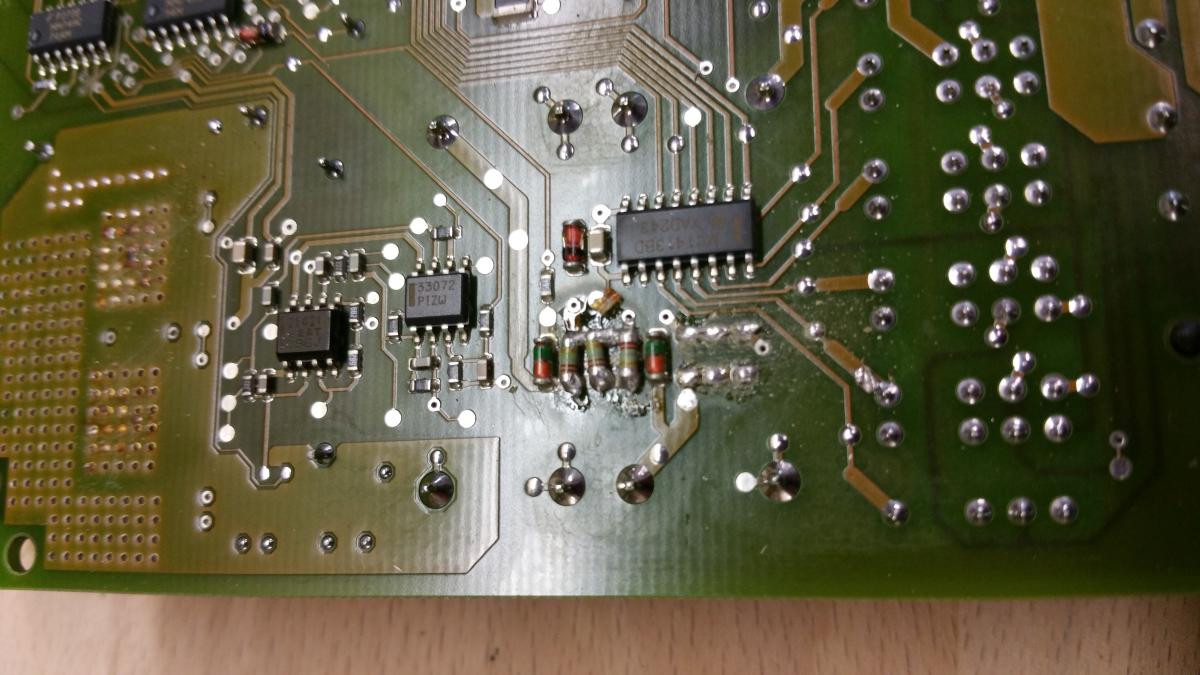
I just want you to know that I was able to fix my Kessy problem as well! :notworthy: Because I did not succeed at once, I want to share my findings. I had to do some troubleshooting. In my first attempt to try soldering the 2 x mosfets (transistors) and the 6 x condensers (2 times, 3 per mosfet), I experienced some issues. I did not had the time to de-solder both mosfets, so I did one, and I replaced all 6 condensers. "Wrong choice" I have to say afterwards, because the fusible condensers will be fried as soon you start the car because of the defect mosfet I did not replace. Result, I had to do all the solder again. After successfully solder the components, I checked the values with the multimeter as well. As the DIY manual described, you can measure the mosfets, but also the condensers should be tested. If you have a different value then 0.2 or 0.22ohm, replace all the 3 condensers as they are parallel switched as group. Test both groups of 3 condensers. Second, some notes you should consider: - Solder condensers: never exceed a temperature of 270 degrees Celcius, otherwise there is a chance you will damage the condenser. Also, find yourselves a solder Youtube education movie; I did, and some solder techniques may help you too (you work environment is scaled on 3 mm!). Good luck! - Solder mosfets: 1) to lose them, you should set the temperature on 470 degrees Celsius (don't use a hot air gun, too much heat, so stick with the solder iron, as of my Iron of 48Watt did the job perfectly), and when you have heat the back plate, put some new fresh solder to it. This will heat up the backplate much easier and you will see that it comes off very easy. 2) to fix them, for the backplate (because I know you will fix the two legs easily), again use some new solder as well. Prevent any contacts with other components on the print. - Resetting the faults codes with Durametric software (v6.0.7) or other, will not help you if the components are broken. I tried more then once! No luck, defect is defect. Also any activation of the kessy when repairing is finished, is not software related. - After installing the whole Kessy module back behind the dash, you want to use the plastic dummy key for testing right? Well, if you are lucky you can. I my case, a no go. I had to drive for 20 minutes, parked the car for a couple hours, and then finally the dummy key worked, and also the door locks! Why? Or some component had to charge for a while, or it is related to security matters (Ex. 60 minutes as when removing a wrong pin code in the PSM to activate? don't know..). I have read that issues may lead to the main battery of the car below the drivers seat, but that one I replaced. What I need to replace is the second battery under the Bose subwoofer, preventing strange behavior of the electrical systems, like power fluctuations which can kill your Kessy as well. - Before replacing the mosfets and condensers, be sure your remote key is working wireless. I have read posts where also the remote key was not working. Then some can be wrong with your key battery (should be 3.2V), or your CAN bus (which communicate with the Kessy). Also the control unit in the back can be defect, which handles too the handshake with the key. If your key is working as a remote, start to do the Kessy repair. Plan half a day to do the whole job. - The parts I ordered as in my former post are the right parts! - Kessy module: when trying to disconnect the two connectors under the dash (drivers site, see DIY), you will find it easy to remove the front small connector i think. The big connector needs more attention, because IN the connector the sleeve lock should be extracted first. You can do this by hand and you will find it on the back of the connector (where the cable is going into the connector). You should pull a bit hard, but gentle and the connector will come lose. Vise versa when you assembling the module again after the repair. For now this is it I think. Best of luck, and yes, you will save a lot of money if you succeed! Mark Below my Kessy module under repair: Mosfets just fixed 3 more condensors to go

-
Many thanks, I did not knew those are the same images. Now all is in place to give it a try :-D - the article numbers :lightbulb: I have contacted Mouser Europe for the parts and yes, they have all the items in stock. The distribution depot is in France, but original it will be shipped from the US. The Mouser part numbers are: 942-IRFZ24NSTRLPBF --> "Title: MOSFET MOSFT 55V 17A 70mOhm 13.3nC (Brand: International Rectifier)." needed 2, ordered 10 71-SMM02040B2207JB30 --> "Title: MELF-resistors 1/4watt, 0.22ohms, tolerance 5%, 200V (Brand: Vishay / Draloric, not Beyschlag, that was the old branding, which took me a while to find)." needed 6, ordered 20 Price of the parts: 14 euro (all on stock) Shipment FedEx: 20 euro (3 working days) :blush: shipment costs are worth the money I think.. (or I had to order 6000 pieces). :wrench: I'll let you know if these parts are correct, after the repair of the Kessy next week. (I had to buy a solder iron as well, so I picked the Velleman vtssc10n for 50 bucks, which a good balance between price/quality, they say on the net... :notworthy: let's find out too!)..
-
Hi clarksongli, Brit6, First I have to say that you have shared a lot of useful information about 'how to fix the KESSY module when it’s failing you' (in my case, in an old Cayenne Turbo), and, when you are trusting yourselves enough to give it a go (to save a lot of money)! I have to say, great reading. All the given information is much appreciated! My Kessy module is giving me exact the same symptoms/ faults as you all described. I will try to do the same, fix it myself, but I think I need your help a bit. I know this is rather an old topic, but still very useful. I have decided to make a shopping list first, because I live in Europe and I have to deal with different distributors. My shopping list will contain the following, as described in the DIY: 1/4W 0.22 ohm Mini-Melf Resistor Beyschlag MMA0204-50AL0R22J – 6 IRFZ24NS FZ24NS HEXFET Power MOSFET International Rectifier - 2 So far it’s clear to me, but, in the DIY the images (as guiding example) are gone, so I do not know where to look at, or how to compare (I’m a noob). Is anybody well known with this manual, or is someone keeping a copy of the images? The images will help me to find the exact location on the print board. A bit assistance is very much welcome. Many thanks!!