Welcome to RennTech.org Community, Guest
There are many great features available to you once you register at RennTech.org
You are free to view posts here, but you must log in to reply to existing posts, or to start your own new topic. Like most online communities, there are costs involved to maintain a site like this - so we encourage our members to subscribe or donate. All subscriptions and donations go to the costs operating and maintaining this site. We prefer that guests take part in our community and we offer a lot in return to those willing to join our corner of the Porsche world. This site is 99 percent member supported (less than 1 percent comes from advertising) - so please consider an annual subscription or donation to keep this site running.
Here are some of the features available - once you subscribe RennTech.org
- View Classified Ads
- DIY Tutorials
- Porsche TSB Listings (limited)
- VIN Decoder
- Special Offers
- Paint Codes
- Registry
- Videos System
- View Reviews
- and get rid of this welcome message
It takes just a few minutes to register, and it's quality Porsche information at a low cost.
Contributing Members also get these additional benefits:
(you become a Contributing Member by subscribing or donating money to the operation of this site)
- No ads - advertisements are removed
- Access the Contributors Only Forum
- Contributing Members Only Downloads
- Send attachments with PMs
- All image/file storage limits are substantially increased for all Contributing Members
- Option Codes Lookup
- VIN Option Lookups (limited)

talkenrain
-
Posts
78 -
Joined
-
Last visited
Content Type
Profiles
Events
Forums
Exterior Paint Colors
Downloads
Tutorials
Links Directory
Collections
Classifieds
Store
Everything posted by talkenrain
-
 Thanks again to the members of this forum. So glad you all are here. THANKS
 -
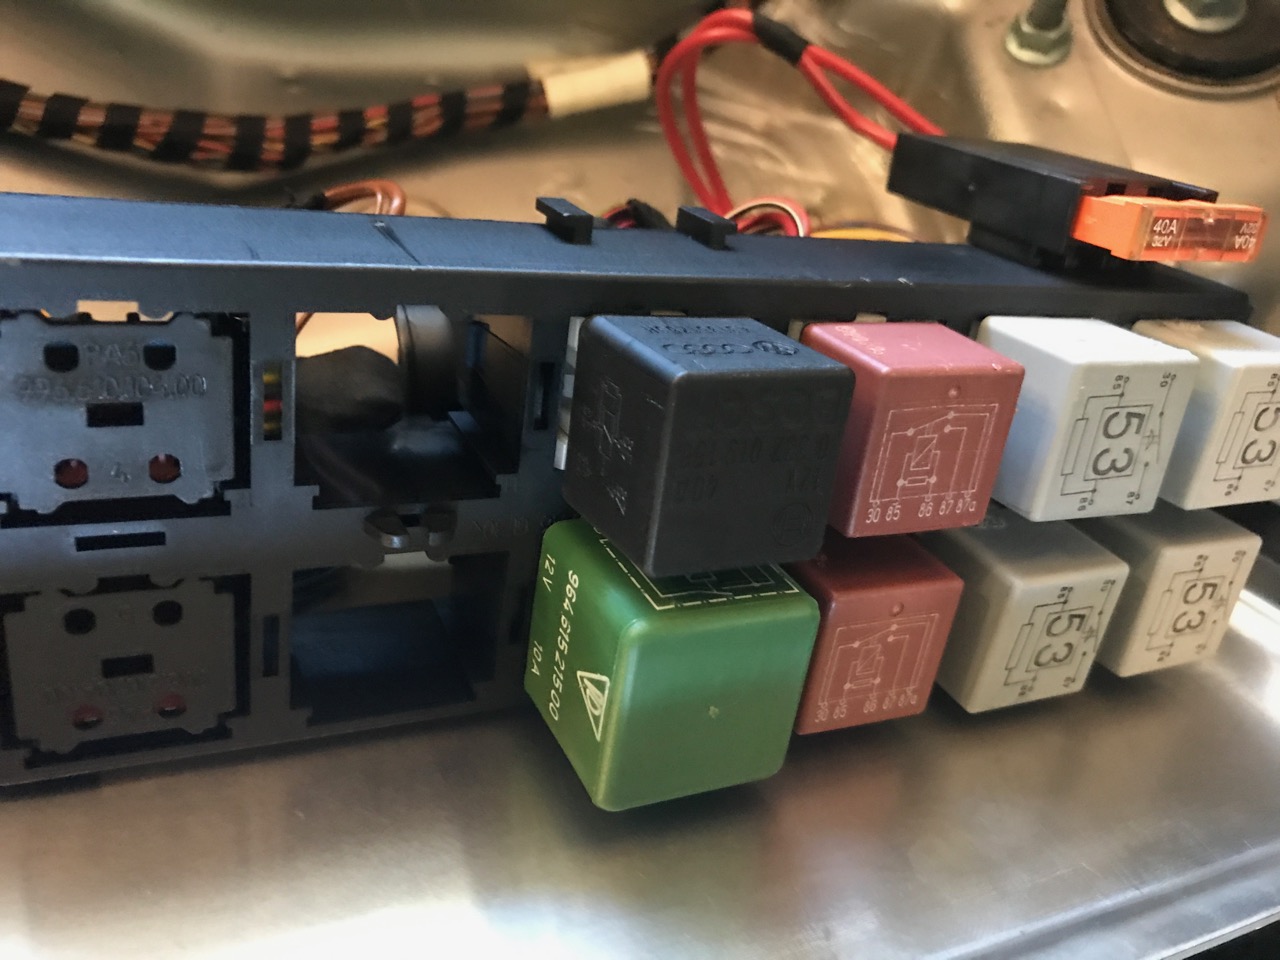
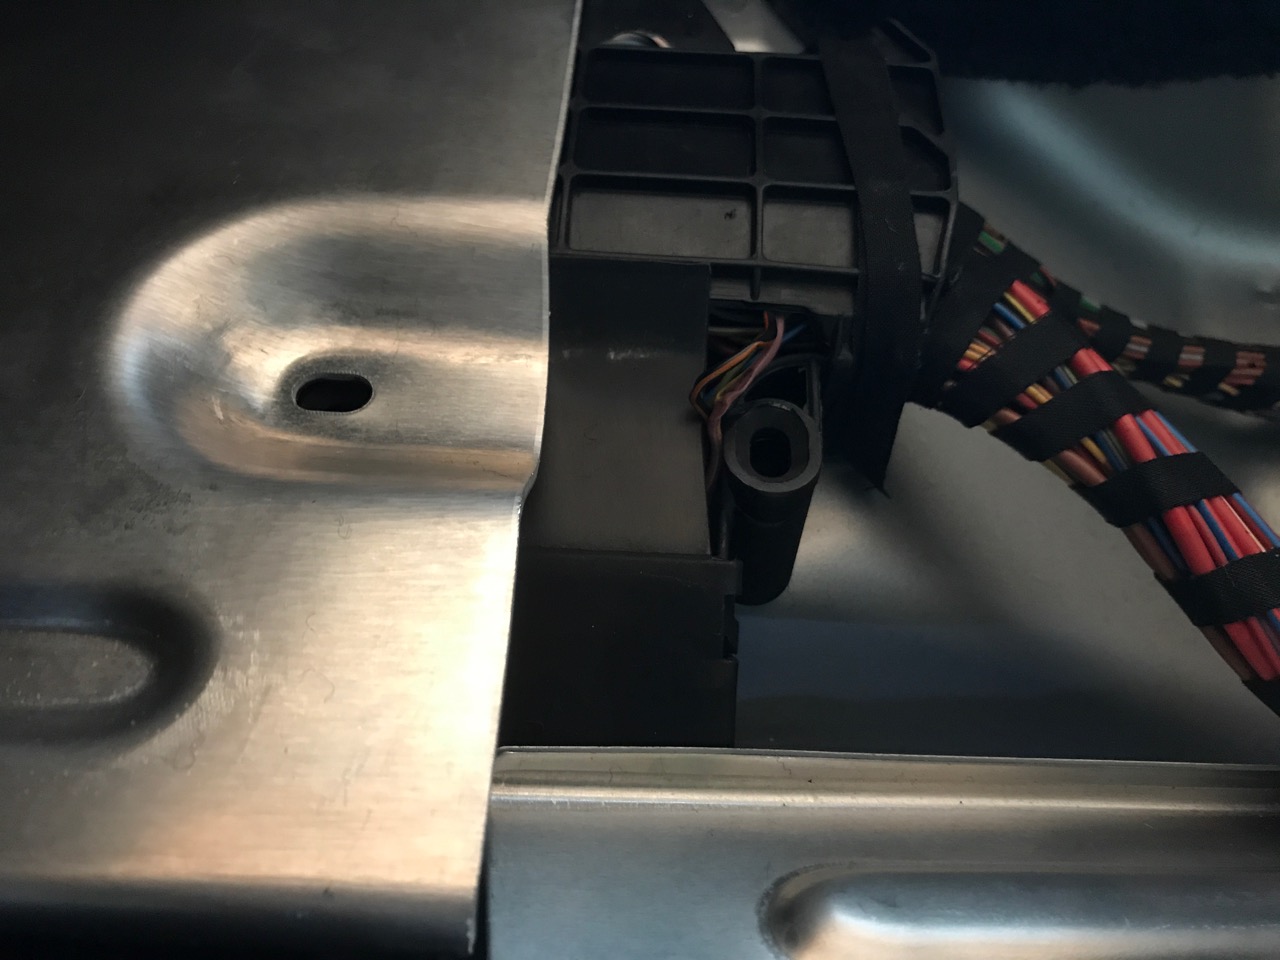
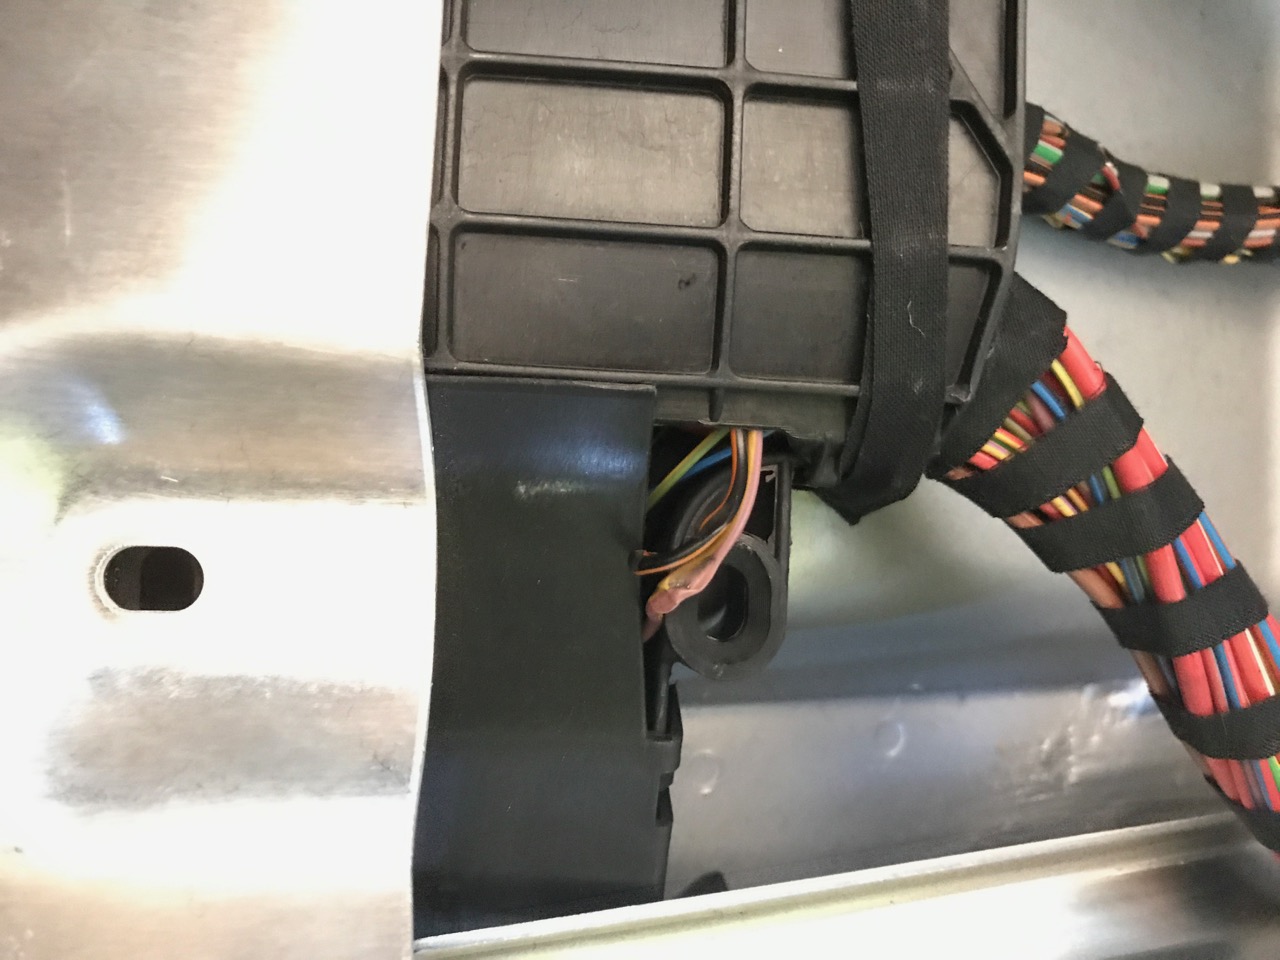
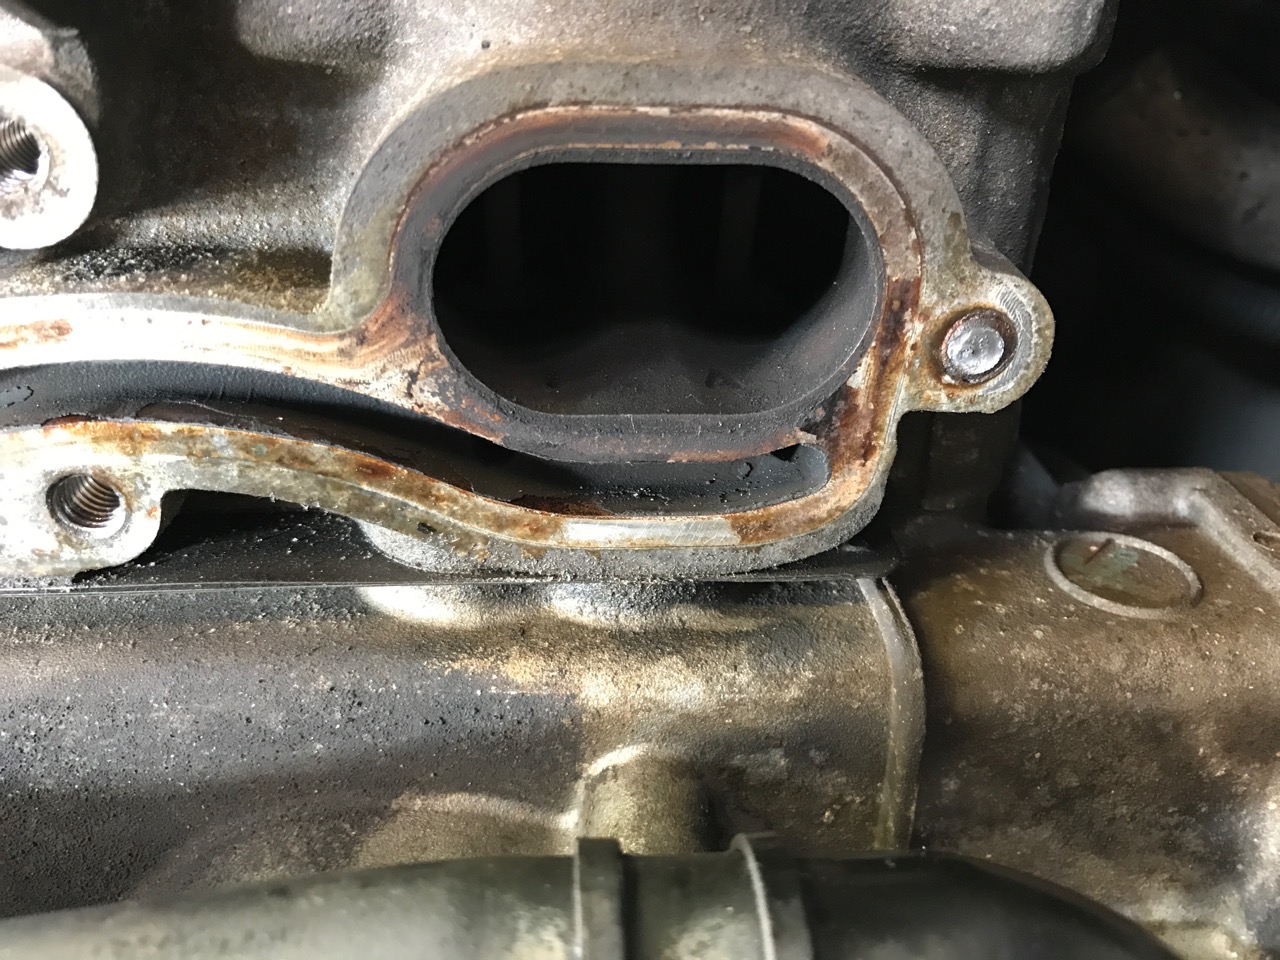
My problem can be marked Solved I'm not sure if the problem was self inflected since i was just recently in the same area (other side) but looking at the pictures of the relay/DME area of the rear deck on the relay side the chamber that houses all the wires had a few stray wires that where not in the chamber and where squished against the large aluminum panel of the relay circuits. I have a heavy subwoofer that sets on top of this area so I think the weight combined with the heat (over 100 degrees here lately) along with engine/subwoofer vibrations wore away the insulation and shorted against the aluminum panel (ground). The wire being shorted was from the "high/low pressure 3 level cooling water switch" (pin 1). This sources 12v to the air conditioner compressor relay (pin 3, violet/yellow) whenever the ignition is on and cooling water switch is in it's normal closed position. This can all be found in the area of L49 of the wiring diagrams. I insulated the wire, made sure they are all in the wire harness, then remounted the relay panel. Short removed, air conditioner and heater fan are both working properly again.

-
Sounds like a great product. I'll try to find one locally. Thanks... although, now that I'm thinking about it I guess I could just use a small 12v bulb across the fuse holder contacts and get the same results.
-
So I removed my fresh air blower. Bench checked it, it checks out fine. I'm going to check the Actuating heat relay and Air conditioning compressor relay tomorrow but I think my problem is somewhere around the 3-level cooling water switch. I don't think it's the air conditioning compressor or relay because I've switched it off and new fuses continues to blow. I tried a new fuse with the blower fan removed from the circuit as well (still blew) So i'm pretty sure I'm tracking down a hard short to ground. I'd be surprised if it's the control unit but I fortunately have a spare to try if needed.
-
D6
-
Ok, thanks. The 30A fuse blew while the air compressor was working. So my new project is to discover if it's the fan motor or the compressor thats shorted. My guess is the fan because I've turned off the compressor from the control unit then replace the fuse but it blew immediately. I'll unplug the compressor and try again to confirm. If you can point me to a wiring diagram, that would be very helpful.
-
I now on the second hottest day of the year am having the same issue. Replace the fuse and the second one piped instantly. I'll pull the relay and check the fan for a short but does anyone have a diagram of what the circuit looks like? Would be very helpful in troubleshooting. Is this fuse only for the fan or does it support other circuits?
-
Thanks, I'll give that a try but now that I've passed the emissions test and have my car properly registered, It's not an issue. I still need to finish taking apart the old solenoid and publish the results. That will be coming soon.
-
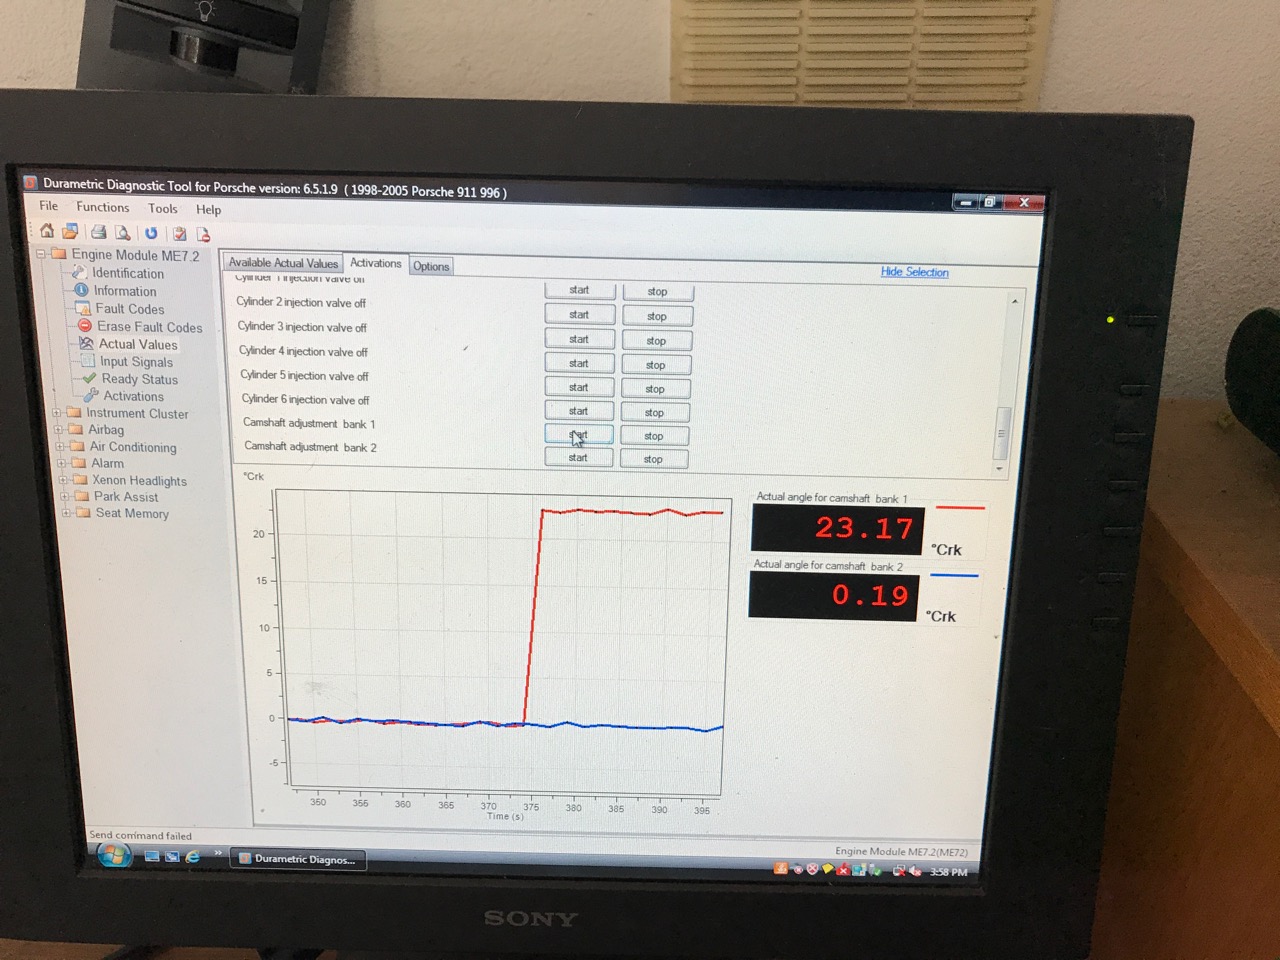
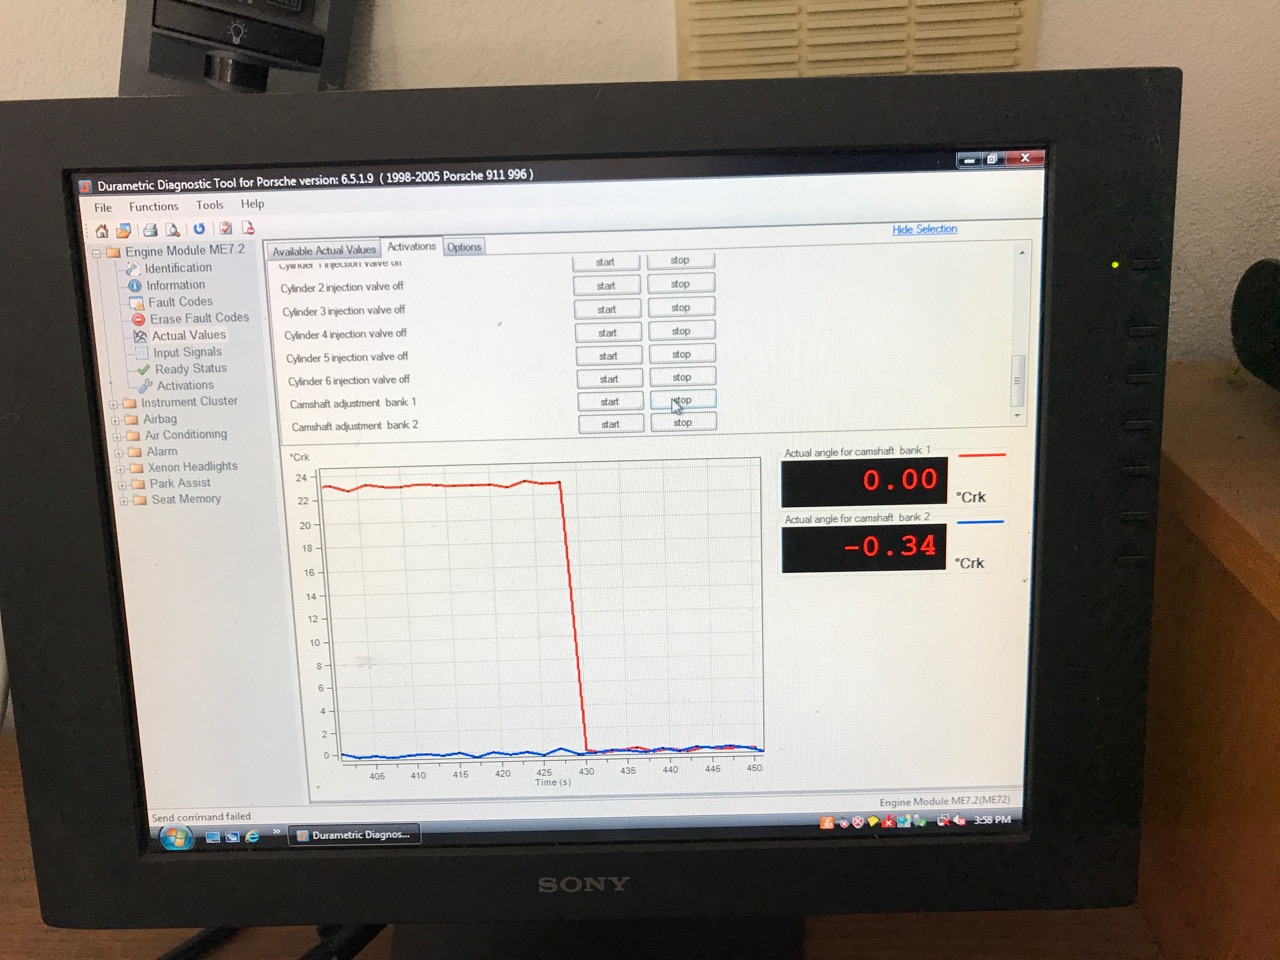
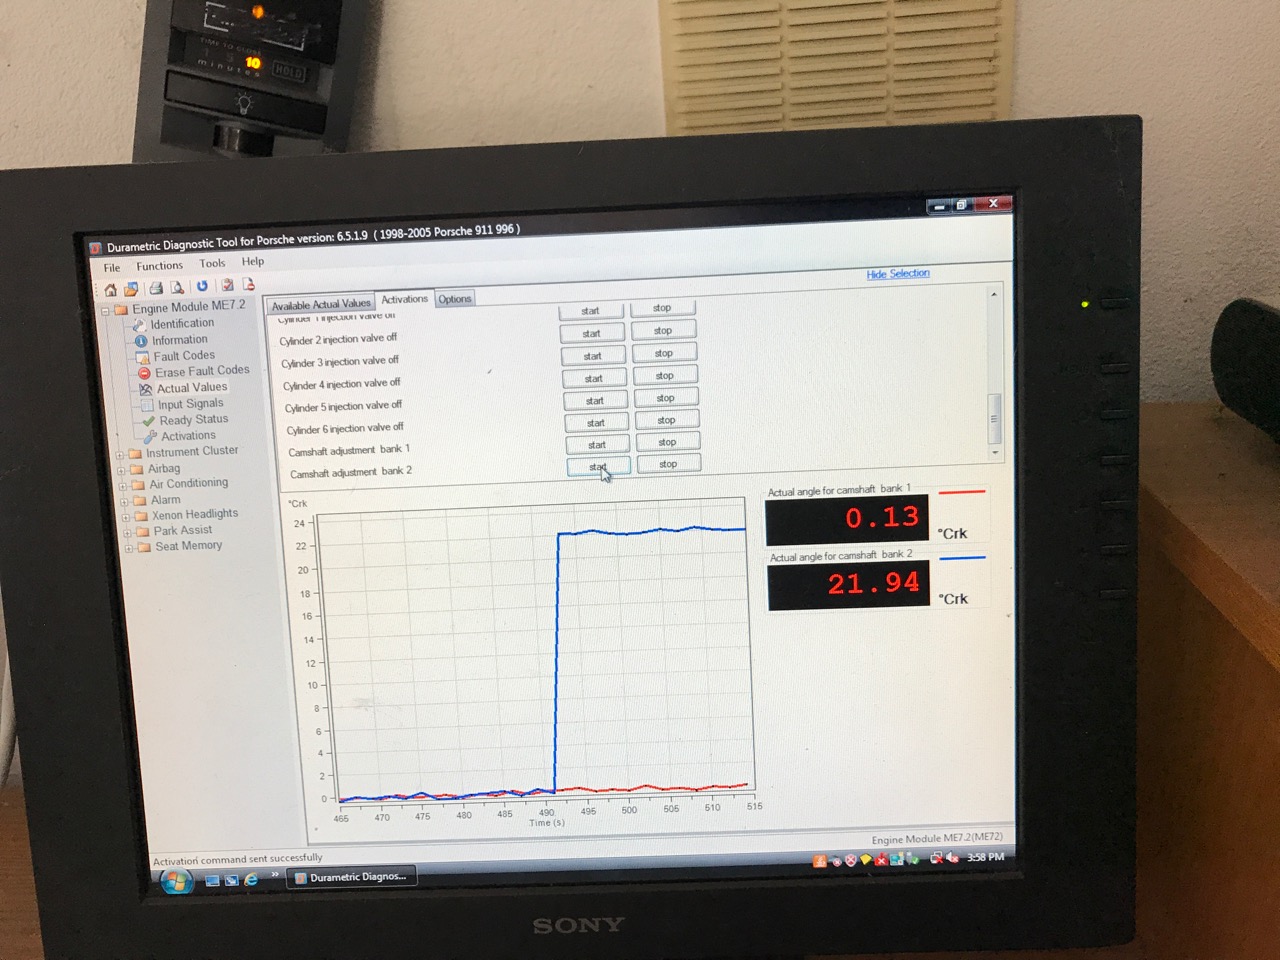
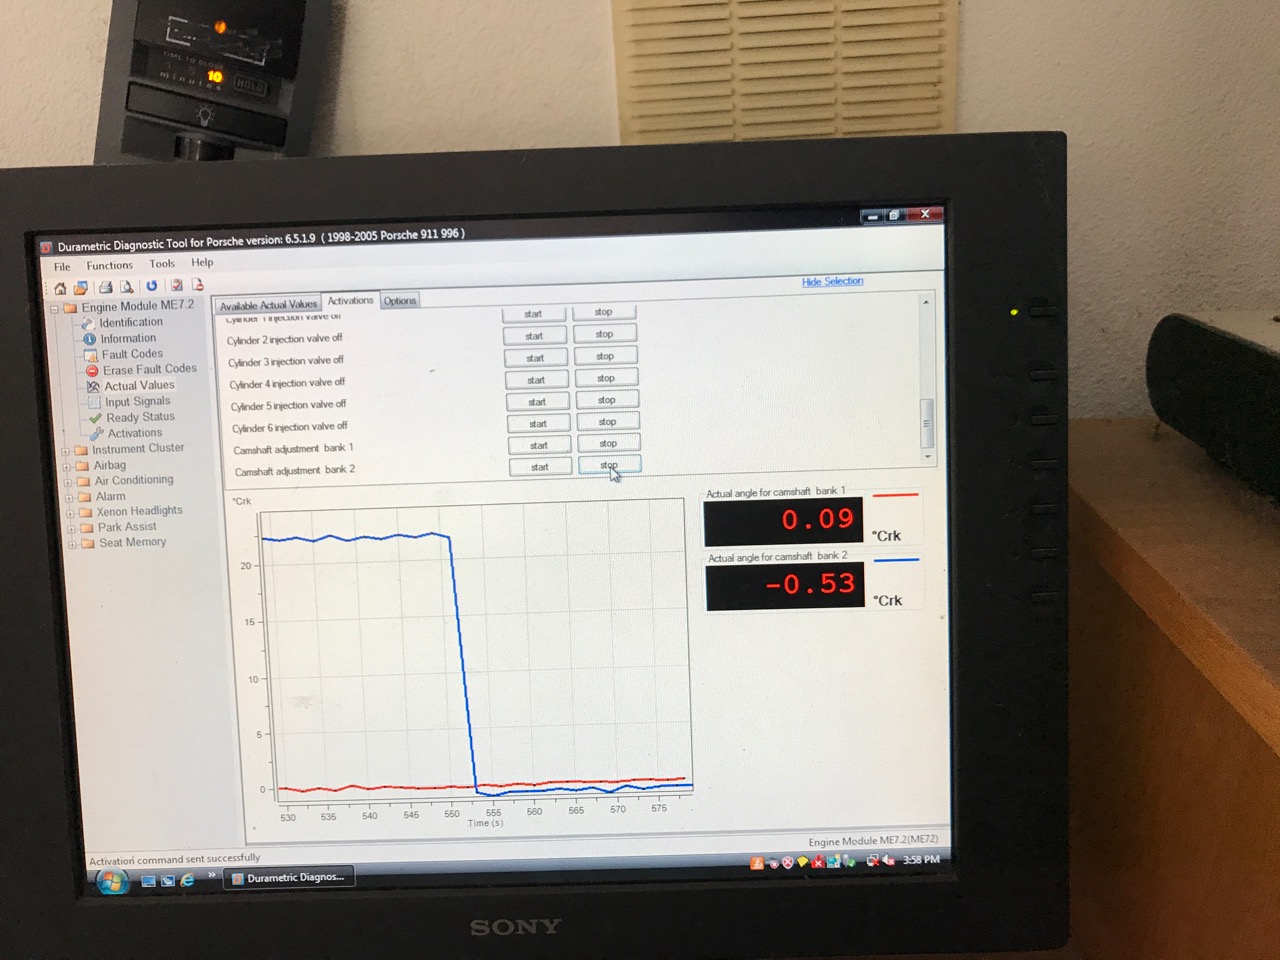
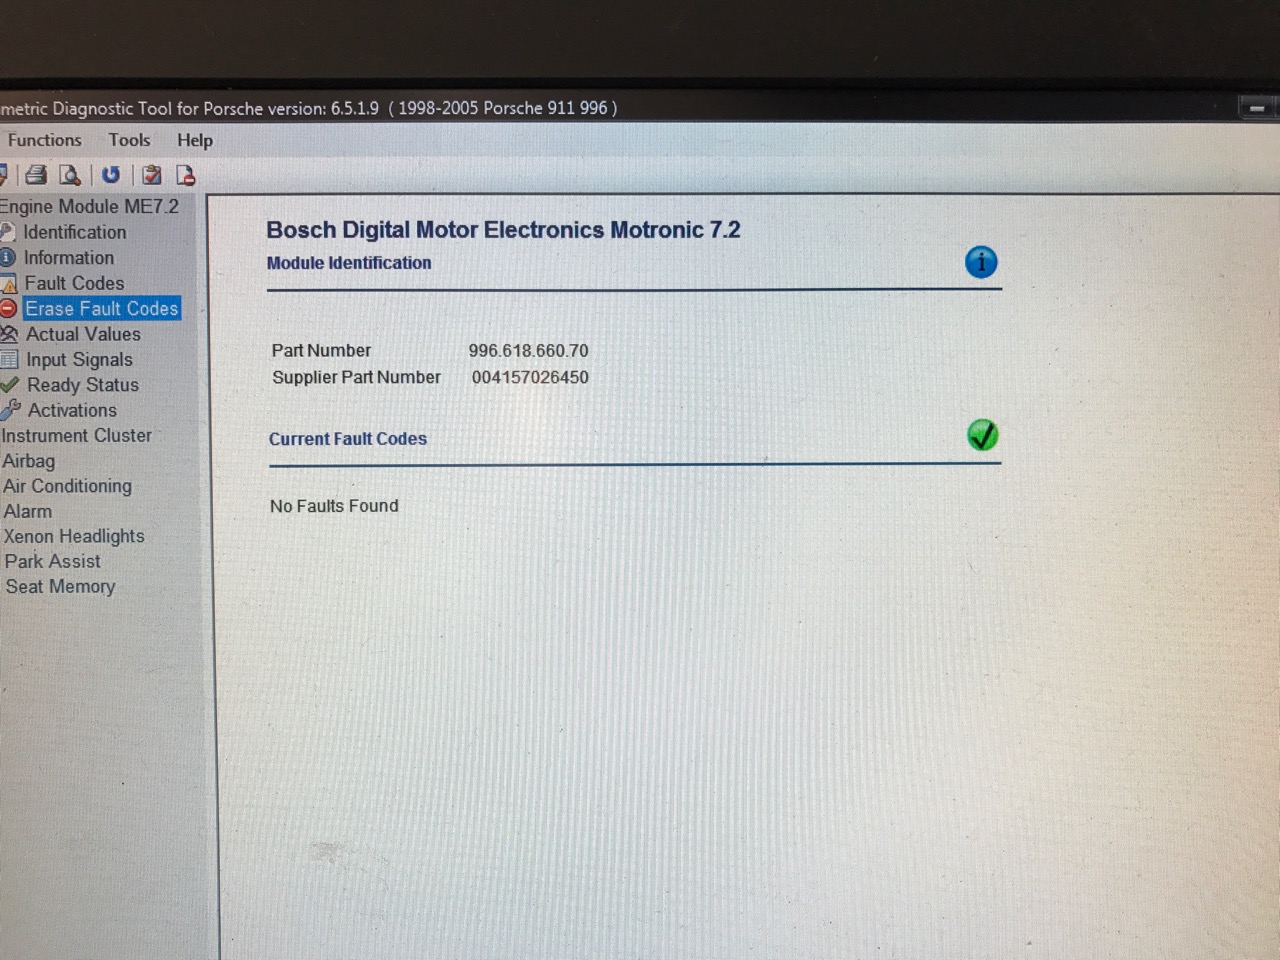
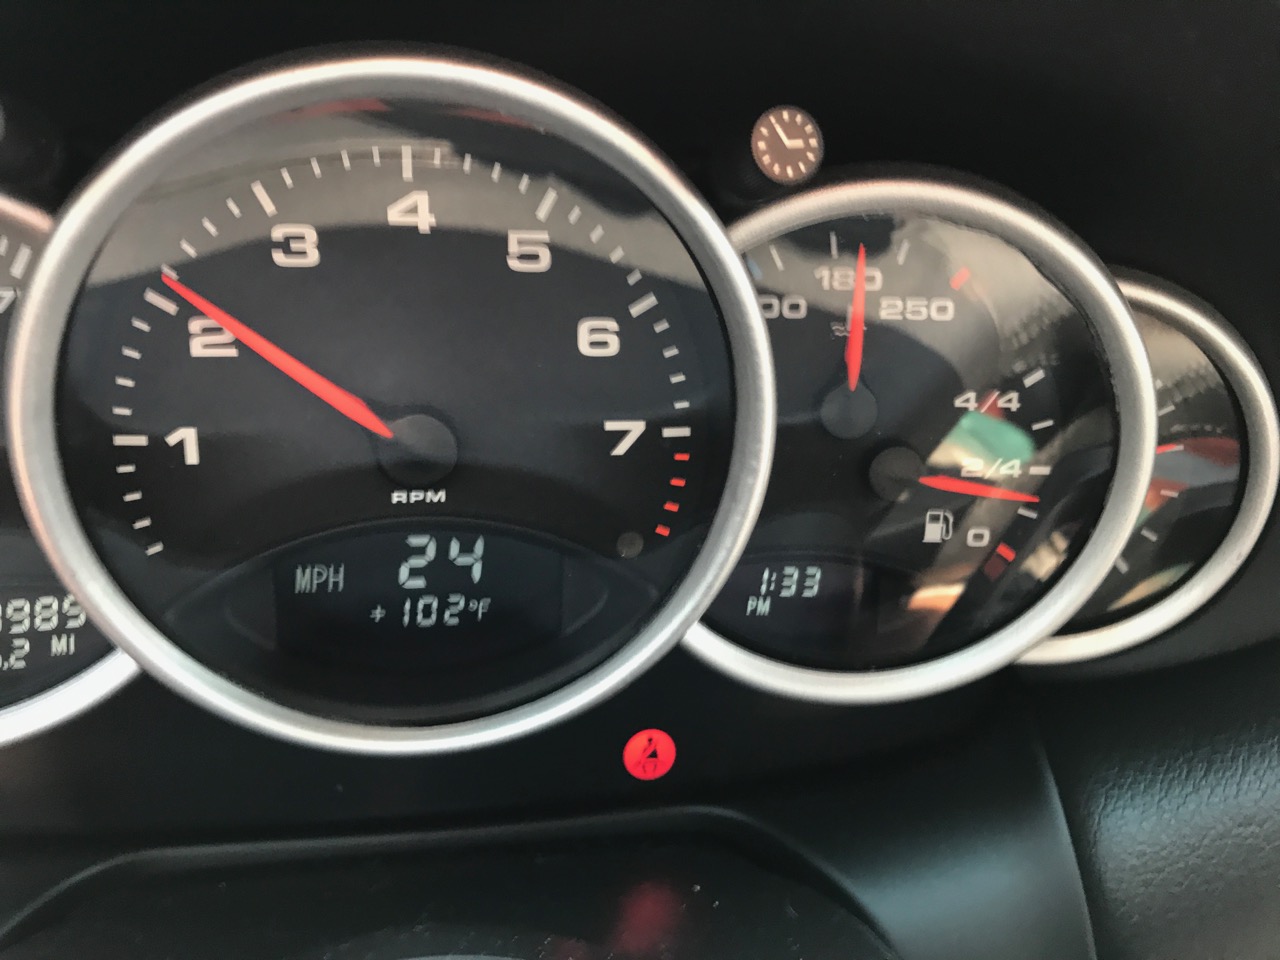
At the smog test facility (DEQ), all systems had become ready except the secondary air (after logging about 50 miles in all different conditions). I don't know about other states but in this state you can have up to 1 test device "not ready" and still pass. Its been very hot here in the northwest the past week with temperatures over 100 degrees. Combine this with some aggressive driving and stop and go traffic. So far there are no leaks spotted. Everything looks sounds and drives great. Engine pulls strong, no misfires. I ran a quick Durametric test again today (see pictures). It still reports no errors. Engine cam timing is identical to before. I can now preform the "camshaft adjustment" on bank 1 and/or bank 2 from the program.
-
Very true and again, thank you both.... Funny you bring hand washing up... I must have washed my hands about 50 times between doing something to the car in the garage then coming inside, washing my hands then getting on my main computer to load new pictures, ask a question or just update the progress. In hind-sight I could/should have just used the computer connected to the durametric in my garage. Geez,
-
Closer to $2k with the motor mounts and misc maintance and yes, it feels great. Very accomplished and closer to my car. Oh and the new OEM motor mounts raised the exhaust at least an inch and really improved shifting stability (they where completely shot). Proper advance gives that extra power I'd been missing. Finally felt confident to step on it and it fells great (better than ever). I truly can't thank you guys enough for all your guidance. I'm now not afraid of wrenching my Porsche...
-
Just passed the local emissions test (DEQ). Finally...
-
Quick update durametric shows variocam advance on both banks just as expected. Pictures later but wanted to announce the great news...
-
Update. It's all back together. Oiled up and ready to go. I started it and let it run for a little while to allow the oil to flow through and check for leaks. My next step is to connect to the durametric and check the variocam advance. More to come...
-
Great, thats what I expected but was concerned if the leak was bad it could cause other issues/problems. I'll re-evaluate after i've had some time dealing with a few other life projects (hot water heater issues today, Oh the joys of home ownership)... Thanks !!!
-
I like the idea of using the exhaust manifold as a templet. The machinist is a friend of a friend, I'm afraid I've already over stayed my welcome with him and I think the if I can come up with a sleeve that may work. At this point I'm tempted to take it somewhere I can get it on a lift. Drilling upside down, on my back and inches from the ground does not sound very appealing. If everything checks ok, would it be ok to reassemble the exhaust manifold and muffler then drive it to a place I can get it in the air or am I better off having it towed?
-
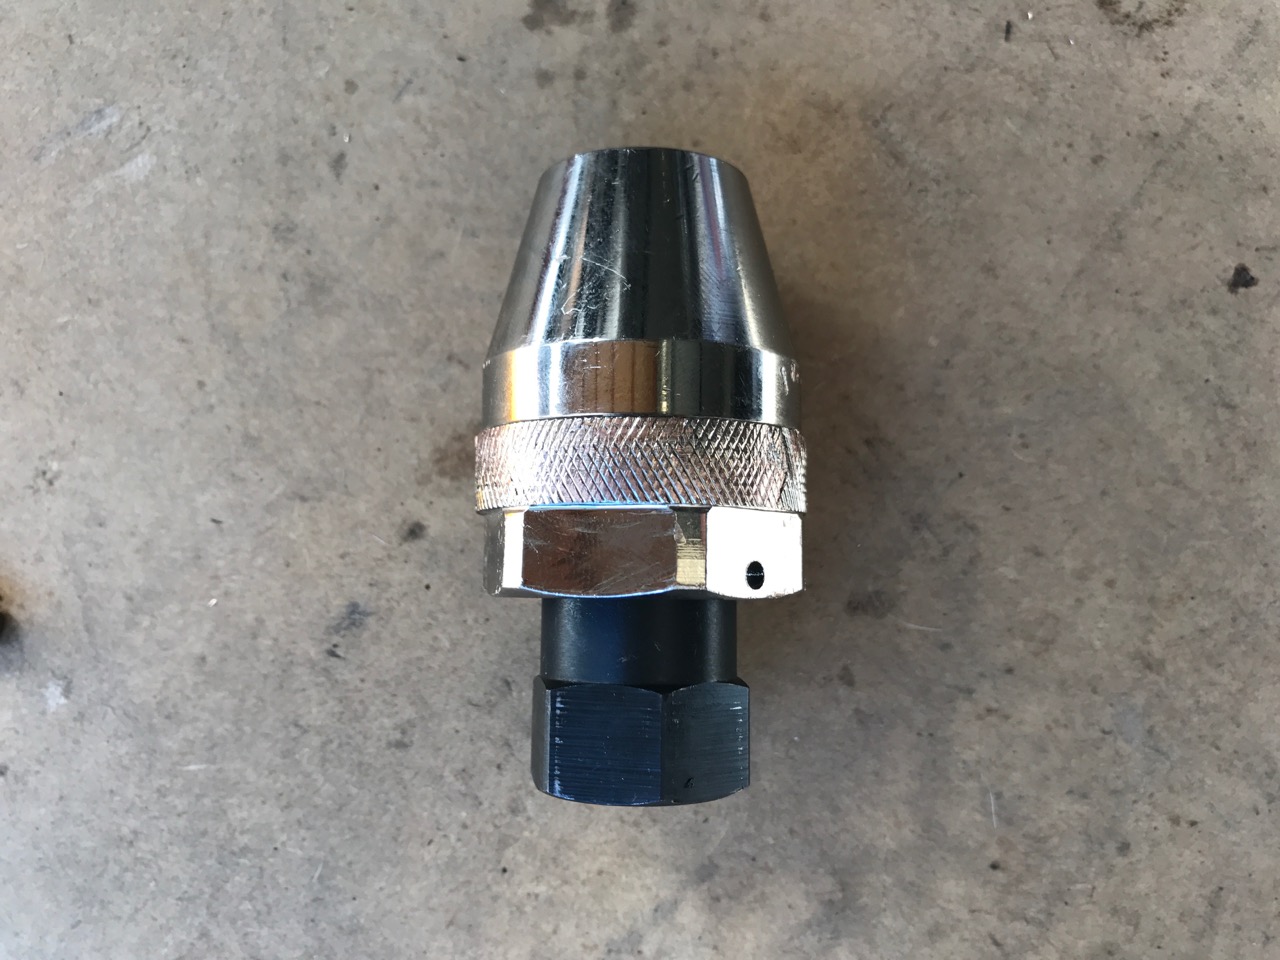
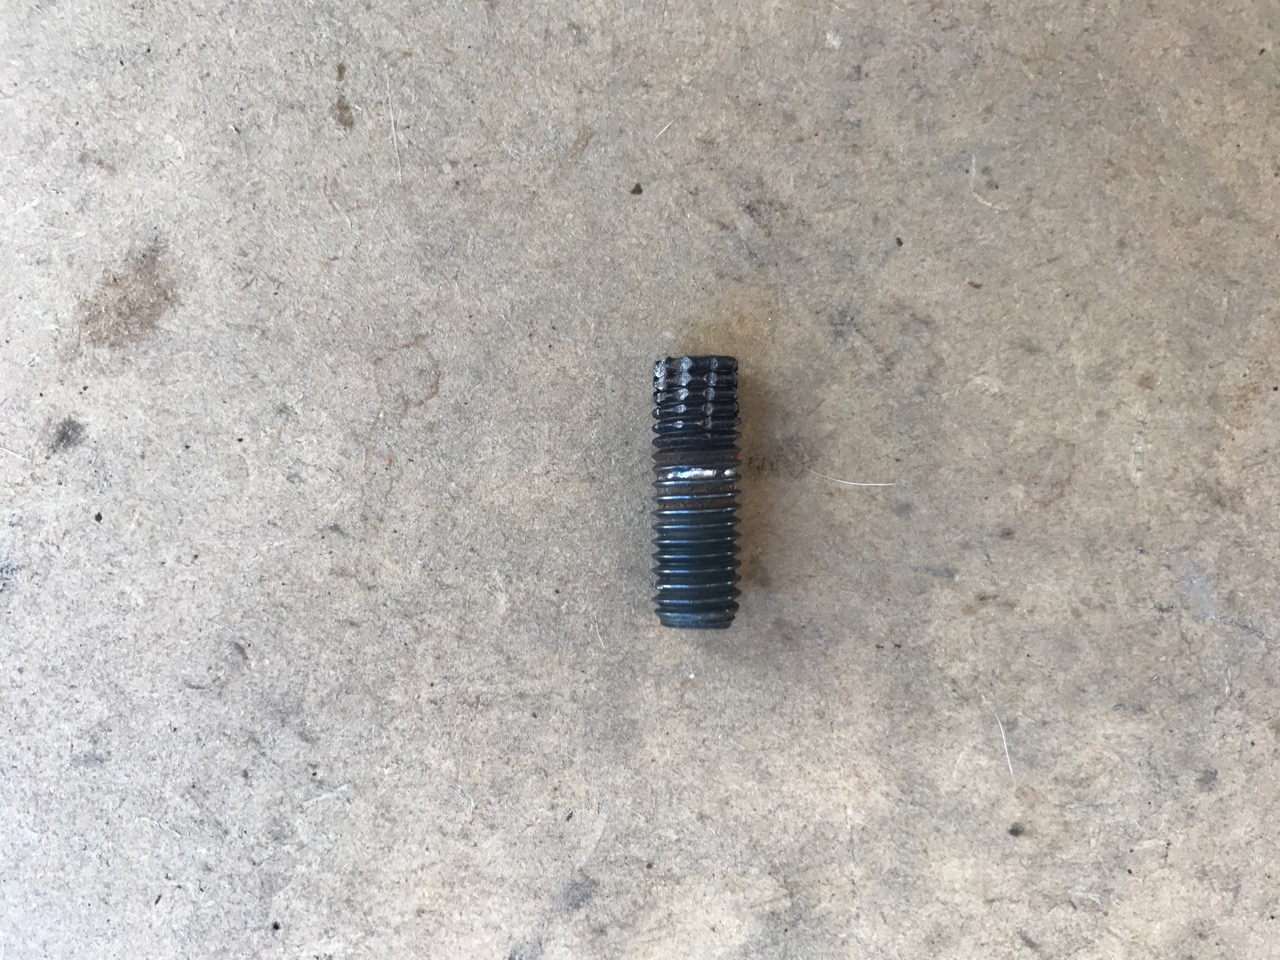
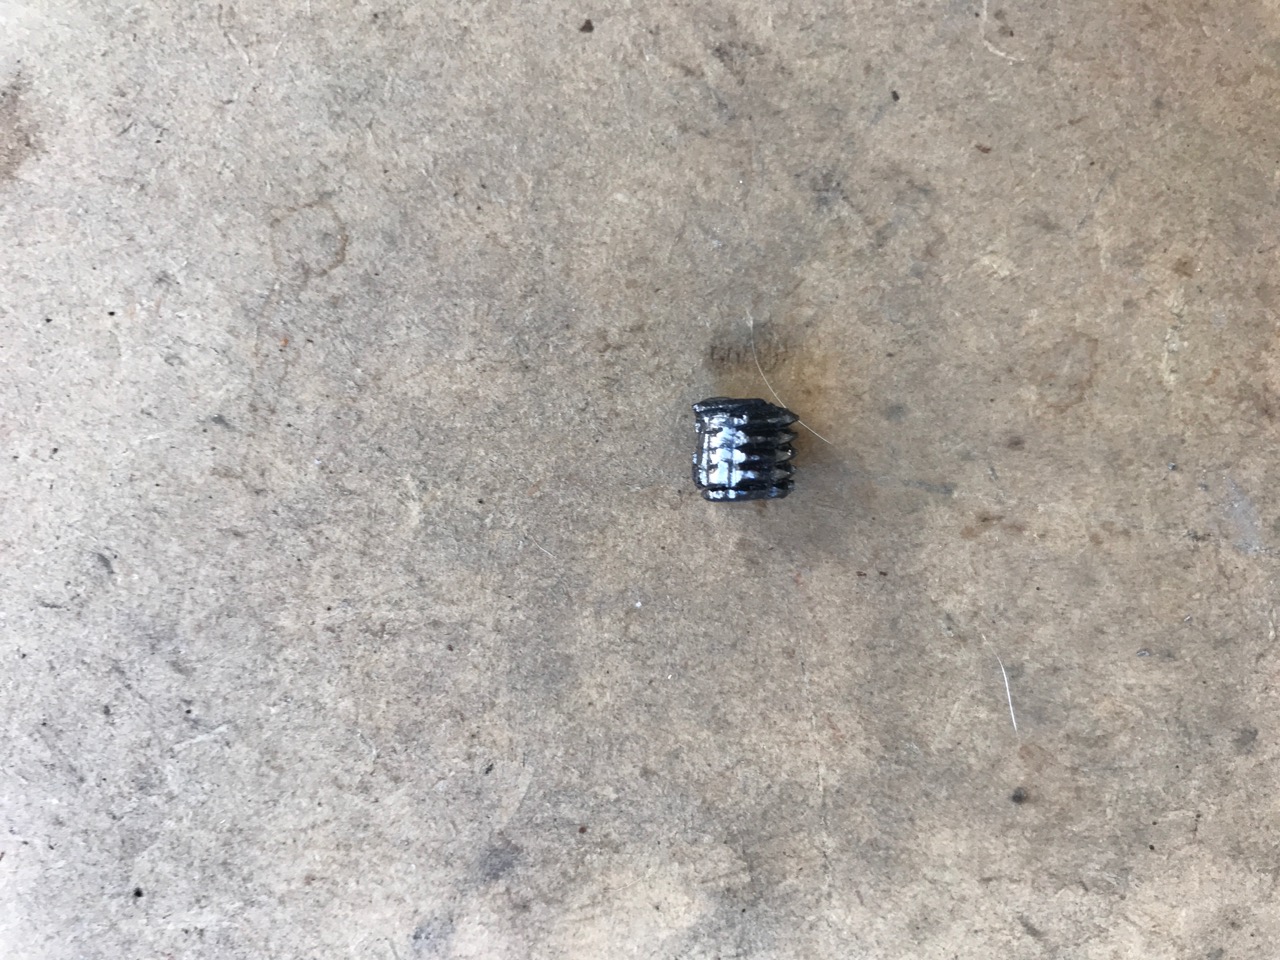
I'm going to call today two steps forward, one step back... More progress getting it all back together. Just about all the new parts are in (motor mounts, magnetic oil plug, serpentine belt, plugs, plug tubes, cam caps, etc. Oil pump is in, oil pressure sensor is reconnected, new solenoid is connected, big ground wire is reconnected, air conditioner compressor is back in place, aux air pump is back in and connected. airbox is back and MAF is connected. Ignition coils are reinstalled and connected. Heat shield and muffler support is back in place. The only parts remaining are the exhaust manifold, the muffler, the heat shield and the bumper, Oh, I need to get oil inside... I borrowed a tool form my friends friends machine shop. He said I could keep it but I'd hoped I wouldn't be needing it for a while after this job is complete. I'd seen this tool before and was excited to have it to use on those two twisted off head bolts of the exhaust manifold. The great news is it clamped down nicely and with a little work twisted out the first stud. The not so great news, The last stud at the end of cylinder 6 was not as friendly. it's like the bolds are made of mush... it twisted right off smooth with the head... This is what I'm left to deal with... drill and easy out or ???
-
I collected a lot of data on the various torque wrenchs. if you're interested, send me a pm and I'd be happy to share. I'm feeling very confident the torque on all the bolts are correct. My big concern is the glue and if I took to long.otherwise, it all seems to be going back together smoothly. I would have done more but wasn't sure about the spark plug tubes and what if any special grease should be used on the o-rings? Then there is those exhaust bolts still being an issue...
-
Today update All the torque talk had me concerned so I talked to a friend that has a friend that owns a local machine shop. After a phone call I gained assess to his snap-on tools and calibration equipment (including his wrench cal station). I'll keep this story short with all the back and forth done with each wrench tested and just say i spent the greater part of the day confirming the really cheep wrench I purchased was consistently within 3% of the cal station at 120in/lbs (about the same as his snap-on wrench). I choose this as it's the magic number I needed to torque my cam cover bolts. I also tested as several other values at the extreems of the wrench. it was in every case within 5% of the adjusted value. I'm pretty happy with these results and feel confident I wouldn't do any damage with the correct value dialed in. I also tested my 3/8 and 1/2 drive torque wrenches. needless to say, they did well in the ranges they where designed for. On the the car. With limited time, I cleaned up the contact points again and laid a beed of glue in the cover, them mated it to the engine head without problems. I may have uses a little more then needed as I felt rushed to get it all back together within 5 minutes. Hard as i tried, I think I had them mated within the time limit but it took some time to torque so many bolts. I'm sure I was within 10 minutes but because I was taking so much care to get it right i'm concerned i took too long. there was a small amount of glue squished out but not much. I took care to not put too much glue around the cam caps. All in all, I think it went well. I've started the reassembly of everything removed but ran out of time. the new motor mounts raised the engine so much I was concerned it would hit the top of the engine compartment. I think the tail pips will be much much higher. Installed new serpentine belt, will install the spark plug tubes in the morning. I feel like i'm near the home stretch. Look for an update with some positive news once I get oil back inside her. Hopefully without leaks.
-
Thanks, I'll be very careful. I have a quality 3/8 and 1/2" drive torque wrenchs but thought after reading the earlier post and a quick check on YouTube, maybe the smaller Harbor Fright would be a better fit and better suited for this job. I'm at technologist so I'm used to working with smaller intricate components with a lot of attention to details. I will be very very careful (says the guy that twisted off 2 exhaust manifold bolts)...
-
That's funny. I just purchased a 1/4" drive torque wrench from harbor freight not 5 minutes ago
-
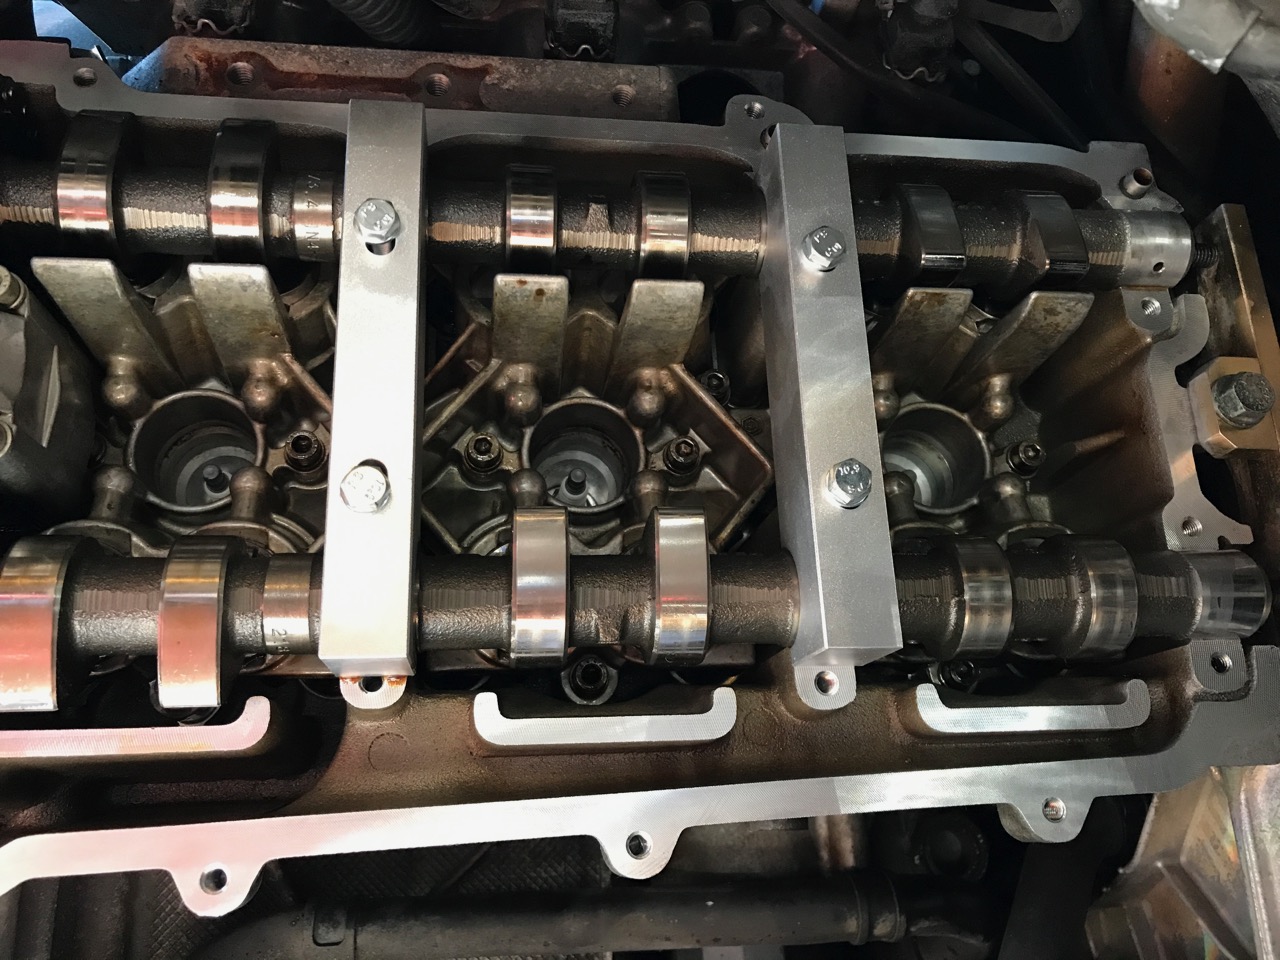
Great, thanks. The saddles are back off and the good news is they didn't leave any marks on the cams. The really good news is the cover now dry fits nice and flat. I'll clean all the oil up and glue it together in the morning.
-
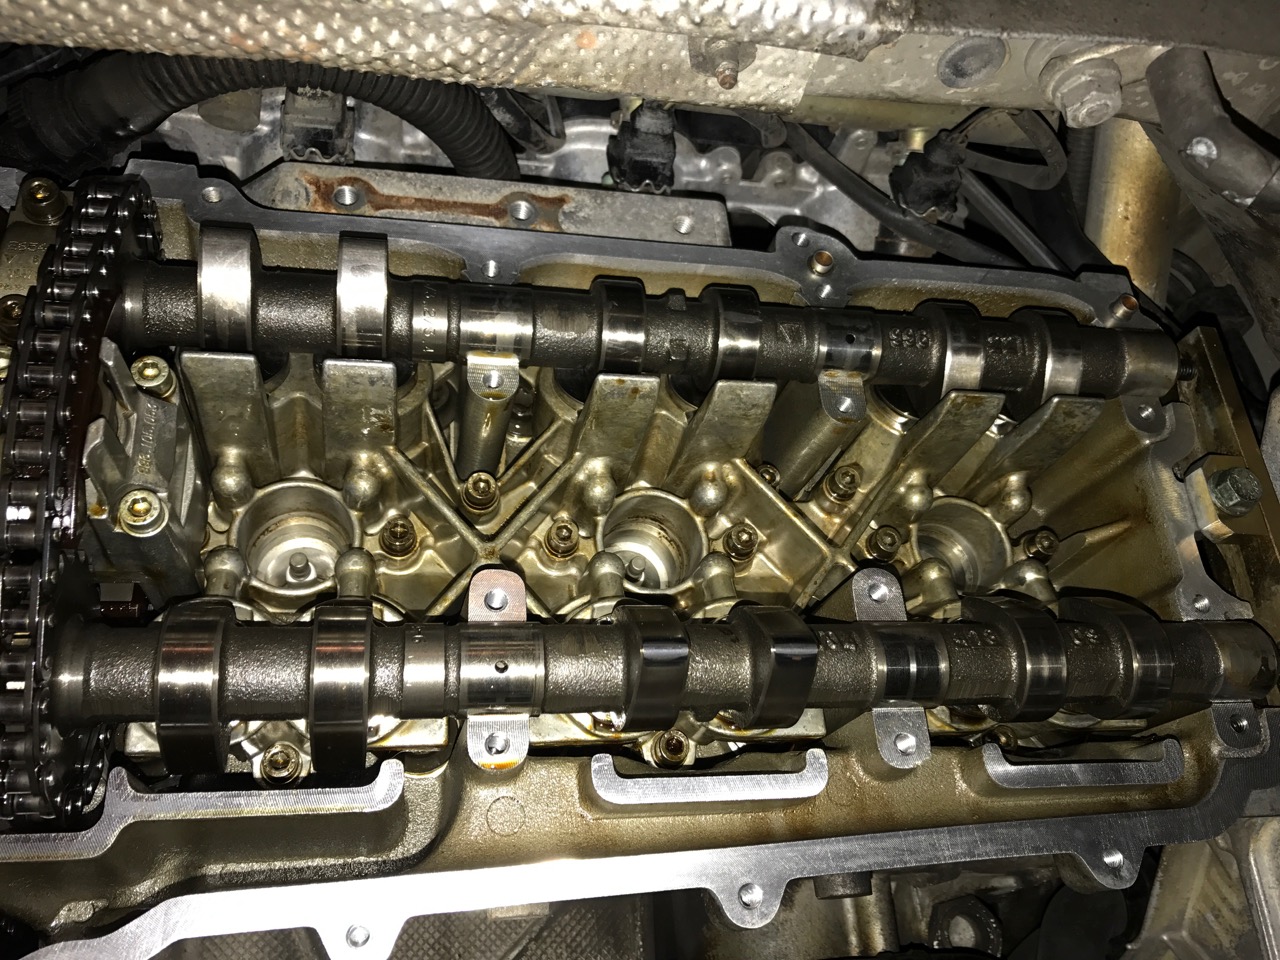
Update The reason the cover was so easy to remove is the cam was 180 degrees from where it should have been. This caused the exhaust valve on cylinder 6 and intake valve on cylinder 5 to be open, creating pressure on the cam, transferring to the cover and aiding in breaking the seal to remove the cover. The bad news is there is now a problem getting the cover back on. The same pressure pushing on the cam is causing the cover to rock when trying to put it back in place. After a few PMs with experts the solution we're going with is to oil up and installing the saddles to push the cams in there correct positions then rotating the engine to a position where there is no pressure on the valves on that side of the engine. The other TDC would be the ideal but this is where I have questions. In order to get to the other TDC, both cams will have to move 180 degrees meaning at least half the lobes will have to travel though there highest pressure positions. Looking at the current position would it make more sense to just release the pressure on cylinder 5 intake and 6 exhaust? that would only require 90 degree change of the cams (180 of the crank). This accomplishes the same without un-needed rotation using the saddles (i'm not confident they are designed to allow the cam to actually move freely, I don't want to create anymore damage (if an at all) then necessary). Saddles are in place with lots of oil where they come in contact with the cam, The cam hold down at the back end of the cams are in place, screws are engaged into cam but are free to turn. I turned crank slowly watching the tension on chains. it looks like its moving freely. I turned the crank about 180 degrees, everything seems to be moving together without resistance. No lobes are touching now. Is this far enough or is there a reason to go al the way back to TDC? If i have to go to TDC, thats going to force cylinder 4 exhaust and cylinder 6 intake to go through there highest stress points. I don't want to do this unless there is good reason. I'm confident the timing has not changed as everything moved together and the intake cam is now pointing at 6 o'clock it was at 3 o'clock and the engine is at 180 from TDC, just where i'd expect. If it's important to go to TDC I will keep going, I just want to understand why. Please advise, and thank again for all the help.
-
Those pictures are come soon. I'm trying to take it apart as neatly as possible... Picking out the plastic back first. Is there difference in bank 1 and bank 2 solenoid ? Do you know what the differences are?
-
Yes, I'm confident the ECU and connecting circuitry are all in good working order from all the tested done on the front side of this with the Durametic. I bench tested the solenoid (impedance and function) before installing and it work as expected. I checked for smoothness and function on the connection to the variocam hardware, it looked good also so I'll be very surprised if the original problem persists. I also took apart the old solenoid today. I was saving it for the end of this thread but it clearly was fried. Very cheaply made for something that cost so much...