Welcome to RennTech.org Community, Guest
There are many great features available to you once you register at RennTech.org
You are free to view posts here, but you must log in to reply to existing posts, or to start your own new topic. Like most online communities, there are costs involved to maintain a site like this - so we encourage our members to subscribe or donate. All subscriptions and donations go to the costs operating and maintaining this site. We prefer that guests take part in our community and we offer a lot in return to those willing to join our corner of the Porsche world. This site is 99 percent member supported (less than 1 percent comes from advertising) - so please consider an annual subscription or donation to keep this site running.
Here are some of the features available - once you subscribe RennTech.org
- View Classified Ads
- DIY Tutorials
- Porsche TSB Listings (limited)
- VIN Decoder
- Special Offers
- Paint Codes
- Registry
- Videos System
- View Reviews
- and get rid of this welcome message
It takes just a few minutes to register, and it's quality Porsche information at a low cost.
Contributing Members also get these additional benefits:
(you become a Contributing Member by subscribing or donating money to the operation of this site)
- No ads - advertisements are removed
- Access the Contributors Only Forum
- Contributing Members Only Downloads
- Send attachments with PMs
- All image/file storage limits are substantially increased for all Contributing Members
- Option Codes Lookup
- VIN Option Lookups (limited)

talkenrain
-
Posts
78 -
Joined
-
Last visited
Content Type
Profiles
Events
Forums
External Paint Colors
Downloads
Tutorials
Links Directory
Collections
Classifieds
Store
Everything posted by talkenrain
-
 Also, can you give me a list of gaskets I'll need to replace?
 -
Ok, I will make sure the area is very clean before cracking the cam cover. I was hoping I was finished with the tuff bolts but I guess have a ways to go... Any advice for removing the rusty ones? I've been using silicon spray. Is a impact wrench a good idea or bad?
-
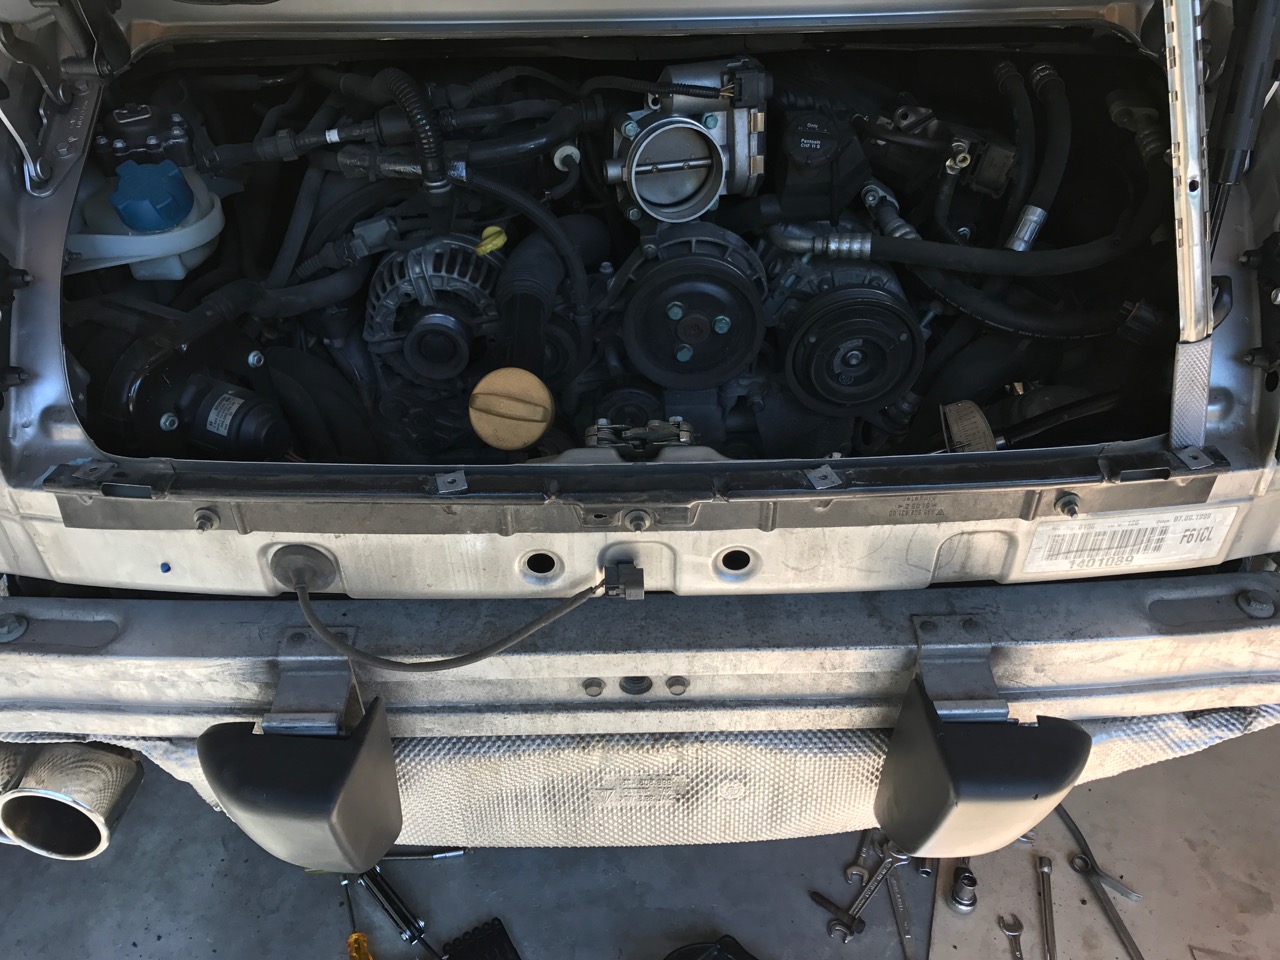
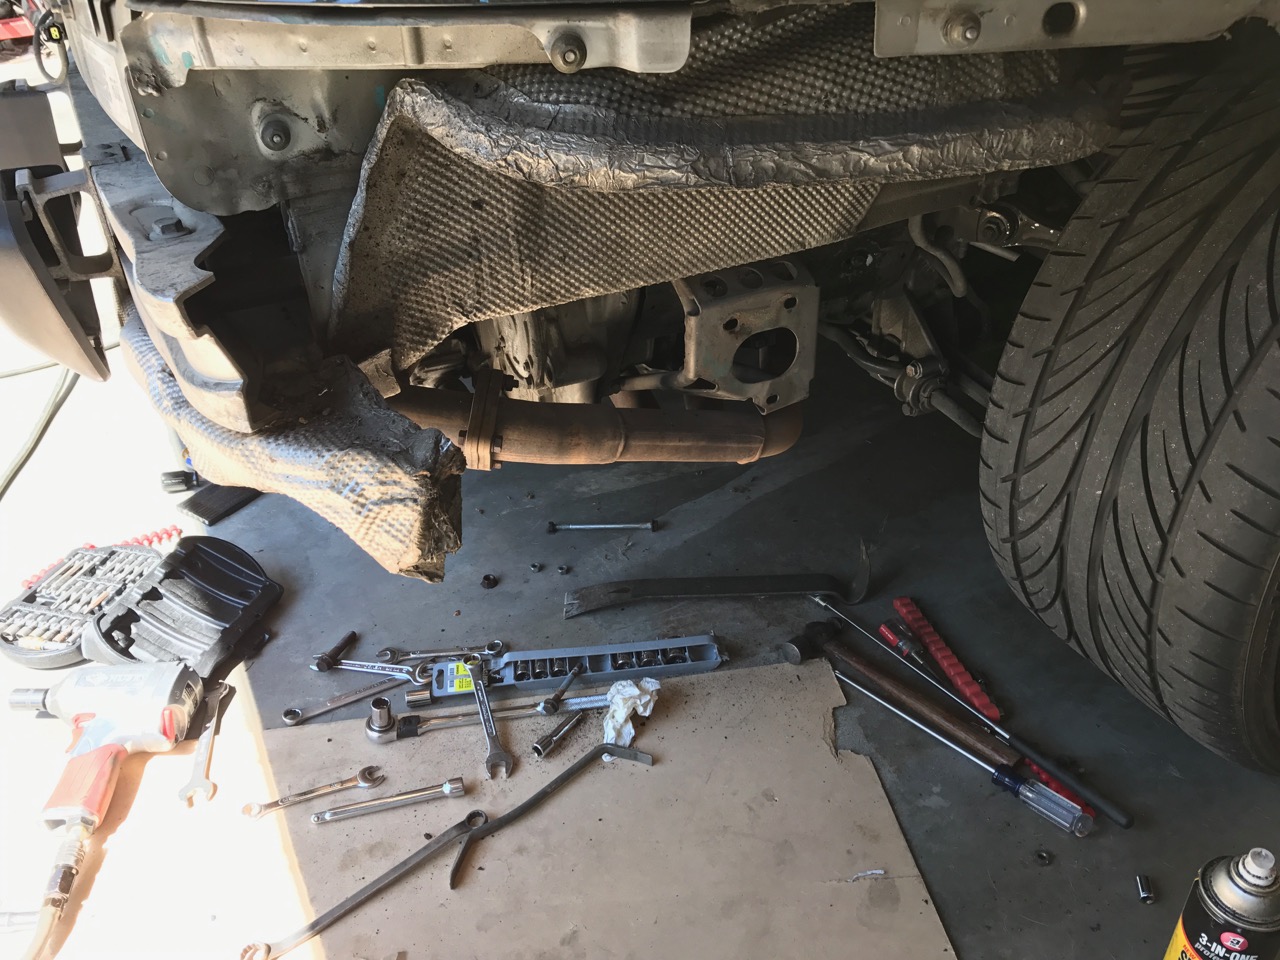
Just a quick update. To all those in fear of wrenching there own. Let me say what a joy it's been working on my own. Exploring the "whats" and "whys", you will learn and appreciate the engineering thats gone into your car so much more when you know exactly whats going on under and within the stunning body. That being said, I've skinned a few knuckles and have had a few moments where i made some new 4 letter words. I am making progress. I pulled the bumper, heat shield and muffler just for more room to work. I so far have not twisted off any bolt heads (although thought I would with the muffler clamp) or have caused any damage at all. Being careful to take lots of photos as I take thing apart. Again taking my time as the parts have not arrived yet. Here are a few picts where i've stopped for today. Will I need to remove the muffler bracket to remove the cam cover?

-
Thanks again for all the help. I'm motivated in part because I haven't seen a lot posted on this (maybe not a common failure). If it's something that can be done at home I think posting the experance and progress for others has great value. So if you don't mind, I'd like to keep this open here to its conclusion. My main fear is causing more damage (like snapping a bolt off or something along those lines. A simple (time consuming) disassembly, replace and reassembly should not be a big deal. I've got the time so why not. Planning on lots of photos and updates. I started the disassembly today. Have not gotten very far (limited time today) Just the airbox and serpentine belt removed today (along with a few misc items). Jacks and tools are in position Friday will be the official start. I'm ordering the solenoid and Cam tool this evening (thanks for the great links). I know I'm going to need replacement gaskets and other bits. Is there a link for the engine components with part numbers. I need to get all the parts I'll need moving in my direction.
-
Thank you both for your feedback. I'm now properly calibrated. I've decided to move forward on this at home. I have the time and believe I have most tools and basic knowledge. I'll order the part and cam tool this evening after a old school try at opening the solenoid short. My old school theory: Typically, a coil short is caused by only a few conditions. Friction, Heat or a contaminant in the circuit. The coil its self is typicaly lacquer covered copper winding with a pin down the center that moves from the electro magnetic field genorated when the coil is presented with a voltage across the winding. If the problem is friction, the moving component would have to be out of alignment and rubbing the coils (causing the short and probably no longer moving or have very limited movement) this must not be the case because it still move completely in and out (can see the engine timing change for the brief duration of the tests). If the problem was heat and the coil insulation was compromised, it would most likely be a partial short if a few winding (maybe 4 ohms or something grater then the reading I got). If it was a complete short of the coil it's self, it would not produce enough electromagnetic field to move the solenoid at all. This is not the case here either as it still moves with a low voltage across the coil. This leaves the last option of some contaminate that is in parallel with the coil (anything from a flake or bad solder connection or a strand of wire either in the solinod housing that is shorting across the intire coil windings. This would display the almost dead short I'm seeing but with enough current is still able to produce enough voltage across the coil to pull the solinode in (when more than 8 amp are applied for a brief second). I'm sure this amount of current is being limited by the DME. The (nothing to loose) option is to use an external power source to try to effectively zap the short. Something like a fairly large charged capacitor (charges to maybe 18 to 24 volts) will deliver very high current for a short period of time. If the short is a flake or fray wire, the higher current will burn it and open the short without being high enough voltage to damage the coil windings. If the short is truly the coil and the high current compleatly burns the coil windings the worst case scenario is the solinod no longer moves at all and world require changing. So at worst, I'm back to changing the solenoid, right? edit: sorry for the typos. Wrote while at the gym, on my phone. Not a good combo and sometimes auto correct is not my friend...
-
I just got a call back from the local dealer after a day to develop a quote. He starts by saying the solenoid can be replaced without pulling the engine. He then went on to studder the words, about $1600 labor and about $500 for the part. I asked him to repeat what he'd said. I said I don't need the entire VarioCam asymbly, just the solinoid replaced. He said yes, that's correct. Said it look about like a "D" sized battery, about what I'd expect it to be. Can this be correct? I asked him to email the quote so I'll have the list. If the engine can stay in, i think I'm going to start pulling it apart tomorrow... but $500 for the solenoid seems crazy high... I'm thinking, if I have nothing to loose, maybe I should use some old school techniques to try to clear the short in the solenoid winding before pulling it apart.?.!
-
I have a few hydrologic floor jacks so no problem there. I've pulled the rear bumper heat shield and exhaust before with no problems. Replaced shark plug tubes and that sort of work. My concerns are resealing the valve cover and in general, a fear of getting into it then discovering I don't have all that's needed (enough hands/tools/patience) to complete the job. I was hoping I'd find some examples of other documented successful home replacements. I just want to understand clearly what the job is. I ran out of time today but will keep searching then deside how to proceed...
-
Im not sure when they started/stopped the double row IMSB but it's an early 2000 with 93k miles on it. Original IMS as far as I know. Has been a relitivly low cost to maintain weekend driver, although I hadn't had a lot of time for it till now (I recently retired). I purchased it about 3 years ago from a friend. So now I'm watching my pennies and have the time to work on it. It's not my only car so I'm ok with it garaged for a while and as I said, I'm not afraid of a project, as long as it's within my ability to do it without an overhead lift.
-
I'm going to call around to find out how many hours to have a shop do the work, then decide. I'd really like to do it myself but don't have the setup for pulling the engine. I'll do some more reading tonight. If you can point me to some links of others that have done it at home, that would be appreciated. If the engine has to come out, it may be time for a new clutch, chain slides and maybe IMS. Thanks again for all your help Ahsai. You've earned a great reputation and in my book, Number One !!!
-
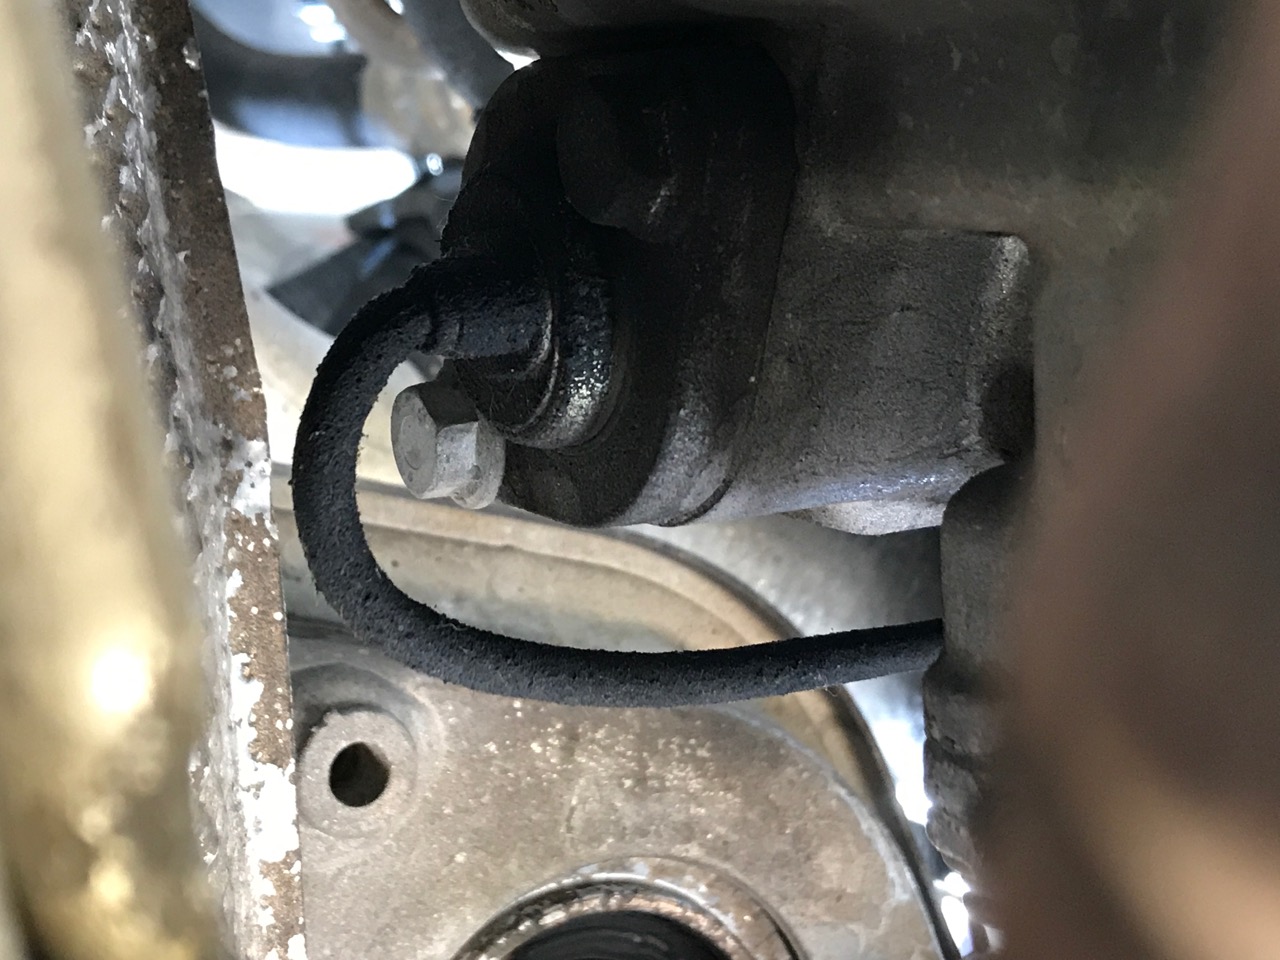
So I managed to find the connector. I ohm-ed it out and it's only about 1.7 ohms. That would explain the very high current reading. So from what I read this is not so simple of a replacement? It looks as if 2 bolts hold it in place but other posts seem to say it's a much bigger job requiring a special tool to hold the cam in place? Am i reading it correctly? I'm not afraid of jumping into it if needed, i just want to understand so I can set aside the proper time and make sure i'm prepared to do it right the first time.
-
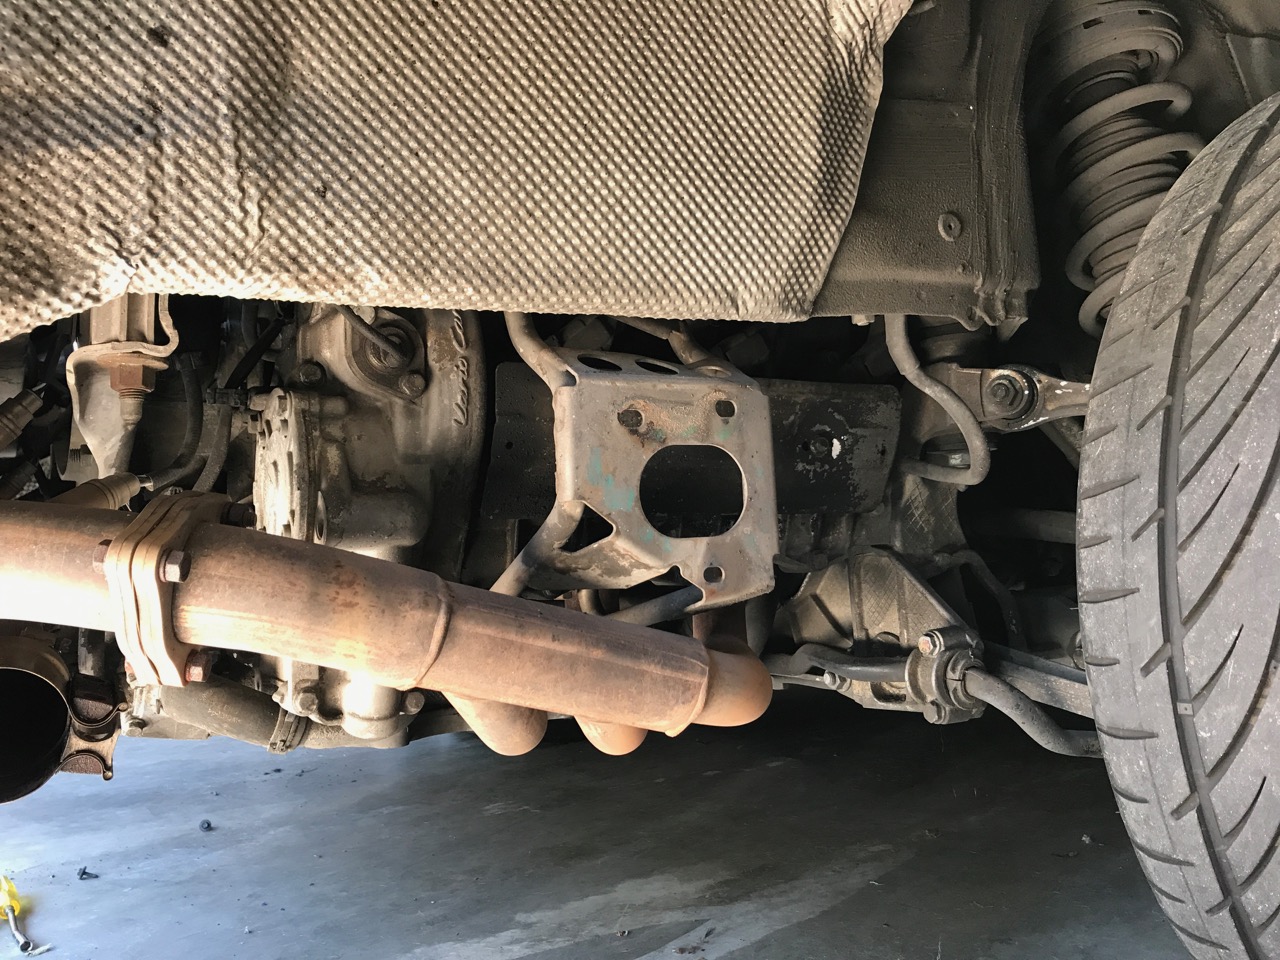
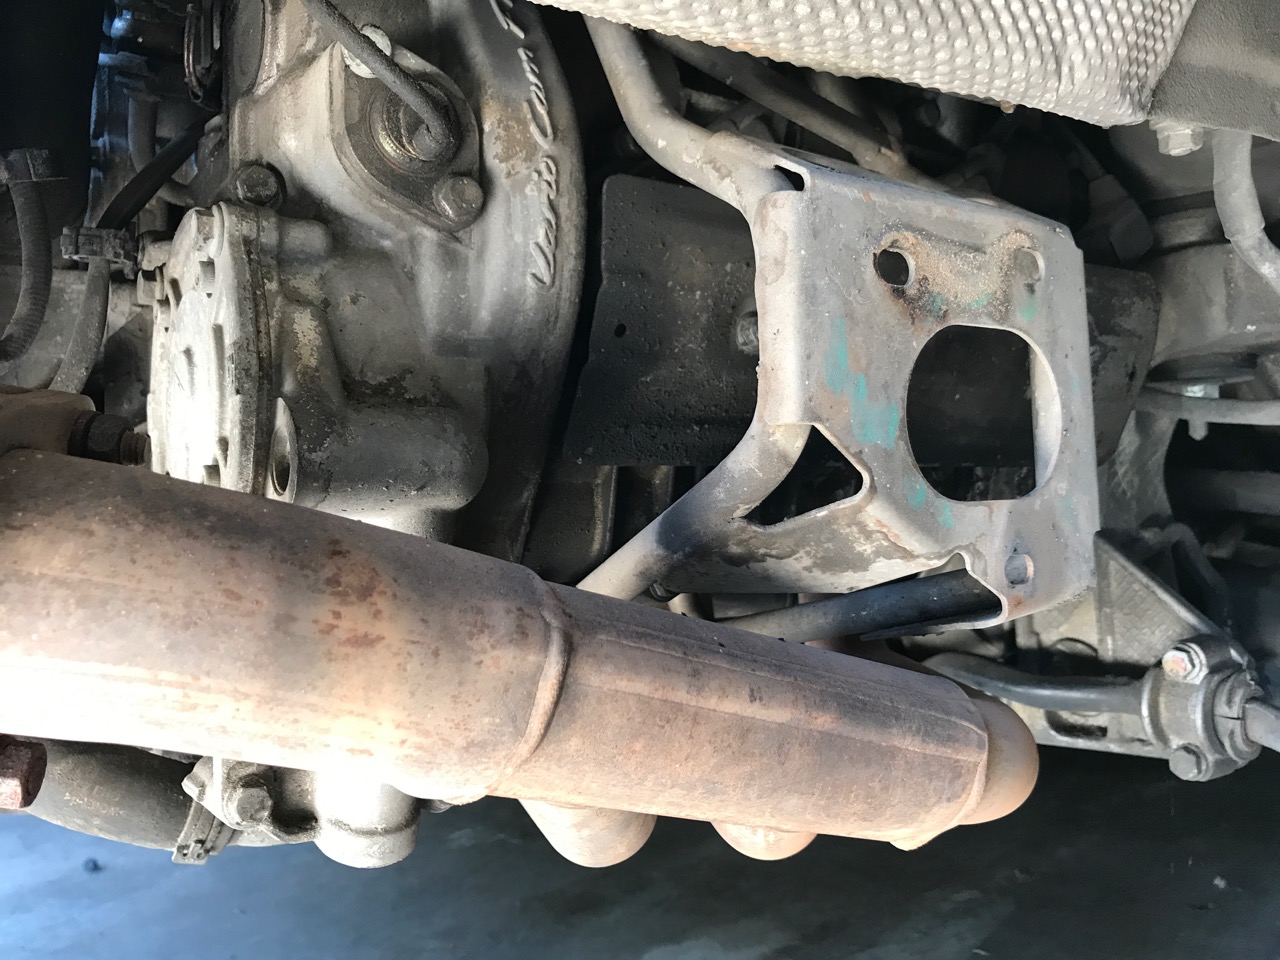
Is this it? (pict is from the bottom passenger side looking up and towards the rear of the car, between exhaust system components)
-
Had just removed the airbox when I got your message. That was just about the funnest moment of the day.
-
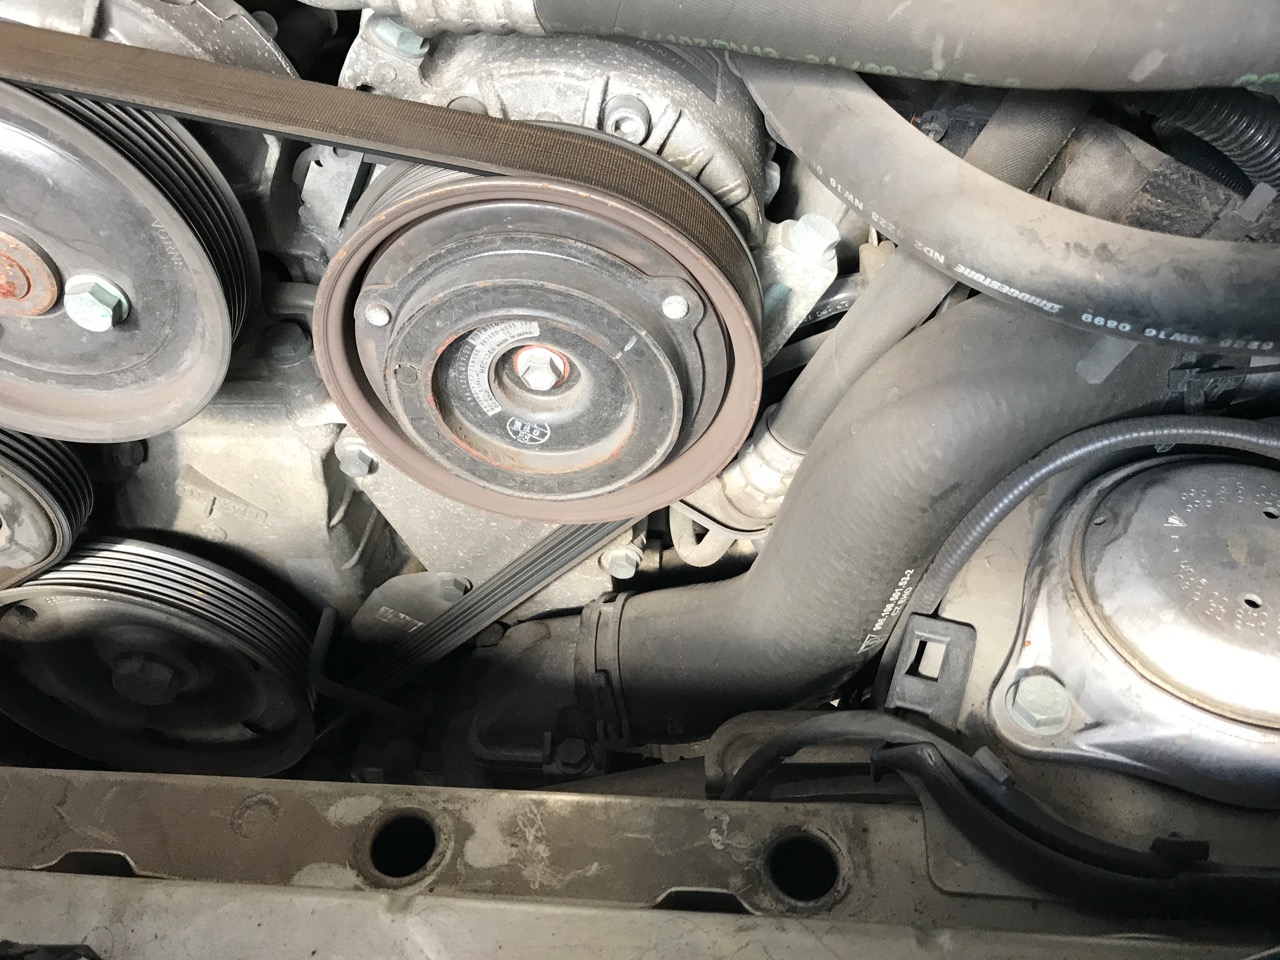
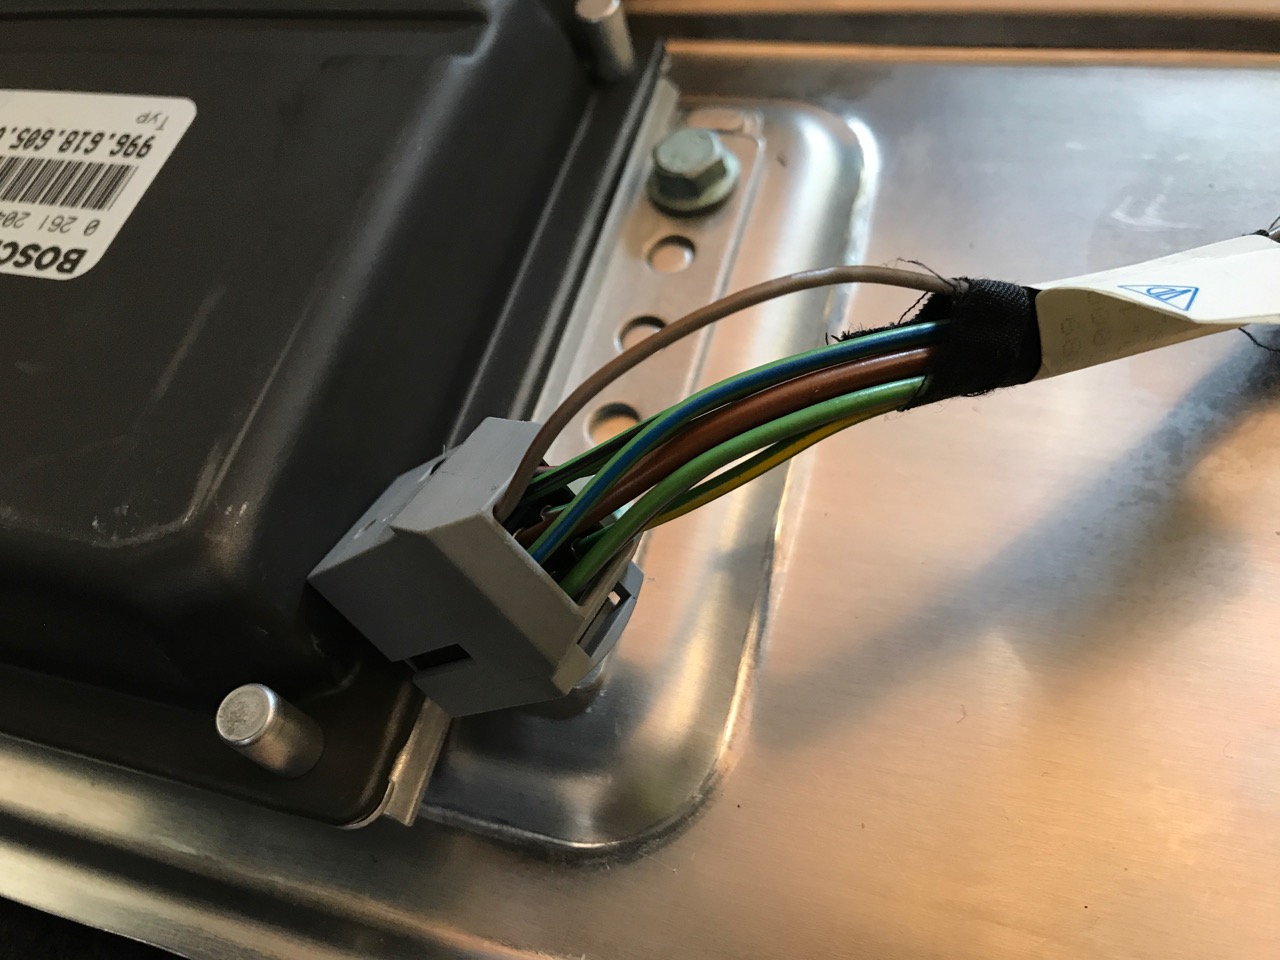
Thanks for the picture, The doesn't look bad at all. Some good news. While pondering exactly where the solenoid was, I disconnected pin #3 from the DME and connected a light bulb to the DME and B+. I then ran the Durametric test and the bulb works as expected ("start" triggers the bulb on, "stop" triggers the bulb off). Now going try to find that solenoid (at least i know what color the wires are).
-
I was just going to update. I think you are correct... So here I go assuming again... Using my ohm meter I worked backwards from the device i re-soldered in the DME to discover it's connected to pin #3 of connector #5 (would sure be nice to have a pin out of the DME). I don't know what pin is the other side of the solenoid circuit or I would ohm the entire path. I ran the bank 2 test again using the Dramatic measuring the voltage at pin #3. With everything connected and the engine running its at 13.5v. when I activate bank 2 to drops to 2.5v for just a second then back to 13.5v. Because it's a active pull down only circuit it should not hurt to short pin #3 to ground. I did using my amp meter and the engine idle changed and stayed changed till i removed the short (as expected). The interesting part is the amp meter showed a much higher current draw than expected I checked again and the solenoid circuit was drawing about 8.5amps (I'd expected to see about 1amp). It looks like although the solenoid is still working it has a short or something in my wiring has a short and the DME shuts down when it senses a high current condition. I'm thinking the reason the solder connection failed was due to heat from all the current the circuit was trying to draw. Anyway, I am now going to get my hands dirty and ohm out the solenoid at it's connector (as you so wisely advised from the beginning). Any advice on locating and puling this connector (I'm still not clear on exactly where it is). Can I get to it without pulling the heat shield or exhaust? is it high on the engine? Can I reach it from the top (through the rear hatch)? Hot day/hot engine = no fun... Once i get to the connector i'll ohm it and do the lightbulb test.
-
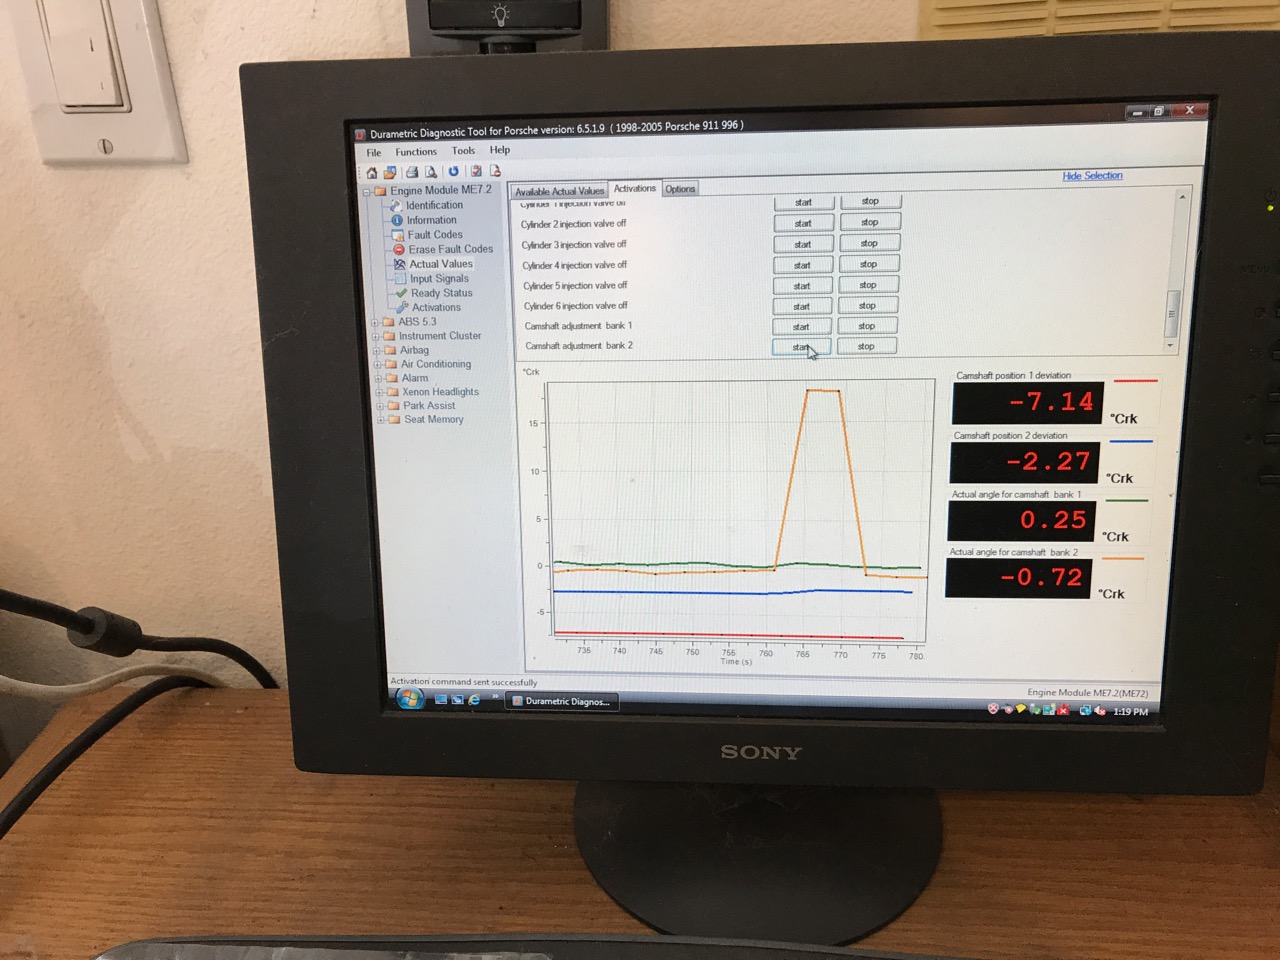
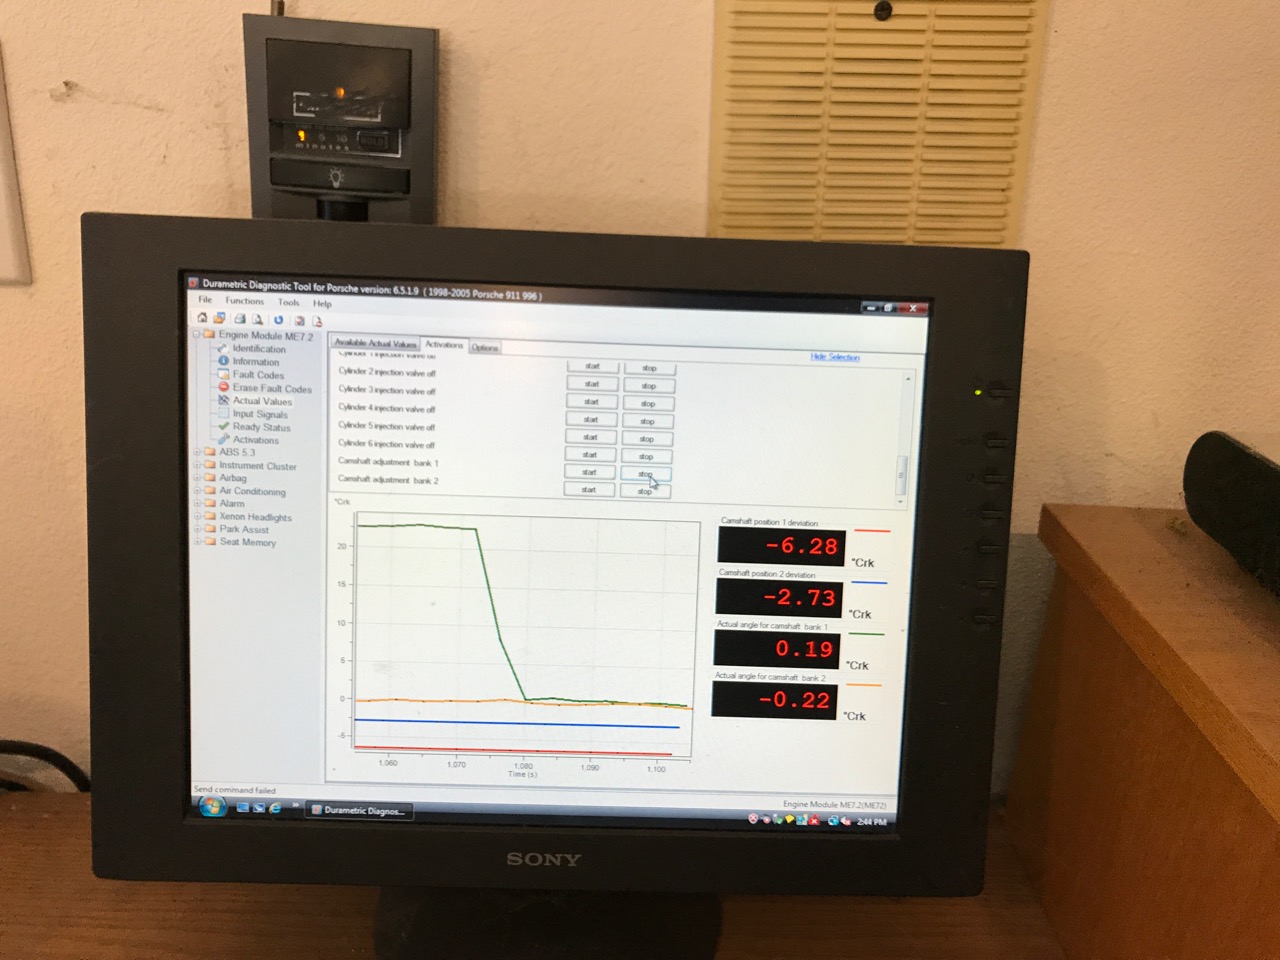
Well, I guess i'm not out of the woods yet... I noted something funny about my results I'd like to confirm because I still occasionally get a P1325 error (it's much better than it was but I'd like to fix it 100%). Please confirm a few things for me. In my first and second picture (above) it shows my ability to activate bank 1 and deactivate it by clicking the "start" and "stop" buttons in the Dramatic software (see mouse hover and resulting timing changes). I also hear the engine idle change when i activate and return to normal when I deactivate bank 1. When I activate bank 2 (click the start button for bank 2) I hear a change in the engine idle but then the engine idle quickly returns to normal (within seconds). I also see a very short change in the timing graph for bank 2 (see attached picture). This is without ever clicking the bank 2 "stop" button. Just to confirm, the timing graph (and idle change) should hold until "Stop" is clicked, right? I'm going to go back and check the voltage at the device in the DME that supplies ground to the solenoid. I want to see if it holds consistent when I activate bank 2 or if it's just a pulse. Assuming my thoughts are correct that the software should treat both banks the same. What do you think would cause the brief change only in bank 2? is it mechanical (is the solenoid maybe sticking) or maybe electronics (maybe DME has got more issues)?
-
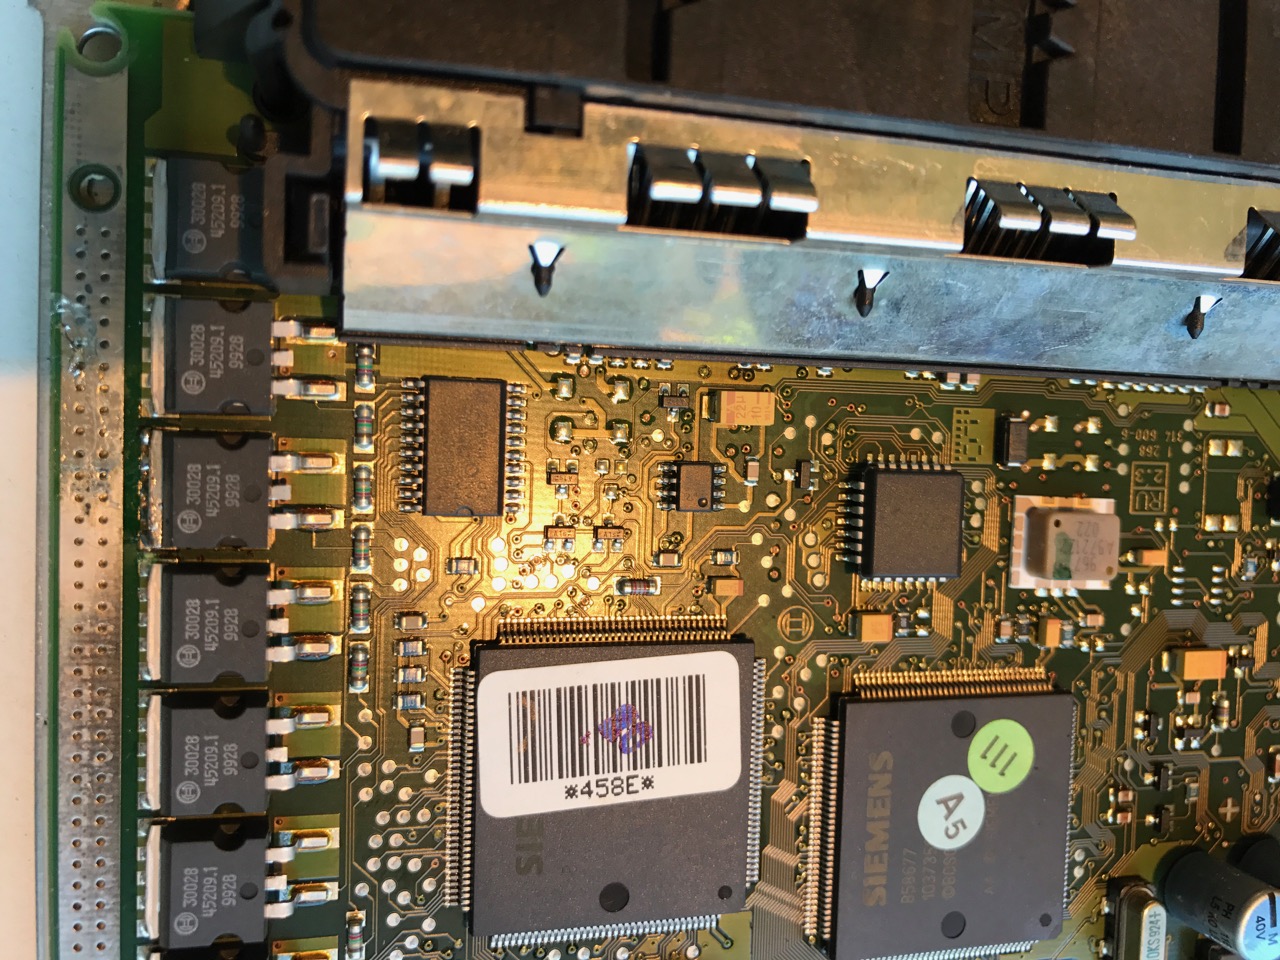
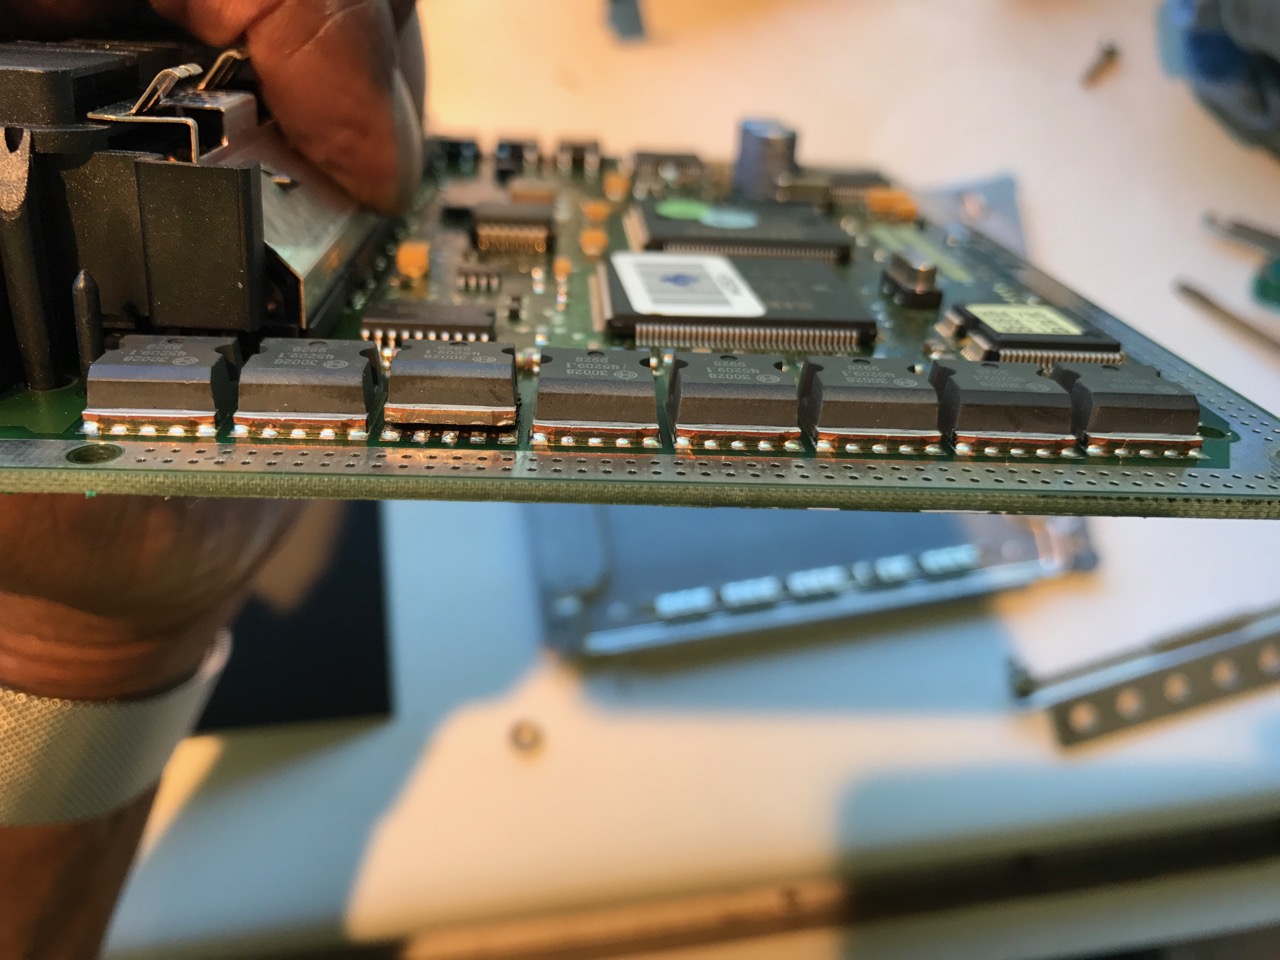
Oh My Gosh, that was it... I hooked everything back up. Durametric can now control both banks. Thanks so much for your help. A two year problem resolved with just a little solder. Could not have done without your help thanks again . Oh, I added a few more picts of the job (for the next guy with this issue). My soldering doesn't look great but I was concerned I'd overheat the device. The solder flowed to the pads and component so it's all good...
-
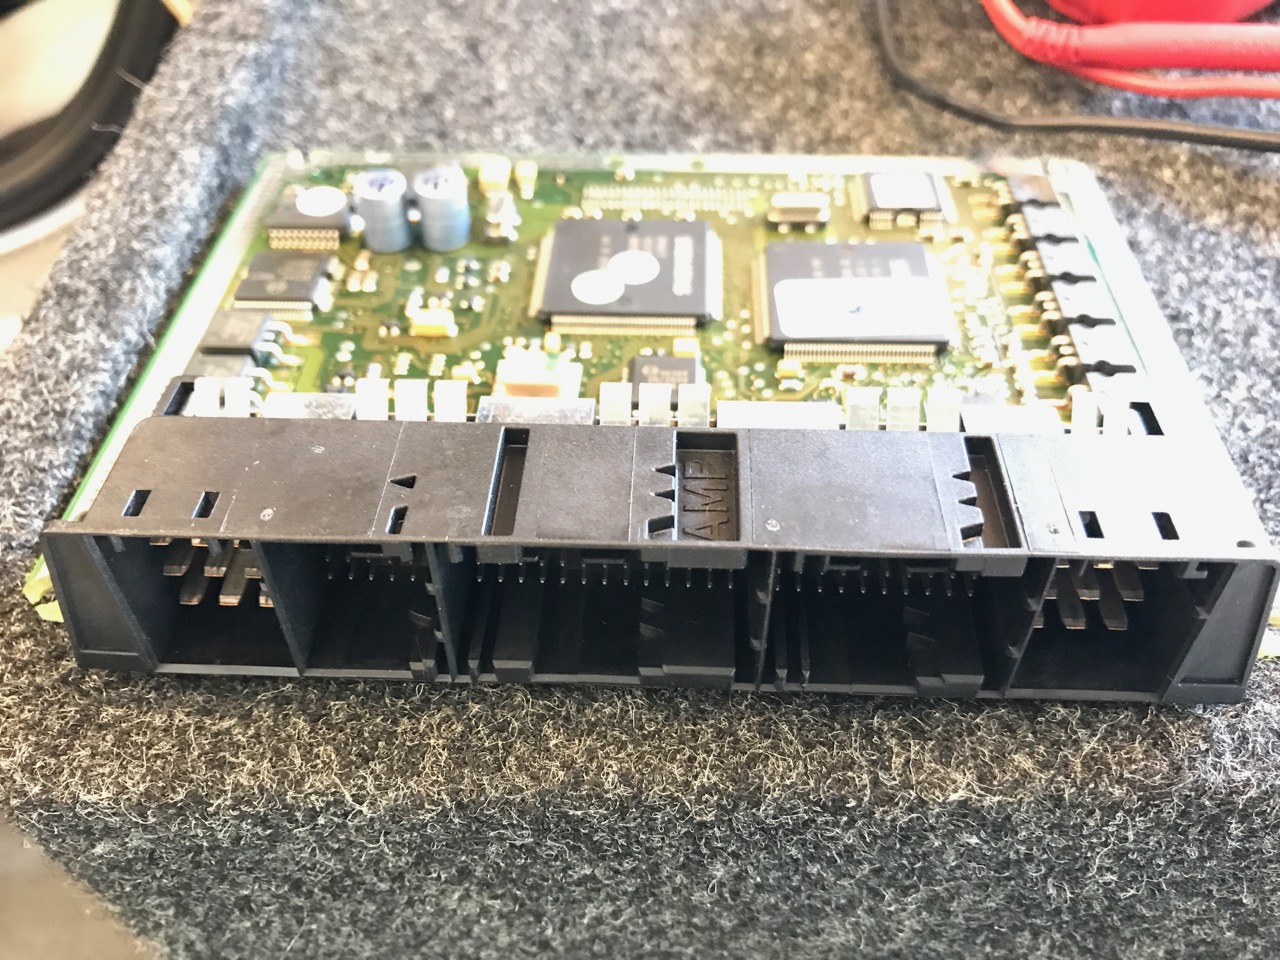
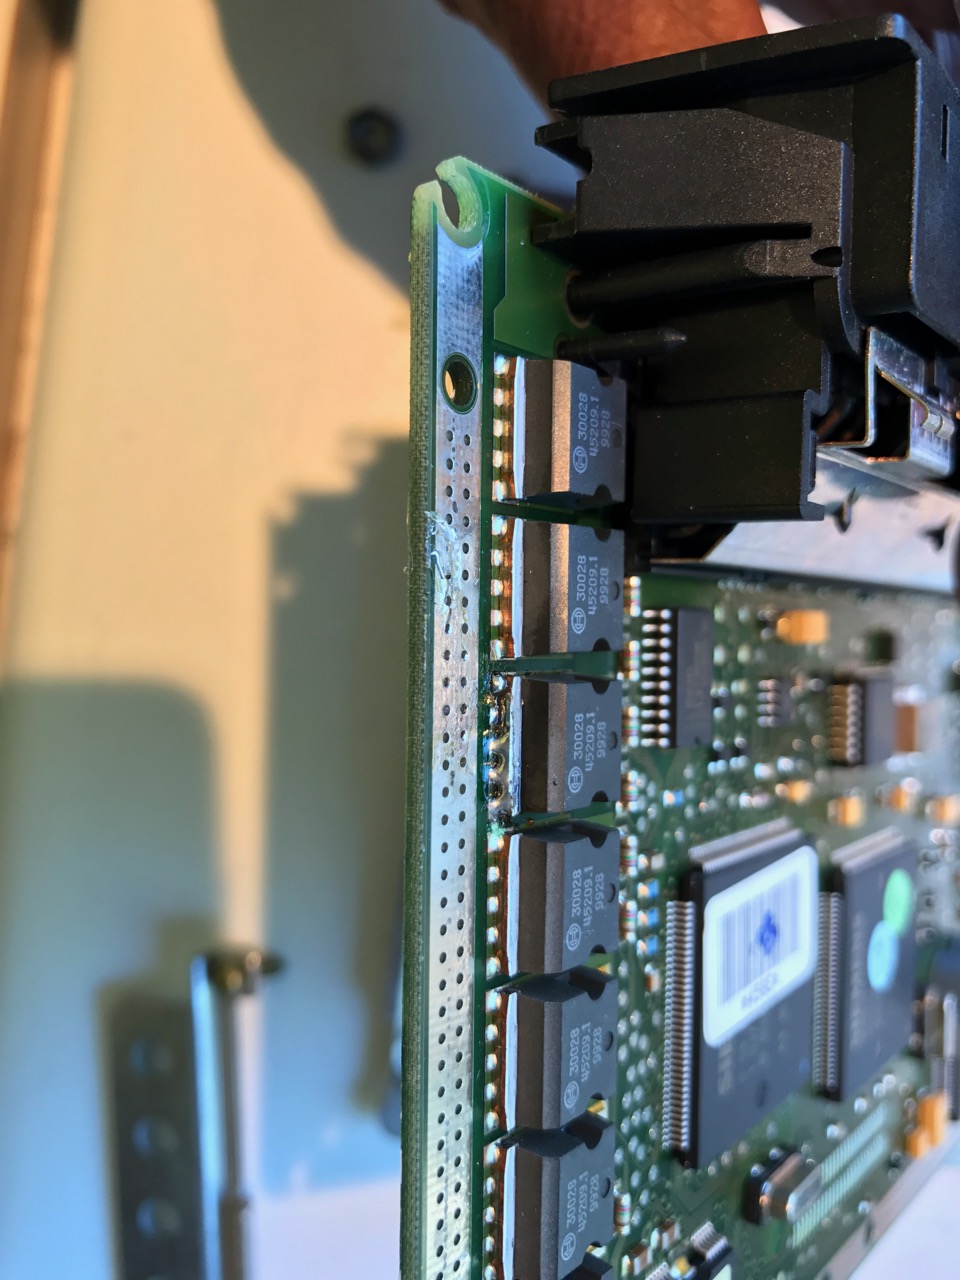
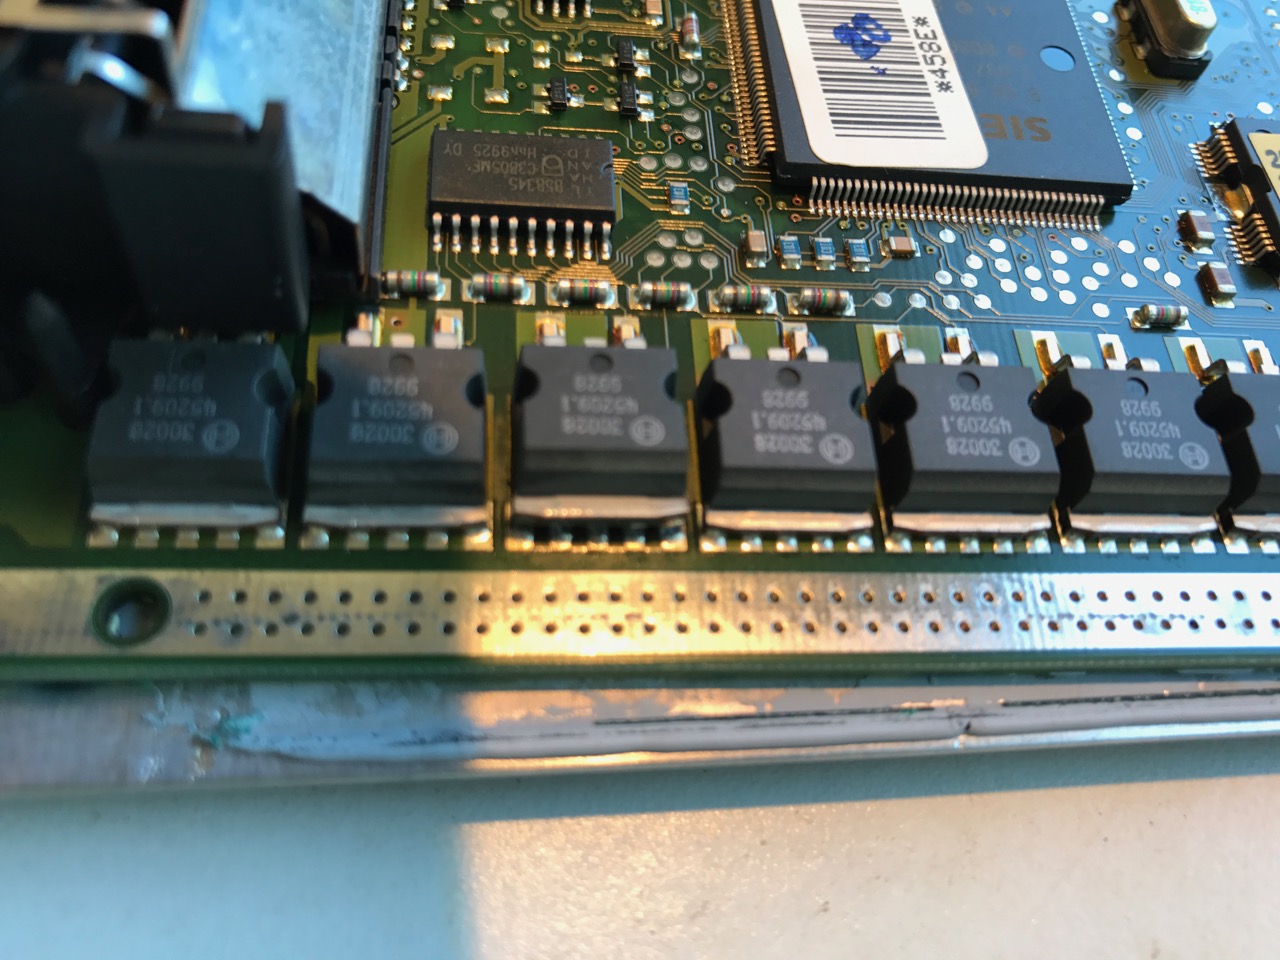
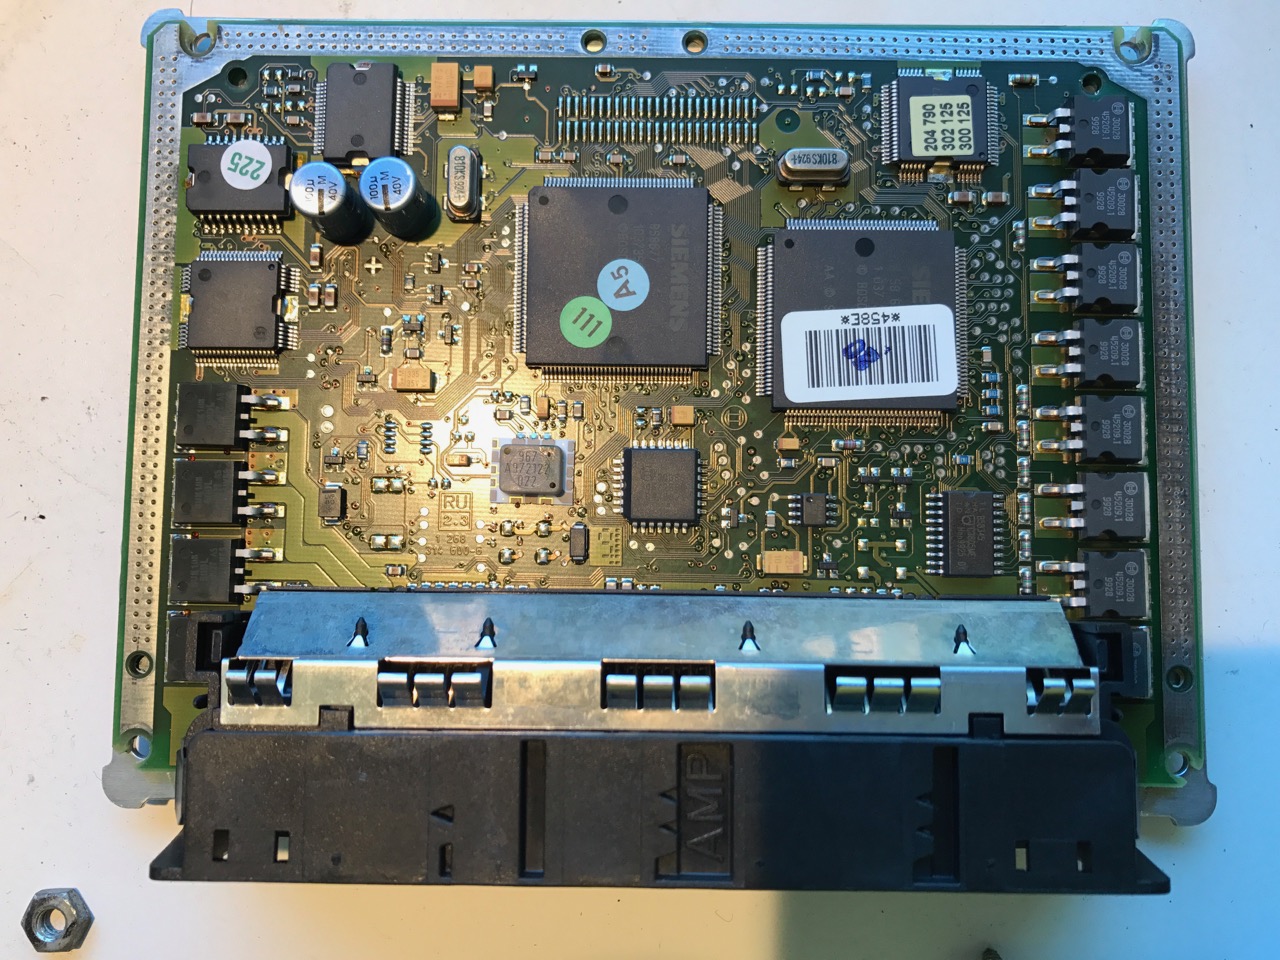
Well, no burnt parts or smell but after some close observation I notice something (see picts)... Could I be so lucky to find a bad solder joint? I'm sure this should be soldered down to make contact. I have no idea if this is the device that controls the solenoid in question but my bet is, it is... I'm going to solder it down and put it back together for a quick test. Back with more results soon...
-
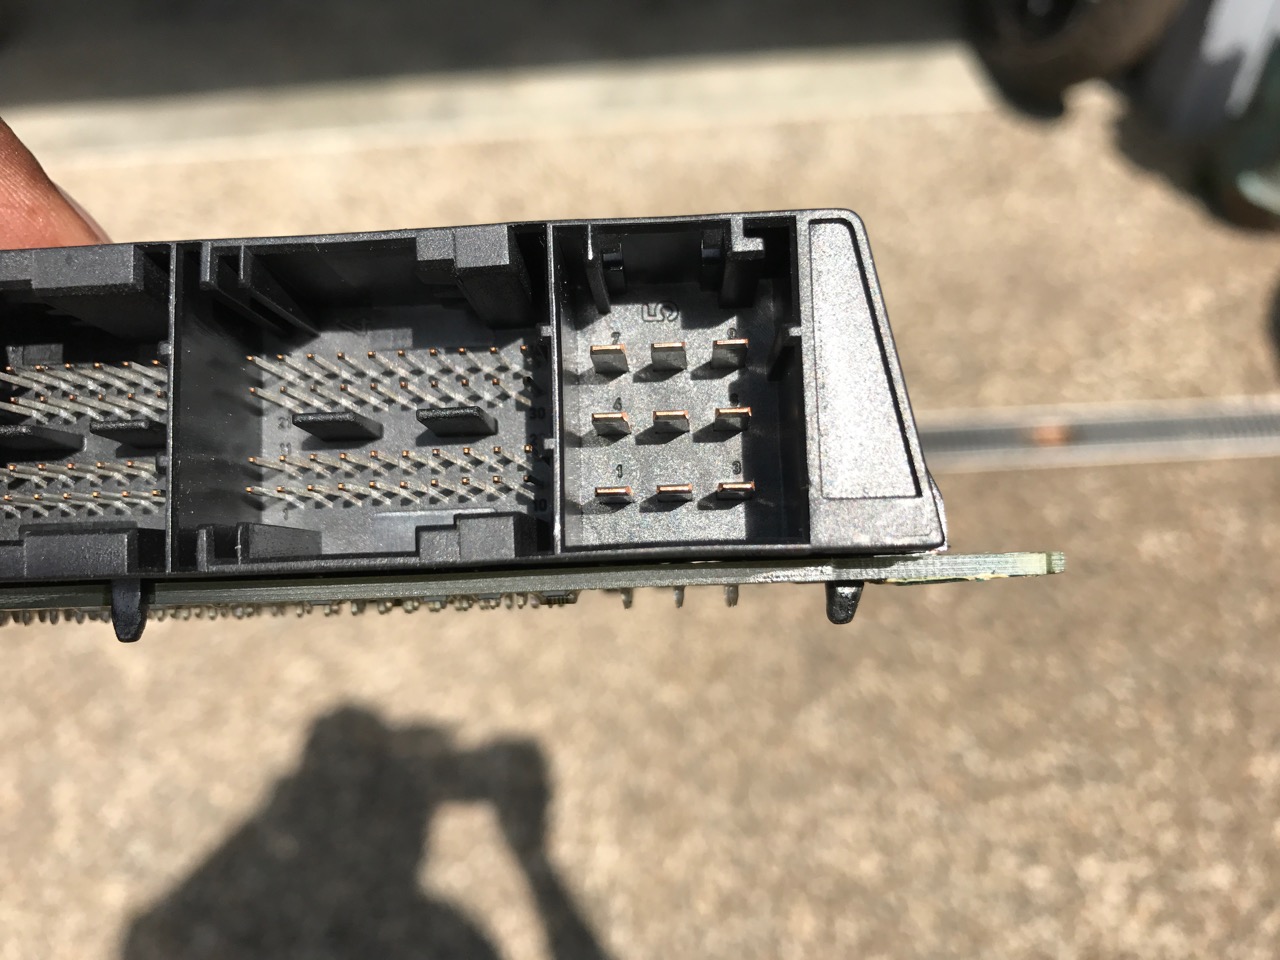
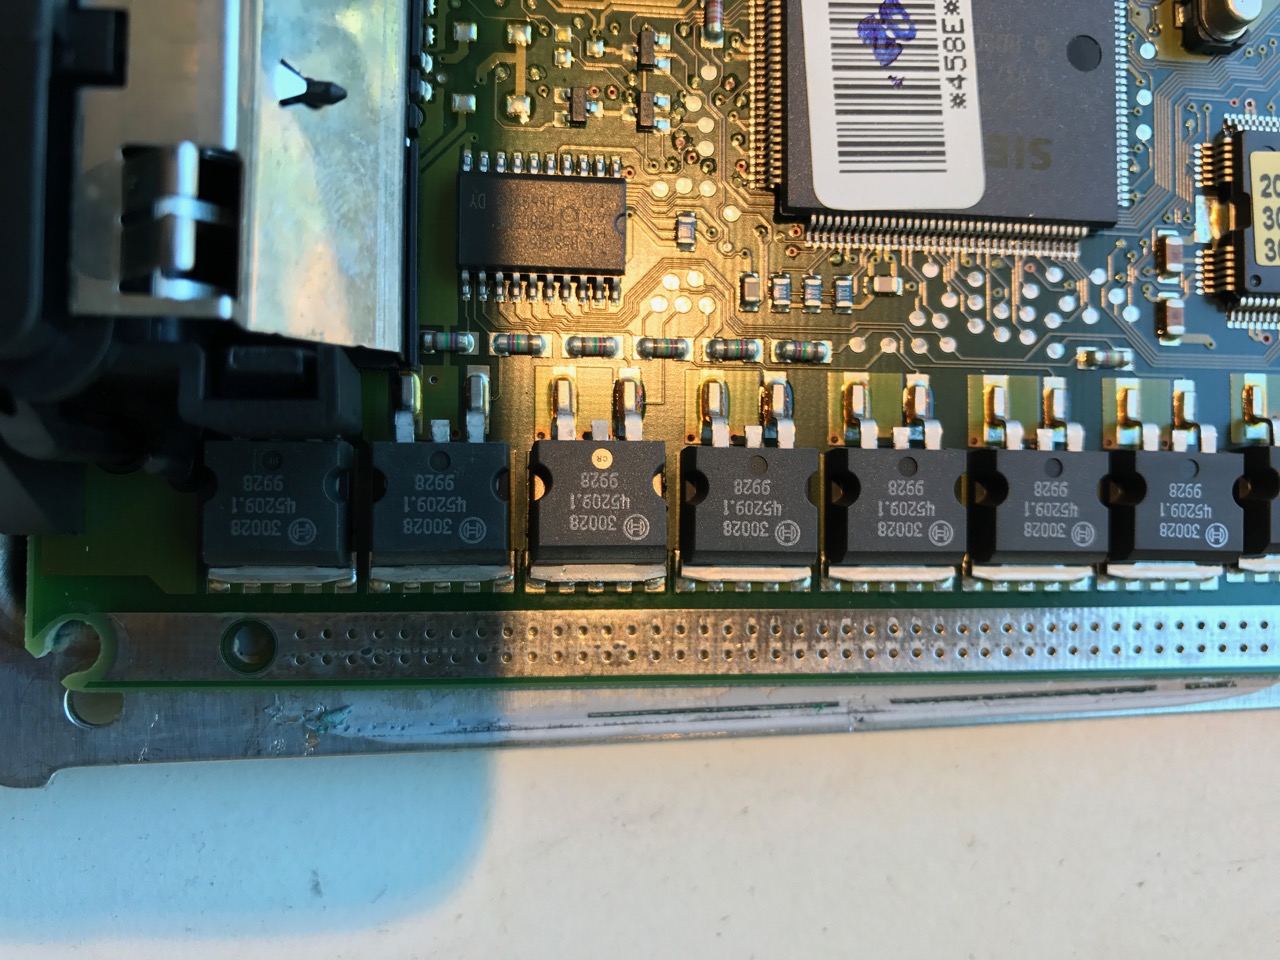
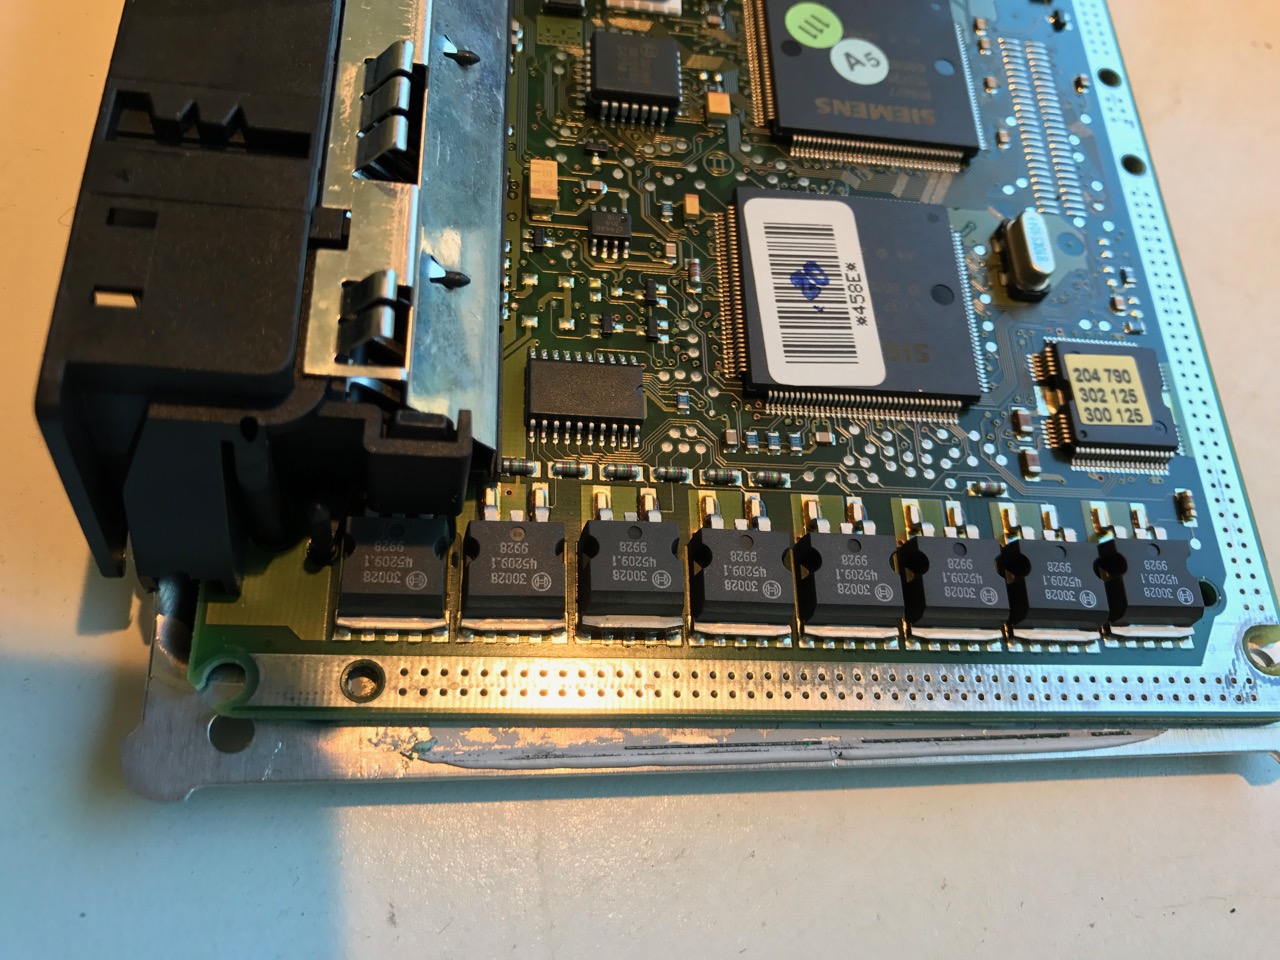
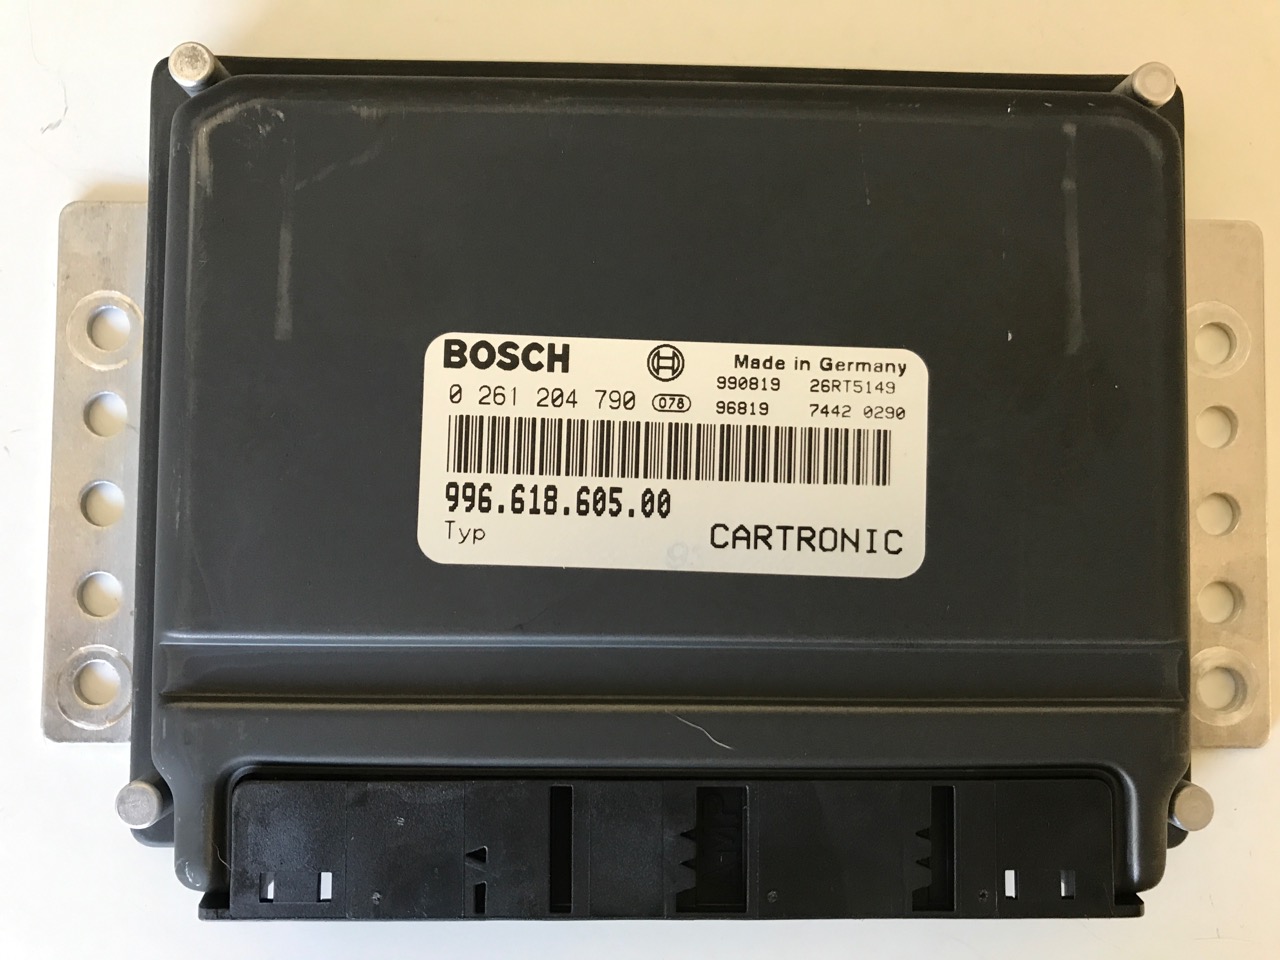
I decided to pull the DME first thing. When I got to the area of it I discovered it has a bunch of connectors rather than one big one. I disconnected them all, pulled it from my car and took it to my work bench (see picts). It's different than i expected (my car is a 2000 C2). I don't have the pin out for this model, but decided to take a look inside.
-
I plan to jump on this today. I'm going to first check the solenoid resistance from the DME connector (from what I read it seems to be easer to access than from the engine compartment). If that looks good, I'll try disconnecting pin 25 and activating the solenoid with a external supply (small battery) while the engine idles. If it changes, I know it's the DME. If not, then I'll have to jump into the engine compartment and get my hands dirty.
-
Oh wow, Thank you for the info and link. If this is my problem, I'll be happy to fix it. I'm a lot more comfortable with electronics than special tools to replace parts hard to reach or requires hours of disassembly. I'll update soon but thanks again.
-
I want to update as my work had me out of the country for a while and I've not had the time to address this so the car has sat in the garage up till now. So I'd like to get back to this. Today i reattached the Durametric and this time while watching the actual cam timing while activating bank one and bank two cam shaft bank solenoids. Activating bank one changed (using the Durametric) the cam timing and engine idle a lot (about 22 degrees). Doing the same with bank two did nothing. This leads me to believe the error message I'm getting has a typo or something is not lining up. Most importantly, one bank responds with about 22 degrees shift, the other does not. According to the data, it's bank 2 thats not responding. Is this common? has anyone else seen this? Does this sound like a solenoid or something bigger? My real question is can I fix this at home or will it require a shop visit. I'm pretty good wrenching my own car but if requires a lot of special tools or an engine pull, thats just to much time/work for me. Please advise... The pictures show activating bank one and the response I see (and hear in the engine idle). Doing the same with bank 2 gives zero change.
-
Ok, Just a quick update. I took the car for an hour long drive, heated to temperature. Here is the results for the camshaft deviation with the P1325 Error: Her is the same setup but just after clearing the P1325 Error: Moving on to troubleshoot the solenoids...
-
Thanks JFP, I will take your advice addressing the P1325 error first. The cars performance seems unchanged. Really the only thing I've noticed a slightly ruff idle but after clearing the error code, its smooth again (until the P1325 error comes back). I'll keep posting my progress..
-
I will run the devation graph again after a good warm up. I'll also do some reading on the cam tensioner pad replacement and blocked passages in the solenoid valve. I'm pretty handy with a wrench. Not afraid to get into it. Just wondering if the engine needs to be pulled to replace the cam tensioner pads? So what I gather is the p1325 error is not necessarily my IMS about to go and the risk of causing damage driving it is relatively low (what I mean is not much higher than before the error), correct? I had plans to pull the transmission later this spring to replace the IMS and clutch at the same time. Can this p1325 error wait till then, OR address the p1325 error separately (right away), OR should I move up my IMS/clutch up to right away (this is a tuff one, my time is short right now)? Just trying to get a sense of urgency... The Porsche dealership is not an option - Don't have the $$$.
-
Thanks JFP, I've searched the forum for info but sadly, not found a solution. The link you suggested had me on the edge of my seat reading every line, just to find there was no resolution to the problem. I've read a few other stories but still no clarity on a solution. I'm wondering how serious of an issue this is. I've not driven the car since but would really like to know if it would do damage to drive or just take a performance hit. Any other suggestions? please post... Thanks,