Welcome to RennTech.org Community, Guest
There are many great features available to you once you register at RennTech.org
You are free to view posts here, but you must log in to reply to existing posts, or to start your own new topic. Like most online communities, there are costs involved to maintain a site like this - so we encourage our members to donate. All donations go to the costs operating and maintaining this site. We prefer that guests take part in our community and we offer a lot in return to those willing to join our corner of the Porsche world. This site is 99 percent member supported (less than 1 percent comes from advertising) - so please consider an annual donation to keep this site running.
Here are some of the features available - once you register at RennTech.org
- View Classified Ads
- DIY Tutorials
- Porsche TSB Listings (limited)
- VIN Decoder
- Special Offers
-
OBD II P-Codes - Paint Codes
- Registry
- Videos System
- View Reviews
- and get rid of this welcome message
It takes just a few minutes to register, and it's FREE
Contributing Members also get these additional benefits:
(you become a Contributing Member by donating money to the operation of this site)
- No ads - advertisements are removed
- Access the Contributors Only Forum
- Contributing Members Only Downloads
- Send attachments with PMs
- All image/file storage limits are substantially increased for all Contributing Members
- Option Codes Lookup
- VIN Option Lookups (limited)


Orient Express
-
Posts
680 -
Joined
-
Last visited
-
Days Won
3
Content Type
Profiles
Events
Forums
External Paint Colors
Downloads
Tutorials
Links Directory
Collections
Store
Posts posted by Orient Express
-
-
Nice write up gary... I'm gonna head out to sears to get some jack stands..
would it be ok if I used 2x4's on all 4 jack stands to elevate the car even more?
I take it the porsche hydraulic jack won't work and I need to get the kind you have
right?
I don't think you will need to give the jack stands any boost. The limiting factor in how high you can get the car up is the lift height of the hydraulic jack.
-
Gary, from the picture attached, could you insert an arrow where the jack should contact the part on the car? - Thanks - I plan on doing this tomorrow and do not want to make any mistakes.
Tony

-
Hey,
A local gas station in my area offers 100+ octane racing gas (its a Union 76 station). I was wondering what issue if any i would run into? I cant buy any better then 91, so i was wondering if i mixed it with 91 like 1/2 and 1/2 or should i just avoid it.
:help:
I have been mixing 1:4 of 100 octane for my car since it was new. It does run smoother, gets better gas milage, and the engine is quieter then when I take a straight tank of 91. I recommend the blend, but not a straight tankful.
-
HELP! I need to know how to drop the convertible top when the electronic method isn't working. I push the drop button but the only thing that happens is that the convertible top light on the instrument cluster starts flashing. I'venever had a problem with the top before.
Is there a manual method to drop the top when the button isn't functioning?
On page 141 through 147 of the 2002 owners manual are detailed instructions for moving the top manually. If you have a different year, look under the section "closing roofs"
I assume that you have the emergency brake pulled when you do this, and the spoiler down & engine cover closed?
-
The mineral oil that is used for the PS pump can evaporate over time as well as leak. My C2 cab would make groaning noises from the steering when it was cold. turned out I was about 20cc low on PS fluid. also make sure that you only use the specified PS fluid. It is the same stuff that is used for VW, and audi.
-
Thanks! Now how was your car held up for this picture? i dont see jackstands... jacks... or lift... ???
I use a levitator lifting jack. You just plug it in the cigarette lighter, sit in on the passenger seat, and turn it on and it will lift up to 3 tons 3 feet off of the ground.
-
I have used a pressure washer and mineral spirits to clean off the cosmoline on the bottom of the car. This method has been very effective for me. It takes several sessions to get all of the cosmoline softened up and off, but it will come off.
Another route for you since you live here in Cupertino/San Jose is to have the bottom of your car steam pressure washed off. There is a place next to HP Pavilion at the corner of Santa Clara St/the Alameda and Stockton Ave. that will clean the underside of your car while you wait.
I would recommend this as your first step, and then you can do the detailing. Your goal is to make the underside of your car look like this:
Good luck with it. AND DON'T USE GASOLINE OF ANY SORT!
-
-
Is the reinforced jackpoint on the chassis aluminum or steel?
Does it need to be protected against corrosion as the paint is chipped off by the jackstands?
Thanks
Brad
the jack points are a stamped steel piece welded to the body. The piece is electro-coated with primer like the rest of the body, but can be scratched exposing bare metal. If you are in an area where corrosion from salt spray, etc. is an issue, then it is a good idea to either coat the ends of your jackstands with a coating like Plasti-Dip, or just stick a piece of rag between your Jackstand and the bottom of your car. Either method will reduce the possibility of scratching off the primer coat.
-
Orient,
Sorry to labour the point, but those stands in the last picture don't look all that stable. It looks like the contact points are at the jaws of the stand, the lower part of the saddle has nothing on it. It just makes me feel a little nervous looking at it. Does the car feel very steady and stable with this set up? Have you done it this way for a while? Maybe I'm being paranoid, but I'm worried that if you were under it and someone came up and lent on the car, it might rock off the stands!!! I thought maybe placing them under a cross-member somewhere would be better? By the way, excellent pics and beautiful underbody. Would eat my dinner off it!! -Jason
On this picture of the back lift point, the car is still being held up with the jack. I took the picture this way to illustrate how the jack stand and the lift point look.
With the car on 4 jack stands, it is even more stable than being on tires. If you notice, the front jack stands are oriented left and right, and the rears are front to back. With the weight of the car on the stands in this fashion, the car's weight pushes down and the out of phase orientations of the front and rear stands lock the car in place. As long as the surface that you are lifting on is flat and level, and the stands are centered on their respective lift points and all 4 stands are raised to the same level, the car is solidly planted on the ground. One can lean on the car, get in and out of it without any stability issues. I have been putting cars like this up on stands like this for many years, and have not had one fall off yet.
-
Look under your engine, and find the oil sump cover. That is the big square plate that is held in with several bolts around its edges. It has a hex head bolt in the center of it which is the oil drain.
Now, looking toward the back of the car just behind the oil sump cover in the center of the engine case centerline there is an area where the case is very sturdy looking. That is where you place the jack. Notice that it is centered on the sturdy area, and not touching the sump cover.
If you are still unsure, just look at the centerline seam of the engine case behind the sump cover, find the thickest portion of the case just behind the sump cover, and put your jack there.
For the Saddle type floor stands, I place the front ones on the square part of the car's lift point, with the saddle pointing left and right. By placing the saddle left/right on the lifting point, the car will pivot on the saddle as the car is lifted from behind.
The rear floor stand is positioned up/down on the round part of the rear lift point of the car. With the jack stands oriented this way, they lock the car in place, and make it very hard to inadvertently push the car off of the stands if someone leans on the car, or it gets bumped.
-
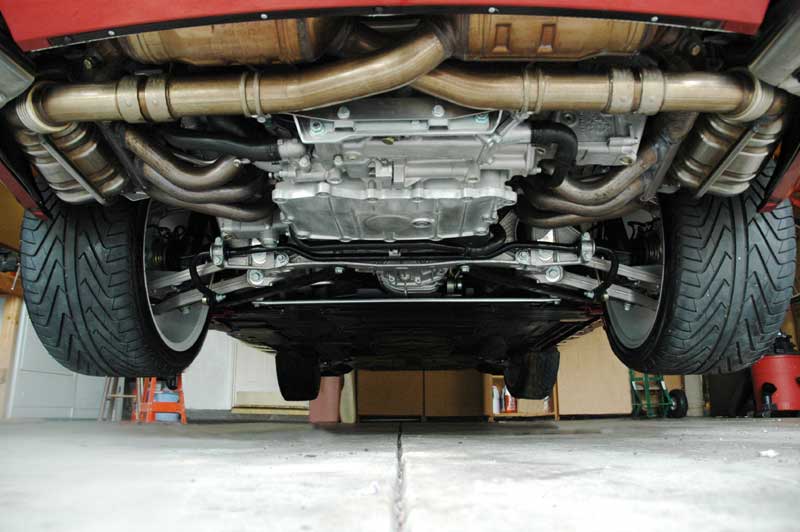
One of the questions that comes up frequently is what is the best and safest way to put your 996/986/997/987 up on jack stands. The chassis and jack points are the same for all models, and lifting the car up off of all 4 wheels is easy. Here is a little DIY instruction on how I do it.
The 4 lift points as described in your owners manual are where you support the car with Jackstands. Here is the jack stand that I use. Any Jack stand with at least a two to three ton rating will do.
First, you put the front jackstands on by lifting the car from the rear lift point. Using a standard hydraulic jack, lift the car up on one side so that both wheels are off the ground, and the front is high enough to clear the jack stand.
Here is the front lift point.
After you have one jack stand placed, lower the jack, and do the other side. The car is so stiff, that the other sides front wheel will come up off of the ground. Other side is just like the first.
Note the orientation of the lift points and how the jackstands are arranged.
Next you have to lift the rear. There are 2 places that mechanics use as a lift point for the rear. One is the rear sub-frame cross member that is below the engine and the transmission, and the other is on the rear engine case just behind the oil sump cover. I prefer lifting from the engine case because my jack does not clear the engine oil sump to reach the crossmember.
There is a large metal stub that is cast into the engine case. That is where you lift, making sure that your jack does not contact the oil sump cover casting. Center the jack on the engine or on the subframe and lift the car high enough to put the remaining stands on the 2 rear lift points.
And with that you are done.
Just take your time and make sure that each jackstand is centered and aligned properly on the lift points and you will have no problems.
One last thing, it is to your advantage to break the torque on all of the lug nuts before your lift the car up off of the ground. Also when you are lifting the car, make sure it is on a level surface, and the car is in neutral and the parking brake is off so the car can pivot on its wheels as it is lifted.
Lowering the car is the opposite of the above. Once you get the hang of this, you can have your car up in the air in under 5 minutes.
-
 1
1
-
-
If you get a new clean one, then put a layer of ScotchCal film on it. This is the clear film that is used on rocker panels to prevent rock chips. To apply it, clean the silver handle with adhesive remover, and then lay on an oversized piece of film. Use a heat gun to fit it to the handle.
You should be able to pick up a scrap at any installer of Stone Guard. You can also buy an 8x10 sheet of it from your Audi Parts counter
It is described as "Foil" and the P/N is AKL-448-300-04. It is a little expensive by this route, at $18 a sheet.
I use this stuff to protect lots of high scuff areas on the car. Properly installed, it is invisible.
-
Any suggestions on a good cleaner for the rear plastic window on a 99 Boxster and 911?
I have used plain old cleaner wax or swirl remover to clean up a plastic rear window. Metal polish will also work pretty good.
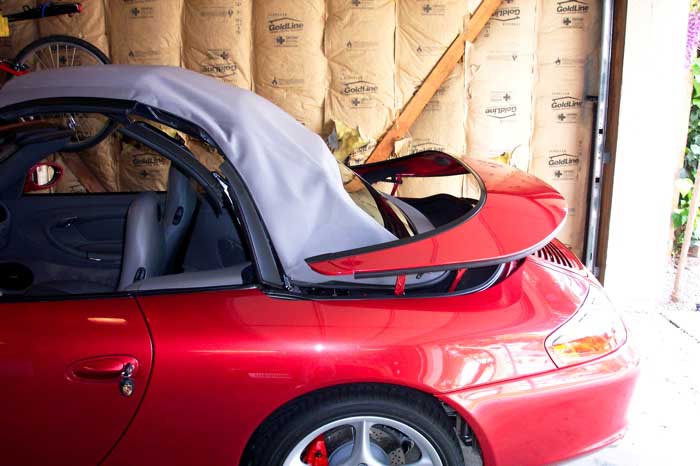
Also, I'm not sure if I have shared this before, but there is an easy way to get at the back inside of a Cabriolet window without being a contortionist.
First raise the top part way like this:
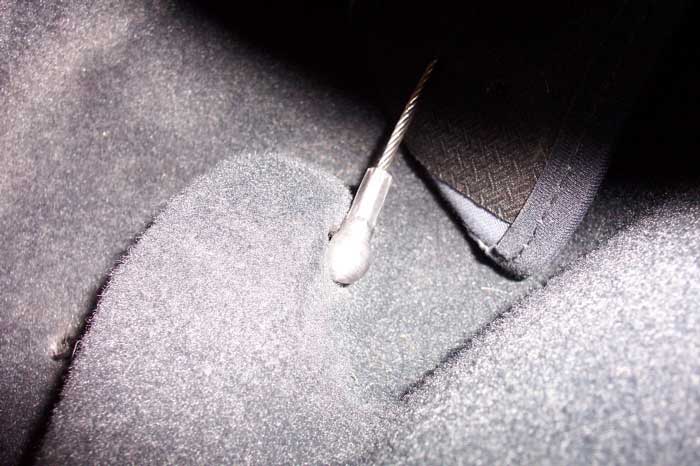
Next find the 2 wire ropes, one on each side of the back of the top that holds the top in place:
Next, pop off the ends of the wire ropes from the bottom
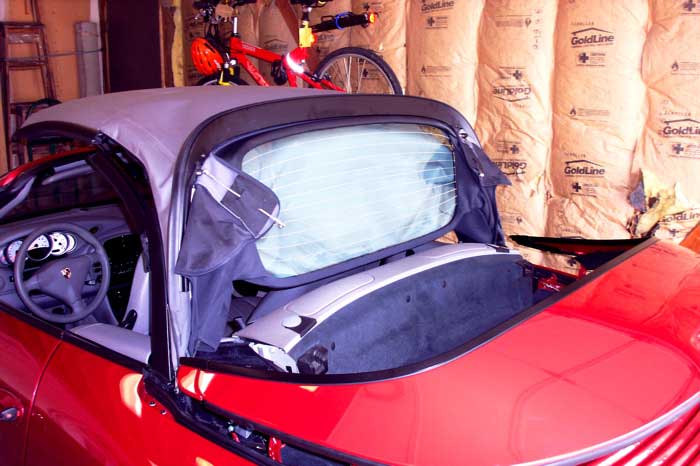
Finally, lift up the back of the top for easy access to the inside of the rear window.
My car is an 02 with a glass window, but it is exactly the same for the earlier plastic window cars.
After you are done, follow the above steps in reverse.
-
I have been using a Speed Lingerie Bra for about 3 years now, with excellent results. Each bra is custom tailored for the car, and the workmanship is outstanding. I think that they are worth the price.
-
So I a have 00, C4 Cab. It has 12K miles on the new Engine. (total of 32K miles). Yesterday I filled the gas and checked the Oil and Coolant levels. Oil was at 5/8 before the full mark on the dip stick and Coolant was at "Min" I got the oil changed about 5K miles ago.
During the day (80deg sunny) when I started the car I thought I noticed a white Smoke Puff.
Took the car to work. Allowed it to cool down and checked the coolant again. It was still on the 'min' mark.
Then later in the afternoon, drove home, once I got home I checked he Coolant level while Engine was running (No I didn't open the cap) just checked it thru the Expansion tank, the Level was at 'Max' while the engine was Idling.
My concern is abviously the white smoke puff and it being somehow related to the Coolant.....Coolant in the engine is a bad thing......!
So question is, is this all normal? I have read several posts on White Smoke Puff but nothing definite.
Does the Coolant level vary during vehicle operation?
Any help would be helpful..
As I understand, under no circumstances the car should loose any coolant...It indicates either an external or an internal leak.
The car is under full Porsche warranty.....So I can always have the dealer check it.!
I did have'em do a pressure test on the cap and Exp. tank and it all passed with flying colors. This was few months ago.
Thanks
Noor.
Don't worry, they all do it every once and a while. Boxer engines can sometimes get a little oil pooled in a cylinder that causes the smoke on startup. My 02 996 does it every once and a while, but only from the right bank. I figure that the ring gaps on a piston must get lined up to let the oil past.
It is not coolant, it is oil.
-
Alberto's car is from South of the Border! He lives in Monterey Nuevo Leon Mexico. In Mexico you can get all of the cool european cars that you can't get in the US. And the cool thing is that he just drove it up over the border! Anyone for a Mexican GT3 RS?
-
This may seem a little simplistic, but it has worked very well for me. If the paint is just chipped or is coming off if just a small area, I have found that using Testors model enamel paint does an excellent job of touching up brake calipers. My calipers are red, and I keep a bottle handy for touch up. This paint does not seem to be affected by the heat that the calipers experience.
-
OK, I was under the assumption that the Becker radios with a 2 digit designator were MOST radios, but if not try this:
The radio has 3 sets of connectors A, B, & C. You want to mess with connector C which is the one on the top of the radio. This connector is further broken down into 3 sub connectors, C1, C2, & C3. That is why the connector is in 3 colors.
C1 is the inner-most connector and has pins 1-6. This is where the phone and the Amp switch sense lines are.
C2 is the middle one and has pins 7-12. This one is for the CD changer logic and control
The analog Becker radios starting with the CD-220 have the ability to accept either a CD changer or AUX input, but not both at the same time. To change from a CD changer input to Aux-in input, you have to remove the CD changer control lines, and enable the AUX-in on the radio. If you do not have a CD changer, you may still have to enable the AUX-in feature.
C3 is the connector on the radio you are concerned about. It is the outboard one and has pins 13-20. This is the one that has the analog audio input lines.
1. In your case, I am assuming that you have a CD changer. If not then skip to the next part. You must make the radio think that there is not a changer, so to do that, connector C2 must not be plugged in. To do this you must separate the 3 subconnectors. They more or less slide apart and have a plastic spring clip holding them together. You can see the release nub between the connectors.
2. Then you add your new audio in lines to pin 18 (GND), pin 19 (yellow L+), and pin 20 (red R+) to connector C3
3. Now you need to enable the Aux-in feature of the radio. To do that:
Push and hold the "TP" button on the radio faceplate for about 8 seconds until "Becker 1" is displayed. Turn the tuning knob until "AUX off" is displayed. push either button directly under the arrows on the display to change the state to "On". Turn the radio on and off, and now Aux-in for your Mp3 player is ready.
However if this radio has a connector for a fiber optic cable on it, then all bets are off because it is a MOST bus radio and only accepts digital audio inputs from the changer
-
Is the CDR 22 a MOST bus radio? If your car is an 03 or later, then this type of radio cannot accept an analog input for a MP3 player.
-
Loren:
here are my Monterey weekend Photos:
And here is a CGT that I mixed it up with on 101 south of Gilroy on Monday
-
Yeah, don't forget to put a drop of Loctite on each bolt when you reinstall them. The rest is a piece of cake.
-
I buy the Stoner window cleaner directly from Stoner by the case (12 cans) for $30. that is half price from buying it a single can at retail.
I do not use Wax, but use Rejex as the top coat.
-
For the older C4, yes, they are the same except for the color. For the C4s they are different. I believe those are from the turbo.


Putting your 996/986/997/987 up on Jackstands
in 996 Series (Carrera, Carrera 4, Carrera 4S, Targa)
Posted
Yes they are Craftsman jack stands. The weight of the car keeps the bar from coming out.