Welcome to RennTech.org Community, Guest
There are many great features available to you once you register at RennTech.org
You are free to view posts here, but you must log in to reply to existing posts, or to start your own new topic. Like most online communities, there are costs involved to maintain a site like this - so we encourage our members to donate. All donations go to the costs operating and maintaining this site. We prefer that guests take part in our community and we offer a lot in return to those willing to join our corner of the Porsche world. This site is 99 percent member supported (less than 1 percent comes from advertising) - so please consider an annual donation to keep this site running.
Here are some of the features available - once you register at RennTech.org
- View Classified Ads
- DIY Tutorials
- Porsche TSB Listings (limited)
- VIN Decoder
- Special Offers
-
OBD II P-Codes - Paint Codes
- Registry
- Videos System
- View Reviews
- and get rid of this welcome message
It takes just a few minutes to register, and it's FREE
Contributing Members also get these additional benefits:
(you become a Contributing Member by donating money to the operation of this site)
- No ads - advertisements are removed
- Access the Contributors Only Forum
- Contributing Members Only Downloads
- Send attachments with PMs
- All image/file storage limits are substantially increased for all Contributing Members
- Option Codes Lookup
- VIN Option Lookups (limited)


lewisweller
-
Posts
926 -
Joined
-
Last visited
-
Days Won
3
Content Type
Profiles
Events
Forums
External Paint Colors
Downloads
Tutorials
Links Directory
Collections
Classifieds
Store
Posts posted by lewisweller
-
-
4 hours ago, mbagge01 said:
Lewisweller, the passenger precat is very easy to replace compared to the drivers side. You can easily reach it with your hand from under neath the car. If I remember correctly, I used an angled ratchet socket with a long extension and from above and below helped to slide it on to the O2 sensor. Once you loosen the sensor, you can unscrew it from below with your hand and then place the new one.
Thanks Mark, I've actually ordered two. So whats your advice to do the drivers side pls?
-
1 hour ago, ekstroemtj said:
Wondering how this can happen during taking off the valve cover?!
Pretty easily, when you lift off the valve cover the back edge catches on the metal tab of the camshaft pick up and it's then bent.
Luckily before I removed my bank 1 valve cover I read the Pelican diy guide and made sure I didn't catch mine when lifting it off and back on.
And who said the internet is full of bad info? Lol
-
29 minutes ago, ekstroemtj said:
Great!!! Lewis you remember what i said?!
the bad running started after they changed my valve cover and spark plug gasket. Maybe here is a hidden reason for the trouble
Thomas definitely worth a check to see if related to your issues.
Cobra23 glad you found and fixed it, bet that feels good!
-
How fortuitous, I been having the beep beep every so often and do the triple pull and lift the pedal up sometimes to lol, so I just added this to the lambda sensors I ordered from eBay to come over in one package from the UK.
£16.95 and free p+p to reach mothers house. Bargain to stop that annoying beeping.
http://m.ebay.co.uk/itm/FEBI-37820-Gas-Spring-foot-operated-parking-brake-/401170530356?nav=SEARCH
My old receipts show it was changed before in 2010, rolls eyes..........
-
On 24 November 2016 at 9:22 AM, Zakowsky said:
Thanks Lewis – my job for this weekend will be the check valves and to go over the vacuum lines, especially at the back where I haven’t really looked much yet. The boost is fine sometimes (0.8 – 0.7) but other times not, and there still is what I think is a minor surging sound when I lift off, after the wastgates open. I recorded it with the GoPro, just have to get it processed and posted.
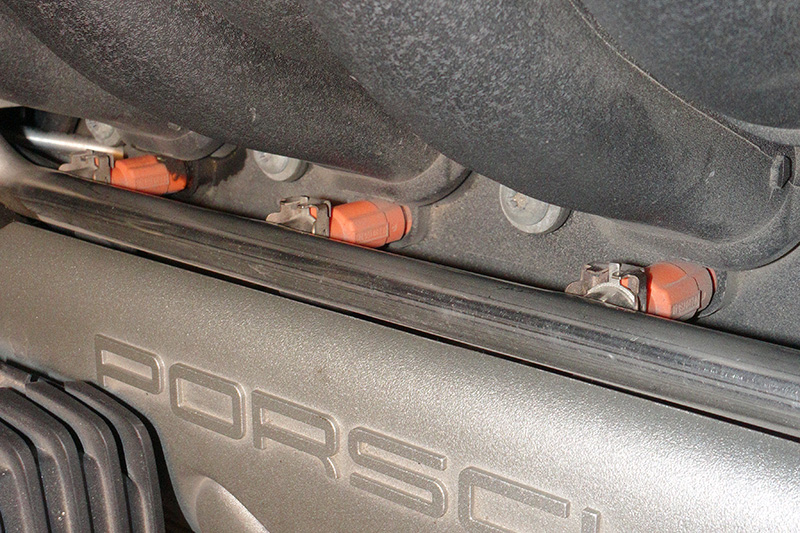
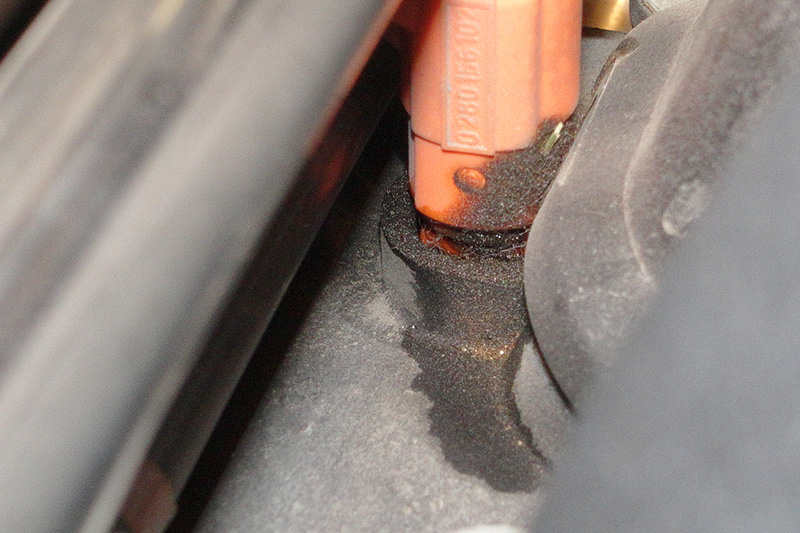
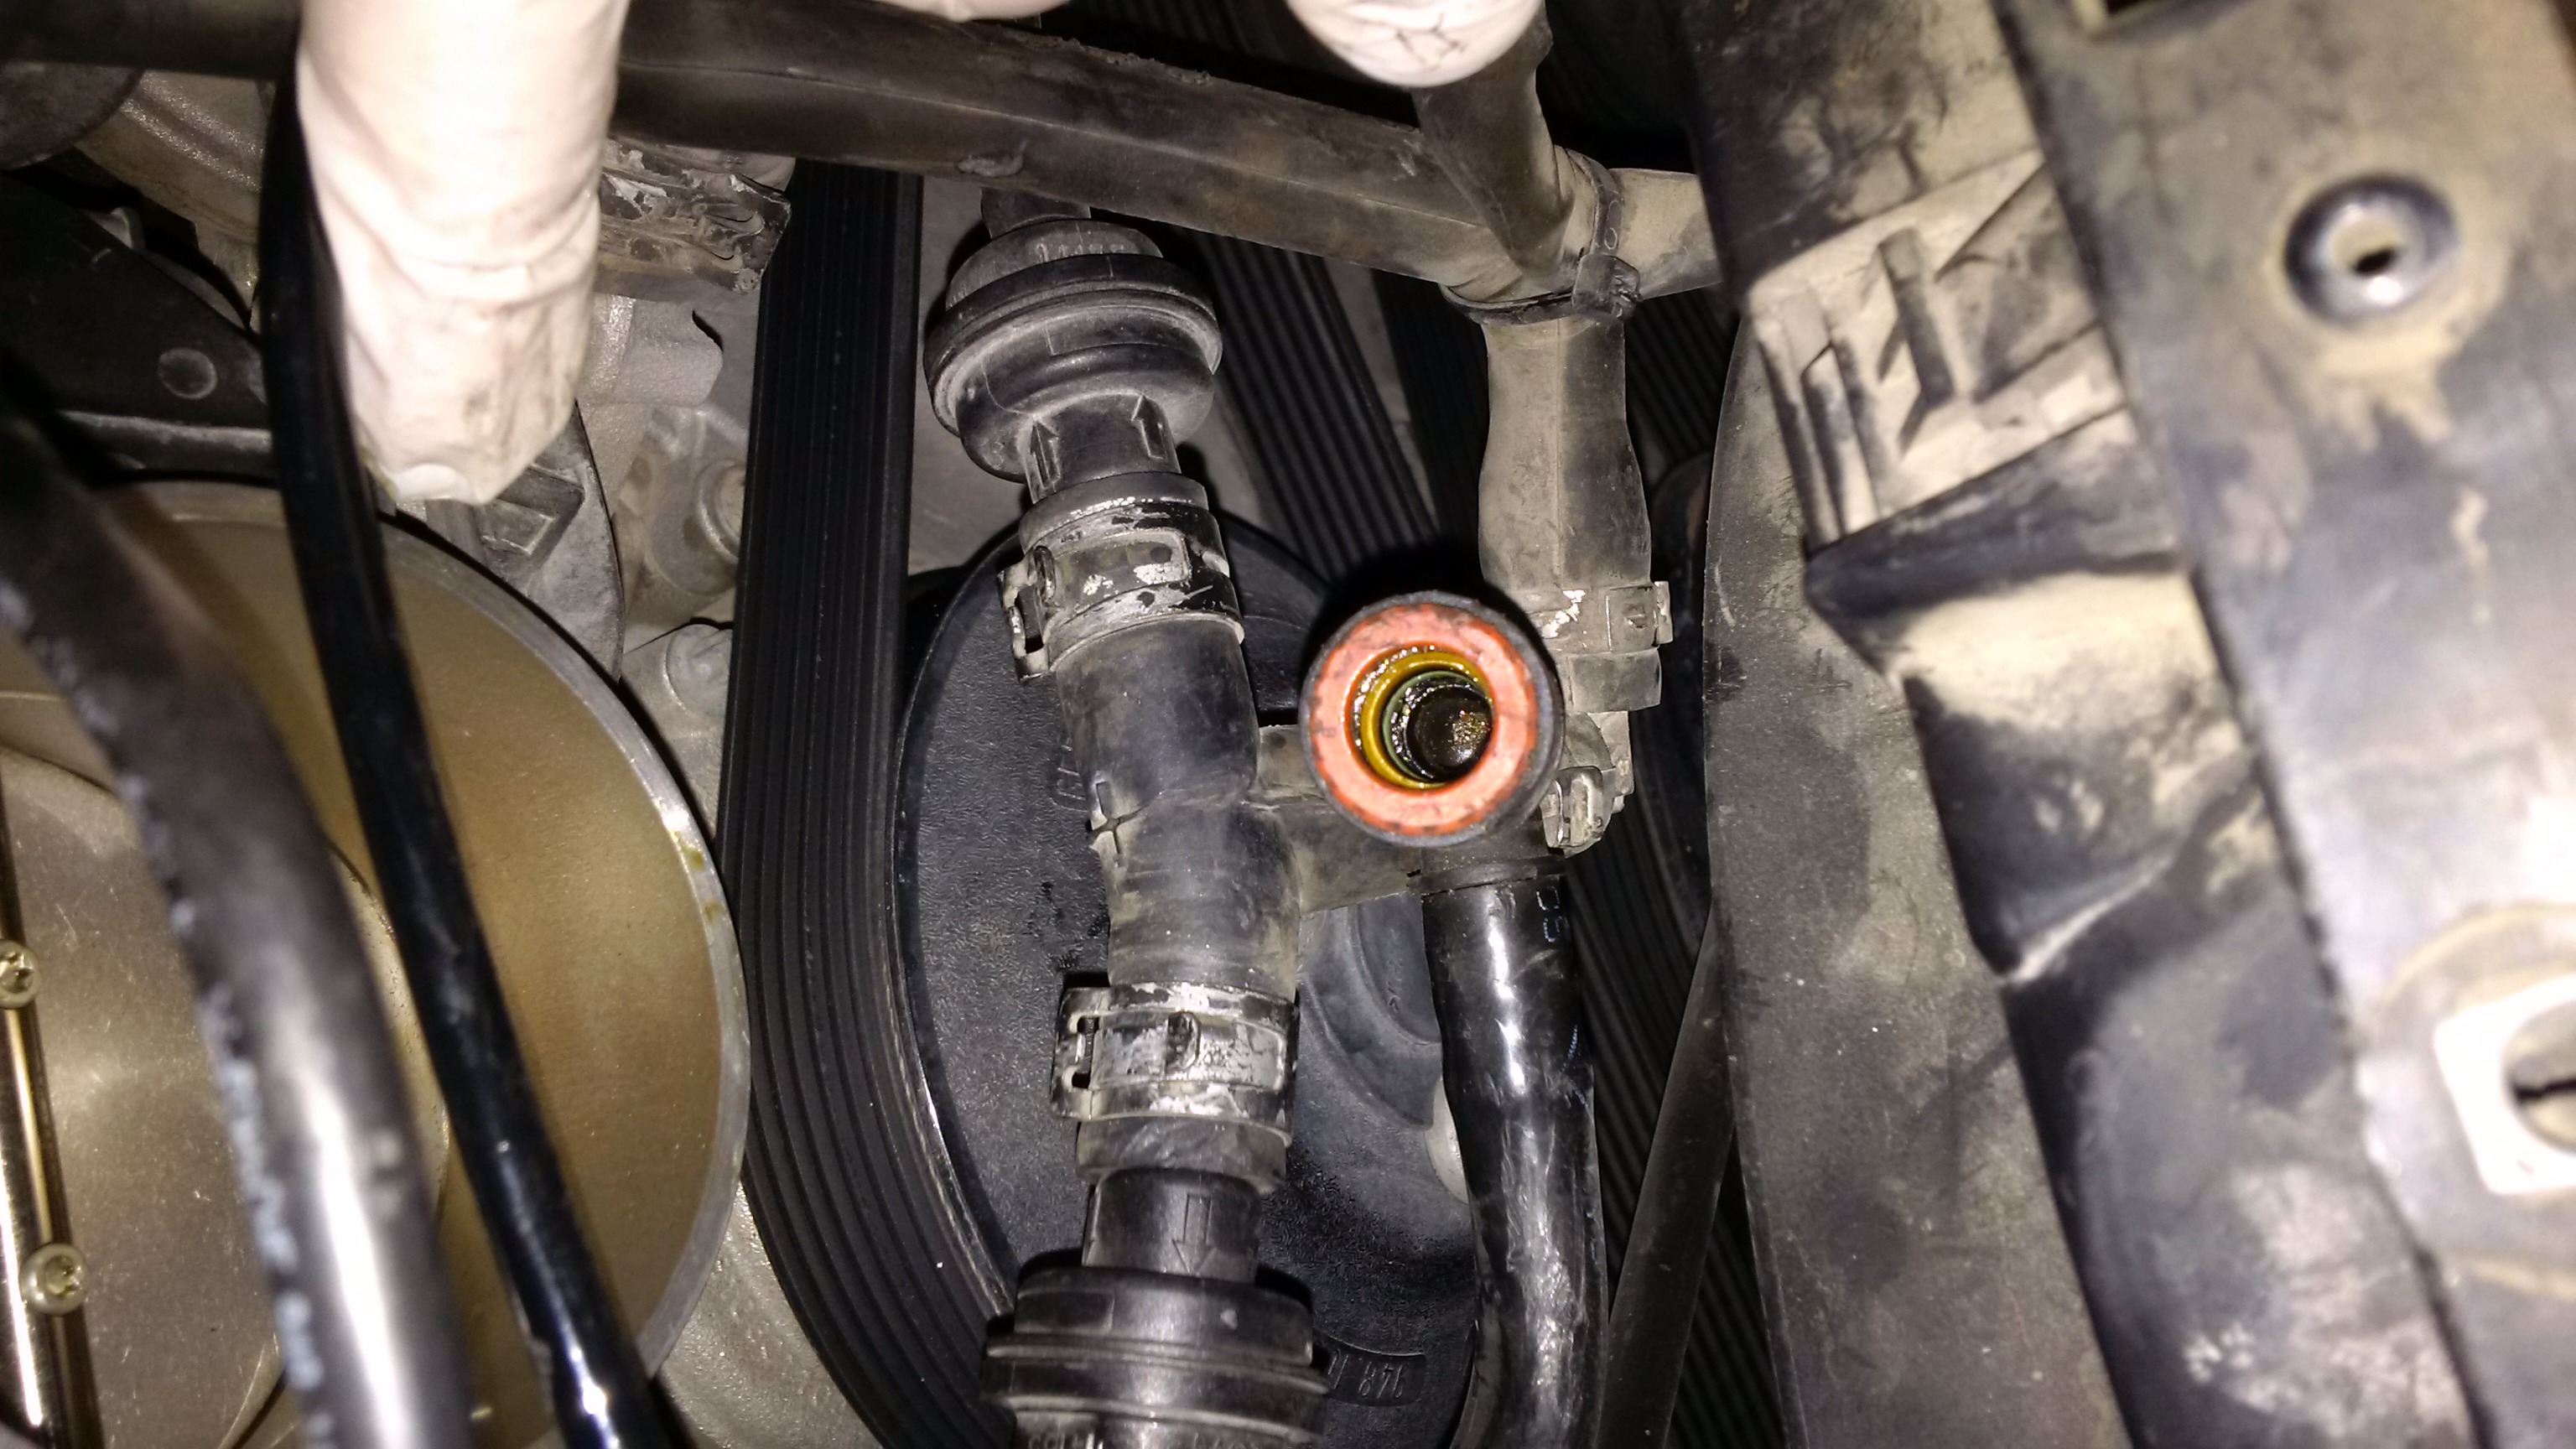
Pictures always! Here is the leak from the rear injector, the others are fine.

I suppose I haven’t paid much attention to this because on my old Jeeps most of the injectors leak and they still run fine! - but then again, this isn’t a Jeep engine. I have also had engines where as soon as you pull the fuel rails off, all the o-rings start leaking, so I guess I try to avoid doing so. I am not sure how long this has been like this – I need to clean it off and see how it builds over time. But maybe this does contribute to the variable rough idle and maybe even the hard starting.
The injector orings are cheap, my advice would be to remove the intake manifold this gives you the opportunity to do the following:
Change all injector orings
Replace intake manifold rubber gaskets
Replace throttle body gasket and clean
Check all the pipes at the back and check valves and change over valve piping (this controls the divertor valve opening and closing.
Also a great time to check all the cooling pipes and wires to start motor are all good clean tight not leaking etc.
Even take out the starter disassemble and clean up all insides and connectors if you got a spare hour.
Manifold only takes 45 mins to remove and 30 mins to reinstall.
Disconnect battery of course.
Before you disconnect the fuel line either leave over night to make sure it Depressurised mostly or pull the fuel pump fuses whilst running and let the engine die relieving all the pressure.
Lots of pictures in my earlier post here
-
34 minutes ago, 911nick said:
My 06' S does have Kessy. Luckily, the replacement module came from an 06' GTS that was apparently equally equipped.
Nice job well done.
-
25 minutes ago, 911nick said:
Lewis, I found the module on ebay. The item was located within my area. I called the business, and it turned out that the owner lives near me. He was kind enough to delivery it to me that day on his way home. Since it is a used module, it came pre-progamed. How cool is that!
Interesting, that means as long as the used module is the same model and spec options wise it's plug and play, great. Also mean the coding for keys is not required then or you wouldn't be up and runny at all. You have keyless entry correct? (kessy)
Sorted thanks for the info.
I'm going to find a used module and swap out mine hopefully fix this check tail light bug.
-
On 16 November 2016 at 8:37 PM, Cobra23 said:
All bolts were tight both sides but I did find where the crankcase breather check valve connects to the air/oil separator what not completely pushed on. I made sure that connection was good and test drove again with same results.
P0016 is bank 1 camshaft sensor reading is different to the crankshaft sensor.
You need to check the camshaft sensor pickup tabs are not bent! They can be bent when you lift off the bank 1 valve cover. Just a small movement will weaken the inductive pickup signal and lower rpm the sensor voltage is not good.
Aside from this all obvious things like the gaskets not seated properly, pcv pipes leaking and coils seated on plugs tightly and plugs gaps correct and torqued down correctly?
-
11 hours ago, 911nick said:
Lewis' diagnosis was spot on. I installed the new box, and everything works like it should! This repair only cost me $50. Lewis, you really saved my bacon. Ekstroemtj, I appreciate your contributions too.
Where did you get the replacement module from and what software did you use to program it? What about programming the keys?
My check tail light warning is starting to get tiring now, luckily I don't drive much at night.
It's time I think to spend some more cash and fix this one.
-
On 2 September 2013 at 7:04 AM, mbagge01 said:
Well, after about 3 hours of frustration, I was able to change out the precat O2 sensors on my 955 CTT without needing the special hazet tools. I am not sure if it is the same layout as the cayenne S but it is a challenge but doable. I only had the remove the engine bay covers and the lower splash pan to accomplish the job. The drivers side one took the longest and involved using some creativity and some different O2 sensor ratchets and angled attachments from above down into the engine bay. The use of an inspection camera helped alot. The passengers side was very easy compared to what I went through on the drivers side. You can actually reach the passengers side sensor with your hand by reaching up behind the wheel well from underneath the car. Once you get it loose, you can actually use your hand to remove it and put the new one in. Looking at where the post cat O2 sensors are, I do not think I could even get to them without at least removing the secondary cat pipes. I am not too concerned about the post cat O2 sensors unless I get a code because they do not affect the air/fuel mixtures like the pre cats. This project felt like when I changed out the drivers side diverter valve.
Hi Mark,
I'm going to change my precat sensor on the passenger side (left hand drive), can you share what tools you used pls and any more detail how you got the tool in from where?
Do you happen to have the Bosch o2 sensor part number as I intend to go to Bosch direct and get one, if price is good I will get two and just do both side bank1+2 for my piece of mind and future reliability, he'll I've changed almost everything else now lol.
Many thanks
-
On 21 November 2016 at 10:10 AM, Zakowsky said:
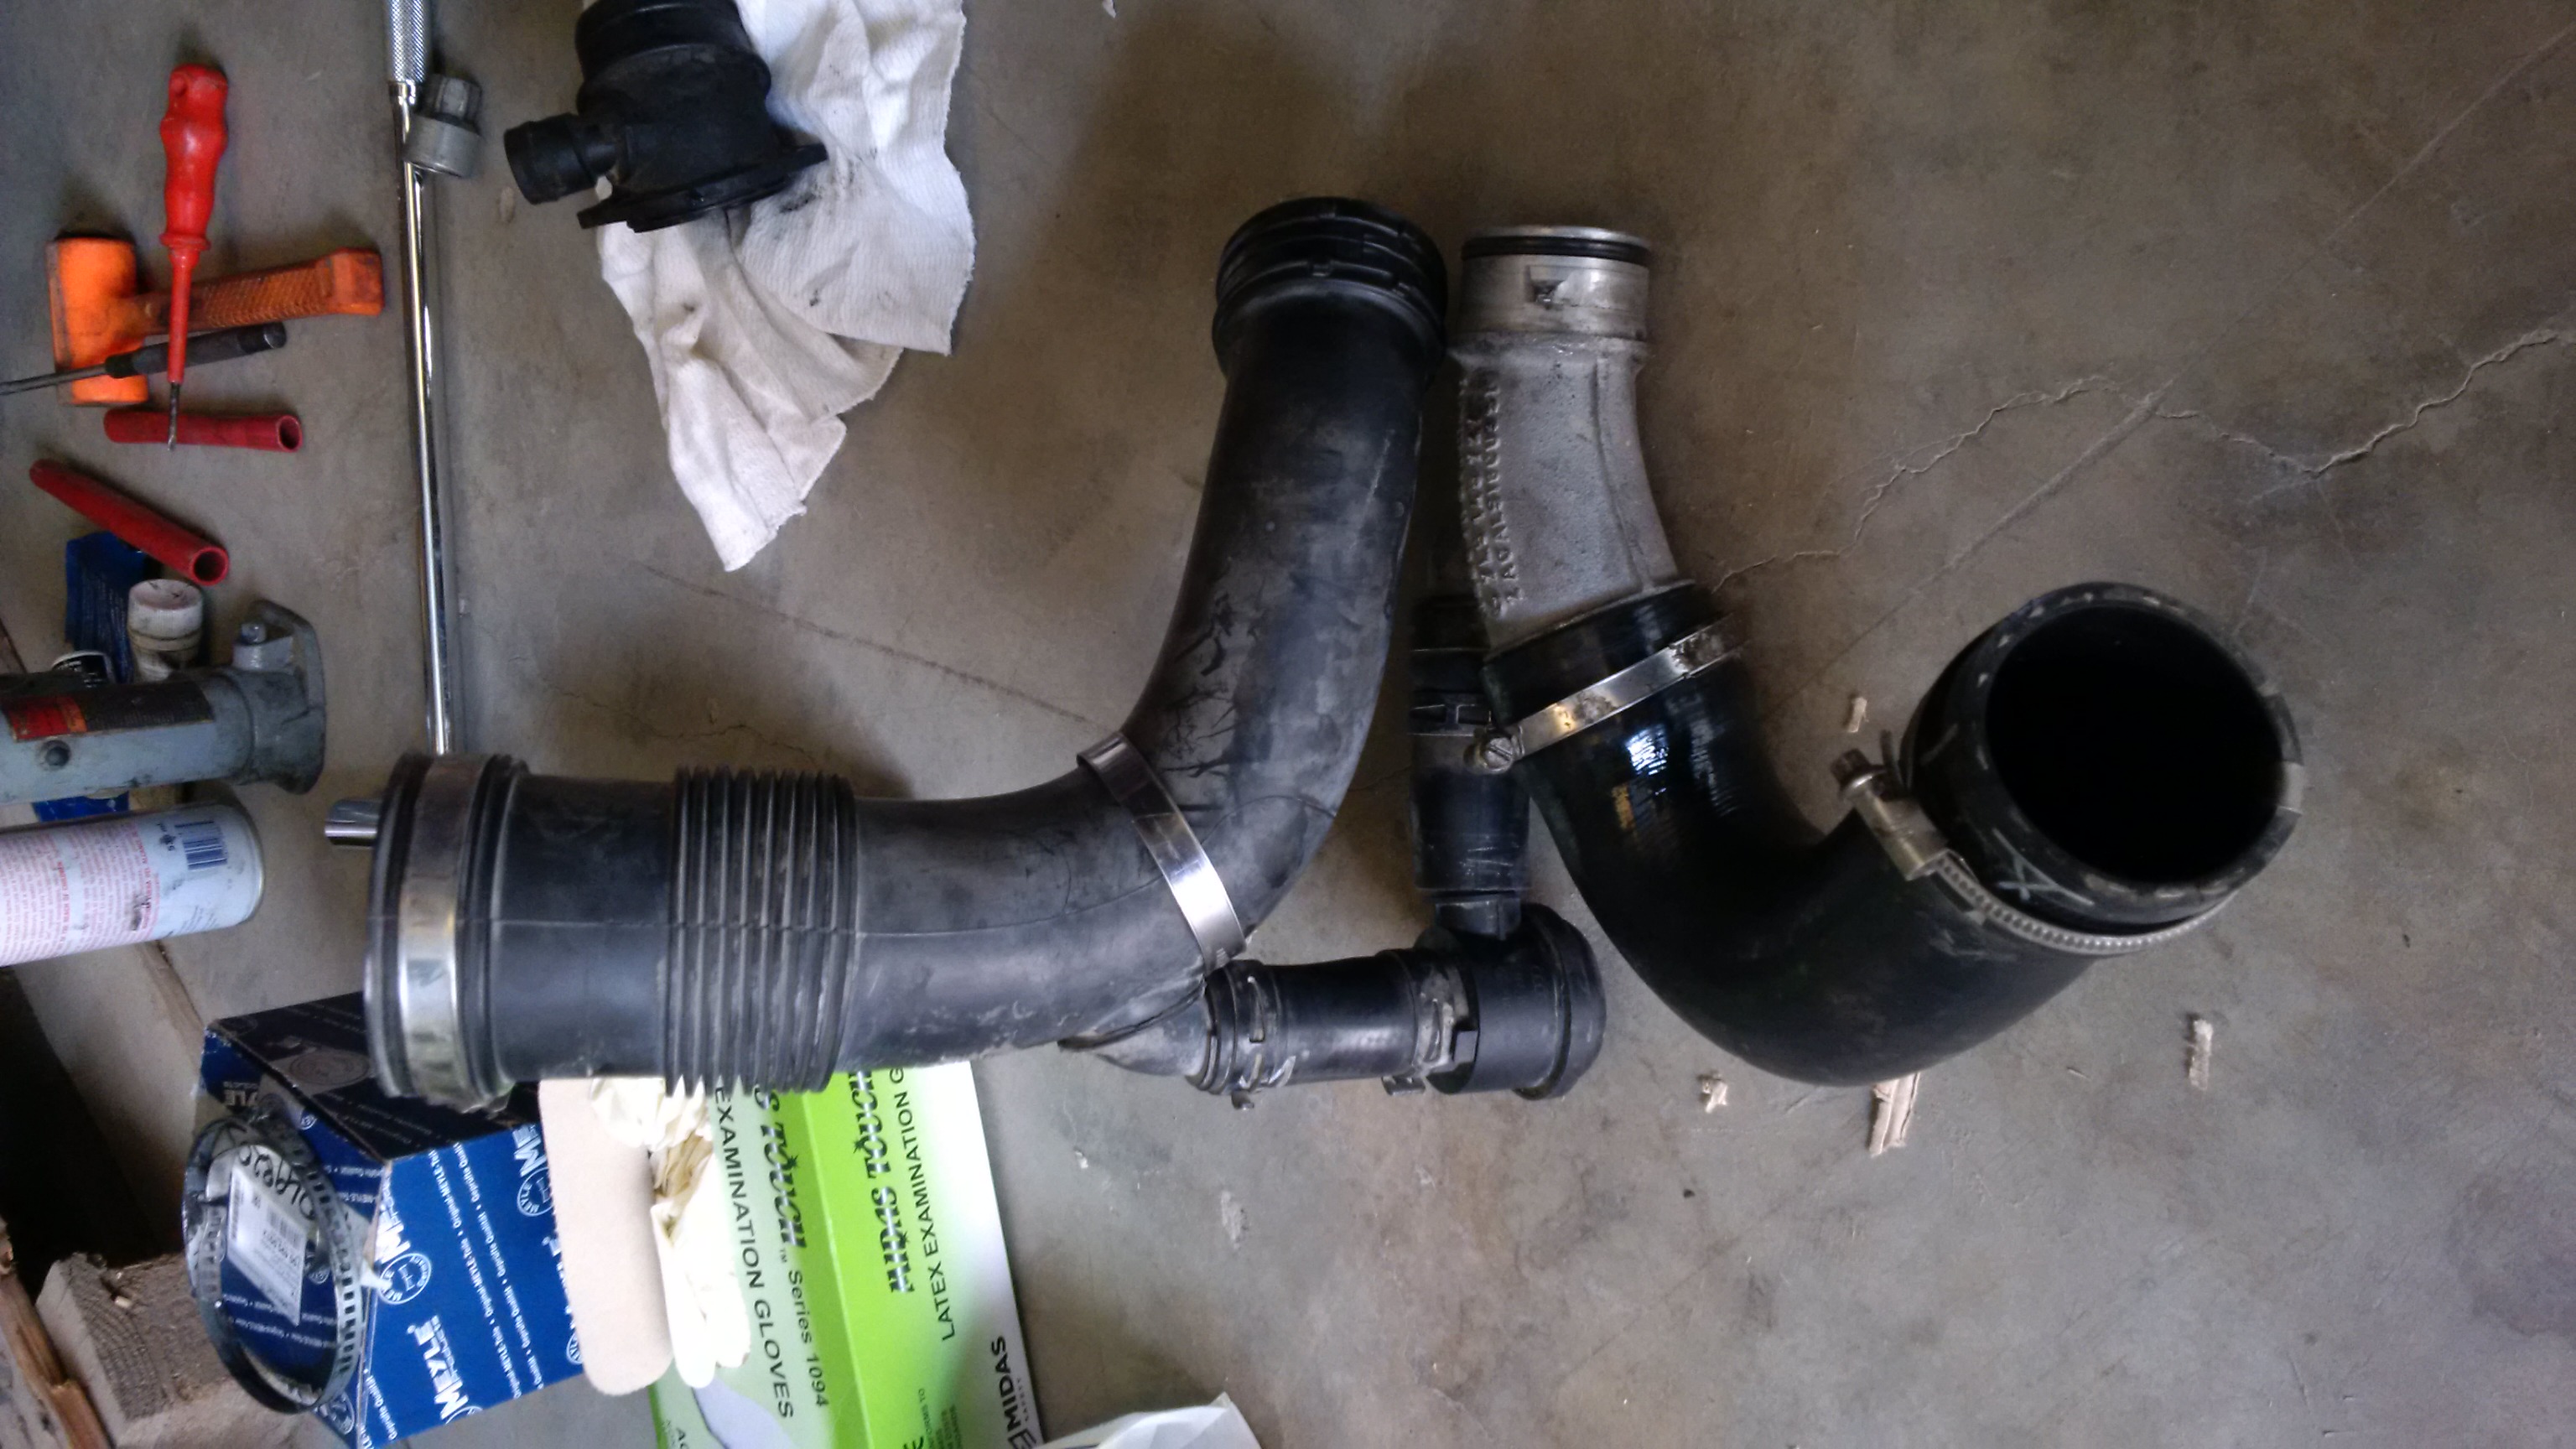
So I pulled everything apart and reassembled, here's how it went.
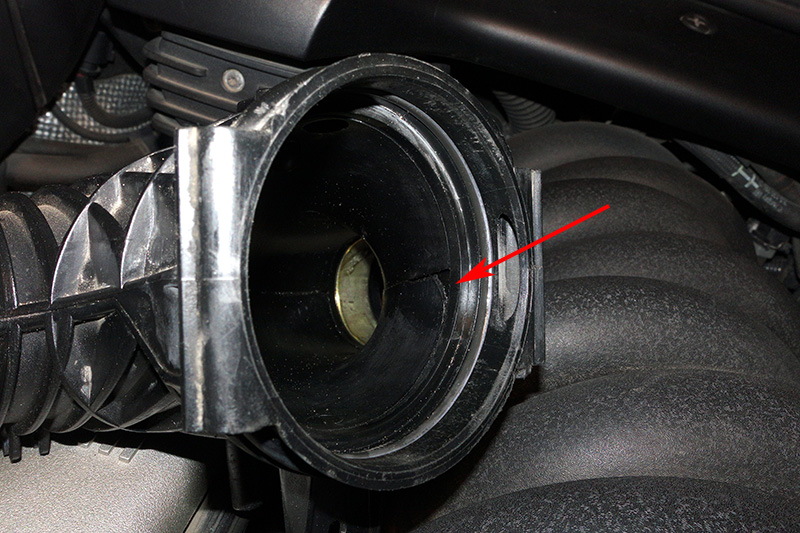
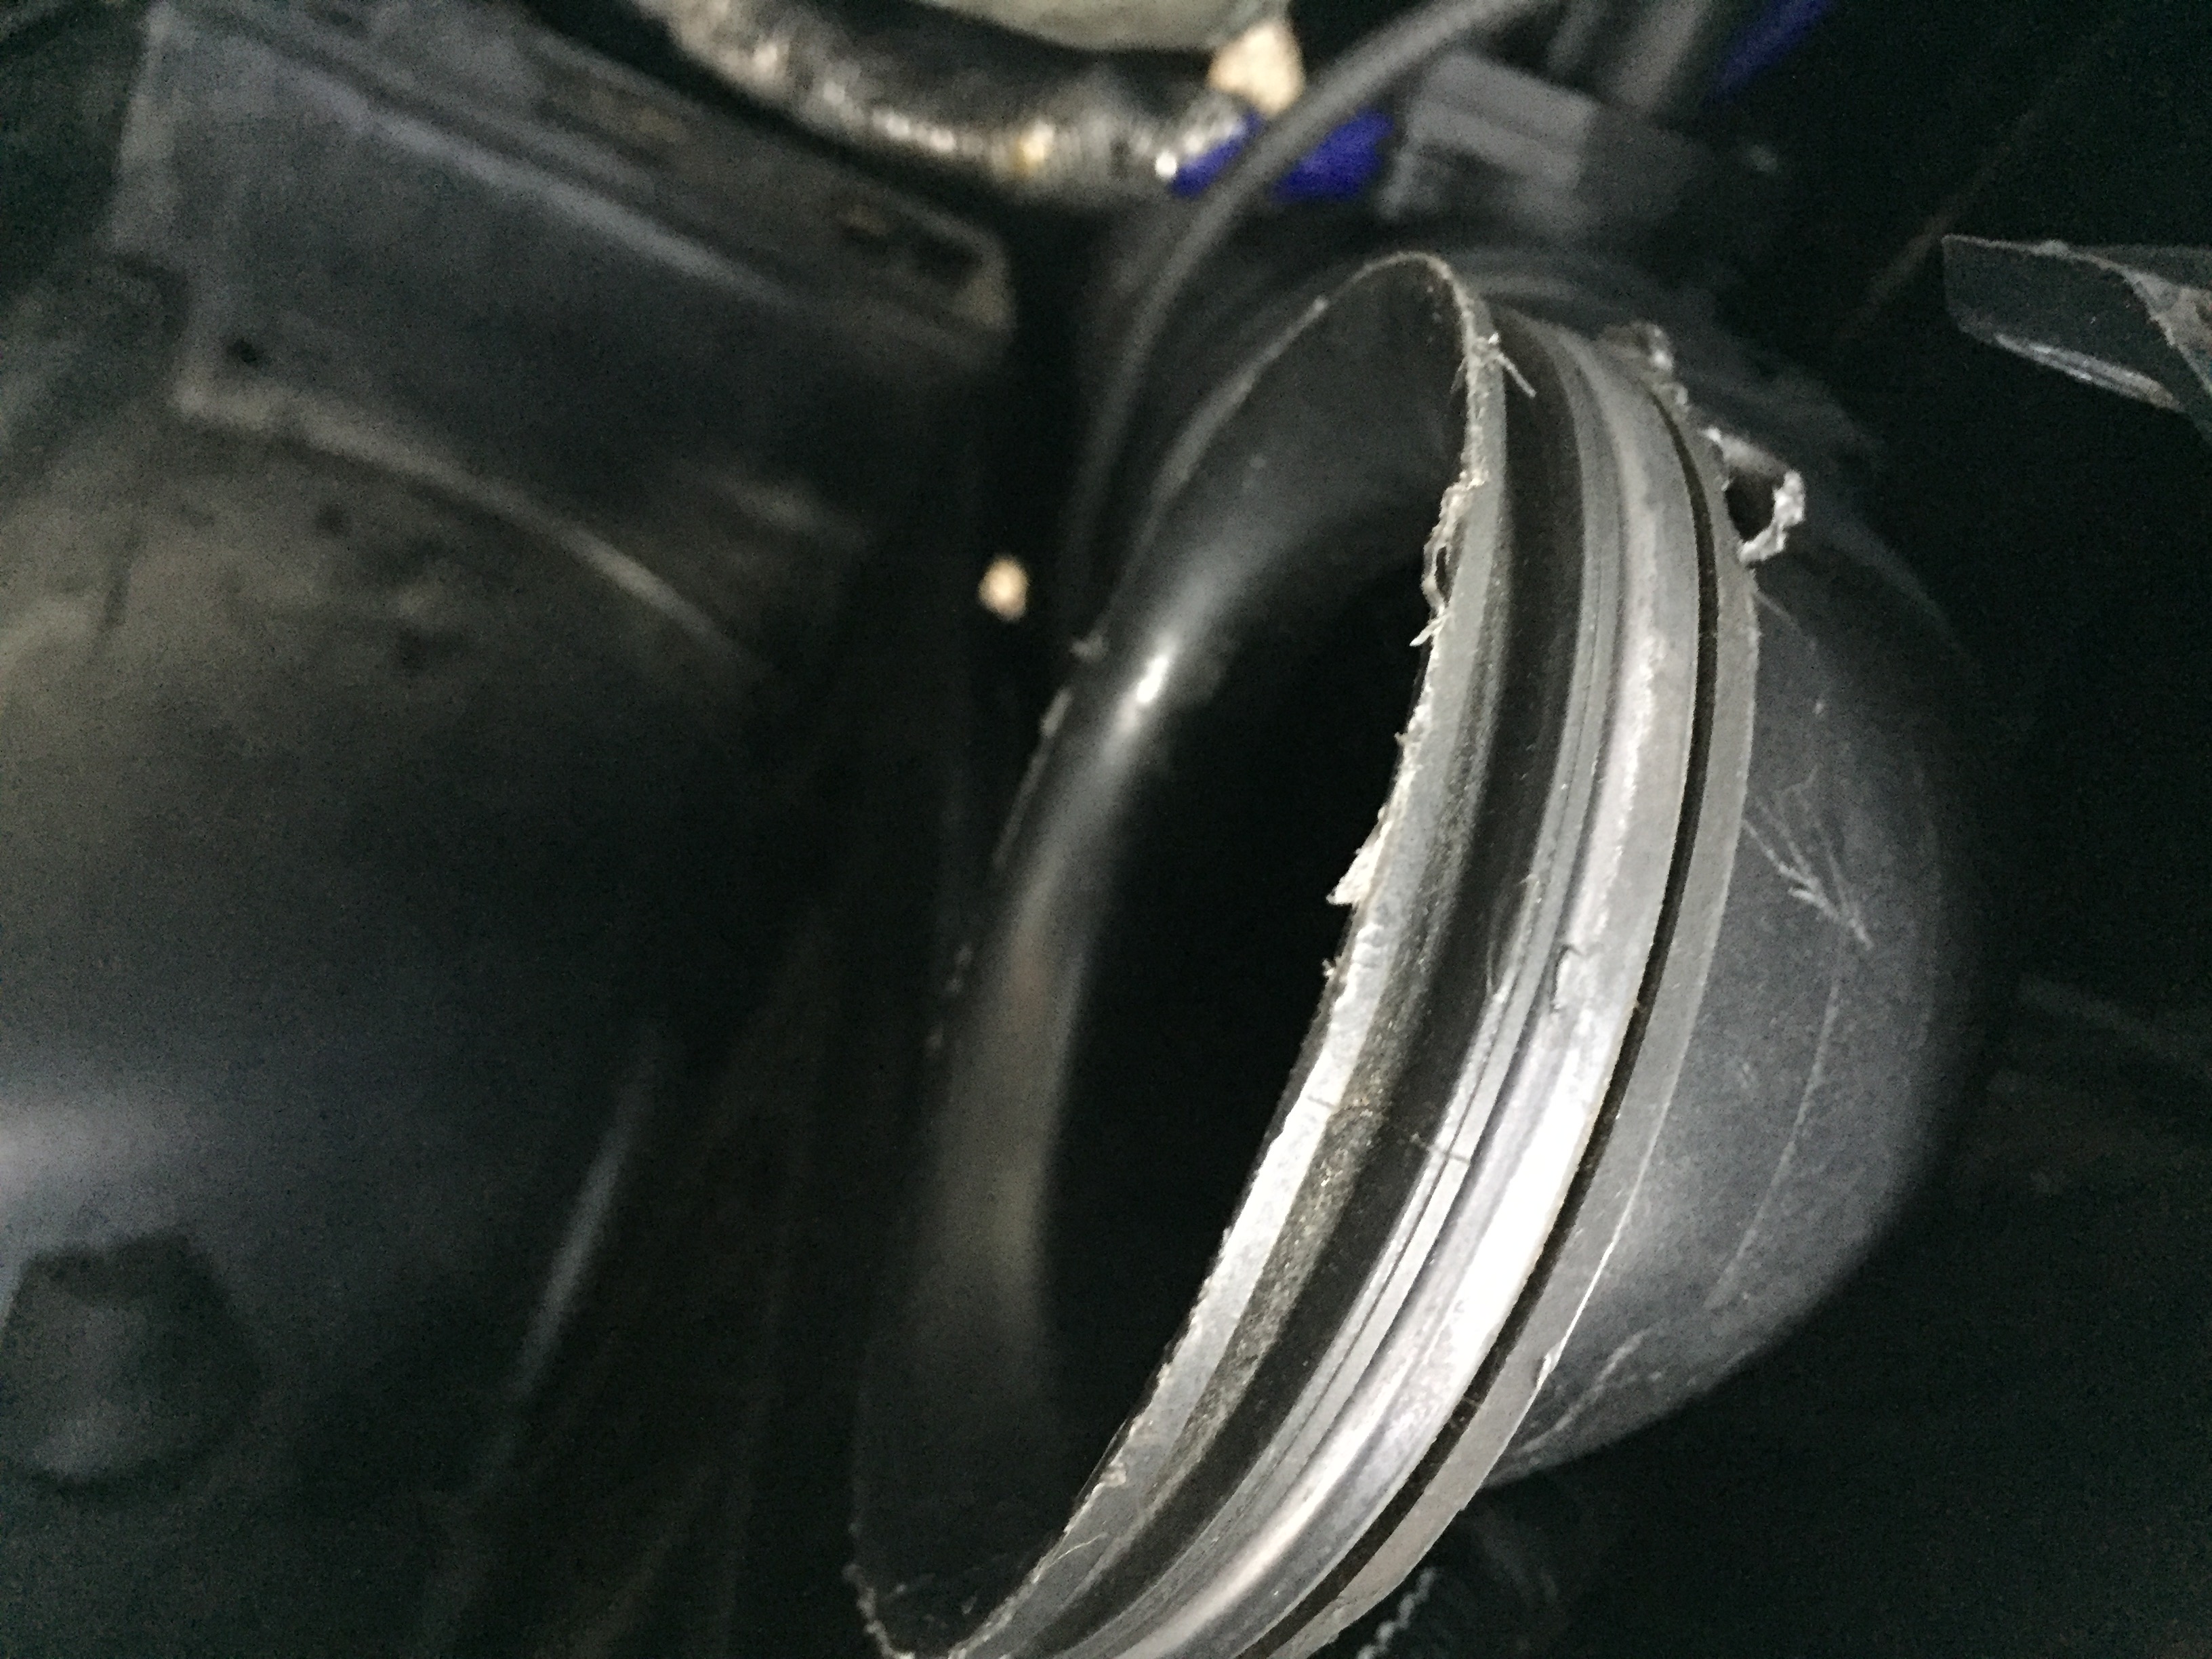
The hose (it does have the 2 clamps) on the drivers side and Y pipe were a bit oily, but a lot better than before I drained the oil from the intercooler hose on the bottom. What did surprise me is that my Y pipe is starting to de-laminate inside. You can see the plastic cracking and coming loose at the arrow:
I also seem to have a really big off set on the drivers side for some reason:
I did the throttle adaptation and I was freaked out at first because the first time I drove it it wouldn't shift out of 2nd after accelerating(!) but after a few minutes of driving it was fine.
I should have tested this when I had it all apart - I will probably take it apart again this week and will try blowing in it then.
After taking out the Y pipe I noticed one of the clips on the venturi line is broken, which might contribute to it not attaching well. I moved it in front of the other hoses as Lewis suggested and it did fit better, although still not perfectly. I will have to look at where it is attached at the back next.
After driving it all day, no more oil was seen around this fitting. As far as performance goes, I think I am indeed still looking for an air leak somewhere. Before I had a rough idle 50% of the time at lights, depending on if I had been driving it hard or not (hard driving = smooth idle). Now I still get this occasionally, but when it is smooth it is almost perfect, and the roughness is less. The two main issues left are a lack of power, sometimes...if I manually shift with PSM off it can go OK, with the boost pressure going to 8.0 then dropping to 0.7 as the revs get higher, as long as I shift by 6500. But in automatic the boost will fall as low as 0.5 in 3rd and 4th gear, PSM on or off. Even when shifting manually, 3rd doesn't pull as hard as I think it used to after 4500. And there is still is this sound after the wastegates open that doesn't seem right; not very loud but it is like a wheezing sound that again wasn't there when I got it. The other problem is when slowing to a stop it drops to 400 rpm and then recovers, and that is actually worse after all this. I did notice a very slight leak around one of the injectors; need to look at that as well.
Anyway overall it is better, but I am still looking for leaks as well. I was thinking a smoke test should be next. I thought I would go green after looking at all the fire-based DIY smoke testers on YouTube. But I figured the pressure was a bit low and maybe all that water vapor woldn't be good for things...but good for a laugh anyway!
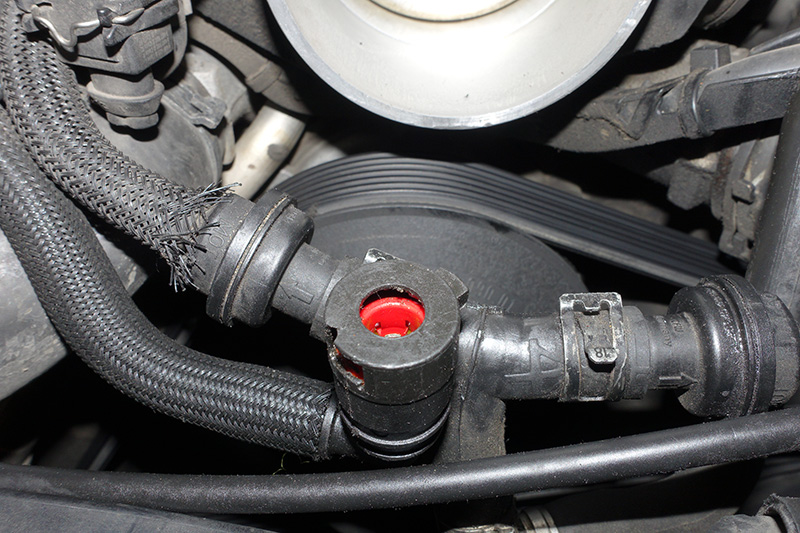
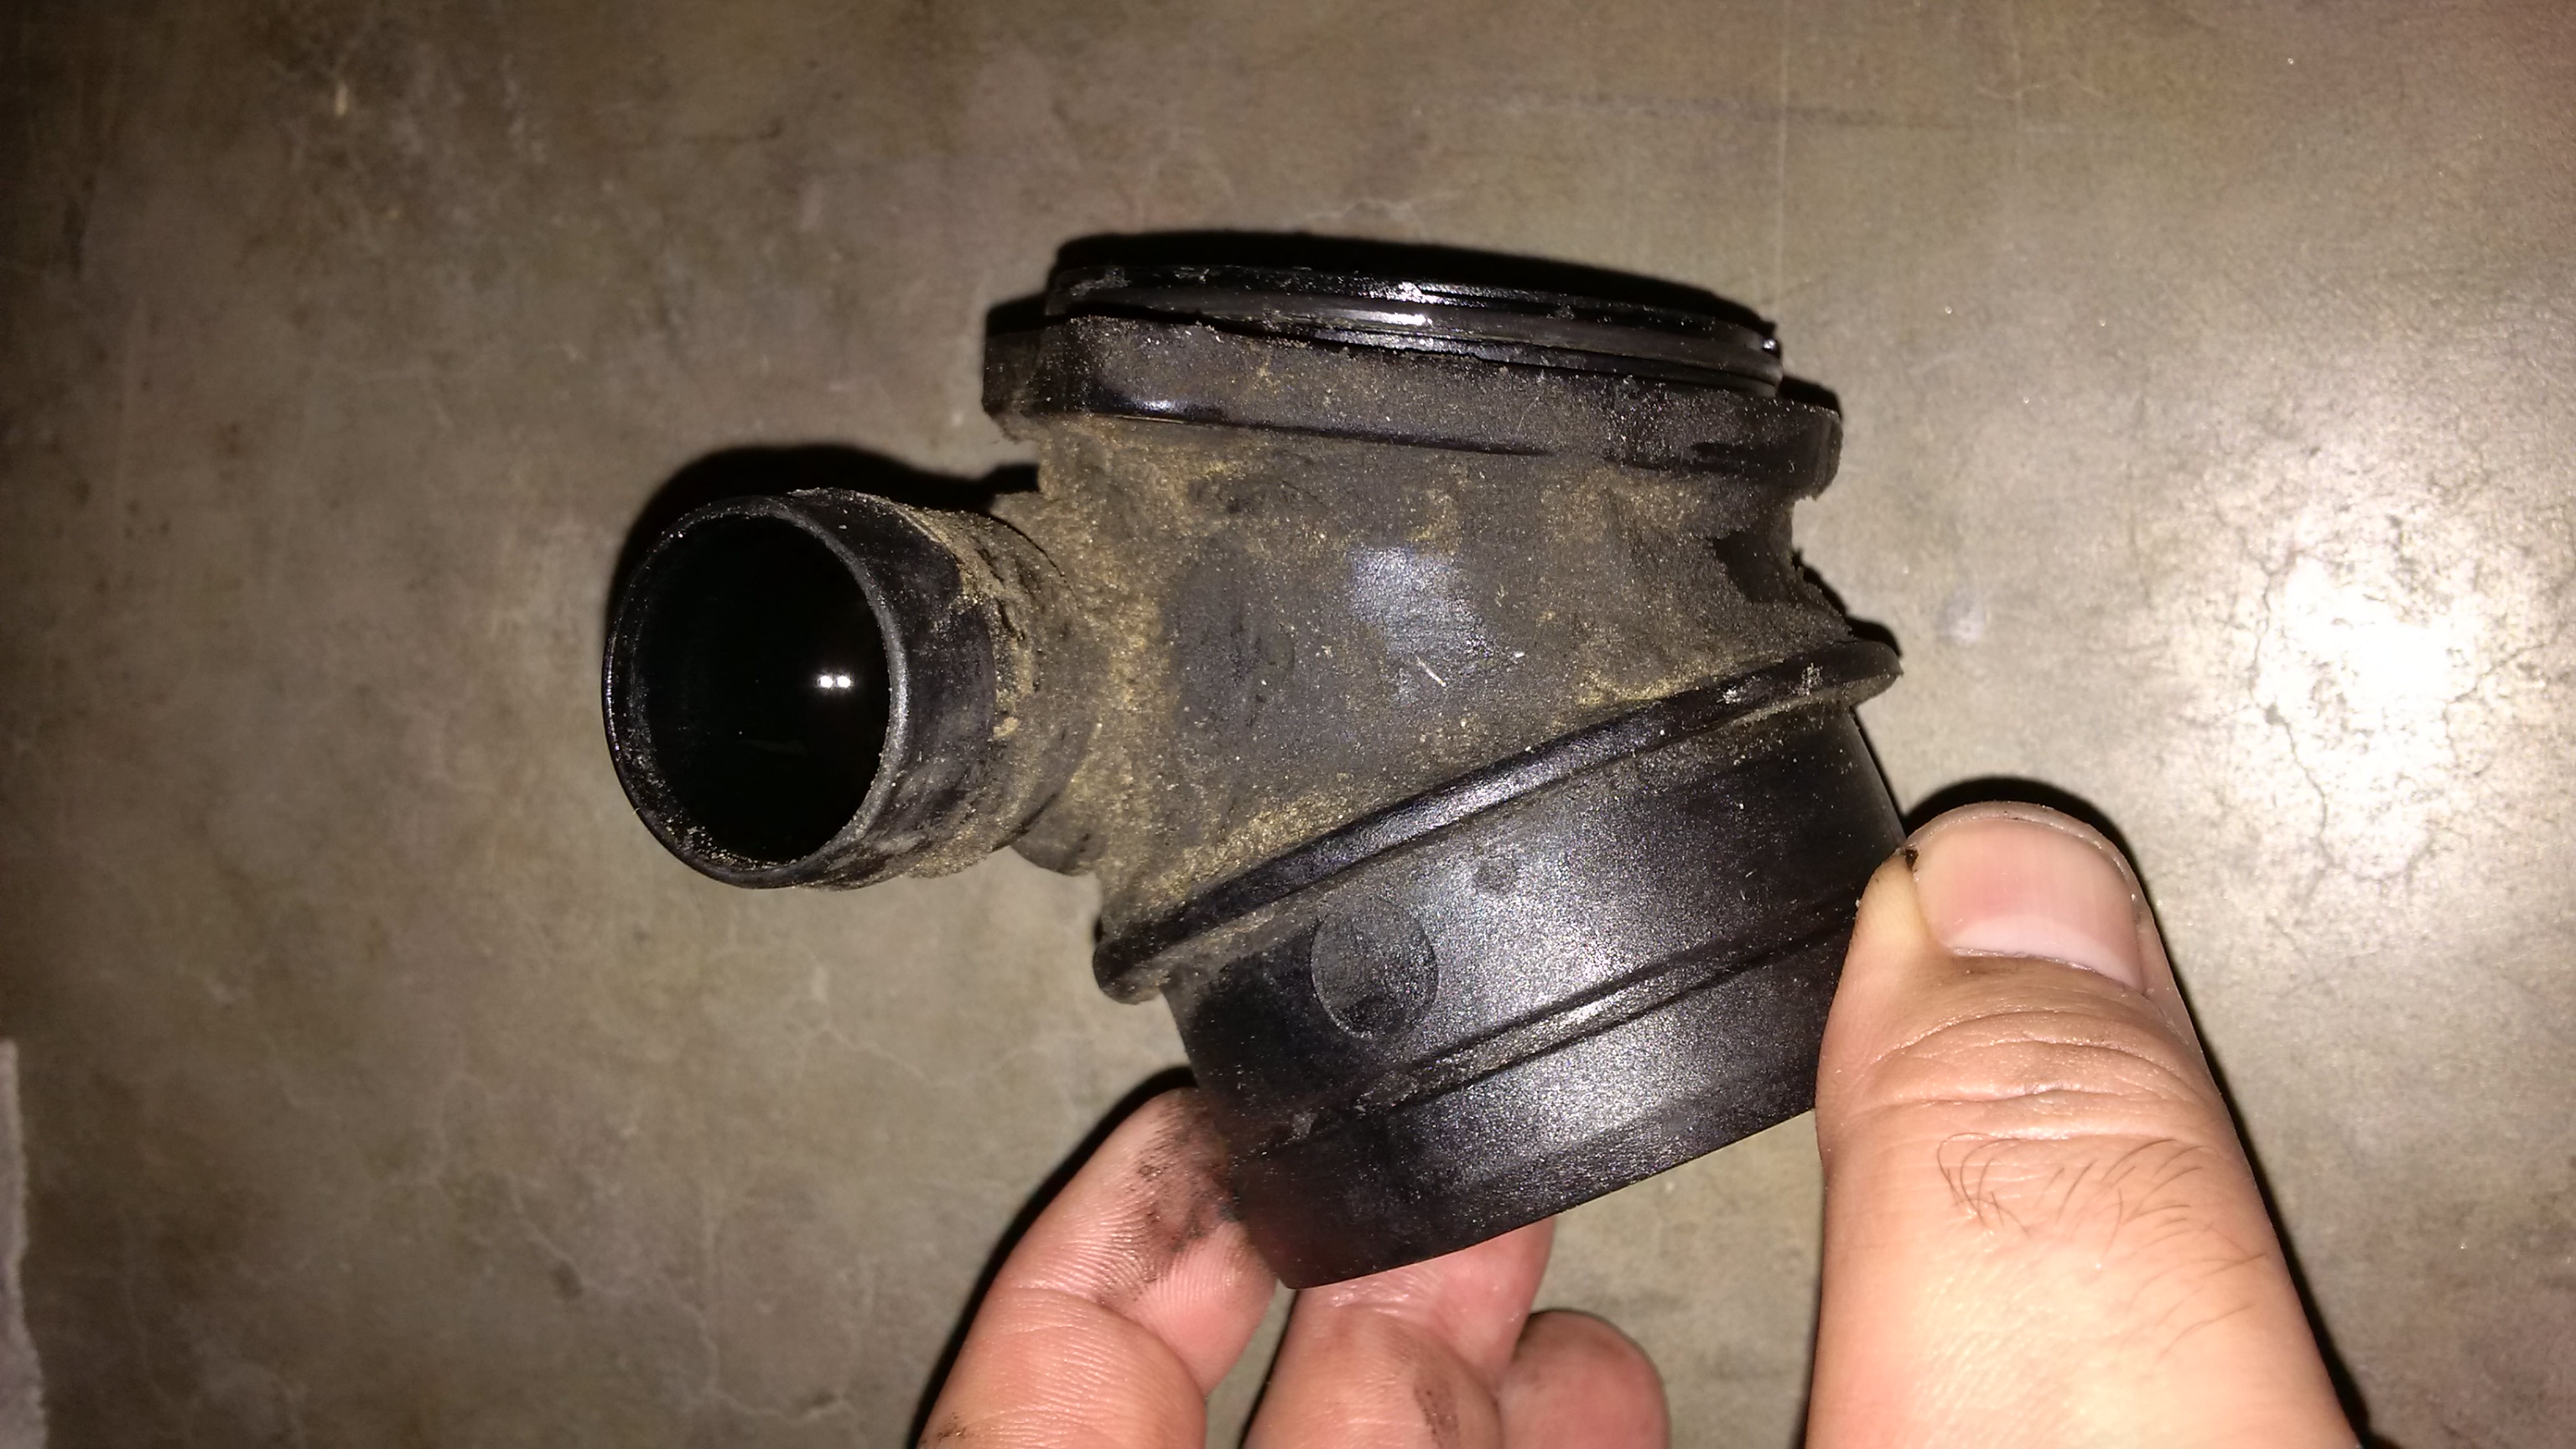
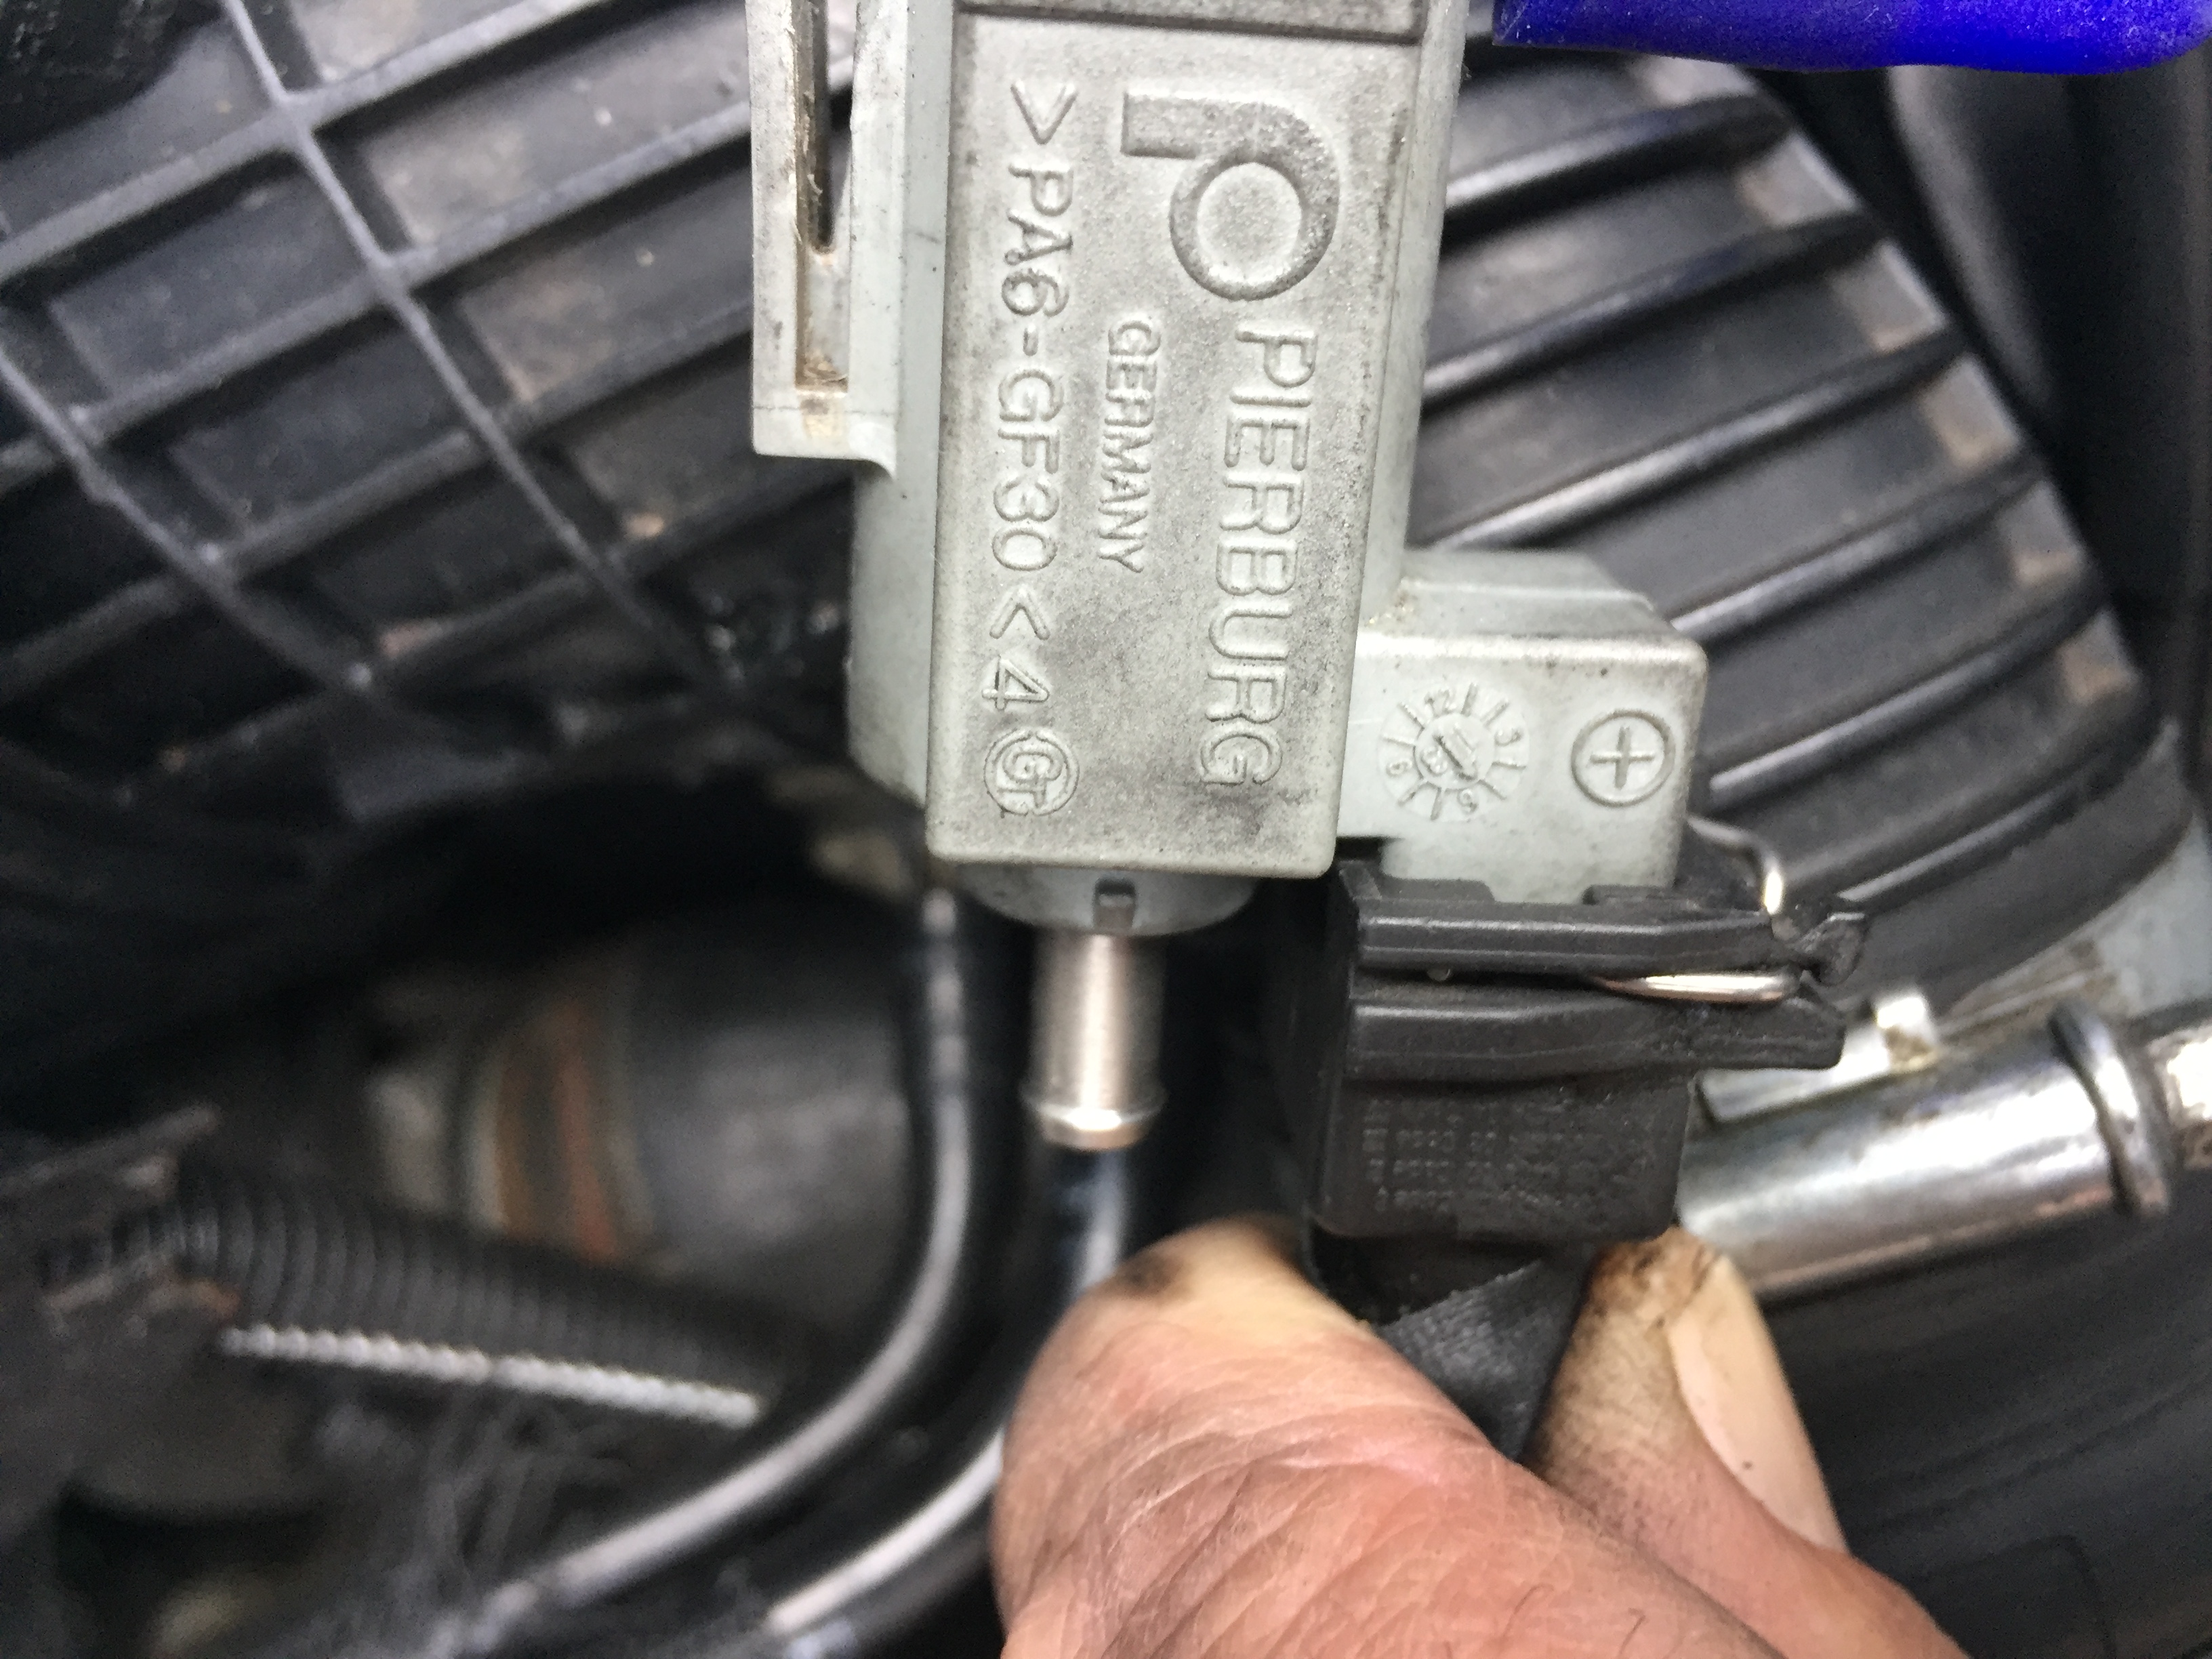
Did you check the black colour check valves,? First picture.
They have an arrow which shows the open direction, blow and suck hard to confirm they work.
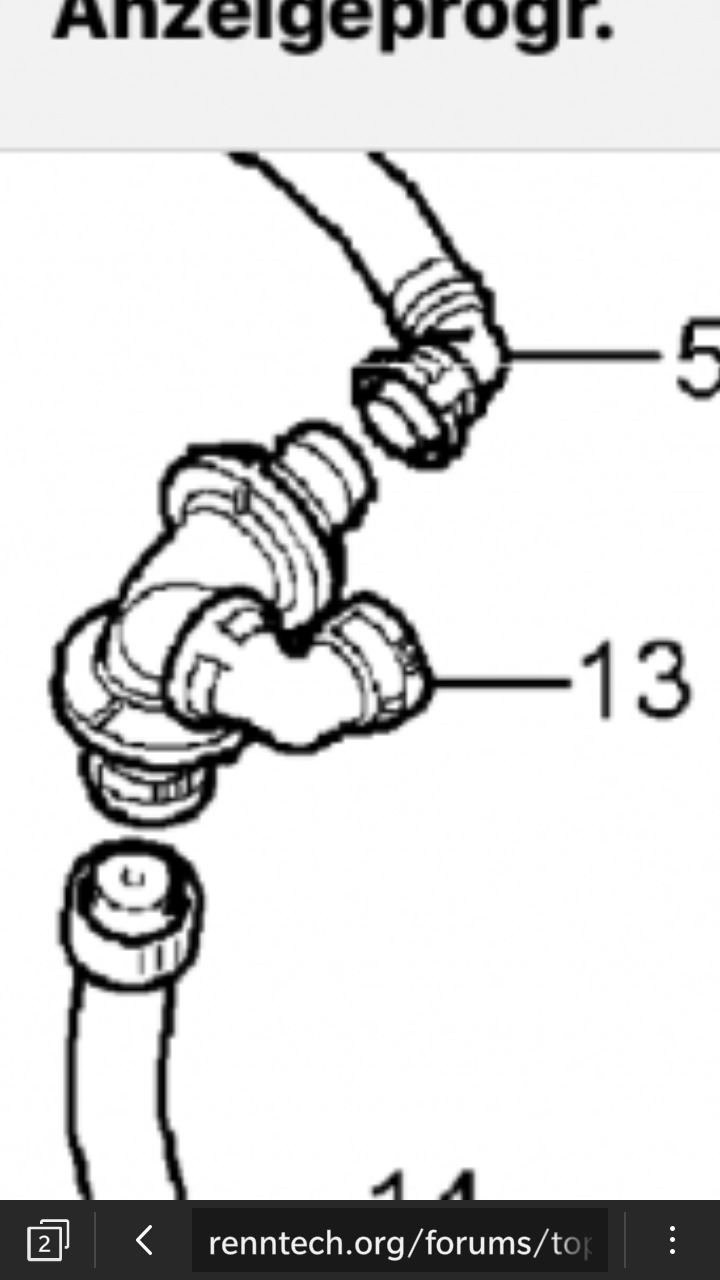
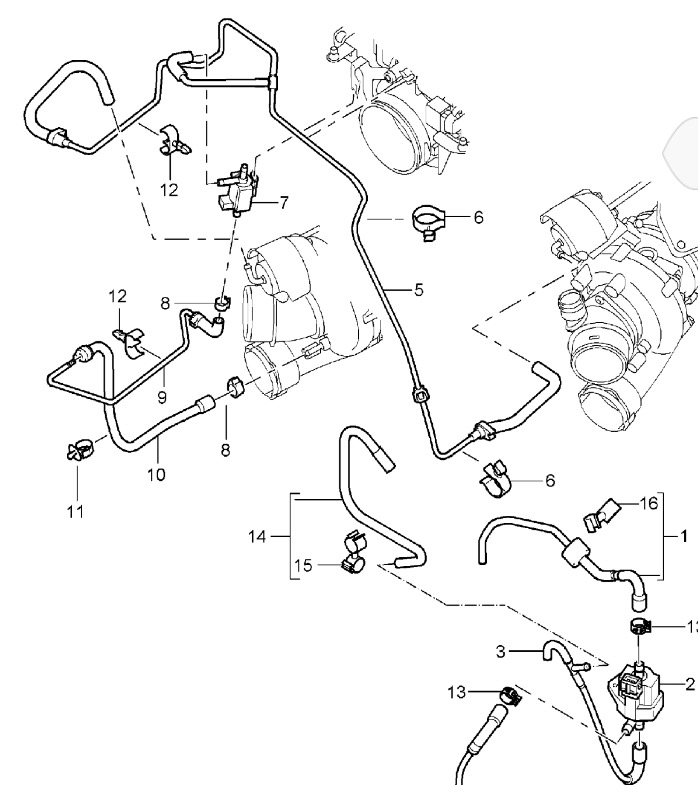
Also check the 3 way check valve 2nd picture below. Blow into pipe where arrowed number 13 is pointing, the air will go through to either other port as normal operation, you need to cover one port to get the other to open as your breath isn't enough to open both simultaneously against the diaphragms. Then blow back though the other two port and you should not be able to blow any air at all through either.
There are some more check valves white and black/ grey at the back of the manifold which also can be checked for functions and the vac pipes too.
I've learnt with a vacuum leak at the manifold intake side the idle can mantain with the throttle body whining away trying to compensate for the extra air, when accelerating the throttle response is rubbish and hesitant, boost takes longer to build as the air escapes.
If you have a divertor valve problem ie split diaphragm or vac pipe running to it is split/leaking the car is very jerky and will under boost as well +-0.5 bar only, lift off surging of boost which is not released from the turbo is felt as the jerkyness.
Leak around the injector would would my first thing to fix, leaking fuel or leaking air in either way can't be healthy. Pictures pls......
-
9 hours ago, ekstroemtj said:
Me. Weller is the real treasure for this forum!!!
Your too kind.
-
9 hours ago, 911nick said:
I made some great progress today thanks to Mr. Weller. The module was exactly where he said it would be. I opened it up, and sure enough there was a bit of moisture inside along with a destroyed capacitor. I was able to get a used one sold locally. We will see how it works tomorrow when I install it. I will post results.
No problem at all happy to help. Some pictures of your repair would be fantastic pls.
-
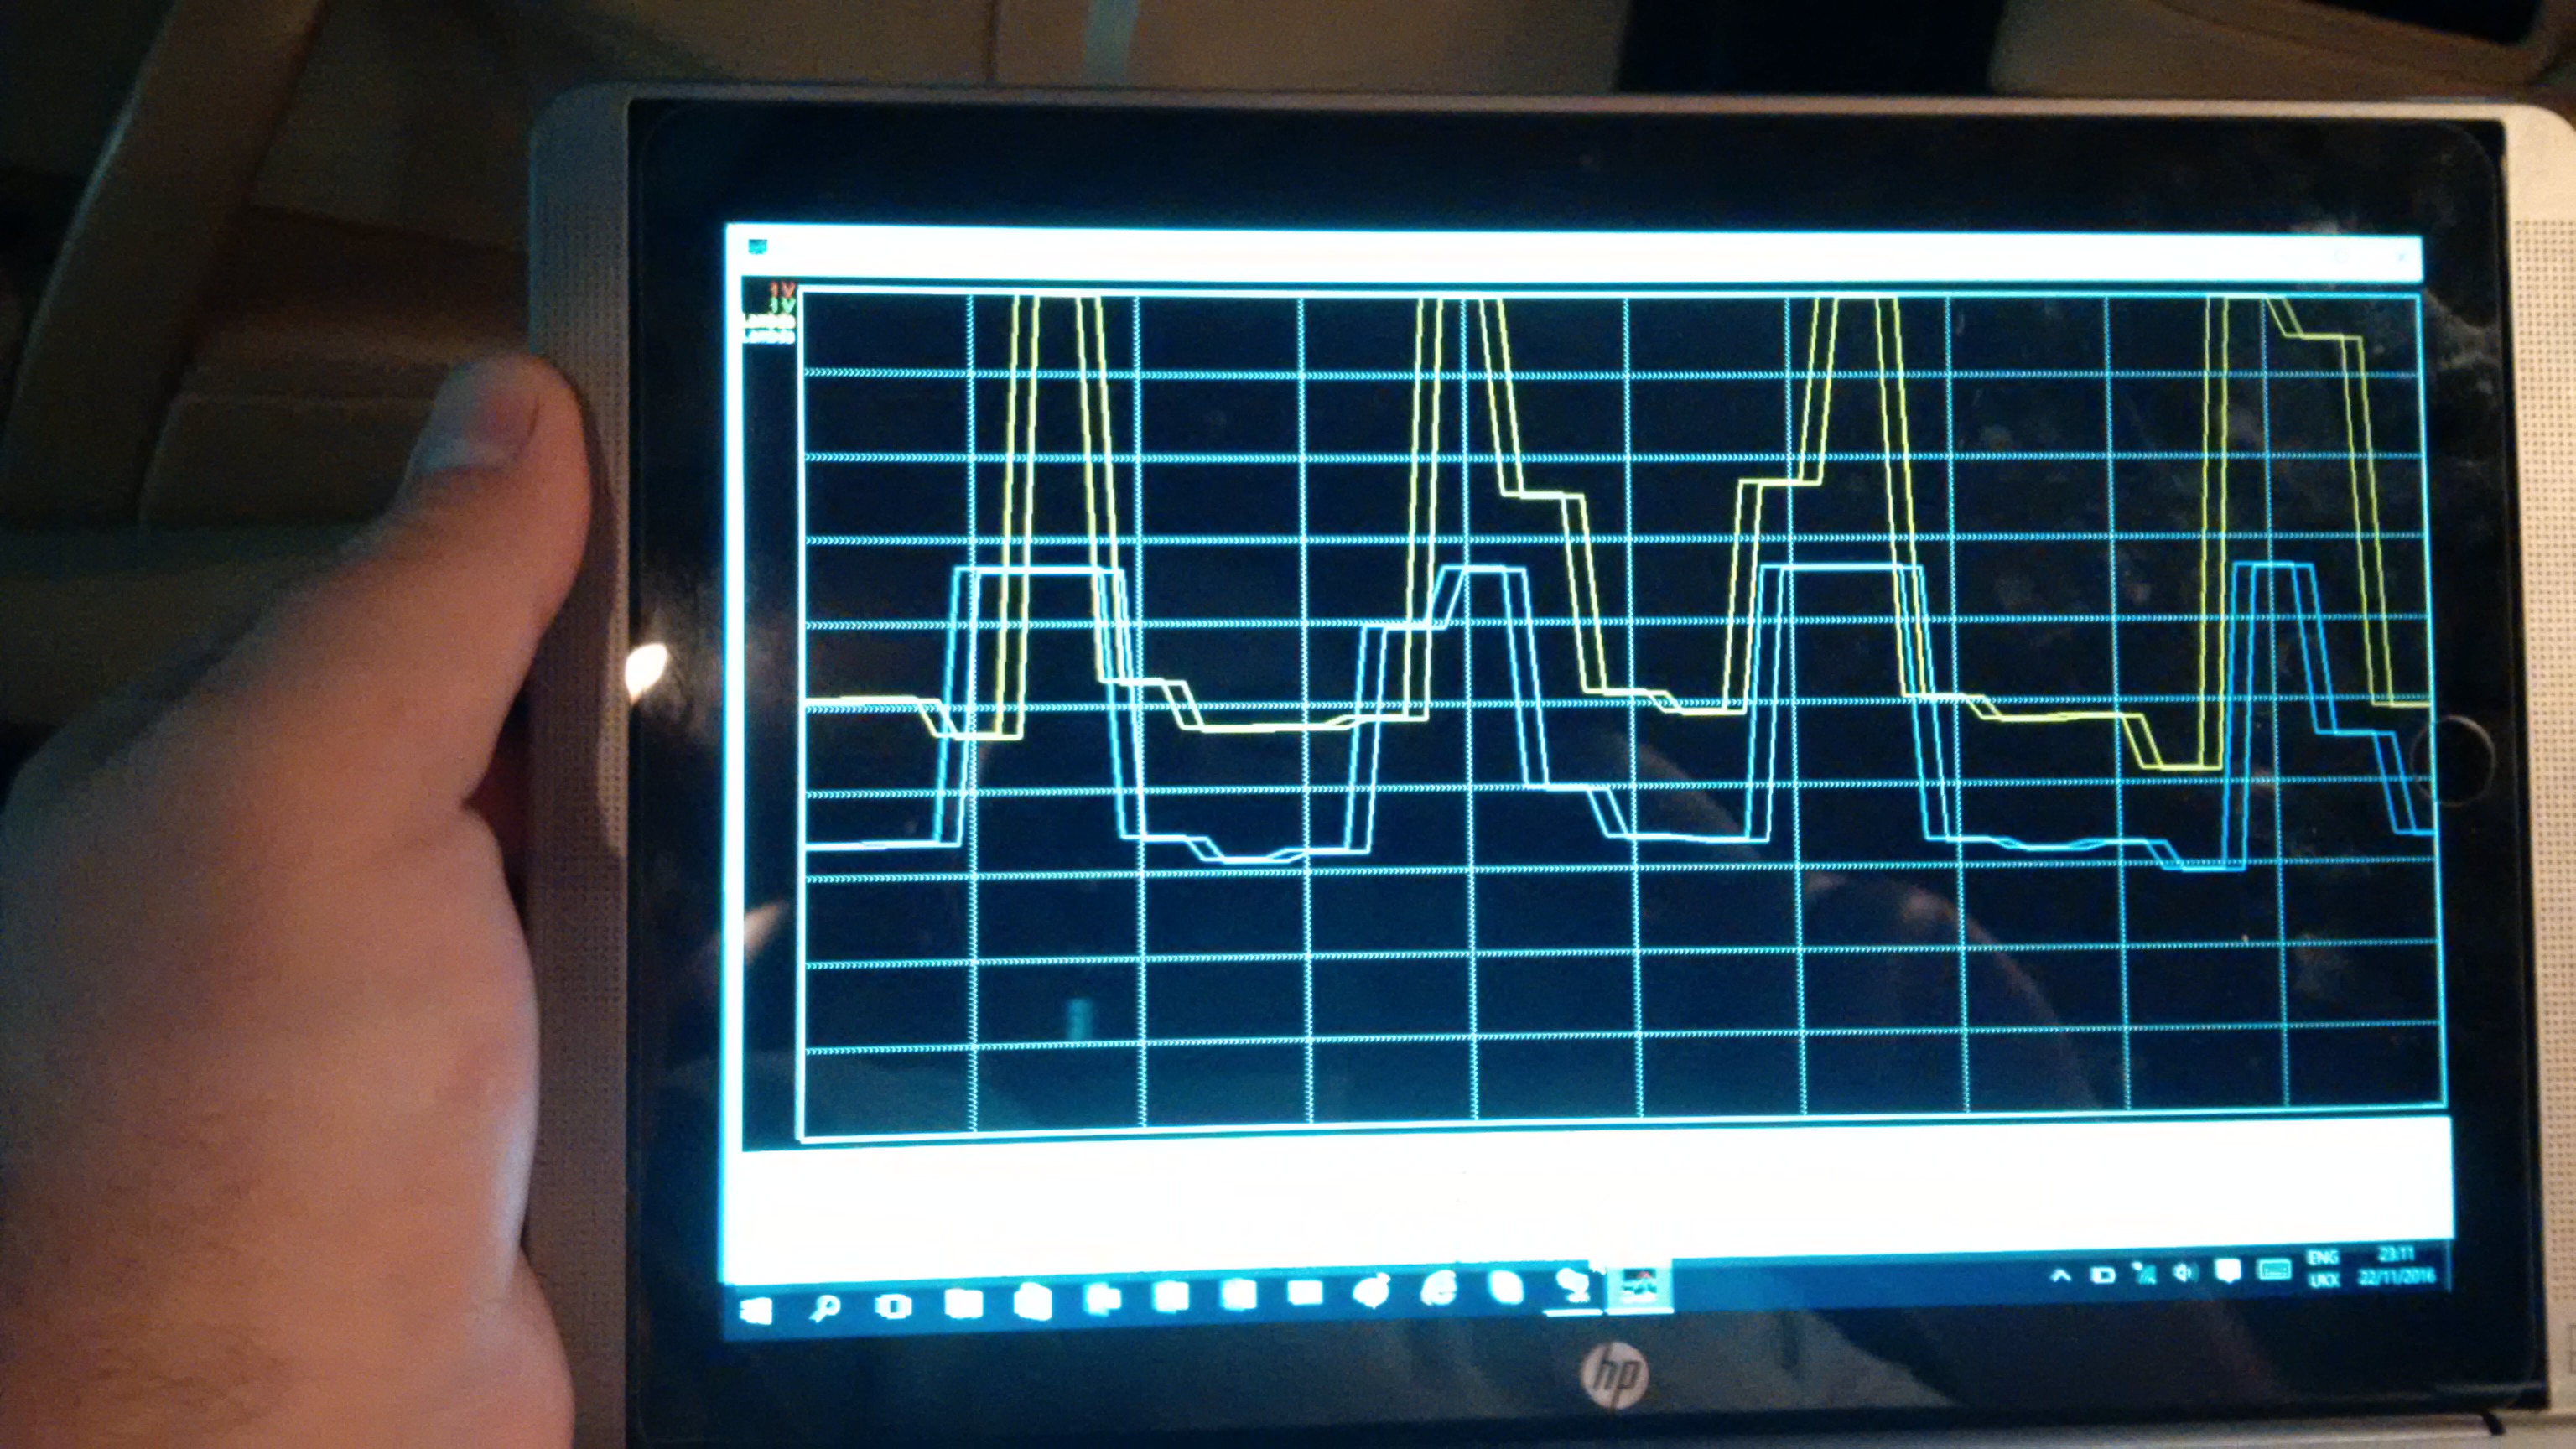
Ran diagnostic last night looking at the pre and post cat o2 sensors. The postcat sensor reading is in volts and the pre cat "wideband" air/fuel lambda sensor reads in milli amps (current).
What I found is the bank 1 sensor 1 lambda sensor is not producing enough current milli amps, take a look at the first picture of 4 times I repeated snap throttle opening and the bank 2 sensor 1 yellow line hit max milli-amps where as the blue line bank 1 sensor 1 doesn't get half way to rich milli-amps. So this could be the issue with the stutter hesitation lazy wide band sensor! As my fuel trims are good and the idle is steady and lambda 1 ie 14.7:1 I dont think it's any other possibility like maf (new) ignition (all new) or fuel (new filter and regulator). No exhaust leaks.
During cold start and warm up the engine drives very well, once warm it stutters all the time.
Anyone disagree or have more experience on this??
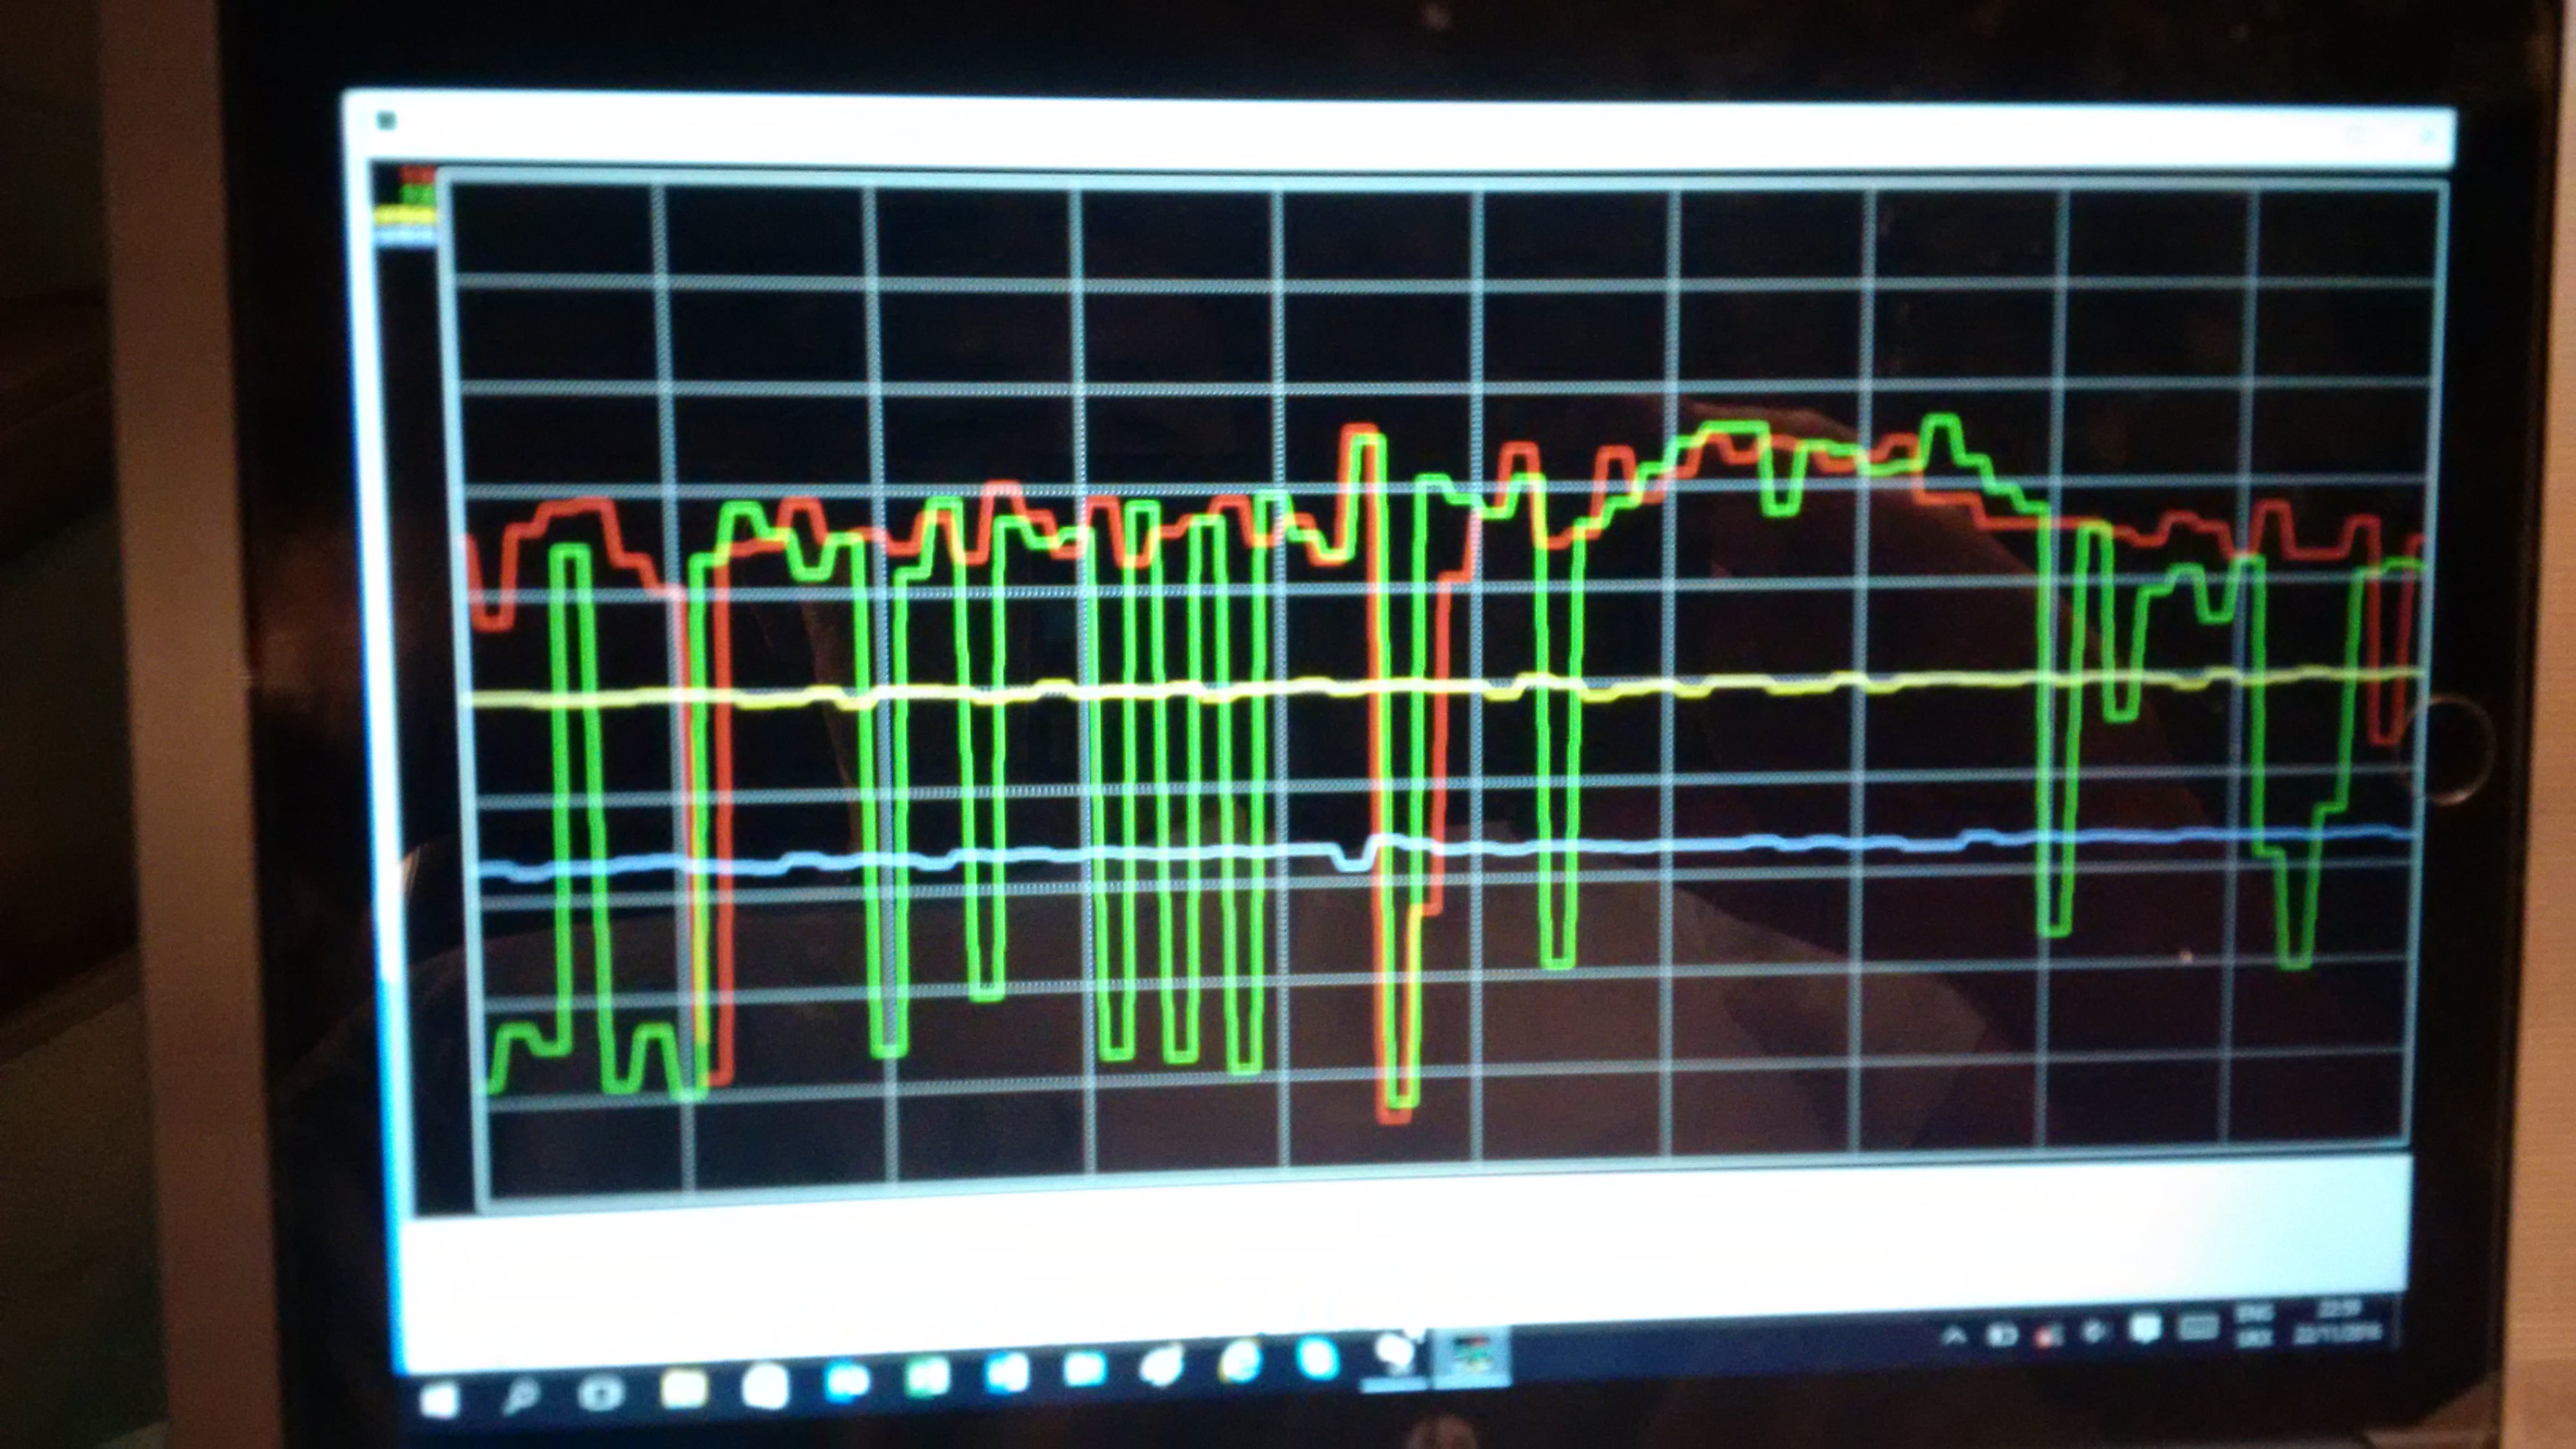
Second picture is the bank 1+2 sensor 2 post cat 02 sensors in volts.
You can see the red line which is bank 2 sensor 2 is normal stable line as the cat does its job whereas bank 1 sensor 2 green line is fluctuating either as a direct result of the wide band sensor 1 lambda fault and/or the cat efficiency is poor.
As the post cat 02 sensors have no effect on air/fuel mixture I don't intend to address this yet.
I am ruling out also a clogged cat because that would highlight performance at higher rpm, the engine would feel suffocated whereas at high rpm the engine runs very well.
Mark Mbagge you changed the bank 1+2 sensor 1 what tools did you use and any advice which way to get in there pls?
How did you diagnose the o2 sensor fault and what symptoms was you experiencing.
-
37 minutes ago, oatmealadam said:
58k miles. oil changed every 3-5k. bad luck or just Porsche engineers with a flawed design to pump out production numbers.
Interesting, well thanks for updating the forum on that find. Happy motoring
-
5 hours ago, oatmealadam said:
Ended up being a sticky lifter. Decided, proactively, just to replace all the lifters. Smooth and fantastic running once again.
What was your mileage and was you oil change interval long or was you doing short trips? Previous owners misuse? What oil grade was being used?
Who advocates engine flushing?
-
Check the rear comfort control module for water damage or unrelated issue which is not water damage but module or wire harness failure to the module.
It located behind the CD autochanger. Right side of the boot as you enter the boot hatch behind side trim panels.
This module controls all the items you mentioned are having faults.
Replacement of module involves recoding which isn't difficult with vcds or durametric but coding the existing keys to the new/replacement module is a Porsche piwis job apparently, if I could work out how to do key coding with my vcds I would have replaced mine to fix check tail light issue when pressing brake.
-
 1
1
-
-
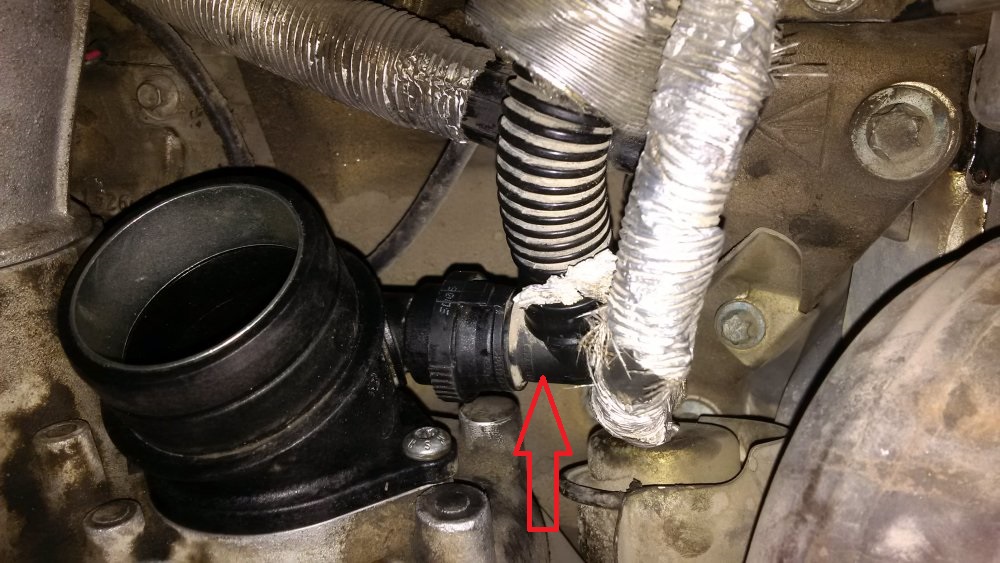
6 minutes ago, ekstroemtj said:
mine looks terrible. Somebody before try to repair something here. Maybe this could be part of my problem.
I bet that leaks!
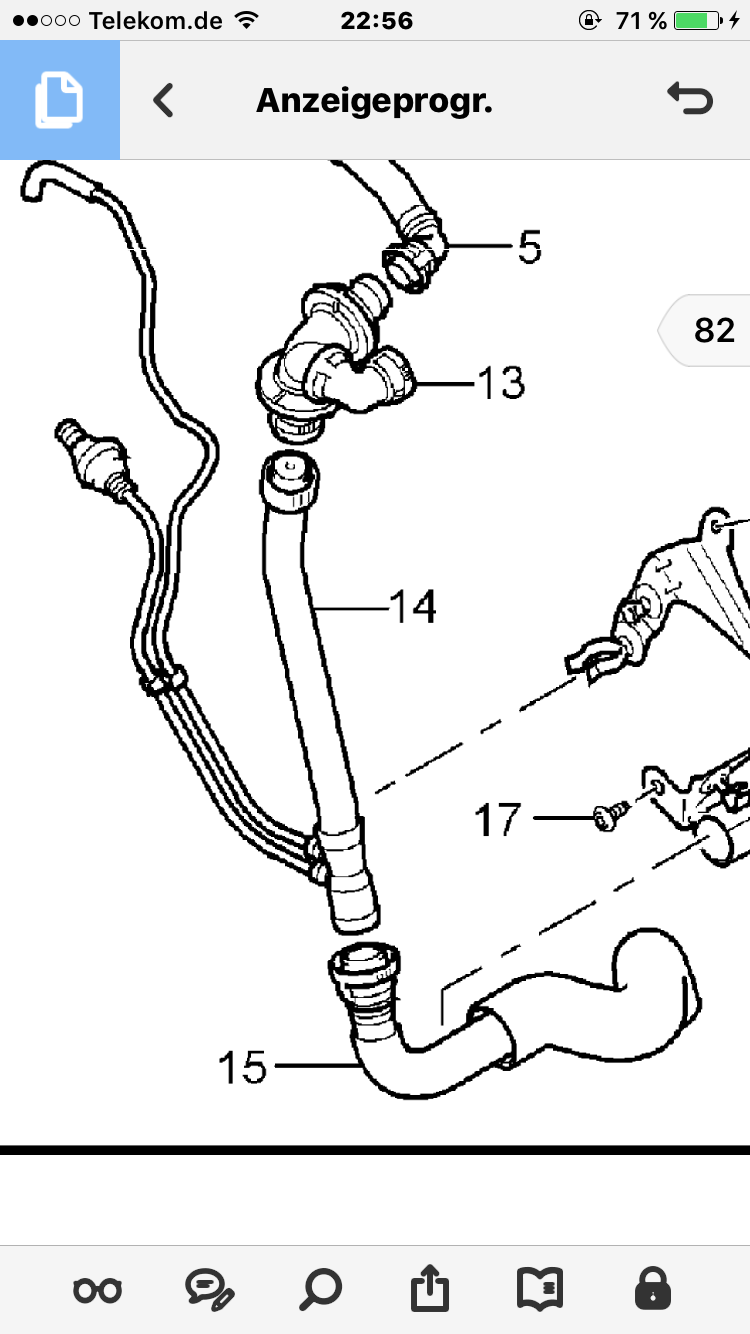
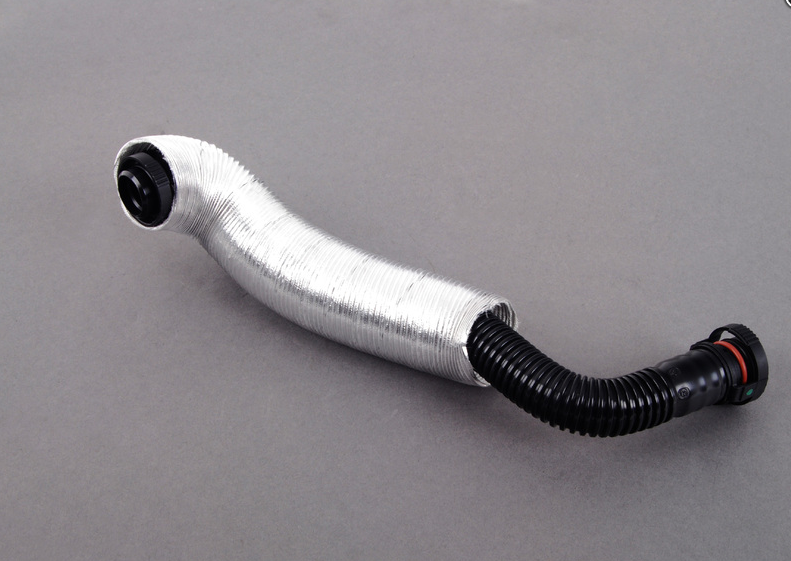
Buy 15 and 14 fit new and forget that as a possible problem so you can move on.
-
Update..........after new filter and regulator. (don't think it was the smoking gun here but as a service item it could only do harm to my wallet!) it does feel better and cleaner at higher rpm now which could have been fuel related I can't really say definitely. It's holding a higher rpm shift too which is puzzling. ?
Fixed pipe 5 leak (diy job, hydraulic hose and two jubilee clips) and had some time to clear codes and put on a few hundred km's. Massive difference now, throttle response is great, low end grunt when changing Lanes and needing a bit extra quick speed very good now, won't downshift all the time looking for power it just goes and pulls like a train. Full Throttle higher rpm is amazing this engine sings to 7,000rpm. Reaches speeds to lose my licence in a flash.
Last night I work on a site the whole night and the car pretty much was running and idling between shifting locations short runs doing checking with my team of irrigation guys. Ran great idle is perfect, cooling system good even with AC off the temp held well creeping just above 80oC until fan kicks in and thermostat fully opens at 87oC I believe.
The drive home at 5am was a blast open roads and no cars had the thing going like a stabbed rat.
So what's left.........the "stutter" even though less pronounce than ever before it is still there.
I just went to a meeting earlier and had a complete cold start, there is no stutter whilst it's on warm up, as soon as the temp gets near 80oC the stutter appeared. This is lean misfire under load for sure. But what exactly is making it lean I don't know.
If you drive low acceleration, cruise or go down hill obviously load is less and the stutter is pretty much none existent. Uphill or asking for heavy acceleration from lower rpm the stutter is repeatable every time once warm.
As the boost comes in and the rpm's start to build with a high load demand it stutters until the engine catches up with the load demand then it flies without stuttering.
Don't get me wrong the car is soooooo much better to drive now. I'm so close to making it perfect and as an Engineer and Virgo perfectionist I need it to be perfect.
-
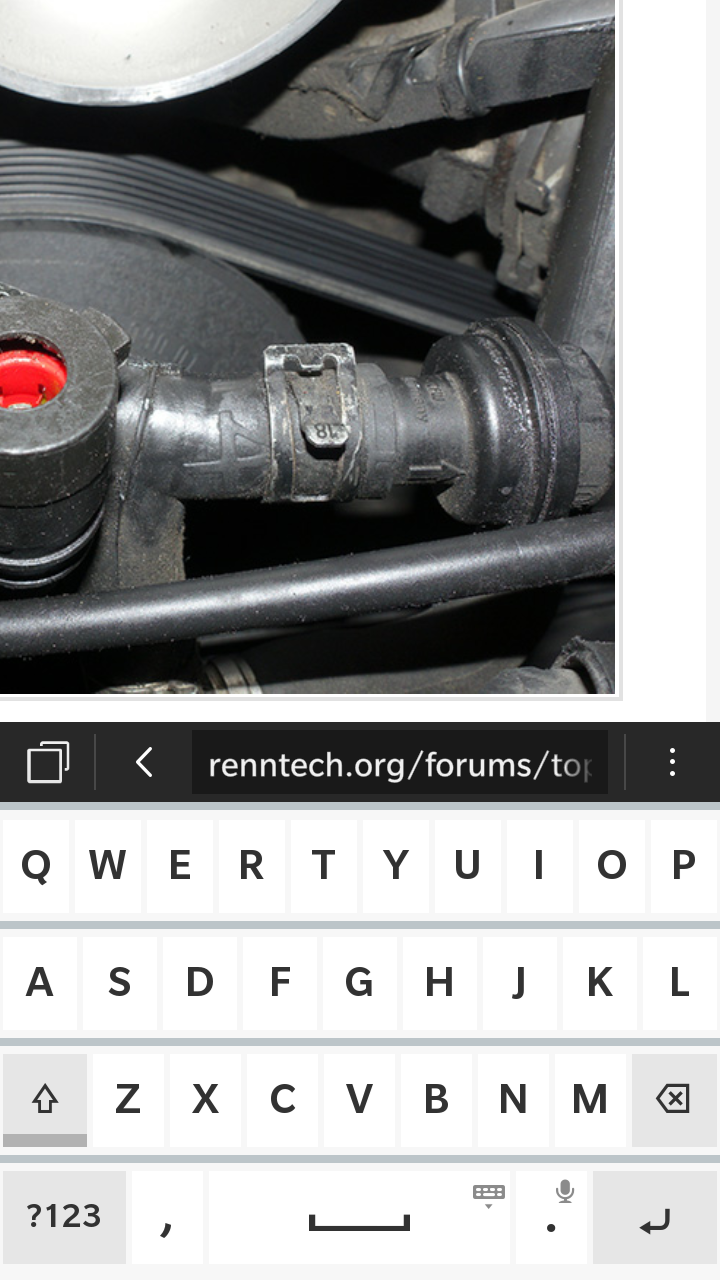
1 hour ago, ekstroemtj said:
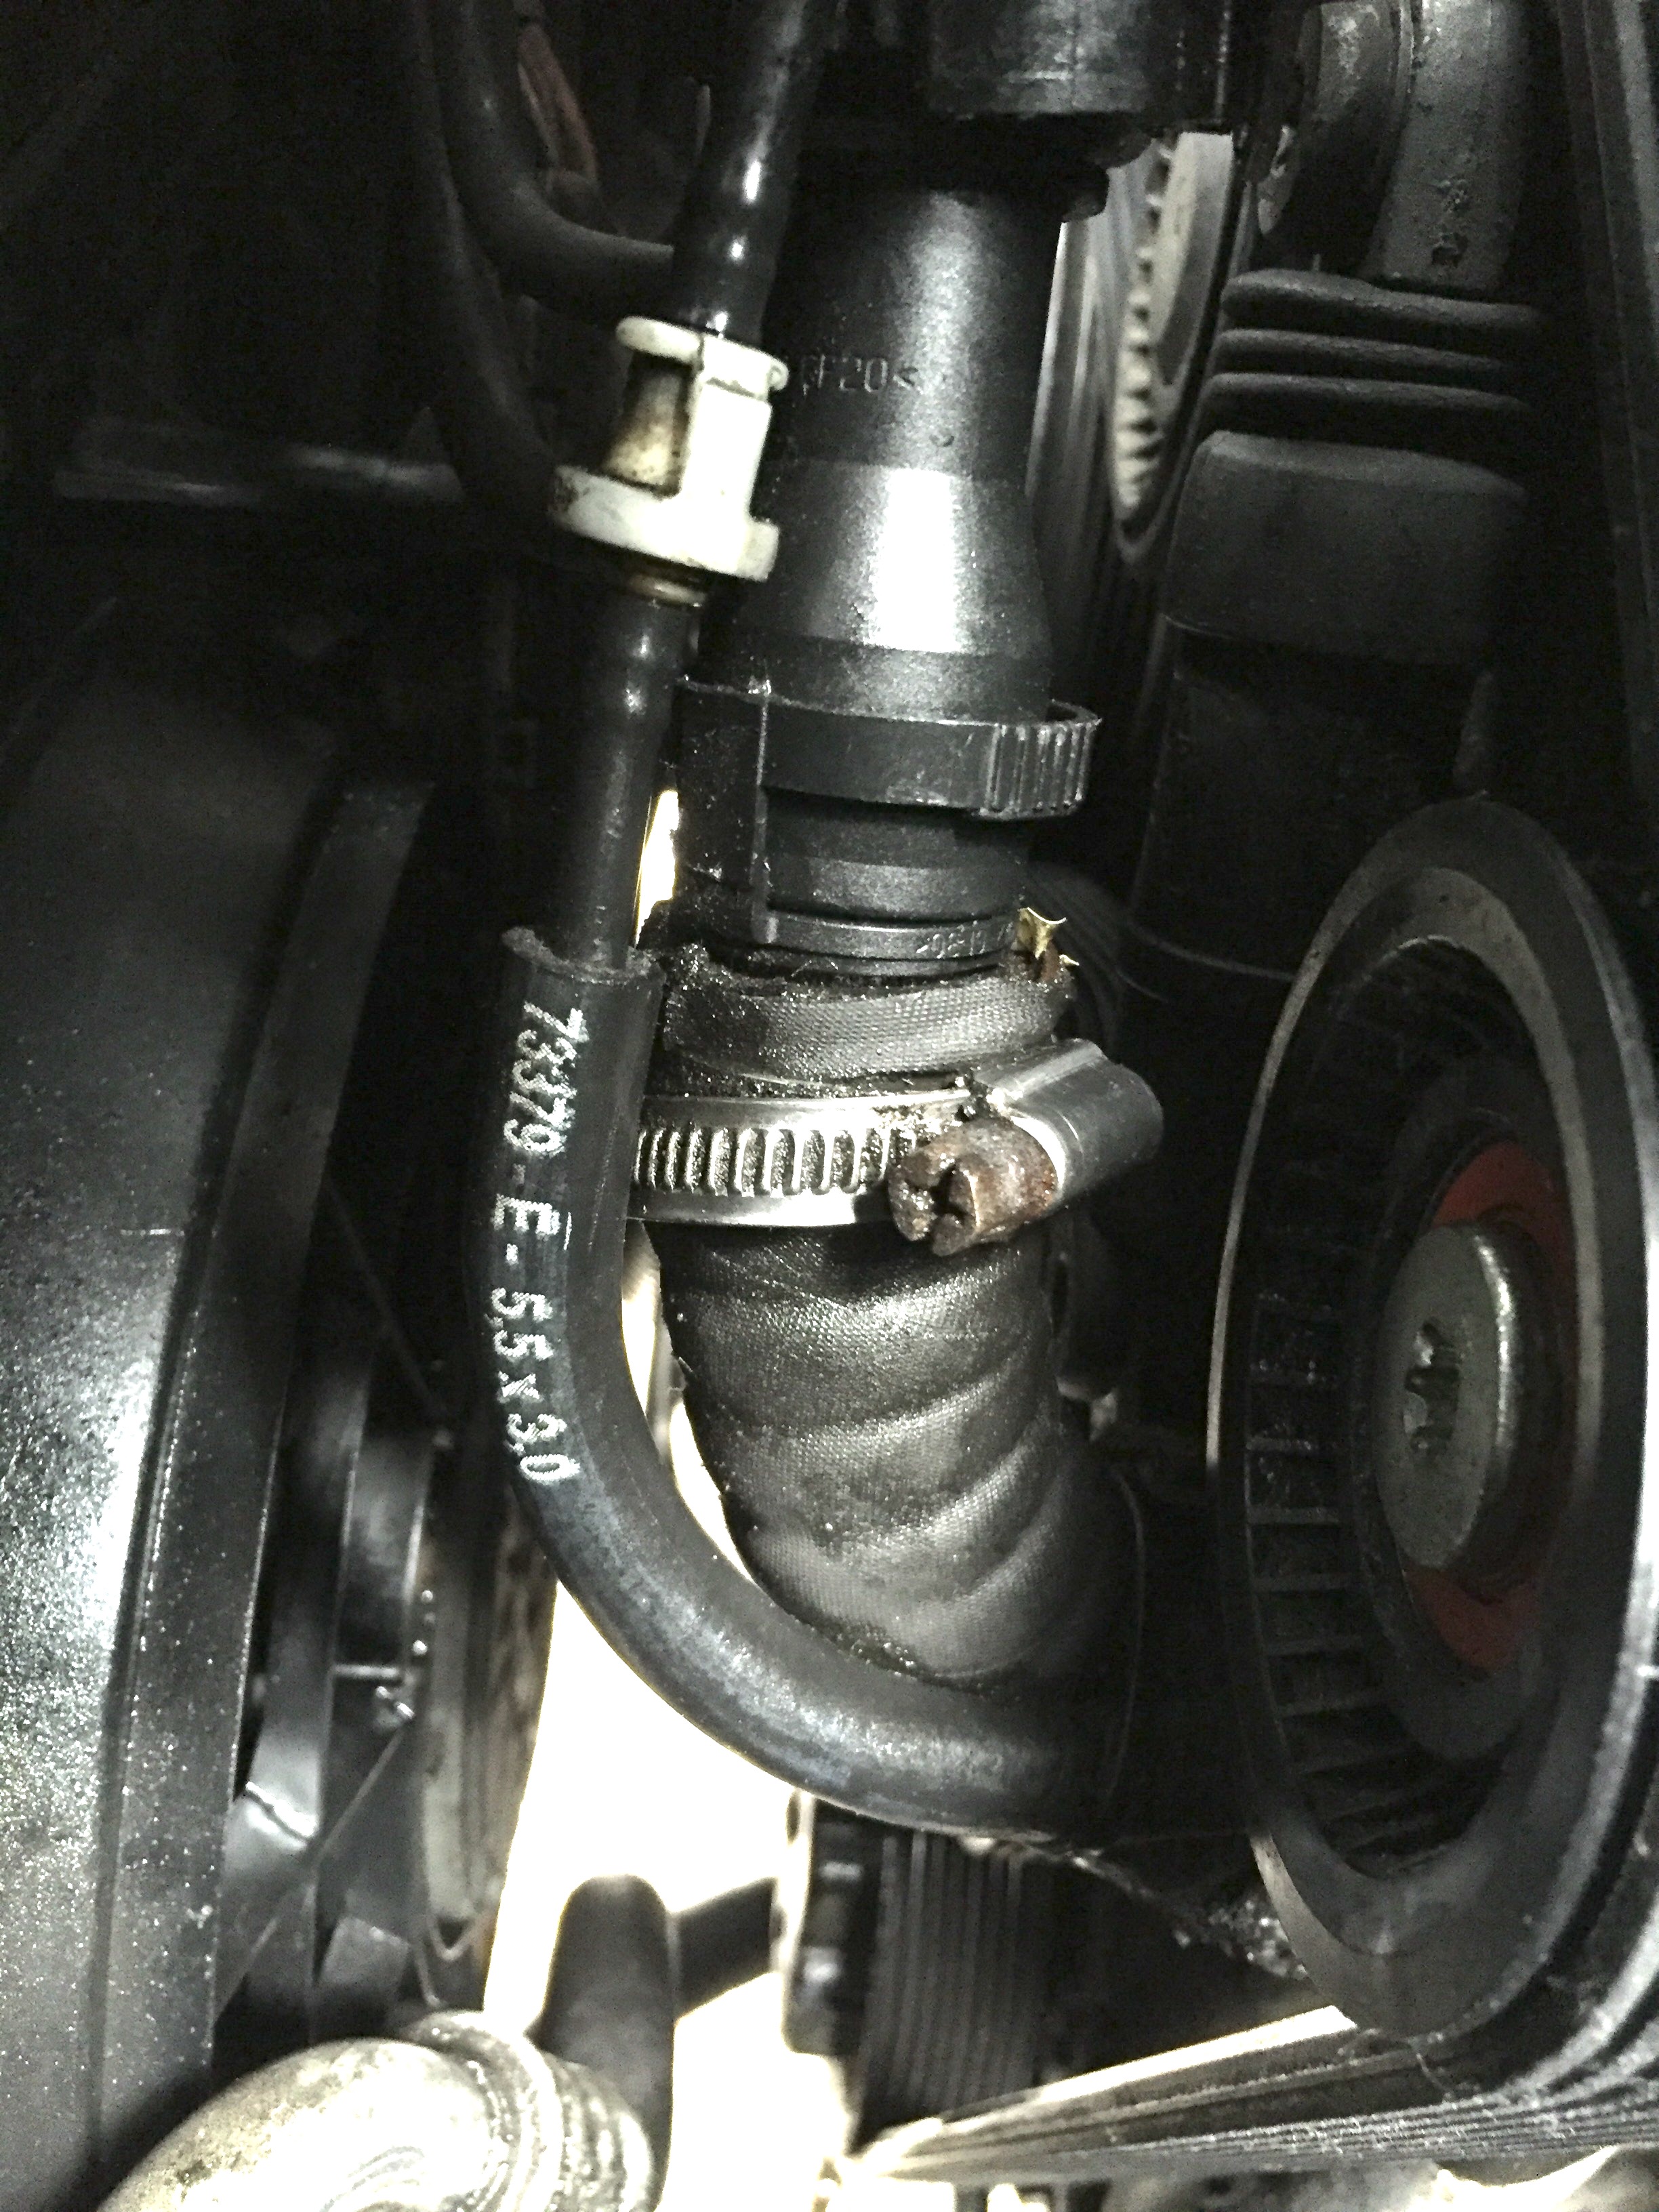
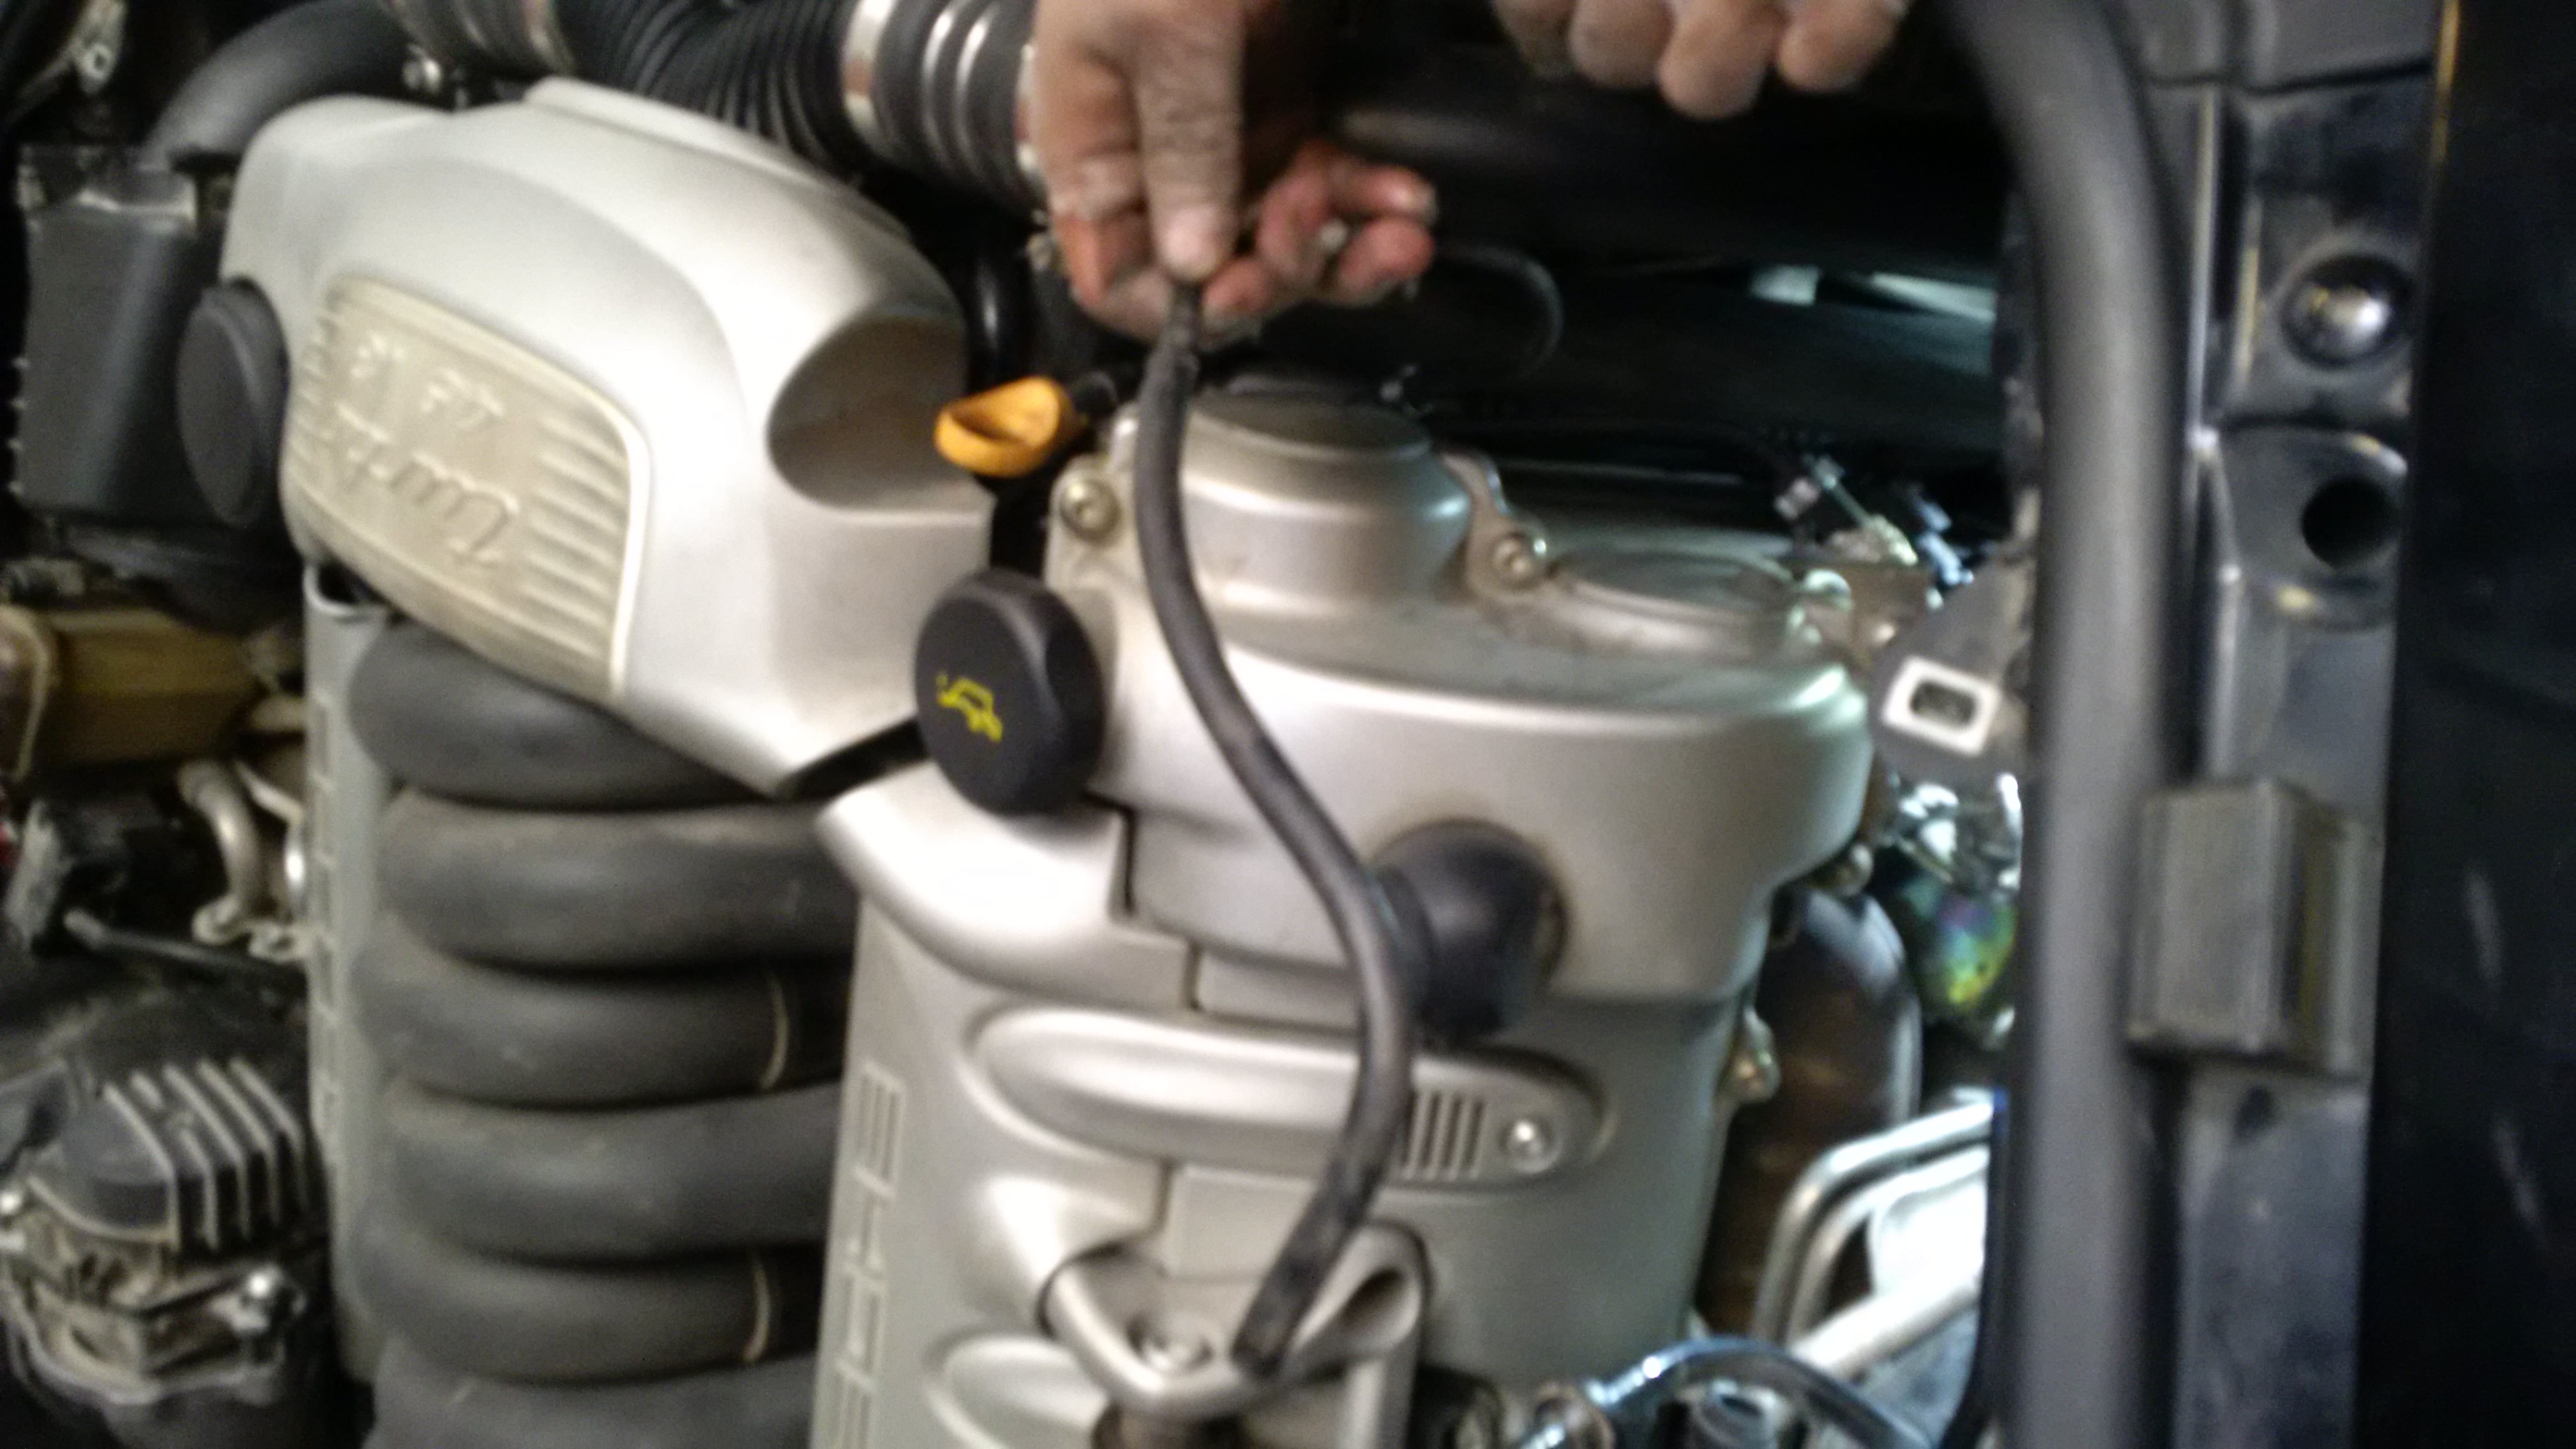
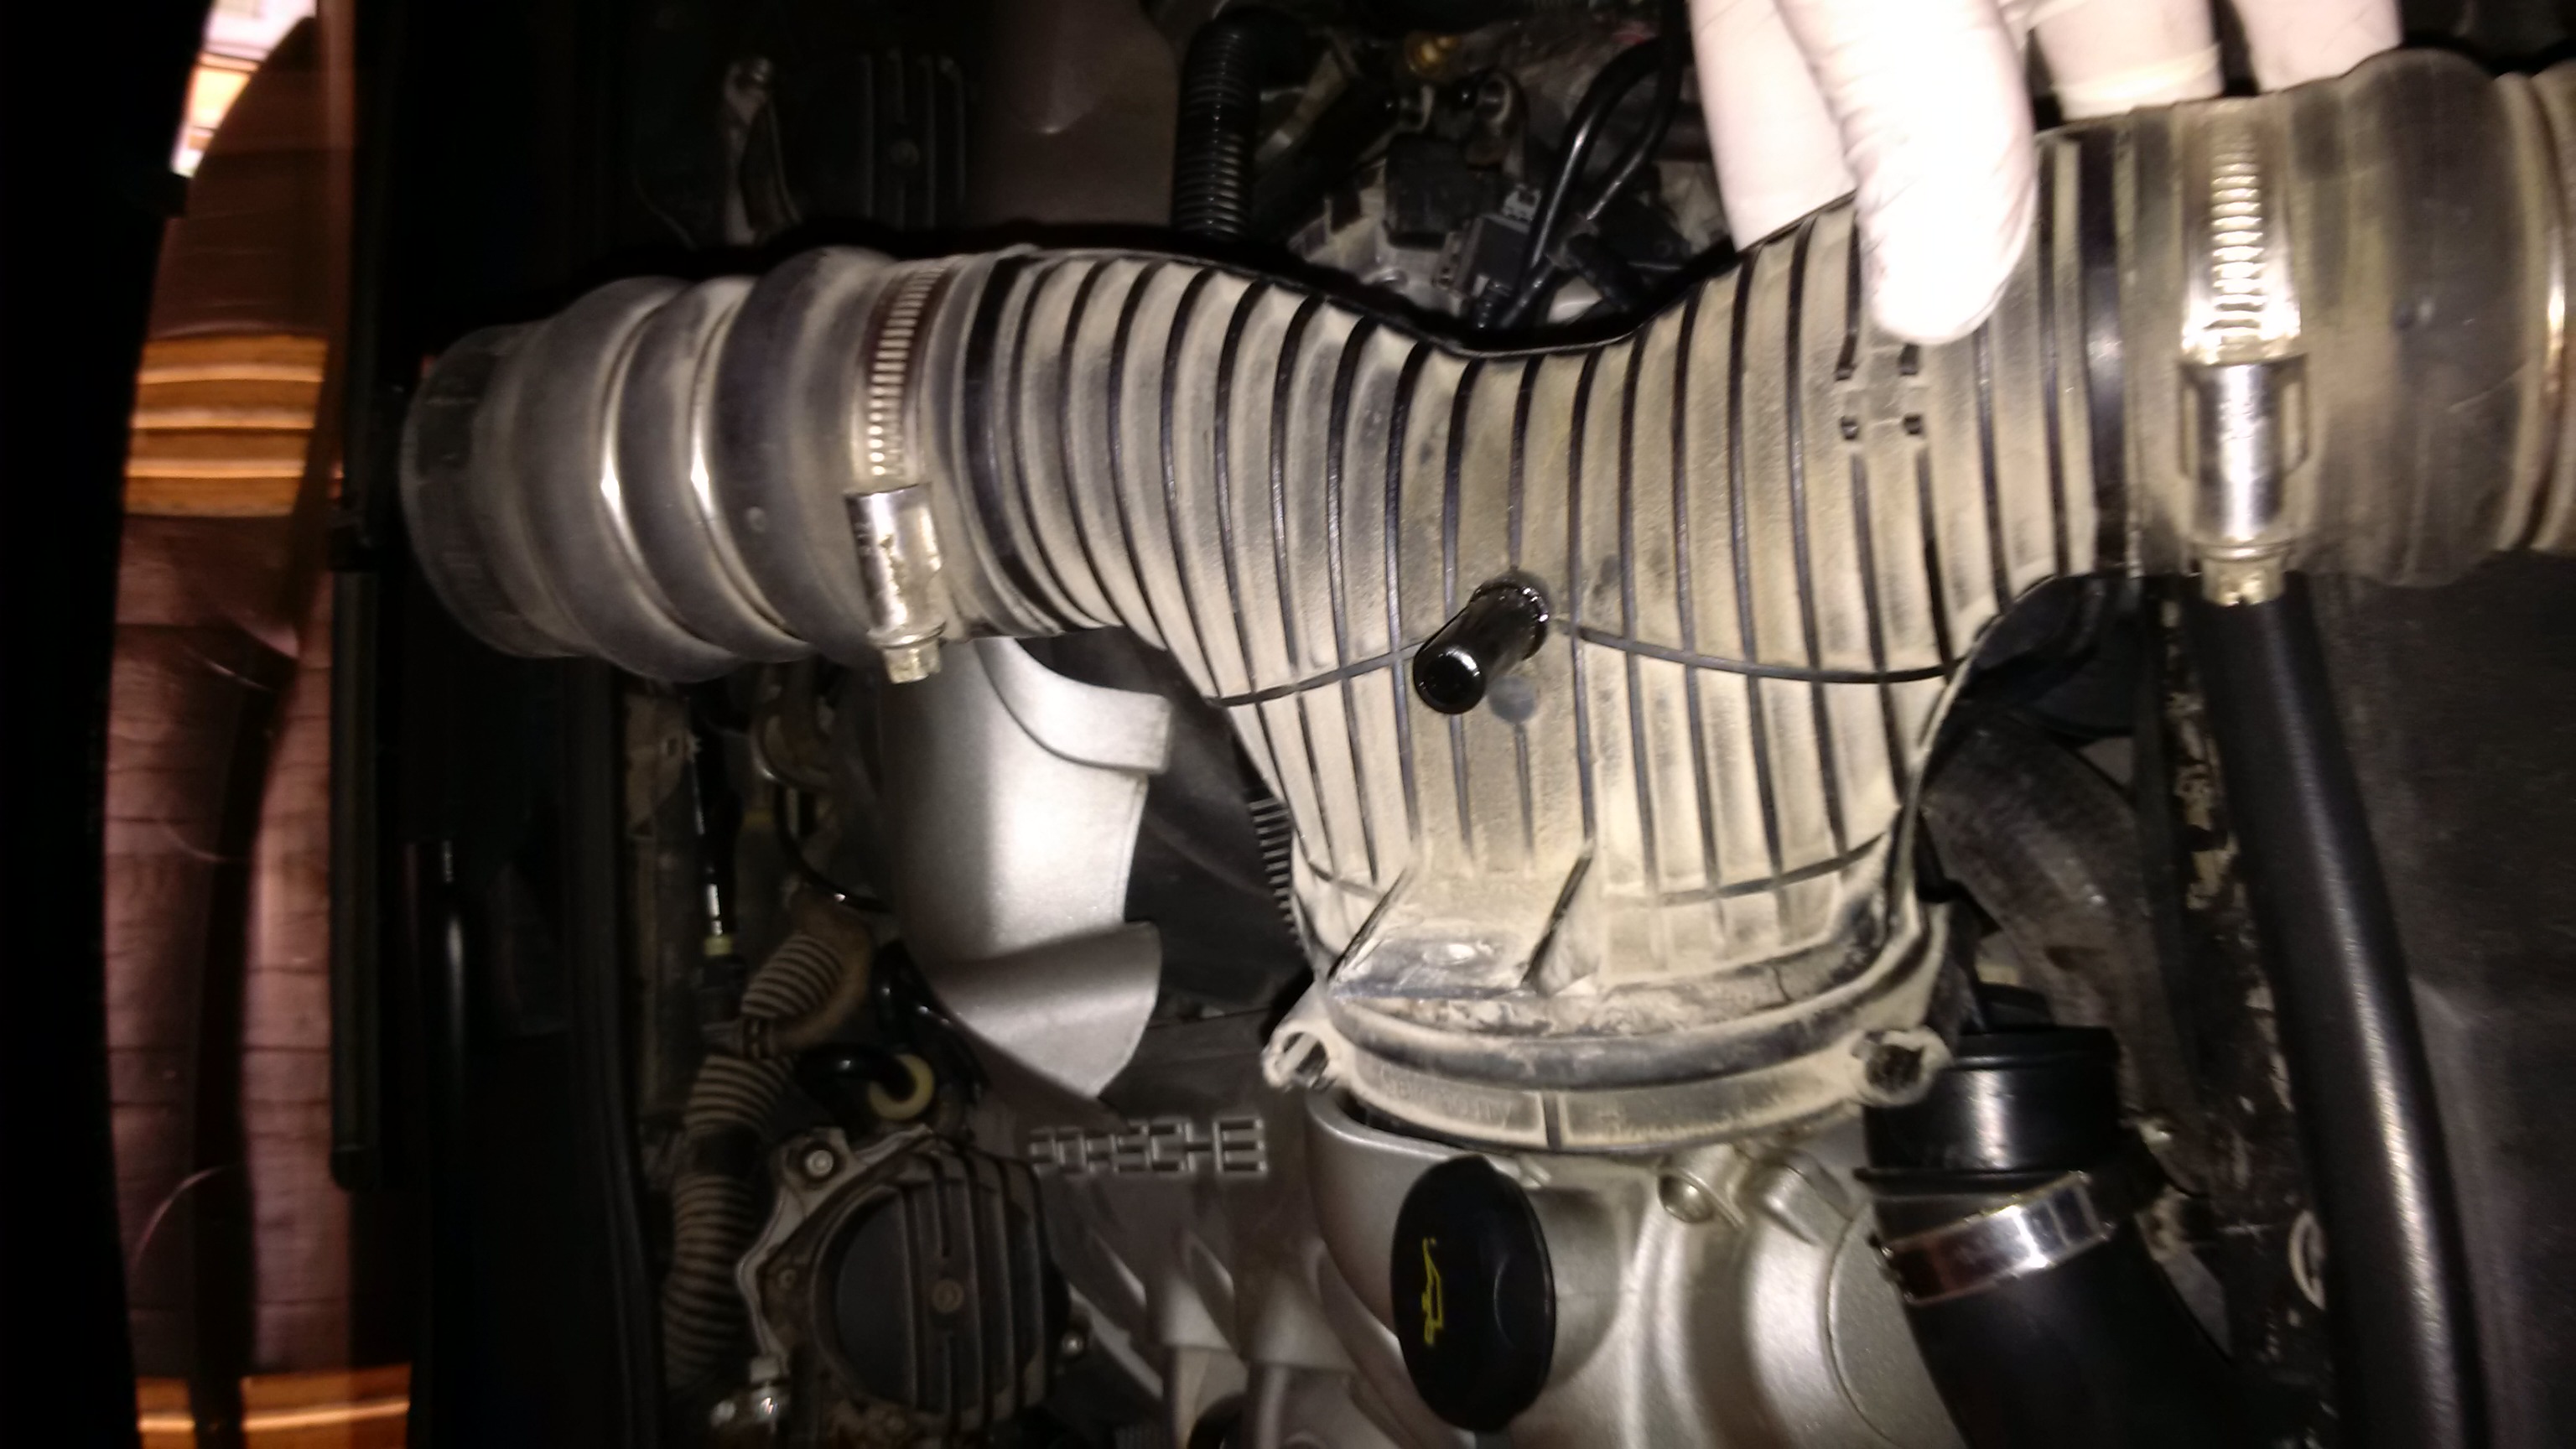
Some time ago the picture from the area close to the driver side turbo charger was posted. See below the pic with the arrow.
Is this the hose 14/ 15 ? If yes, is a replacement possible without taking away a lot of stuff?
I need to replace mine.
It's pipe 15 thomas.
To get access you will need to remove airbox cover and the turbo intake pipe/MAF sensor then you can just about reach inside to get your fingers on the pipe 15 clamp to squeeze the tabs and release the pipe off. Then separate from pipe 14 and wiggle out from between the Serpentine belt.
If you are going to replaced 15 I would also replace 14 as well it only makes sense. You will need to remove the Y pipe to access the small pipe and non return valve underneath the Y pipe.
I tested mine when I stripped it out the other day to change the orings. My pipe 14 and 15 was new when head gasket work was done.
-
10 minutes ago, ekstroemtj said:
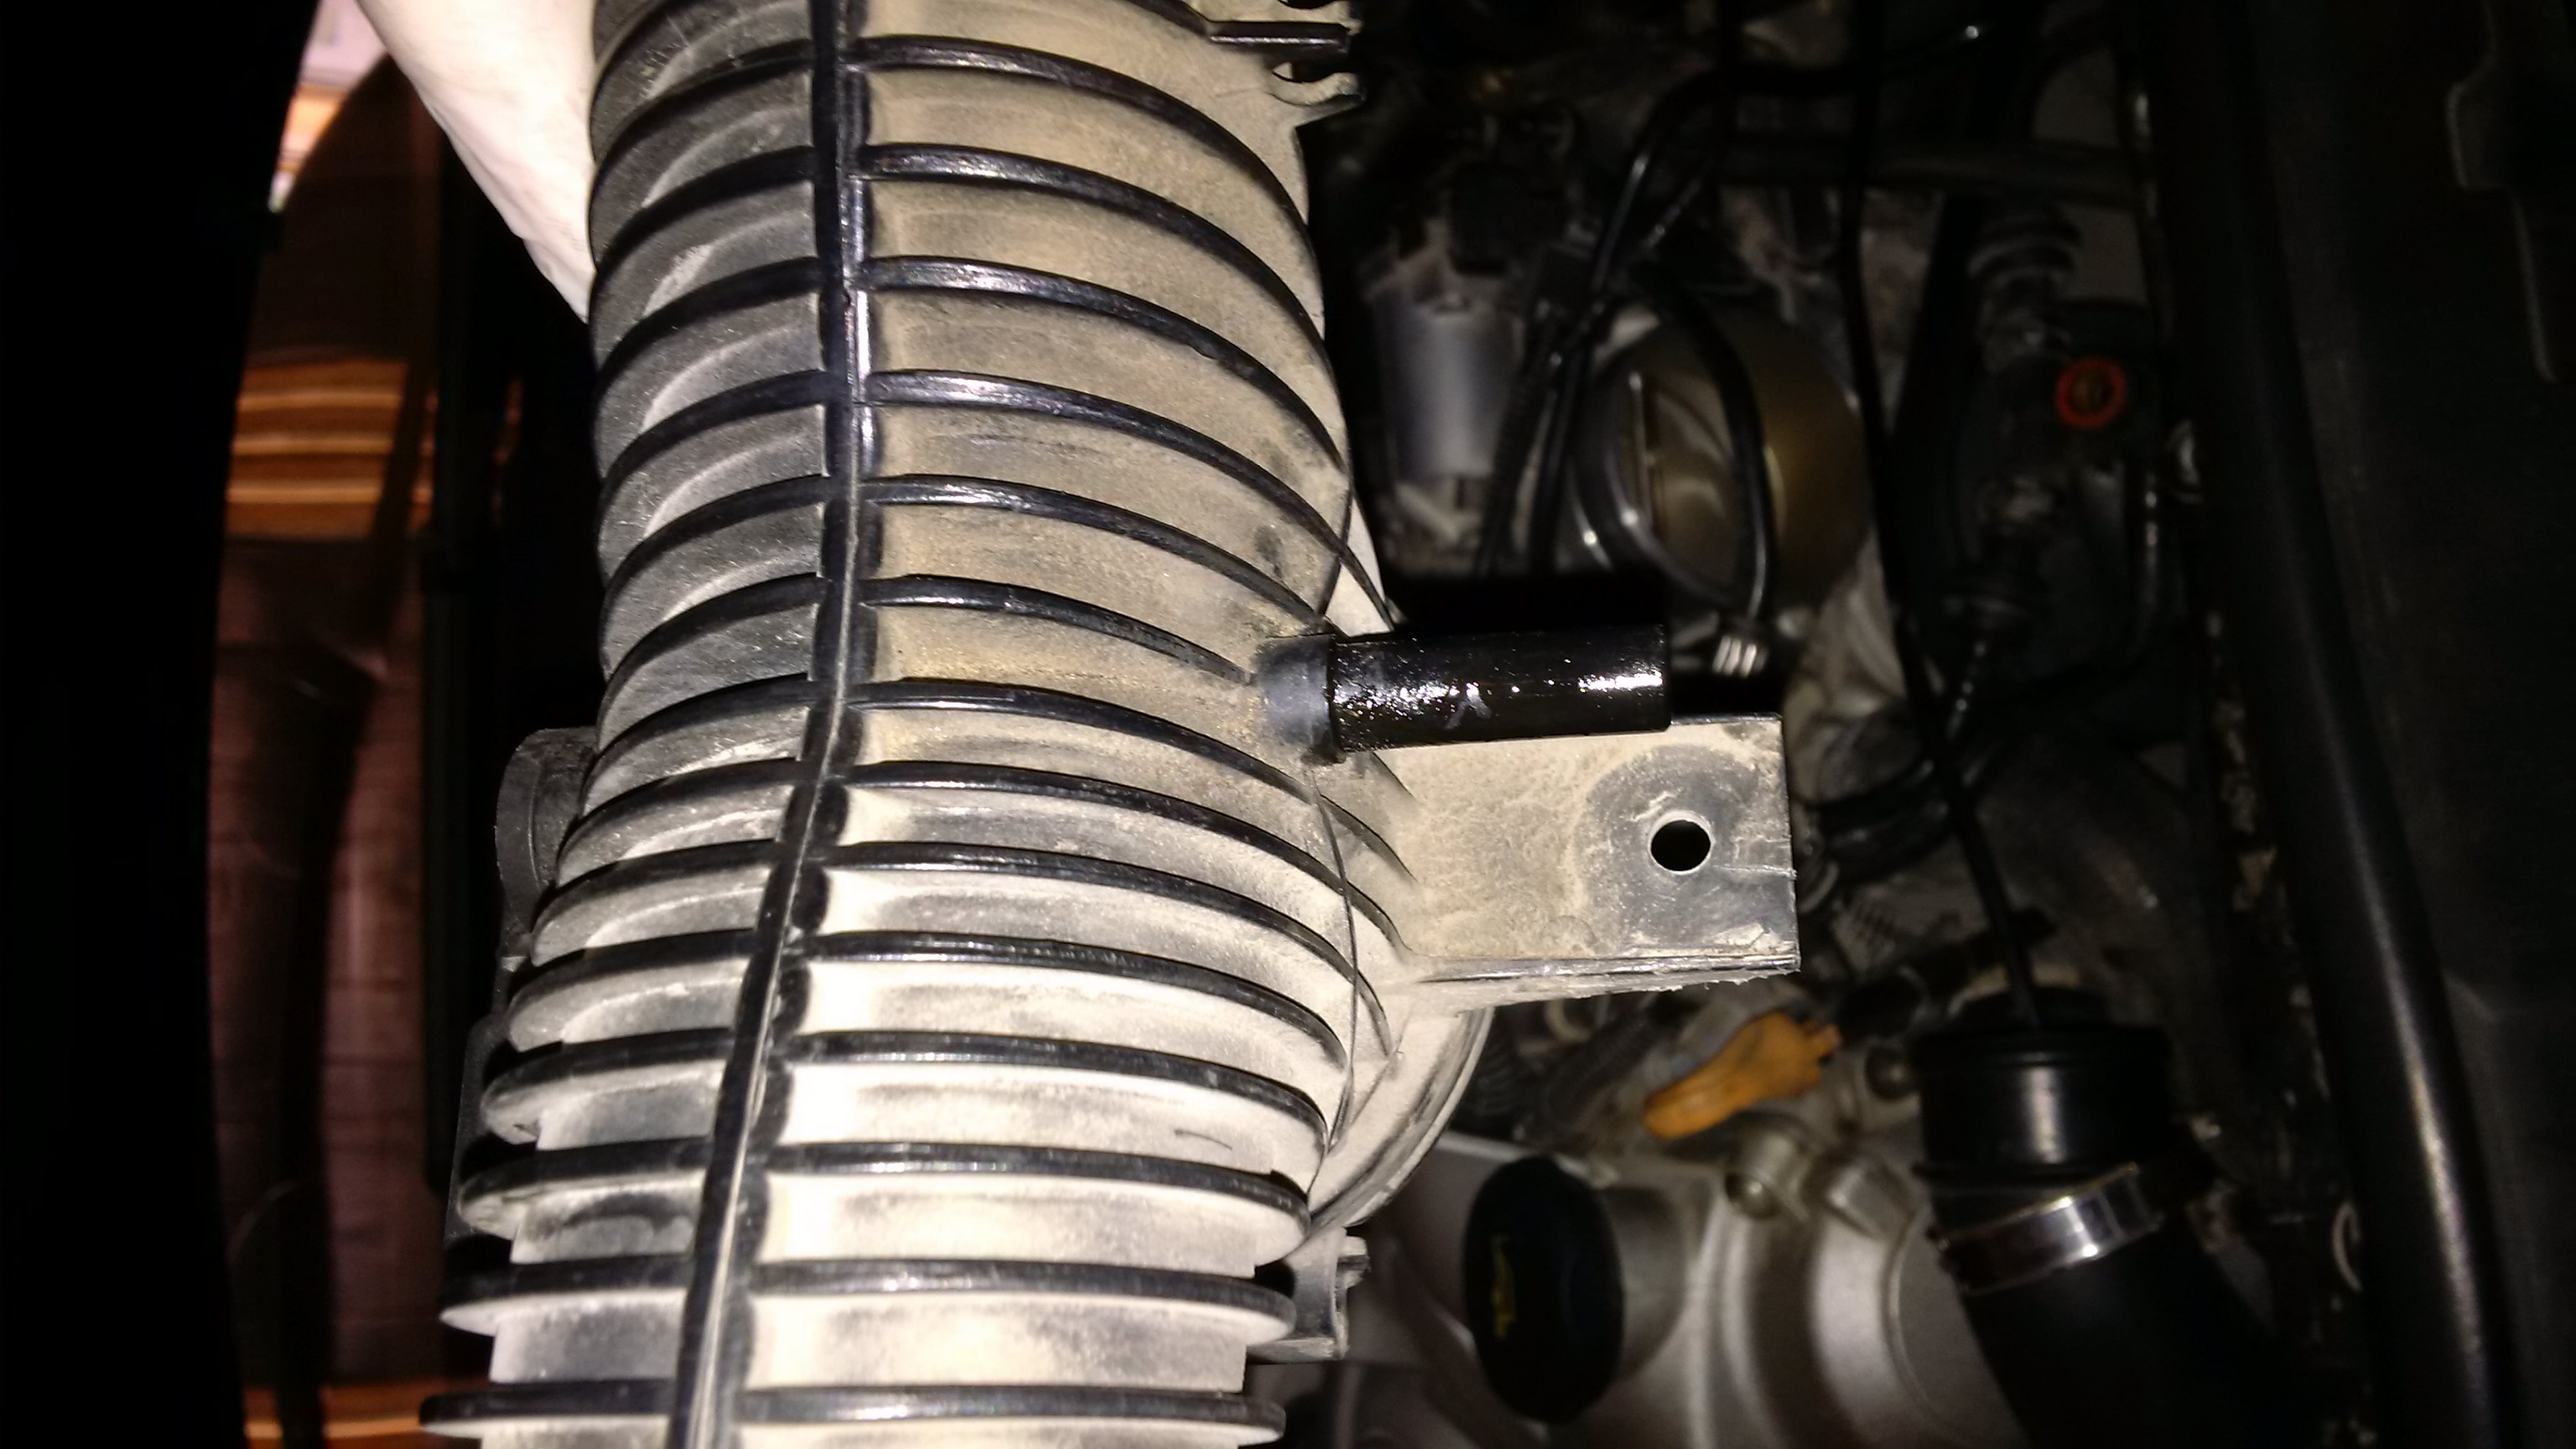
lewis... the pipe is not leaking.
Just when i blow into this pipe, air is coming out at the air hose which is connected to air filter box. Is this usual?
Normal yes pipe is straight through. No check valve or anything so you can hear the air travelling into the turbo and back around up to th airbox.
-
21 hours ago, ekstroemtj said:
Here is onother question.
I replaced today the pressure line (9+10 on the diagramm) which is going from n75 valve to the turbo. Dont know what it does?! I blow into the pipe and i hear the air coming out on the air duct which is connected to the air filter box. Is this right?
Hi Thomas, one night of working on a site and I missed so many posts! Lol
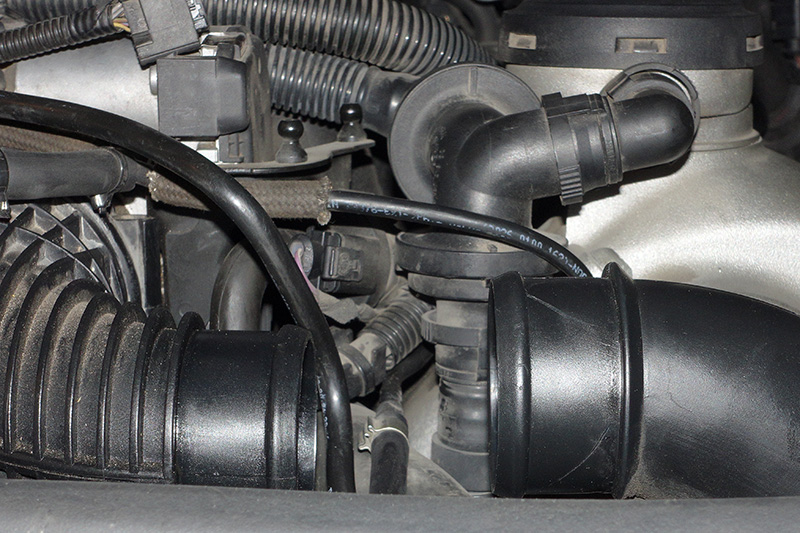
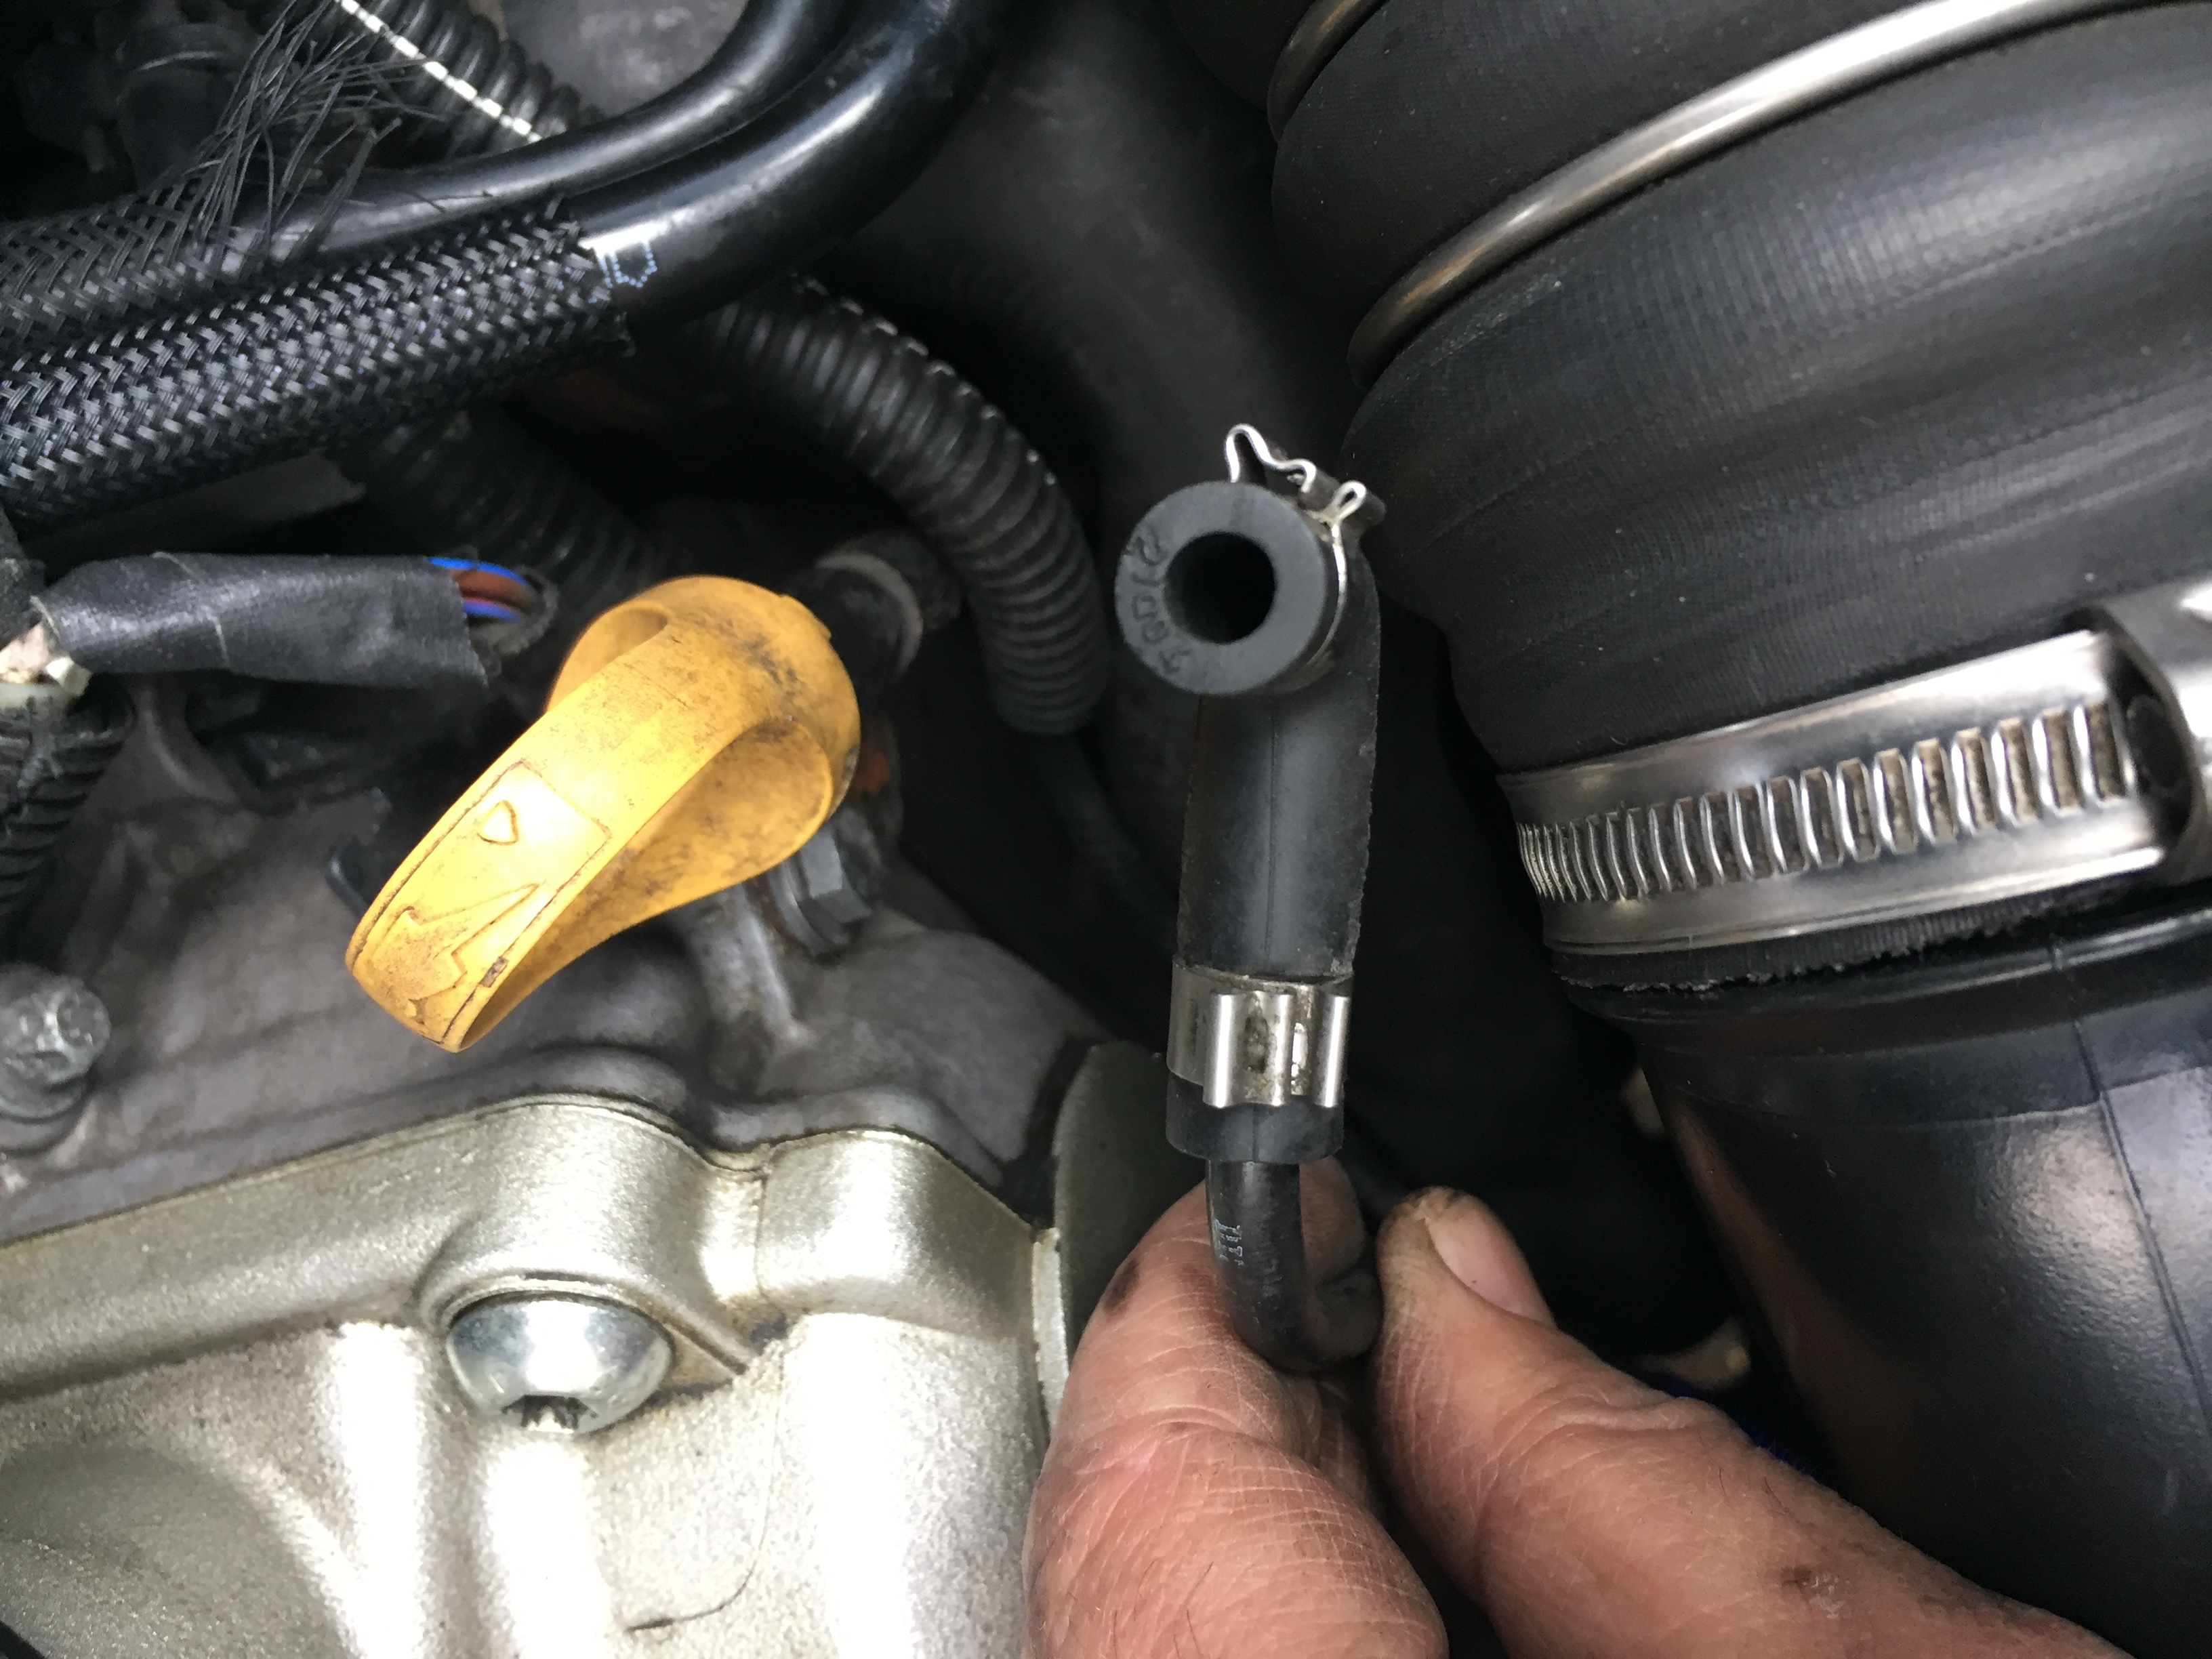
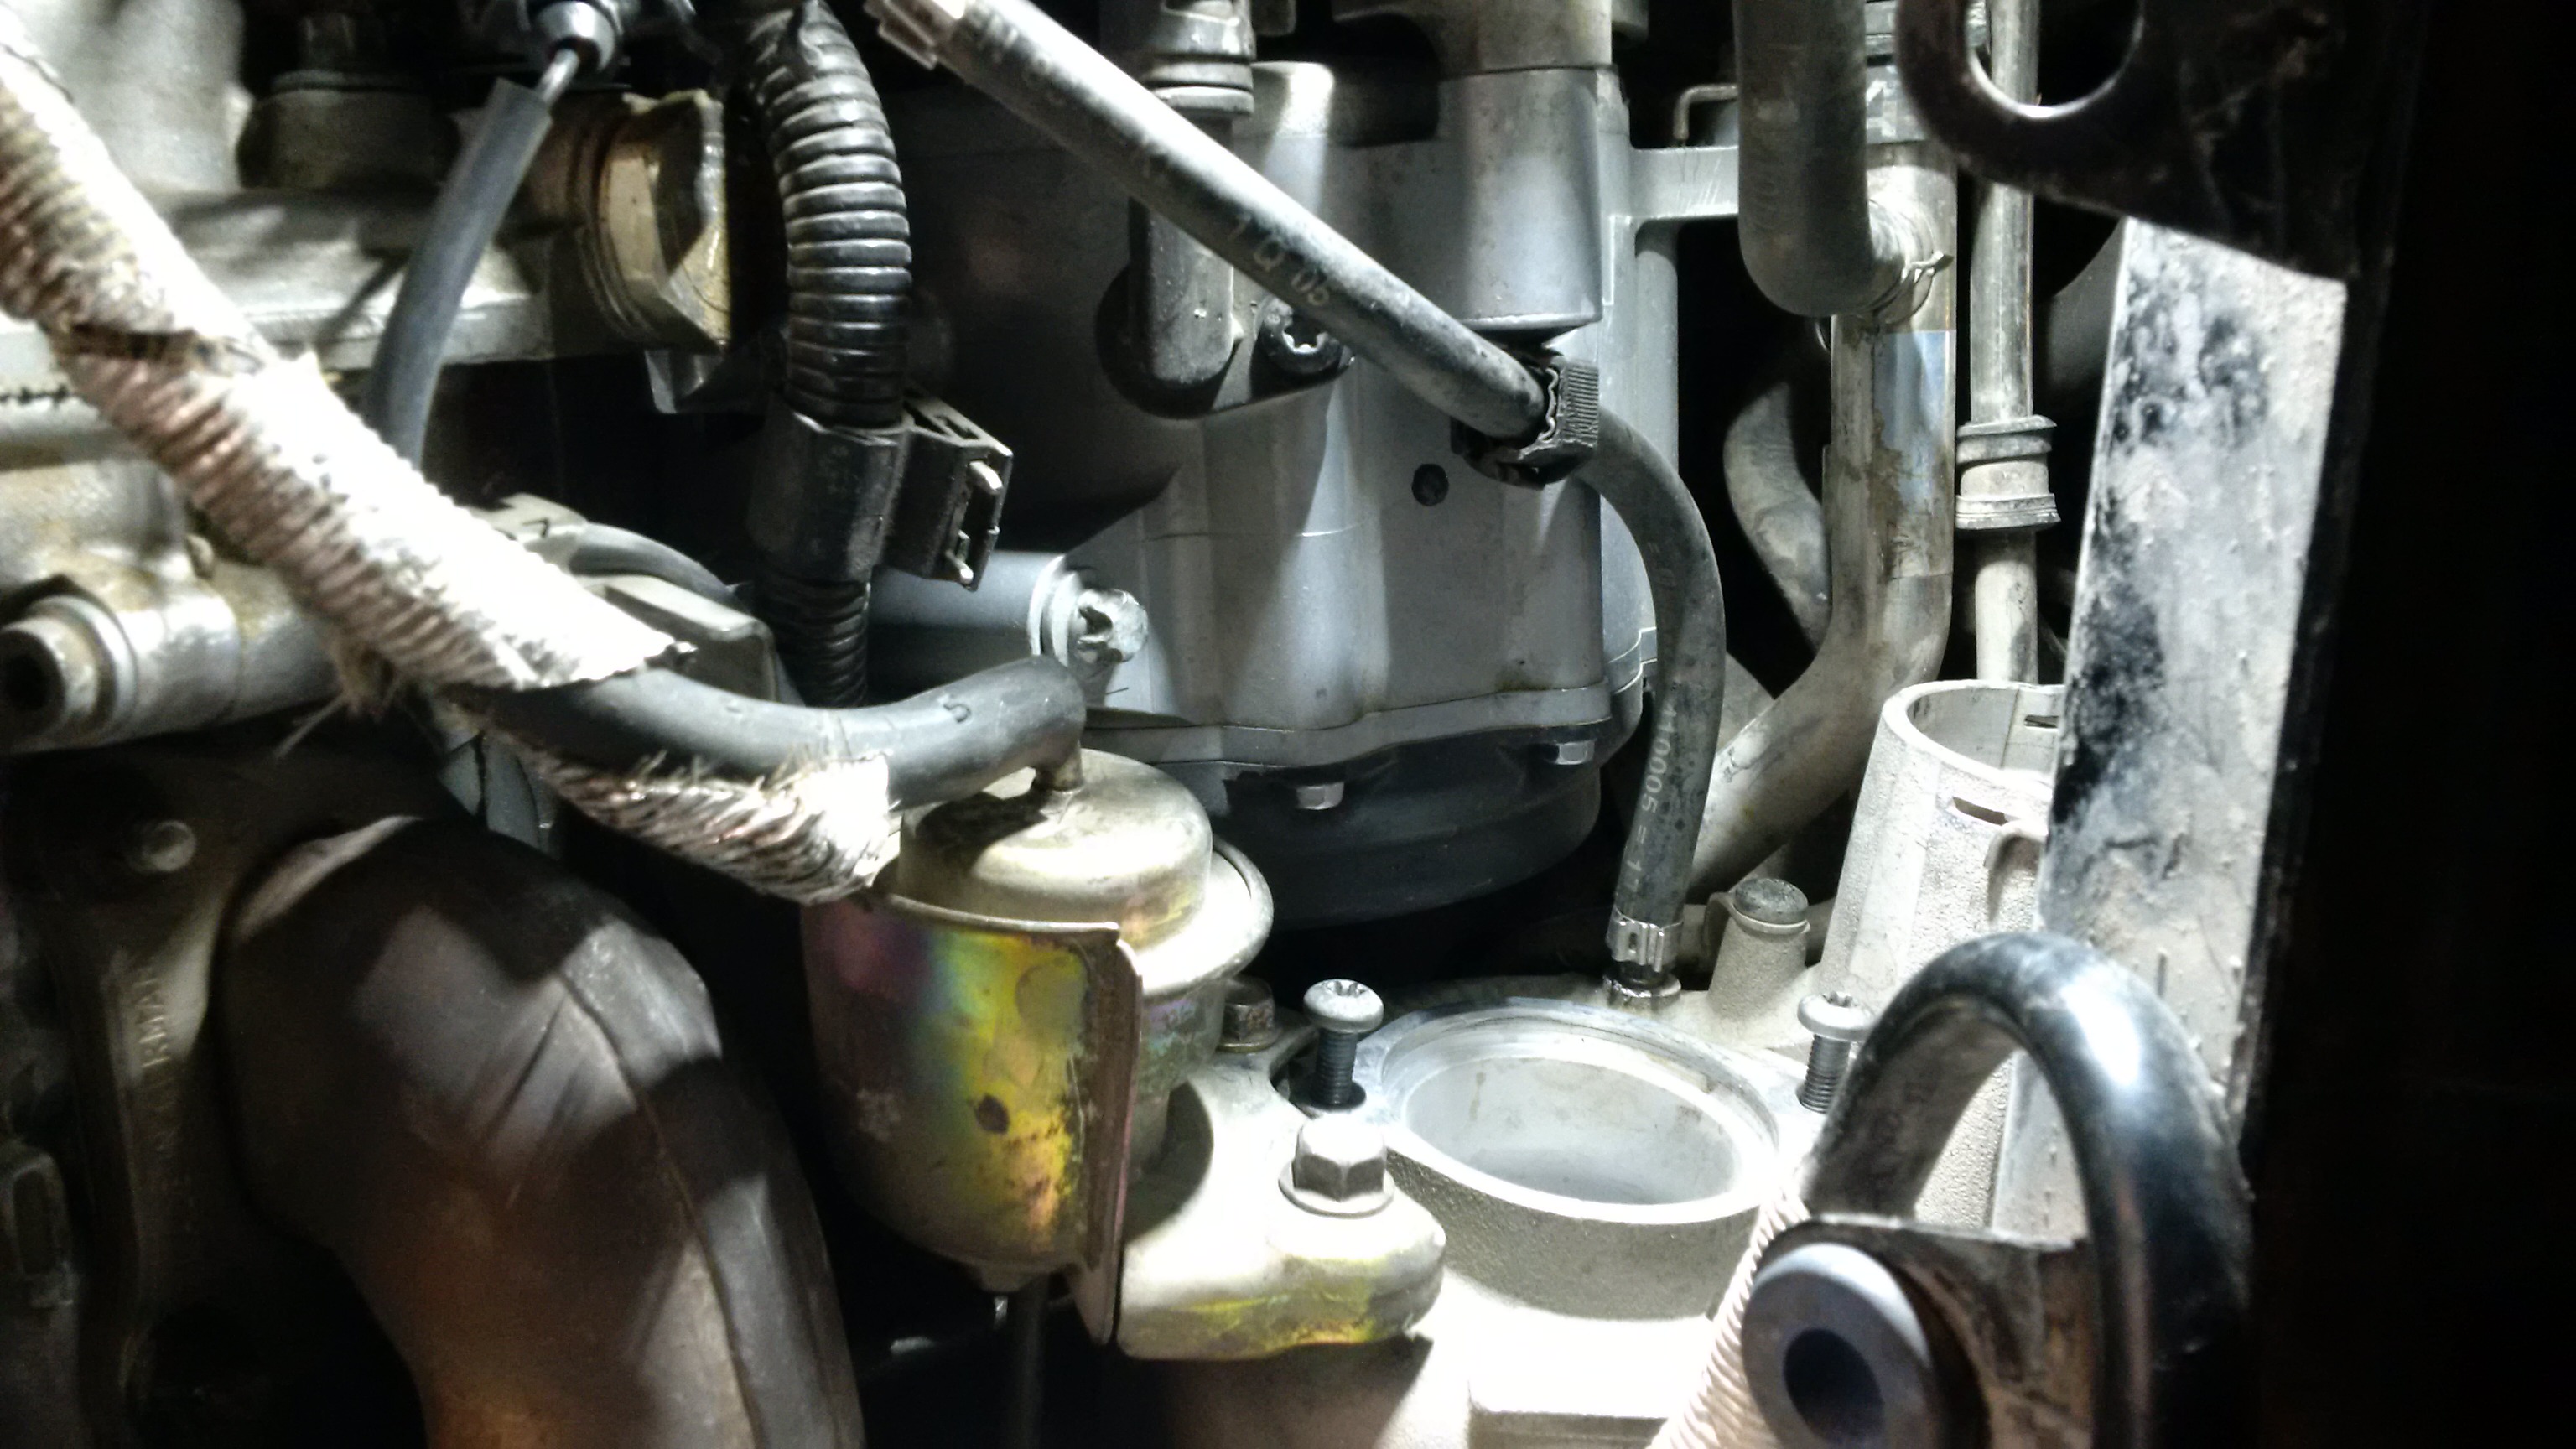
Ok this pipe is the boost reference from the passenger side turbo. The n75 valve uses this boost pressure to control the wastegates opening. If this pipe leaks usual you get Overboost code. I changed this pipe the other day and posted the pictures. As below pics it the lower pipe with the securing clip attached to the alternator.
You have to take the turbo pipes off to access this pipe and replace.
-
You can also remove the air filter box and get behind the light from there. Not difficult to remove and makes a lot of space.
-
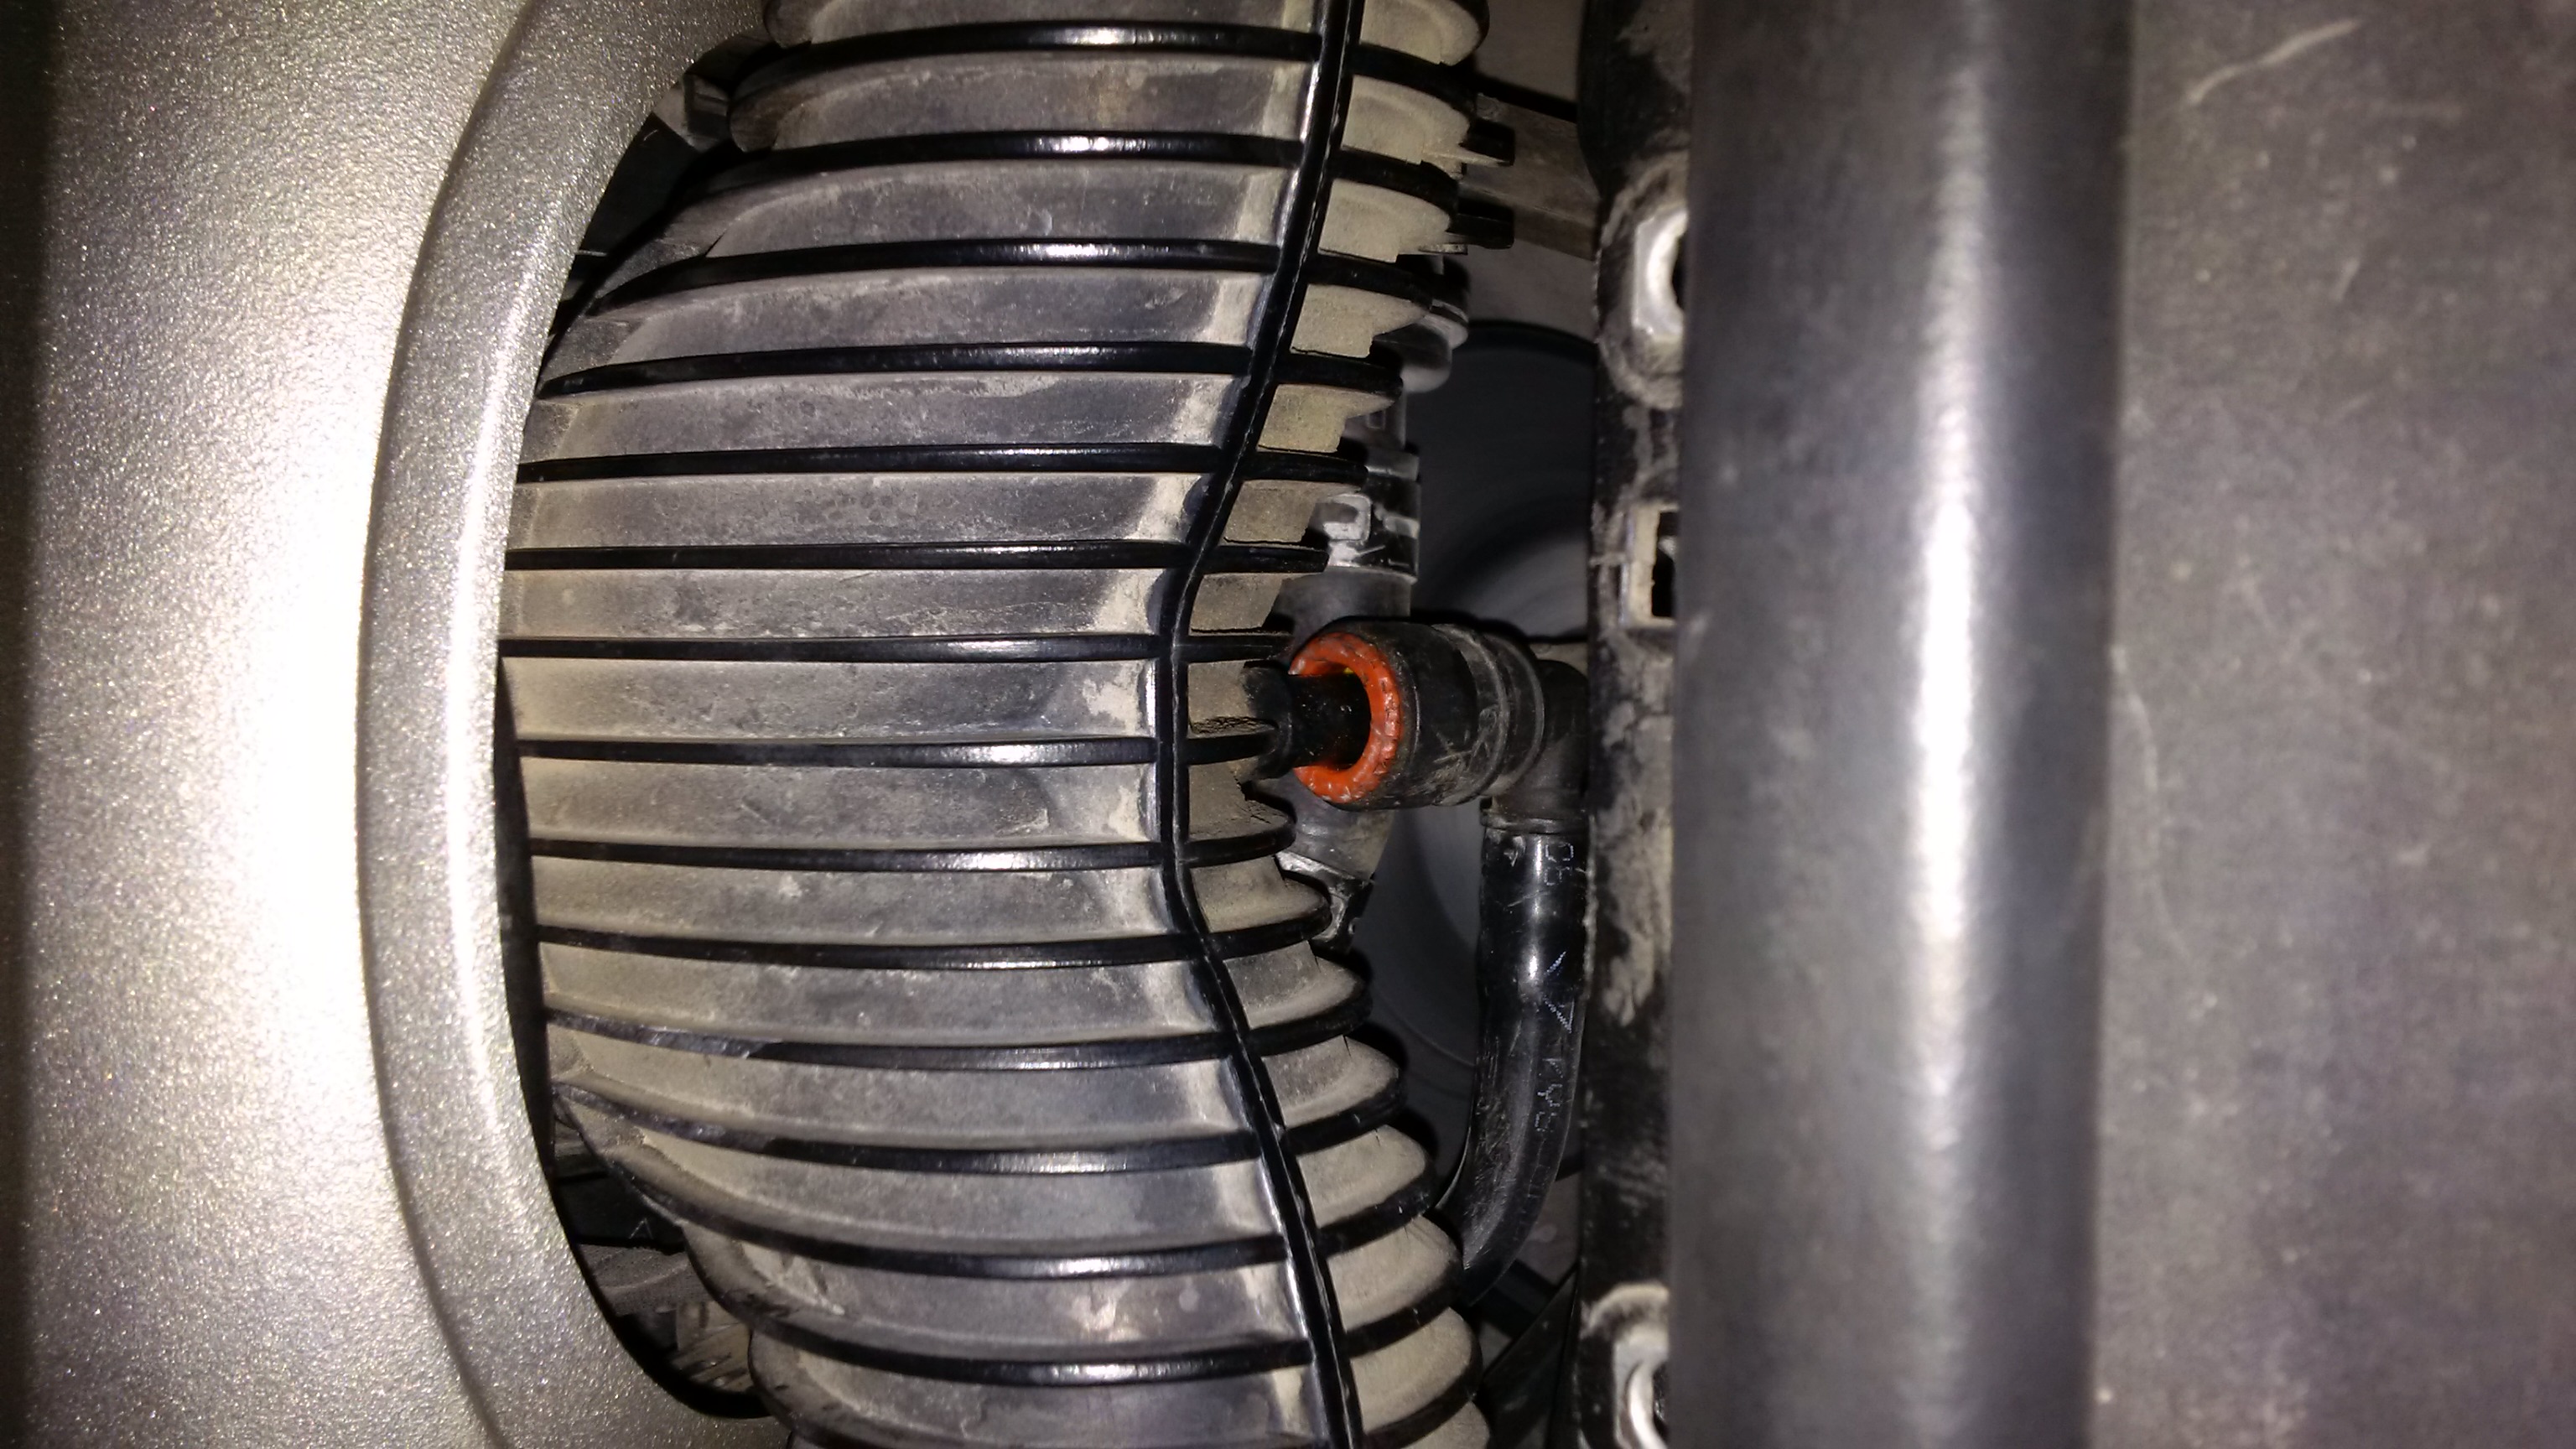
Some more pictures for you.
The bottom picture is the pipe fully inserted into the spigot and no leaks.


Turbo / MAF replacement, Oil found
in 9PA, 9PA1 (Cayenne, Cayenne S, Cayenne Turbo, Cayenne Turbo S)
Posted
have you tried removing those flexible hoses connecting from bank 1 and 2, and the pipe 5 I had split also I assume the small check valves you check when replacing the silicon hoses the other day?
Lastly as we was emailing earlier you said the whistle noise started after replacing the driver side DV, time to jump back in there and recheck everything again top to bottom.
Whistle noise is almost always a boost leak, when boost is leaking out the dme holds the wastegate shut longer to build up the boost it wants to see in the manifold, when you shut the throttle it will spike up and over boost code will pop up, then performance is reduce until you switch ignition off or reset the dtc.
When you have the turbo inlet pipe off, feel the turbo impellor wheel for play, there should be no movement side to side up and down. A small amount of movement in and out is acceptable. Also spin the impellor and check it's not rubbing and also spins freely.
A faulty worn turbo can cause overboost as well.