Jump to content

Welcome to RennTech.org Community, Guest

There are many great features available to you once you register at RennTech.org
You are free to view posts here, but you must log in to reply to existing posts, or to start your own new topic. Like most online communities, there are costs involved to maintain a site like this - so we encourage our members to donate. All donations go to the costs operating and maintaining this site. We prefer that guests take part in our community and we offer a lot in return to those willing to join our corner of the Porsche world. This site is 99 percent member supported (less than 1 percent comes from advertising) - so please consider an annual donation to keep this site running.

Here are some of the features available - once you register at RennTech.org

  • View Classified Ads
  • DIY Tutorials
  • Porsche TSB Listings (limited)
  • VIN Decoder
  • Special Offers
  • OBD II P-Codes
  • Paint Codes
  • Registry
  • Videos System
  • View Reviews
  • and get rid of this welcome message

It takes just a few minutes to register, and it's FREE

Contributing Members also get these additional benefits:
(you become a Contributing Member by donating money to the operation of this site)

  • No ads - advertisements are removed
  • Access the Contributors Only Forum
  • Contributing Members Only Downloads
  • Send attachments with PMs
  • All image/file storage limits are substantially increased for all Contributing Members
  • Option Codes Lookup
  • VIN Option Lookups (limited)

GOB

Contributing Members
  • Posts

    184
  • Joined

  • Last visited

Everything posted by GOB

  1. The head tech at the local dealer told me to make sure to let the car rest on an incline (nose down) for a few hours with the coolant tank lid off to make sure that all air bubbles get out. I was having the itermittent low coolant light and fluctuating levels, but after topping it off and bleeding it many times as suggested (even a few overnight resting periods), I am happy to say no more issues. Anyone have the part number for the updated cap? Thanks
  2. Well, since my side vents were blowing a ton of what appears to be dry rotted foam :eek: , I decided to remove them and clean them out (as well as repair the left side which had the "up and down" piece missing). Everyone told me "just remove the two bolts on the side. Well, I now know A LOT more.... Here are some random tips for those interested and for future reference Start with the passenger side as it gives you easier access to remove and re install before tackling the driver side. There are 3 THREE! bolts to remove (I learned by breaking...). You must first remove (with a small screw driver or nail) the round cover (think headlight switch cover for RHD cars). There you will find the third screw at what I would call 7' o clock. Remove the two side screws (I had a tough time due to the fact that I did not have a box wrench for the torx bit). To remove, "gently" tap with your fist the top part near the dash and just pull out. The vent itself has a black plastic tube that goes into another tube attached to the dash. To re install, its the same thing, except that you need to be careful when re insterting the vent because more likely than not, the open/close lever will catch on the side of the dash and un pop itself. Trick is to grab the black plastic side from the dash and pull sideways (towards the door) to make room for the lever to go in. I also found it useful to have the vent in the 3/4 position towards the top to make it easier to see if it caught or not. The driver side is the same with one exception: headlight switch. To remove this, pull on it as if you are turning on the fog lamps. Do this while having your back on the floor so you can see a bronze colored "pin". Push on this pin with a small pointy "thing" and the knob will fall into your hands. There is a torx screw in the area left behind the headlight knob. I would venture to say around 4 o'clock. You better have a long torx bit otherwise it will be hard to get to. After that, remove the two side screws and reapeat as above. The headlight knob just pops back into place with some forward pressure. Another thing I learned was to make sure that the plastic pink threads are lined up where they should be, BEFORE inserting the vents again. I know this might seem trivial and perhaps its written down somewhere (I searched with no results), but its the small details that can make something easy and trivial, versus breaking a bunch of plastic and having stuff not fit right after re installing :o Ask me how I know! :lol: I hope its of use to someone eventually.
  3. If you are sure about the location (airbag), go with the instructions given. I found out that the source of my noise is the bottom of the A pillar. As soon as I put a tad of pressure, it disappears. Still no idea how to solve my issue though :cursing:
  4. Quick update: had the car re aligned (yes, that is 4 times now :eek: ...) and it tracks a lot better (takes about 8 seconds to cross the lane at 55 mph), but they left the steering wheel crooked to the left! :oops: Will be back on Saturday to (hopefully!) have this solved once in for all.
  5. I will have them re align the car and add negative camber to the right so it matches the left side (I cannot get more positive camber in the left unless I file away at the mounting holes! :unsure: ) Will post update for all once its done so we can all learn from this.
  6. Will swap front tires as suggested elsewhere, but my question still remains if I should match the front camber settings, even if they are off spec. -1.06 of camber does not seem much, especially when the fronts wear half as fast as the rears. Am I completely off?
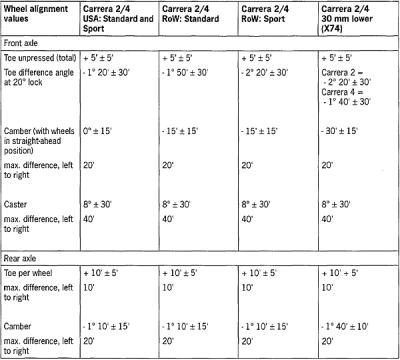
  7. O.K. Just got some new Falken Azenis RT-615 tires on the car. Had it re aligned (numbers were WAY off spec) and all is within the ROW M030 alignment spec chart I have (see attached) EXCEPT for the front camber. On the left side, the minimum I could get was -1 degree and on the right it was -0.46 degrees. Would this difference cause the car to switch from one lane to the next in 5 seconds at 60 mph? Should I match the front cambers on either side even if its off factory spec? Reason why I could not get more positive camber is that I learned the car was in an accident (I learned this AFTER I got the car :cursing: :cursing: :censored: :censored: ) So, would matching the front negative cambers solve my pulling to the right issue? For those interested, here are my final alignment specs: FRONT LEFT: Caster 7, Camber -1, Toe .03 FRONT RIGHT: Caster 6.54, Camber -.46, Toe .03 REAR LEFT: Camber -1.24, Toe .06 REAR RIGHT: Camber -1.18, Toe .06 On research that I have done, apparently the caster is non adjustable on these cars (particularly in the front). <_< Mine does have factory M030 ROW suspension on it. Even though it pulls to the right, I can tell that these new tires are awesome :jump: :jump: 1998 Carrera 2 RoW, Coupe, 6 Speed
  8. I purchased a Sachs kit for $374 from Vertex (matched the price from www.gripforce.com on ebay) and dealer quoted me $400 to drop the engine alone. Can anyone give me the part number for the lever mentioned above that could cause premature wear? Thanks.
  9. The e-brake worked perfectly, but after my twin boys spent an hour pretending to be Alonso and Montoya :drive: the button for the emergency brake has been pushed in and I am unable to "pop it back out". :cursing: Do I have to remove the entire center console and disassemble the entire thing? From other posts, it is my understanding that this is an entire unit that cannot be taken apart! It still works fine, just that I cannot "lock it into place" since the release button is sunken in. Can anyone shed some light into this matter? Please? :help: And yes, kids are no longer allowed to play in the front seats :censored:
×
×
  • Create New...

Important Information

We have placed cookies on your device to help make this website better. You can adjust your cookie settings, otherwise we'll assume you're okay to continue.