Welcome to RennTech.org Community, Guest
There are many great features available to you once you register at RennTech.org
You are free to view posts here, but you must log in to reply to existing posts, or to start your own new topic. Like most online communities, there are costs involved to maintain a site like this - so we encourage our members to subscribe or donate. All subscriptions and donations go to the costs operating and maintaining this site. We prefer that guests take part in our community and we offer a lot in return to those willing to join our corner of the Porsche world. This site is 99 percent member supported (less than 1 percent comes from advertising) - so please consider an annual subscription or donation to keep this site running.
Here are some of the features available - once you subscribe RennTech.org
- View Classified Ads
- DIY Tutorials
- Porsche TSB Listings (limited)
- VIN Decoder
- Special Offers
- Paint Codes
- Registry
- Videos System
- View Reviews
- and get rid of this welcome message
It takes just a few minutes to register, and it's quality Porsche information at a low cost.
Contributing Members also get these additional benefits:
(you become a Contributing Member by subscribing or donating money to the operation of this site)
- No ads - advertisements are removed
- Access the Contributors Only Forum
- Contributing Members Only Downloads
- Send attachments with PMs
- All image/file storage limits are substantially increased for all Contributing Members
- Option Codes Lookup
- VIN Option Lookups (limited)


optimusglen
-
Posts
8 -
Joined
-
Last visited
-
Days Won
1
About optimusglen

- Birthday November 10
optimusglen's Achievements
Member (1/1)
2
Reputation
-
Cayenne 2007 rear seat angle modified (9PA1, 957)
optimusglen replied to boonewe's topic in DIY Articles - Cayenne - Mods
yikes, how sketchy. In the event of a rear end collision, the rear seat back is very likely going to fly back snapping that tiny little metal bracket, possibly sending the rear seat occupants out the back and into the grill of the vehicle behind. To put it bluntly, if you do this you could cause the death of your loved one or passenger. -
View this tutorial 955/957 rear seat latch replacement I believe it's a fairly common issue, but granted that I've only been around these Cayennes for a short while. Failure modes: 1-Unable to release latch to tilt seat-back forward, failure to unlatch. 2-Seat latch fails to secure seat-back in the upright position, failure to latch For me, I was running into failure mode #2. When pushing the seat-back up it would not latch no matter how hard I tried. I sourced a new-used replacement from ebay. The parts Author optimusglen Category Cayenne (9PA, 9PA1) - Common Fixes and Repairs Submitted 11/15/2018 10:46 AM
-
- 1
-

-
955/957 rear seat latch replacement
optimusglen posted a tutorial in Cayenne (9PA, 9PA1) - Common Fixes and Repairs
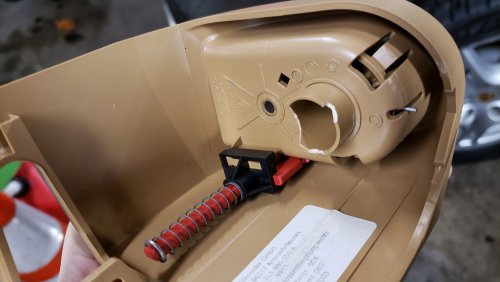 I believe it's a fairly common issue, but granted that I've only been around these Cayennes for a short while. Failure modes: 1-Unable to release latch to tilt seat-back forward, failure to unlatch. 2-Seat latch fails to secure seat-back in the upright position, failure to latch For me, I was running into failure mode #2. When pushing the seat-back up it would not latch no matter how hard I tried. I sourced a new-used replacement from ebay. The parts between 955 and 957 are interchangeable. Unsure about 958. Tools required: -torx bit/driver/key, T20 I believe, or T25 -triple square bit, I forget the size but can update later -wrench that fits triple square bit, I used a ratchet with a 13mm socket Step 1: Remove two torx screws, T20 I believe. The first screw is partially hidden by the latch lever, pivot the lever and remove the screw. The second screw is installed from the side, in the opening of the plastic latch cover. The plastic on my cover had cracked around where the screw was inserted, so it is shown here after removal. The entire plastic cover assembly is now free and is removed by sliding up along the same axis as the first screw. If you are experiencing failure mode 1, at this point you should inspect your plastic cover assembly. It is possible that three tabs on the lever can break off as shown here. If this is the case, you simply need to replace that part and not the entire latch. The latch assembly is held on by two triple-square screws which are visible once the plastic cover is removed. Remove these screws and the latch will be come loose. Then there is a plastic clip that holds the upholstery to an edge of the latch, shown front and center in this photo, that simply pulls off. The latch, removed from the seat back. Here is the top of the latch, this cup with the three slots corresponds to the latch handle that should have three tabs. Another option for failure mode #1 is that the latch itself had a broken component, there is a 2-prong fork that should cover the front and back side of this post, as you can see the rear prong is broken off. That post is connected to the cup, which the lever is assembled to. So when you pull back on the lever to release the seat back, it turns the cup, and rotates the post against the fork, which releases the latch. In my circumstance it seems as if it was a 2-part problem. My fork was broken, but when I purchased the truck my problem was failure mode #2, not being able to latch it. My theory is that the broken part of the fork lodged itself into the latch and prevented it from securing properly. Next, reassemble with new or used parts that are not broken. It's pretty self explanatory here with the exception of lining up the plastic cover/lever assembly. You need to pull the lever as if you were disengaging the latch, and then feed the plastic cover assembly down ensuring that the round 3-prong section aligns with the 3-slot cup. I have heard that there is some adjustment you can do with the post that this latch connects to, the post mounted into the chassis itself. Adjustment here, if it does exist, would move it slightly so that the latch would travel further over the post and enable it to latch. Upon testing my new latch worked fine so I didn't explore this option. Finally, you want to keep that latch working well. From now on when you want to release the seat-back, first push the seat-back back and then while holding it pull the lever to release. This puts far less strain on the release mechanism and will prolong it's life.
 -
I've started looking into a small lift of my '09 CS that does not have air suspension. So far the only info I've found is from our friends on the VW side of things. People are either installing a spring spacer (reducing shock compression as it is pre-loaded all the time) or some had experimented with a spacer on top of the strut assembly. I say "had" because as far as I can tell there's nobody doing this anymore. I'm looking for maybe 1-1.5" so that the CV's stay happy, nothing crazy. That paired with some slightly bigger A/T's will do it for me I think. Anyone here have any experience?
-
If this were a Honda Civic, sure, paint them while still on the car... For a Porsche? Do it right please. Take it apart properly, disassemble the calipers down to their bare components, powder coat instead of paint, and reassemble with new seals. Install with new bolts. This, of course, means that you will need to bleed the brake system after reassembly. If you're not going to do it right, please don't do it at all.
-
Just wanted to share with the group, hopefully it will help someone. I had been getting a warning on my dash "Check dynamic cornering lights" with no specification as to right or left. Both bulbs worked fine. On inspection, it looked like one had it's little reflector cage intact (sits in front of/around the bulb) while the other, at first glance, didn't have one. Once I looked a bit more I saw that it did have one, but it had dislodged on the last bulb change and had apparently wedged itself in one of the cracks that opens up when the auto leveling headlights move around. With a bit of fiddling I was able to pull the cage/reflector out of the crack and get it seated properly. When the bulb holder is in place it keeps it from coming out. I also took the opportunity to spray some DeoxIT D5 in the headlight connectors. Great for electronic connections. The warning went away and all works as it should now.
-
Hi all, new here. Great page and I'm happy to contribute some funds to help keep it going. Hoping that the rest of you do too. My apologies if it's a stupid question... I found the TSB page on here for my 2009 Cayenne S, but can't see how to actually view the TSB's. I can view a general name or title, and the TSB number, but that's it. Am I missing a button somewhere?
-
