Welcome to RennTech.org Community, Guest
There are many great features available to you once you register at RennTech.org
You are free to view posts here, but you must log in to reply to existing posts, or to start your own new topic. Like most online communities, there are costs involved to maintain a site like this - so we encourage our members to donate. All donations go to the costs operating and maintaining this site. We prefer that guests take part in our community and we offer a lot in return to those willing to join our corner of the Porsche world. This site is 99 percent member supported (less than 1 percent comes from advertising) - so please consider an annual donation to keep this site running.
Here are some of the features available - once you register at RennTech.org
- View Classified Ads
- DIY Tutorials
- Porsche TSB Listings (limited)
- VIN Decoder
- Special Offers
-
OBD II P-Codes - Paint Codes
- Registry
- Videos System
- View Reviews
- and get rid of this welcome message
It takes just a few minutes to register, and it's FREE
Contributing Members also get these additional benefits:
(you become a Contributing Member by donating money to the operation of this site)
- No ads - advertisements are removed
- Access the Contributors Only Forum
- Contributing Members Only Downloads
- Send attachments with PMs
- All image/file storage limits are substantially increased for all Contributing Members
- Option Codes Lookup
- VIN Option Lookups (limited)


CJ_Boxster
-
Posts
480 -
Joined
-
Last visited
Content Type
Profiles
Events
Forums
External Paint Colors
Downloads
Tutorials
Links Directory
Collections
Store
Posts posted by CJ_Boxster
-
-
I just called TRW and they say they dont have any aftermarket listings for Porsche boxster, No bearing cartridge at all.
-
Any news on the replace-just-the-bearing front? I'm glad there is now a proven solution (replace the arms), but I'd rather not spend $600+. Out of curiosity, what could the new bearings cost?
insite above said he found a manufactor of the bearing cartridge but i asked that mofo to give us the part number and the company who supplies it but he hasnt replied in nearly a month.
never found a source for the part. it's a TRW bearing, but no part numbers on it. i did some experimentation with modifying / repairing the cartridge with mixed results. it will be a lengthy post; i'll get it up this week (lots of pics).
cant wait!, The idea of removing the cartridge from the arm and filling it with urethane and a sleeve ran through my head but, urethane would likely not be able to handle the shock and twisting that the rear control arm does.
-
Just replace the bad one.
The others will tell you when they die too.
I hope that is the case, I remember reading other members threads on how after they replaced the 1 sensor, they received CEL's for the other sensors... Ill first check them with my Ohm meter on the weekend or sooner, depends on how upset i get with the cel and performance drop.
-
P1115 Oxygen Sensor Heating 1 Ahead of Catalytic Converter - Below Lower Limit
Your pre-cat O2 sensor is heated at startup so it can immediately start reading emissions and adjust have the DME adjust the mixture.
Your fault indicates that this pre-heating is failing to happen. Either their is a poor connection at that heater element, the heater circuit is open, the heater circuit is shorted. If you have an ohm meter you can check the sensor by:
1. Removing connector of 02 sensor ahead of catalytic converter.
2. Connect ohmmeter on pin side to pins 1 and 2.
Display: 1.8 - 2.5 ohms at 20°C.
3. Connect ohmmeter on pin side to pin 1 and 02 housing.
Display: infinite ohms
If the ohm readings are correct then look for bad or broken connectors on the sensor electrical connector.
If the ohm readings are bad and if your car has over 50-60,000 miles then the heater is likely bad and the sensor will need to be replaced.
Thanks Loren, Lets say i had to replace the sensor cause the reading were not right, would that mean i would have to replace all the sensors to avoid the CEL appearing and saying the others are bad cause theres a fresh new one installed?
-
I know the P1115 code is "Oxygen Sensor Heating 1 After Catalytic Converter - Above Upper Limit"
But whats that mean, does that mean my O2 is going bad or does that mean my a/f is too lean cause of some other issue like a possible bad MAF or vacum leak?
Anyone else experience these 2 codes at the same time?
About 5 minutes before the CEl turned on, i was in 3rd gear 2700rpm and i slammed my foot on the gas to see how responsive the car is and once it reached about 5300rpm's it felt like i had let go of the gas pedel, then pressed it again... kinda scary, then 5 minutes later the CEL came on. And ever since then, the car has run alittle rough... misfires alittle during idle, acceleration isnt very responsive.
-
Any news on the replace-just-the-bearing front? I'm glad there is now a proven solution (replace the arms), but I'd rather not spend $600+. Out of curiosity, what could the new bearings cost?
insite above said he found a manufactor of the bearing cartridge but i asked that mofo to give us the part number and the company who supplies it but he hasnt replied in nearly a month.
-
JFP in PA wrote:
> Why?
So I don't need to turn on & off the light switch, and more importantly; so I won't drain the battery whenever I forget to turn off the lights.
-- peer
I see what you mean, For instance, you would like to have your headlight low beams in the on posistion and as soon as the key leaves the ignition or is placed in the Off position, the lights also turn off, Its a nifty hack is someone were to make it for our boxsters. You probably can look for a wiring diagram for the ignition and see if there is a spare accessory pin that you can use that cuts power when ignition is off, then you can run the Headlight main power wire on the headlight switch to the ignition, then back to the headlight switch so if the ignition is off, that will cut the power to the switch.
It can be done and i wish i had it. You try it first and let me know how it works for you.
-
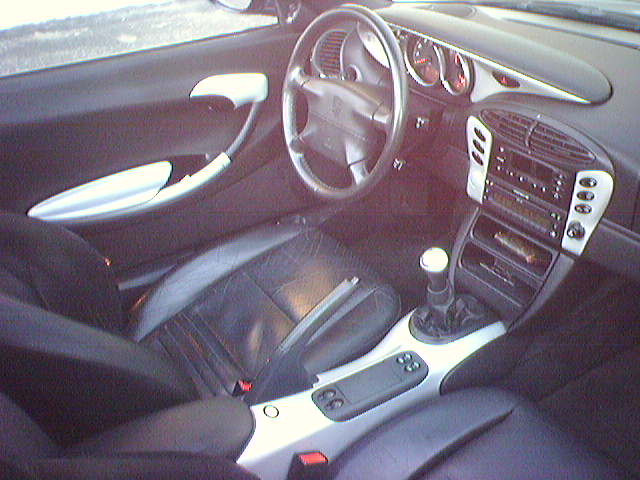
There are two "slots" in the lower console, and the environmental controls only fit in the lower slot.
So are you telling me that the AC controls will only fit in the lowest slot... if so, is there anyway they will fit in the slot that the thread starter is attempting to fit his AC control in?
-
what exact sandpaper did you use and steps if you dont mind
I dont remember at all, it wasnt the finest stuff pepboys sells but i think the packaging said that for sanding primer... i sand the base coat anyway.... I would buy the variety pack if i were to do it again. The Steps are "removal, prep(wipe down), sand, Wipe Down, primer, primer, sand, primer, paint, Sand, paint, paint, clear coat, clear coat, clear coat and reinstallation"
I would advise anybody wanting to paint their console to let it dry at least 24 hours before any sanding. The paint will not have even fully cured after 24 hours but it is good enough to sand. If you sand too quickly after painting the whole job will be ruined. With metallic colors you can sand the metal flake right off if you are not careful because it tends to float to the surface.
I did not sand the base coat of my console at all. I used very light coats up until the last coat of color which I left glossy and let dry overnight before clearing.
I used 400 grit wet paper to remove the factory finish down to the plastic, 800 grit to smooth the plastic, 800 grit after the high-build primer, and 1500 grit to sand the clear before buffing.
The reason i sand the primer once and the base once was to only sand off excess and allow little deposits to settle in the pits that the plastic originally has. I pretty sure its ok to sand a single coat of primer or paint after about 15-20 minutes on a low humidity day
The pits are a big problem. The stock finish settles in there and part of the problem with the original finish is that it isn't well bonded to the plastic, so it flakes off due to age, UV, sweat, sunscreen, whatever. I would never want to paint over that stuff primarily for that reason. Sand, sand, sand until all those pits are gone, then sand with the 800.
You MAY be able to get away with sanding after a half hour, but I would not risk it. Let the paint cure 24 hours (longer if you can wait) and the end result will be much more consistent.
Well i shouldnt have anything to worry about since 1) it wasnt flaking when i painted it. and 2) its painted over and therefor protected from the elements and shouldnt age anymore from the original surface area anymore.
-
Well, i filled my tank to the brim and i drove about 120-135 miles before using half a tank of gas, So i would be getting anywhere from 240-270 miles per tank full...... topup the entire period. whats that equate to in mileage per gallon?
-
what exact sandpaper did you use and steps if you dont mind
I dont remember at all, it wasnt the finest stuff pepboys sells but i think the packaging said that for sanding primer... i sand the base coat anyway.... I would buy the variety pack if i were to do it again. The Steps are "removal, prep(wipe down), sand, Wipe Down, primer, primer, sand, primer, paint, Sand, paint, paint, clear coat, clear coat, clear coat and reinstallation"
I would advise anybody wanting to paint their console to let it dry at least 24 hours before any sanding. The paint will not have even fully cured after 24 hours but it is good enough to sand. If you sand too quickly after painting the whole job will be ruined. With metallic colors you can sand the metal flake right off if you are not careful because it tends to float to the surface.
I did not sand the base coat of my console at all. I used very light coats up until the last coat of color which I left glossy and let dry overnight before clearing.
I used 400 grit wet paper to remove the factory finish down to the plastic, 800 grit to smooth the plastic, 800 grit after the high-build primer, and 1500 grit to sand the clear before buffing.
The reason i sand the primer once and the base once was to only sand off excess and allow little deposits to settle in the pits that the plastic originally has. I pretty sure its ok to sand a single coat of primer or paint after about 15-20 minutes on a low humidity day
-
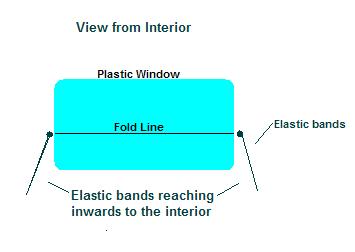
I thinking of getting some kind of elastic bands and mounting them from the interior edges of the plastic window folding points (both sides) to something near the rollbar to pull area i want to fold in towards the rear seats. Only issue i see with this is the elastic losing its elastisity.

-
what exact sandpaper did you use and steps if you dont mind
I dont remember at all, it wasnt the finest stuff pepboys sells but i think the packaging said that for sanding primer... i sand the base coat anyway.... I would buy the variety pack if i were to do it again. The Steps are "removal, prep(wipe down), sand, Wipe Down, primer, primer, sand, primer, paint, Sand, paint, paint, clear coat, clear coat, clear coat and reinstallation"
-
Save that center console. on a free weekend, you can go buy a can of pretty spray paint, fine sand paper and clear coat spray paint and have yourself a really nice center console.
Picture below took me only the last half of one weekday to complete, removal, prep, sand, paint, paint, sand, paint, paint, paint, clear coat, clear coat, clear coat and reinstallation.
-
The problem with the idea of it being the oil separator is that the only function of the oil separator is to keep oil from intake, has nothing todo with water... Just oil and vaccum, no water goes in, or out.
and if its a head gasket, they isnt anyother way of telling unless you remove the head and see the breach in the gasket. Whatever you do, DONT put radiator stop-leak to cure the leak, not sure if porsches like stopleak leaking into the block and clogging oil gallys.
-
The problem with the idea of it being the oil separator is that the only function of the oil separator is to keep oil from intake, has nothing todo with water... Just oil and vaccum, no water goes in, or out.
-
you can probably tap into the rear parking light power and have that as a power source for the license plate light power.... its close by and would run off the headlight switch just like the parking lights and as if you still had the daytime running relay installed still.
-
Dear All,
Seasons greetings to all, I've spent the last couple of days tidying up those annoying little things, such as replaced the sun visor hinges, replaced a snapped off wind deflector bracket, steam cleaned and shampood carpets etc etc.
Any way to the point the very last job I had to do was that I had a small tear in the leather part of my Tequipment handbrake, being fussy I decided that a bit of superglue and then a rub over with shoe polish would cure it. The fatal mistake was I took the superglue pot into the car and rested it on the console, I'm sure you all know what is coming next - YES I did knock it over and spilled superglue all over the console.
I have managed to source a second-hand item, and have worked out how to remove the old one, However the 2 items I need to swap from the old to the new are the storage lid and the lock, does anyone have any tips or a link to a procedure for doing this.
Many thanks
Nik
Yes screws under the rubber mate. under the ash tray, under the shift boot and also one more screw... pull up on the coin holder and once removed, you will see a screw under that.
-
Well as an Ex-mechanic and with a father with a lifetime of Mechanic experience... I can tell you that means your head gasket is bad. not good at all, also another possible reason for water in the oil is a cracked head... maybe even a cracked block depending on location of the water passeges on teh block and heads.
-
well, i've found that TRW makes the bearing cartridge. now i just have to source it... it should be possible to press out the old and press in the new.
Could you give us the part number and link to the bearing cartridge so that the info stays on the forum for good?
-
That is the air pump used for emissions control. It should run a few minutes at start up and sometimes a few seconds at idle (usually when stopping after leaving a freeway). It is normal for it to run - it is not normal if it is vibrating or rattling. Mine sounds a little like a portable vacuum cleaner :lol:
YES THATS WHAT IT SOUNDS LIKE!!!! well i get the Secondary Air injection error code for both cyclindars 1-3 and 4-6 so would this noise mean that the root of all my 2 air injection CE codes is the air pump?
-
Hey people, im getting a vibration noise on cold starts in the AM, When i start the MY97 boxster, i hear what sounds like a fan turn on in or around the engine bay. Its sorta vibraty...if thats a word...which its not. It goes away after about 4 minutes, sometimes less. If it goes away in 4 minutes and if im sitting for the 5th minute in traffic, it'll come back for 1 more minute. Once the engine it warmed up abit more, it doesnt come back.... Whats that noise?
-
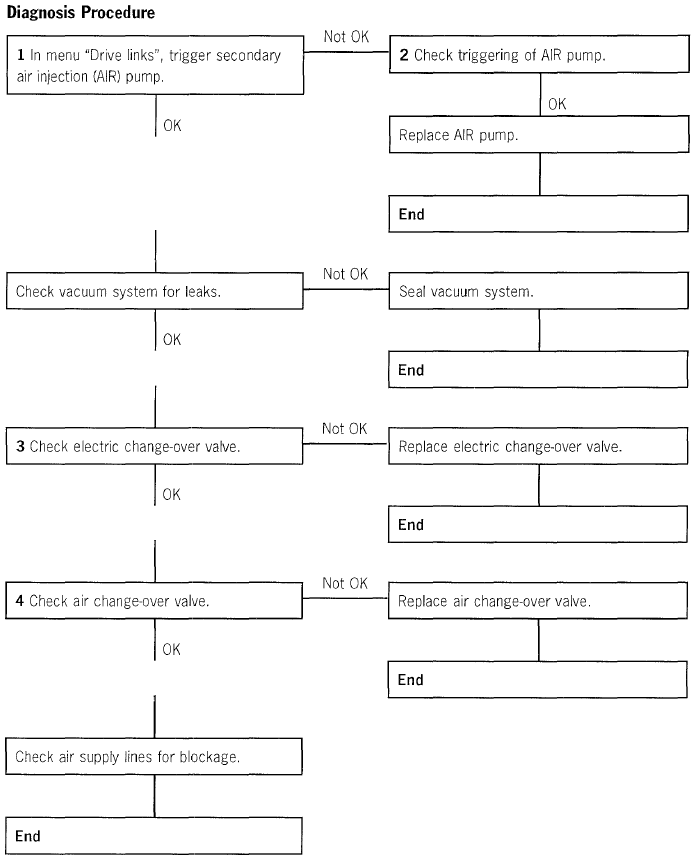
Detail:
I. ln menu "Drive links", trigger secondary air injection (AIR) pump.1. Connect and switch on Porsche System Tester 2.
2. Select DME.
3. Call up "Drive links" menu.
4. Select AIR pump.
5. Activate AIR pump (audible function).
II. Check triggering of AIR pump.
1. Check fuse (Maxi Fuse) of AIR pump (on relay carrier2).
2. Remove relay of AIR pump (on relay carrier 2). Connect voltmeter to pin 3 and ground.
Display: battery voltage
Connect voltmeter to pin 2 (negative) and pin 7 (positive). Start engine (the DME relay must pick up).
Display: battery voltage
If 0 V is indicated, check wire from pin 2 to DME control module, pin 37, for continuity. Push relay back on.
3. Remove connector of AIR pump.
Connect vo Itmeter to pin 1 (positive) and pin 2 (negative). Trigger AIR pump with Porsche System Tester 2.
Display: battery voltage
III. Check electric change-over valve.
1. Remove two-pole connector of change-over valve.
2. Connect voltmeter to pin 1 (positive) and pin 2 (negative).
3. Trigger AIR pump with Porsche System Tester 2.
Display: battery voltage
4. Remove vacuum hose of change-over valve with the engine running. Check whether vacuum is present.
IV. Check air change-over valve and air supply lines.
1. Run engine briefly to produce vacuum.
2. Trigger AIR pump with Porsche System Tester 2.
3. Remove vacuum hose of air change-over valve. If vacuum is present at the air change-over valve, check
air supply from the AIR pump to the change-over valve to the air supply line to the cylinder heads.
Check function of air change-over valve.
Thanks Loren, so i assume i wouldnt not be able to preform the 1st test unless i was a dealer or i have a PST2
-
Ok, In the past I was getting the P1411 code ONLY. Its was only Intermitent and after I cleared the code from the ECU, it would take about a month to come back. Now I got both P0410 and P1411 which are Secondary Air Injection Cylindars 1-3 and 4-6.
I've heard that the air injection system is under the intake plenum which makes it alittle back breaking and difficult to diagnose the exact culprit in the air injection system. Could someone here give me some steps in pin pointing the cause of these Pcodes so i dont buy parts i dont really need?
Thanks in advance!
Noisy Boxster Rear Suspension
in 986 Series (Boxster, Boxster S)
Posted
Please do! It would mean alot to us all!!!! Usually the rear control arm rattle is worse on hotter days, and makes lost of noise at low speeds over cracks and bumps in the road... hopefully thats what your expierencing and the Shop you take your car to will locate the bearing for the application!!!!!!