Welcome to RennTech.org Community, Guest
There are many great features available to you once you register at RennTech.org
You are free to view posts here, but you must log in to reply to existing posts, or to start your own new topic. Like most online communities, there are costs involved to maintain a site like this - so we encourage our members to subscribe or donate. All subscriptions and donations go to the costs operating and maintaining this site. We prefer that guests take part in our community and we offer a lot in return to those willing to join our corner of the Porsche world. This site is 99 percent member supported (less than 1 percent comes from advertising) - so please consider an annual subscription or donation to keep this site running.
Here are some of the features available - once you subscribe RennTech.org
- View Classified Ads
- DIY Tutorials
- Porsche TSB Listings (limited)
- VIN Decoder
- Special Offers
- Paint Codes
- Registry
- Videos System
- View Reviews
- and get rid of this welcome message
It takes just a few minutes to register, and it's quality Porsche information at a low cost.
Contributing Members also get these additional benefits:
(you become a Contributing Member by subscribing or donating money to the operation of this site)
- No ads - advertisements are removed
- Access the Contributors Only Forum
- Contributing Members Only Downloads
- Send attachments with PMs
- All image/file storage limits are substantially increased for all Contributing Members
- Option Codes Lookup
- VIN Option Lookups (limited)


Jinster
-
Posts
379 -
Joined
-
Last visited
-
Days Won
1
Content Type
Profiles
Events
Forums
External Paint Colors
Downloads
Tutorials
Links Directory
Collections
Classifieds
Store
Everything posted by Jinster
-
Have the speedo and the fuel gauge re calibrated. I was quoted $400 and two weeks by a local shop. Instrument cluster has to be removed and sent to a facility that does that kind of work. Or you can simply go with a taller wall profile tyres next time you change tyres. The speedo is calibrated to the diameter of the tyres. Since my Boxster came with 17" Pirelli P Rossos, which are a low profile tire, my speedo should be calibrated for those so which replacement tire are you saying would recalibrate the speedo so it is accurate? Speedo signal comes from axle rotations. Each rotation of the axle is assumed to equal to a certain distance travelled. This distance is the circumference of your tyres. The speedo signal can only measure the rotation of the axle and not the actual circumference of the tyres. So if your tyres have a bigger circumference, your car would cover a larger distance even though the speedo still gets the same amount of axle rotation signal. So if your speedo is off by 5%, then you can just increase your tyre circumference by 5% to offset it. This assumes the increased tyre size fits inside the wheel well - which I would have thought is quite reasonable but isn't something I have experience with personally. I don't know which brand and model of tyre would give you the exact increase in diameter you need. But your tyre shop should have no trouble telling you which ones. It would seem then that you would end up with a tire that has a taller side wall and I would question how it would perform under conditions such as track, AX and general aggressive driving since Porsche selects tires that are "performance based" and generally low profile. A new set of tires would also cost as much, if not more, than the $400 calibration so all you would save is time and you might lose some performance. Actually, you will end up with a new set of tires with a slightly taller wall profile or a $400 saving. If this is correct then why doesn't Porsche and the independent shops recommend it as a cure for speedo calibration? A taller wall profile is not necessarily a good thing on a high performance vehicle used in racing conditions. If all you want to do is drive on the street then possibly. This is correct as far as correcting the speedo error goes in theory. Why Porsche doesn't recommend this is not for me to know. Don't put too much faith in Porsche. They are the ones that made the mistake in the first place. Behind the corporate facade and a brand name that might instill confidence in the customer, there are a still a bunch of human engineers of various levels and experiences working on things. They make mistakes and omissions like anyone else. However, one possible suggestion, like Maurice says, is that it is only the speedo that is off, not the OBD2 data as used by the ECU. This almost suggests deliberate foul play by Porsche. Be it as it may. Another possibility, is that the fatter tires may cause problems with a lowered car. A third possibility, is that Porsche simply doesn't want to admit to the problem. I would place even less confidence in independent shops. I would've thought that the speedo correction shop would propose the speedo correction method rather than the fatter tire method for obvious reasons, amongst others. Yes, it is possible that tires with a taller wall profile might not be better for racing.
-
MY97, Tip. No codes. My car starts fine in the morning after overnight rest. But when I try to start it during the day when the car is warm, it sometimes takes about 10 seconds of cranking to start it. During this time, it sounds as if the engine is trying to start but just can't build up enough rev consistently. I can start it by either keeping cranking for like 10 seconds, or to just back off the key, and turn the key again within a few seconds, almost as if the first crank "primes" the car somehow. On a few occasions, after warm starting, the idle would fluctuate up and down within a range of around 300 to 1000rpm. This was only evident at idle, but may have been happening at higher revs without me being aware of it. What do you think is going on? I am thinking: fuel filter? fuel pump? spark plugs? ICV? AOS? Which is more likely?
-
Have the speedo and the fuel gauge re calibrated. I was quoted $400 and two weeks by a local shop. Instrument cluster has to be removed and sent to a facility that does that kind of work. Or you can simply go with a taller wall profile tyres next time you change tyres. The speedo is calibrated to the diameter of the tyres. Since my Boxster came with 17" Pirelli P Rossos, which are a low profile tire, my speedo should be calibrated for those so which replacement tire are you saying would recalibrate the speedo so it is accurate? Speedo signal comes from axle rotations. Each rotation of the axle is assumed to equal to a certain distance travelled. This distance is the circumference of your tyres. The speedo signal can only measure the rotation of the axle and not the actual circumference of the tyres. So if your tyres have a bigger circumference, your car would cover a larger distance even though the speedo still gets the same amount of axle rotation signal. So if your speedo is off by 5%, then you can just increase your tyre circumference by 5% to offset it. This assumes the increased tyre size fits inside the wheel well - which I would have thought is quite reasonable but isn't something I have experience with personally. I don't know which brand and model of tyre would give you the exact increase in diameter you need. But your tyre shop should have no trouble telling you which ones. It would seem then that you would end up with a tire that has a taller side wall and I would question how it would perform under conditions such as track, AX and general aggressive driving since Porsche selects tires that are "performance based" and generally low profile. A new set of tires would also cost as much, if not more, than the $400 calibration so all you would save is time and you might lose some performance. Actually, you will end up with a new set of tires with a slightly taller wall profile or a $400 saving.
-
MY97 Australian delivered car. Has driver side and passenger side keyholes. Has central locking. No remote. No alarm. I just installed an aftermarket alarm/remote/proximity entry unit. I will write up a DIY if there is enough interest but I believe most people from the US would have the remote feature as standard. Come to think of it, there is probably not much to write. Everything you need to know is below: 1. Everything can be hooked up under the passenger seat (RHD car) except the ACC ON signal, so remove the seat first (4 screws) 2. A Bentley manual or a wiring diagram from the factory manual is an absolute must, and contains all the necessary information to figure out which wires to splice into. 3. The door motors are negatively triggered 4. The door open trigger is labelled "door contact" on the wiring diagrams. I am unsure the difference between this and "door safe" - which also appear on the wiring diagram. 5. The door open signal is negatively triggered. 6. There is a separate trigger for "door contact" (door open) for each door, and there appears to be no combined signal. You might need an additional relay if you want your alarm unit to be triggered when either door is opened. 7. Unlock signal is labelled "unprime", and a single connection would unlock both doors. 8. A single lock signal would lock both doors. 9. The wire colours for a RHD car are: Red/Brown (thick) = 12V, Brown/Red (thin) = motor to open door, Brown/White = motor to close door, Brown/Green = (RHD) driver door status (closed), or LHD passenger door status; Turn signals = Black/White, Black/Green 10. Don't splice into the dash central locking switch (inside handle not secured), use the direct connections to the motors above
-

window goes up after closing the top?
Jinster replied to Jinster's topic in 986 Series (Boxster, Boxster S)
Thanks for the replies. Bloody MY97 misses out again :) -
What is meant by "comfort open"? Is it when the window drops by 0.5cm when opening the door or is it when the window drops by 5cm when unlatching the top?
-
Ok, this might be a very silly question. But I lost my owner's manual a long time ago. When I unlatch the top (to open it), the windows would drop about 10cm, that's normal. The question is, after closing the top and latching the top, should the windows automatically go back up?
-
More fixes for those who might search the forum with DLM problems: The cable tie solution was temporary. After a couple of weeks, they became loose and the window not courtesy dropping problem were intermittent again. So I decided to fix this by re soldering those 8 pins in the DLM. That was my intention. But I decided to try a "blind re-soldering" solution: basically, the pins are visible from outside through the socket on the DLM. The actual solder joints are inside the DLM. So instead of opening the entire DLM assembly to see the 8 solder joints and re-solder them directly under vision, I decided to try to melt the solder by applying heat to the pins with the soldering iron, taking care not to touch any of the plastic parts. After about 15 seconds of heat, I removed the soldering iron, allowing the pin/solder joint to cool. This way, you don't have to open the DLM, which saves a lot of time. Those with some soldering experience would know that heat would get transferred down the metal pins to the solder joint anyway so you don't have to apply heat to the solder joint directly. And the solder would re-solidify within seconds of removing the soldering iron. The tricky bit here is to make sure that within those seconds before the solder re-solidified, the solder doesn't separate from the circuit board. This usually doesn't happen unless the pin/circuit board moves. The challenge is of course you can't actually see the solder joints melt and re-solidify with this method. Some soldering experience and faith is required to get a "feel" for the situation. Anyway, it worked. No more intermittent window problems! Just to be clear though, this trick should only be attempted if you fully intend on opening the DLM if it doesn't work. Because the solder joint may separate completely if you weren't lucky with the "blind" re-soldering technique. And if it separates completely, you probably can't fix it with the cable tie technique.
-
Have the speedo and the fuel gauge re calibrated. I was quoted $400 and two weeks by a local shop. Instrument cluster has to be removed and sent to a facility that does that kind of work. Or you can simply go with a taller wall profile tyres next time you change tyres. The speedo is calibrated to the diameter of the tyres. Since my Boxster came with 17" Pirelli P Rossos, which are a low profile tire, my speedo should be calibrated for those so which replacement tire are you saying would recalibrate the speedo so it is accurate? Speedo signal comes from axle rotations. Each rotation of the axle is assumed to equal to a certain distance travelled. This distance is the circumference of your tyres. The speedo signal can only measure the rotation of the axle and not the actual circumference of the tyres. So if your tyres have a bigger circumference, your car would cover a larger distance even though the speedo still gets the same amount of axle rotation signal. So if your speedo is off by 5%, then you can just increase your tyre circumference by 5% to offset it. This assumes the increased tyre size fits inside the wheel well - which I would have thought is quite reasonable but isn't something I have experience with personally. I don't know which brand and model of tyre would give you the exact increase in diameter you need. But your tyre shop should have no trouble telling you which ones.
-
Have the speedo and the fuel gauge re calibrated. I was quoted $400 and two weeks by a local shop. Instrument cluster has to be removed and sent to a facility that does that kind of work. Or you can simply go with a taller wall profile tyres next time you change tyres. The speedo is calibrated to the diameter of the tyres.
-
Cayenne blank key, cut to use with Boxster
Jinster posted a topic in 986 Series (Boxster, Boxster S)
Anyone know the size of the Cayenne keys? Whether that's comparable to a Boxster's? I am thinking about getting hold of a Cayenne remote flip key and adapt it to work with my Boxster (transplanting the pill, of course). I understand the remote won't work. But that's not a concern. I will just hollow it out and fit my aftermarket remote into the housing somehow. -
Anyone know whether this can be done? I am at the planning stage of painting the instrument cluster inside and out. Being able to remove the transparent plastic lenses would be a huge help. Or are they glued in place?
-
Sorry, very late reply. Again, didn't keep an eye on this thread. 2004 model I believe. I believe something like this would work: http://cgi.ebay.com/ebaymotors/VW-Passat-Jetta-Polo-Bora-Golf-DVD-GPS-Digital-screen-_W0QQcmdZViewItemQQhashZitem1c14b3b3bdQQitemZ120606405565QQptZCarQ5fAudioQ5fVideo#ht_16237wt_1009 Most sellers on eBay would give you the dimensions of the unit. As long as your measurements fit, it probably doesn't matter which year. But obviously from my experience, the aftermarket units made for 2004 Jetta models seem to fit well. The bezel was included with the sale from the seller. Most sellers of these units are very friendly and you can ask them for bezel measurements if you are not sure or it's unclear.
-
Weld point 21, it's just not there!
Jinster replied to Jinster's topic in 986 Series (Boxster, Boxster S)
Yep. Weld point 21 is supposed to be a bunch of wires held together by a "weld point" - or more like a metal crimp, I have been led to believe. Also it should be black with blue stripe. I didn't find such a wire, much less a bunch of them. I did find a blue wire with black strip, which sure looks like what you are showing in your photo. But mine is a single wire that goes to the central locking unit. I read one of your earlier posts and you guys found the whole "bunch". Mine was a just singular. Anyway, I didn't want to splice into something I didn't know. So I ended up running a small wire all the way from the tail light to the dash under the carpet. Now my dimming mirror works "prudently" and my reverse camera screen has an automatic trigger. -
Weld point 21, it's just not there!
Jinster replied to Jinster's topic in 986 Series (Boxster, Boxster S)
Is there an emoticon for waving my fist in the air? An hour of my life wasted. Dam you Porsche!!!! Thanks Loren. :) -
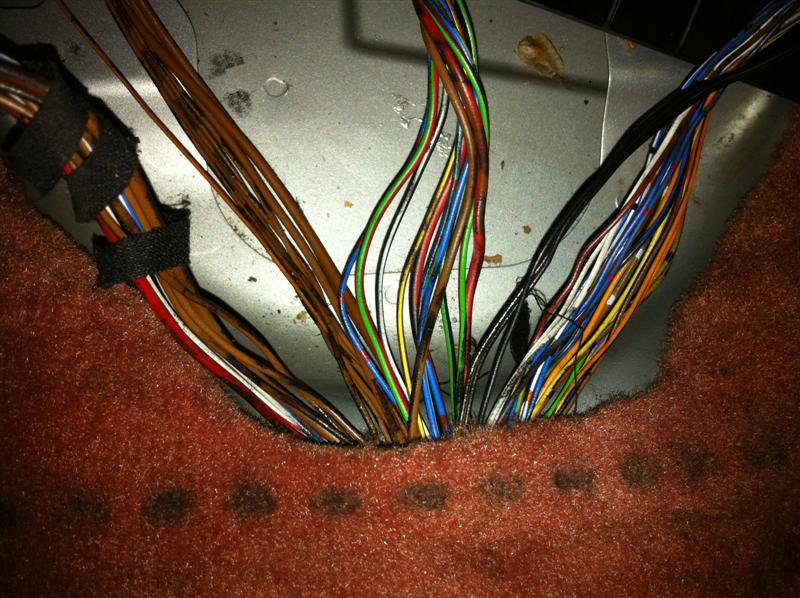
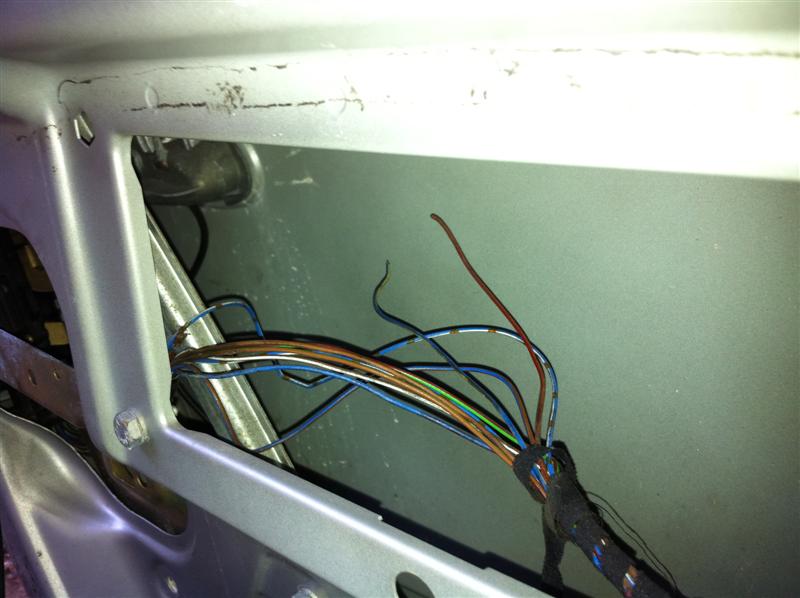
I spent the afternoon installing the auto dimming rear view mirror. I need some help with finding the elusive weld point 21. I looked under the left hand seat, unplugged the wires from the central locking unit, and unwrapped all the tape. But I just can't find a wire that's black with blue stripe on it, much less a bunch of them. Some on the forum have said it's about an inch from the connector. It's just not there as far as I can see: There is a blue wire with black stripe, that's not it, is it? It's not in a bunch with any crimp metal bits and it goes to the central locking unit:

-
door lock mechanism broken, but which one?
Jinster replied to Jinster's topic in 986 Series (Boxster, Boxster S)
Rich, you were right. It was the passenger door. Didn't even get to crack open the DLM and I already found the problem: Two wire joiners and a few cable ties later, we were in business! The problem was the wire holder holding the wires to the door frame came loose at some point, the wires got in the way of the window, and a dropping window sliced them in half. :)
-
There have been a few people having trouble with the door locking mechanism. I have just fixed problems with both of my door lock mechanisms in the last few days. Here is my summary for anyone who have similar problems in the future. My symptoms: driver door would lock and then automatically unlock; passenger door can only be locked by triple turning the key; driver side window would not stay dropped with the door open; the car (in terms of the dome light etc) doesn't think the driver's door is open even though it is My problems: driver side door lock mechanism: bad solder joints inside the door lock assembly - twisting the wire connector would erratically fix the problem of the window not dropping passenger side door lock mechanism: two broken wires going to the lock mechanism Primary Solutions: driver side door: secure the wire harness with multiple cable ties to force the broken solder joints into contact; or you can resolder the contact points passenger side: broken wires joined with joiners Root cause: On both sides, a plastic wire holder that holds the wiring loom to the door came lose over time due to plastic deterioration. On the driver's side, this resulted in excessive weight of the wires burdening the connector, which in turn burdens the solder joints inside the DLM. On the passenger side, the lose wires were caught by the window going down, the window sliced the wires in half. Root fix: secure the wires going to the door lock mechanisms with cable ties Some suggestions: A lot of people (workshops especially) suggests fixing the problems with DLM by replacing the DLM, which costs hundreds. Based on my (limited) experience, I think the problem is frequently the wiring loom's weight pulling off the solder points on the connector of the DLM, which should be an easy fix for all who has basic soldering skills. The weight of the wiring loom is supposed to be alleviated by the plastic tabs - but they fail and come lose over time.
-
Difficult Starting
Jinster replied to hugo kohl's topic in 996 Series (Carrera, Carrera 4, Carrera 4S, Targa)
Did it work Hugo? Anyone know where exactly this is located? I am having the same issue with my Boxster. -
door lock mechanism broken, but which one?
Jinster replied to Jinster's topic in 986 Series (Boxster, Boxster S)
Thanks for both replies. That's good deduction, Richard. I didn't realise turning the key physically turns the lock to lock. I thought turning key sends a signal to activate the lock motor, which then locks the car. If the action of turning the key replaces the lock motor actuating, then it sounds like my passenger side lock motor is the problem. My other symptom was after emergency locking the car from the passenger side, only unlocking the passenger side would unlock both doors; unlocking from the driver side only unlocks the driver door - against suggesting a passenger side motor problem. This all fits now! I will crack it open and have a look at it this weekend. -
I was idling my car today for about 30 minutes when working on something. Suddenly the car started dumping coolant from around right rear wheel area. It sounded like a hose leak. Initially I actually thought it was the neighbour using the garden hose. The leak then stopped after about losing 1L of coolant. No oil in the mix. I then topped up the coolant, it required about 4L, so it was low on coolant already. Although I haven't noticed any obvious leak before. I then ran the car down the street, sat it idling for a while, the problem hasn't occurred again. This is strange because the speed of the leak when it happened, and the fact it just stopped leaking straight away. One would think if the leak comes from a broken hose it would constantly leak once the flood gate is open. Does the Boxster have some sort of "over pressure" coolant dump mechanism? I theorise that if I was low on coolant already, the idling made the remaining coolant boil (it's mostly water, not much of the green stuff in there), and then some sort of pressure valve opened to dump the coolant? I didn't think this existed on the Boxster. I replaced the water pump 3 years ago, so hopefully it's not that. What could it be?
-
door lock mechanism broken, but which one?
Jinster posted a topic in 986 Series (Boxster, Boxster S)
I know I have a problem with one of my door lock mechanisms. But I can't figure out which one. I have a MY97. No remote. No alarm. When I try to lock from the driver side with 1 turn of the key: the driver side locks and unlocks the passenger side does nothing (stays unlocked) When I try to lock from the driver side with 3 turns: the driver side locks the passenger side does nothing (stays unlocked) When I try to lock from the passenger side with 1 turn: the passenger side locks the driver side locks and then unlocks When I try to lock from the passenger side with 3 turns the passenger side locks the driver side locks So which side is the fault? (when locking from driver's side, nothing happening to passenger side seems to suggest passenger side problem; but able to lock up the passenger side from the passenger side with the driver's side locking and unlocking seem to suggest driver side problem) P.S: Both windows courtesy drop when doors are open, so the door-open sensing part is at least ok. -
Thanks for the replies. When I bought the centre piece, it definitely made a big difference. I had my doubts about the mesh pieces. They are meshes for starters, and also they fit just behind the seat which doesn't make much sense. I will probably save my money on this one then.
-
I already have the center clear piece windblocker. Some wind still gets through at high speeds. I realise obviously it's not possible to block all wind when driving with the top down. But I am just wondering if those two additional mesh pieces for behind the seat provide any significant wind blocking at all, esp if I already have the larger center piece. Anyone experienced a before/after?
-
Headers Install - frozen "nuts"
Jinster replied to 1schoir's topic in 986 Boxster Suspension, Brakes, and Wheels
What did you end up doing Maurice? Did you convert to the stud and nut setup (if I understood it correctly)? And did the header make much of a difference? I have had a set of eBay headers with me for almost 3 years now. Haven't got around to installing them.