Welcome to RennTech.org Community, Guest
There are many great features available to you once you register at RennTech.org
You are free to view posts here, but you must log in to reply to existing posts, or to start your own new topic. Like most online communities, there are costs involved to maintain a site like this - so we encourage our members to subscribe or donate. All subscriptions and donations go to the costs operating and maintaining this site. We prefer that guests take part in our community and we offer a lot in return to those willing to join our corner of the Porsche world. This site is 99 percent member supported (less than 1 percent comes from advertising) - so please consider an annual subscription or donation to keep this site running.
Here are some of the features available - once you subscribe RennTech.org
- View Classified Ads
- DIY Tutorials
- Porsche TSB Listings (limited)
- VIN Decoder
- Special Offers
- Paint Codes
- Registry
- Videos System
- View Reviews
- and get rid of this welcome message
It takes just a few minutes to register, and it's quality Porsche information at a low cost.
Contributing Members also get these additional benefits:
(you become a Contributing Member by subscribing or donating money to the operation of this site)
- No ads - advertisements are removed
- Access the Contributors Only Forum
- Contributing Members Only Downloads
- Send attachments with PMs
- All image/file storage limits are substantially increased for all Contributing Members
- Option Codes Lookup
- VIN Option Lookups (limited)

jporter
-
Posts
97 -
Joined
-
Last visited


jporter's Achievements
Member (1/1)
3
Reputation
-
I just looked at the operation again and there is also a delay in the movement up after the motor starts. When you push the button to move the spoiler up, there is a short delay of about 2 seconds when the motor is running and the spoiler starts to move up. This is very similar to the delay for the motor to stop when the spoiler is going down. It seems like there is a gap formed between the hydraulic system and the mechanical part of the spoiler when the spoiler is retracted. This gap causes the delay when the spoiler is raised as the gap between the hydraulic system and the mechanical part of the spoiler must first be closed. If I release the down button before the spoiler if fully retracted, there is no delay when you press the button to raise the spoiler. The spoiler does appear to be fully raised when it is at the top. Is the delay before the spoiler raises and after the spoiler fully retracts normal?
-
I have a 2001 911 turbo with about 40k miles and the warning started to show up about a month ago when the spoiler was raised on the highway. I could duplicate this by raising the spoiler with the button. There were no signs of leaking fluid. I removed the microswitch unit with the spoiler up and noticed some light dry crude on the metal part of the upper microswitch that touched the outer surface of the ram. There was some light crud on ram - this was visible looking through the opening for the upper microswitch. I cleaned both surfaces and put some WD40 on the contacting surfaces and the warning has not returned (yet). I do have a question on the operation of the system. Raising the spoiler with the button just requires pressing and releasing the switch and the spoiler raises and stops at the top (passenger side stops ever so slightly after the driver side and this made sense as a result of the location of the microswitches). Lowering the spoiler with the button requires you to hold the button down to keep the spoiler lowering, but if I continue to hold the button down when it stops the motor seems to continue to run for something less than two seconds and then stops - is this how it is supposed to work with the button?
-
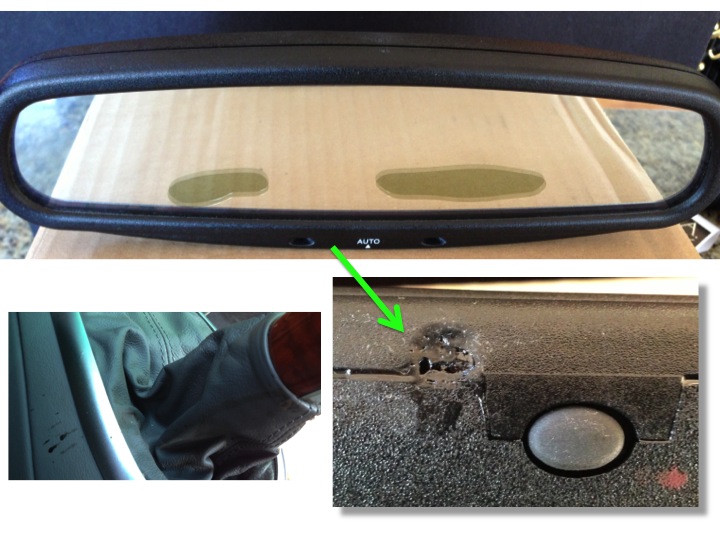
2001 996 TT I thought I would pass this on as someone might catch this prior to having their mirror leak on their shifter and center console. I noticed something had leaked onto my shifter boot and center console and realized it was coming from my interior mirror. There was a thick gooey material oozing from the bottom of the mirror. It looks like the “oil” in the mirror corrodes the plastic frame of the mirror. I also noticed you could see “oil” in the bottom of the mirror in a pattern that look like waves or for those my age it looks like a lava lamp this is not on. The “oil” looks like bubbles in the following photo. The following picture should help in identifying if you have this issue. I replaced the mirror at more than $400. You have to go to the rain sensor section of the manual to get instructions on how to remove the mirror with the rain sensor option as the mirror section in the repair manual is only for the standard mirror. The instructions indicate that you put some downward and twisting force on the mirror to remove it from the puck – this disengages two small indents that allow the bracket to slide down. I must have used too much twisting and not enough downward force as I pulled the whole thing off the glass. Any thoughts on how to clean up the leather would be appreciated.

-
Thanks JFP in PA. I appreciate the quick reply.
-
I have a stock 2001 996 TT. I was at a HPDE and had the CEL come one. The code was P1341. The car was running fine and the CEL stayed off all day after being reset. The code came on at the end of the second day and stayed off for 3 days after being reset and just came on again. The car continues to run fine and was very strong (as usual) on the track. I understand that this is related to the camshaft adjustment for bank 1 and have read the related threads on the other forums. Is there anything specific to the 996 TT that I should consider and is there a recommended order to resolve this issue when working on a 996 TT? Jim
-
I dont want to buy Mich. Pilots for my car again
jporter replied to Stevenorcal's topic in 996 TT, 996 TT S, 996 GT2
I would like to use Super Sports as they were highly recommended by a Micheline Test Engineer that was my instructor at Road Atlanta. They don't seem to produce the right size though as I can't find 295/30 18's. Does anyone know if they are producing 295/30 18's? -
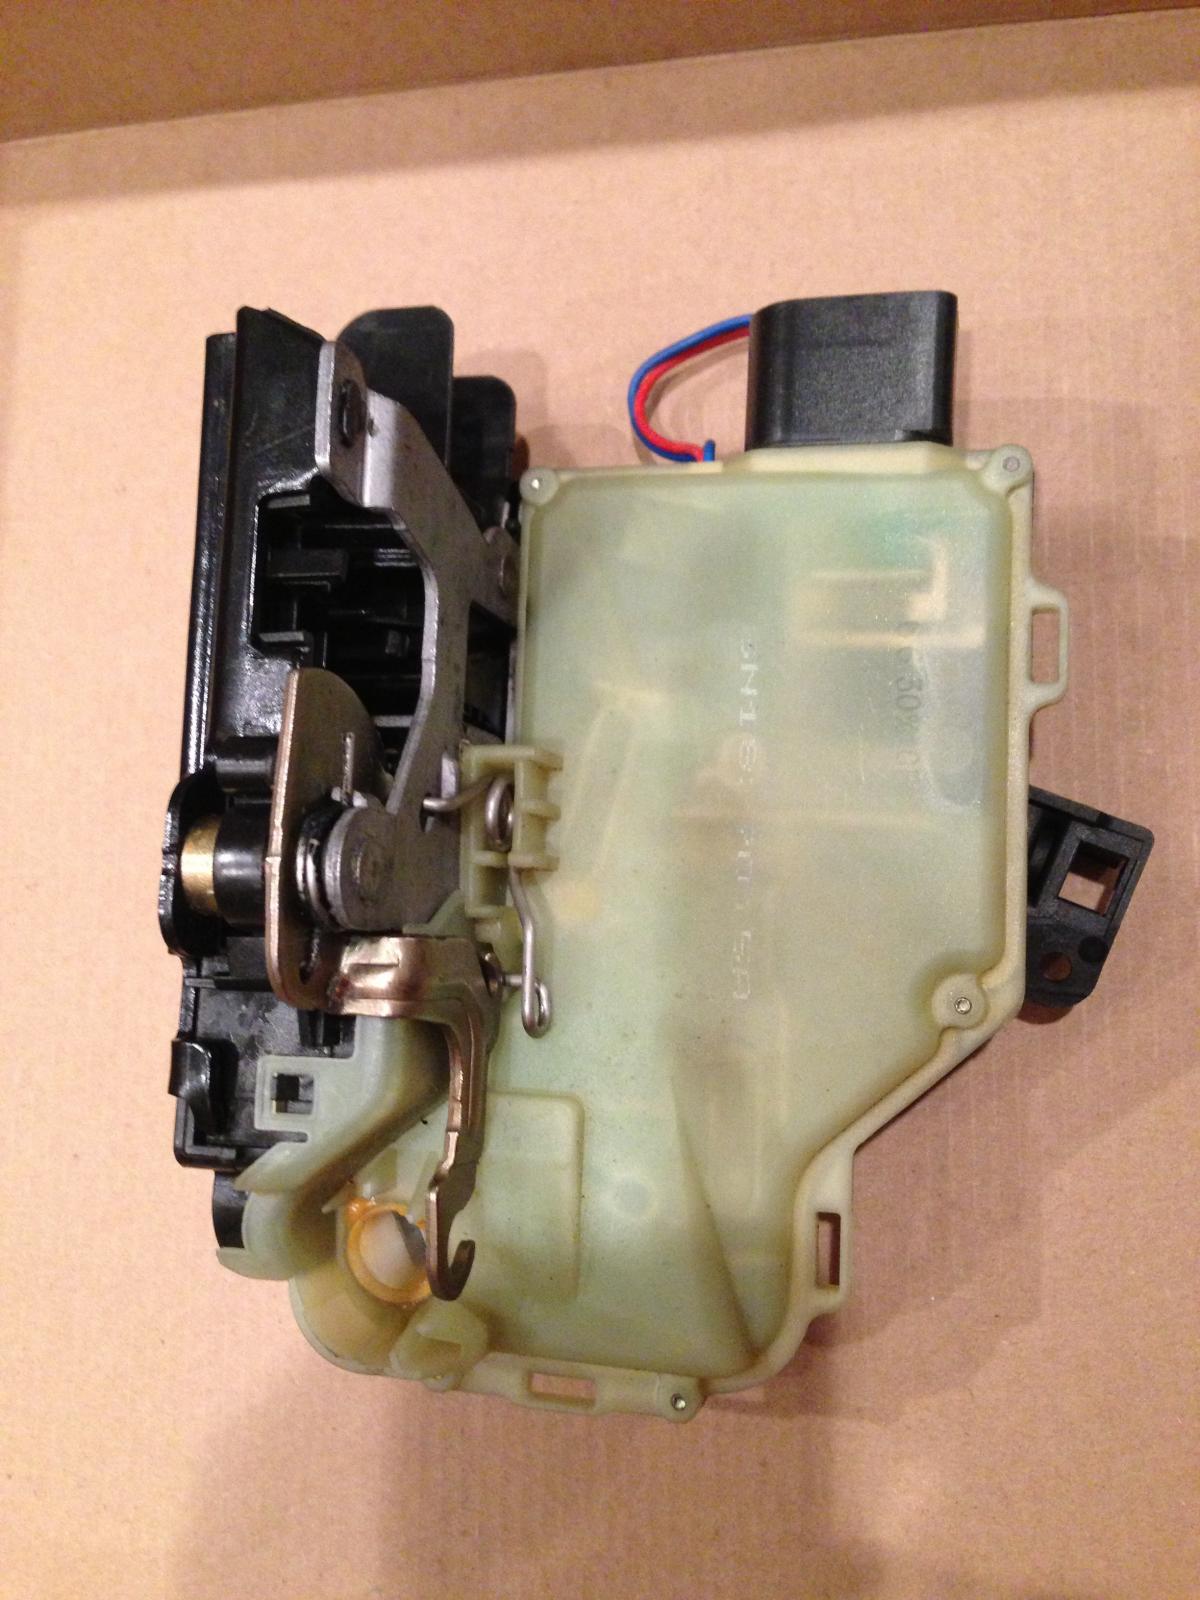
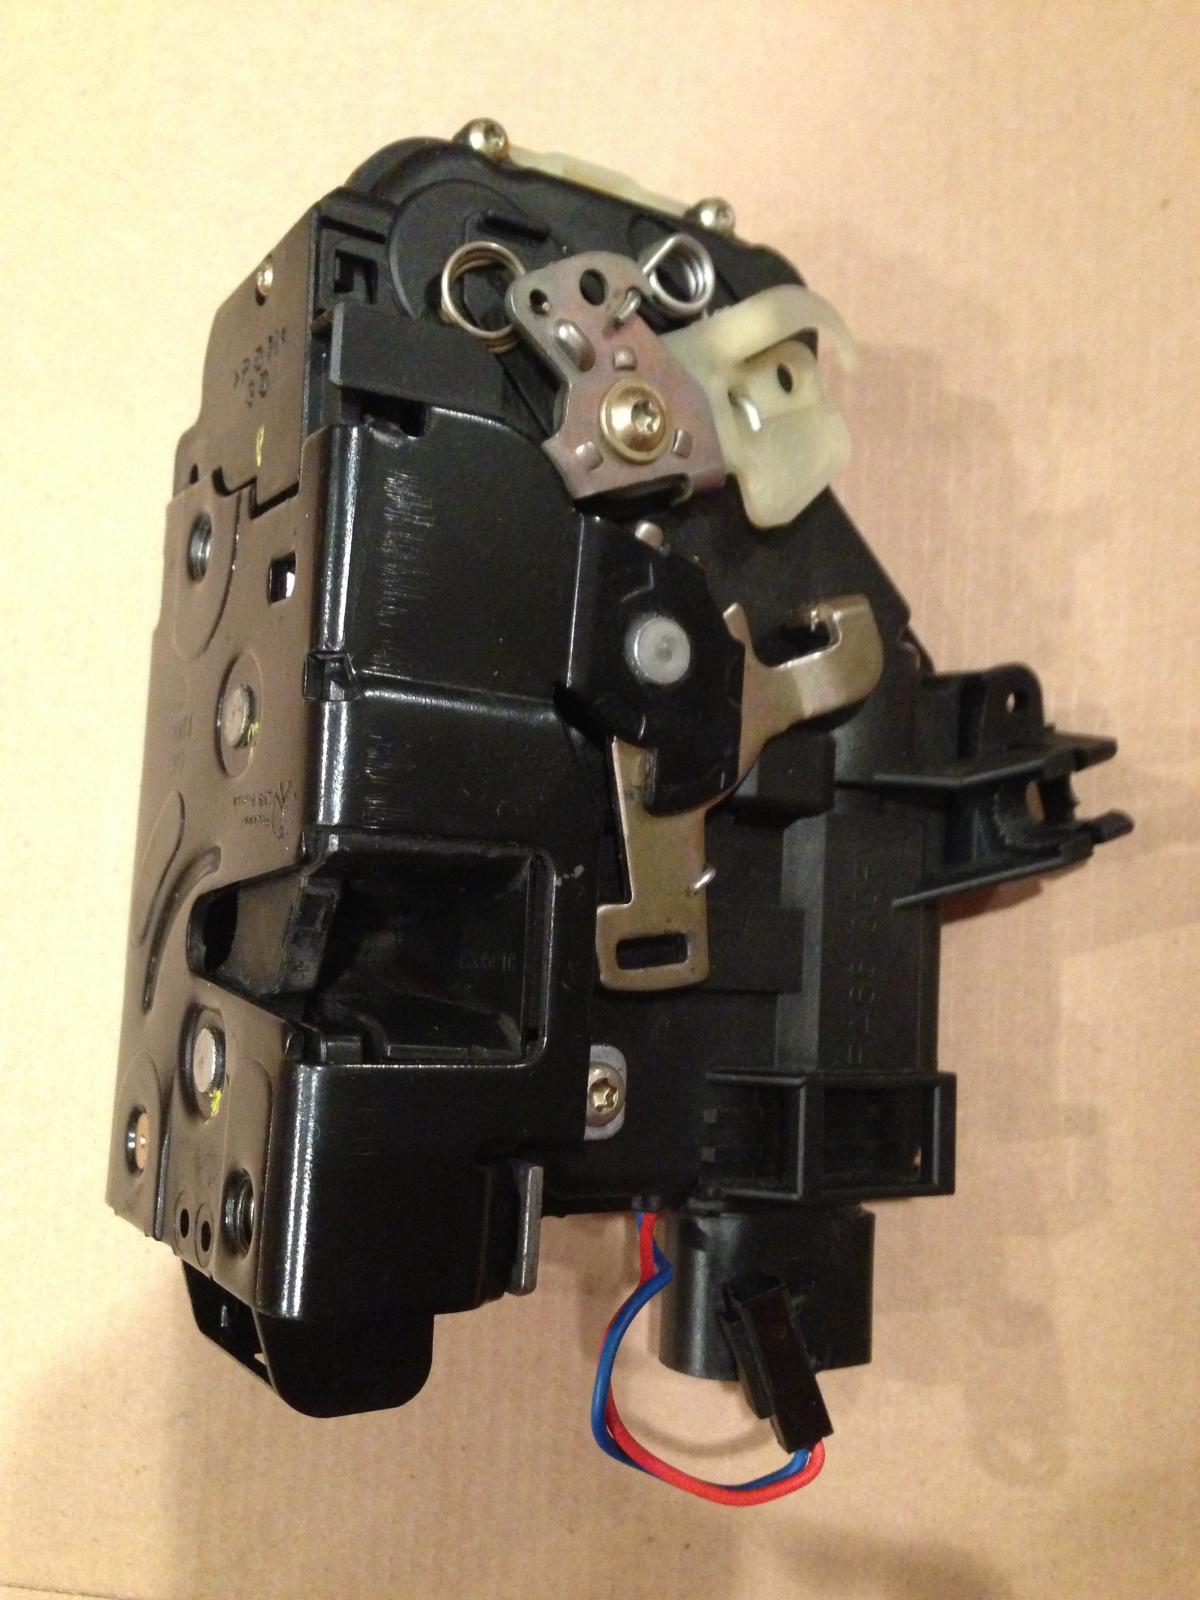
Blue Eyez, Here some pictures of the lock I removed from my car.
-
Thanks. That could be it as there is very little time between 7 and 8. I'll do some research on how the system works.
-
I have a 2001 996 tt with 39K miles and it is all stock. I had an issue with my brakes over the weekend at Mid-Ohio and thought someone may know the cause. At the end of the back straight (longest straight on the track) I threshold brake with my right foot for about 3 seconds and downshift at the end of the braking using heal-toe, turn into turn 7 (right hand turn) and full acceleration through 7 into turn 8 (appropriately called Madness). When I start to left foot brake into 8 the pedal or master cylinder seems to be stuck at the top and I have to push harder to break it loose and then everything seems ok. The brakes work great on all other parts of the track. The brakes and rotors are stock and I use Motul RBF 600 that is changed before each event and I’ve never had a problem with boiling fluid causing a soft pedal. I would appreciate any thoughts on what could be causing the sticking pedal or master cylinder. Jim
-
I had the same issue and I had someone sit in the passenger side to listen for the sound. We also found a screw driver (normal size) left by the prior owner. I also found that the clamp that holds the pluming up and together that is under the car and under the passenger side door was broken (bottom half missing) and I replaced it with a new one. The noise was the result of the screw driver, but I think the broken clamp could also cause some noise.
-
Thanks for the information. This will help in coming up with a fix. I was also thinking about a sport exhaust, but then that would lead to a flash of the ECU, replacing the diverter valves, adding new turbos, lowering the car, …:D
-
I have a 01 996TT with about 35K miles and I noticed a rattle sound from the muffler area. I traced this to the shields that are attached to the muffler. Three of the attachment points that appear (not sure) to be welded to the muffler have detached. The result is that one of the shields rattles when starting to move from a standstill. Has anyone had this happen to their cars and found a suitable fix to the problem? I would also appreciate any comments regarding how the shields are actually attached to the muffler – I could not get a good view of the attachment as I didn't want to try to remove the shield since the hex head bolts are very rusty.
-
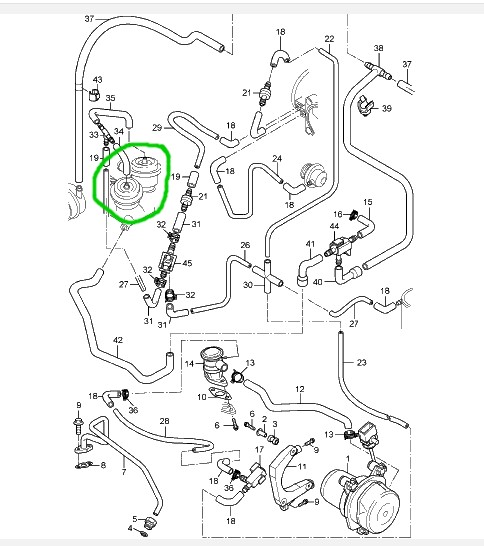
It's been a couple months since I replaced the diverter valve and the codes have not reappeared. The attached image shows the relationship of the diverter valves to the air injection system.
-
The following are some details on replacing the door lock. I did not take any pictures of the removal and installation so I'll do my best to recall what I did. There are 2 DIYs that will be very helpful (I know they would have helped me if I had looked at them before I did the work). Loren has posted a DIY on removing and installing the door panel and Richard Hamilton has posted a DIY on the door microswitches. Verify the problem using Richard's DIY and remove the panel using Loren's DIY. I disconnected the battery as I was worried about the window moving when my hand was in the door – this is probably also prudent do to the location on the airbag. I found I could save the adhesive for the sound/vapor barrier by slowly peeling it back to gain access to the door lock/handle part of the door. This resulted in the adhesive staying attached to the sound/vapor barrier. You will see a small diagonal brace that might (depends on size of your hands) make it difficult to reach inside the door. I loosened the bottom bolt to make it easier to reach in the door. The edges are somewhat sharp so you will need to be careful – my wrist looked like I tried to commit suicide with a butter knife when I was done. I decided to remove the outside door handle as I didn't want to disturb the widow support - don't know if this can be done without removing the handle. There are 2 nuts that hold the outside handle in place. There is a metal cup-like part that you will also have to remove from the inner side of the door. The door handle is connected to the lock by a flat piece from the key lock part of the handle and a threaded part. The flat part slides out when you remove the handle. The threaded part is attached to the lock with a plastic part that flips up (I believe) to disengage from the threaded part. You will see that a section of the plastic piece is removed so that it can be engaged and disengaged from the threaded part. You will need this part so take your time. There are some wires attached to the microswitch in the handle. I left this attached to the handle and disconnected the clip from the sheet metal under the handle. I recall that once the handle is free to remove you have to lift it slightly and remove it from the bottom. When done right it will not take any force to remove the handle. The lock is attached with the two torx bolts that you can see on the outside frame of the door. There is an electrical connector and a mechanical connector. I disconnected these after I removed the bolts. I removed the lock through the door handle hole.
-
I just noticed this as I have been busy at work. I will post some notes over the weekend, but I have the following comment until I have time for a more detailed post. You have to remove the inside door panel and this involve several bolts/screws that are and are not visible. The ones under the handle are the least obvious. There is also a sound/vapor liner that you will have to move to the side. You will then have to find someone with hand as small as a 3 year old, as nimble as a pianist and as strong as a 200 lb man to remove the handle and lock mechanism and then get it back in place. As I said I'll post some details over the weekend.