Welcome to RennTech.org Community, Guest
There are many great features available to you once you register at RennTech.org
You are free to view posts here, but you must log in to reply to existing posts, or to start your own new topic. Like most online communities, there are costs involved to maintain a site like this - so we encourage our members to subscribe or donate. All subscriptions and donations go to the costs operating and maintaining this site. We prefer that guests take part in our community and we offer a lot in return to those willing to join our corner of the Porsche world. This site is 99 percent member supported (less than 1 percent comes from advertising) - so please consider an annual subscription or donation to keep this site running.
Here are some of the features available - once you subscribe RennTech.org
- View Classified Ads
- DIY Tutorials
- Porsche TSB Listings (limited)
- VIN Decoder
- Special Offers
- Paint Codes
- Registry
- Videos System
- View Reviews
- and get rid of this welcome message
It takes just a few minutes to register, and it's quality Porsche information at a low cost.
Contributing Members also get these additional benefits:
(you become a Contributing Member by subscribing or donating money to the operation of this site)
- No ads - advertisements are removed
- Access the Contributors Only Forum
- Contributing Members Only Downloads
- Send attachments with PMs
- All image/file storage limits are substantially increased for all Contributing Members
- Option Codes Lookup
- VIN Option Lookups (limited)

jporter
-
Posts
97 -
Joined
-
Last visited
Content Type
Profiles
Events
Forums
External Paint Colors
Downloads
Tutorials
Links Directory
Collections
Classifieds
Store
Everything posted by jporter
-
Thanks again for your replies. The following observation could help resolve what is causing the issue. When I initially notice the problem (window up when closing door), I found that while the door was open the widow would drop when I pulled the handle and rise when I released the handle as if the door was closed. RFM, Thanks for the comments on the gas gage.
-
Thanks everyone for all of the replies. I have several areas to look at and I will try to resolve the issue. I also have a problem with the gas gage showing full when the car is running and yes you can run out of gas. I disconnected and reconnected the battery hoping this would help solve the problem, but no luck. I did try to reprogram the window with the switch after I reconnected the battery without any luck. I will let you know what I find.
-
I have a 01 turbo and I think I have a problem with the sensor that indicates when the driver side door is closed. It started with the window not staying slightly down when the door was open - the result was that the door would not close. Now the window does not make the small move up when the door is closed. Also the door lights stay on as if the door is not closed. And I can't lock the door with the remote and I get the single horn beep as if something is not closed. I would appreciate any ideas or an indication of where the sensor is that indicates when the door is closed.
-
Clutch Pressure Accumulator Replacement
jporter replied to jporter's topic in 996 TT, 996 TT S, 996 GT2
RFM, Thanks for the reply and the great support on this site. -
I’m a new 01 turbo owner – used to have a 98 Boxster. My first work on the turbo was to change the clutch pressure accumulator this past weekend because of a very hard pedal at startup. This was a straight forward procedure and I spent most of my time trying to find the proper size/shape wrench to tighten the new accumulator to the slave cylinder. This fixed the hard pedal at startup and also improved the shift from 1st to 2nd that used to be unpredictable. The question I have concerns the bleeding procedure. I initially thought that I would have to bleed the system using the bleeder valve on the slave cylinder. The repair manual seemed to imply that this was not necessary. The manual says “Bleed clutch high−pressure hydraulic system. To this purpose, depress the clutch pedal approx. 10 times”. I bled the system by pumping the pedal several times and put new fluid in the reservoir for the steering pump in the engine bay to keep fluid up to the proper amount. This worked and as I said the clutch works great. My assumption is that the bleeder valve on the slave cylinder only applies to the low pressure side (pedal side) of the system. Does anyone know if this is a correct assumption?
-
Convertible Top Problem
jporter replied to jporter's topic in 986 Boxster Convertible Top Issues and Solutions
I had some time to see if tightening the screws fixed the problem. I removed the microswitch and the top works perfectly. I'm now confident that the loose screws were the cause of the problem with the top. -
Replacing Dipstick Guide Tube
jporter replied to LemmyCaution's topic in 986 Series (Boxster, Boxster S)
I just replaced mine and your right, it will be obvious when you get the new part. You press the white areas on both sides of the part that attaches to the engine and then you can pull it off the engine. No force is needed when you get it right. -
The connection is on the engine side.
-
Just about to embark on the AOS R&R
jporter replied to Highlander's topic in 986 Series (Boxster, Boxster S)
It's the tube that connects the oil opening in the trunk to the motor. I replaced it as it was one of the areas leaking oil I was fixing along with the AOS.
-
Just about to embark on the AOS R&R
jporter replied to Highlander's topic in 986 Series (Boxster, Boxster S)
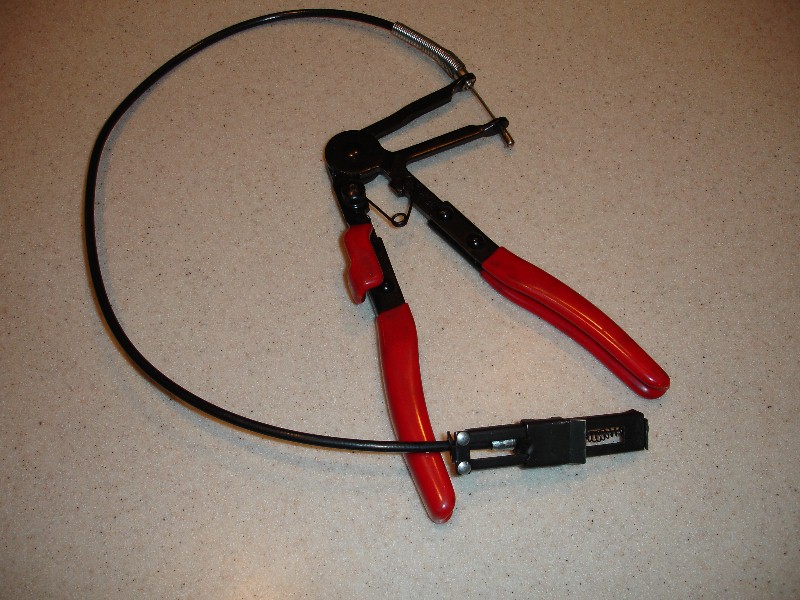
I bought the following "Flexible Ratcheting Hose Clamp Pliers" when I replaced my coolant tank. They were great for the tank replacement. I also used them when I replace the AOS and the oil filler tube. I think it's a great tool to have.
-
I had a similar problem. I believe the bolt extends out of the hub and the threaded end gets dirty or corroded.
-
I thought it was due to leaking from the bolts for the intermediate shaft cover. These bolts appear to go through the case and the new bolts have sealant applied to them. I noticed this past weekend that the drip is back so I plan to take a look at the RMS and intermediate shaft cover in a couple weeks to try and locate the leak. It should be easier to locate the source since I cleaned everything up last time. I just need to order new flywheel bolts.
-
flat spot in power band at 5000rpm
jporter replied to rsfeller's topic in 986 Series (Boxster, Boxster S)
I had the exact same problem (no codes either) until I replaced the MAF. -
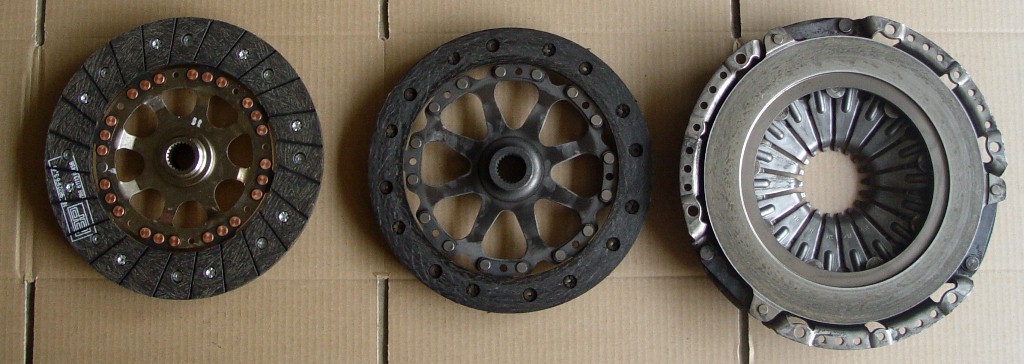
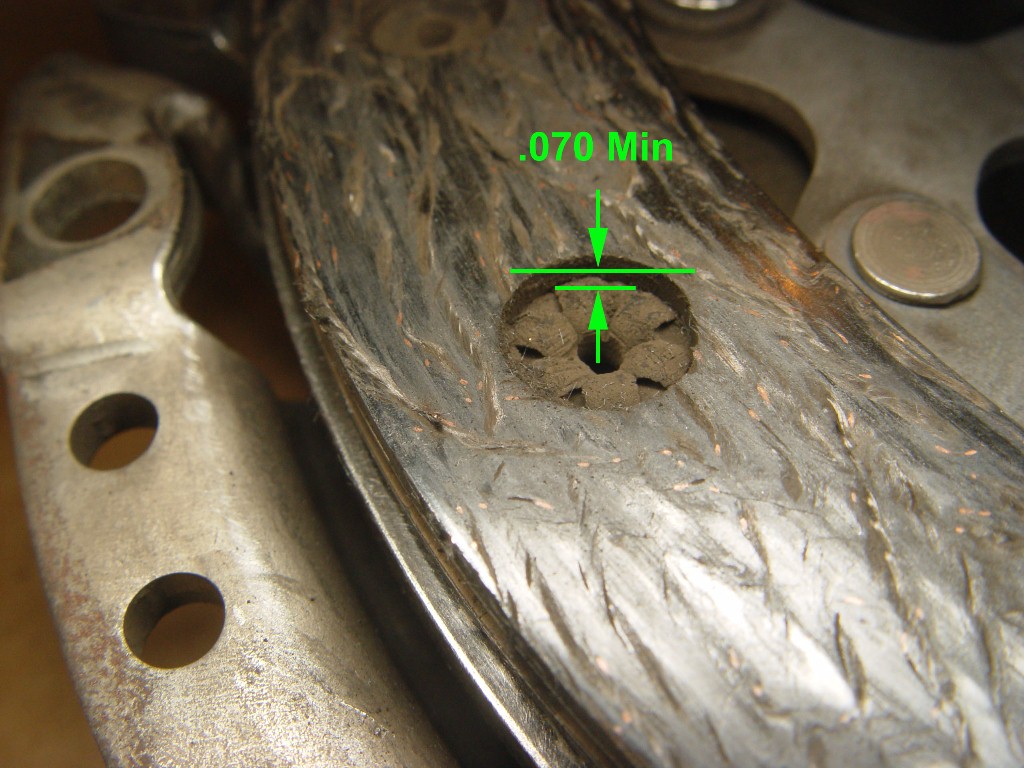
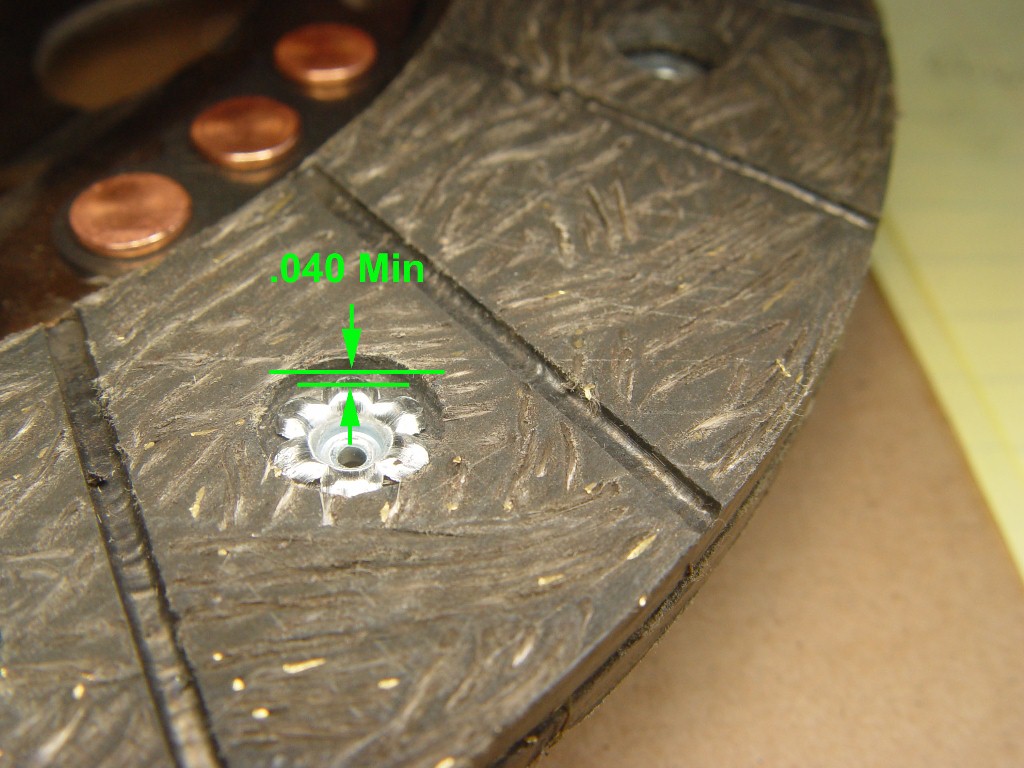
The following is an update on the clutch wear. I ordered a new clutch disc and when it arrived I found that it was a different size than that already on the car. The following picture compares the new disc with the old disc and pressure plate. The outside diameter was the same for both discs, but the inner diameter was smaller for the new disc. Although the new disc would have full contact on the flywheel, only the outer portion would be in contact with the old pressure plate. I’m guessing this is not an issue with the new pressure plate. I also measured the thickness of the new and older discs and found them to be close in overall thickness. I then measured the depth from the face to the rivet and found that the old disc actually had thicker material on the face as shown in the pictures that follow. The depth to the rivet on the new disc ranged from .040 inches to .050 inches and the depth on the old disc measured .070 inches to .105 inches. As a result I put the old disc back in the car and returned the new disc to the parts dealer. One last comment is that I don’t know how many miles are on the old clutch since I have only had the car for the last 15K miles of the 85K total.
-
Wow!! I was just hoping to figure out how to get a 3.4 in a 98 someday. This is incredible.
-
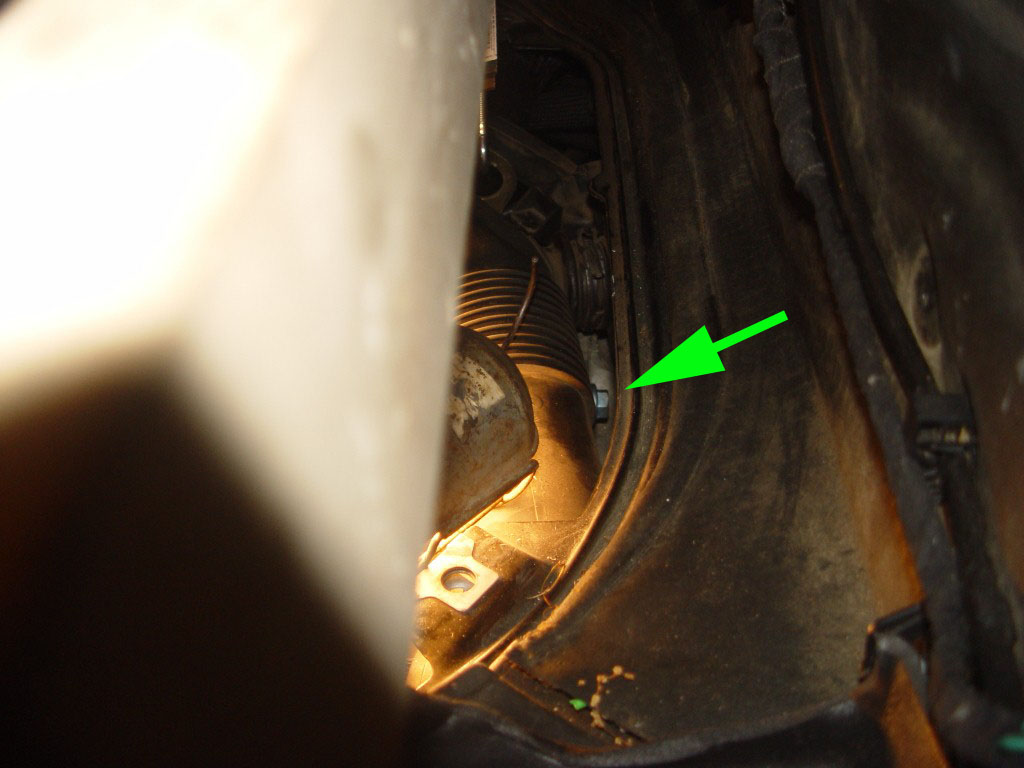
I did mine by feel and I think I covered the seal - just barely - I hope. There were 2 small shoulders on the top and the bottom of that portion of the AOS and I could not get these to be flush with the surface. I just put everything back together last night so it will be hard to get a good look at the seal, but I'll try and let you know if I can see the seal or leaks - nothing on the floor yet. I got a chance to look at the AOS connection this morning. I found that I could see it from the back right corner of the car and following is a picture I took of the AOS connection at the side of the crankcase.
-
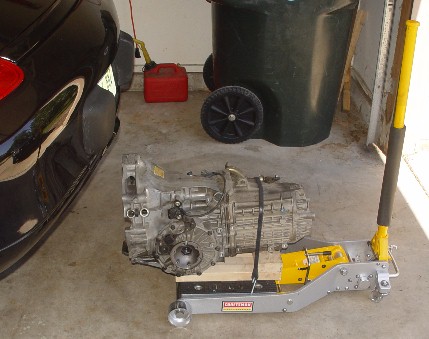
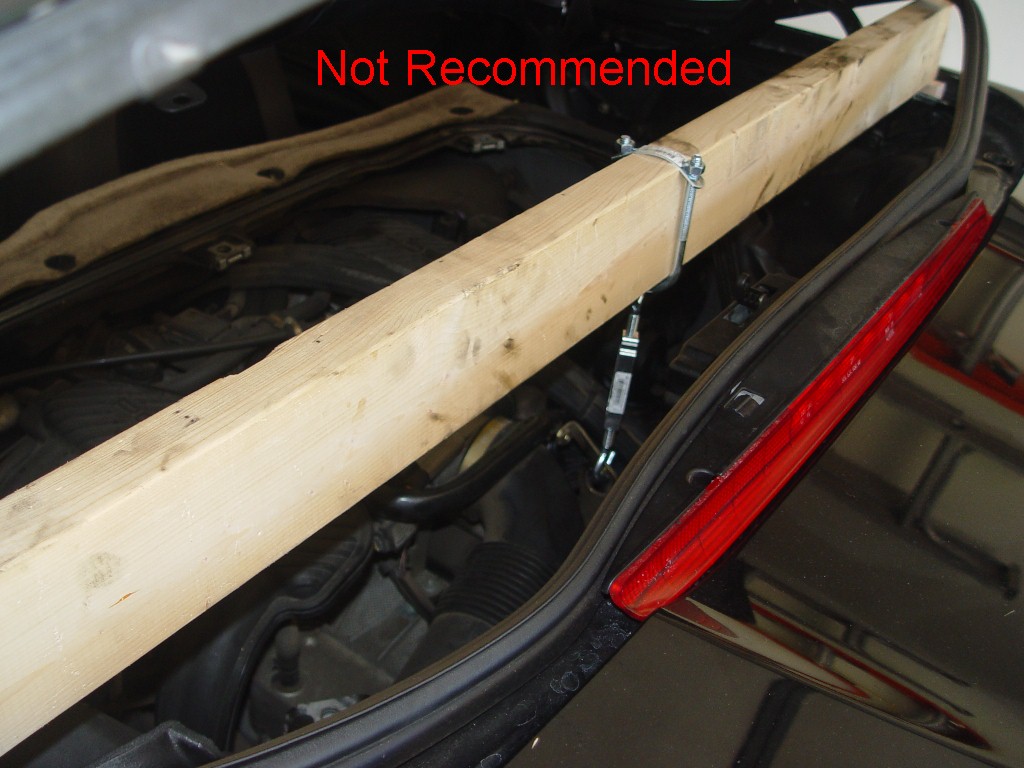
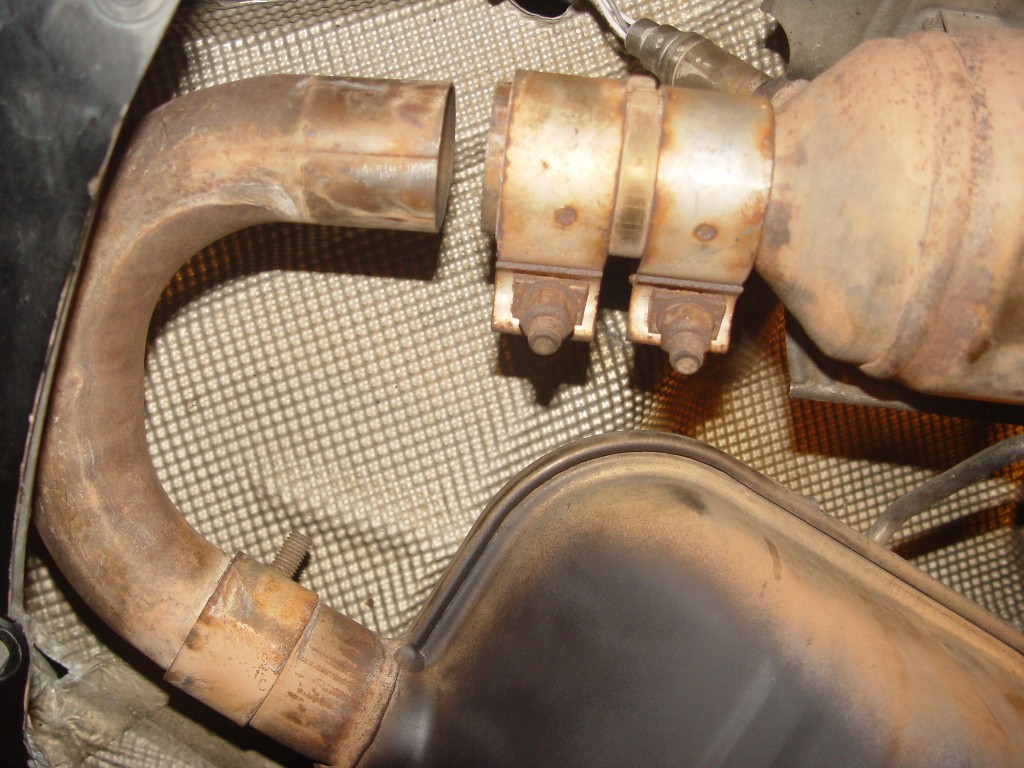
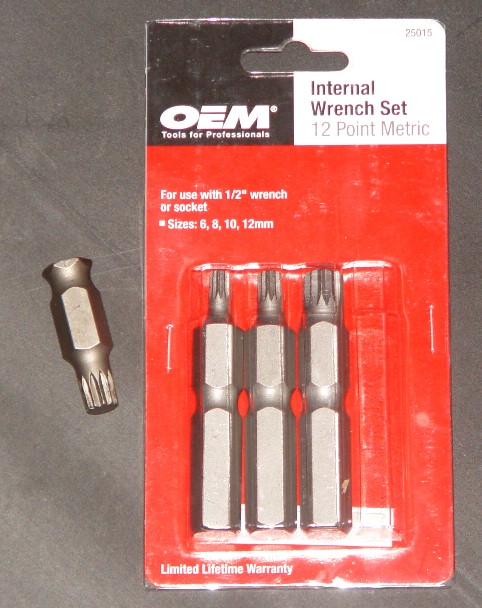
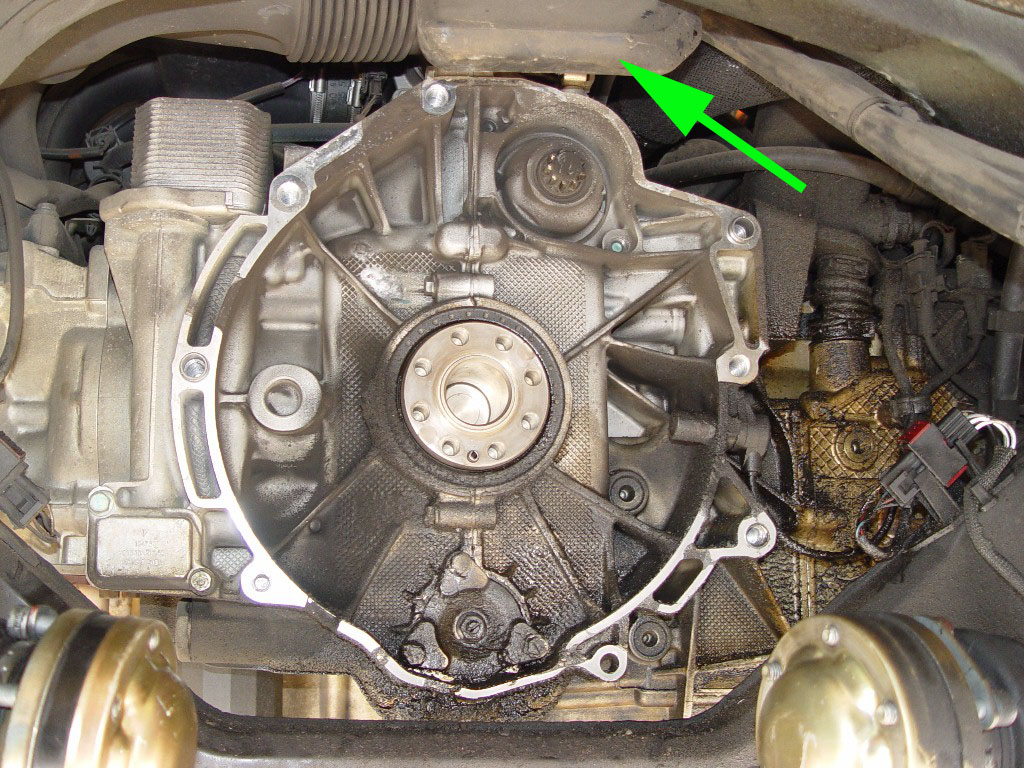
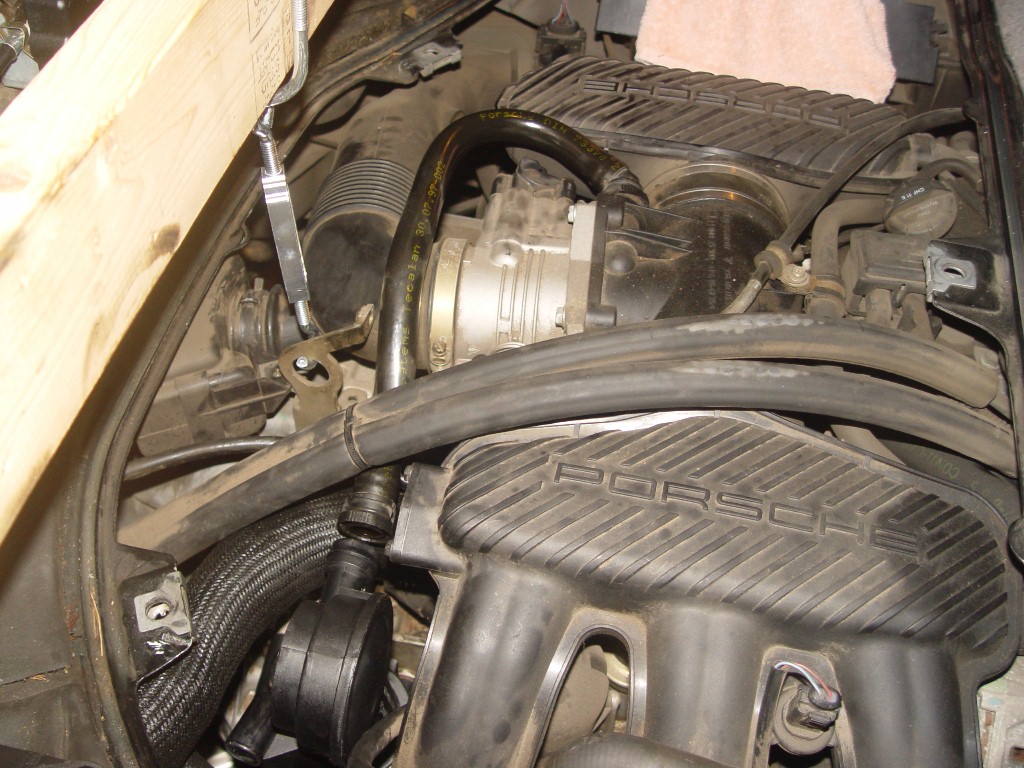
The following are some thoughts on this project. There is much information in this and other sites as well as the Bentley manual and these are only some additional thoughts on the procedures. These apply to my 98 Boxster. I did the work myself and put the car on jack stands. I used a motorcycle/ATV jack to remove the muffler and transmission – this made the effort much easier. If I tried to remove the transmission without the jack, I would probably still be under the car with the transmission on top of me while my wife was trying to figure out how to get the mess cleaned up. Following is a picture of this jack. I will make a shorter handle next time I use it as the long handle would hit the bumper and moving the jack further under the car caused the lift to rise. I used a 2x4 on blocks to support the engine as shown in the following picture and I don’t think I would recommend this approach. I hope someone has a better solution. The hardware results in the load pivot point being under the 2x4 so it would not flip over and a chain wrapped over a 2x4 would give me serious concern of this happening. The hardware also bent from the load as you can see in the picture and even though I adjusted it once, the engine was about ¼ to ½ inch lower when I reinstalled the transmission (based on transmission mounts). I also spent a significant amount of time thinking about what would happen if the 2x4 broke when I was under the car. I used a slightly different approach then shown in the Bentley manual to remove the muffler. The muffler was supported by the jack shown above. I removed the muffler by sliding the connectors (after loosening the bolts) out of the way at the cats as shown in the following picture. I then unbolted the muffler at the transmission mount. These bolts are easier to get at than the muffler support frame on top of the muffler. These bolts will slide back, but will be stopped by the muffler. The small support frame at the end of the transmission will come down (probably fall at some point) with the muffler. You have to pivot the muffler to get it down as the U shaped section attached to the end make the whole unit too wide to drop straight down. Reinstalling the muffler at these connections was also easy. There are 6 bolts mounting the transmission to the engine. One of the bolts (bottom left corner) was a triplesquare internal nut. I got several strange looks when I asked people at different auto and hardware stores for the proper tool to remove a triplesquare internal nut bolt, but finally found someone at Autozone who recalled that he had a strange set of tools that might work. They were triplesquare, but were too long so I had to cut the one that was the proper size to a shorter length. This can be seen in the following picture. The bolt at the top of the transmission is hidden behind something called a muffler that is attached to the air box. This can be loosened to get to the bolt and is shown in the following picture. For the life of me I could not get this top bolt off from underneath the car. I tried flexible and wobble extensions. I eventually rounded two of the corners and looked for another approach. I found that I could get to the bolt from above as shown in the following picture. I had to use a straight ended closed-end wrench to remove this bolt. I tried an open ended wrench and thought I was going to round more corners and eventually used a GearWrench with an extension to get the bolt off. I would get a couple of extra long M12 bolts to help align the transmission and clutch as this took several tries. I was told by the Porsche parts dealer that Porsche does not indicate that you will have to replace the "J" tube when installing a new AOS on a 98 Boxster – only on the 97. He checked and confirmed that the 97 and 98 originally used the same "J" tube so I ordered the replacement tube. This is needed as the old tube is too short (probably could be forced) for the new AOS as shown in the following pictures. I also didn’t replace the RMS as this seemed to be in good condition. I suspect it’s the original because of the location and I figured why mess with something that appears to be working. The design of the new seal is somewhat funky with an extended coated lip with some small ridges on the inner surface that contact the shaft. I may be old school, but the new design didn’t give me any confidence that it would work better than the one already on the car. Someday I may regret not installing the new seal. I plan to look at the seal in about a year – unless I have to look at it earlier as a result of seeing some leaks coming from the clutch housing.
-
Good luck with the filler tube. The connection at the trunk side is hard to reach. I did the trunk side from underneath as I had the big parts out of the way, but still have the wounds on my wrist from rubbing against all the hoses in the way. I recall someone mentioning that you could get to this connection by working from the coolant reservoir in the trunk. I replaced a leaky coolant reservoir earlier this summer and the oil filler section of the reservoir is a separate part that can be removed, but it will take some effort to do this as you will have to unbolt and disconnect some parts to get enough play to disengage the oil filler section of the reservoir. I believe the oil filler section of the reservoir is the part that the oil filler tube attaches to with a spring clip in the engine compartment. Although I hope I don’t have to replace the filler tube for another 9 years, I would think others will appreciate any insight you gain on how to make what should be a simple procedure easier.
-
I did mine by feel and I think I covered the seal - just barely - I hope. There were 2 small shoulders on the top and the bottom of that portion of the AOS and I could not get these to be flush with the surface. I just put everything back together last night so it will be hard to get a good look at the seal, but I'll try and let you know if I can see the seal or leaks - nothing on the floor yet.
-
The actual change out probably took less than an hour. This was easier for me since I had the transmission out of the way – I suspect this would be much more difficult with the transmission in the way. I also replaced the oil filler tube between removing the old AOS and installing the new unit – this time was not included in the hour estimate above. Cleaning up the mess left from the leaking oil and accumulated dirt represented about half the time. Getting the new AOS seated was the next most time consuming part as the new seal on the tube that attaches to the side of the crankcase has a significant amount of interference. It takes sometime figuring out how to remove the hoses that have “clip” fitting. You have to squeeze these and pull them off at the same time which was a little difficult due to the available space, having the car on jack stands, and the way I was supporting the engine from the top. The last issue is removing the spring clip that holds the bellows to the crankcase. This was easier for me as I had bought a spring clip remover with an extension for replacing a leaky coolant reservoir earlier in the summer. I didn’t include the time researching the AOS and there is some great information in this site and a very good description of the replacement by Mike Focke at the following link. http://mike.focke.googlepages.com/airoilseparatorreplacement If I had seen the damage before ordering parts I would have considered changing just the bellows as mentioned in WilliamsF1 post above. This would have been very easy for me. You would still have the spring clips to deal with, I don't know how difficult it would be without transmission removed, and I don't know if you can just order the bellows.
-
I had the same thought when I looked at the damage. I already had the new AOS so I just replaced the whole unit. There have been updates to the AOS since 98 and the new AOS looks significantly different than my original. The two most obvious changes are the geometry at the top of the unit (don't know the significance of this change) and what looks like a significantly improved seal for the other connection to the crankcase. Maybe someone else can elaborate on the significance of changes on the new AOS.
-
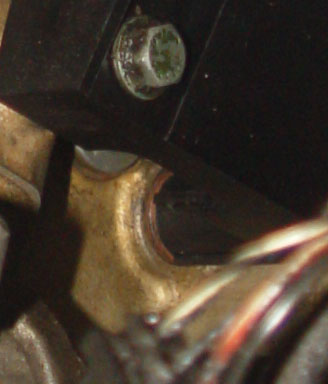
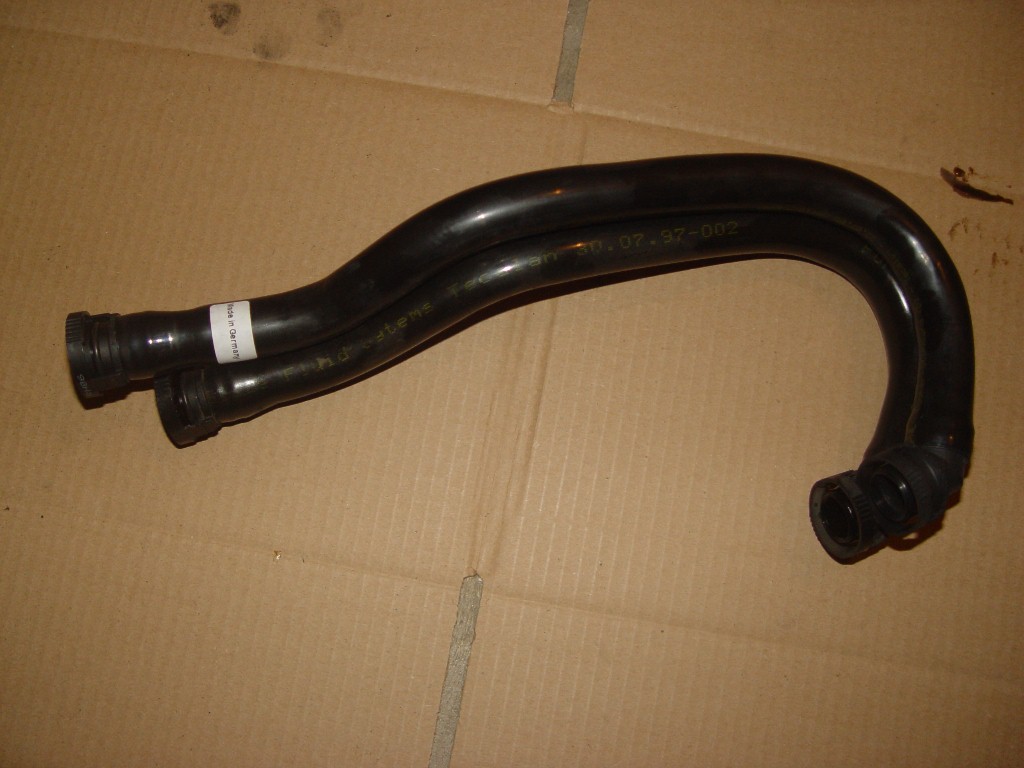
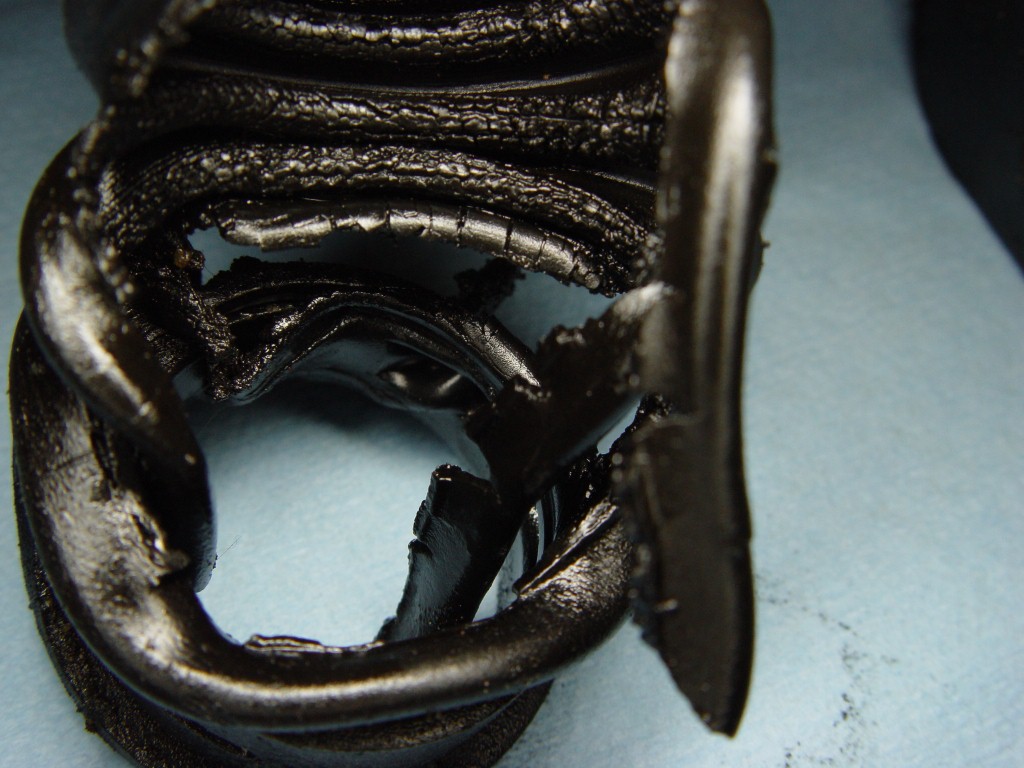
The following images are of the original AOS I replaced. The backside of the bellows (toward the front of the car) was gone. This could have been worsened when removing the AOS. This is a close-up of the bellows and you can see the significant deterioration of the rubber on the inside of the bellows. My guess on the cause would be a combination of chemical reaction at elevated temperatures.
-
I changed the plugs earlier this year and didn't see any problems there - maybe next year. I'm considering leaving the original seal in since it looked ok and plan to only change the bolts. I just finished changing the AOS and filler tube. Having the transmission out of the way made these changes easier. The back side of the bellows on the AOS was almost completely gone. I'll post some pictures tomorrow.
-
No ideas at this point. I'll take a close look when I get it out and maybe I will see something.
-
The work was easier than I thought, but not easy. There are some tough-to-reach bolts. I could have used an incredibly strong 6" tall gnome to remove the top bolt on the transmission. I found it easier to remove this bolt from the top. The use of a motorcycle jack helps when removing the muffler and transmission. I will post some comments and pictures of the whole process when I'm finished. For example the Bentley manual suggests removing the muffler at the joint next to the muffler and I found it easy to remove it at the joint next to the cats.