Welcome to RennTech.org Community, Guest
There are many great features available to you once you register at RennTech.org
You are free to view posts here, but you must log in to reply to existing posts, or to start your own new topic. Like most online communities, there are costs involved to maintain a site like this - so we encourage our members to subscribe or donate. All subscriptions and donations go to the costs operating and maintaining this site. We prefer that guests take part in our community and we offer a lot in return to those willing to join our corner of the Porsche world. This site is 99 percent member supported (less than 1 percent comes from advertising) - so please consider an annual subscription or donation to keep this site running.
Here are some of the features available - once you subscribe RennTech.org
- View Classified Ads
- DIY Tutorials
- Porsche TSB Listings (limited)
- VIN Decoder
- Special Offers
- Paint Codes
- Registry
- Videos System
- View Reviews
- and get rid of this welcome message
It takes just a few minutes to register, and it's quality Porsche information at a low cost.
Contributing Members also get these additional benefits:
(you become a Contributing Member by subscribing or donating money to the operation of this site)
- No ads - advertisements are removed
- Access the Contributors Only Forum
- Contributing Members Only Downloads
- Send attachments with PMs
- All image/file storage limits are substantially increased for all Contributing Members
- Option Codes Lookup
- VIN Option Lookups (limited)


kristian
-
Posts
210 -
Joined
-
Last visited
Content Type
Profiles
Events
Forums
External Paint Colors
Downloads
Tutorials
Links Directory
Collections
Classifieds
Store
Everything posted by kristian
-
My Xenon headlights started flickering and when they are on, they have a purple tint. I did some research to find out that that what happens when they are on their last leg. I bought two lights for $31 including shipping from www.xenonlightshid.com I was surprised to get them so cheap, since I saw them go for $75 a piece elsewhere. Kristian PS.I hope they are the right ones
-
Finally got everything back together. It took a while since I got the wrong parts in the mail and had to order them from Germany. Pulling everthing apart was hard and putting it back together was also the same way. I found out that two of the manufacturer boot clamps were so tight that I could not slide the boots on with them or without them so I went ahead and bought two universal boot clamps from Autozone to get the job done. I also got a joint braker from Harbour Freight for $16, since the rental one from Autozone did not work on my car. I almost gave up on putting the second axle back together untill I looked at how much a half axle was.... Kristian
-
Hi, I just got the right shaft off my car. It looks like the outer CV joint is not designed for disembling, so I had to pick apart the inner one. I can slide both boots on from inside.I had to use a torch and a three prong puller to get the end piece off. I don't think that was designed for an easy replacement either. They sent me the wrong boots via mail, so I could not continue the project today. I checked out Napa auto parts online and it seems like they are just selling the outer ones for front and back and the rear axle inner ones. I think I have to goto the dealer for the front axle inner boots because it does not seem like anybody is selling them for a four wheel drive... I will let you know if I can get the parts back together. Kristian
-
Thanks for that. Great article. Too bad you can't print it out for some reason. KL
-
Hi I have a 1999 Carrera 4. I saw last week that one of my front CV-boots was leaking. I ordered the inner and outer boots for all cv joints and I'm ready to tackle the job today. I found out that I need a CV-boot clamp tool snap ring pliers braker bar and a 32mm socket with a braker bar. The front one was broken, so I will start with the front ones today. Does anybody know of a good write up for changing these boots? I was trying to look for one, but could not find any. Thanks beforehand Kristian
-
steering wheel horn problem
kristian replied to kristian's topic in 996 Series (Carrera, Carrera 4, Carrera 4S, Targa)
Thanks guys, I just ordered the two screws. KL -
Hi, I just read about fixing my steering wheel horn by changing the bushings. The problem is that I can't seen to get to the two screws in the back. I tried a phillips screw driver without luck. Does anybody know if it's phillips or some special screwdriver you have to use? I have a 1999 carrera 4 convertible. Thanks Kristian
-
60k mile maintenance
kristian replied to orlandoguy1's topic in 996 Series (Carrera, Carrera 4, Carrera 4S, Targa)
This it what the dealer does. I did it myself and on top of that I replaced the three pulleys and the coil packs. It's a easy job. Kristian 1) Diagnosis system: Read out fault memory 2) Polyrib belt: Check condition 3) Change the engine oil and oil filter 4) Replace the spark plugs 5) Vehicle underside and engine compartment: Visual inspection for leaks (oils and fluids) and abrasion (lines and hoses) 6) Underbody panels: visual inspection for completeness, installation and damage 7) Coolant hoses: Check condition; 8) Radiators and air inlets at front: Visual inspection for external contamination and blockage; 9) Coolant: Check the level and antifreeze protection 10) Air cleaner: Replace the filter element 11) Particle filter: Replace the filter element 12) Fuel system: Visual inspection for damage, routing and secure fit of line connections 13) Power steering: Check the fluid level and bellows 14) Parking brake: Checking the free play of the parking brake lever 15) Brake system: Visual inspection of the brake pads and brake discs for wear 16) Brake hoses and lines: Visual inspection for damage, routing and corrosion. Checking the brake fluid level 17) Clutch: Check the play and pedal end position 18) Throttle actuation: Check smooth operation, check the full throttle position with the Tester 19) Steering gear: Visually inspect the bellows for damage 20) Tie rod joints: Check the play and dust bellows 21) Axle joints: Check play, visual inspection of dust bellows for damage, check screw connections of running gear adjustment facility, front and rear, for secure fit 22) Drive shafts: Perform a visual inspection of the boots for leaks and damage 23) Exhaust system: Visual inspection for leaks and damage, check suspension 24) Tires and spare wheel (collapsible wheel): Check the condition and the tire pressure 25) Check the door locks, lid locks and safety hooks of the front lid to ensure that they are secure and functioning properly: 26) Check lid lock, front and rear; Check safety hook, front lid; Function test, check door lock; Check door and lid tightening torques 27) Seat belts: Check function and condition 28) Vehicle lighting: Check function; All headlights: Check adjustment; 29) Horn: Check operation. 30) Windscreen wiper/washer system, headlight washer: Check fluid level and nozzle settings, pay attention to antifreeze protection in the winter months. 31) Electrical equipment as well as warning and indicator lights: Check operation. Test drive Remote control, front seats, foot and parking brakes (also actuation travel), engine, clutch, steering, transmission, ParkAssist, automatic speed control, TC/PSM switch, heating, air-conditioning system and instruments: Check operation. Oils, fluids: Visual inspection for leaks -
Here's the wiring instructions. KL Apparently you haven't yet noticed but your CC is also disabled. In my RX300 I went in and modified the current flow sensing aspects of the bulb failure detection controller so it was satisfied with the lower (~10:1) LED current flow. For my '01 C4 I simply added a relay and a 50 watt incandescent bulb in the LED high mount circuit behind the high mount itself. The NC contacts of the relay connect the bulb into the circuit, satisfying the CC bulb "keep-alive" current flow requirement. When a full 12 volts is applied (the brake lights are on) the relay pick sup and takes the 50 watt incandescent out of the circuit.

-
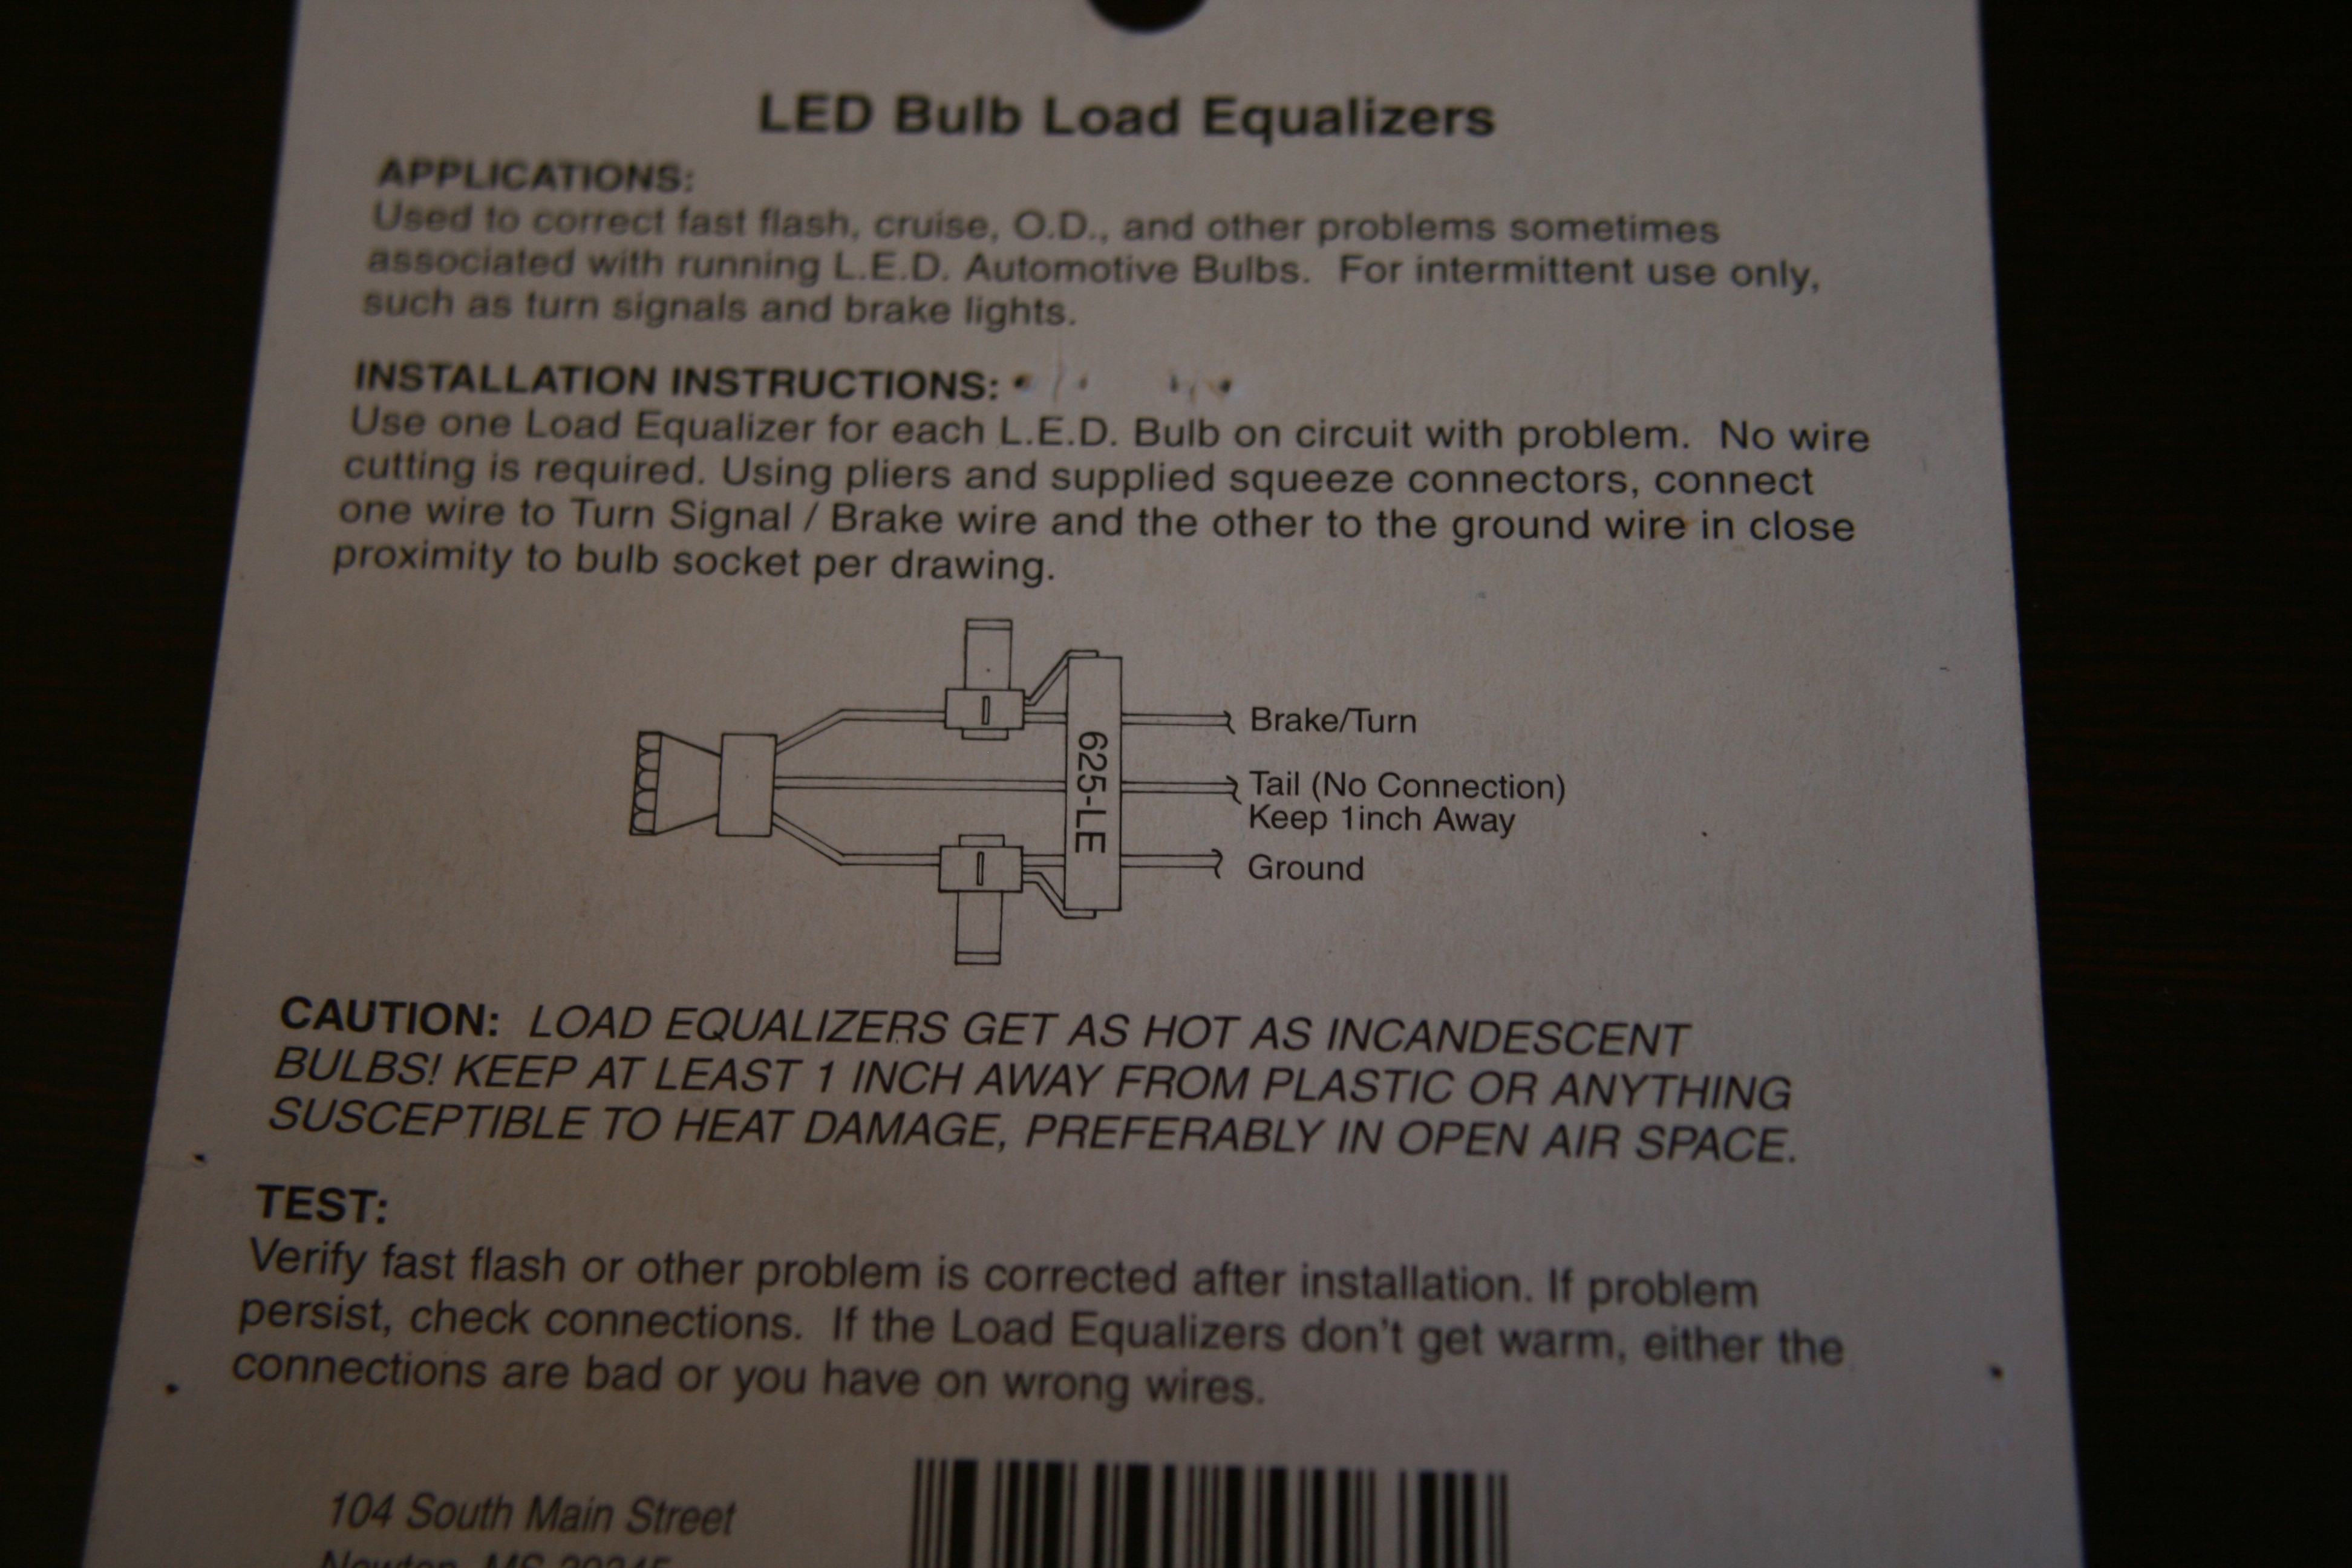
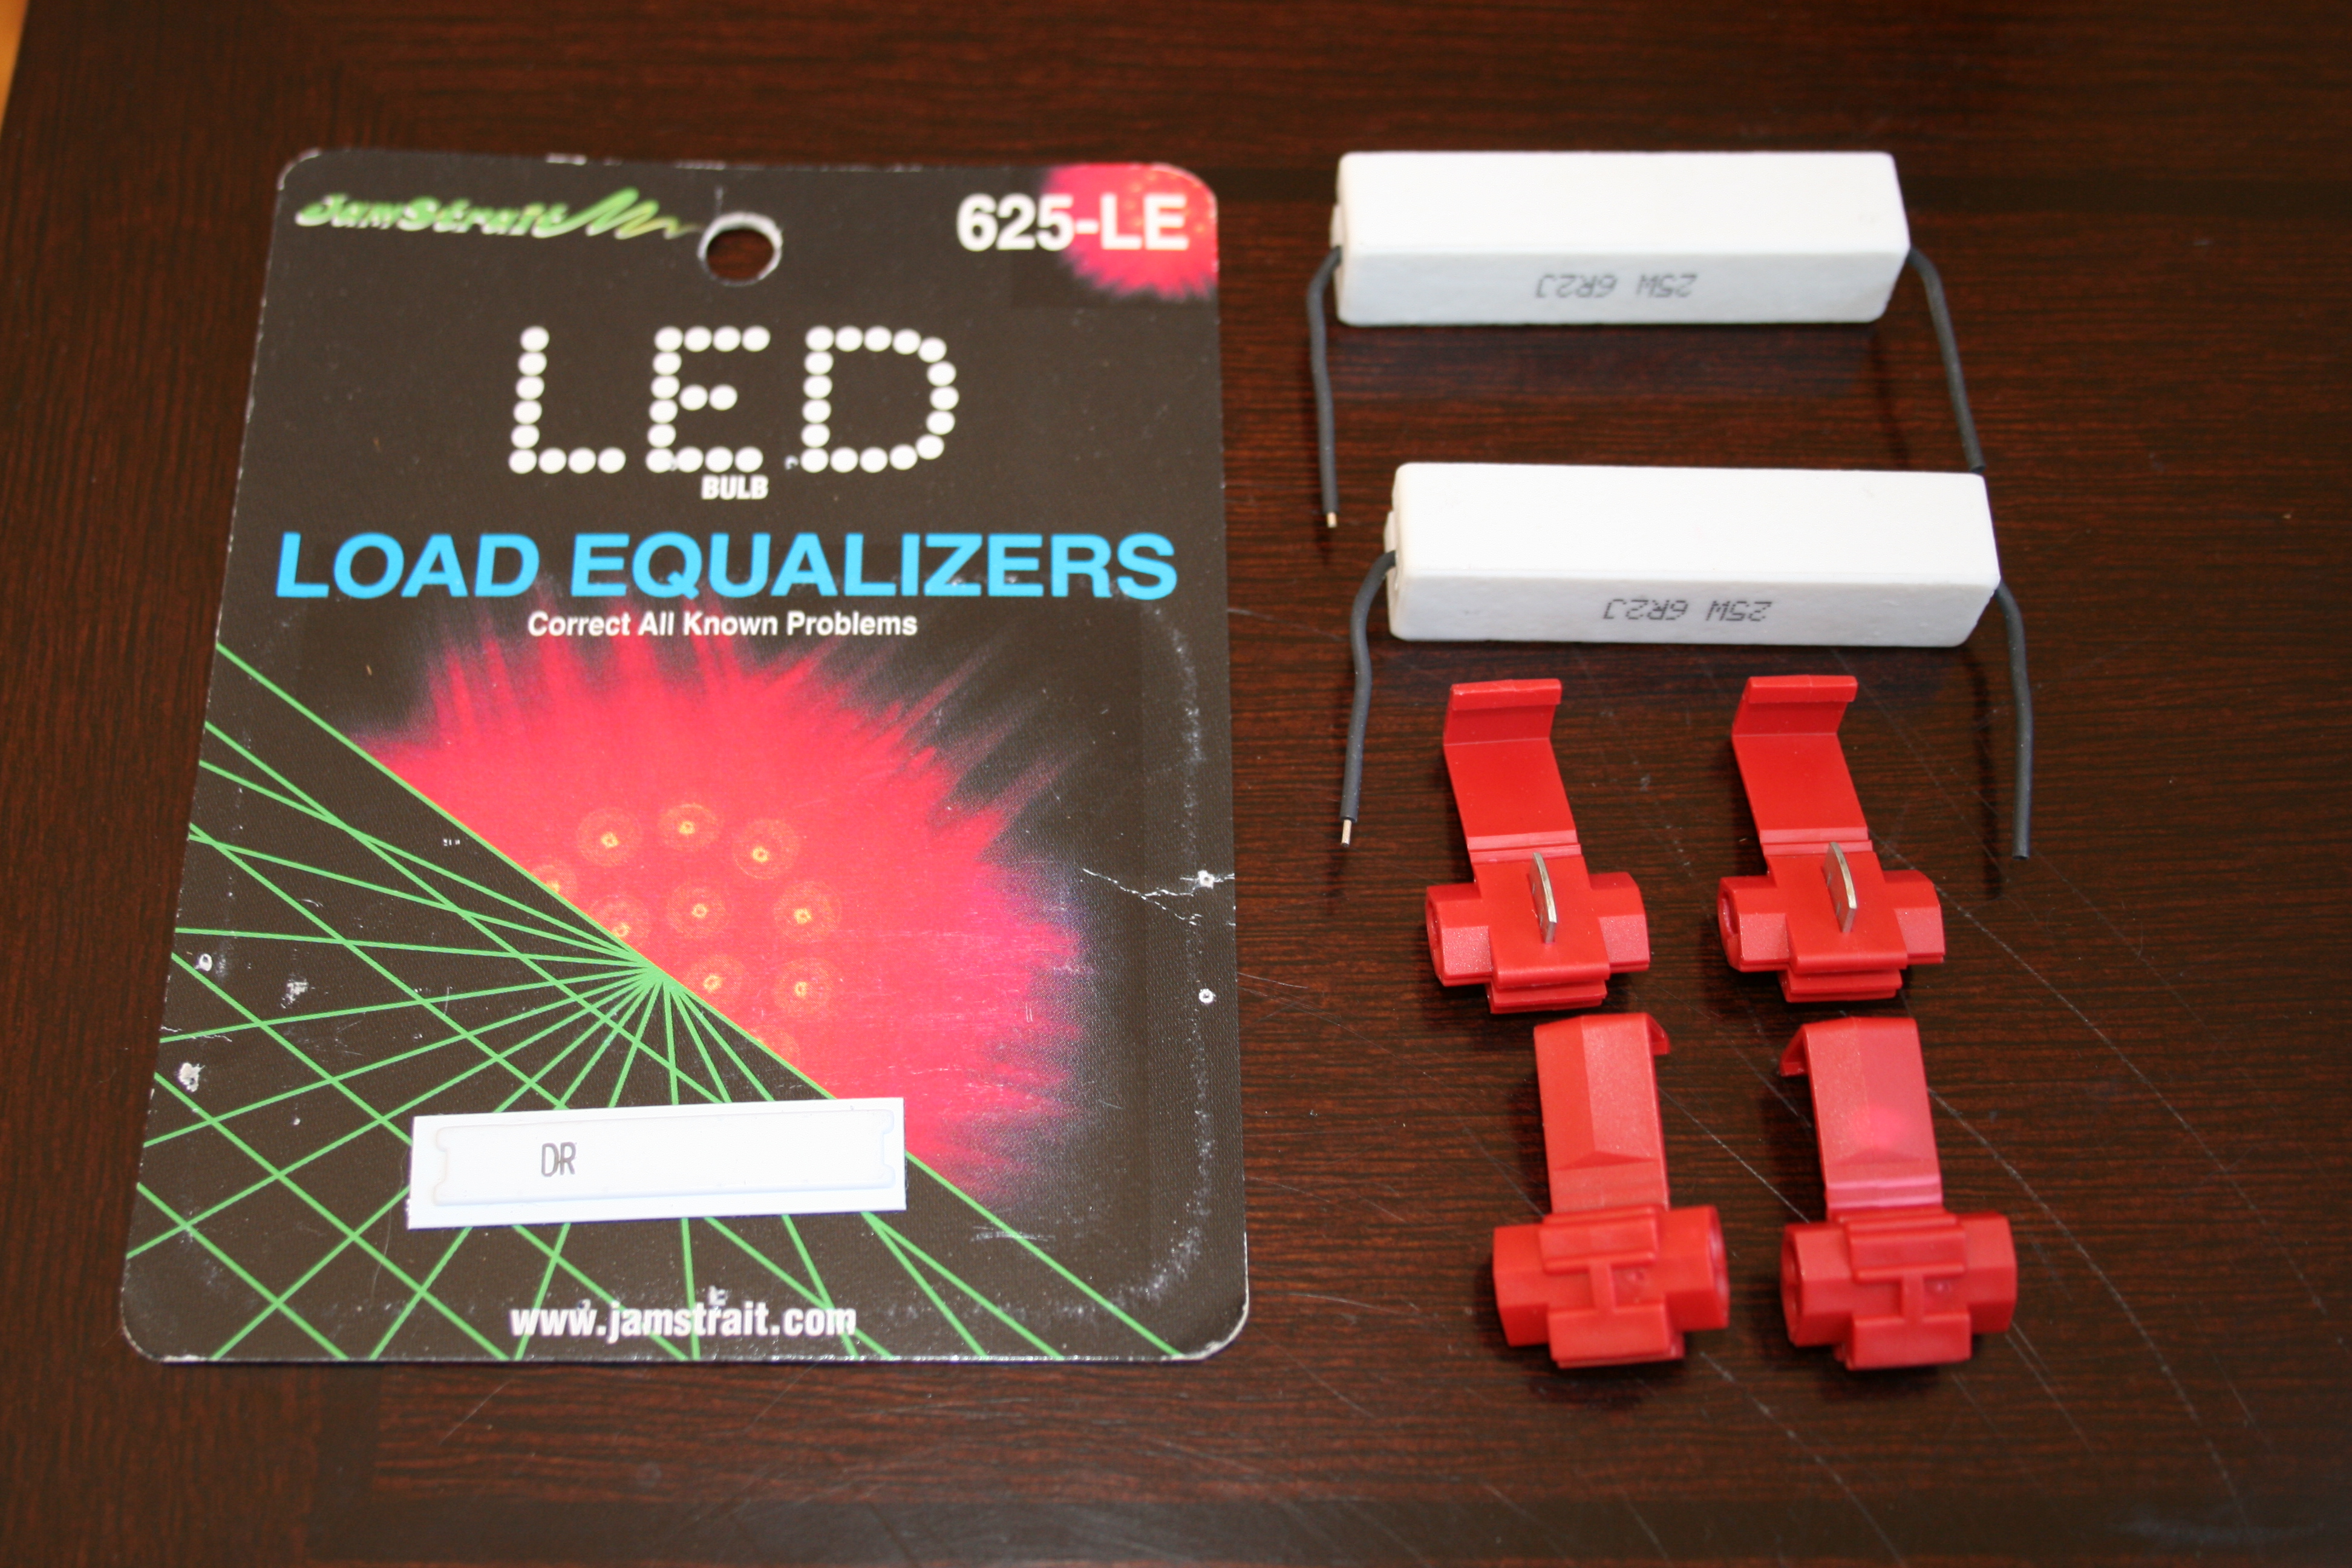
Hi, You can resolve the problem by buying a load equalizer from ex.Autozone for about $10. You get two of them and you don't have to cut the wires to do the job. They also come with simple instructions. If you have stock tail lights and add an LED 3rd brake light, you have no issues. Also no issues, when you have a stock 3rd brake light and add LED tail lights. You only have issues when all your brake lights are LED KL
-
996 carbon door sills
kristian replied to kristian's topic in 996 Series (Carrera, Carrera 4, Carrera 4S, Targa)
Hi, I went to Autozone and got something similar, since they did not have it. I will let you know how it worked. Thanks Kristian -
996 carbon door sills
kristian replied to kristian's topic in 996 Series (Carrera, Carrera 4, Carrera 4S, Targa)
Thanks guys, I'm actually looking for something that would soften the glue, so that I can easily scrape it off. Most of it came off easy in one piece, but there is still some left. Kristian -
Hi, I just bought carrera carbon door sills for my car on Ebay. Is there an easy way to get the old glue/silicone off the door frame without taking off the paint? Thanks Kristian
-
996 LED Install
kristian replied to Dwiggy's topic in 996 Series (Carrera, Carrera 4, Carrera 4S, Targa)
I bought some LED lights for my car about a year ago, but I had some problems too and I decided not to install them. I only installed the tail corner lights. I installed the brake light, but it was not as bright as the original, so I did not do it. I replaced my 3rd brake light with a clear unit that I bought from Ebay wihtout having do do any modifications. I also liked the clear look more than the original read KL -
LED daytime running lights
kristian replied to kristian's topic in 996 Series (Carrera, Carrera 4, Carrera 4S, Targa)
I would like to install these in the middl of the left/right openings Kristian -
Has anybody installed LED daytime running lights on a 996? Is there any online instructions? I have a 1999 Carrera 4. Thanks Kristian
-
The tank was about $110 and DIY was pretty easy. You just have to take your time putting it back in since it's tight. I have done it two times. Keep the receipt for the tank, since they have warranty... Kristian
-
996 Clutch
kristian replied to belleriver's topic in 996 Series (Carrera, Carrera 4, Carrera 4S, Targa)
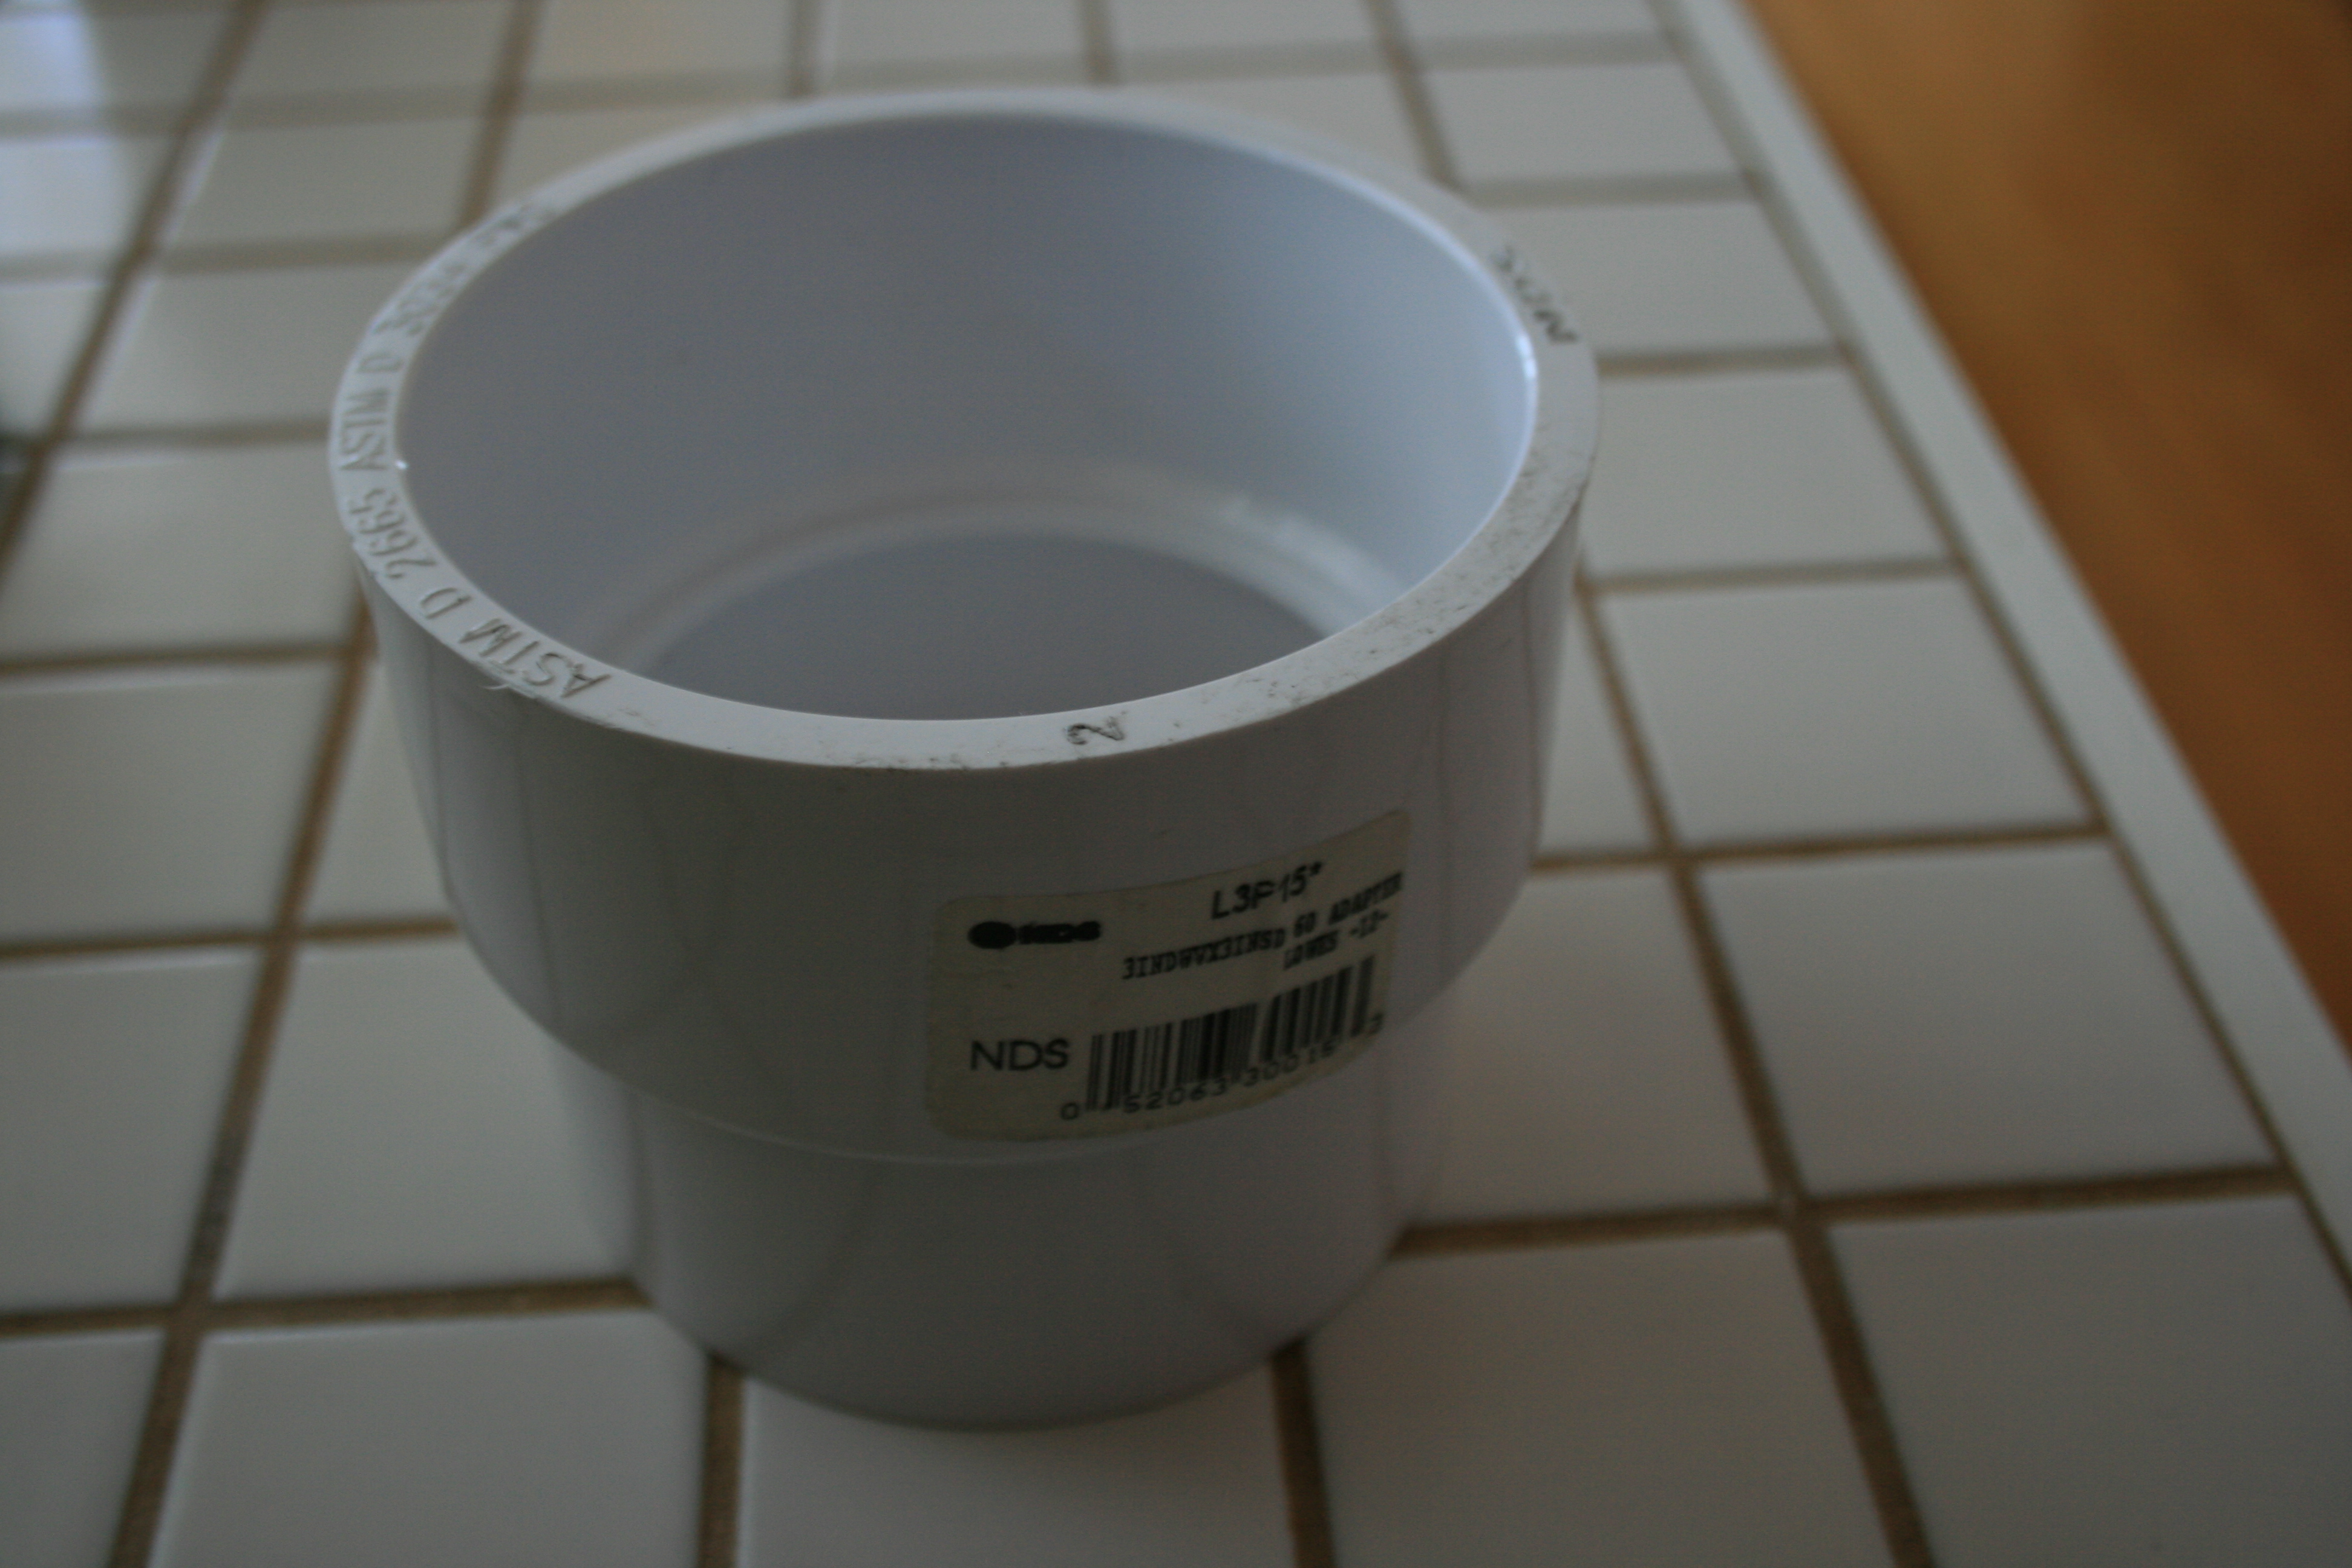
I bought it from Lowes. It's a PVC adapter that is the same size as the RMS seal. When you get the RMS seal, take it with you to a hardware store. I placed it on top of the RMS seal and tapped lightly with a mallet evenly untill it slid in it's place. The old RMS is hard to get out. I used a small drill and drilled a hole on it. Then I screwed a screw in it and pulled it out. Kristian PS. I had my car on jacks. If I would do it again, I would try to find higher jacks to have more room under there. I did not drop the engine. I forgot that I bought a 12 star security bit to open up one of the security bolts on the transmission ($10) and a universal clutch centering pin for $30 from Napa Autoparts. Tranny jack was $80 from Harbor Freight Tools.
-
FINALLY a pic of my car!
kristian replied to TripleBlack911's topic in 996 Series (Carrera, Carrera 4, Carrera 4S, Targa)
Is that a picture of a white car with a macro lens? :P -
996 Clutch
kristian replied to belleriver's topic in 996 Series (Carrera, Carrera 4, Carrera 4S, Targa)
I changed my Clutch, Flywheel and RMS by myself without any experience. If you do it have good stands (higher than normal ones), a tranny jack that sits low. I did not get a RMS tool. I just bought a $5 plumming joint that was the same size as the RMS seal and tapped it in place. The clutch was $350 flywheel $700, so it saved me big bucks. The only time I needed a hand was when I put the transmission back.. Kristian I have a 03 996 with 36K on the clock.I bought the car this past July from a private owner.I too thought the clutch pedal was rather stiff.Fortunately or unfortunately (depending on how you look at it) my RMS started to leak. MY car is CPO'd so the dealer said I should get the new seal installed. I called sunset Porsche and got the complete clutch kit for $490 shipped.I told my service advisor to "throw" in the new clutch kit when they did the RMS under warranty. Labor cost to me $0.The clutch pedal is much smoother/lighter now. I imagine that the pressure plate has alot to do with some of the additional tension of an older clutch. -
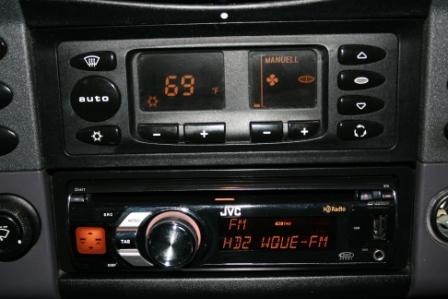
Stereo is great. The radio sounds much better than the original one because it has HD radio. It also tells you the song titles etc, like the original. The sound otherwise is not much different because everything goes through original amp. I really like the front USB port that allows me to use a thumb drive. Now I don't have to burn CD's any more. I can just download all the songs to my thumb drive and take plug it on the radio. I have an extra crutchfield harness if anybody is interested. Kristian
-
I bought an GAHH top from Ebay. I paid 1299 +50$ shipping for and glass window with the defroster ($100 extra) I took it to a convertible top specialist in Houston and I paid them $500 to put it on. I was referred to that specialist through an Porsche indie shop. It good quality and it looks better than the original. KL A local shop in Kansas City replaced my worn-out canvas top with an aftermarket GAHH top that has the rear glass window. The top is very high quality. Total cost parts & labor $2300. I do a lot of work on my car, but the canvas top is not one I would want to attempt. The shop does ALL of the convertible top work for dealers in the KC area... and it still took them 1 1/2 days to complete.
-
I have a 1999 Carrera 4 Convertible without navigation and with door speakers. I'm trying to locate the stereo amplifier. I'm thinking of replacing it at the same time with the radio upgrade. Thank Kristian
-
I just bought a unit from www.crutchfield.com It's a JVC KD-HDR50 For $159.99 It includes the wire harness, antenna adaptor,two year warranty, shipping and no taxes. It's great since the same unit in Best Buy is the same price without taxes and without any of the extras. So I saved over $50. I also have tech support available if I need it. I chose the unit because it has HD radio built in and a flash drive plug in. The HD gives you cd quality radio and the plug in means I don't even have to burn CD's any more. I will let you know how everything went after I get it and install it . KL
-
Thanks guys for your help! When you goto the Crutchfield website you have to specify exactly what year, make model and what options you have and they will get you the right harness. I had to choose "No navigation system" "with door speakers" .