Welcome to RennTech.org Community, Guest
There are many great features available to you once you register at RennTech.org
You are free to view posts here, but you must log in to reply to existing posts, or to start your own new topic. Like most online communities, there are costs involved to maintain a site like this - so we encourage our members to subscribe or donate. All subscriptions and donations go to the costs operating and maintaining this site. We prefer that guests take part in our community and we offer a lot in return to those willing to join our corner of the Porsche world. This site is 99 percent member supported (less than 1 percent comes from advertising) - so please consider an annual subscription or donation to keep this site running.
Here are some of the features available - once you subscribe RennTech.org
- View Classified Ads
- DIY Tutorials
- Porsche TSB Listings (limited)
- VIN Decoder
- Special Offers
- Paint Codes
- Registry
- Videos System
- View Reviews
- and get rid of this welcome message
It takes just a few minutes to register, and it's quality Porsche information at a low cost.
Contributing Members also get these additional benefits:
(you become a Contributing Member by subscribing or donating money to the operation of this site)
- No ads - advertisements are removed
- Access the Contributors Only Forum
- Contributing Members Only Downloads
- Send attachments with PMs
- All image/file storage limits are substantially increased for all Contributing Members
- Option Codes Lookup
- VIN Option Lookups (limited)


laalves
-
Posts
215 -
Joined
-
Last visited
-
Days Won
2
Content Type
Profiles
Events
Forums
External Paint Colors
Downloads
Tutorials
Links Directory
Collections
Classifieds
Store
Everything posted by laalves
-

New DVD Navigation Install
laalves replied to trieullionaire's topic in 986 Series (Boxster, Boxster S)
As promised my pics below. Note the damage to the right edge of the horseshoe :( . A new one is coming from ebay for 50 euro!
-
SOLVED!!!! Initially, I tried the learning process as above and the result was.... a closed sunroof with the windbreaker sticking fully out! LOL! This would have been interesting, noisewise at 200kph+! So that wasn't it... I looked again in detail and a flashlight to the inhards of the articulation of the left and right arms with the windbreaker. Something didn't look quite right since, when depressing the arms fully down manually, the windbreaker would still stick out. So I figured there was a dislocated shoulder (...) and pressed the windbreaker down manually and using a screwdriver and gentle force, I pryied both left and right arms up. I was delighted to hear a healthy click sound and the joints slotted into place! Beautiful and everything is just fine in sunroofland!
-
Mmmm.... I didn't bother since I dismissed it as a mechanical problem, it sure won't hurt trying, which I'll do. Will keep you posted!
-
New DVD Navigation Install
laalves replied to trieullionaire's topic in 986 Series (Boxster, Boxster S)
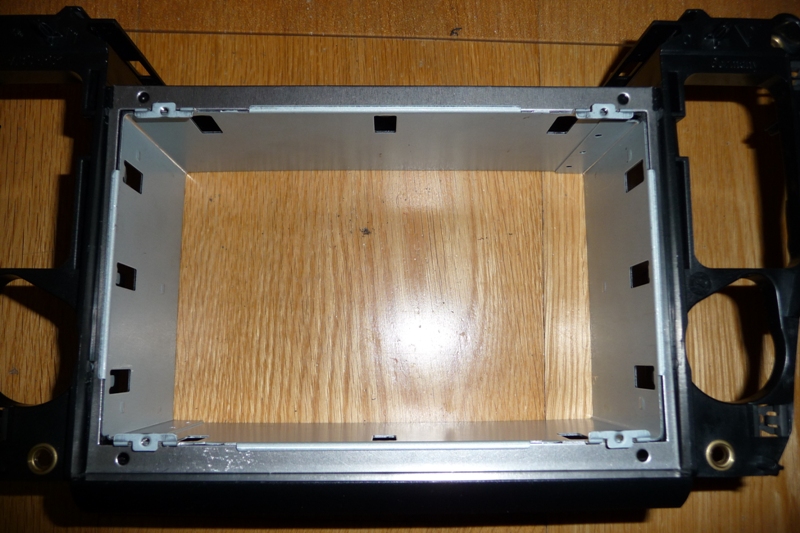
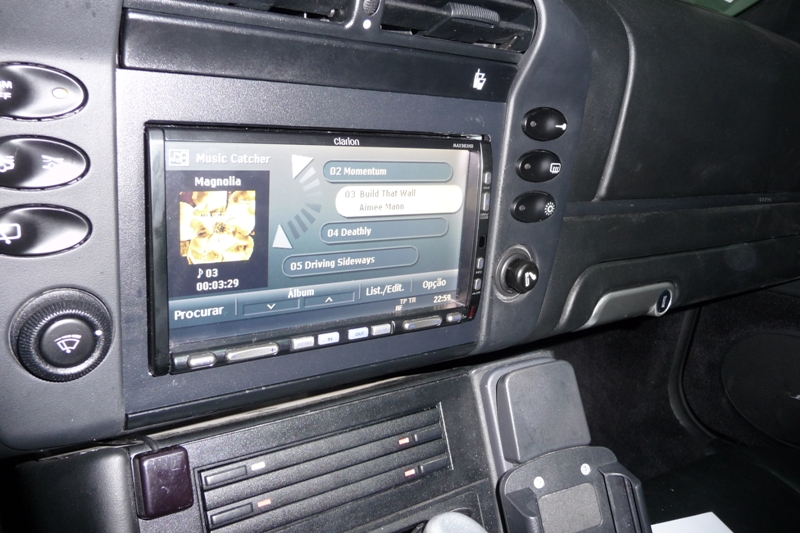
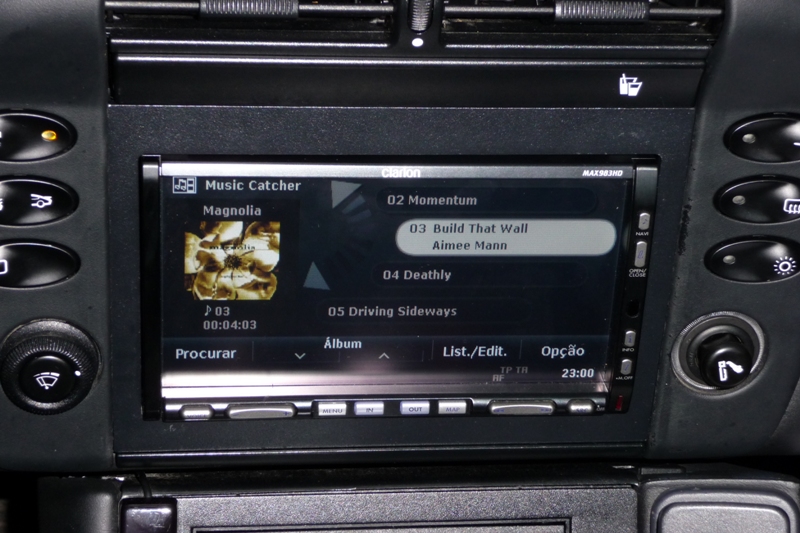
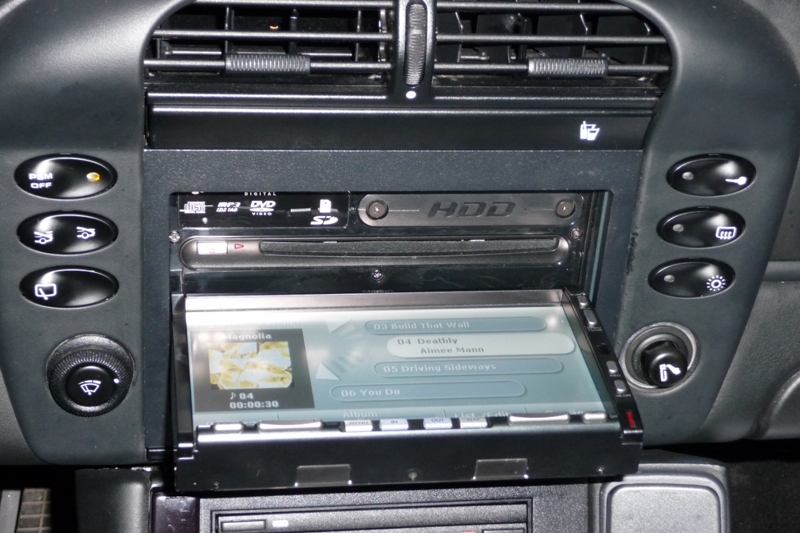
Hi, Just completed my refinish of my Clarion MAX983HD install, which I originally did in 2008. When I saw the upgraded 2-DIN kit I decided to modify my install to take the new powder coated bezel. Since my car was a PCM1 car, the 2-DIN aperture was not centered in the space available and I couldn't use the previous piano black bezel. I used a mix of the Clarion supplied thin bezel and a strip of Trieullionaire's bezel. The result was less than satisfying, so I bought part of the new kit: the bezel and the cage. The cage itself is a Pioneer product and is the best I've seen, miles ahead of what I had previously (Clarion Universal kit). It fits, slides and looks way, way better. That said, I had to cut quite a bit of plastic to fit the cage and setter, since the aperture was not centered. The setter was extremely useful in establishing what to cut, thank you! I installed the setter and the cage and reinforced the lower area with Milliput epoxy. After installation of the assembly, I slid the HU in just beautifully snug. Then I found that the bezel was a bit too snug.... When I opened the motorised front panel, it either spit the bezel out or just couldn't close... Took the bezel to my Proxxon milling machine and cut 1.5 mm off the lower strip and voila, perfect! I'll post a couple of photos when I shoot them. -
Today my MY02 Turbo's sunroof refused to close during a highway ride. BAck in the garage, I found that, for some reason, the windbreaker does not go down enough and sticks out, the sunroof stumps against it a bit (3-4mm) and goes back. If I press the windbreaker down with a flat nose screwdriver and take it out JUST before the panel shuts, it closes just fine. From what I could understand without disassembly, the windbreaker is springloaded open during the opening process and it's the panel itself that pushes the left and right arms of the windbreaker down during the closing process. I found no visible reason for the windbreaker not going down completely. Any ideas?
-
New DVD Navigation Install
laalves replied to trieullionaire's topic in 986 Series (Boxster, Boxster S)
I don't believe you'll be able to get good lOEM ooking results with any sort of manual tool. If you have access to a milling machine and to someone who knows how to operate it, then yeah, it is more than feasible with excellent results. Otherwise forget about it. -
Thinking out loud.... What would it take to convert a MY02 996TT (mine...) to a 996TT S? I know of the X50 kit, PCCB brakes and "S" rear lid decal ( :lol:). 1 - Is there anything else required? 2 - Is it cost effective in terms of driving pleasure? Bear in mind I don't track my car regularly; it's my daily driver. 3 - How much do you estimate this conversion would cost? Thinking in the 20,000 euro region, done in Porsche Center. 4 - Am I correct in that the PCCB brakes have an advantage only in fatigue, not in actual braking power or reduction of braking distances?
-
New DVD Navigation Install
laalves replied to trieullionaire's topic in 986 Series (Boxster, Boxster S)
Hi, I have purchased an older version kit from you before and would like to upgrade. Can you sell me only the following parts: # High Grade Aluminum Bezel - Powder coated in a factory textured finish (NOT PIANO BLACK) # Custom Support Bracket # 2-Din Housing (cage sleeve) & Housing # Custom Porsche 2-Din Housing (cage sleeve) Setter I have sent the same question to your ebay post but I have received no reply. Please note that my car is a MY02 911 Turbo originally with a 2-DIN slot already. Best regards, Luis Alves -
New DVD Navigation Install
laalves replied to trieullionaire's topic in 986 Series (Boxster, Boxster S)
Michael, If you become a contributing member, you may ask Loren for the wiring diagram for your specific case. That's what I did! -
New DVD Navigation Install
laalves replied to trieullionaire's topic in 986 Series (Boxster, Boxster S)
This kit is not applicable to Bose 996s nor for PCM 996s. My TT had both. When I received these guy's kit I noticed that :( I used only the antenna adapter and used only the top strip of the surround. -
New DVD Navigation Install
laalves replied to trieullionaire's topic in 986 Series (Boxster, Boxster S)
Hi, That's because the Bose amp takes speaker level inputs, instead of the more common way, i.e., line level inputs. If you want to install a new head unit, you can either use the Bose amp by feeding it with speaker level outs of the new head unit (easier way) or remove the Bose amp and feed the speakers directly with your new head unit. I opted by replacing everything and installed a Clarion 2-DIN head unit, two Alpine amplifiers and replaced all Bose speakers with Focals of similar sized ones, keeping the OEM look. You can check my install in the 996TT DIY section. -
Hi, Thanks for your kind words. Regarding 2-way vs 3-way speakers, I used Focals 2 way because I wanted to keep the original look of the car. I would have been happier with the sound of 16 inch 3-way speakers, but I decided to compromise with looks.
-
Thanks! None noted. Do bear in mind these are high efficiency digital amps thus they don't dissipate much heat. After, say, an hours drive at medium/high volume, they get a tad warm to the touch. They have never triggered their thermal protection.
-
So, while at the dealer to check the coolant consumption as reported in another thread, I had them check this too: new secondary air valve will be installed, under warranty.
-
Right, after noticing it was dropping in level again and after actually noticing some fluid drip puddling under the front left radiator, I took the car to the dealership. New set of radiators are getting installed due to corrosion, under warranty. Excellent! This must be due to my car's previous life in Germany in salt laden winter roads. No more of that in its current life, so they should be good for more than the next 7 years.
-
Went to a Porsche Driving Experience promoted by the local Porsche Driving School. Tracked a buch of 911s with PDK and Caymans. Amazing thing the PDK, even driving in full auto mode around the track. I must say what I enjoyed more was the 480 Turbo (I have a 996 420), what a fantastic machine. If I had the guts to pay for a new set of tires, I'd love to track mine and check it out. Still it is better to track somebody elses's money :D
-
Congratulations on a fantastic handywork and a great result!
-
Checking mine (which I removed), the top unit is the music part and is labelled Becker indeed. The lower unit (each is 1-DIN size) is labelled Siemens, as is the nav computer. I don't know who acted as the integrator: Becker, Siemens or Porsche itself.
-
Only one I know of: http://www.solisto.de/index.php?page=home〈=en
-
The slot is for a SIM card when the phone module option is installed. I think it was not available in the US. As for the iPod kit, there is no simple solution, except one from Solisto, I think, that will connect to the PCM via the CD-Changer interface. This will disable the CD-Changer and is quite limited in functionality.
-
I have a PCM head unit for sale, but I'm in Portugal, may be prohibitive due to freight, customs, etc. Luis
-
Right, after the first measurement and EQ run were done, I got to play with the thing again after the bass drivers installation modification described previously. The following three pdf files represent different situations: The first: Porsche_Audissey_1.pdf Before bass drivers installation modification, but no amplifier gain correction (all channels at 12 o'clock). The second: Porsche_Audissey_2.pdf After bass driver installation modification, but no amplifier gain correction (all channels at 12 o'clock). The third: Porsche_Audissey_3.pdf With amplifier gain correction. What I did was, by ear, match speaker levels using amplifier gain settings, then run the EQ process. The difference is dramatic in terms of SQ. This has been a learning process, and I thouroughly recommend closely following the instructions ( :P ), i.e., roughly equalise amp gain, AND using a PC, do not use the PXE-H650 standalone process, there's a handful of additional important options when using a PC. It is visible on the first file of this post that when the drivers were installed in unsealed boxes, there was significant bass rollof in all channels. This severe rollof disappeared from the front channels and from the subwoofer in the second file. It is still present in the rear channels due to them not having subs associated, just the fronts and rear bassbox, which is alright because I crossed them over at 120Hz to the the bassbox. I did the same with the fronts at 80Hz. Notice that trimming of all channels was large, going from +7dB in the RB speaker to -7dB in the sub, which were right at the maximum ability of the PXE-H650. So, the following step was to match channel gain, which I did and the results are visible in the third file. Notice how much better the door subs blend with the dash speakers, in the LF and RF graphs, even before correction. Also note the much flatter sub response. You may find strange that the high frequencies are rolled off in the "after" graphs, in all channels. That is my doing, since the place the tweeters are located makes them scream at my ears. Rolling them off like I did, makes the system sound pleasant, smooth and untiring. Also, the bass boost in all channels is also my doing, I did that to compensate for road and engine noise. After the whole deal, I can NOW say I'm finally happy with the way the system sounds! It is VERY good for a car system. Still no match for my home system, but I fully expected that.
-
Congratulations! Just last March I was in the same position as you were today, big smile, driving away from a Porsche dealer in my beautiful 996TT! It's now September and the smile only keeps getting wider everyday! Have fun!
-
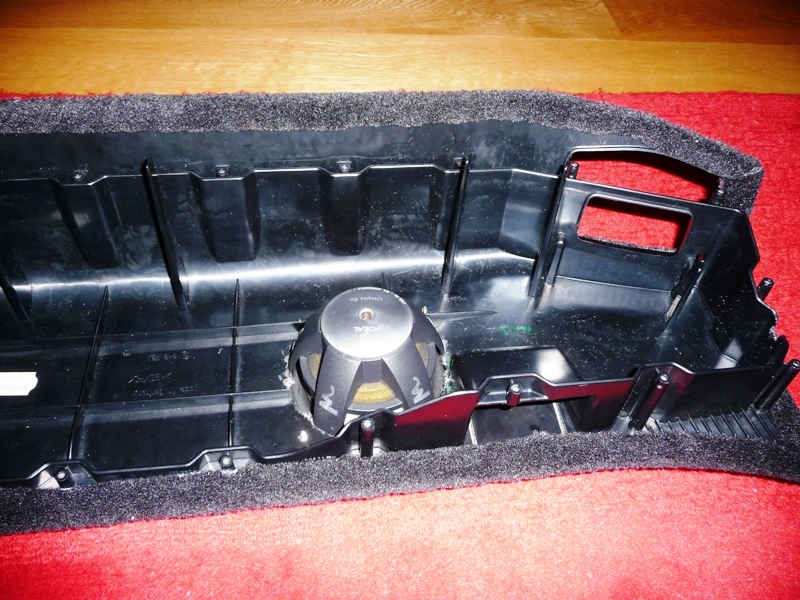
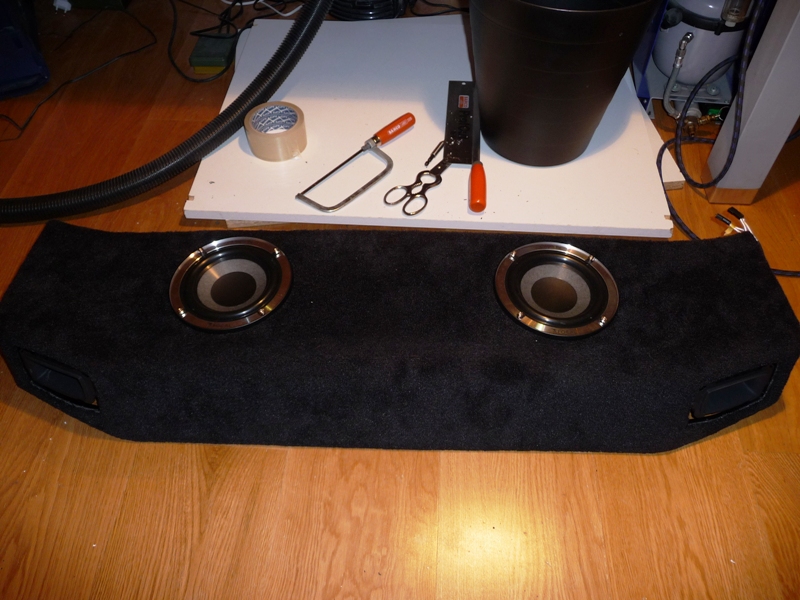
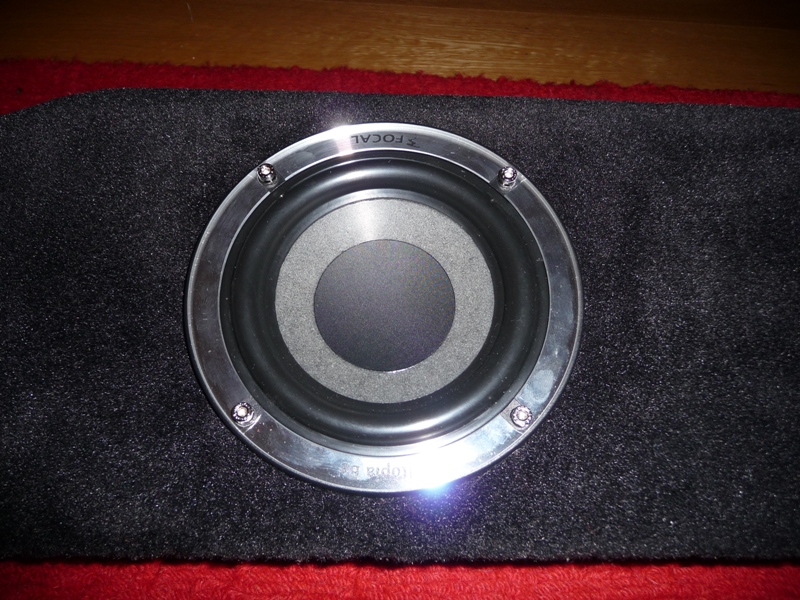
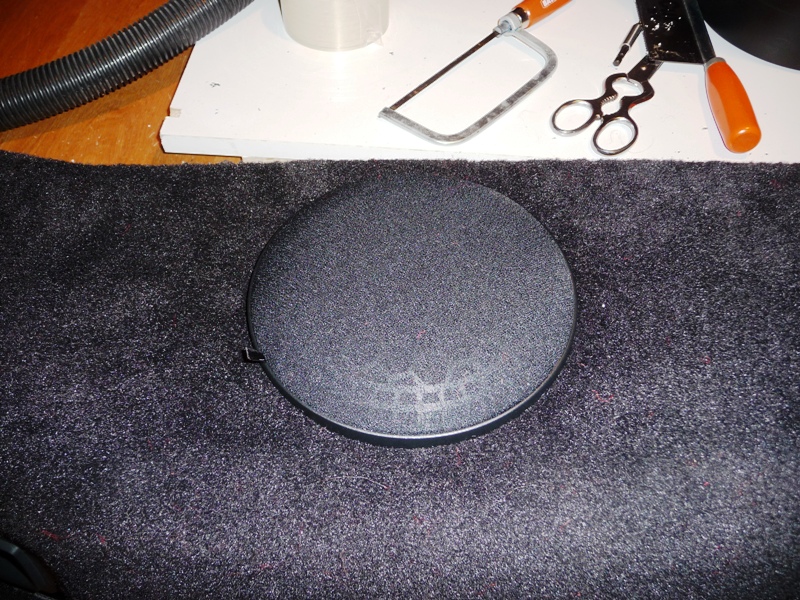
Well, after living with the system, I felt that my bass was not good, muddy, out of focus and not as powerful as I would like it to be. This meant I had to modfy the my sub drivers were installed: I wanted to keep absolutely OEM look, so I didn't install the subs as Focal intended, i.e., in a sealed box. Now I had to seal the boxes. So I simply installed styrofoam very tight plugs in the door bass reflex ports sub boxes, effectively sealing them, and had to heavily modify the rear bass box: remove the woofers from their floor firing position and install them in a "up" firing position, while sealing the bass ports. Inside view of the modded bass box Completed bass box, no grilles installed Zoom of one of the drivers Completed bass box, with grilles installed. This is how I have them in the car, it is still decently OEM looking. Zoom of the same. I will add a pic of the box installed in the car. Guess what? After redoing the eq, the SQ is every bit as I wanted it to be! Some tweaking is still possible (will play a little with the head unit volume settings into the PXE-H650 and amplifier gains), but it is now very good!
-
Hi, You should try and get a 3-way kit from any manufacturer with a 3 way crossover. Most of the 3-way kits I've seen come with 6.25", which may be too big to fit. Alternatively, use a 2-way kit with a 5.25" mid bass driver and a tweeter and use the in dash receptacle just for the tweeter. I used two Alpine PDX4.150, totalling 8 channels. I bridged two of them for the sub and used the other 6 for everything else: two for the rears and four for the fronts. What you should NOT ever do is wire different sized speakers in parallel. The results are guaranteed to be absolutely horrible: different sized speakers will have completely different frequency responses, in some frequencies you will have unnatural boosts, in others sound will seem to disappear into a hole. Do not do that, your amps will not complain, but your ears will. Check my install in the 996TT DIY section of this site. Have fun!