Welcome to RennTech.org Community, Guest
There are many great features available to you once you register at RennTech.org
You are free to view posts here, but you must log in to reply to existing posts, or to start your own new topic. Like most online communities, there are costs involved to maintain a site like this - so we encourage our members to donate. All donations go to the costs operating and maintaining this site. We prefer that guests take part in our community and we offer a lot in return to those willing to join our corner of the Porsche world. This site is 99 percent member supported (less than 1 percent comes from advertising) - so please consider an annual donation to keep this site running.
Here are some of the features available - once you register at RennTech.org
- View Classified Ads
- DIY Tutorials
- Porsche TSB Listings (limited)
- VIN Decoder
- Special Offers
-
OBD II P-Codes - Paint Codes
- Registry
- Videos System
- View Reviews
- and get rid of this welcome message
It takes just a few minutes to register, and it's FREE
Contributing Members also get these additional benefits:
(you become a Contributing Member by donating money to the operation of this site)
- No ads - advertisements are removed
- Access the Contributors Only Forum
- Contributing Members Only Downloads
- Send attachments with PMs
- All image/file storage limits are substantially increased for all Contributing Members
- Option Codes Lookup
- VIN Option Lookups (limited)


rick3000
-
Posts
267 -
Joined
-
Last visited
-
Days Won
1
Content Type
Profiles
Events
Forums
External Paint Colors
Downloads
Tutorials
Links Directory
Collections
Classifieds
Store
Posts posted by rick3000
-
-
It depends on the internals of the switch because they are not all the same, the standard hack uses a FWL switch which has the same problem with illumination. Unless you want to modify the internals of the switch, the only solution is to use a different switch. You can look up the internal wiring of the switches in the Bentley Manual, you want one that is internally identical to the convertible top switch.
I recently updated my OBC hack that used the FWL switch with a convertible top switch to allow night illumination. You just need a small flathead screwdriver if you want to swap the top of the switches.
-
DIY Manual Radiator Fan Switch w/ an OEM Switch
DIY: Manual Radiator Fan Switch w/ an OEM Switch Fan Switch Part List $32 Defroster Switch, Matte Finish (996-613-134-10-A05) $25 Omron MY2K-DC12 Latching Relay $5 ATC Fuse Tap with .250 Male Disconnect $5 2.8MM Female Wire Terminal Various Male & Female Disconnects, Butt Connectors and Heat Shrink Tubing Various Lengths of 16AWG Wire Optional: $23 2-Butt
-
Author
-
Category
-
Submitted09/06/2019 12:42 PM
-
Updated09/07/2019 07:06 PM
-
-
Hi Everyone,
I have a small wear spot on my '99 soft top that is about 1/8" in diameter. The tough waterproof layer under the outer fabric is still intact, but I would like to stop the fabric from wearing anymore and creating a hole. I use my hardtop 75% of the time, and I plan to replace the top with a glass one when the window finally breaks, so I am not looking to do an expensive repair on this top. I was thinking of putting some superglue over the wear spot, Loctite makes a flexible/fabric superglue that dries clear. Any thoughts on doing this? Would a better option be to carefully hand stitch it back together?
Thanks,
-Rick
-
Hi Everyone,
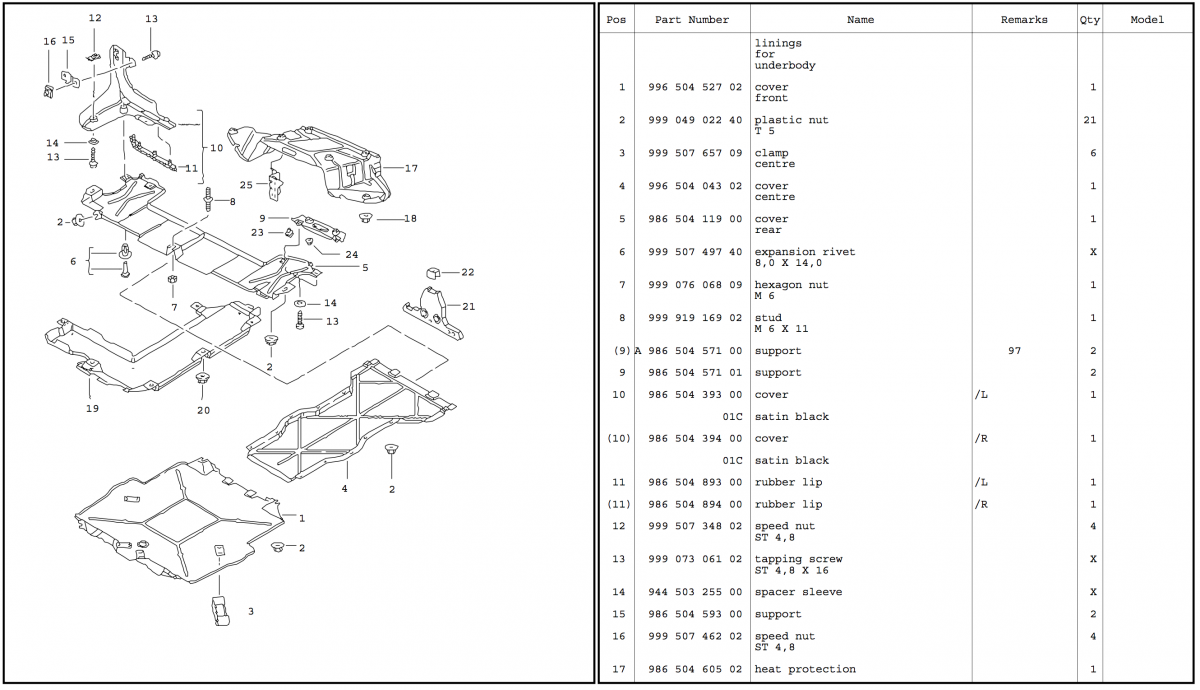
I was looking for some guidance for the fasteners for the rear underbody shield/cover. I got my car up on stands (first time under the car myself), and discovered the rear underbody shield is completely gone. (I am assuming my horrible mechanic broke it and never replaced it, one of the many reasons I am now working on the car myself).
I know that I need:
# 5 - 986 504 119 00 - Rear Underbody Shield/Cover
#2 - 999 049 022 40 - Plastic Nuts x2 (one per side)
#6 - 999 507 497 40 - Expansion Rivets x2 (one per side)
#7 - 999 076 068 09 - M6 Hexagon Nut x1 (for the center stud, I need to check but I believe it is still there)
Not Sure How Many of these are needed for just the rear cover?
#23 - 999 591 699 02 - B4,8 Speed Nut x4?#13 - 999 073 061 02 - Tapping Screw ST 4,8 x 16 x?
#14 - 944 503 255 00 - Spacer Sleeves x?
The mounts for the cover are also very chewed up and I would like to replace them, can anyone confirm the part numbers/quantity?
#9 - 986 504 571 01 - Cover Support x2 (same for each side?)
#24 - 999 084 212 02 - M6 Nut x4?
Thank you so much in advance to anyone to takes the time to respond!
-Rick

-
I did some sleuthing. It looks like this motor (Porsche PN: 99662433200)is similar to one used on a few Mercedes (PN 2108201242), they have the same manufacture name, Temic. After looking at some eBay pictures, the connector looks identical to Mercedes part A0175452126 or A0175452128, which when you search is called a pin bushing (no pictures). I did find another picture that looks identical, but the connector number is difficult to read, I think it is 728 025 300, and it doesn't turn up as a part.
This is guess work, but for about $6 you can pickup PN: 017 545 21 26, and see if it works? Let us know how it goes.
-
Kevin, have you looked on the connector itself for any kind of number? These connectors are often VW or Mercedes parts that can be ordered separately. I could not find any images with a number or a separate part number, you can order the entire assemble for about $60.
-
And I'm sure that online system cost's an arm and a leg. Thanks again!
-
Thanks for the clarification Jeff!
I am aware those less than reputable pdf's are outdated, but they have a few illustrations and diagrams that can't be found anywhere else.
-
While I wait for the last few parts to arrive before I do a water pump replacement (among other service/upgrade items), I was reviewing my Bentley manual and the 986 Workshop Manuals (the pdf's ones that are around). I found a few discrepancies, and was hoping someone may be able to help clear them up.
For the passenger seat, Porsche says to torque the Torx bolts to 15lb // 20Nm. Bentley says, 48lb // 65Nm. That's a pretty significant difference.
For the motor mount, Porsche says to torque everything to 34lb // 46Nm, Bentley says 34lb // 46Nm for the mount, then 48lb // 65Nm for the yoke/bracket.
Thanks again,
-Rick
-
Thanks Loren! I think I will try to source the clamps locally, once my Y-hose arrives.
-
I am hoping someone familiar with the center radiator install for the 986 can help me out. I am looking for the part numbers for the six hose clamps used when installing the Y-hoses. The parts diagrams are not super clear, and I would like to order the spring type clamps as they seem to be the best type for hoses that expand/contract under pressure. Does anyone have the part numbers for these six spring type clamps?
x2 Y-Hose to 'S' Hard Lines
x2 Y-Hose to Side Radiators
x2 Y-Hose to Center Radiator
Thank you,
-Rick
-
I recently asked BumperPlugs about getting a painted Non-Smoker Tray, they said it such an undertaking for them (ei - not cost effective), that they won't do it unless you are also buying the entire console. So you will have paint it yourself.
Most Boxsters with a silver console are Arctic Silver, which is code X1. You can look here: http://www.986faq.com/4-0/#002
-
SOLVED: Realized it was about 40° in my garage, put a hair dryer on the amp plug and pins went right in.
Thank you for the help kbrandsma!
-
The steering wheel is all one piece, so it would be difficult to replace or repair just the wood. I have never seen or heard of a wood replacement kit or DIY. I am not sure if a shop could repair it, so that might be worth investigating, but I suspect it would be more expensive that buying a used 4 spoke wheel.
I would look for a nice 4 spoke that matches your interior in the $2-300 range, or upgrade to a 3 spoke.
-
@kbrandsma thank you for the help!
After your post, I went ahead and took all three tabs off the inside of the amp plug (they where all one pin off compared to the 4x40W), and tried it out. Reconnect the battery and it works just fine! Very pleased this amp will work, and now I can confirm for any future 986 owners that stumble across this model amp, that it will work.
One other question, I am having a hugely difficult time getting the rear speaker wire female pins into the amplifier plug. I can get them 75% of the way in, and then they simply won't go in any farther, even with some prodding from a pair of pliers.
Any suggestions/tips?
Lastly, for anyone who might see this and is installing the OEM rear speaker kit with the inadequate 12" extension I have a tip I have not seen posted anywhere else. Cut the brown plug off of both the speaker cable and extension. Run the speaker cable through the firewalls, then soldiered it to the 'extension' that goes into the amp. The speaker cable is long enough to clear both firewalls. I also cleaned it up a bit with some heat shrink tubing.
-
It is identical to the picture you posted. Same colors in the same places.
-
Hi Everyone,
I have had a 6x40W amplifier sitting in my garage for quite some time waiting to be installed for my rear speakers. I decided to install it today, and have the entire thing wired. However, as I was about to finish up and install the amplifier, I noticed that the serial number on it is different than what most people have been installing.
I have a 1999 Boxster with standard 4x40W amplifier. I want to install a Nokia 6x40W M490 amplifier with the serial number 996.645.301.01. Searching around I have only found one mention of this particular serial number.
Is anyone familiar with this amplifier? Is the pinout the same for the rear speakers and/or the rest of the pins?
I was going off of this:
RL+ #6
RL- #16
RR+ #5
RR- #15
Thanks,
-Rick
-
Hi Everyone,
After 4 1/2 weeks at the dealer I have finally gotten my Boxster back, and it is perfect! I was very lucky that the dealer took a more detective like approach to keep the cost down, versus spending 3 days with in a bay and stripping it down until they found something. It cost about the same as the 75k mile service. Luckily, I had a spare car to use, however if this every happens to anyone else, now you will know what to check. Of all the things it could have been, and testing/replacing/etc the AOS, MAF, intake, throttle, DME, among many other things it was the throttle control valve. I knew it had to be something stupidly simple.
The throttle control valve is only on non e-gas cars (I believe pre-2000), and when you come to a stop it opens to provide the engine air to idle while the butterfly flap is shut. They did not replace it, it had some carbon buildup that was keeping it shut, so when the car idled it would stall from the lack of air. After some compressed air and WD40 and it is as good as new.
They found it yesterday while playing with the throttle, no one thought to check it because no one at any Porsche dealer on the West Coast had ever heard of one getting blocked like this. They also replaced a tank vent line and valve, which is what was causing the hydraulic/gas escaping sound, however that was unrelated to the idle issue. I think it also restored some lost low end torque, because on my way home it was like driving a bullet!
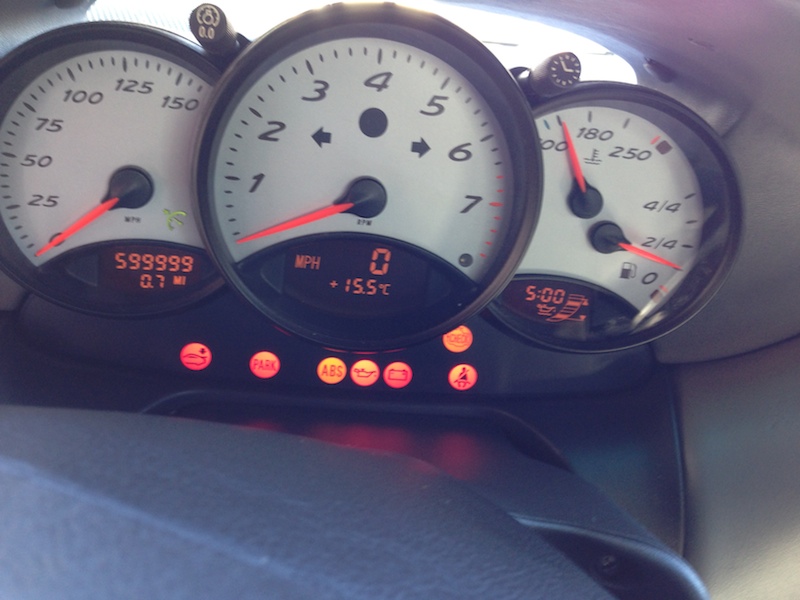
Lastly, when I picked it up the instrument cluster went a little crazy, until we disconnected and reconnected the battery. The mechanics had also never seen anything like this either. Enjoy the picture of the highest milage Boxster ever. I only grabbed a picture after they switched to miles, when it was in km, it was reading 999,999. Which I think may have affected resale value.
Thanks for all of the input everyone! I have had a serious case of PermaGrin all day!
-
It sounds like you may have tapped in to the always on 12V power instead of the variable 12V power (turns on with ignition). Did you splice into the existing wiring used by your garage door modification? I am not sure why it is is adjusting the brightness inversely, but I would double check all of you wiring first. You might also try temporary hooking the switch up to the cigarette lighter to see if that solves the issue, then you can start ruling things out. Best of luck!
-
UPDATE:
The dealer has had the car for almost three weeks, and the techs are still completely baffled. They have said they could go at it and spend a few days dismantling it until they find a problem, but to keep the cost down they are taking a more detective like approaching, checking something then pondering the problem about while they do an oil changes, etc on other cars. They are waiting to hear back from Porsche in Germany and the regional rep. to see if they have any suggestions.
Apparently, after the smoke test, the car refuses to idle. The next morning they tried to start it and it runs if you rev the engine up, but at idle it dies. The car keeps triggering MAF codes, but they have checked the sensor, the wiring between the sensor and the DME, and tried a replacement DME to no avail. (and it should run without the MAF anyway) They have also checked the throttle, and a number of other things, but have found nothing. The current theory is something related to the air system, and possibly a blockage from an animal or nest. The tech said it is acting like an air leak (despite checking for that before), but they can't test for an air leak without the car being able to idle, which is the catch-22.
So for the time being I am waiting to hear what they might find, or if the rep or Porsche Germany have ever seen this issue, and have a suggestion. Has one ever encountered, heard of, or had this kind of an issue?
Thanks!
-
Thanks Loren, I will post when I hear what is happening, just in case it ever happens to anyone else. I seriously doubt it is any of the usual suspects, because most of them have been replaced at this point. I suspect some valve, or electronic problem but I have no idea. Last I heard the dealer mechanics where scratching their heads.
-
The plot thickens, while waiting for the part referenced in the TSB, they attempted to do something to see if the purge valve was in fact bad. They then got a MAF code, and the car was turning over and dying. They replaced the MAF, but it still turns over and dies. No codes, so the mechanics are 'working on it.'
-
Thank you for all of the advice, I suggested a lot of these ideas when I dropped it at the dealer this morning. On the way there I recorded the tachometer with my phone at every red light. I was lucky enough to catch the exact moment it fluctuated, the CEL turned on, and the car made a high pitched gas escaping type sound.
I showed it to the mechanic, who said it is definitely not something common, like the MAF. He thinks it may be a failing purge valve, but they are going to do a pressurized smoke test. I will probably swap the battery out anyway before the temperature begins to drop.
I'll keep everyone updated on what they find, definitely an unusual issue, the mechanic said he had never heard anything like it.
UPDATE: They did a smoke/pressure test, and did not find any air leak, the car was operating within the normal/acceptable range. However, they said they found an old bulletin from Porsche concerning early 986's, that mentioned the two exact codes I have (P0446, and P1126) indicate replacing some kind of hose in the air system near the purge valve. I am hoping this will solve the issue.
-
I took my car into the dealer last week, they replaced a valve (996.605.201.01) and said they think they fixed it, they where unable to replicate the fluctuating/rough idle issue. I drove about 150 miles and they fluctuating idle has come back, and I had another instance where it fluctuated so far the car stalled when it dropped to about 200-300RPM and then did not want to turn back over, but eventually did. I parked, tried to turn it over again, no issue starting. Five hours later, I go to start it and it did not want to turn over, again.
There does not appear to be any catalyst or pattern to these issues, and this time I am not getting any codes. Any suggestions or thoughts before I take it back to the dealer? I really appreciate everyones help! Thanks!
EDIT: This could be a long shot, but I saw a mention of poor electrical possibly causing this type of issue. The dealer checked my battery because it is old (5-6 years). Would replacing it and seeing if that changes anything be worth trying?
Wind Deflector (Center Piece) Frame removal
in 986 Series (Boxster, Boxster S)
Posted · Edited by rick3000
It isn't glued, the plexiglass is snapped into the black frame. Don't use a razor blade. You just need to "unsnap" one side, which can be a really difficult, but it can be done, the black frame will bend enough to remove the plexiglass. You should be able to see the plexiglass where it clips into the frame on each side, and you can pry it out with a flathead screwdriver. Just be careful the screwdriver doesn't slip and scratch the plexiglass.