Welcome to RennTech.org Community, Guest
There are many great features available to you once you register at RennTech.org
You are free to view posts here, but you must log in to reply to existing posts, or to start your own new topic. Like most online communities, there are costs involved to maintain a site like this - so we encourage our members to donate. All donations go to the costs operating and maintaining this site. We prefer that guests take part in our community and we offer a lot in return to those willing to join our corner of the Porsche world. This site is 99 percent member supported (less than 1 percent comes from advertising) - so please consider an annual donation to keep this site running.
Here are some of the features available - once you register at RennTech.org
- View Classified Ads
- DIY Tutorials
- Porsche TSB Listings (limited)
- VIN Decoder
- Special Offers
-
OBD II P-Codes - Paint Codes
- Registry
- Videos System
- View Reviews
- and get rid of this welcome message
It takes just a few minutes to register, and it's FREE
Contributing Members also get these additional benefits:
(you become a Contributing Member by donating money to the operation of this site)
- No ads - advertisements are removed
- Access the Contributors Only Forum
- Contributing Members Only Downloads
- Send attachments with PMs
- All image/file storage limits are substantially increased for all Contributing Members
- Option Codes Lookup
- VIN Option Lookups (limited)


Paul Fraser
-
Posts
292 -
Joined
-
Last visited
Content Type
Profiles
Events
Forums
External Paint Colors
Downloads
Tutorials
Links Directory
Collections
Store
Posts posted by Paul Fraser
-
-
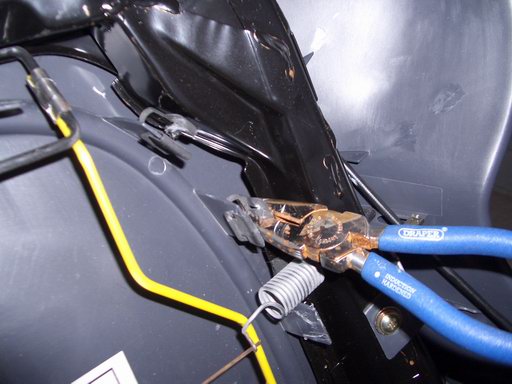
To remove the outer leather stole completely you now need to unhook it at the bottom -- IIRC there are three grey metal hooks and also unhook all the grey metal clips that keep it secured in the centre. The picture below shows one of the clips that has come adrift from the leather stole. Try to keep them all on the stole, and in the same position, as it helps with putting it back on later. It's a bit of a pain getting these off as they are quite tight and move around when you wrestle with them.
PS That set of pliers has been retired.

-
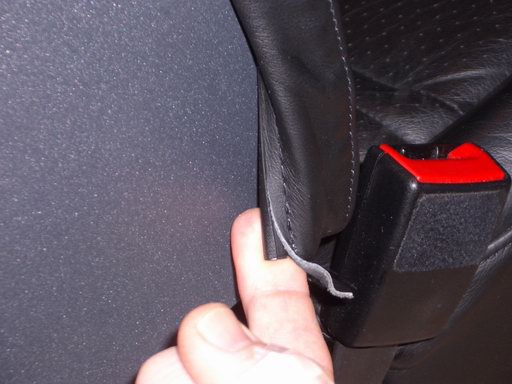
As you can see in the photo above the outer leather stole is already partially removed. You do this by locating the tags at the bottom of the rim of the seat at either side and pulling these out and upwards. Do this as gently as you can but it may require a little encouragement.
-
Saw the new post, so here are some (not very good) pix. (PS I've learned how to do manual focus since :) )
Before you start you need to take the seats out of the car. Be careful, I managed to gouge the trim on my passenger sill so put down padding and make sure it is secure: mine wasn't and it dragged the cover off. It is much easier to get someone to help you remove the seat and even then you will need to take it slow.
First take off the central leather section (it is held on a wire by the three white clips at the top -- lift up and then out to remove).
-
Glad you got it sorted. Am I right in thinking that the clutch plunger switch had gone too far down and you had to pull it back up to get the cc to work? What happens the next time you depress the clutch -- won't the plunger remain too far depressed?
Don't suppose you could take any photos of the item concerned so I can see what it looks like? (It's either picking up info like this or buying a car with cc and dismantling it to see how it is all put together :) )
-
The hinges below are the type I have on my 10/97 996. I guess these are the discontinued old style. Anyone upgraded to the new type?
-
On second thoughts, and taking a wild stab at this, I suspect that if the green light is on the cluster (showing a power supply to the cruise control), your brake lights are working ok?
-
I've had a look at the PET and wiring diagrams for cruise as it is one of my fantasies to retrofit it to mine (fantasy as currently no parts, ability or motivation). There is some info I posted on a Boxa.net thread here:
http://www.boxa.net/forum/index.php?showtopic=12789&hl=
I don't think that a faulty brake light would stop the cruise working, but the unit is supplied with power from the stop light switch, so if this fuse has blown (caused by the stop light blowing, maybe?) then that might cause the problem. Fuse is B7, 15A. Second row down seven to the right. Might be worth changing if the brake light is not working.
There is a clutch switch input to the cruise control. What do you mean by 'jumpering' yours? The wire from the clutch switch goes to the cruise control unit and then on to the tiptronic something or other.
Finally, for my own education (never seen a car with cruise) where is the green light you refer to. On the dash I presume?
-
I only hope you manage to get it sorted without too much aggravation.
-
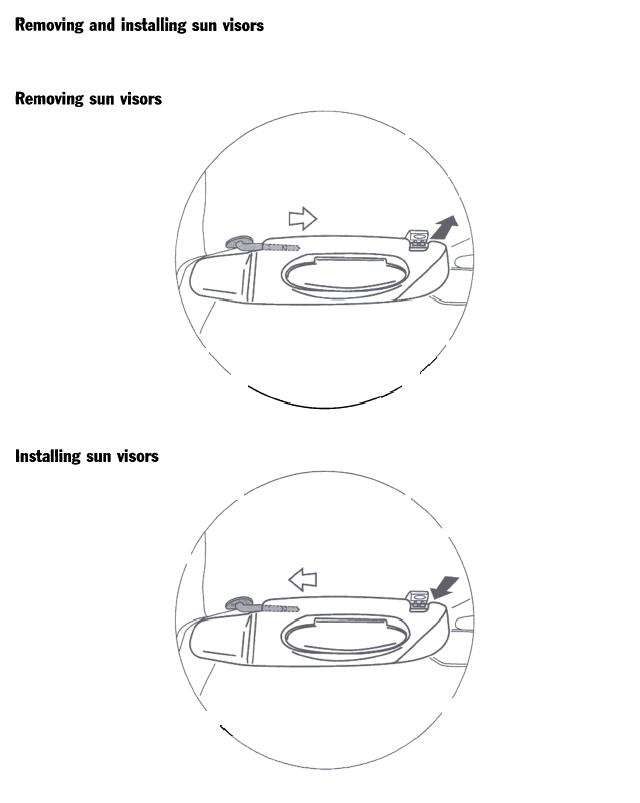
No other screws apart from the two that hold it to the frame. Pull it to the left or right depending on whether is is the right or left one. It should come off.
Perhaps you had best check the cost of a new hinge before doing anything you might regret -- if yours is wobbling it may be cracked and will fail if you do this. However, they do come apart as I have showed you in the pic above. If you do decide to try immobilise the hinge with one hand while pulling on the visor with the other. Good luck...
-
Do you have an address/url? I might be visiting LA next year.
-
Do they actually delete numbers then? Not just add on another part number when it becomes available? OK, worth knowing if that is the case.
-
Mmm... interesting. My copy of the PET also has the numbers you quote above but nonetheless that is not what is on the back of the hinges. I can post photos if you like.
One other thing that I've been wondering about is what is fitted in my 996 (a '97 car that was one of the first at the local OPC). From memory it doesn't have anything like those hinges, but the car is at my Dad's at the moment and I can't look at this/photograph it.
-
Stefan -- the part numbers on my hinges are:
986.561.607.00 (LH)
986.561.608.00 (RH)
The PET lists these numbers for '98 996:
996.561.607.01 (L)
996.561.608.01 ®
Anyone know what the difference is?
-
UK prices from the OPC are £19.31, £32.59 both plus VAT.
As $11.66 is about £6.58 and $48 is £26.67 at the current exchange rate it would probably be cheaper getting them from the USA... I'll let others comment on the fact it is three times the price for a non lit insert here.
-
The flap pulls off the hinge. It may be stiff. The hinge in mine is fixed and does not move. I think a replacement hinge would be inexpensive -- have you checked the two securing screws are tight?
-
Unfortunately for me, the passenger visor on my 1999 Boxster is flapping and the problem is the main hinge on the sun visor (not the mirror flap). There is no quick fix that I know of.
Stefan, I don't understand what part is broken. Can you describe it reference the picture below, please?
-
Only hugely, Jim.
I've had this as a fault on my 996 for about two years now and although it bugged me I grudged the cost of replacement sunvisors.
Recently, reading another thread I had a go at 'sorting' both my lit 996 ones and my unlit 986 ones. Only got one of the Boxster ones to repair. Both of the 996 ones stopped being 'flappy' when the visors were down but wouldn't click up enough to get the light to come on. Even though I've been fortunate to get a cheap lit pair on Ebay for around $55 I'll now be able to sort the remaining Boxster one.
Great tip, thanks a lot.
-
Anyone installed this on a '97? The PET suggests that additional parts are required. TSB 6692 refers. Anyone had this done on their car? Which bits seperate from the RTS system were required (the PET is a bit vague). Thanks.
-
Thanks for the diagram above; useful.
This was a much harder job than I thought it would be. The coils and spark plugs are very hard to access and work with. I would have thought that the spark plugs at the back are difficult if not impossible to take out. What do the OPCs do? Drop the engine?
Anyway, the first thing I did wrong was jam a ratchet in the innards of the car trying to take out the rear cover plate retaining bolt. That wasted a lot of time and was eventually extracted the second go I had at sorting the problem. Once this was done I swapped the coils on 3 and 2, and, hey presto, the fault code changed to 0302, but only once I had the wheel on, had packed my bags and set off home. Returned to my father's, got replacement (cost £37, so I got two).
The outer cover was cracked so I assume that the dielectric inside had started breaking down as a result of this. Pic to follow.
What does the coil do? Is is some kind of high voltage capacitor system?
-
Hi. I have got a CEL -- flashing initially -- and a rough running engine, especially noticeable at low revs. My OBD2 gives a P0303 which is a cylinder 3 misfire, damaging to the cat. Any ideas what may be causing this misfire?
48000 mile service around 250 miles ago.
Thanks.
PS I assume P0303 is bank 1 and the left hand side of the engine.
-
Any pix of the hood removal? I may want to replace the hood with a glass windscreen one.
-
2) as long as you don't have a '97 ECU it is easier to have the ECU reprogrammed, and not have to worry about the driveblock, you will utilize the Boxster DME harness as well not the one on the 996 engine.
When my 2.5 engine eventually explodes I will probably get this done, so:
1. What is the problem with the '97 ECU?
2. What is a driveblock?
Hope the project is going well.
-
Wow. Are you going to do this yourself? Wish I had the know-how. Hope you'll post lots of pix as you do the job, and good luck with it.
-
Unfortunately I can only give you written instructions as I am away from home (and photos). Easy job when you know how though.
Lift top on inner centre leather panel to unclip
Pull out leather from the bottom of the seat back rim (this is a plastic rim that tucks into the seat back rim) and gently tease out (do this from both sides up to the top.
You should now have access to the screws that hold the seatback onto the frame. You will also have to unhook the cables that operate the titling mechanism -- make sure you do not break any of the plastic clips.
PS Will check my digital camera to see if I still have the photos on it.


removing hardbacks from sport seats
in 996 Series (Carrera, Carrera 4, Carrera 4S, Targa)
Posted · Edited by Paul Fraser
OK. Next you have to unscrew the seat back from the frame. I forget how many screws there are Probably four or six.