Welcome to RennTech.org Community, Guest
There are many great features available to you once you register at RennTech.org
You are free to view posts here, but you must log in to reply to existing posts, or to start your own new topic. Like most online communities, there are costs involved to maintain a site like this - so we encourage our members to subscribe or donate. All subscriptions and donations go to the costs operating and maintaining this site. We prefer that guests take part in our community and we offer a lot in return to those willing to join our corner of the Porsche world. This site is 99 percent member supported (less than 1 percent comes from advertising) - so please consider an annual subscription or donation to keep this site running.
Here are some of the features available - once you subscribe RennTech.org
- View Classified Ads
- DIY Tutorials
- Porsche TSB Listings (limited)
- VIN Decoder
- Special Offers
- Paint Codes
- Registry
- Videos System
- View Reviews
- and get rid of this welcome message
It takes just a few minutes to register, and it's quality Porsche information at a low cost.
Contributing Members also get these additional benefits:
(you become a Contributing Member by subscribing or donating money to the operation of this site)
- No ads - advertisements are removed
- Access the Contributors Only Forum
- Contributing Members Only Downloads
- Send attachments with PMs
- All image/file storage limits are substantially increased for all Contributing Members
- Option Codes Lookup
- VIN Option Lookups (limited)


benaslan
-
Posts
69 -
Joined
-
Last visited
Content Type
Profiles
Events
Forums
Exterior Paint Colors
Downloads
Tutorials
Links Directory
Collections
Classifieds
Store
Everything posted by benaslan
-
Yeah, I second that...sounds like the battery going.
-
Probably because Amsoil is too small to bother with when people here in the US can get other stuff that they've already tested (Castrol, Mobil and so on). I've always been an Amsoil guy. I've run it in so many vehicles and every vehicle I've run it in I have had zero engine problems, smoother an quieter idle, better fuel efficiency. I got introduced to Amsoil 15 years ago when right out of high school I worked in a race shop where we races sprint cars. We had jst changed over to Amsoil and after the first race on it, just like we always did, we sent off our oild to be analyzed. The lab responded asking us why we were sending them new oil. I've been sold ever since. I've only had my 996TT for 2,000 miles, but I plan on going Amsoil in this too. I'm waiting another 1,000 miles, and going to run an oil analysis on the current Mobile 1, then run an analysis on the Amsoil later on and compare them. I'd be more than happy to post my results since this has always been such a debated topic, but it will obviously be a little while.
-
Body Shop suggestions CA Bay Area?
benaslan replied to benaslan's topic in 996 TT, 996 TT S, 996 GT2
Yeah, the exact same thing happened with my Audi TT a few years ago and I took it to German Auto Body. They did great work, but the fact that they put my emblems on the wrong side of the car kinda left a sour taste in my mouth... but other than that the work looked great. -
Body Shop suggestions CA Bay Area?
benaslan replied to benaslan's topic in 996 TT, 996 TT S, 996 GT2
Yeah, the whole Acura-Porsche thing doesn't really make sense to me and I don't see how they can do the same quality. Neither of the two have agreements with my insurance, so I thing I'm going with the Bodystyle recommendation, and thanks to all who gave input. I went by there today and he seemed to know what he was doing and he uses Glasurit paint which I happen to think is top quality. The shop State Farm wanted me to go to uses R&M paint...what the hell is that? Never heard of it and I have some body shop experience from my step dad's previous business of owning a shop. He even agreed to paint the bumperettes and I don't think he's charging me any extra for that. I'll let you guys know how it turns out. SHould be a couple weeks though before I take it in. Ben -
So, I had the unfortunate incident of having a nice old lady think i started moving when I didn't... Doesn't look like there's any damage other than a small mark on the bumper cover, but I obviously want it to look just like it did a few hours ago. Anyone have any good experiences with body shops around this area? Thanks in advance
-
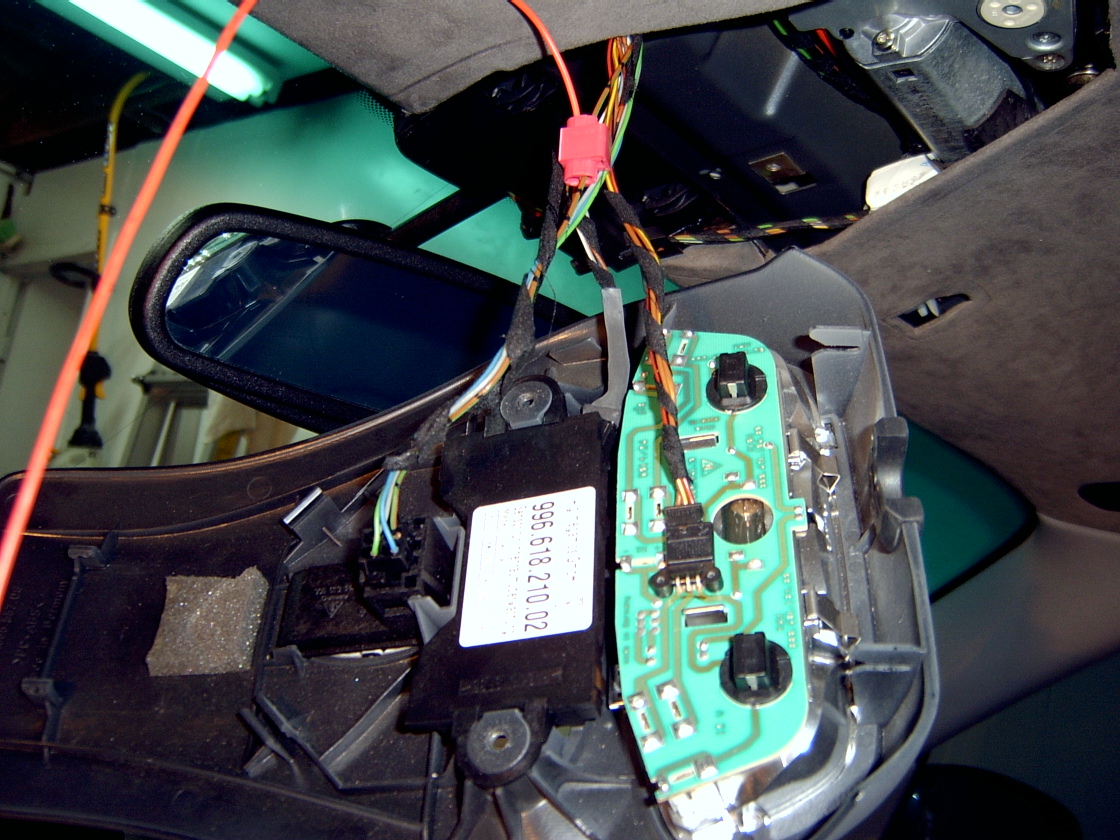
CRAP! Now that you mention it, there was a spot for a third wire in mine, but nothing was there. I didn't even think about backlighting until I was on my way home the other night and couldn't see it. I think I'm going to have to go back in there and see if I can get lucky with that third spot, but yes, the wiring on yours does have a different connector than the one I got. Yours looks newer.
-
No, it actually only looks like it has 4 wires. the connector is a crappy self splicing connector that's really annoying if you don't have the exactly wire to replace the original wire (don't ask me how I know). In other words, two of those 4 wires are the same wire (and so are the other two). it goes in one side and out the other. You'll see when you get it. Black is ground, the other is hot...or at least it was for me. No battery hold...it does not need battery to maintain the memory, it's stored in the chip. I know for sure, as I programmed it by doing a temp wire job so that I didn't get it all installed and then figure out that it was broken. You can go here for programming instructions: http://www.eurohomelink.com/_uk/programming.html It says Europe, but it seemed the same for me. Ben
-
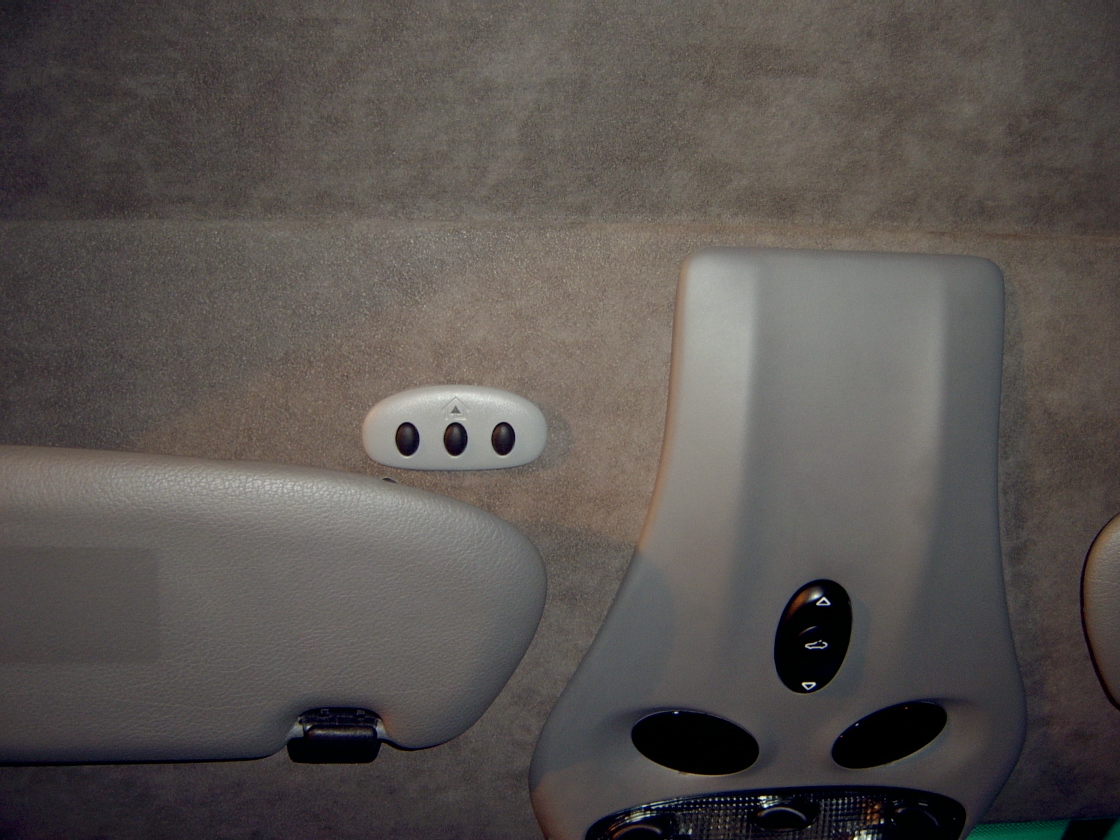
Okay, so I did it...all done and I'm pretty happy with it. It was not easy getting in there and mounting it though. I used double sided tape, and there is not a smooth flat surface, so hopefully it stays there well enough, cause it's never going anywhere else. In the picture below, you an see the wire I spliced into. It is switched power that will stay on after you shut off the car as long as the key hasn't been removed. It's brown with a green stripe (at least on my '02 TT) and it the power wire going to the sunroof switch. Only thing I noticed is that sometimes after you shut off the engine, it may not get enough power...but it works great for any normal use (while the car is running and shortly after you shut the car off- my issue also may have been because I hadn't driven the car and I'm sure my battery was lower than average). In this one, you can see what I used for ground. The screw that is missing, is where I attached my ground wire. Here is a not so clear (due to space) picture of the homelink mounted above the headliner. You can see that it only mounts on part of it. It's so light though, that this should not be a problem. If I had to do it over, I would probably try it with heavy duty velcro so I could adjust it to be straight without starting over...(wasn't easy and my arm is all scraped up. Look! All done and how pretty is that! I absolutely did NOT enjoy cutting my suede headliner that I'm sure would be costly to replace had I screwed up. I am happy with it and it works great, and looks like it came stock that way. [You can also see the bad luck I had in removing the ugly airbag sticker...still shows there, and the other side is worse, as I used goof off and it ate away the plastic on the mirror. I'll have to get new visors at some point that come w/o the sticker. Anyway, I hope this helps someone! I sure could have used the help.

-
I bought it on ebay from seller "cbpa40". It was $35 as a buy it now auction, shipping was cheap, he packaged it very well, and sent it very quickly. I was impressed and I'd buy from him again. I tested it (temprarily wired) as soon as I got it, and it works great. It's also a lot smaller than I thought it would be. Here's a link to his store with the search "homelink" and you will see two there. One tan and one dark grey. He seems to get them frequently. http://search.stores.ebay.com/cbpa40_homel...1809190QQsofpZ0
-
I got the headliner...what a PIA! If I had known I would have saved this for another day. A-pillar, C-pillar....looks like I'm not driving that car tomorrow! Anyway, it should be interesting mounting the homelink there since there isn't a smooth surface. for the wiring, I don't think I want to splice into any of those, and since I already have the darn A pillar off, I may as well run a wire down it to power. We'll see. I'll take some pics and update maybe tomorrow, but I'm done for the night. Ben
-
Yeah, but since it would be from the lead before the visor, it'll be always hot. Which brings another question...I'd rather have the homelink be on switched power if not too difficult, is there any switched power up there? Maybe I could use the sunroof lead, I guess that's switched... Lastly, as far as removing the headliner, is there any trick to it? It does not look like that suede or whatever would be cheap to replace if I screwed it up. I only need to remove the driver's corner which would include removing the visor and support. Thanks!!! Ben
-
I got a homelink transmitter, grey to match my grey interior and it's pretty close. I've looked all over at people's suggestions on where to put it and I don't like any of them. The only one I thought looked nice, was the one that was integrated into the batwing panel from "arenared" but there wasn't any info on how it was done. If he did it himself, I don't think I could do that good of a job. So, I'm thinking of putting it into the headliner right above the driver's visor. There is a TON of room there, I can feel it and I can just splice the power from the visor... Anyone have any thoughts on this?
-
There is a pass-through right behind the battery. A big circular rubber plug. Pull it out, cut a small x in the middle (so it closes back up easily and seals) and the put it back in.
-
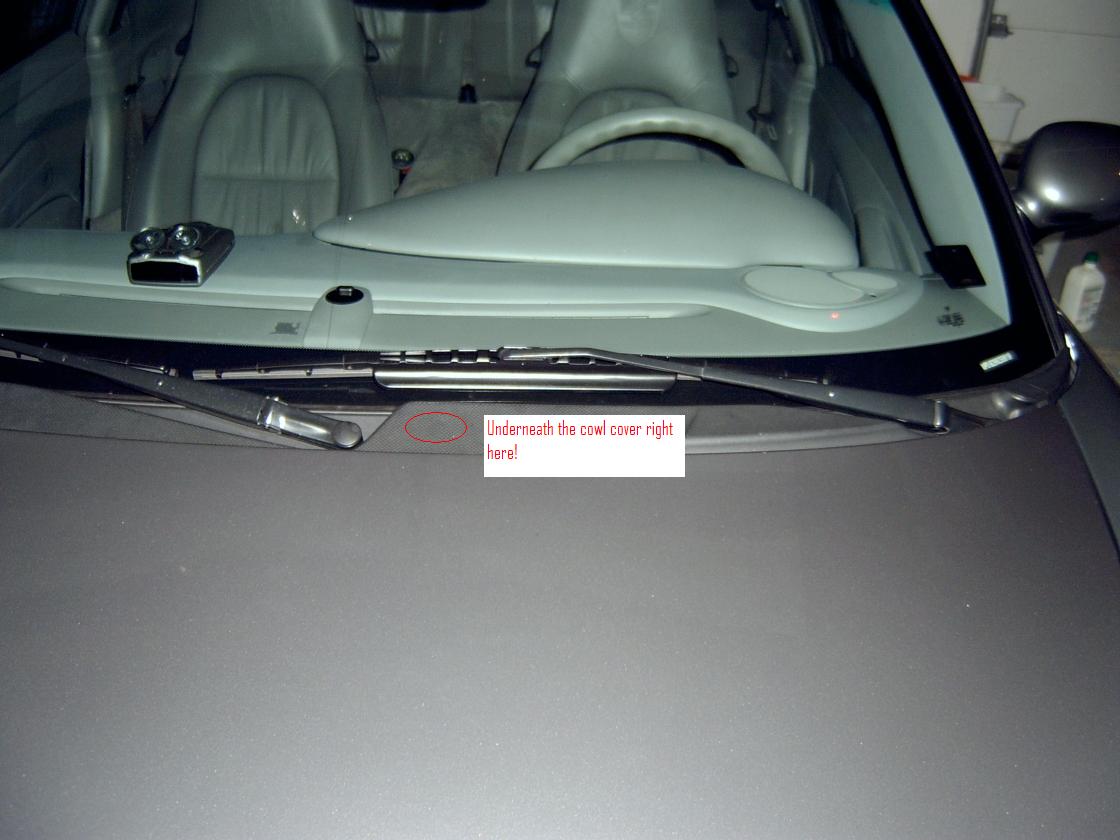
Sorry, it's been a rough week... So, I have a Kenwood deck, but I swear I saw a writeup somewhere that someone integrated the Sirius into the PCM... but not sure. Seriously, don't put it anywhere other than under the cowl cover. I can't take it apart right now, but here's a picture of where it is.
-
If anyone tries to follow my instructions and just can't seem to get it, I could be pretty easily pursuaded to remove my cowl cover and snap come shots. Let me know. Ben
-
FYI, this has been driving me nuts and I couldn't find anything anywhere that seemed to work for me, so I thought I'd post what I had and what I did. Originally, I had my sirius antenna mounted in the middle of the dash, behind the windshield. It worked when I had a clear view of the sky, most of the time, but not always and it cut out a lot. First try, I bought the Sirius Sigma antenna to mount to the glass inside the windshield. It worked gerat, but is HUGE and UGLY!. Second try, I got the "Ultra DOT low profile antenna" from sirius. I mounted it underneath the cowl panel cover, right in the middle. On the mount for the widnshield wiper linkage, there is a hole. I used this hole and fabricated a bracket from a 90 degree piece of metal with holes in it that you get from the hardware store. I mounted it as is with a locknut, then bended the metal over itself and put the magnet antenna on top of this and the edge touching the windshield. I put the cowl cover back on, tested everything out and holy crud! I even get a signal in my garage WITH THE GARAGE DOOR CLOSED and the second best part, is that you can't see any antenna. Sorry, I didn't take any pictures, but can answer any questions if anyone has any. Ben
-
Crap, I did that too quickly...it's just the knob! Sorry, I tried.
-
I just found this, so I would think so... http://www.carnewal-europe.com/cpx_p96191.htm ;)
-
Hi everyone, I'm new around here, and I recently purchased a 2002 911 Turbo. The cowl cover seems to be having issues on the main screw supports on both the driver and pass sides. The passenger side one is broken, and the drivers side one is cracked and about to be broken. I'm putting a bit of epoxy on it, and I think they should hold, but am curious if anyone else has had similar problems, or is it just my luck? I couldn't find any info while searching for cowl cover stuff...is that even the real name of it? (This is the cover that goes between the hood and the windshield). Thanks in advance, Ben Los Gatos, CA