Welcome to RennTech.org Community, Guest
There are many great features available to you once you register at RennTech.org
You are free to view posts here, but you must log in to reply to existing posts, or to start your own new topic. Like most online communities, there are costs involved to maintain a site like this - so we encourage our members to donate. All donations go to the costs operating and maintaining this site. We prefer that guests take part in our community and we offer a lot in return to those willing to join our corner of the Porsche world. This site is 99 percent member supported (less than 1 percent comes from advertising) - so please consider an annual donation to keep this site running.
Here are some of the features available - once you register at RennTech.org
- View Classified Ads
- DIY Tutorials
- Porsche TSB Listings (limited)
- VIN Decoder
- Special Offers
-
OBD II P-Codes - Paint Codes
- Registry
- Videos System
- View Reviews
- and get rid of this welcome message
It takes just a few minutes to register, and it's FREE
Contributing Members also get these additional benefits:
(you become a Contributing Member by donating money to the operation of this site)
- No ads - advertisements are removed
- Access the Contributors Only Forum
- Contributing Members Only Downloads
- Send attachments with PMs
- All image/file storage limits are substantially increased for all Contributing Members
- Option Codes Lookup
- VIN Option Lookups (limited)


97boxsterred
-
Posts
82 -
Joined
-
Last visited
Content Type
Profiles
Events
Forums
External Paint Colors
Downloads
Tutorials
Links Directory
Collections
Store
Everything posted by 97boxsterred
-
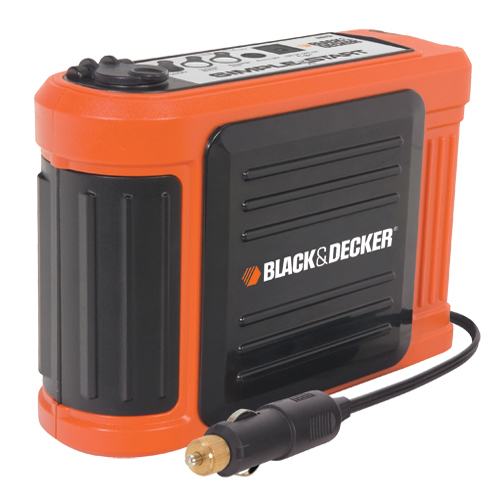
The easiest way to do this is to go to the store and buy this which plugs into your lighter. Black and Decker Simple Start Vehicle Battery Booster Model #:BB7B # Vehicle battery booster plugs directly into vehicle’s DC outlet # No jumper cables required, charges & starts vehicle in minutes

-
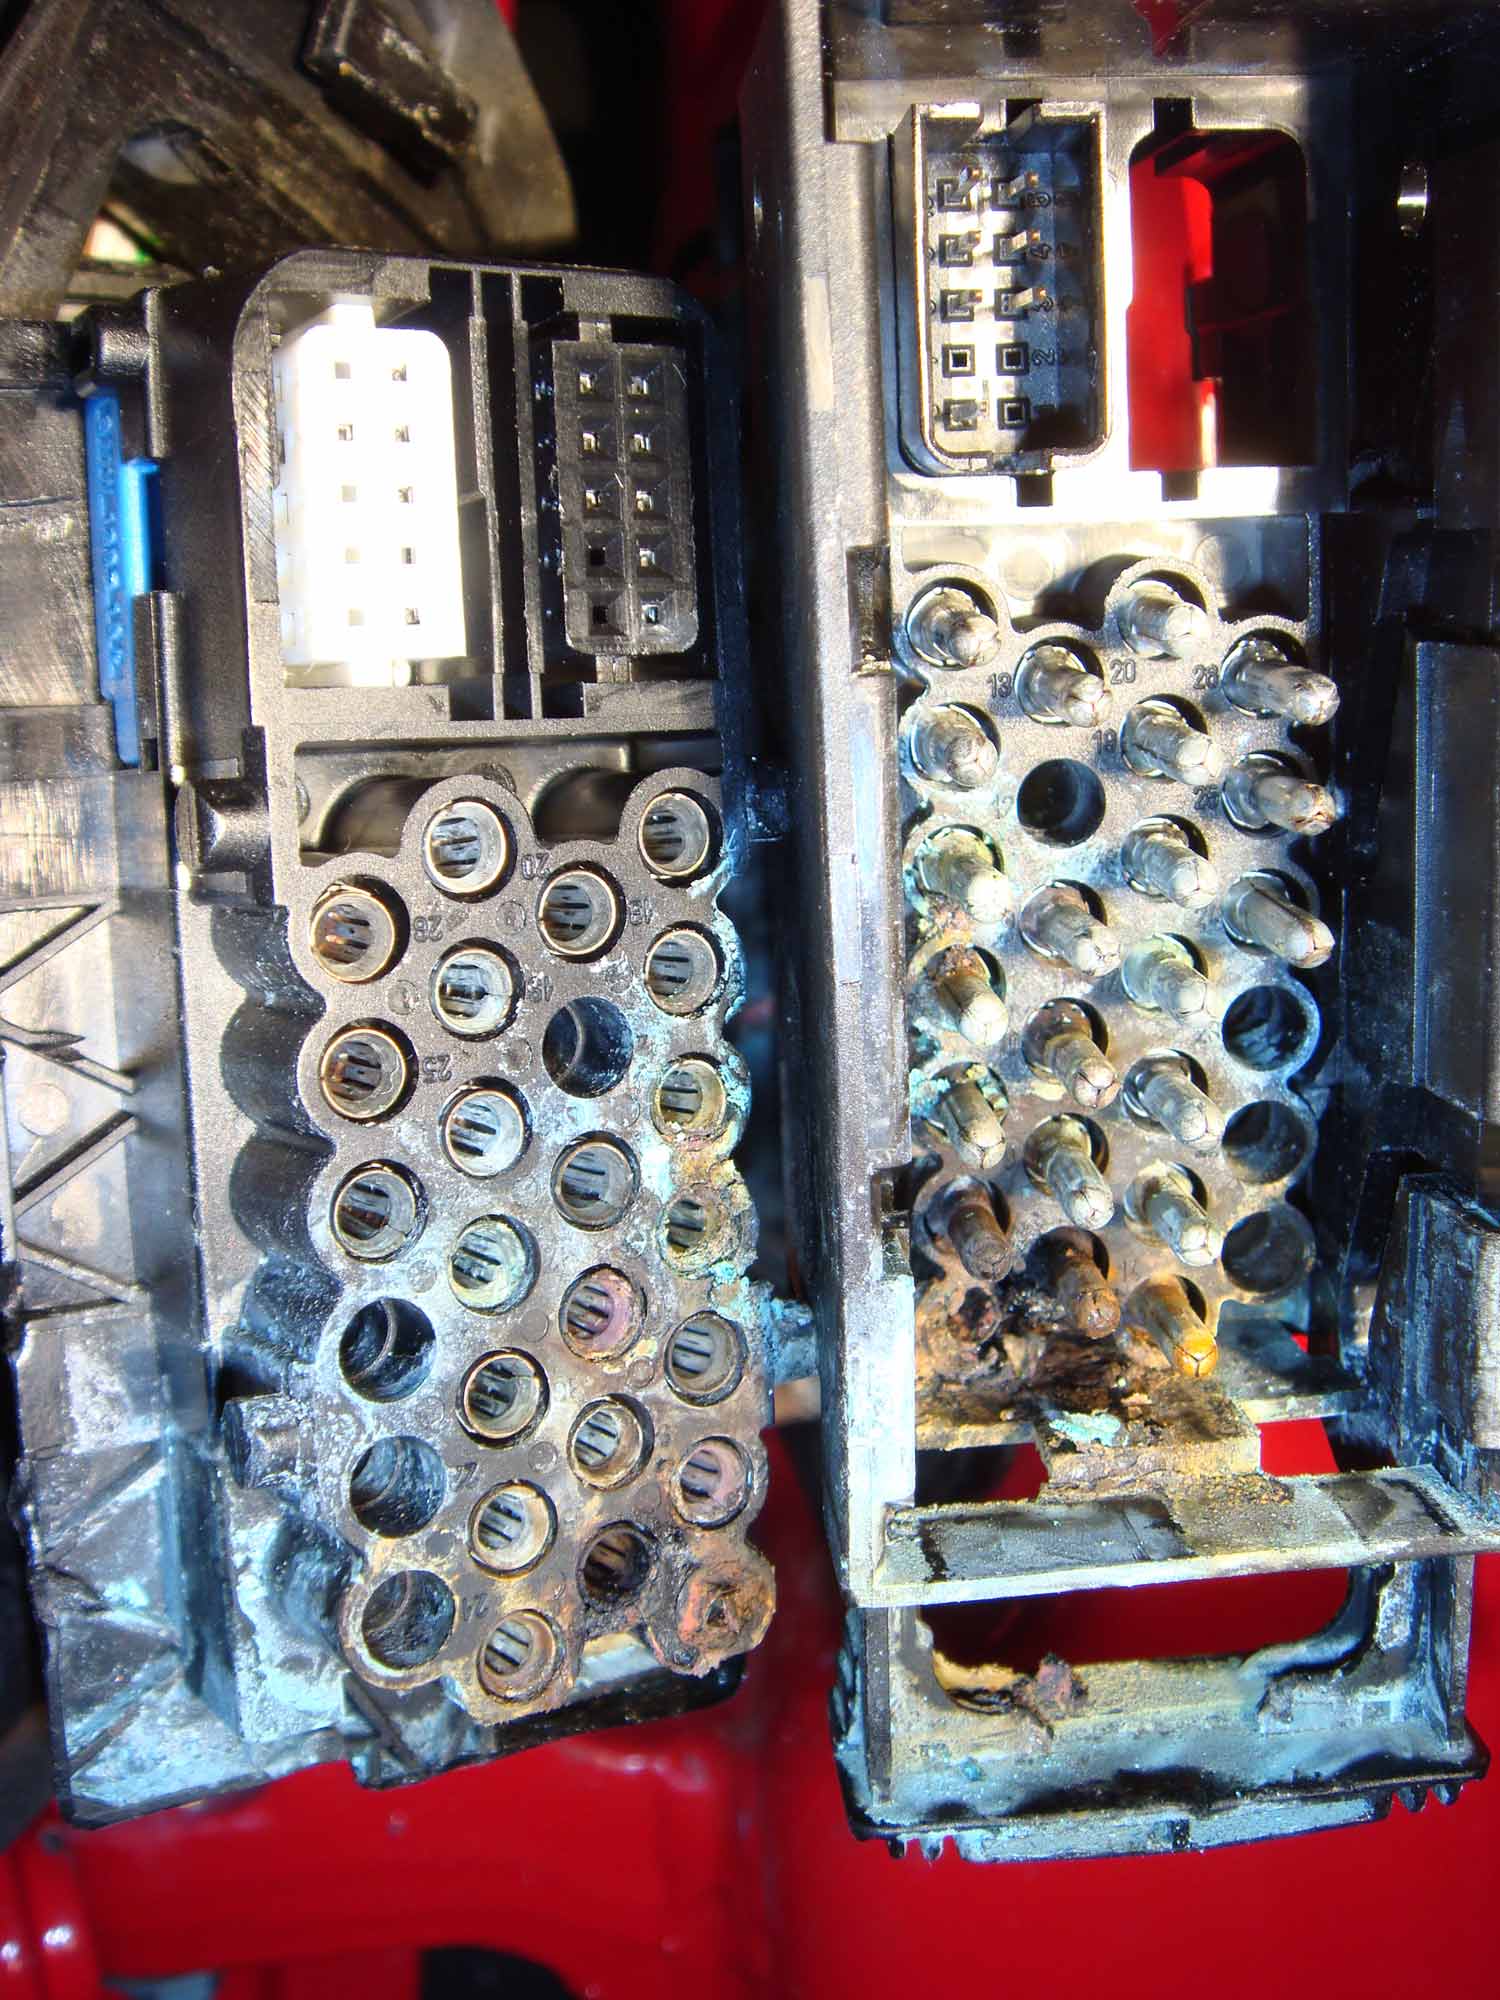
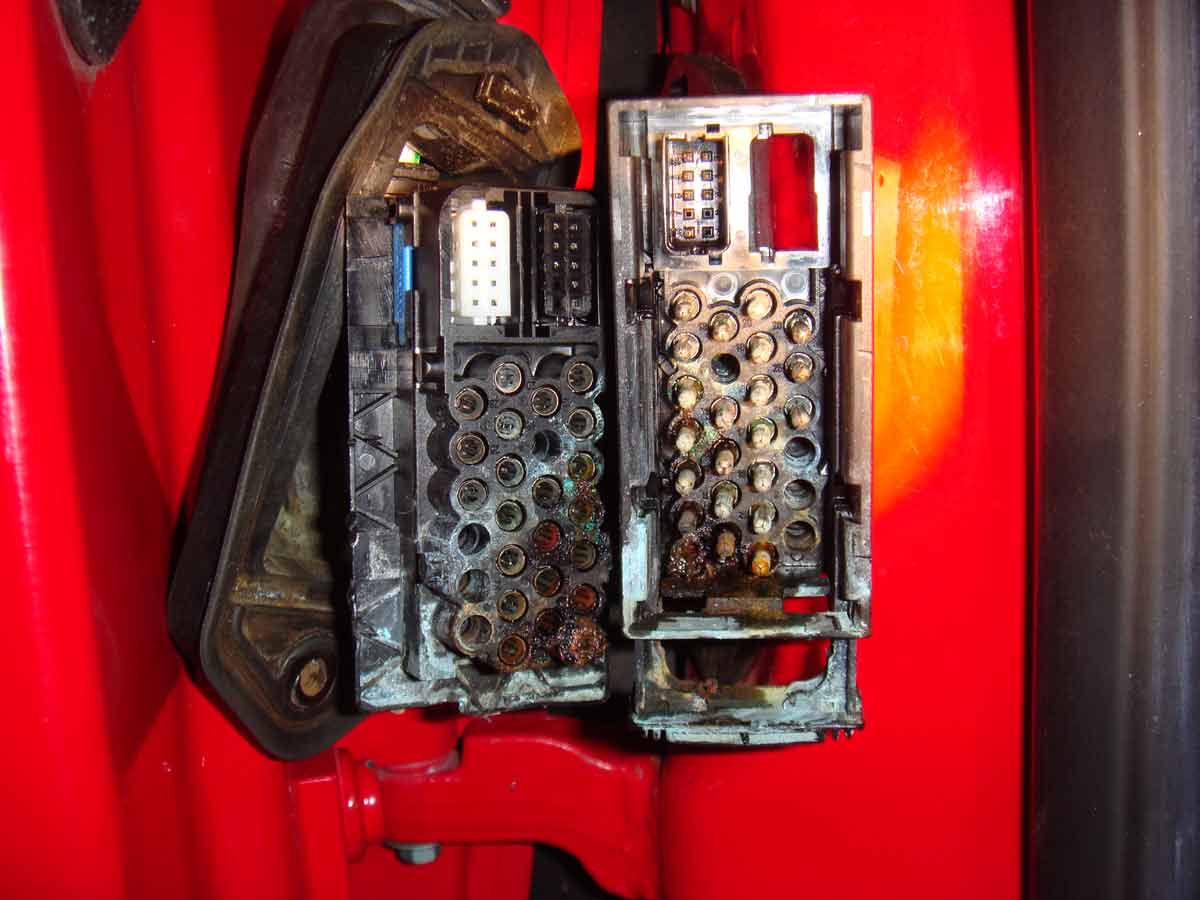
FYI: The dealer wants $650 for each door to perform the bulletin. Its basically replacing any pin that is damaged ($1 part) and putting a new rubber boot that has a vent pipe. TOTAL $1300, Outrageous!!
-
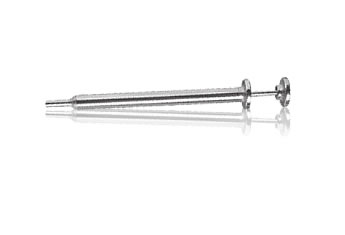
HI, I was able to pick up a pin removal tool from radio shack Model: 274-223, which is exactly the same size .093 as the Porsche pins. I did a temporary fix of the pins that were completely toast. The red wire had come out of both sides of the plastic connector and I put in new pins that look the same. (these same pins are also on 12volt radio control car batteries, which I have lying around since my childhood days) I also cleaned out the entire area with electric terminal cleaner spray. MY WINDOW IS FINALLY WORKING.... THANK YOU EVERYONE. Next step I will order all the new parts , new pins, new plastic pin holder box, new rubber boot, new broken screw............ If anyone can send me the bulletin I would really appreciate it, otherwise I will ask the dealer tomorrow.
-
The drill bit that fit the female pin is size 3/32. Where do I purchase new male/female pins, and the tool locally, will Radio Shack or a hardware store have these? Should I replace all the pins? Should I purchase a new driver door wire harness or does it look like just changing the pins will fix the problem. The entire connector looks a little greenish, will cleaning the entire connector with a electrical spray fix this. The red wire that came off was a little brittle at the end, will just stripping a new front correct this problem.
-
I want to thank Tool Pants, Juniinc, Loren, Maurice and everyone else who helped figure this out. I know you all told me to check this, but the screw wouldn't turn, the head got stripped, and it took me another 2 hours today to first try to unscrew it (very slow process) and then I finally cut off the head with a dremel. It looks like the moisture rusted the screw and its actually still stuck in the door. I tried to fix the car without breaking or scratching anything. This car has been perfect and the only problem it has had in 10 years is the air bag light, the convertible top cable end getting short, and now this window problem. These are all know problems I guess, but this year I decided to work on my car rather than take it to the dealer. So THANK YOU everyone, you have made it very easy and this board is just amazing. THANK YOU, THANK YOU, THANK YOU EVERYONE !!!!
-
ANOTHER PICTURE
-
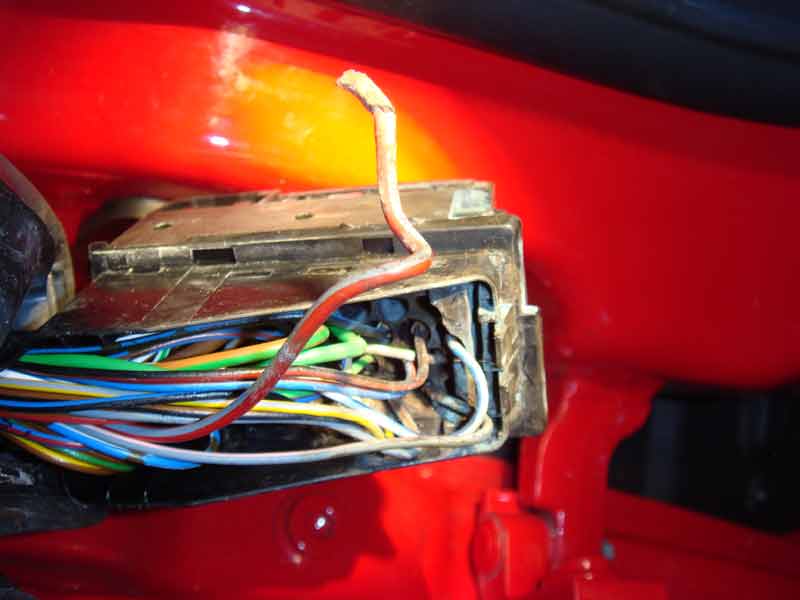
You guys were RIGHT!!! We found the problem... That one lower wire that popped out was toasted, the front of it just fell off, and the pins looks terrible. Now what is the next step.
-
I finally got this driver side door pin open and this is what i found. Some wires look terrible, with green stuff there and this lower red wire just popped out by itself. Any thoughts, and what do I do next. Thanks.
-
Maurice, I think there is only one relay for windows. Its the white one on the left next to the large double relay which is for the convertible top. I don't know why the wiring diagram shows two relays and they have one labeled white and the other labeled black. Strange.. Anyways I will report back after checking the door pins. Thanks everyone for your help.. I feel like we are close to solving this problem.
-
Do you know where this "black right side" relay is located? I only checked the white relay located under the driver side footwell. Does anyone have a 97 boxster relay diagram?
-
Yeh the switches are fine, the white wires have power when you press the switch. I will check the door pins tomorrow when I get the screw off. Looking at the wiring diagram you gave, are there two relays, one is labeled "white left side" and the other is labeled "black right side". Someone had said there is only the White relay for windows, located next to the double-relay near the driver side fuse box. So where is the black right side relay, I want to check that also.
-
juniinc So you think the problem is in the door pins, the black connector in the door hinge. See picture which toolpants put up early in the post. I have been trying to get this unscrewed in my car for over a week,, it got stripped. I think I will just break the screw off and report back tomorrow.
-
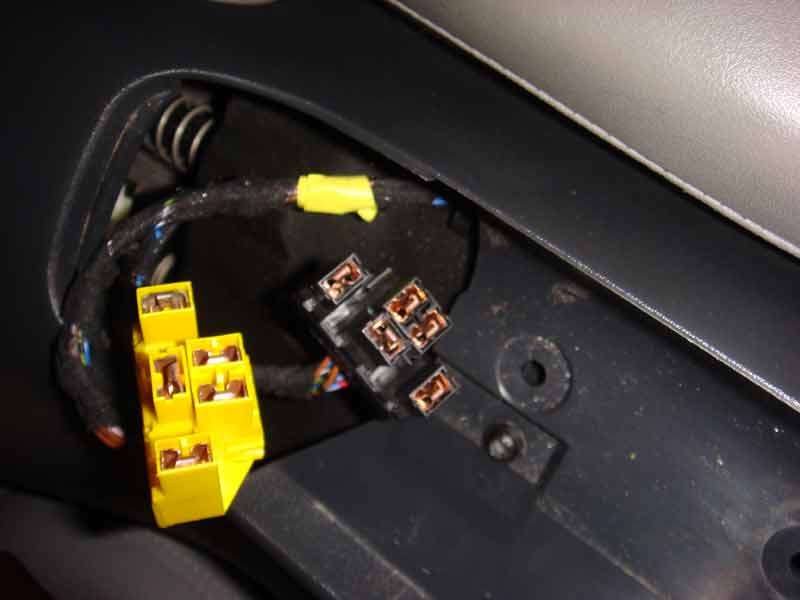
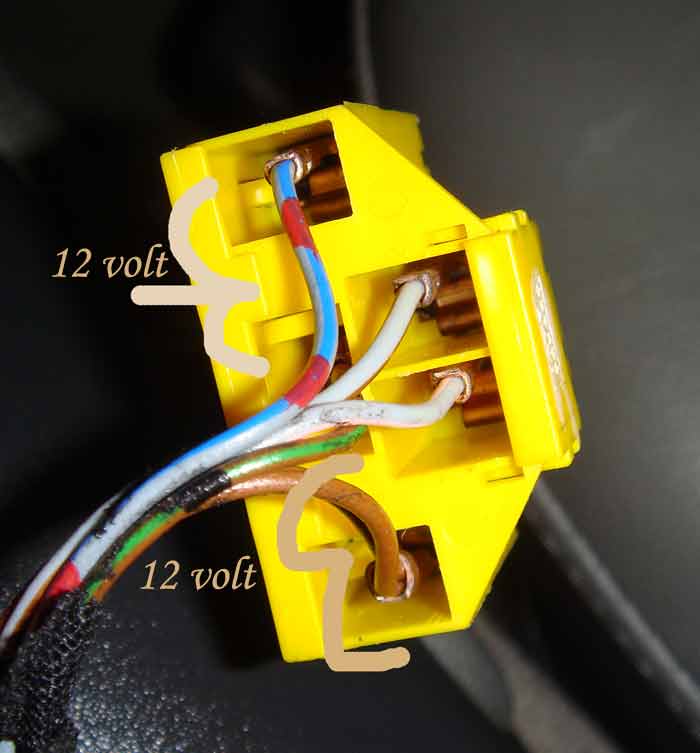
Junniic, This is how I got 12v on both wire harness that go to the window switches. Both wires for left and right hand side windows showed the same readings. If you look at the yellow connector as reference, I used a multimeter and placed RED to center terminal with Brown/Green wire and Black to either outside Brown wire or Red/Blue produced 12 volts. The two outside white color wires didn't show anything on both harnesses.
-
Sorry Toolpants, you have been asking about this but the screw that holds the connector in the door frame got stripped (torx screw) and I have been trying to unscrew it (cut a line in it with dremel tool to get a philips head) and I got it to turn but it keeps on turning without any noticeable loosening of the black connector holder from the door. I will keep on trying to get this out,
-
Hi, I just tested the relay with a 12v source and also put in a new relay, so that didn't solve the problem. I also took out the window switch between the seats and tried the drivers side switch in the passenger side and it works fine. I then tested both of the wire harness and they both are getting 12v in the same places.. The only thing is the on the two light blue/brown (appears white/brown in photo) wires on the right hand side of the picture don't have 12v, what are they for? What should I do next to figure this out?
-
I want to confirm if there is only one relay for both windows, the white one near the footwell. Also when I press the passenger side window switch I hear a click but on on the driver side window switch this doesn't happen. What does the click sound come from and could it be the cause of the problem?
-
I used the durametric software and this is what it says, please help solve this window problem. 1) P1602 Code 108 Supply Voltage (Open Circuit) I also had this airbag light on about 2 months previous to this window problem. 2) Code 45 Belt Buckle Driver.
-
Ok Here is an update. Since the new motor did not spin I got another new motor and that did not spin also. So the problem is somewhere else. I figured out what all the terminal pins are in the wire harness, they are numbered on the black plastic connector, and tested all the pins. It looks like the problem can be on the comfort open/close function. However the little microswitch on the door handle is only for when you open the door and the window drops a little bit, so where is the switch for when you put the key in the door lock and turn it left or right to open/close the windows?
-
I have used the Battery Minder made by VDC Electronics on all my cars. Its so easy to use, just attach the plug-in wire to the battery terminals and thats it, its a simple connecter that keeps the battery maintained and will never over charge it. It works on every type of battery, I have used it for over 6 years now. I bought mine from Autosupermart.com , below is a link. http://www.autosupermart.com/store/shop/vd...erycharger.html
-
UPDATE: Since I couldn't get the new window motor to spin even after using the wiring diagram and applying 12 volt, I decided to send it back to the Porsche Dealer and have them check it. The dealer's main Porsche mechanic took out his own wiring diagram and attached the ground and 12v to the correct motor pins and could not get it to spin. Now the mechanic says because there are so many other pins that act like switches, he is not sure if the motor can be tested like this. He thinks the only way to test it is to plug it into a car. Does this sound correct to you guys?
-
"Have you opened the door connector yet to check the condition of the pins?" I tried to unscrew that one screw that holds that black boot door connector wire harness assembly. however it looks the that screw is a little stripped, so now I am in deep trouble. Any advice on how to get this screw (torx screw) to open... I need to check the wire terminals to make sure no moisture is getting in this area.
-
Hi, How do I fix a bad ground? " If the 12V signal did go on and off when u pressed the window switch it;s probably bad ground!"
-
I am using the wiring diagram to check everything but do you know how I am suppose to count the pins on the window motor, left to right, up/down from left to right? Also since you can hold the window motor anyway, how should I hold it to correctly label each pin. I want to connect a 12v battery supply to test the motor , but I will need to put ground to the correct ground on the motor and then I can put red to any one of the terminals to test if the motor spins. Is it necessary to even connect the ground from the 12v battery to the ground on the motor, or can I connect the ground from the battery to any metal object and only touch the red wire to one of the motor pins? Sorry, but this is the first time I am doing electrical checks on a Porsche, I figure I try it before I have to shell out $600+ to the overpriced dealer ($120 hourly rate).
-
Thanks for the link to the shop manuals, this is very helpful. Does anyone know from the window wiring diagram what the terminals pins on the motor labeled "term 31 and term 30" refer to? Also what is "claw blank"?