Welcome to RennTech.org Community, Guest
There are many great features available to you once you register at RennTech.org
You are free to view posts here, but you must log in to reply to existing posts, or to start your own new topic. Like most online communities, there are costs involved to maintain a site like this - so we encourage our members to donate. All donations go to the costs operating and maintaining this site. We prefer that guests take part in our community and we offer a lot in return to those willing to join our corner of the Porsche world. This site is 99 percent member supported (less than 1 percent comes from advertising) - so please consider an annual donation to keep this site running.
Here are some of the features available - once you register at RennTech.org
- View Classified Ads
- DIY Tutorials
- Porsche TSB Listings (limited)
- VIN Decoder
- Special Offers
-
OBD II P-Codes - Paint Codes
- Registry
- Videos System
- View Reviews
- and get rid of this welcome message
It takes just a few minutes to register, and it's FREE
Contributing Members also get these additional benefits:
(you become a Contributing Member by donating money to the operation of this site)
- No ads - advertisements are removed
- Access the Contributors Only Forum
- Contributing Members Only Downloads
- Send attachments with PMs
- All image/file storage limits are substantially increased for all Contributing Members
- Option Codes Lookup
- VIN Option Lookups (limited)


iornman86
-
Posts
63 -
Joined
-
Last visited
Recent Profile Visitors

iornman86's Achievements
Member (1/1)
0
Reputation
-
IMS upgrade TOTAL FAILURE
iornman86 replied to iornman86's topic in 996 Series (Carrera, Carrera 4, Carrera 4S, Targa)
any update? -
IMS upgrade TOTAL FAILURE
iornman86 replied to iornman86's topic in 996 Series (Carrera, Carrera 4, Carrera 4S, Targa)
thanks for the suggestions. I think my mechanic did something similar to what you suggested and stripped the Nut just like you mentioned -- we've almost got it out -- but need to get a new nut. PITA, Mike so the bearing has begun to pull out? -
IMS upgrade TOTAL FAILURE
iornman86 replied to iornman86's topic in 996 Series (Carrera, Carrera 4, Carrera 4S, Targa)
also the allen bolt i purchased to reinforce the puller was from fastenal, it was "just" barely long enough to reach but it did the job it was 12.8 grade harness or whatever the top one is, i forget, metric stuff and all :) also when you attempt to pull it out you may put a piece of that cardboard around the ims to help center the puller Flat6 thought that may have been part of my issue. I also ground the puller a little. if i remember right the thickness of the puller wall is .2" i ground maybe .05" around just to give a little additional clearance. i wouldn't take too much off otherwise it may load the ims weird or something....but .05 give .1" larger hole just a little extra clearance in case it is not being aligned correctly example of the cardboard is below
-
IMS upgrade TOTAL FAILURE
iornman86 replied to iornman86's topic in 996 Series (Carrera, Carrera 4, Carrera 4S, Targa)
Funny -- or sad --- we are having the same problem with our most recent IMSR. Snapped the bolt right at the inner race. we destroyed a Kukko 21-4 as soon as we got it. $90 in 10 sec :-( Not happy. a hand made butterfly/molybolt style extraction "tool" didn't work -- it failed several times. We are going to resort to welding to the ims and trying again. What tool did you use to pull the outer race? Just in case we need to order that one too. thanks, Mike THE kUKKO 21-4 can be reinforced with an allen bolt of the same thread type. grind down the allen bolt head to a wedge shape and it will never break, i stripped the 15/16 bold but that wedge was still strong. ultimately if it dosent come out the inner race will break apart, make sure none of the balls fall into the case, collect all the stuff out of the ims with a magnet and then pull out the grinder I used cardboard from a roll of paper towels and cut strips of it to go around the IMS. this will protect he sealing surface on the block. make sure you put enough cardboard around there to seal it tight to keep steel debris from getting into the block. Also put a rag down the ims to keep debris out of there. I used an air powered die grinder. grind down one part of the outer race so it is paper thin all the way to the back. be careful not to grind into the ims, if you stop often as you get close you will see a small hole form when it breaks through. . you will break through the snap ring area first, as it is raised. make sure it is very thing from front to back. the hard part is getting through the back part of the bearing as the IMS steps up behind the bearing. After you have ground down one section, grind down another section 90 degrees away paper thin again. then take a screw driver and snap that section out. as long as you have ground it paper thin all along it will snap out easy. then cloose a section in the middle of the remaining bearing and start grinding again. as it gets then you can bend it out with a screw driver as i was grinding i stopped often to wipe up all the debris. after the race is out wipe everything down good, pull the rag out from the ims. Then use a magnet to clean out all of the area that you can. put a rag back in and use compressed air to blow the area clean. then pull out the card board. dont forget to plug the screw holes before you start grinding, the metal debris will get EVERYWHERE -
IMS upgrade TOTAL FAILURE
iornman86 replied to iornman86's topic in 996 Series (Carrera, Carrera 4, Carrera 4S, Targa)
well the car is finally back together! I want to thank LN Engineering who overnighted extra tools to me at his expense to help me get this worked out and flat6 for their advice! and the people on this forum whom i could have never figured out how to do all the stuff i have done. for those who are curious here is a list of "maintenance items" i did replace ims bearing lower temp thermostat replaced cam to cam wear pads replaced cam to cam timing chains replaced starter (found the main power lug stripped out) replaced starter again (first napa one was defective made a horrible noise) replaced bracket on engine that supported vacuum canister (it was zip tied before) replaced hose from AOS to passenger side engine (it had broken before i replaced it with rubber hose and that leaked, had to have engine out for this) cleaned engine well from various oil leaks over the past 10 years Flushed cooling system, which probably didn't need it, the coolant looked new from draining it out did not find any debris fixed vacuum line routing, the intake flap was not hooked up to the vacuum switch for some reason changed oil now the only lingering item is to fix the convertable top, the cylinder is leaking. Also need to trouble shoot a sticky clutch. I think the clutch pedal has worn bushings, bad spring or the master cylinder is defective. the slave had been replaced and did not fix the issue. -
vacuum line routing
iornman86 replied to iornman86's topic in 996 Series (Carrera, Carrera 4, Carrera 4S, Targa)
so that vacuum switch activated the resonance flap on the intake? -
vacuum line routing
iornman86 replied to iornman86's topic in 996 Series (Carrera, Carrera 4, Carrera 4S, Targa)
99 c2 carrera convertable 6 speed -
is there a vacuum line routing schematic? if not i am tring to figure out what the vacuum switch that is mounted on the drivers side intake under the AOS tube is hooked to
-
IMS upgrade TOTAL FAILURE
iornman86 replied to iornman86's topic in 996 Series (Carrera, Carrera 4, Carrera 4S, Targa)
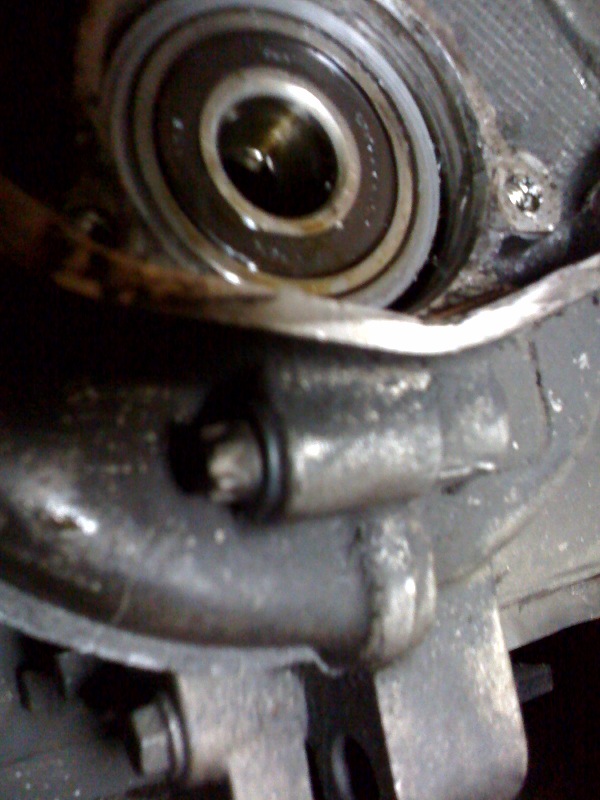
Not sure of your last statement? You didn't put the clip back in did you? the puller never moved the outer race enough to pop the circlip out of place the new bearing comes with a different clip to retain it -
IMS upgrade TOTAL FAILURE
iornman86 replied to iornman86's topic in 996 Series (Carrera, Carrera 4, Carrera 4S, Targa)
well through frustration and despair got the outer race out....it was not pretty but everything looks to be in good condition now, the new bearing is installed. time to start putting everything back together so i can reinstall the engine oh and the circlip never did get popped out of place, i did verify that, not sure why the thing would not ever move, except that it was extremely tight. The new bearing going in was quite tight too, however i do believe the new bearing would pull out if i removed the retaining clip -
IMS upgrade TOTAL FAILURE
iornman86 replied to iornman86's topic in 996 Series (Carrera, Carrera 4, Carrera 4S, Targa)
well I got the new tools in, and when i attempted to pull it out the inner race broke up. i have cleaned up all of the ball bearings and the inner race. From my last conversation with LN Engineering i will need a different puller to extract the outer race from the ims..... when i started the pulling proccess tonight the inner race had cracked already. i tried to center the puller as best as i could however it did not take much force for the race to pull out. I tried to center the race as best as i could by placing a strip of card board arount the ims. this created a shell to help align the ims with the puller. the puller itself is .2" thick in wall thickness. I beveled about .025 around the edge to give me about .05 additional in clearance. i just don't think there was enough structure left to pull the race out It will be another long wait for another tool. hopefully like Jake said it is an alignment issue and with the right tool and getting it aligned properly i will be able to pull it out If not then I dono..... -
IMS upgrade TOTAL FAILURE
iornman86 replied to iornman86's topic in 996 Series (Carrera, Carrera 4, Carrera 4S, Targa)
I should have additional tools tomorrow, will update everyone then or Friday, thanks a bunch for the help! -
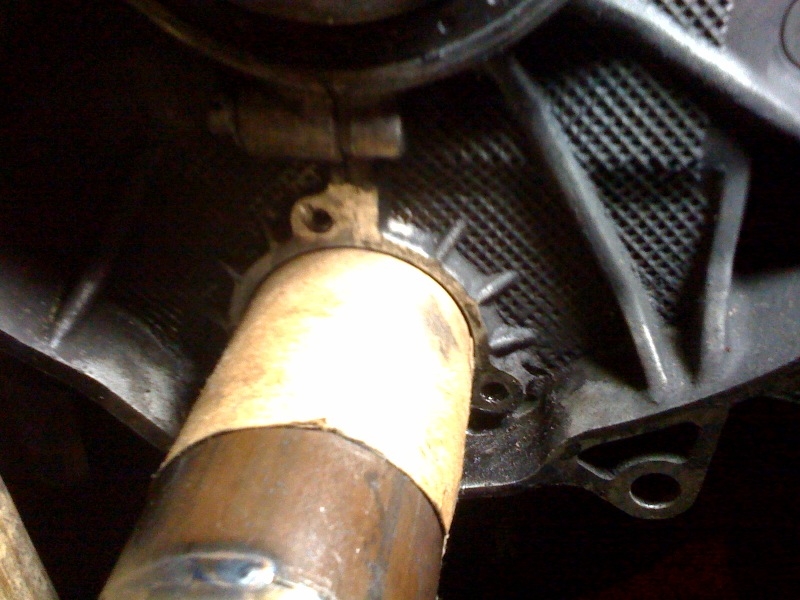
Ok so i have a 1999 c2 convertible that I decided to do the IMS upgrade from LN engineering (dual row bearing. Got the order in last week, and attempted to remove the bearing. The support stud broke. Called LN engineering and they said this happens occasionally and i needed an additional tool from kukko. so I ordered that. The Kukko tool has now broken! There is so much force going into this puller i doubt the tool was defective. I doubt it is possible to pull the bearing. You can see from the pictures where the Kukko puller and the ims bearing were digging into each other so there is a lot of grip between the two. I have no clue what i am going to do at this point, and am quite frustrated. any advise?
-
Vertex said they wouldnt worry about it too much either, they rebuild it 2 years ago. I am going to check the oil level and make sure it is not low. Thanks for the pointer about the vent, I will also check that
-
Just wondering if anyone has ever dealt with the shift linkage on the transmission leaking oil, is it a difficult repair to attempt on your own? any how to's?