Welcome to RennTech.org Community, Guest
There are many great features available to you once you register at RennTech.org
You are free to view posts here, but you must log in to reply to existing posts, or to start your own new topic. Like most online communities, there are costs involved to maintain a site like this - so we encourage our members to subscribe or donate. All subscriptions and donations go to the costs operating and maintaining this site. We prefer that guests take part in our community and we offer a lot in return to those willing to join our corner of the Porsche world. This site is 99 percent member supported (less than 1 percent comes from advertising) - so please consider an annual subscription or donation to keep this site running.
Here are some of the features available - once you subscribe RennTech.org
- View Classified Ads
- DIY Tutorials
- Porsche TSB Listings (limited)
- VIN Decoder
- Special Offers
- Paint Codes
- Registry
- Videos System
- View Reviews
- and get rid of this welcome message
It takes just a few minutes to register, and it's quality Porsche information at a low cost.
Contributing Members also get these additional benefits:
(you become a Contributing Member by subscribing or donating money to the operation of this site)
- No ads - advertisements are removed
- Access the Contributors Only Forum
- Contributing Members Only Downloads
- Send attachments with PMs
- All image/file storage limits are substantially increased for all Contributing Members
- Option Codes Lookup
- VIN Option Lookups (limited)


kevinkw
-
Posts
64 -
Joined
-
Last visited
Content Type
Profiles
Events
Forums
Exterior Paint Colors
Downloads
Tutorials
Links Directory
Collections
Classifieds
Store
Everything posted by kevinkw
-
-
Taking out the front vents
kevinkw replied to kevinkw's topic in 996 Series (Carrera, Carrera 4, Carrera 4S, Targa)
Ok, a quick update, especially for someone who's never taken trim off of their cars before. I just did the passenger side, and plan on driving it to work with all the pieces removed and see if the noise goes away. 1. Taking the side vent out was easy. Just follow the steps in the linked post. 2. Removing the long A Pillar trim piece was a little bit harder, especially since there's no pictures I can find. You need to pull up on the hanger piece that rests above the seat belt on the B Pillar. Just pull up and out. Once that is removed, put your fingers in on the top side of the A Pillar trim out, rocking it out and slightly up. I worked from the back to the front. Where it joins the vents, it is clipped to the defroster vent, just slide it out. 3. Taking out the alarm cover. This is tricky. There are 2 plastic posts keeping the alarm cover in place. Push it forward towards the windshield before you pull up, otherwise you will break it. I broke one of the two, but it is easy enough to glue back on. It is a very small small piece of plastic. 4. Pry out the defroster vent piece. I started out at the door and worked my way in. It was pretty easy until I got to where the alarm cover used to be. The 2 posts on the alarm cover seat (that also clips to the alarm cover plastic posts) overlaps the vent. I yanked a little too hard, and that broke off. Luckily I found it, and easy to glue back on. Underneath the vent, there is a long strip of black plastic that the vent piece touches. There are a lot of places where the two rather flexible pieces of plastic comes into contact, I think the noise is coming from those two pieces vibrating against each other on rougher roads. Another suspect is the plastic pieces that joins wires together along the A Pillar. -
Rattle noise from vents
kevinkw replied to chanda's topic in 996 Series (Carrera, Carrera 4, Carrera 4S, Targa)
I have had the same issue for months now... I stuffed felt everywhere, had the speakers out. Next up is taking off the defroster vents. -
Taking out the front vents
kevinkw replied to kevinkw's topic in 996 Series (Carrera, Carrera 4, Carrera 4S, Targa)
Thanks Loren, It looks to be a multi-parter. First the side vents http://www.renntech.org/forums/index.php?s...amp;#entry14785 Then the A Pillar trim http://www.renntech.org/forums/index.php?s...5&hl=pillar Then finally the defrost vent pieces http://www.renntech.org/forums/index.php?s...082&hl=vent -
I have a 99 C4, and there's been a rattle coming from the front vent area for a while now, but recently it has gotten much worse, even on roads that are semi-smooth. Is there any instructions on this? I think you have to take off the A pillar trim, the side vent covers, and the alarm cover to get to the 2 front vents right? Is there step by step for that? Also the seat belt mechanism that slides up an down rattles on the passenger side. If I get someone to press it, the noise stops, any idea how to fix that?
-
Yeah, it could be the smog / air pump. Especially if it is cold. Sometimes it sounds like either a big vacuum pump or like a table saw / high pitched whine of a jet engine. Do you hear this sound after driving the car around for half an hour, turn it off, and then turning it back on?
-
Warranty on 996
kevinkw replied to kevinkw's topic in 996 Series (Carrera, Carrera 4, Carrera 4S, Targa)
My old trusty 1997 BMW 318ti I drove to 110,000 miles without any major problems aside from the window regulators breaking (driver and passenger side), and the speedo connection being loose after driving around Berkeley potholes for 2 years. My even older 1987 Cadillac Cimarron lasted without any major issues until 95,000 miles until the entire Corvette style digital instrument cluster went out. At which point a new instrument cluster cost more than the car. It ended up being donated and a shop found a working cluster in a junk yard and fixed it and gave it to a very deserving recent immigrant family. Are Porsches really less dependable than a 80's GM V6 J platform? Adding to my additional concern is that one of my co-worker's Boxster S's engine just went out at 50 something, and her husband has been posting here last month trying to figure out a solution. -
Warranty on 996
kevinkw replied to kevinkw's topic in 996 Series (Carrera, Carrera 4, Carrera 4S, Targa)
Lastly, I did try something online, the offer was for 3 years, unlimited miles through these guys http://www.genuinewarranty.com/ The price was $3500 with a $200 deductible, the coverage is about the same as the other gold plus plans. -
Warranty on 996
kevinkw replied to kevinkw's topic in 996 Series (Carrera, Carrera 4, Carrera 4S, Targa)
The dealer that did my PPI is offering me Fidelity http://www.fidelitywarrantyservices.com/ If you click on the plans, the break down the price that was offered to me was for 5 years / 60k miles Powertrain - $3200 Silver - $4200 Gold- $5200 Gold Plus - $6200 Platinum - $7200 My local mechanic has had other cars on the Fidelity plan and they worked out well. The other plan that was about $1000 cheaper was MasterTech. http://www.mastertechvpp.com/ Anyone had experience using them at all? Do dealers accept them as well as indies? -
Warranty on 996
kevinkw replied to kevinkw's topic in 996 Series (Carrera, Carrera 4, Carrera 4S, Targa)
I have gotten quotes from companies I have never heard of for bumper to bumper for about $4000. it's a decision between reliability of the 996 3.4 engine vs warranty companies I haven't heard of before vs companies I heard of and lots of money. What do you all think? Anything else that can go wrong in a 1999 C4 with 52k miles that would need fixin'? -
Hey Guys, I got a call from the dealer that did my PPI and was offered warranty on the 1999 996C4. The car is at 52k miles, and I plan on driving it until it either it breaks or I decide on more graduate school. The policy is fidelity, and I have heard good things about them. The low end policy is $3500, it covers just the power train. The high end policy is $7200, it is bumper to bumper, both are good for 5 years or 60k miles. The only thing I am really worried about is the blown engine issue on the 996. So should I go with the $3500 option, the $7200 option, or none at all?
-
High mile role call
kevinkw replied to violaGT3's topic in 996 Series (Carrera, Carrera 4, Carrera 4S, Targa)
1999 C4 Tip, 52k miles Only thing now is trying to hunt down rattling noises. -
Labor Operation time in TSBs
kevinkw replied to kevinkw's topic in 996 Series (Carrera, Carrera 4, Carrera 4S, Targa)
20 TU works out to be 15 minutes if I'm generous? Would the dealer or indie shop be charging rates based on the TUs listed in the TSBs? -
Hi All, I was looking at a TSB and for Time for a particular Labor Operation says 20 TU. How much time is that? Thanks, Kevin
-
Need help buying a head for my S
kevinkw replied to woodywoodpecker's topic in 986 Series (Boxster, Boxster S)
http://www.911pcar.com/ They're in LA -
Key Remote not working?
kevinkw replied to JamesD's topic in 996 Series (Carrera, Carrera 4, Carrera 4S, Targa)
Hey James, I had the exact same problem a few months earlier. 1. Make sure you buy a new battery. Just because it has enough juice to light up the remote doesn't mean it can power the rest of the remote. 2. Re-seat the battery and make sure it snaps in the the battery holder. That's the first thing the dealer should do to the keys. Mine saved me $250, and gave me the battery for free. -
I have a 1999 C4 that I'm trying to do some of the dash noise TSBs on. Type is 4362 Serial is X5013010 47/98 Thanks
-
Changed remote battery, now it won't work!
kevinkw replied to Brewrby's topic in 986 Series (Boxster, Boxster S)
Yeah, they should be easy to find at your local drug store. It's the same size as a common hearing aid battery I believe. -
There are celebs out there who love cars and collects them. Seinfeld and Leno being two. Just wondering if there are any more accidental Porsche owners, or celebs we don't hink are into cars, but ends up with a very nice Targa 4 anyway.
-
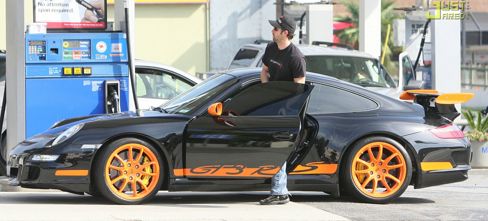
Also Posh Spice has a 997 cab with aero kit, and huge rims. Patrick Dempsey of Grey's Anatomy and Can't Buy Me Love has a GT3 RS.

-
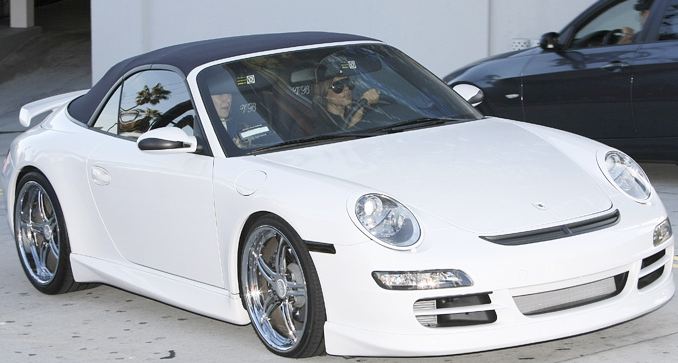
Saw this picture at one of the celebrity gossip sites. Looks like she / Samantha Ronson drives a 997 Targa 4.
-
Changed remote battery, now it won't work!
kevinkw replied to Brewrby's topic in 986 Series (Boxster, Boxster S)
I had this happen to me too. I thought the remote was broken, but it wasn't. 1. Make sure the battery is brand new. The red light on the remote can flicker, but not strong enough to actually send signals. 2. Re-seat the battery and make sure that it clicks into the battery seat in the remote. That was my problem after thinking that the entire remote needed replacing. -Kevin -
Okay my engines toast now what
kevinkw replied to woodywoodpecker's topic in 986 Series (Boxster, Boxster S)
All the options are listed on the sticker underneath the hood. The option codes lookup is under documents. -
Pre-inspections
kevinkw replied to ash8609's topic in 997-1 Series (Carrera, Carrera 4, Carrera 2S, Carrera 4S)
I did mine at Michael Stead, it was $300 ($270 if you mention you're PCA member). The tech inspection seems to be ok, but the service rep did not mention a couple of the things that the techs actually found to me (2 visor springs broken). They also didn't check for the fact that the cluster surround was not in the car's original options, and was a replacement. I wouldn't have know if I didn't compare the option codes myself. The replacement surround was dark wood grain while the rest of the interior was aluminum / black. It was hard to tell in certain light conditions, but if I paid $300, I'd expect them to catch little things like that. They do not do any of the leak down or compression tests. Looks like road test was 4 miles. They do check the brakes and tires. -
Rear Spoiler Warning Light Stays On
kevinkw replied to kevinkw's topic in 996 Series (Carrera, Carrera 4, Carrera 4S, Targa)
I ended up opening up the connector, the plastic is highlighter green and the leads were clean and silver. I snapped the connector back up, lo and behold, the spoiler was able to be manually opened and closed. The wires leading out of both connectors were also clean and firmly attached. We'll see if I come back and post again in a week.