Welcome to RennTech.org Community, Guest
There are many great features available to you once you register at RennTech.org
You are free to view posts here, but you must log in to reply to existing posts, or to start your own new topic. Like most online communities, there are costs involved to maintain a site like this - so we encourage our members to donate. All donations go to the costs operating and maintaining this site. We prefer that guests take part in our community and we offer a lot in return to those willing to join our corner of the Porsche world. This site is 99 percent member supported (less than 1 percent comes from advertising) - so please consider an annual donation to keep this site running.
Here are some of the features available - once you register at RennTech.org
- View Classified Ads
- DIY Tutorials
- Porsche TSB Listings (limited)
- VIN Decoder
- Special Offers
-
OBD II P-Codes - Paint Codes
- Registry
- Videos System
- View Reviews
- and get rid of this welcome message
It takes just a few minutes to register, and it's FREE
Contributing Members also get these additional benefits:
(you become a Contributing Member by donating money to the operation of this site)
- No ads - advertisements are removed
- Access the Contributors Only Forum
- Contributing Members Only Downloads
- Send attachments with PMs
- All image/file storage limits are substantially increased for all Contributing Members
- Option Codes Lookup
- VIN Option Lookups (limited)


doughep
-
Posts
66 -
Joined
-
Last visited
Content Type
Profiles
Events
Forums
External Paint Colors
Downloads
Tutorials
Links Directory
Collections
Classifieds
Store
Everything posted by doughep
-
http://www.renntech.org/forums/index.php?showtopic=1512 <{POST_SNAPBACK}> Can one of you guys who have done this post the disassembly steps? I don't want to tax Loren's generosity by adding to the list of times he is asked to send them out . . . . I'm betting there are several of us that have been unable to figure out this first step. Thanks. - Pete
-
I'm not sure a lemon would fit my hand - not to mention that the texture of a lemon's peel would cause it to become slippery under 'sweaty palm' driving conditions. Is there a coconut version available? This would give you size, texture, and a touch of the exotic caribbean all in one nominal upgrade . . .
-
This is just a curiosity question. Last week I had an unexpected - and unwanted - opportunity to drive in snow (I know, I know, put her away for the winter - but I just can't seem to do it!). Based on the way the vehicle responded, it seemed to be pushing predominantly from the passenger side rear. After I noticed this, I experimented in some various (safe) snow covered locations, and found the behavior to be consistent on flat ground, hills, straights, corners, etc. The tread depth and wear on my tires is uniform on all four tires. Is this a false read on my part, or does the vehicle favor one side over the other when distributing torque? I know that was pretty common 30 years ago, but I didn't think it was a common practice anymore. BTW - my Boxster is a base model 98, if that makes a difference. Again, just curious. Thanks. - Pete
-
Thanks for checking it - I'll definitely note this one.
-
O.K. - mystery solved. Turns out it was a fuse after all. The fuse that was blown was C3 (I don't have the chart in front of me, but it deals with the alarm system - if I recall correctly, it was for the alarm control unit.) Now, it's worth noting that my alarm appears to be after-market, and it was not wired correctly when I got the car (setting the alarm from the key fob did not lock the doors, it just turned the alarm on). I had to bring it in to a shop that specializes in this alarm system (Viper). They hooked everything up, but now I'm not sure that they did everything right. I checked the fuses for the windows, and they were not blown. The alarm was still setting and unsetting from the key fob (flashing the lights and chirping), but I can't say for sure that it was locking the doors. It was indicating a violation (I think it was showing 5 fast blinks on the LED). And, the dome light was inoperative. My report that the windows were not functioning at all was inaccurate - they were not responding to the rocker switches, but I noticed that when I opened the door, they dropped an inch like normal (even though they were already part way down). When I realized this, I started checking each and every fuse one by one. I found C3 blown and replaced it, and now all is working the way it was before (including the dome light). Anyway, all is now well for me, but the symptoms don't seem to match the problem. I'd be curious to see what happens on a vehicle with a factory-installed alarm system if fuse C3 is pulled. If the result is the same as what I got, it may be worth filing away the symptoms and the cause in your 'good-to-know' file. If it's different, I'll just note it as an anomoly for my vehicle. Thanks for all the help! - Pete
-
Everything else seems fine - took it out for a spin, no noticeable symptoms other than the dome light and the windows. I don't have the lower door panel lights, but I can check the trunk light . . . The dome light doesn't react in any position, but it did before I monkeyed around, so I should check the bulb. I think Toolpants may be onto the problem with a fuse (or fuses). Thanks to all. - Pete
-
Did it ever work? My 98 behaves the same way yours does. When I got it, the key did not operate any of the locks or doors, it only activated the alarm. I took it to a stereo and alarm shop and they hooked the alarm up to the door locks. They said that there wasn't a solenoid for the trunk (because it was a base model) and that I would have to add one if I wanted to operate the trunk latch from the key. I don't know if what they told me is accurate or not, but that's what I ran into. - Pete
-
Yes - the windows are down about 4 inches (from putting the top down before I started), and now they won't go up or down. The dome light doesn't come on either. So based on Loren's and your info, it was probably already disconnected and I hadn't noticed it before I started working. I didn't do the obvious and check the fuses, since the plug convinced me it was the problem by the power of it's presence . . . Anybody got any additional diagnostic suggestions? Thanks guys - I feel like a dope, but it's good to have a place to get help. - Pete
-
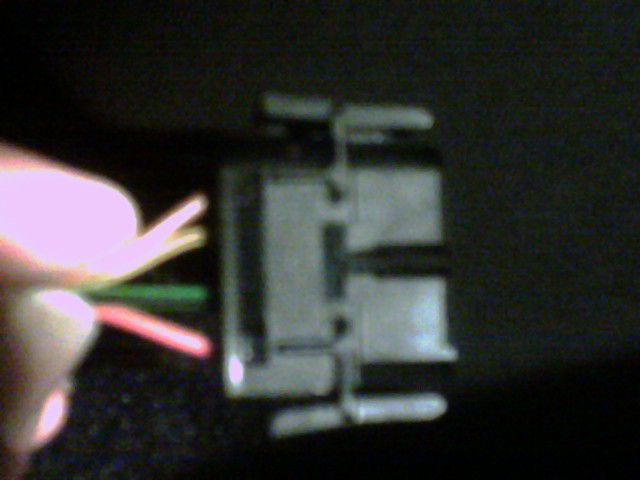
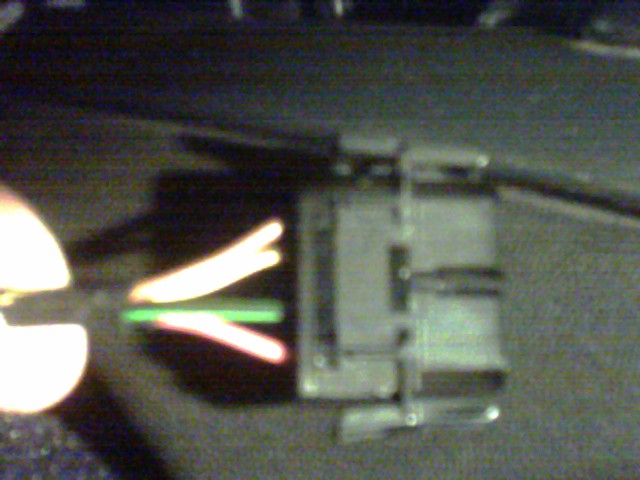
I know this sounds stupid, but I was relocating the AC control unit and radio in my MY98 to the lower storage compartment, and when I was getting ready to put everything back together, I noticed a disconnected plug near the bottom of the storage area (see pics below). Now, the dome light and the windows are not working. Seems like everthing else is O.K. This is a bit of a problem, because the windows were partly down, and I can't get them back up. I'm going out of town tomorrow for a couple of days, and I sure would like to fix this tonight. Anyone got a clue where the other end of the plug is? Thanks.

-
I know this sounds stupid, but I was relocating the AC control unit and radio in my MY98 to the lower storage compartment, and when I was getting ready to put everything back together, I noticed a loose plug near the bottom of the storage area (see pics below). Now, the dome light and the windows are not working. Seems like everthing else is O.K. This is a bit of a problem, because the windows were partly down, and I can't get them back up. I'm going out of town tomorrow for a couple of days, and I sure would like to fix this tonight. Anyone got a clue where the other end of the plug is? Thanks.
-
Great. I have to pull the radio anyway - I am planning on moving the radio down a slot to the the upper storage space, because the top row of the LED display is hard to read on my headunit due to the angle. The storage spaces are at a bit of an angle, so moving the radio down to take advantage of the angle looks like it will take care of this. Thanks again - I'll post a dash shot once everything is done for the sake of anyone else that's interested in doing this. - Pete
-
Man, Your good! I just called the dealer to have him order the part. I got the part number (the same one you listed) from him, and told him I'd check it out to make sure I didn't have him order the wrong thing (I trust this site a bit more than I trust the dealer ;) ). I thought I was being proactive, but you beat me to the punch. As usual, I'm impressed. Do you happen to know off hand if that part is for the lower of the 2 storage spaces (as in the picture you posted above), or the upper one where the CD holder is? Thanks! - Pete
-
Thanks guys, I appreciate the help. The pics are particularly useful. I get the extra trim piece from the dealer, and then I'll be in business. I'll also keep all the old parts, in case I discover what my predecessors have and decide to reverse the operation. Just out of curiosity, what does everyone else do for a cupholder, if not the in-dash unit? All the aftermarket stuff I've seen looks cheesy or ineffective. Certainly, you aren't electing to go without coffee!?! Thanks. - Pete
-
I just got my hands on a new in-dash cupholder for my MY98, but it didn't come with instructions. It was easy enough to assemble, but I'm having trouble figuring out how to fit it. I know from posts I've read in the past that the AC controls need to move down to the upper container unit space. This makes sense, as the faceplate is the same size as the AC control unit, and they won't both fit up top. But it seems that the lower container space won't be big enough to hold the AC control unit. There is a 'lid' above the container space that looks removable, but even if I do that, it looks like the Faceplate will still stick up above the side trim. It als has a slight curve at the top that looks like it won't mate up properly. Does anyone have any insights on this, or maybe a picture of what it should look like? Thanks. - Pete
-
Wiring harness for non-Becker/Blaupunkt headunits
doughep replied to doughep's topic in 986 Series (Boxster, Boxster S)
Hi Dave - Sorry I took so long to get back to you - I've been on vacation, and just logged on today for the first time since before Christmas. I'll find the part number tonight (the receipt is boxed away with the 'leftover' parts) and I'll post it tomorrow. As I recall, it was about $8. Thanks. - Pete -
Adding Cruise Control to a MY98
doughep replied to doughep's topic in 986 Series (Boxster, Boxster S)
Thanks, Toolpants. Don't go to any trouble - if you happen to remember next time you talk to him, great. Thanks again. - Pete -
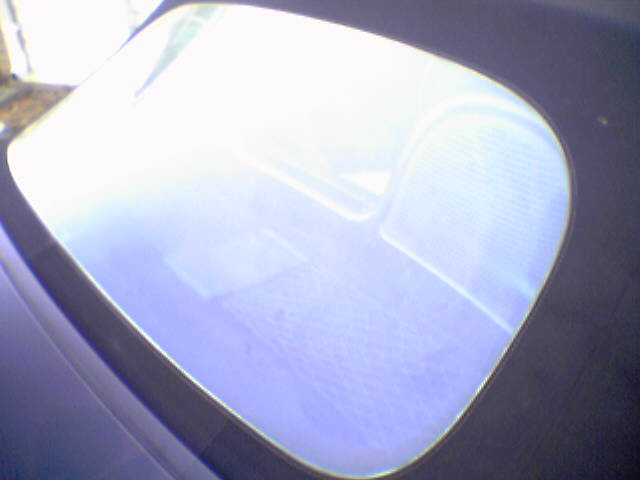
Yeah, it really did. The whole window is now consistent and as clear as glass. If I can get a hold of a better camera, I'll post some better pictures. I was really impressed with the stuff.
-
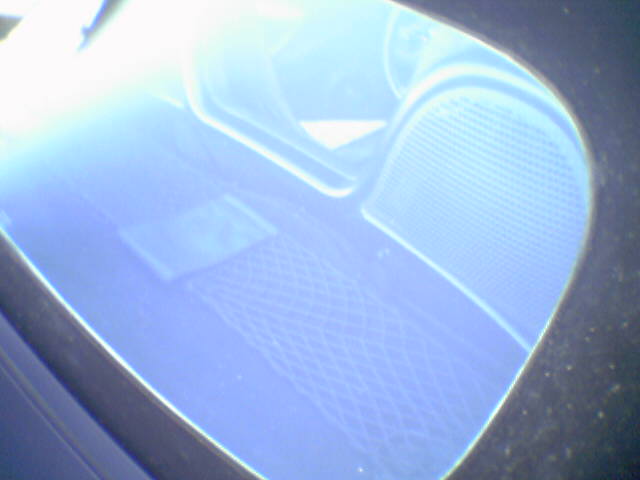
This is probably pretty elementary to most of you 'seasoned' convertible owners, but this is my first, and I'll pass this along for any other rookies out there. My rear window was so badly hazed, I was having trouble seeing through it. It also had some areas with pretty significant clusters of scratches. I had been looking for Meguire's Cleaner (#17) and Polish (#10), but couldn't find it in any store, only mail order. I stumbled across a pair of 3M products - 3M Plastic Cleaner (39017) and 3M Plastic Polish (39010). Noticing the similarity to the Meguire's part #, I decided at about $7 a bottle, I'd give them a try. All in, it took me about half an hour to do and was about as easy as you could hope for. I was so impressed with the results of just the cleaner that I was tempted to skip the polish. But hey, I bought it, and was determined to use it. I'm glad I did, because the results were spectacular after using the cleaner, and even better after the polish. I can't overstate the significance of the difference it made. Below are a set of before-and-after pictures, but my cell phone camera doesn't do justice. The before picture looks much better than the window really did, and the after doesn't look nearly as clear as it now does. Before: After:
-
I'd like to add cruise control to my base MY98. I've read through the pinned instructions a few times, and I have a couple of questions I hope someone can answer for me. 1. What is E-gas, and would that change the process for US Boxsters? 2. Tool Pants displayed a cruise control unit that apparently is not typically present if CC was not optioned on the car. Can this be added as a DIY? 3. Has anyone done this on a base '98, and if so, was it much more difficult than the pinned instructions? Thanks - hope I'm not asking questions that I should be able to answer for myself from the well-articulated write-up. - Pete
-
I just installed a Kenwood MusicKeg in my MY98. For anyone not familiar with it, this is a device that accepts a cartridge (ranging in capacity from 10 GB - 80 GB) that will play mp3 and a few other music file formats through your existing headunit. It will work with any brand headunit that supports a CD changer via an RF modulator, but it plugs up native to Kenwood headunits, which is what I have. The headunit recognizes it as a CD changer, and treats each mp3 playlist as a disc. I have the smallest cartridge available (10 GB), and so far I have 72 CDs - over 900 songs - stored on it. This only consumed about 1/3 of the available storage space. The device is made by Phatnoise and relabeled by Kenwood. Phatnoise estimates that the 10 GB unit will hold about 2,500 songs. So far, that seems to be accurate. I think this is the COOLEST stereo upgrade going. I installed it using the CD changer instructions abundantly available on this site, so I didn't bother to document it as it would have been redundant. Having said that, if anyone wants installation info or pictures - or info on the unit itself - let me know and I'll post it. BTW - I got it factory refurbished on EBAY, and it ran $169 plus $20 S+WY. Best money I ever spent on audio equipment. In fact, there is a home unit available that I'm now looking at. This will allow me to take my entire music collection out for a drive . . . - Pete
-
Cleaning the motor (outside and underneath)
doughep replied to scherb's topic in 986 Series (Boxster, Boxster S)
It's a Porsche; it's not being held up, it's just landing. :thumbup: -
This may already be common knowledge, but I couldn't find a post related to this so I thought I'd post one. I just swapped out the Blaupunkt headunit in my '98 for a Kenwood unit. Unfortunately, the Kenwood unit does not accept what appears to be a standard German plug configuration, so I had to buy an aftermarket harness adaptor to connect the harness of the Kenwood unit to the Boxster connections. I checked at all of the likely places (except the dealership ;) ), but I couldn't find one. Finally, I got a hold of an installer at Tweeter (an East Coast high-end stereo equipment shop). He told me that the harness used by Volkswagon was used by many of the German manufacture's, Including Porsche, Audi and BMW. He pointed out that the VW adapter cable would work, however the two power wires (Ignition switched and battery direct) were swapped. Sure enough, when I got the harness, it plugged in perfectly but the power wires are reversed. I intend to hook it up tonight, but I don't expect any problems. Just thought I'd save anybody looking for this harness a few phone calls. If anyone wants the manufacturer name/part number, let me know and I'll post it. - Pete
-
A couple of places to go are: DragonPlate (look at the Carbon Fiber Laminate) Koval Knives (for small pieces; navigate to catalog/handle materials) Texas Knifemakers Supply (also for small pieces; navigate to Online Store/Carbon Fiber Sheet) Dragon Plate sells larger sheets (about 2'x 2'), and as thin as 1/16" which should be thick enough for things like dash parts. I would experiment with a small piece before buying a big piece so as to ensure that it is the appropriate dimension for your application (for knives, folders typically use 1/8" on each side, fixed blade 1/4", if that helps). Dragon Plate also has a flexible, adhesive-backed carbon fiber veneer that can be cut with sheers, and sounds like it could be mounted over existing (moderately) curved parts. I haven't ever used it, but if you try it, I'd be interested to hear how it turns out. Have fun! - Pete
-
Oil level display somtimes stays on
doughep replied to doughep's topic in 986 Series (Boxster, Boxster S)
Thanks - I feel better knowing I'm not the only one. Safety in numbers, and all that. - Pete -
Anybody have a fuse diagram for a '98 5 speed?
doughep replied to doughep's topic in 986 Series (Boxster, Boxster S)
Thanks, Toolpants. Your not just good, your fast! It amazes me the speed of the responses I get . . . Thanks again. - Pete