Welcome to RennTech.org Community, Guest
There are many great features available to you once you register at RennTech.org
You are free to view posts here, but you must log in to reply to existing posts, or to start your own new topic. Like most online communities, there are costs involved to maintain a site like this - so we encourage our members to subscribe or donate. All subscriptions and donations go to the costs operating and maintaining this site. We prefer that guests take part in our community and we offer a lot in return to those willing to join our corner of the Porsche world. This site is 99 percent member supported (less than 1 percent comes from advertising) - so please consider an annual subscription or donation to keep this site running.
Here are some of the features available - once you subscribe RennTech.org
- View Classified Ads
- DIY Tutorials
- Porsche TSB Listings (limited)
- VIN Decoder
- Special Offers
- Paint Codes
- Registry
- Videos System
- View Reviews
- and get rid of this welcome message
It takes just a few minutes to register, and it's quality Porsche information at a low cost.
Contributing Members also get these additional benefits:
(you become a Contributing Member by subscribing or donating money to the operation of this site)
- No ads - advertisements are removed
- Access the Contributors Only Forum
- Contributing Members Only Downloads
- Send attachments with PMs
- All image/file storage limits are substantially increased for all Contributing Members
- Option Codes Lookup
- VIN Option Lookups (limited)


jpflip
-
Posts
684 -
Joined
-
Last visited
-
Days Won
9
Content Type
Profiles
Events
Forums
Exterior Paint Colors
Downloads
Tutorials
Links Directory
Collections
Classifieds
Store
Everything posted by jpflip
-
see this link, previous discussion boost
-
According to what I have learn so far about the TT. You definitively have a modified ECU. Non modified one can get max .7 bar.
-
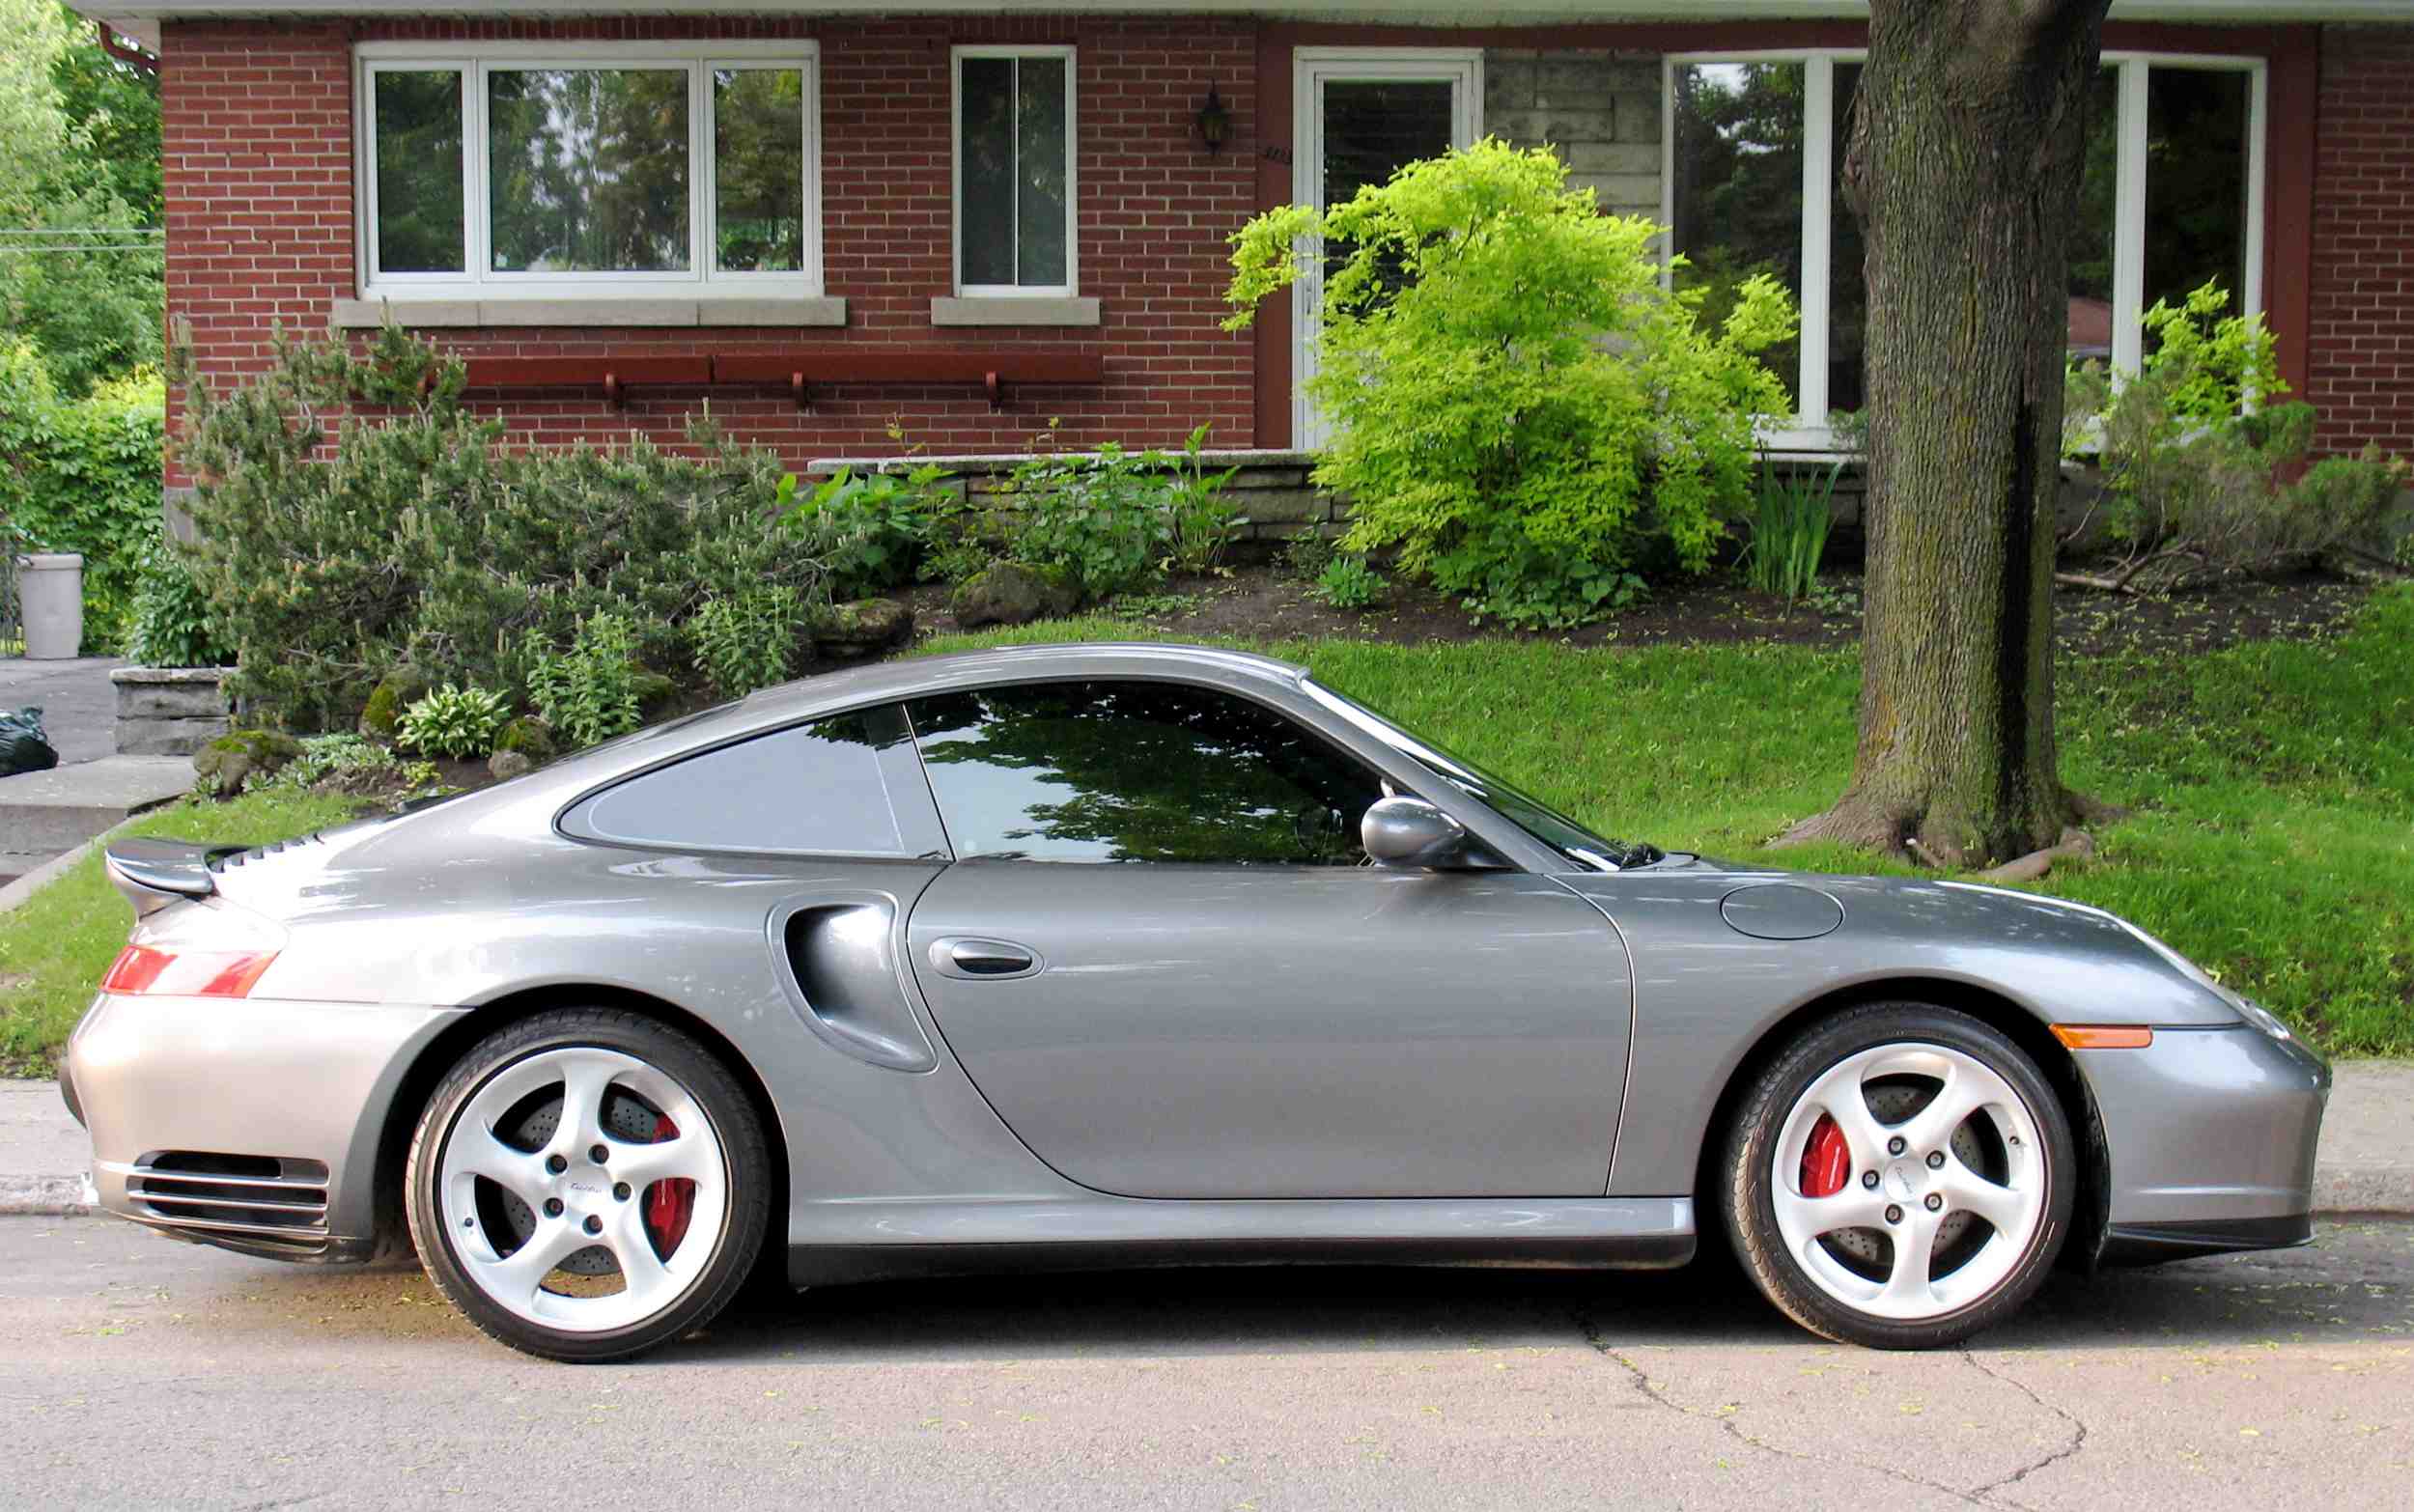
just received an email from guy who sold his 2002 TT, 39k miles, for $53,000. Florida. Clean title, the works. That is one heck of bargain if the car is all it was described to be! I am the one who purshase the car in Melbourne Florida from a very patient and fantastic sellers. I had a lot of problem to get it ship to the Canadian border but this is another story now it is in my driveway... I love the car. So far I had to replace the battery, the clutch accumulator the slave cylinder and soon the oil pressure sensor.....The car is simply amazing and a joy to ride. I probably drove so far only 1000 miles and wash it about 26 times but my pleasure is to drive it as much as learning about this fantastic piece of engineering. Got the Durametric software and found somewhere the repair manual etc...I know it wont be japaneese reliability but this is my toy and I am proud of it....
-
Part number please....Clutch reservoir access panel...
jpflip replied to jpflip's topic in 996 TT, 996 TT S, 996 GT2
Wow excellent thanks a lot!!!! Exactly what I was looking for.... -
Never thought about it. I will do some search in my paperwork. Thanks
-
Part number please....Clutch reservoir access panel...
jpflip replied to jpflip's topic in 996 TT, 996 TT S, 996 GT2
I guess they won't sell the rubber grommet only. I will have to found an alternative to hold down this panel...Thanks anyway... -
Why not another question. I broke the wheel lock bolt adaptor. Is it possible to get a replacement or I have to replaced the 4 lock bolts with a new adaptor... Thanks again.
-
In the luggage compartment o the driver side there is a black plastic panel to reach the clutch reservoir. I am looking for the part# of the screw and rubber grommet that hold this panel down.... Can you help. Thanks, J.P. I think the panel number is 996 502 017 05
-
I realized the post is not for me but...I didn't know about that thanks for the info but how can you explain that suddenly after replacing the slave + accu I got this vibration. May be it is because I got more space between the piston end and the fork itself... I am talking about millimeters here...I did not compare both slave before installation. I should measure the total length of both before installation. Toooo bad....
-
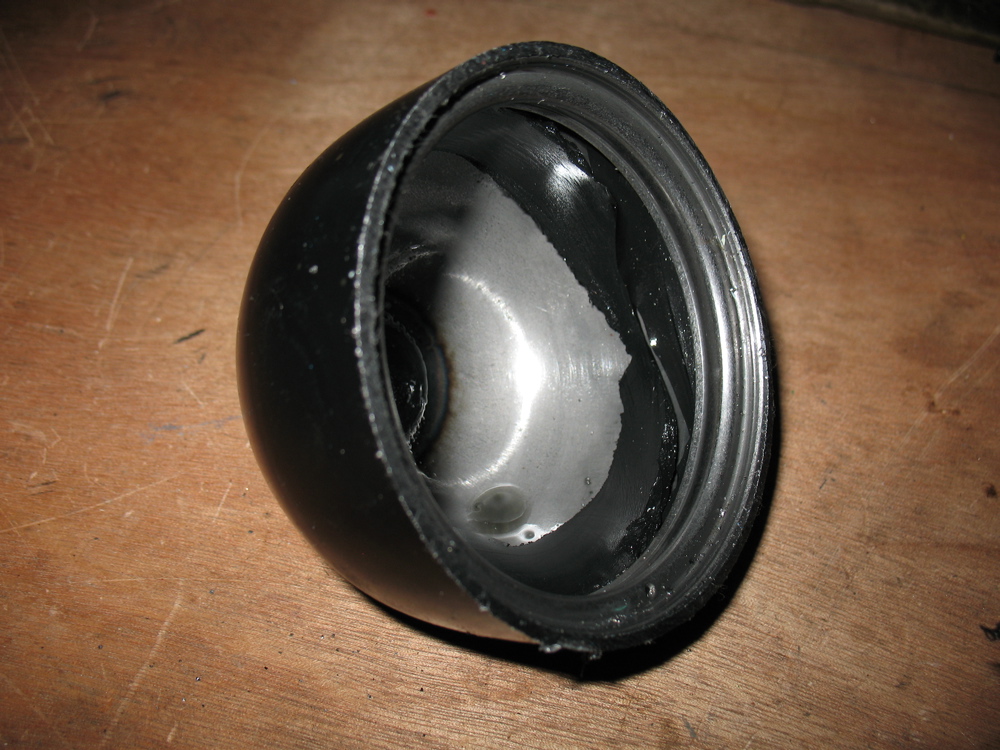
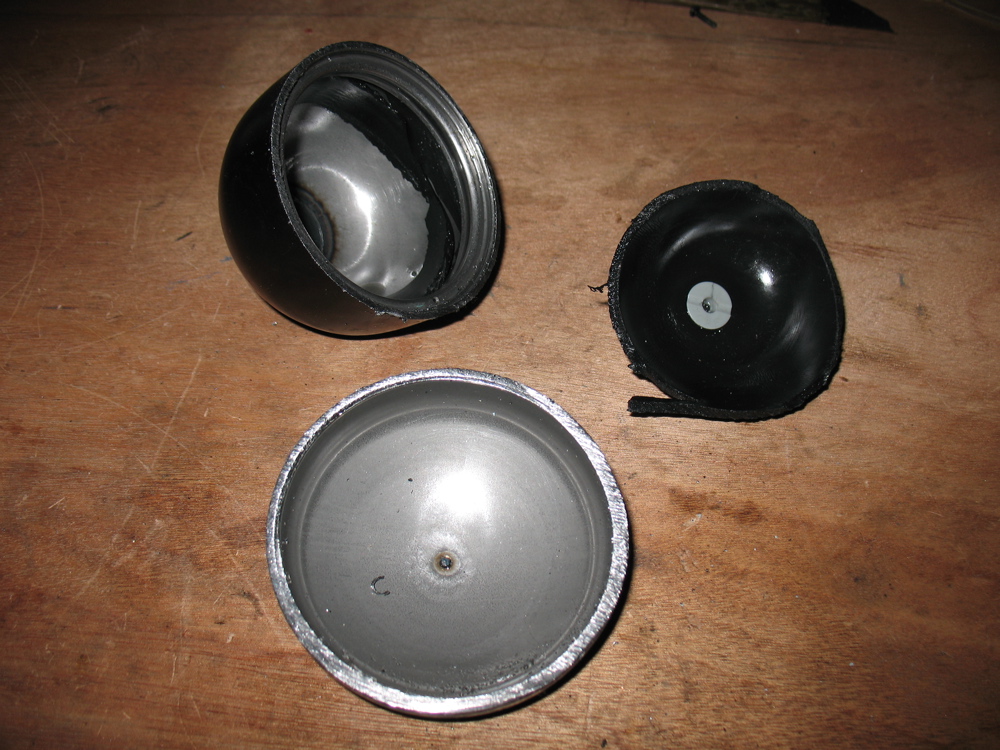
I have split the accumulator in half to found out what can fail in this simple reservoir. The rubber seems to be of a good quality but in my case it split at the joint between the top bell portion and the base. It is a bladder type accumulator and I guess there was previously pressure on the other side of this bladder but before cutting it in half I have drill a small hole to release the pressure and nothing came out so I am sure the accu was at fault in my case...On aircraft accumulator you can recharge the nitrogen side but as soon you open the pressure valve and you got hydraulic comming out you know the bladder failed.... The bell is cut in half and I also cut the bladder or diaphram. Now you see my failure on the joint portion the rubber is completely off at the base or the split and cut at several places...Weaken by the hydraulic ??? May be...

-
I have split the accumulator in half to found out what can fail in this simple reservoir. The rubber seems to be of a good quality but in my case it split at the joint between the top bell portion and the base. It is a bladder type accumulator and I guess there was previously pressure on the other side of this bladder but before cutting it in half I have drill a small hole to release the pressure and nothing came out so I am sure the accu was at fault in my case...On aircraft accumulator you can recharge the nitrogen side but as soon you open the pressure valve and you got hydraulic comming out you know the bladder failed.... The bell is cut in half and I also cut the bladder or diaphram. Now you see my failure on the joint portion the rubber is completely off at the base or the split and cut at several places...Weaken by the hydraulic ??? May be...
-
Thanks for your help and info Chuck...
-
I cannot believe it Chuck but I replace both unit yesterday and now I got this strange pedal vibration when I am depressing the clutch. I did not have this symptom with the previous slave or accumulator. I will do a longer test drive later this week and probably will try a deeper bleeding of the system.
-
Clutch slave cylinder and accumulator replacement. Clutch slave cylinder and accumulator replacement. Please note this text was made by a french canadian. I hope you will understand my english. Sorry about any mistake. After the car is jacked 1: remove the aluminium cross member 2 bolts 15mm wrench 2: remove the drive shaft on the driver side 6 alen bolts 8mm allen key. 3: remove the cooling lines from the transmission bracket and tie them to the most left of the car. 4: Remove the cooling lines bracket one bolt 10mm socket. 5: To get a Author jpflip Category TT/GT2 (996) - Common Fixes and Repairs Submitted 08/01/2008 07:43 PM Updated 11/16/2014 06:29 AM
-
Clutch slave cylinder and accumulator replacement. Please note this text was made by a french canadian. I hope you will understand my english. Sorry about any mistake. After the car is jacked 1: remove the aluminium cross member 2 bolts 15mm wrench 2: remove the drive shaft on the driver side 6 alen bolts 8mm allen key. 3: remove the cooling lines from the transmission bracket and tie them to the most left of the car. 4: Remove the cooling lines bracket one bolt 10mm socket. 5: To get as much pressure off after cycling the clutch several times I open up the bleed screw with a small hose on it to bleed the extra pressure. 6: remove the accumulator 22mm in my case for the one coming off and 27mm for the new one. 7: Remove the small vertical bracket holding the cylinder to the transmission 2 bolts 13mm 8: with a small wrench 13mm unscrew the most aft line (I purchase a set of mini 4 to 5 inch wrench very good for that job) 9: Remove the forward line but first you have to unscrew it from the bottom where the line is green. 2 wrench of 15mm. Catch the extra fluid. This fluid is coming directly from the forward reservoir. And after remove the line completely from the slave cylinder. 10: After you have to use the fuel/ac removal tool. I purchase a set for $13.00. It is to hold the red collar in place when you want to pull the middle line out. 11: The last 2 bolts 15 mm hold the cylinder to the transmission. 12: you can now take out the cylinder. 1 :Before installation on the old one feel the tension of the inner sring of the cylinder by pushing the actuator pin into the cylinder to give you a feel of the opposite force you will encounter when you will position the cylinder in place. If the cylinder go in place without this back pressure it is because you miss the fork of the pressure plate. This was my only concern so I use my finger to locate this fork and after I position the cylinder in front to locate the pin in the fork and after many trial I found I had to apply pressure towards the transmission casing to fight the inner spring of the cylinder and when I was confident with the position I screw in one bolt 15 mm and I left it loose. I screw in the other bolt 15mm and left it loose. 2: while the bolt are loose position the most aft hyd. line by hand that way you wont cross thread it. You can thigh it 3: you can installed the middle line were there is a red collar. 4: You can tightened the two 15mm bolts that hold the cylinder. 5: Install the vertical bracket with the two bolts 13mm. Remember to do this before the accumulator... 6: install the forward hyd. line and torqued. 7: After your three hyd. lines are tight , your 2 bolts for the cylinder are also tight and the vertical bracket also tight you can install the accumulator. 8: And the rest is simple backward process... Torque of the drive shaft flange to transmission is 60ft/lb I had a lot of plastic bracket broken so I used tie wrap instead.... Bleeding is simple. One on the clutch and one on the bleed point . Do not forget to fill the forward reservoir continuously. note.: At the beginning you have to lift the clutch by hand before you start having a pressure build up... Poor man set-up...But proud owner of a TT ;-) (that was in 2008! But now I got a Maxjax LOL!!!) That is the set up and tools require. Cleanup before removal and installation Slave position...
-
PST2, PIWIS & Durametric Tool Registry
jpflip replied to CJ_Boxster's topic in Diagnostics, Tips and Diagnostic Tools
Yes I have received a Durametric professional kit. If you live in the area and want to get code retrieved, erase messages or info on your ECU etc. Just PM me and I give you my coordinate.... See you, J.P. -
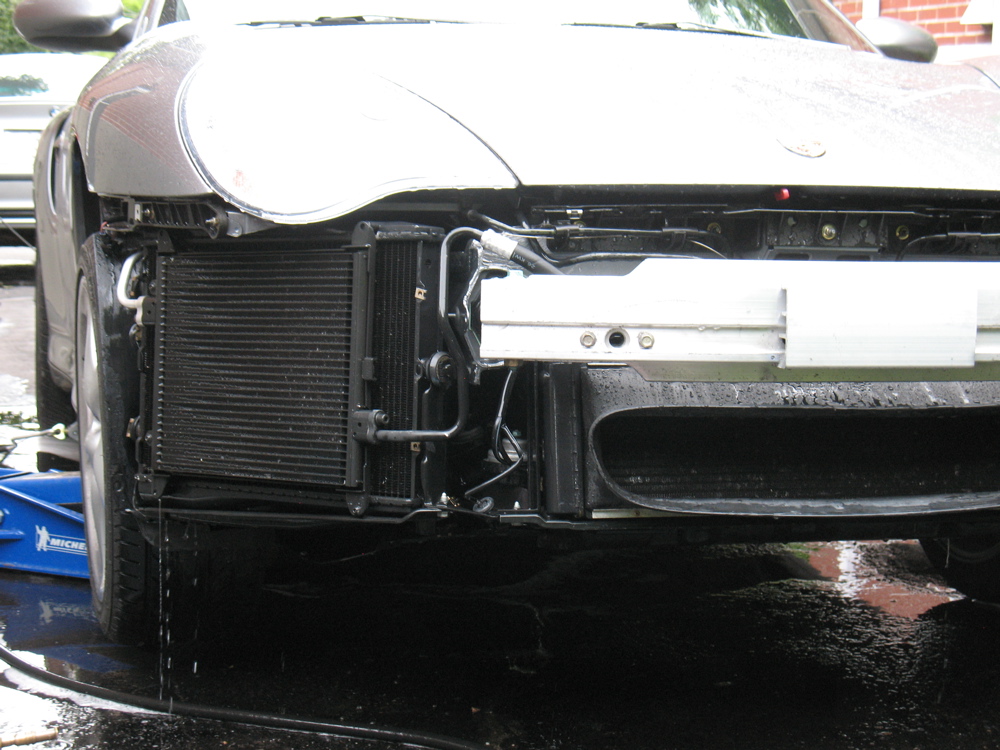
Thanks for the advise. I see what you mean but it was my first trial of cleaning it up with the bumper in place with an air gun and a product called simple green...I realized later the situation needed the bumper ,or has per repair manual, the front spoiler removal.
-
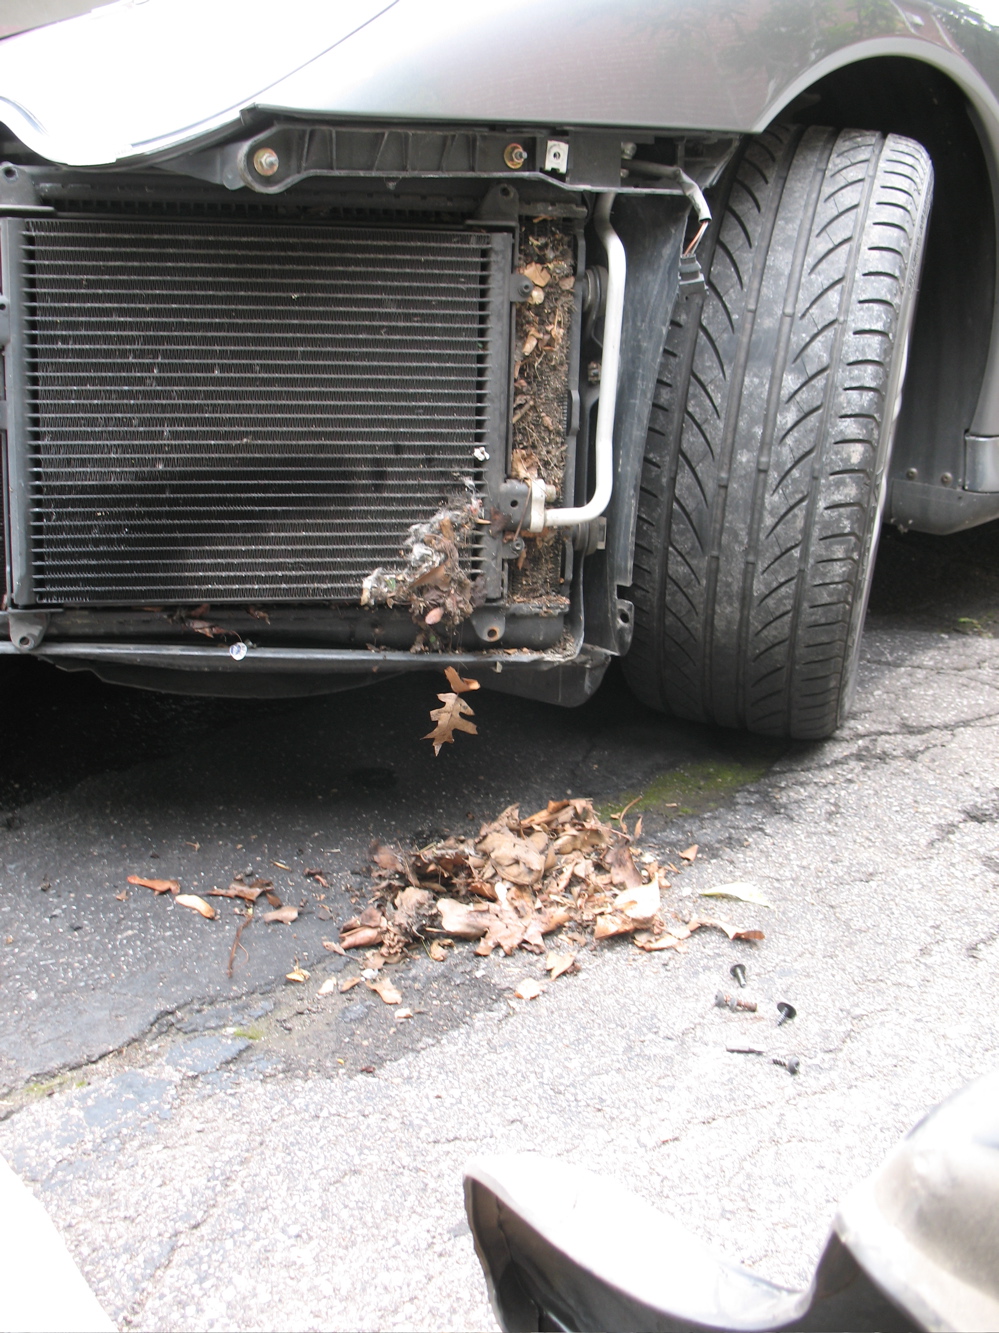
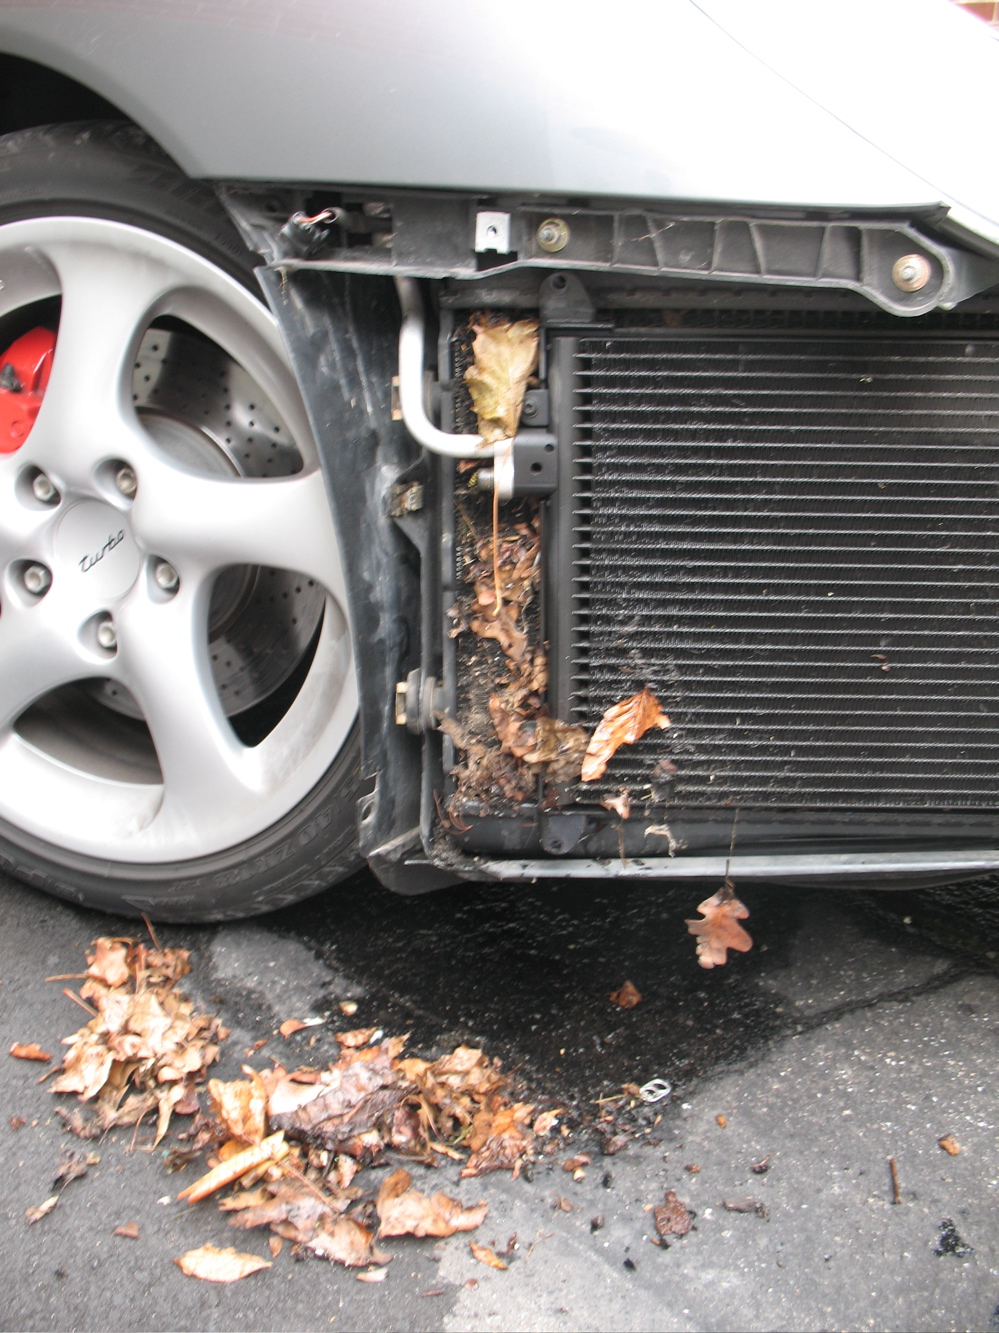
Water from a very deep cleaning with the garden hose..after the vacuum of course...And I used a fine little screwdriver to gently straighten the fins that were damaged by rocks...
-
Since I know now how to post a picture (Thanks to Loren) allow me to post a pics of my TT....
-
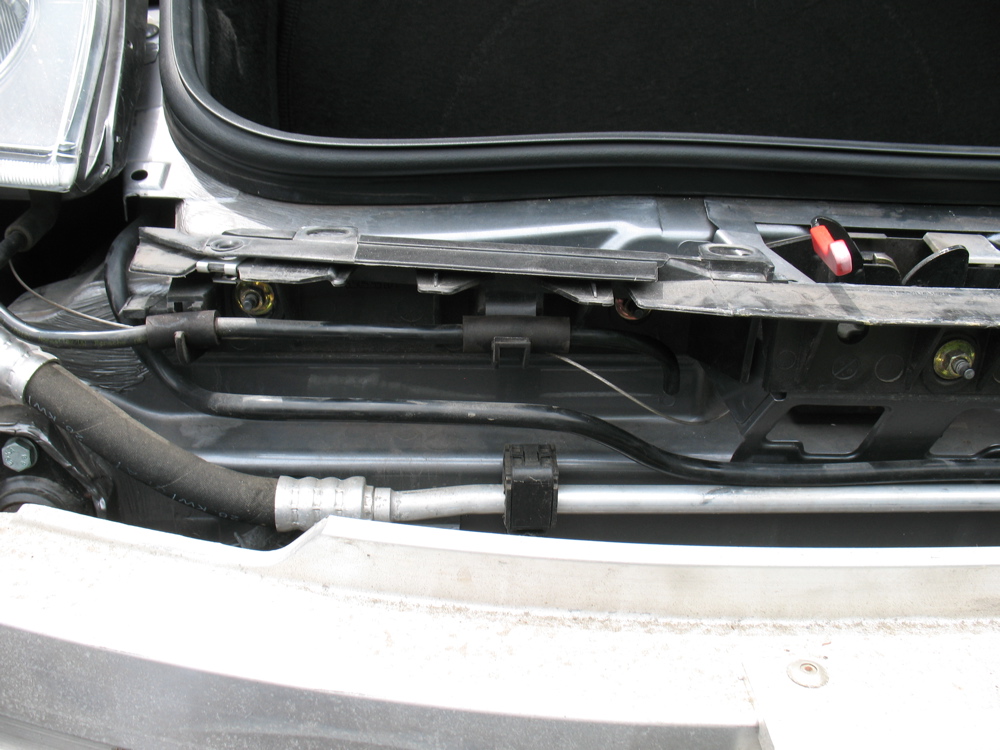
Too bad I cannot post my pics because it is really a mess in the aft corners where everything accumulates...I am sure over 10% to 20% of efficiency was lost... (If you feel like explaining a computer illiterate the way to post picture on this forum feel free to PM me, Ihanks) (Now I can thanks to Loren...) Mysterious cable going far in the aft portion of the right fender...As you mention may be it is coming back to the headlight. Will found out next radiators cleaning...Thanks for your help, info and patience with a new french speaking 996TT owner, computer illiterate. Soon my english will get better especially after I translate all Chuck Jones thread and replies to this forum ;)
-
What a surprise after the front bumper removal. A lot of leafs and dirt stuck in the corner on both side blocking part of engine water cooling radiators and a/c condensers...Do yourself a favor. It takes only 30 minutes max to remove the plastic cover of the front bumper and after you got access for a good clean up and inspection... Also I was surprised to found a cable that release the front hood. But I cannot found were it goes....I dismantle the right wheel well covers but no access to this cable because I have read somewhere about an handle... I am sure it is an emergency release but does it go to the cockpit or behind the glove box. Thanks, J.P.
-
Just to give you a start I was told you need a 27 mm open end for the accumulator and a 13 mm crow foot can be helpful for the most aft hydraulic line. Also a special tool is needed for the quick disconnect hyd line . The one with the red collar. Just do a Google search for fuel/ac disconnect tool....Good luck and please keep me inform of your struggle !
-
If you look on 6speed you will found a post by Mikelly. He is doing the job right now...http://www.6speedonline.com/forums/996turbo-gt2/137426-clutch-slave-replacement-need-answer.html. Myself I just received the parts today so I will soon start this job. You don't have the repair manual for the TT ?
-
Thanks a lot Topmech0 for your help. I am still waiting for the parts and anxious to start working on it. There will be a feedback on my final result. Thanks again, J.P.
-
Just order Pentosin + accumulator + slave cylinder. I will let you know what fix it . I will also dismantle (or cut in half) the accumulator and the slave cylinder to exactly found out were there is a possibility of oil migration and what can cause this failure (o-ring wear or cylinder corrosion or bypass valve failure...). Give me a month before I found the time to crawl under my car and start working on it. Thanks for your info Wvicary.