Welcome to RennTech.org Community, Guest
There are many great features available to you once you register at RennTech.org
You are free to view posts here, but you must log in to reply to existing posts, or to start your own new topic. Like most online communities, there are costs involved to maintain a site like this - so we encourage our members to subscribe or donate. All subscriptions and donations go to the costs operating and maintaining this site. We prefer that guests take part in our community and we offer a lot in return to those willing to join our corner of the Porsche world. This site is 99 percent member supported (less than 1 percent comes from advertising) - so please consider an annual subscription or donation to keep this site running.
Here are some of the features available - once you subscribe RennTech.org
- View Classified Ads
- DIY Tutorials
- Porsche TSB Listings (limited)
- VIN Decoder
- Special Offers
- Paint Codes
- Registry
- Videos System
- View Reviews
- and get rid of this welcome message
It takes just a few minutes to register, and it's quality Porsche information at a low cost.
Contributing Members also get these additional benefits:
(you become a Contributing Member by subscribing or donating money to the operation of this site)
- No ads - advertisements are removed
- Access the Contributors Only Forum
- Contributing Members Only Downloads
- Send attachments with PMs
- All image/file storage limits are substantially increased for all Contributing Members
- Option Codes Lookup
- VIN Option Lookups (limited)


jpflip
-
Posts
684 -
Joined
-
Last visited
-
Days Won
9
Content Type
Profiles
Events
Forums
External Paint Colors
Downloads
Tutorials
Links Directory
Collections
Classifieds
Store
Everything posted by jpflip
-
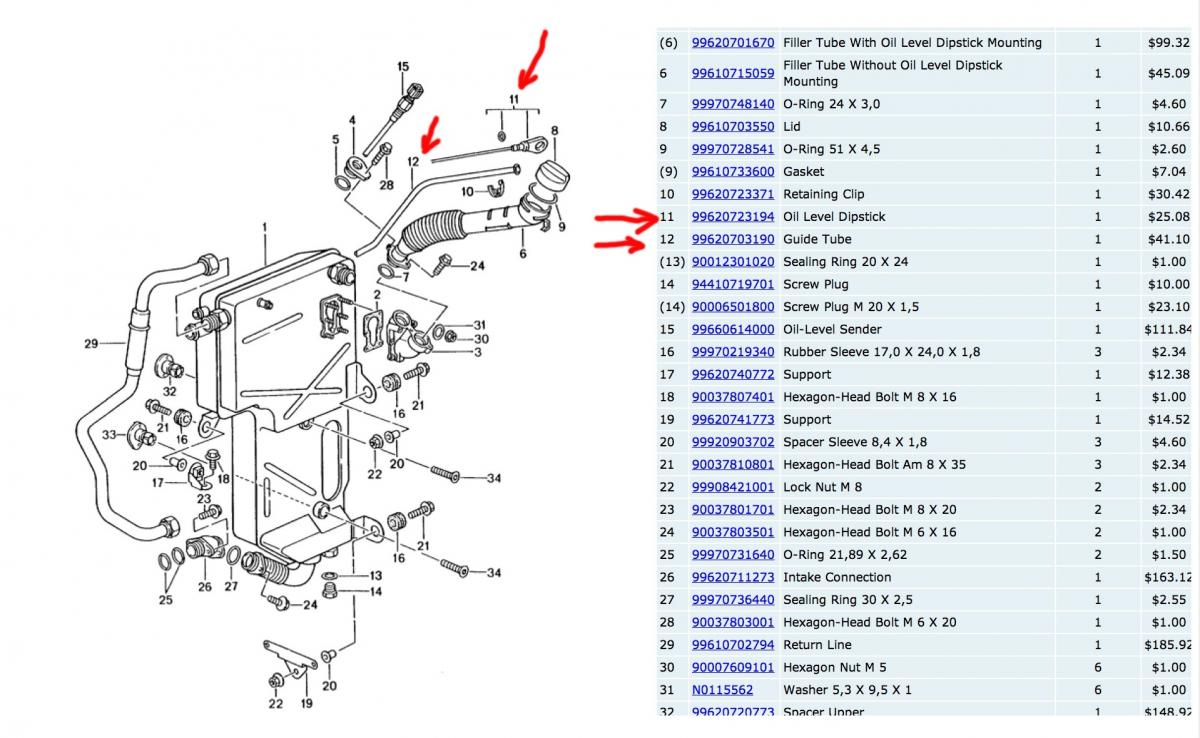
This is really useful! Do you know if I can literally just buy the indicated parts and have them fitted? Are they difficult to fit? Many tanks. Here is a good thread on the subject of installing a dipstick! http://rennlist.com/forums/996-turbo-forum/802200-pulling-engine-for-failed-coolant-tubes-what-else-should-i-do.htmlhttp://rennlist.com/forums/996-turbo-forum/802200-pulling-engine-for-failed-coolant-tubes-what-else-should-i-do.html
-
Dealers charge 20 hours total for removal and installation. But it can be done in less than 16 hours. I would like to know exactly what sensor, related to your problem, need the engine removed….There are one other option for you, the installation of a GT3 dipstick….

-
996 tt Non anti-dazzle Rear View Mirror Swap out
jpflip replied to mat59's topic in 996 TT, 996 TT S, 996 GT2
Good ending, I'm happy for you and thanks for the update! -
996 tt Non anti-dazzle Rear View Mirror Swap out
jpflip replied to mat59's topic in 996 TT, 996 TT S, 996 GT2
Sorry I don't know….You should contact them. The other option is a dismantler like Oklahoma Foreighn or L.A. dismantler... -
996 tt Non anti-dazzle Rear View Mirror Swap out
jpflip replied to mat59's topic in 996 TT, 996 TT S, 996 GT2
You can get it fix for about $75.00 at this place: Stacy Svay Customer Service Rep. Sybesma's Electronics 581 Ottawa Ave. Ste.100 Holland, MI 49423 1-800-456-4265 -
Your the best Loren!
-
Windows and Sunroof Not Working (Checked Fuse)
jpflip replied to mjbull23's topic in 996 TT, 996 TT S, 996 GT2
Just to double check, the fuse related to power window and sun roof are D1-D3-B6…. -
Of course I have a preference…Ultimate Motor Werks! I am far away from being a person who knows a lot about modified TT's but I am more than happy about UMW tune and also about after sale service. Kevin is really one of the best out there….http://forums.rennlist.com/rennforums/996-turbo-forum/810206-2014-ultimate-motorwerks-spring-tuning-special.htmlhttp://forums.rennlist.com/rennforums/996-turbo-forum/810206-2014-ultimate-motorwerks-spring-tuning-special.html
-
Rear spoiler instructions for bleeding hydraulics
jpflip replied to roadsterdoc's topic in 996 TT, 996 TT S, 996 GT2
Thanks a lot for the update!!! Great to know you got no issue :thumbup: -
Interesting thread here: http://www.renntech.org/forums/topic/32406-door-closed-sensor/?hl=%2Bdoor+%2Bswitch#entry172001
-
Richard, I know Pat is working on his Tip Transmission. And I think he found somewhere the parts catalog...May be you should send him a PM. Very knowledgeable guy! You will found him on this thread: http://www.6speedonline.com/forums/996-turbo-gt2/326723-engine-reference-pictures.html
-
It happen to someone on 6speed. Here's the link: http://www.6speedonline.com/forums/996-turbo-gt2/129016-tiptronic-fluid-leak.html
-
OMG sorry I miss the "TIP" word sorry….
-
Pentosin, Take a look at your clutch reservoir in front under the hood. May be it is overfilled . If it is your slave is at fault. If the leak comes from the middle of the car it can also be the slave or the accumulator that is becoming loose on the slave…Saw both cases ….
-
Andres!!! Your back!!!! Are you in USA or still in Puerto Rico? New Porsche? !!!! Happy to see you around! J.P. (I would like to thank you again for the PST2 I simply love it!!!!)
-
Yesssssss!!!! :thankyou: Again Loren!!!!
-
Loren, I've looked at it and is it the big wide c shape spring clip you have to remove?
-
I got my front bumper cover off for painting. The cover was painted and repaired (nick and scratches) but wrong color match. Not exactly dead on...I would like to remove a part from the car to take it to a second paint supplier for a better color match. Which part is easiest to remove. I was thinking about the fuel access cover, never remove it before…Is it easy? Or may be mirror cover?…The spoiler can also be remove but can be damage while handling… Any help or suggestion is greatly appreciate, Thanks! J.P.
-
The noise is probably from the fact you had low level in the steering reservoir. The pressure being a lot higher coming from the steering pump , it migrate to the clutch system through a weak slave part. Some say a worn seal and some are talking about a weak check valve….. GT2 better??? Hum, I cannot answer, there are some pro and con out there ;-) I still got the slave on my car. But many post on the subject on Rennlist and 6speed: Happy reading! http://www.6speedonline.com/forums/996-turbo-vendor-classifieds/206605-gt2-clutch-conversion-kits.html http://forums.rennlist.com/rennforums/996-turbo-forum/694627-dilemma-gt2-slave-mod-or-just-replace-with-stock-parts-my-slave-is-toast.html http://www.6speedonline.com/forums/996-turbo-gt2/261187-993-gt2-slave-conversion.html
-
The front reservoir is for the clutch and if it is overfilled it is due to a faulty clutch slave actuator. The clutch system used the power steering system pressure to help you depress the clutch pedal. If the slave is faulty there is a migration of fluid between the steering and clutch system. If you look at the steering reservoir which is the engine compartment you will found the reservoir level low…. For now you can always remove this extra fluid and refill the steering reservoir. I did this for a couple of months before replacing the slave and accumulator at the same time The slave part# is : 99611623752 and it is about $352.00 and the accumulator : 99731416600 $114.00 and it takes about 3 hours to replace those parts…. Of course there is a third possibility to fix this problem forever: The GT2 system, many threads about this subject...
-
OBD2 Fault Code P1325-Inlet camshaft bank 2
jpflip replied to Iceyankee-Tsi's topic in 996 TT, 996 TT S, 996 GT2
Wow! Thanks a lot Silver. I am really touched! :thankyou: :cheers: -
OBD2 Fault Code P1325-Inlet camshaft bank 2
jpflip replied to Iceyankee-Tsi's topic in 996 TT, 996 TT S, 996 GT2
Sadly Andres (Iceyankee-tsi) sold his car as it was and never heard about the new owner…. I bought his PST2 ... -
Take a picture of the area of the leak…Give yourself some more time, because you don't drive your car often, to evaluate since you had an overspill while refilling the reservoir. I'm pretty sure it is related….
-
Front bumper cover removal, radiators clean-up and radiator replacement... The front bumper cover removal is really easy and give you access for a good cleanup of your radiators. I had to remove the left radiator and the fan at the same time. So here is the process….Hope this will help anyone... Toll needed: Philips screwdriver #2 Torx screwdriver 030 Tork screwdriver 025 Socket 13 and 16mm To do a good clean-up of the front radiator… (Pop rivet gun + six 1/8 diameter pop rivets 3/8 inch long) +++ Cover removal: Take out both side markers. (thin screwdriver p Author jpflip Category TT/GT2 (996) - Maintenance Submitted 11/17/2013 08:43 AM Updated 11/19/2013 06:43 PM
-
The front bumper cover removal is really easy and give you access for a good cleanup of your radiators. I had to remove the left radiator and the fan at the same time. So here is the process….Hope this will help anyone... Toll needed: Philips screwdriver #2 Torx screwdriver 030 Tork screwdriver 025 Socket 13 and 16mm To do a good clean-up of the front radiator… (Pop rivet gun + six 1/8 diameter pop rivets 3/8 inch long) +++ Cover removal: Take out both side markers. (thin screwdriver press the clip towards the font of the car) You will discover a screw behind and a clip nut (that was not used on my car, front inner fender needs to be remove to get access to this screw...) In front of the wheel , at the bottom, you have a screw on each side. easier to get at if wheel removed... Now in front right side you got the outside temperature sensor. Just push it to the aft and it will pop out of his holder…. Open the front trunk and remove the four small plastic screws cover (1/4 turn) and remove carefully this plastic liner going from the left headlights assembly to the right side... Under this liner you will found two screws. Remove them…(Torx 030) Now under the front of the car you will found some Torx 030 and philips screws…Four on each side (3 torx and one philips) and three in the middle...Remove them. Now you can carefully take out the bumper cover….Risk of scratching is high. Be careful…. Under the bumper cover you got some ducts. Two for the side radiators and one for the front. To get proper access to clean up removal of the ducts is required…. The side radiator ducts are attach with two screws located in front and inside the ducts. Be ready for a surprise when the ducts are removed ;-) Side radiators ducts are held by two screws each. Note The small radiator in front of the big one is the condenser for the air conditioning. It is held with 4 crews to the radiator ….Remove them to give you little bit more access to clean the side radiators properly! Remove the front aluminum bumper reinforcement. (2 vertical bolts with a 16 mm socket) note 63 ftlb torque at reinstallation... Now that you have both side radiators duct removed, the front one is held by rivets. I've decided to remove it and was really happy about it because some part of the front radiator were impossible to clean with it in place…. Simply use a drill (1/8) and drill the 6 rivets out. The top or bottom one are not in front to the radiator core so don't worry about damaging anything behind those rivets… Two aluminum angles will be part of the fixture…. You can also remove the outlet duct for the front radiator if you are using water for cleaning…. Now that you have all the parts in front of the radiators removed it is really easy to get access to any of the three radiators. The front one is straight forward but the side ones need a fixture to be removed. First stop the flow of fluid with vise grip and metal plate to prevent damaging the rubber pipes... Now remove the three pipes clips and the fan electrical connector…One for the supply one for the return and a small one hidden in the back for the vent….On the installation leave the clips in place and when you put the pipes in place you will hear a small click. That means the pipes is secure in place…. Now only the aft fixture has to be remove for side radiator removal….Remove the two clips on the radiator holding pins aft portion and one in the forward portion of the radiator. (I use a screwdriver to release the lock and a center punch to force the clip out…) Also remove the forward bolt of the aft mount... Now remove the bolts and screw that hold the fixture in place. Be careful the radiator might come at the same time.Note: I have used i little bit a release oil on the radiators grommets (3) to facilitate the sliding of the grommets on the pins…. Now the radiator can slide out in the back…To remove the fan from the radiator,remove the two screws and slide it out to the left side…Note: I was able to slide out the fan assembly with the radiator in place. There is no need to remove the radiator to replace the fan assembly but the removal of the aft radiator fixture is required…. For your information. I have found the line for the headlight washer completely loose just over the bumper reinforcement Tie wrapping is a good thing because now there are no more rubbing or rattling on anything…. Of course the installation is the reverse process. The bumper reinforcement bolts should be torque to 63 ftlb. and replenishing of the coolant system is a must if you had a radiator removed. Happy wrenching!