Welcome to RennTech.org Community, Guest
There are many great features available to you once you register at RennTech.org
You are free to view posts here, but you must log in to reply to existing posts, or to start your own new topic. Like most online communities, there are costs involved to maintain a site like this - so we encourage our members to donate. All donations go to the costs operating and maintaining this site. We prefer that guests take part in our community and we offer a lot in return to those willing to join our corner of the Porsche world. This site is 99 percent member supported (less than 1 percent comes from advertising) - so please consider an annual donation to keep this site running.
Here are some of the features available - once you register at RennTech.org
- View Classified Ads
- DIY Tutorials
- Porsche TSB Listings (limited)
- VIN Decoder
- Special Offers
-
OBD II P-Codes - Paint Codes
- Registry
- Videos System
- View Reviews
- and get rid of this welcome message
It takes just a few minutes to register, and it's FREE
Contributing Members also get these additional benefits:
(you become a Contributing Member by donating money to the operation of this site)
- No ads - advertisements are removed
- Access the Contributors Only Forum
- Contributing Members Only Downloads
- Send attachments with PMs
- All image/file storage limits are substantially increased for all Contributing Members
- Option Codes Lookup
- VIN Option Lookups (limited)


usaf-lt-g
-
Posts
361 -
Joined
-
Last visited
Content Type
Profiles
Events
Forums
External Paint Colors
Downloads
Tutorials
Links Directory
Collections
Classifieds
Store
Posts posted by usaf-lt-g
-
-
Ran my durametric software this morning and am getting the following:
Fault Code 33
Interior Sensor faulty
Status: Not present
Frequency counter: 1
Fault Code 60
Central Locking Limit Position
Lock Not Reached
Status: Not Present
Frequency Counter: 3
Not exactly sure what this means... I can't seem to "clear" these codes (the option is blocked out) These are the only fault codes currently in the system.
-
I finished yesterday to remove and replace my cracked coolant tank.
The process was not the easiest but it was completed.
so i drove the car last night and all seemed good
but today when i got to work the coolant was leaking fast from the CAP. (01 revision)
So i let it cool, The tank ended up empty after it cooled down.
So i removed carpet and clean all area, filled in the tank with coolant half way and started the car..... the temp light still blinking..... i checked the sensor at the bottom of the tank and it had some coolant at the wires where the plug is (could this cause the blinking temp light??)
also i didnt bleed the system yesterday .... is this what caused the cap leak, or is this a faulty cap??
Thank you guys.
Ok just saw this. This sounds very similar to me Sc00ter. I was driving and then noticed spillage everywhere. Luckily for me, it wasn't a cracked tank, it was due to the cap not being on tight enough. However, the "Temp" light has been on ever since. I'm wondering the same if the sensor might have coolant on it. Although I'm not 100% sure where the sensor is located.
-
at the bottom of the expansion tank there is a sensor .... if that little sensor is faulty or perhaps the wiring.....it might trigger the blinking
The resovouir tank? Or the expansion tank? Is there a write-up on replacing this somewhere?
-
So I bought the durametric software and hooked it up to my boxster S this morning. I ran a AC/Heat Diagnostic and got no error codes. I got 2 alarm codes, and couldn't run an instrument cluster diagnostic (just kept hanging and wouldn't let me). Is there some other test I can run to figure out why the Temp light is blinking at me? :huh:
-
I do recall some of your cooling discussion but what was the primary issue again. Slow warm up? I know it flux'd some but nothing to be concerned about. Change that thermostat as we discussed. Otherwise the will most likly be no error codes or help to tell you about the cooling system.
Now it will give you "real time" values of different coolant sensors on the system, assuming they are working correctly.
Essentially, the original problem occurred after pulling in one day to the garage after my new transmission was installed. Got home, coolant everywhere, looked to be coming from the coolant tank. Re-filled with standard Green-type coolant (yes I know Porsche takes a different coolant, but from what i read there's nothing "special" about it) and re-tightened the cap to make sure it had proper seal. I haven't seen it leaking since.
However, the standard temperature reads out as normal on the gauge between 190 - 200 aprox. I've also confirmed the cooling fan running. Yet the Temp Gauge light blinks slowly and steady as soon as the car is turned on.
-
Took your advice and purchased the Durametric software as well. Hopefully, this will also help indicate what my cooling problem is that I have.
Thanks!
-
Hmmm.... interesting.... well now, the problems don't seem to be present any longer. The CEL light is not on, the auto-up auto-down work, and the alarm is working approrpriately.... weird.
-
Interesting that I never saw your 2nd post (cancel it was the wheel) until just now!
What were you specifically doing to your car from your original post that required the battery disconnect? It sounds like a ground or such may have been disrupted to cause issues with the alarm and now the window drop feature.
First, have we established the drop issue is in fact with both windows, or just one?
Are you still having the alarm issue?
Everything is good with starting the car now?
My personally opinion is that anyone who can own a somewhat expensive (and mildly exotic) car such a Porsche should have two things sitting on the bench if they are planning to DIY anything on the car. One is the Bentley manual and the other is the Duratmetric software. The 2nd will pay for itself after one trip to the P-dealer to have a simple CEL reset. Plus it can tell you many specific things that are bound to surface on your Boxster. Just spend the money and get it if you need to save money and know enough to take the connection off the battery!
It is posible to have error codes related to your alarm w/o a CEL light. So there is most likely codes in there.
Others can correct me but I doubt there are any codes related to window failure. It's a pretty low tech system in there. The window drop is controlled by a microswitch in the door handle. Did you do any work to disrupt the switch(es)?
#1) Both windows do not "auto go down / up" they'll go down if I hold the button. They used to auto go up and down with a quick click on either button.
#2) Yes - Beeps once regardless
#3) Car starts fine
#4) When I did the install of the interior / exterior "Anti-Dazzle Mirrors" the TSB required me to disconnect the negative terminal on the battery as step #1. So I did that, and roughly it was disconnected for about 3-4 days.
#5) Technically the driver's side door panel is still disconnected. and off, although, I do believe I hooked up all the wires for the time being.
#6) Where exactly do I get that software from? I thought I needed some device to hook up and read the codes?
Thanks!
-
Yup it is pretty cheap. U prolly can get it at Ebay
Yes I'll writer up something, if I do it. I'm still debating
do it, do it :D
Haha.. juniinc, with any luck, you'll have to pull out the old "relay support Bay" and have as much fun as I did! Don't hit your head a dozen times on the steering wheel like I did ;)
B)
-
FYI, what you are tapping into is called a bridge plug; these are identified on the schematic as "BS" and then a number. Sorry I didn't read this sooner, but glad you figured out you had to remove the relay carrier to get to them.
Make absolutely sure you tapped into the correct bridge plug, since your perspective is different whether you are looking at the relay carrier from the front vs. the back.
--Brian
THanks Brian, Yep I did a double check to make sure before i plugged anything in. I think she's good to go. Now I just have to figure out how to get the faults cleared, which the TSB mentions. The cool thing was that when I looked at the back of the plugs... all the wires that were previously plugged into them had the same color band as the wires i was plugging in.
-
Are you sure it's just not a coincidence and you have a bad (common) switch tumbler? Additionally, my would not turn either even after swapping the tumbler. It seems to me the design flaw in the steering lock is very sensitive. Even w/o the steering wheel turned I often have to turn the wheel and find the sweep spot (sometimes) to get the ignition to turn.
My wife called one day and could not get the car started. I drove and hour to help her and when I got their I made the discover that slightly turning the wheel (steering) one way or another found the spot to allow the unlocking.
As far as the beep, I do believe one beep does warn of an alarm failure. You'll have to review the owners manual or Bentley to confirm. Mine also does this from time to time and I have not been able to figure out the cause. Hasn't done it in 6 months but all last summer it was picky when engaging.
Durametric pulled error codes related to the inferred sensors which I believe Lauren said was common. Not sure if this causes my issues or not.
Regarldless my point is sometimes things are truely unrelated to the activy you just preformed and you car has other common issues with ignition tumblers and/or steering wheel interlocks.
Interesting, the TSB on the install I did did say I would probably need to "clear error" codes... however, I'm not sure how to do that. I imagine it would either require me taking it to the dealership and having them clear it, or purchasing my own "device" to allow me to do so.
In regards to the tumbler, i don't think it's an issue. When i was literally on my back underneath the dash I moved the wheel a couple of times and it locked, which prevented me from turning the key. I haven't had the issue pop back up since.
On another note, I have noticed that the automatic "up / down" feature of my windows no longer works. I'm wondering if this is also related to the presence of error codes.
Per the TSB's Last step - "Read out fault memory of the control modules in the equipment with the PST2, check, and erase if necessary. Input Radio Code if Necessary."
Since I don't have a factory radio, the radio code is unnecessary. However, I'm wondering if other faults are present from the install, if that could be messing with things?
Thoughts?
-
Hey where'd you get the white Porsche Decal for the bottom of the trim piece? I just ordered the trim kit off ebay for my install and thought it came with, but apparently not. Just curious where I can get it from. Looks sharp!
-
Disregard... it was the dang wheel. Once I turned it a little, no issue. everthing came up fine.
-
Hey guys,
I disconnected the battery while i worked on my car the past few days. I just finished putting most her back together minus the driver's door panel (but all the electrical is connected). I just now reconnected the battery, however I can't turn the key in the ignition. Literally, I can't turn it at all in the ignition. Whenever i hit the lock/unlock button it beeps at me once. What's going on here?
:huh:
-
then U need to modify those 2 pins to fit? or take the black plate out
are the wires even connected to those relay holes? have u looked
Have U tried to put it in the hole itself on that black plate?like I said earlier , U need to pull 1 of those relays & see
Yours should be the same way
Hmmm... <_< There's got to be a way to get that black cover off. Why would they have attached these special connections to the harness with no other instructions other than to plug em into a loose slot in the plug? I honestly don't see how you're supossed to be able to plug a wire in there anyways unless there's someway to get that black piece off.**** I'm so close to... these are the last wires I have to finish, then I can put her all back together and finally get my garage clean.
Yep... I tried that... It's literally like "putting a square peg in a round hole" ;) Doesn't fit.
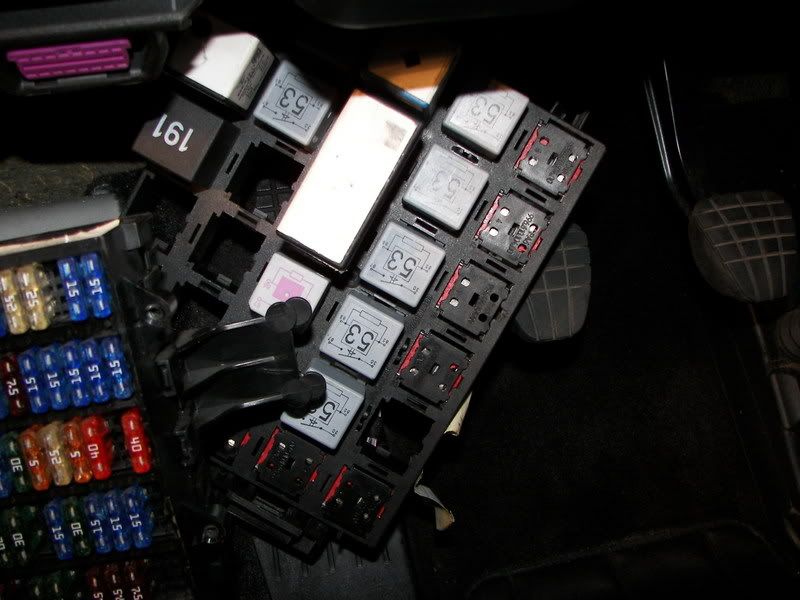
Bingo, bango, bungo.... Unbelievable... I just dissassembled the fuse carrier AND the Relay carrier (boy was I lucky to have the right tools to get to the bolts for those, I was literally on my back under the driver wheel getting to them with a special extension tool (size 10 bolt for anyone who cares). Anyways...
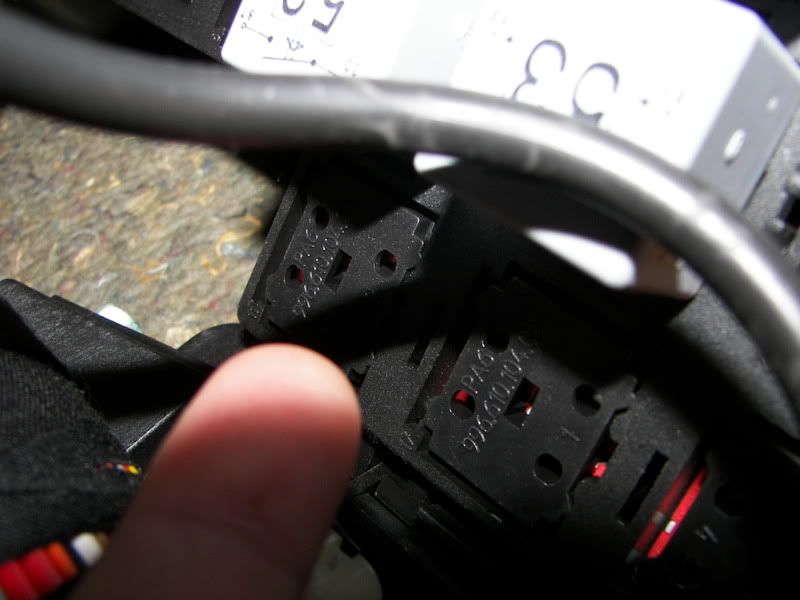
After I got the relay support down guess what I found.... 2 Nice spots to plug into the BACK of the plugs, which the factory connections fit easy into.
Here's the nice Relay Support Bay after I took off the 2 10mm bolts. Boy was THIS fun to take down

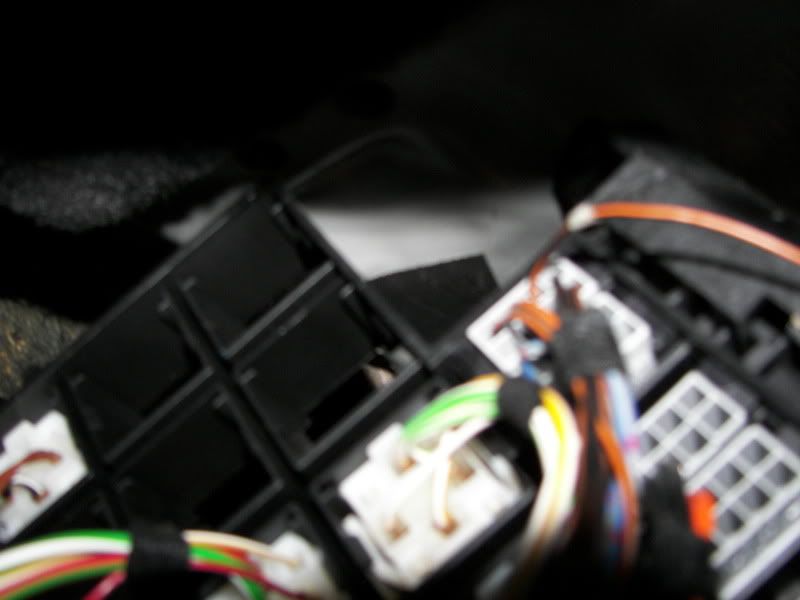
Sorry for the bit of a hazzy picture here, but FINALLY I've located the CORRECT place to plug these wires into. This is a picture of the back side of BS 16/2. As you can see I've routed the wire to one of the "empty pins." Now can I please get off my back? This is an awkward position...
Now just to finish up the last wire and put the beast back together and test.
-
Wait a second...
I just read something.... earlier in the install.
2.6 - Remove the fuse carrier, carpet lining, and relay carrier, cutting tie wraps where necessary.
Is this telling me I have to somehow "remove" the relay carrier?? and the fuse carrier? I basically just took off the carpet lining thing for the fuse carrier and didn't think to remove the actually remove the entire fuse carrier and relay carrier. Is that even possible to do under there?
-
Have U tried to put it in the hole itself on that black plate?
like I said earlier , U need to pull 1 of those relays & see
Yours should be the same way
Hmmm... <_< There's got to be a way to get that black cover off. Why would they have attached these special connections to the harness with no other instructions other than to plug em into a loose slot in the plug? I honestly don't see how you're supossed to be able to plug a wire in there anyways unless there's someway to get that black piece off.**** I'm so close to... these are the last wires I have to finish, then I can put her all back together and finally get my garage clean.
Yep... I tried that... It's literally like "putting a square peg in a round hole" ;) Doesn't fit.
-
Hmmm... <_< There's got to be a way to get that black cover off. Why would they have attached these special connections to the harness with no other instructions other than to plug em into a loose slot in the plug? I honestly don't see how you're supossed to be able to plug a wire in there anyways unless there's someway to get that black piece off.
**** I'm so close to... these are the last wires I have to finish, then I can put her all back together and finally get my garage clean.
-
Are U refering to those white covers? if U are , not supposed to touch it.
Your 2nd question would be the answer
Pull the relay out to acess .
Now I'm worried if U are qualified to tackle this project,,,HAHAHA :rolleyes:
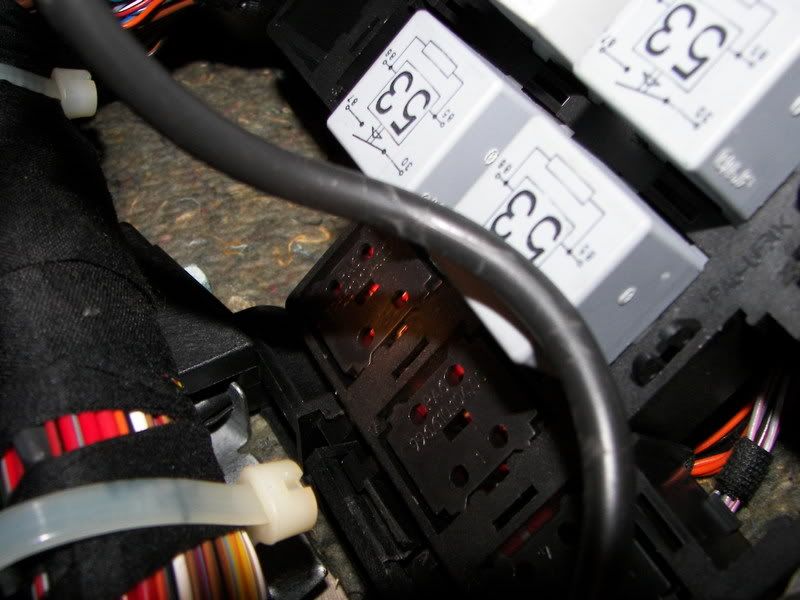
I'm actually referring to the black piece upper left. According to the diagram this is where I am supossed to plug the wires. Is in through that black piece into one of the red connectors. The wire has one of those special snap in plugs.
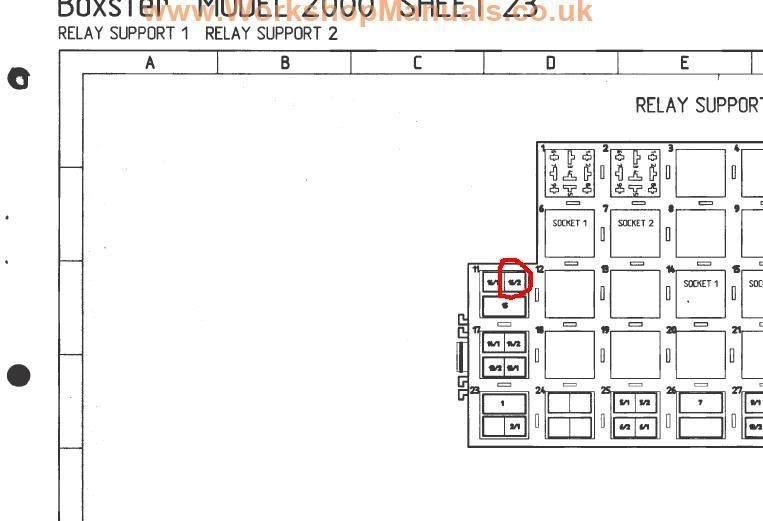
According to the diagram, BS 16/2 is located here:
Which in my bay is this circled area here:
Here's the two wires I need to connect:
And there connectors:
The instructions read the following:
BK/OR wire = Plug wire into an "unused" pin of multi-pin bridge plug BS 16/2 found in Relay Support 1
BR wire = Plug wire into an "unused" pin of multi-pin bridge plug BS 11, found in Relay Support 1
So the question is, if the above photos show where BS 16/2 is, which is currently unused. Is there a way to take that black piece off to plug the connection into one of the "un-used" pins? Because I can't seem to get that off. Or am I just extremely confused here?
-Chris-
-
Allright, well here's another question. I located the correct "relay" i need to connect the 2 wires from the Interior mirror to. However, it appears there's some plastic covering over it. Am I supossed to remove this? or just place the wires through the holes into an available connection? I tried seeing if there was some "snazzy" way to remove it, and tried using a flat-head to take it off, but it doesn't seem to come off. It's also in a somewhat difficult location to reach.
Upper left corner is what i'm talking about...
Here's another image
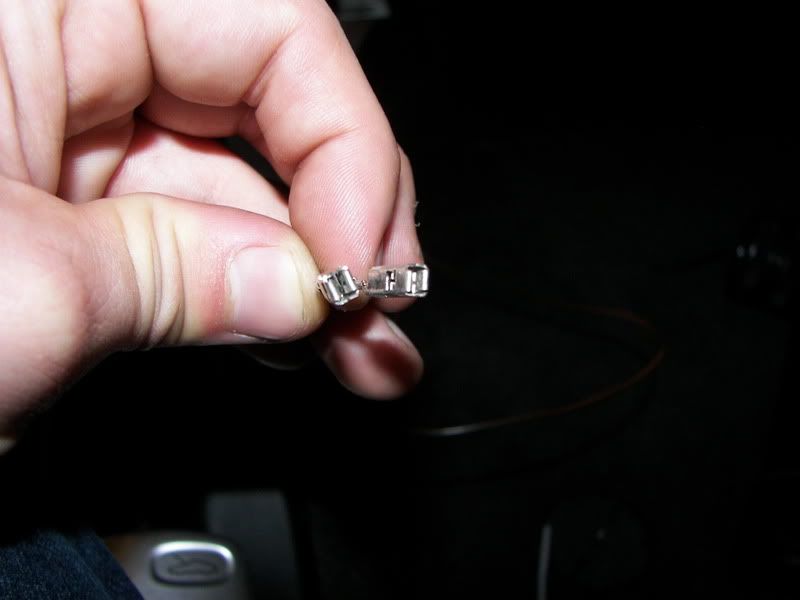
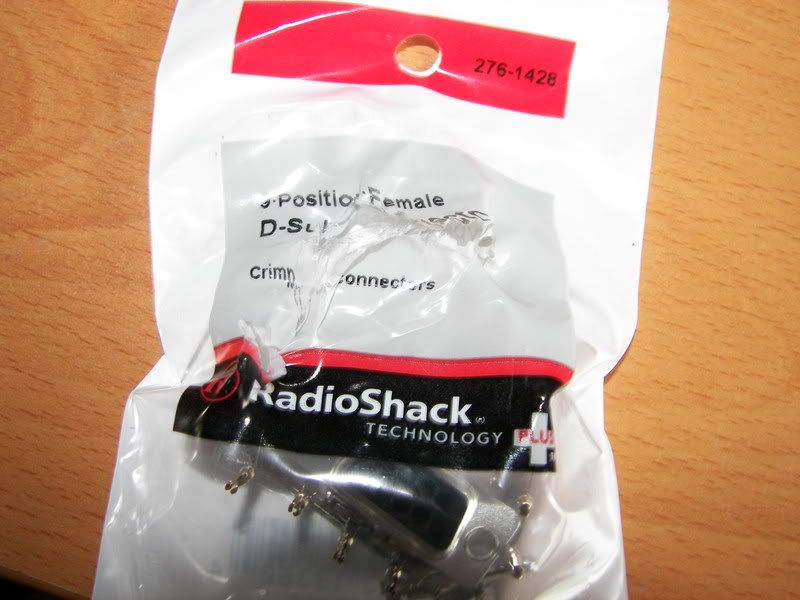
Also I took your advice, and glad I did. I headed over to radio shack this morning and found EXACTLY what I was looking for. The pins only came in their "serial port" connection kit, but I tested them to make sure they fit. If anyone else is ever interested in this mod, you'll want to get a 9-Position Female D-Sub Connector kit. Part # 276-1428. Below are the pictures
Kit
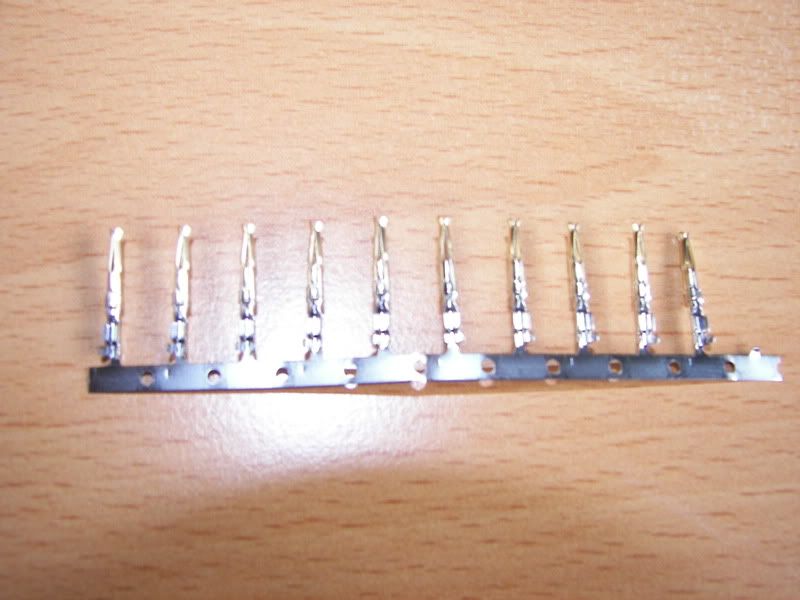
Picture of the pins themselves
Thanks again for your help guys... Sorry if it's annoying.
:thankyou:
-
about $60. U could hack it to work when the wiper is on.
That's pretty reasonable. Where are you getting it from? I might consider it as well. You plan to do a write-up on it?
-
I think the auto-light option is a good option. I have it on my Maxima and it's awesome, especially the security feature. It would be nice if they also turned on when you turn on the windshield wipers. I know in Illinois, this is a mandatory state law that if it's raining, the lights need to come on.
Is this a kit? How much aprox?
-
Also, this is probably one of those questions that has been addressed already I'm sure... but is there any easy way to take off the door handle mechanism from the door panel and reconnect it later? I was looking at it earlier, but it looks like it's pretty "spring loaded" and might be difficult to disengage and reconnect.
Reason I ask, is because I think it's basically just leaning up against the side of the door right now on it's side, and everytime i'm on the ground working my big foot seems to knock it down 3-4 times everytime. Tell me that's not annoying :thumbup:
I'd just like to place it out of the way with everything else. My garage is a mess of parts right now lol.
:thankyou:
-
So, I decided that rather than purchase a $309.00 replacement harness for 2 additional wires that need to be run from the new Interior "Anti-Dazzle" rearview mirror to the Driver's Side Exterior mirror... that there had to be a better way.
I decided that it was much easier to remove the X11 Plug from the driver's side door, and route the 2 additional wires through the stock door harness opening and in through the door, up along to where the stock Driver's side mirror "plug" is located.
The NEW plug has exactly 2 more pins (hence the 2 wires I am running) than the original.
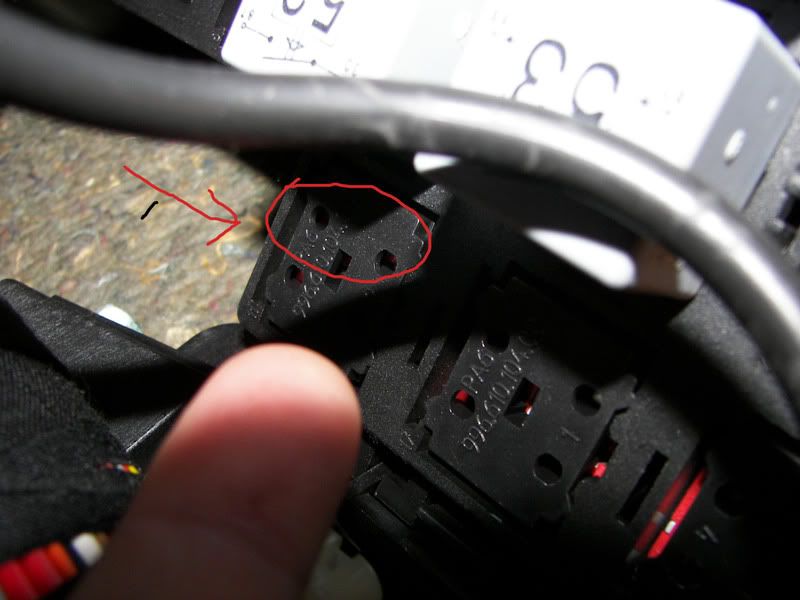
I decided to take a look at more detail at the actual plug connector
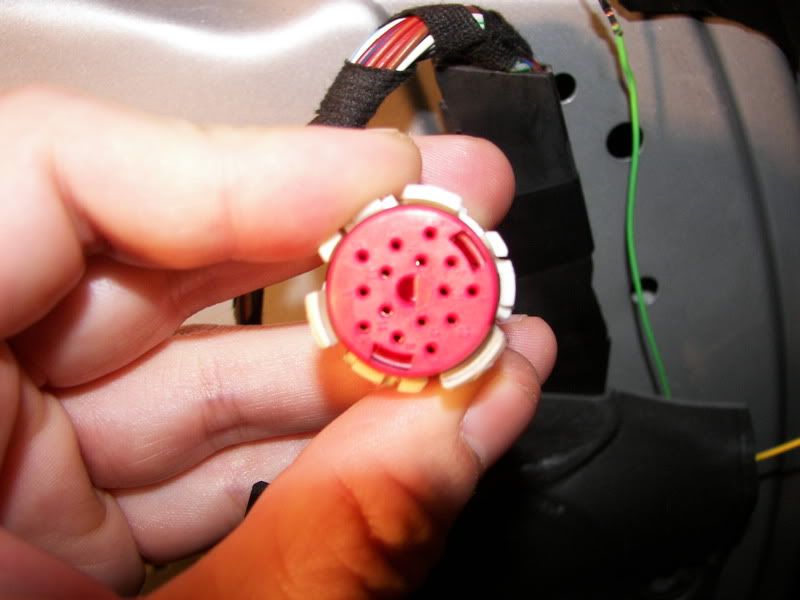
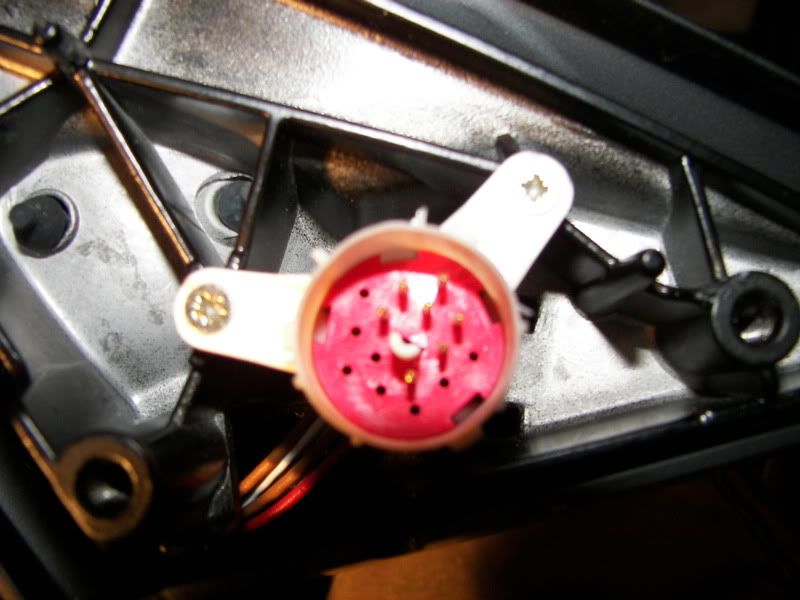
Here you can see the original factory harness plug which is attached to my driver's side door which connects to the Exterior Rear-View Anti-Dazzle mirror connector
In this image I've removed back part of the rubber housing of the plug to expose the connections. This is where I would like to plug the yellow and green wire into Pin 1 and Pin 2 of this connector
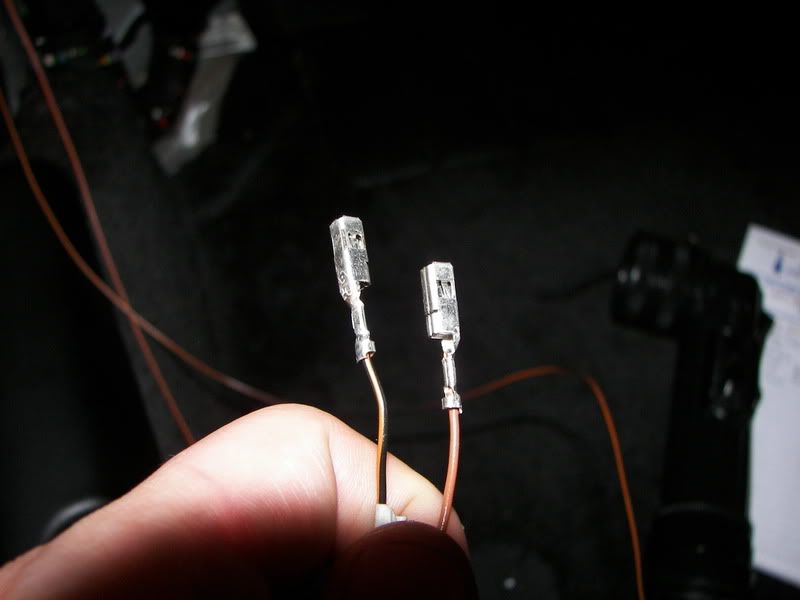
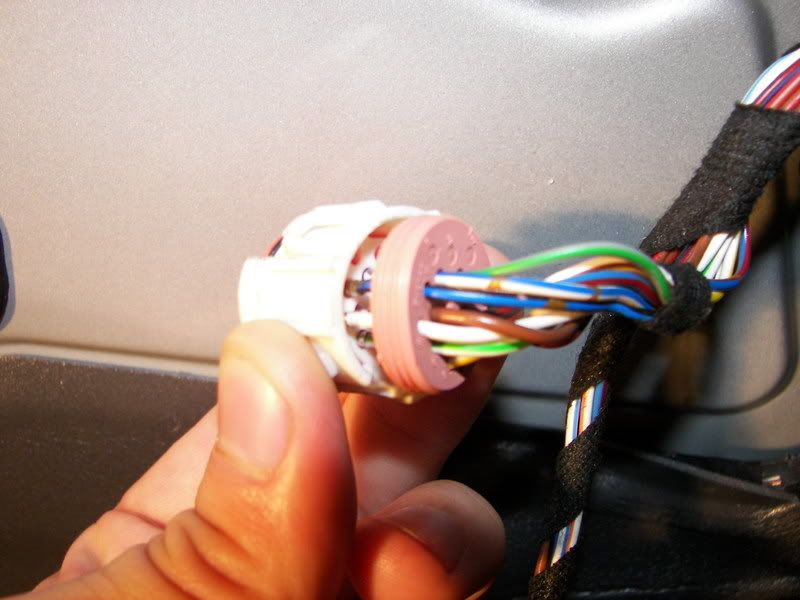
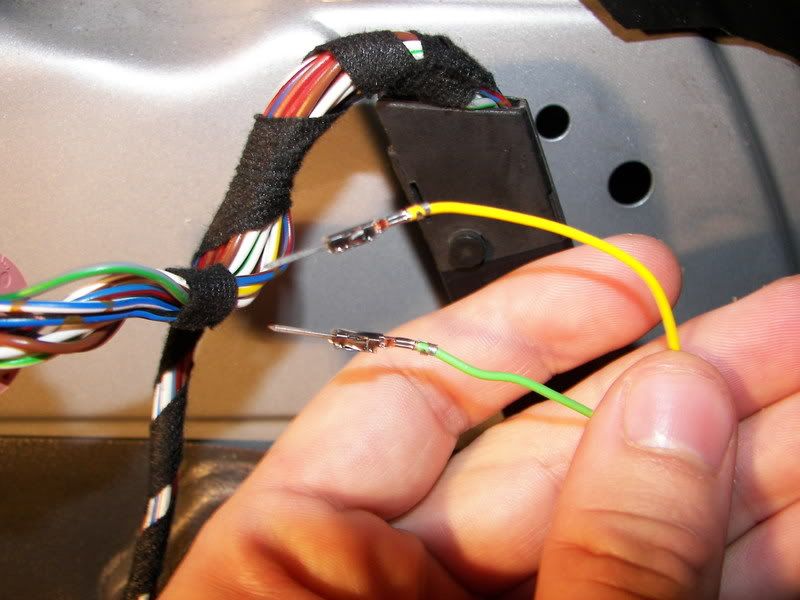
These are the 2 wires which will activate the "anti-dazzle mode" of the new mirror assembly. You can see here that they were fitted with a different type of connector on the end that will not allow me to simply plug them into the unused Pin 1 and Pin 2 ports of the factory plug.
This is an image of the "new" external anti-dazzle mirror plug that the harness connects to. Note that there are 2 extra pins here (Pin 1 and Pin 2) used for the Anti-Dazzle.
What I would "like" to do is replace the ends of the yellow and green wires with a connector I can plug into the stock wire plug. This way I won't have to tap directly into the mirror, and will have saved myself $309 for a new harness. The question is, what type of connector could i use to do this and what size? It will need to be some-type of female ended connector that will allow the new "pins" to make contact once the plug is connected. I had a couple of female connectors i thought might work for this from an older project, but they are too big. Not quite sure what they're called or even where to begin looking for something to fit this. Any ideas?
Advance Thanks!
HVAC Screen starting to go out
in 986 Series (Boxster, Boxster S)
Posted
Hey guys,
This just started a couple days ago... it looks like the HVAC "lights" are starting to go:
It should say 65, but instead it says E5.
Is there anything I can do to fix this? Or do I have to replace the whole HVAC control. I'm starting my audio system upgrade soon anyways and have to relocate the unit. So if I have to get a new control, I may just as well look into it. Anyone know what these typically go for? Any other ideas?
Thanks!