Welcome to RennTech.org Community, Guest
There are many great features available to you once you register at RennTech.org
You are free to view posts here, but you must log in to reply to existing posts, or to start your own new topic. Like most online communities, there are costs involved to maintain a site like this - so we encourage our members to donate. All donations go to the costs operating and maintaining this site. We prefer that guests take part in our community and we offer a lot in return to those willing to join our corner of the Porsche world. This site is 99 percent member supported (less than 1 percent comes from advertising) - so please consider an annual donation to keep this site running.
Here are some of the features available - once you register at RennTech.org
- View Classified Ads
- DIY Tutorials
- Porsche TSB Listings (limited)
- VIN Decoder
- Special Offers
-
OBD II P-Codes - Paint Codes
- Registry
- Videos System
- View Reviews
- and get rid of this welcome message
It takes just a few minutes to register, and it's FREE
Contributing Members also get these additional benefits:
(you become a Contributing Member by donating money to the operation of this site)
- No ads - advertisements are removed
- Access the Contributors Only Forum
- Contributing Members Only Downloads
- Send attachments with PMs
- All image/file storage limits are substantially increased for all Contributing Members
- Option Codes Lookup
- VIN Option Lookups (limited)


usaf-lt-g
-
Posts
361 -
Joined
-
Last visited
Content Type
Profiles
Events
Forums
External Paint Colors
Downloads
Tutorials
Links Directory
Collections
Store
Posts posted by usaf-lt-g
-
-
I've got a 1999 Boxster with Arctic Silver exterior and Boxster Red interior. The interior already has a two tone black-red thing going on, but I really think it would look great to bring some of the silver look into the interior. Like the rest of you I've been staring at the prices of Alumi-look Tequipment with a dropped jaw. This DYI approach to repainting select interior pieces is a great idea. I really look forward to seeing pictures of your handiwork usaf-lt-g! Depending on how flush my finances are and how well your results turnout I may want to opt in on your offer.
P.S. For some additional pictures of Alumi-look parts checkout this place: http://eagleday.stores.yahoo.net/interiortrim2.html I stumbled upon it googling.
P.P.S. I think this is Porsche's full list of Alumi-look extras: http://www.porsche.com/usa/accessoriesands.../interior/n265/
"Instrument surround.
Part no. 986 552 984 18
Dashboard trim – side air vents (left/right). With leather trim.
Part no. 000 044 802 16
Dashboard trim – side air vents (left/right). Available in black and Aluminum-Look only.
Part no. 000 044 802 17
Rear section of center console.
Part no. 986 552 995 09
Central air vent from 08/02.
Part no. 996 552 951 00
Door features (left/right).
Part no. 000 044 802 19
Steering wheel – manual.
Part no. 996 347 983 28
Steering wheel – Tiptronic.
Part no. 996 347 983 29
Handbrake lever.
Part no. 996 424 980 22"
Thanks for the picture find :) I was specifically looking for what the side vents looked like, and now I know ;) Once i get my paint gun and the paint, i'll be sure to post on the progress.
-
I have to replace the front cross member on my base 99 Boxster. I ran over a rock and it broke off the bracket for the strut.
I think you need to give a little more detail, maybe a picture would help. I don't really see how you could damage the cross member by hitting a rock and the strut assembly (shock and spring) mount directly to the hub, so what bracket you broke is unclear. The procedure that usaf-lt-g gave you a taste of is correct for removing the cross member, but the cross member is the HUGE support that makes up the lower sub-frame in the front and ties both sides of the suspension together along with the steering. I really don't think you're looking at replacing this!
Kirk
Not to mention the rack and pinion piece as well ;) It's an integral and important piece of the crash crumpling for safety as well... It's hard to believe the actual cross member is what's damaged.
-
My 00' Boxster S I have done every single piece of work on it myself. It now has 85K and is running great. I have replaced the AOS, Brakes and rotors (front and back), routine Oil Changes and filter changes (Mobil 0w-40), Spark Plugs, a brand spakin new transmission and clutch at 75k as pre-cautionary. I have a brand-new fuel filter I need to eventually install but haven't found a good way to get under the car yet and replace this. I'd prefer a nice lift to do it, but don't have one of those ;)
-
Well... no easy way to put it.... this is going to be some work.
First you'll have to remove the wheel and suport the vehicle
Then you'll need to remove the front plastic underbody shield by removing the plastic retaining nuts, and then prying off the six retaining clips (carefuly because these are easily damaged during removal.
Next you'll need to disconnect the control arm retaining bolts both at the diagonal control arm where it fastens to the the transverse control arm and where the transverse control arm fastens to crossmember
You may need to physically remove the control arms on both sides of the vehicle to gain access to complete removal of the crossmember, which would require separating the transverse control arm from the wheel bearing carrier, loosining the ball joint nut which will require special tool 9560 or something similar.
Also, if you plan to replace the control arms as well, you'll need to reset the wheel alignment, and tighten the bolts to the following torques:
Control Arm to cross-member 88 ft-lb
Diagonal control arm to transverse control arm 118 ft-lb
Transverse control arm to wheel bearing carrier 56 ft-lb
This is by no means a complete guide to how-to-DIY. But it's a start....
Hope it helps.
-
After I get all the paint ordered and my pieces finished, i was thinking that i'll probably have enough paint left over to do at least a couple more sets of these if anyone is interested. Maybe say like an even $300 for all the pieces that are normally upgraded to Aluminum Look finish (i.e. Instrument Surround, Side Air Vents, Rear Section of Center Console, Door Lids...) plus whatever it costs to ship the pieces to me. I'll post pictures once I have mine done. This way you get all the pieces upgraded, for WAY less than Porsche or bumperplugs.com offer, and it's to Porsche specification.
-
My hands aren't incredibly steady, and if you lay tin foil around the edges or a cloth, you've really got nothing to worry about. Also, if you haven't done so, I recommend the "Clear 3rd Brake Light" replacement.
-
Alright,
For those interested, I was able to get all the ratios and paint necessary based on the manufacturer specs:
It's as follows.
Only one stage base coat is needed. Reducer and Paint is all that's needed for the base coat, which is a 2:1 ratio. 2qts Paint, 1 liter reducer
Next is the clear coat which manufacturer uses a flat semi-gloss clear coat which uses a 3:1 ratio of activator / paint. Activator only comes in 1 liter amounts, so 1 liter of clear coat, and 1 liter of activator are what is needed.
Total cost of paint and everything is $348.60, and they gave me a 15% discount.
-
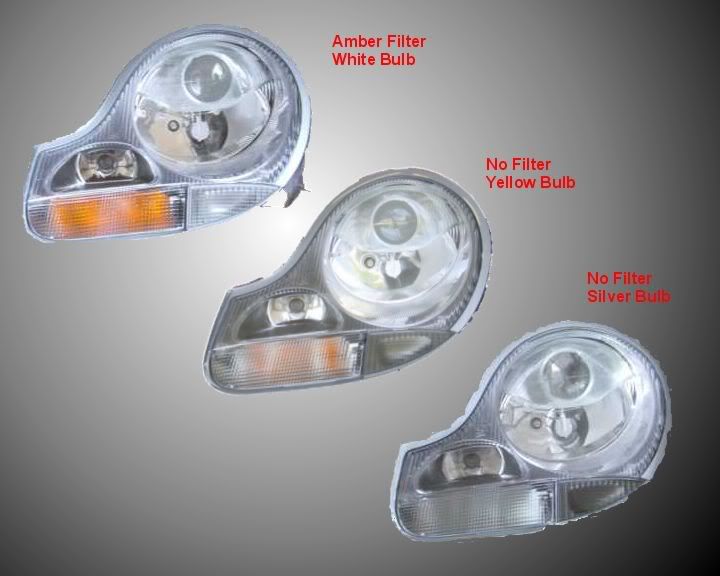
Oh also, just another quick mod I would do if I were you. Upgrade all your turn signal bulbs to the Phillips Silver bulbs (they have no amber during the day, but are amber when you turn them on), this would include your side markers, rear turn signals, and litronic turn signals. Then taking a soldering iron, you can easily remove the amber lens inside the litronic headlight turn signal bulb area by burning through it with the soldering iron and removing with pliars.
www.xenonmods.com for the bulbs you need.
Here's the difference:

-
Nice ride! Same color and model as mine although my interior is black. You should enjoy it!
Quick question, what are you planning to do with the foreign front license plate?
-
Yes, there are two kinds - that is why I asked.
The white says 8.0 x 0.9 and the grey does not say.
999.507.505.40 clip grey -- US MSRP $0.19 each
999.507.582.40 clip white -- US MSRP $0.19 each
Thanks Loren :) I'll order up both... never can have too many spare parts on hand I always say ;)
-
Hello , can anyone tell if a 2001 996 turbo front bumper will fit my 2002 c2 ? thank you
This is the one you'll want to get... http://www.fiberwerks.com/BOXSTER%20TURBO%...%20BLK%20FD.jpg
go to fiberweks website and you can order it. $995
-
Hello,
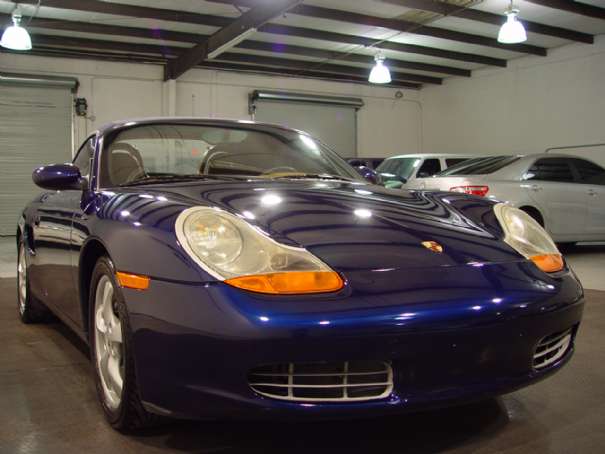
I would like to upgrade my 2001 boxster's headlights to the new 2003-2005 look.
I am still undecided whether to get them from jasmine motorsports or design911.
986 Boxster Clear Light Kit under:
http://www.jasmine-motorsport.co.uk/porsch...ster/lights.htm
or the ones on:
http://www.design911.co.uk/fu/prod1360/Cle...r-986-1997-02_2
Has anyone tried getting them from the above sources?
Which would you recommend? Any others that offer these at such low prices?
Do these look exactly the same as the post 2003 OEM?
I have uploaded a pic of my car.
Any input is appreciated...
Thanks!
Personally... I would upgrade to the litronics. You get the "real deal" HID lights, motorized, and you can clear out the amber turn signal easily with a soldering iron (you'd probably want to do this anyways even if you got these other lights). Just my opinion, but the HID lights make a HUGE difference for night time driving.
-
Grey or White?
Does it matter? I take it there's 2 different kinds? The outer ones are the ones that need replacing. They are white. Wasn't sure if there were longer ones though. Are the grey ones longer?
-
Tolum,
I'd recommend ordering 6 new spark plugs from Sunset Imports (there's a link at the top for "Porsche parts at dealer cost." I also recommend that as a "preventative" maintainance item.... replace all 6 spark plug tubes and rubber o-rings that fit on the tubes. Not expensive or hard to do, and it's worth the extra $12 (i think that's what i cost me for all 6 tubes and o-rings). Just my 2 cents.
-
Hey guys,
Hopefully this is an easy one. I need to get some replacement door trim panel clips. Is there by chance some slightly longer ones I can use that I can order? It's a pretty tight fit with the upgraded 3/4" Oak speaker baffles I created. Either way, if anyone knows the part #, please let me know. Thanks!
-
Since the surfaces you are painting are relatively new, you can start out with 400 grit wet/dry and finish with 600 grit just before painting. Be sure to use a tack rag just before spraying to get any errant dust particles.
Again, the most important part is making sure that the surface is absolutely free of any contaminants (fingerprint oils, silicone, grease, etc.). If you leave any of those behind, you'll see what is called "fish eyes", which looks like a little pinhole sized pool around the spot. If you get one of those, the only solution is to either remove all the paint if you have just started spraying, or wait until the paint has cured, then clean it again with the Prep-sol or Pre-Kleano and just give it a very light scuffing with the 600 grit.
Also, make sure you "spank" the sandpaper so that no sandind residue stays on the sandpaper. That would cause a slight "gouge" on the surface.
One good way to insure you are always getting just sandpaper to surface contact, with no residue in between, is to use the wet-sanding method. I don't know if you have the inclination, but if you do, all you have to do is get some low pressure stream of water constantly running just above what you are sanding and the water will carry away the residue.
You can get great results with either method, but it does take time.
Regards, Maurice.
Any ideas on where I can get the proper Paint / Reducer / Hardener mixtures? I haven't been able to find this yet, so I have no idea what the proper manufacture mixture is supossed to be. Thanks again for all the info.
-
As with any spray painting, the most crucial part is in the preparation of the surfaces to be painted. You should also get a solvent specifically made for the pre-cleaning of the surfaces that you must do immediately before painting. "Prep-Sol" or "Pre-Kleano" are two products from different manufacturers that will remove all traces of fingerprint oils, silicone, etc. and give you a surface ready for light sanding, tacking off with a tack cloth, and then spraying.
If you are meticulous, you can get professional results. Just don't be tempted to cut any corners.
Regards, Maurice.
What grit sanding paper would you recommend for the light sanding prep? Thanks!
-
Yeah usaf-lt-g, $859 for the console, side trim, ashtray, and ashtray surround! $400 for the pocket lids, pretty pricey stuff.
Alex
Lol, exactly why I just assume do the job myself ;) Whoever was able to find that paint code Porsche uses for the Aluminum look pieces was a pure genious. It was extremely difficult to find, but once I had the code and verified the paint manufacture Porsche uses for it I was golden. Once I get this gun, and all the elements necessary to prep the pieces and the mix, I'll make sure to write-up a detailed DIY as always and provide plenty of pictures.
Just another reason to DIY if you have the ability I always say ;) No thanks on paying those kind of prices Alex! ;)
-
No specific code, it's standard with any of the modern urethane paints. Each manufacturer has their own line of hardeners. The hardener is an essential part of the paint package for durability and hardness. If you follow the formula that the manufacturer publishes for mixing the ingredients (paint/reducer/hardener) very carefully, you won't have any problems.
You can get excellent results with a Sharpe brand mini HVLP (high volume low pressure) spray gun for this type of work. Sharpe is a knock-off of much more expensive brands and gets very similar results.
As with any spray painting, the most crucial part is in the preparation of the surfaces to be painted. You should also get a solvent specifically made for the pre-cleaning of the surfaces that you must do immediately before painting. "Prep-Sol" or "Pre-Kleano" are two products from different manufacturers that will remove all traces of fingerprint oils, silicone, etc. and give you a surface ready for light sanding, tacking off with a tack cloth, and then spraying.
If you are meticulous, you can get professional results. Just don't be tempted to cut any corners.
Regards, Maurice.
How about this one? http://www.keenzo.com/showproduct.asp?M=SH...4625&ref=GB
-
usaf-lt-g,
Hello, Suncoast Porsche has all the 'alumilook' parts for sale. Pictures are kinda small but... My 996 already has the pocket lids and the tip knob but I'm really wanting the centre console. I'm willing to try the paint to match, I imagine several coats are needed plus a good clearcoat. It's gotta be strong enough to withstand scratches, etc. Keep posting your findings guy!
Alex
I'm sure they are on sale, but still, I imagine the price of "one" piece such as the door lids would still end up costing more than the price of the paint. Keep in the mind the paint we are talking about is the actual genuine PORSCHE paint (the same paint Porsche uses to make the Alumi-look finish) not knock-off store bought paint. So painting it yourself using this paint, should give you the "exact" same result, for less money, as oppossed to purchasing it if you do it right. You won't need "several" coats or a clearcoat. Again, the paint is the same Porsche uses, has a metallic in it.
-
As an FYI...
I called over to my local paint shop who carries Dupont and Spies, explained exactly what it was I was attempting to do etc. Essentially, the paint has to be "made" as it's a special paint. To do the entire interior to "tequipment" spec (not meaning paint EVERYTHING in the interior, just the pieces that would be painted by a tequipment upgrade) would probably be about 2qts. You also need a qt of reducer according to my paint company. For all that paint, I was quoted $249.02, which is pretty reasonable considering a "Left Vent" alone, is about $289. It's a bit pricy since the paint has a "metallic" in it, but granted, this is "quality" paint not "Autozone" paint ;)
So I think this will shake up to be a pretty good DIY project ;) Still could use pictures of what the "Stock" Tequipment looks like though if anyone has them.
Two quarts sounds generous, but, better to have some left over than not enough to complete all of the parts. Dupont and Spies Hecker are excellent paints, but don't forget to get and add the hardener. It's the smallest proportion, but the most important if you are going to avoid nicks and tiny dents from your fingernails hitting the pieces over the years after they are installed.
Be sure to take some photos and share them with us. It should look rad!
Regards, Maurice.
Hmmm Hardener eh? Is there a specific code for this or is it pretty standard. I also placed another call on an airbrush as i'm not sure which type of airbrush would be best for this type of application. Any thoughts? I'll make sure to take pictures once I start the project. Still looking for those "tequipment" pictures though ;)
-
As an FYI...
I called over to my local paint shop who carries Dupont and Spies, explained exactly what it was I was attempting to do etc. Essentially, the paint has to be "made" as it's a special paint. To do the entire interior to "tequipment" spec (not meaning paint EVERYTHING in the interior, just the pieces that would be painted by a tequipment upgrade) would probably be about 2qts. You also need a qt of reducer according to my paint company. For all that paint, I was quoted $249.02, which is pretty reasonable considering a "Left Vent" alone, is about $289. It's a bit pricy since the paint has a "metallic" in it, but granted, this is "quality" paint not "Autozone" paint ;)
So I think this will shake up to be a pretty good DIY project ;) Still could use pictures of what the "Stock" Tequipment looks like though if anyone has them.
-
Pulled this off another site...been keeping it just in case.
Aluma Look is " ALU 03 EFFECT " trim etc.
Code is 4W9 and Dupont stock code is X1070
You are the bomb :) Does anyone have pictures of all the "Aluminum" upgraded pieces you can buy from Porsche? The factory tequipment trim you can purchase that is. I want to match my stuff to it and a build a DIY guide on how to do it. I checked several sites and can't seem to find pictures of everything, just bits and pieces. If someone could post that would be EXTREMELY helpful! Thanks!
-
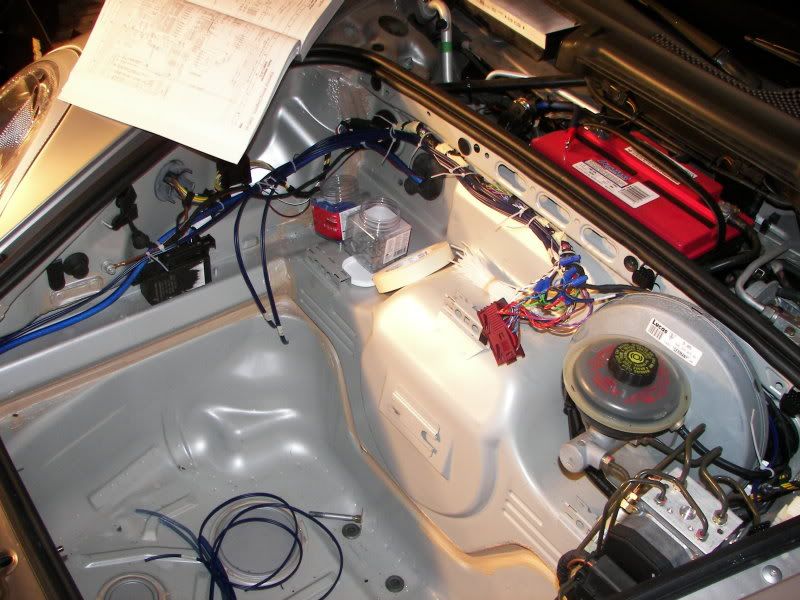
Also,
Here's a picture where you can see that i used the factory porsche amp harness to tie into the factory wiring for all the speakers / remote connection to the factory amp etc. FYI... if you haven't done so already, I HIGHLY recommend getting yourself the Bentley Porsche Service Manual. Loren has an amazon store you can access from here that has a link to it. It has all the electrical wiring diagrams / pinouts necessary to help you as well as a ton of other information and helpful photos to do a lot of work yourself.


Alumilook interior parts - painting possible?
in 986 Series (Boxster, Boxster S)
Posted
I've worked with a gun several times before, just don't have my own. Painters around this area are extremely expensive, and tend to "ahem" screw up my instructions on anything I've ever asked to be painted in the past. It's not very difficult to do.
Paint + Reducer + Clear coat + Gun = $300 aprox. Plus I'll have plenty of paint left over in case I decide to do anything else.