Welcome to RennTech.org Community, Guest
There are many great features available to you once you register at RennTech.org
You are free to view posts here, but you must log in to reply to existing posts, or to start your own new topic. Like most online communities, there are costs involved to maintain a site like this - so we encourage our members to donate. All donations go to the costs operating and maintaining this site. We prefer that guests take part in our community and we offer a lot in return to those willing to join our corner of the Porsche world. This site is 99 percent member supported (less than 1 percent comes from advertising) - so please consider an annual donation to keep this site running.
Here are some of the features available - once you register at RennTech.org
- View Classified Ads
- DIY Tutorials
- Porsche TSB Listings (limited)
- VIN Decoder
- Special Offers
-
OBD II P-Codes - Paint Codes
- Registry
- Videos System
- View Reviews
- and get rid of this welcome message
It takes just a few minutes to register, and it's FREE
Contributing Members also get these additional benefits:
(you become a Contributing Member by donating money to the operation of this site)
- No ads - advertisements are removed
- Access the Contributors Only Forum
- Contributing Members Only Downloads
- Send attachments with PMs
- All image/file storage limits are substantially increased for all Contributing Members
- Option Codes Lookup
- VIN Option Lookups (limited)


waterboy
-
Posts
26 -
Joined
-
Last visited
Content Type
Profiles
Events
Forums
External Paint Colors
Downloads
Tutorials
Links Directory
Collections
Store
Posts posted by waterboy
-
-
What a great idea. What did you use for the part on the pad that goes into the slot on the car?
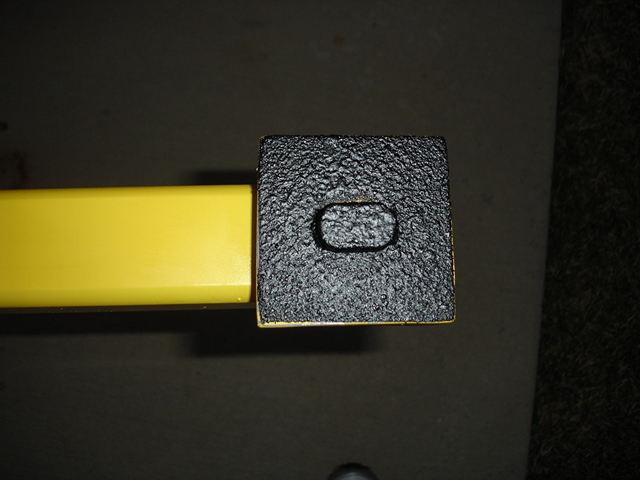
The part that goes into the slot on the car is a piece of 1/4 inch thick solid steel that was welded to the pad.
-
Tim- the top pad is spray on (rubberized) undercarriage coat, and the bottom is Home Depot grip tape. The top pad would work better with grip tape. From one use the undercarriage coating has already "stripped away". Jim
Looks like Rhino Liner or some other liner "paint". Looks like he also put the same on the bottom at the jacking points.That is cool :clapping: How much to make another set? I would love 1Steve
Steve, I used top quality steel from fresh stock and paid $180.00. The welder that I used charged me $85.00 an hour. It took him 1 and 1/2 hours to cut and weld all the pieces together. Paint and decals were $30.00. So the grand total was just over $300.00. It was a bit more than I planned, but it's a one time charge. My local Porsche dealer charges $120.00 an hour so about 2 and 1/2 hours at the Porsche dealer. These will enable me to do a bit more than basic maitenance, and I know for sure I will get more than 2 and 1/2 hours out of them. Hope that helped. Jim
I originally posted a question about the guage, I've since reliazed that it is included in the original post.
Do you mind sharing how, and with what material, you coated the pads (the black material)?
Tim.
-
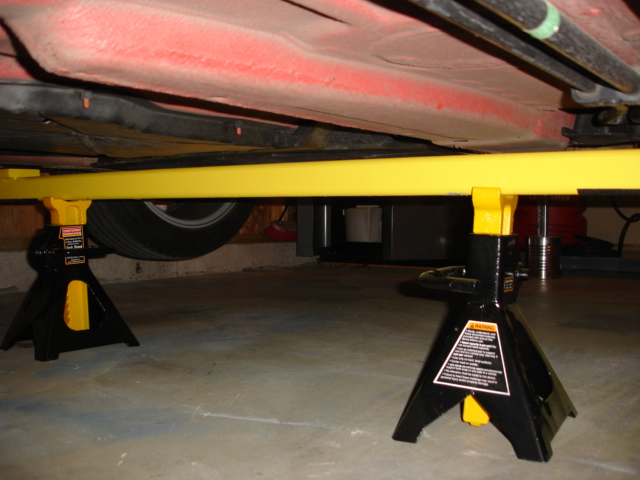
Is there any trick to getting the second side up? It looks like you jack up the first side under one side of the bar, then place the jack stand. Then the opposite side bar would be lower or touching the ground. What's the process for jacking up the second side?
Like others said in your original post, it looks like they might be more effective in a front-to-back configuration instead of side-to-side. Now that you've used them, and knowing what you know now, would you still make the bars go side to side?
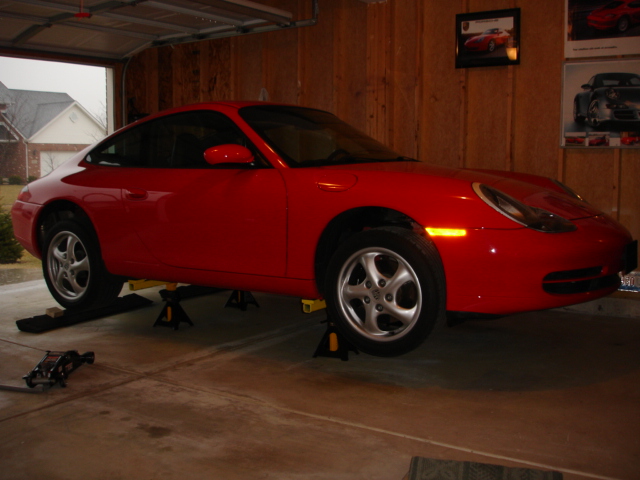
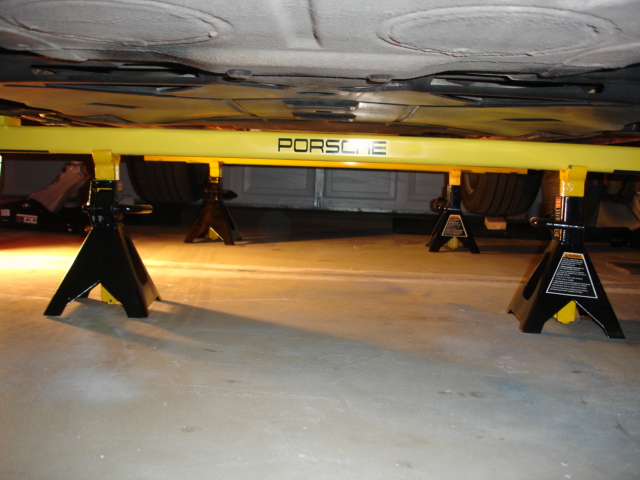
I chocked the back wheels and jacked the entire front of the car first. I used two floor jacks and raised the front corners in equal increments. So the first two jacks stands were under the front and the rear tires were still on the ground. Then I jacked up the back also in equal increments. So the car went straight up and straight down. The car was never leaning at a sharp angle. I do believe that you are correct, if you raise from side to side you will create such an angle on the opposite side that it might be impossible to get your floor jack under. That is why I don't think bars from front to back would work. With these bars the car is jacked up in more of a LINEAR method than a twisting one. I attached this picture of just the front end supported and the back wheels are still on the ground. Hope this helped. Jim

-
Hey guys- These new bars work great. There are a few ways you could use them. Here is how I did it today.
[attachment=16090:lift_007.jpg]
-
Good idea, but I also think that front to back would be more useful.
Beautiful car!!
-
I considered front to back but there were some connectors that would have made me drop the bar even lower. With the ones I made you need a 3 inch ground clearing jack. I would have needed to by a new set of jacks with lower ground clearance.Sweet. :)Would a set for front-to-back be usable?
P.S. WAITING ON TRANS FLUID, AND FUEL FILTER. ACTION SHOT IN NEAR FUTURE!!!
-
That is cool :clapping: How much to make another set? I would love 1
Steve
Steve, I used top quality steel from fresh stock and paid $180.00. The welder that I used charged me $85.00 an hour. It took him 1 and 1/2 hours to cut and weld all the pieces together. Paint and decals were $30.00. So the grand total was just over $300.00. It was a bit more than I planned, but it's a one time charge. My local Porsche dealer charges $120.00 an hour so about 2 and 1/2 hours at the Porsche dealer. These will enable me to do a bit more than basic maitenance, and I know for sure I will get more than 2 and 1/2 hours out of them. Hope that helped. Jim
-
Hello guys-
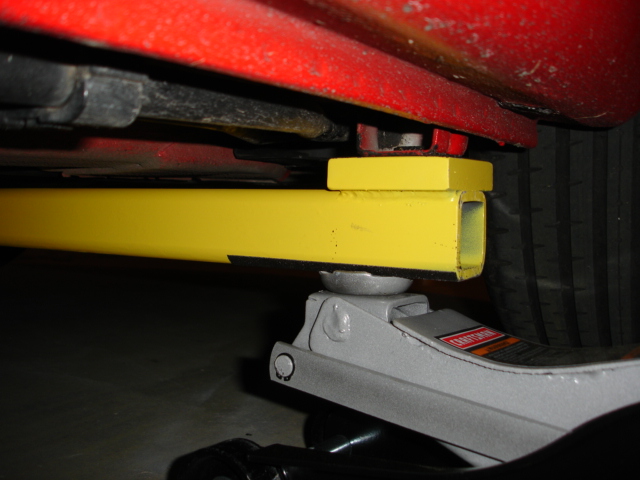
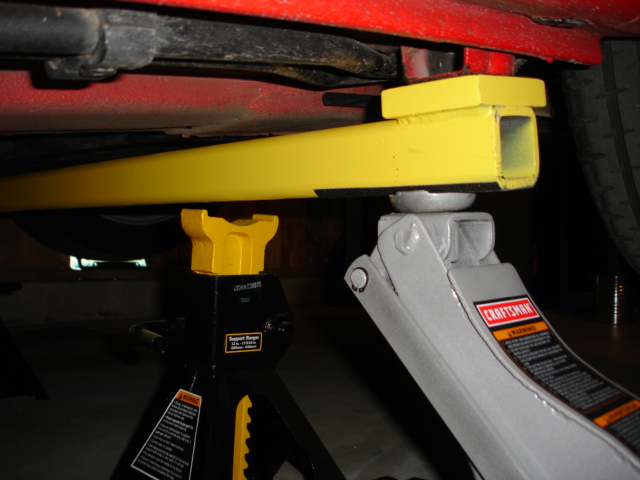
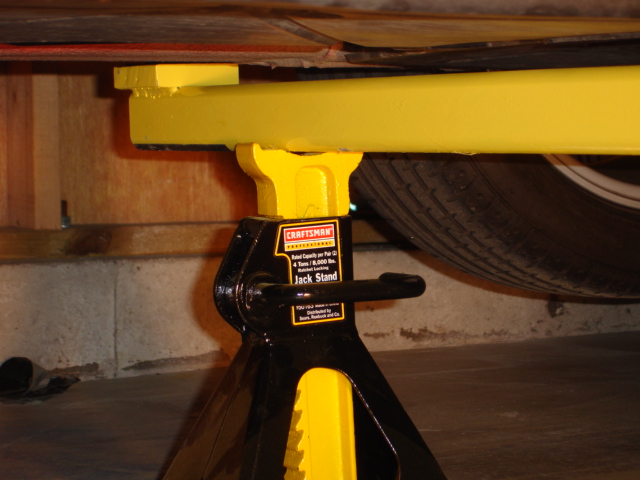
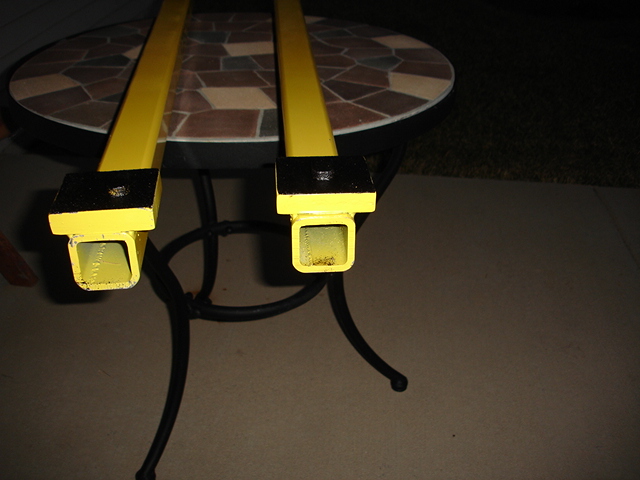
I made these 2x2x1/4 inch square tubular steel bars with jack"pads" that fit my 996 stock jack mounts to the millimeter. The "pads" even have a male receptor to fit snug into the stock Porsche jack pad. The jack "pads" are 3/4 inch thick solid steel. That 3/4 inch dimension is important because it lowers the bar enough to clear any coolant lines or plastics that may be attatched to the undercarriage. One bar fits the front and the other fits the back. Now I can jack and support my car from any point along the bar. I painted them "speed yellow" and finished them with a Porsche decal from ebay.
-
Hello guys- I have a 99C2 with a 6 speed manual trans. I want to replace my transmission fluid, but before I start the job I would like to have an extra drain plug, filler plug and seals as a back up. I looked in the 996 part #'s catalog but did not have any luck. I also called Sunset Imports and they also were not able to find a part number for these plugs and seals. Does any body know the part numbers? Thanks
-
I have to use a front license plate in Illinois so I bought the Porshe plate holder/mount and the two parts that go behind the mount and pop into the front bumper cover. One of them just will not stay attached it keeps popping out. Any suggestions? I thought maybe I could put a small bolt and nut on but can't figure out how to get to back of bumper cover. Any Ideas?
I just finished the job myself. I ordered the parts from Pelican Parts. If your parts are the same as mine 996-701-801-00 also 996-701-802-00 these are the two parts that go behind the holder/mount and the mount is part #996-701-107-00. All you need to do is use a long enough self tapping tapered head screw that will go through the plate holder/mount and the parts that attatches to the bumper. Once you tighten those screws your bracket and mounts should be tight. :D
-
Just finished the seal, 9nine6's advice was right on the money. Thanks 9nine6 :renntech:
-
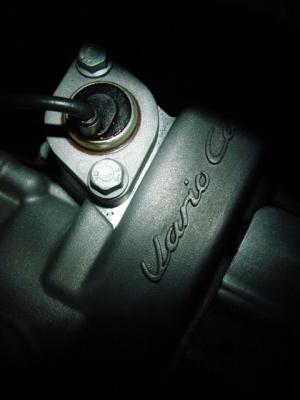
Hello guys- I have a 99 C2 and on the drivers side vale cover, where it says Vario Cam, there is a sensor. My seal around that sensor weeps oil a bit. I am looking at replacing the cover piece around that sensor, part # 996-105-223-52. As you can see the cover only has two bolts, but before I start unscrewing them, I would like some advice. MY FIRST QUESTION IS WILL OIL POUR OUT WHEN I UNSCREW THE BOLTS, AND DO I HAVE TO DISCONNECT THE WIRE FROM ITS CONNECTOR? (FOLLOWING THE WIRE, THE CONNECTION POINT IS FAR UP IN THE ENGINE COMPARTMENT AND VERY DIFFICULT IF NOT IMPOSSIBLE TO REACH.) ANY ADVICE WOULD BE APPRECIATED. THANKS
Sensor on valve cover
Seal that needs to be replaced
Oil will not pour out and the connector will have to be disconnected. It is possible to disconnect from under the car. just follow the wire up to the connector past a fastener to the chassis. if I remember right its a narrow connector that releases from the top of the connector....Be patient <_<
should be a 10 min job once the car is on jacks
Thanks for your advice. I did find the connection point and it does release from the top.
-
Hello guys- I have a 99 C2 and on the drivers side vale cover, where it says Vario Cam, there is a sensor. My seal around that sensor weeps oil a bit. I am looking at replacing the cover piece around that sensor, part # 996-105-223-52. As you can see the cover only has two bolts, but before I start unscrewing them, I would like some advice. MY FIRST QUESTION IS WILL OIL POUR OUT WHEN I UNSCREW THE BOLTS, AND DO I HAVE TO DISCONNECT THE WIRE FROM ITS CONNECTOR? (FOLLOWING THE WIRE, THE CONNECTION POINT IS FAR UP IN THE ENGINE COMPARTMENT AND VERY DIFFICULT IF NOT IMPOSSIBLE TO REACH.) ANY ADVICE WOULD BE APPRECIATED. THANKS
Sensor on valve cover
Seal that needs to be replaced
-
Hello guys does anybody have a comprehensive coolant/water/radiator hose diagram for a 1999 C2? Thanks
You can download a PDF of the cooling system parts list. The link is in the Links section here.
Thanks Loren
-
Hello guys does anybody have a comprehensive coolant/water/radiator hose diagram for a 1999 C2? Thanks
-
Hey guys- I have a 99 C2 all stock. I would like to replace the large coolant hose that is on the left side of the engine (drivers side) that goes from the very bottom of the engine to the top near the coolant tank. This hose is about 2 inches thick. Has anyone ever changed out this hose? Is it as simple as drain the coolant from the allen plug at the bottom of the engine, swap out the old hose for a new one and refill the amount of coolant lost, and then purge the system? I have never done this before, any tips would be appreciated. Thanks.
-
Switched means power is only there when the car is switched on (with the ignition key).
Unswitched means that power is always present - even when the car is off.
Be careful what you put on unswitched power as it could drain your battery.
Thanks :renntech:
-
There should be a phone adapter connection under the factory radio. Which will give you switched power and non-switched. You want switched. Do a search radar detector hardwire install. There are a lot of write ups on it.
Thanks for the response. Would you be able to tell me the difference between switched and non switched power?
-
Hello guys. I have a 99 C2 and am looking to hook up a laser jammer. The interface box needs to hook up inside the car to a 12 volt power supply. This 12 volt power supply needs to go on and off with the ignition. The question is where is a 12 volt power supply that I can hook up this interface box to. Can I hook the interface box straight to the fuse box? Electricity and wires are not my thing, please be thorough with your explanation.
-
Hello guys does anyone have a laser jammer installed on there 996. Radar detectors are no match for police laser. I have a Valentine 1 that does detect laser, but once it warns you it's to late. So I have reserched the Blinder M25 Extreme. It seems to jam all police laser. (not radar) I do mostly highway driving and am taking a trip to the West Coast (2000 miles of highway one way :drive: ) and I would like to cruise at 90 mph. If you have a laser jammer on your 996 please let me know how you like it and if it is worth the money. Thanks
-
White, start your engine after the winter with removed fuel pump fuse ( approx. 10 sec. ) till oil pressure is present, install the fuse and fire up the engine, easy to do and effective. Add synthetic 2 stroke oil ( 1cc per liter fuel ) in the gas tank, on your last run before the winter and let the engine not running before spring is come
No thanks. I'll do that to my weed wacker!!
-
Thanks guys for all your responses. I don't want to risk the "sucking oil down the intake" method. In spring I'll put the car in 5th or 6th ( drink a Red Bull) and see how far I get. Thanks guys.
-
Hello guys I have a 99 C2 with a 6 speed tranny. I store my car over winter, and was wondering if you put the car in 6th gear are you able to push the car, and will that lubricate the cylinder walls?? If so, this seems like a great idea before the first start up in spring? Has any one done this on a Carrera?
-
It's bitter sweet to have my 99 C2 put away for the winter. I live near Chicago and am fortunate enought to have an option not to drive my Carerra this winter. So... this is what I did to get it ready for its long hybernation.
* Wash, dry, drive, and re-dry the nooks and crannies.
* Zymol wax, Zymol seals, Zymol leather (treat),and Zymol vinyl.
* Drove the car to Shell gas station and filled up with V-Power and added 7oz. Stabil .
* Changed the oil & filter, Mobil 1 0w-40.
* Drove the car 2 miles just to circulate the fresh oil.
* Parked the car in a attatched non-heated garage.
* Under each tire I placed 1/4 inch super dense foam so the the tires are not in contact with the cement floor.
* Increased tire PSI to 55
* Attatched a Battery Tender Jr.
* Dusted the car off.
* Coverd the car with 100% cotton sheets.
* Cried like a baby!!!
I plan on manually rolling the car every month, but may not start it up till late April. Anything I missed..suggestions? Thanks


Jack It Up (follow up) Action Shots
in 996 Series (Carrera, Carrera 4, Carrera 4S, Targa)
Posted
Loren go ahead order yourself a pair, and after you crush your subframe post your pictures!!!