Welcome to RennTech.org Community, Guest
There are many great features available to you once you register at RennTech.org
You are free to view posts here, but you must log in to reply to existing posts, or to start your own new topic. Like most online communities, there are costs involved to maintain a site like this - so we encourage our members to subscribe or donate. All subscriptions and donations go to the costs operating and maintaining this site. We prefer that guests take part in our community and we offer a lot in return to those willing to join our corner of the Porsche world. This site is 99 percent member supported (less than 1 percent comes from advertising) - so please consider an annual subscription or donation to keep this site running.
Here are some of the features available - once you subscribe RennTech.org
- View Classified Ads
- DIY Tutorials
- Porsche TSB Listings (limited)
- VIN Decoder
- Special Offers
- Paint Codes
- Registry
- Videos System
- View Reviews
- and get rid of this welcome message
It takes just a few minutes to register, and it's quality Porsche information at a low cost.
Contributing Members also get these additional benefits:
(you become a Contributing Member by subscribing or donating money to the operation of this site)
- No ads - advertisements are removed
- Access the Contributors Only Forum
- Contributing Members Only Downloads
- Send attachments with PMs
- All image/file storage limits are substantially increased for all Contributing Members
- Option Codes Lookup
- VIN Option Lookups (limited)


the head
-
Posts
102 -
Joined
-
Last visited
Content Type
Profiles
Events
Forums
Exterior Paint Colors
Downloads
Tutorials
Links Directory
Collections
Classifieds
Store
Everything posted by the head
-
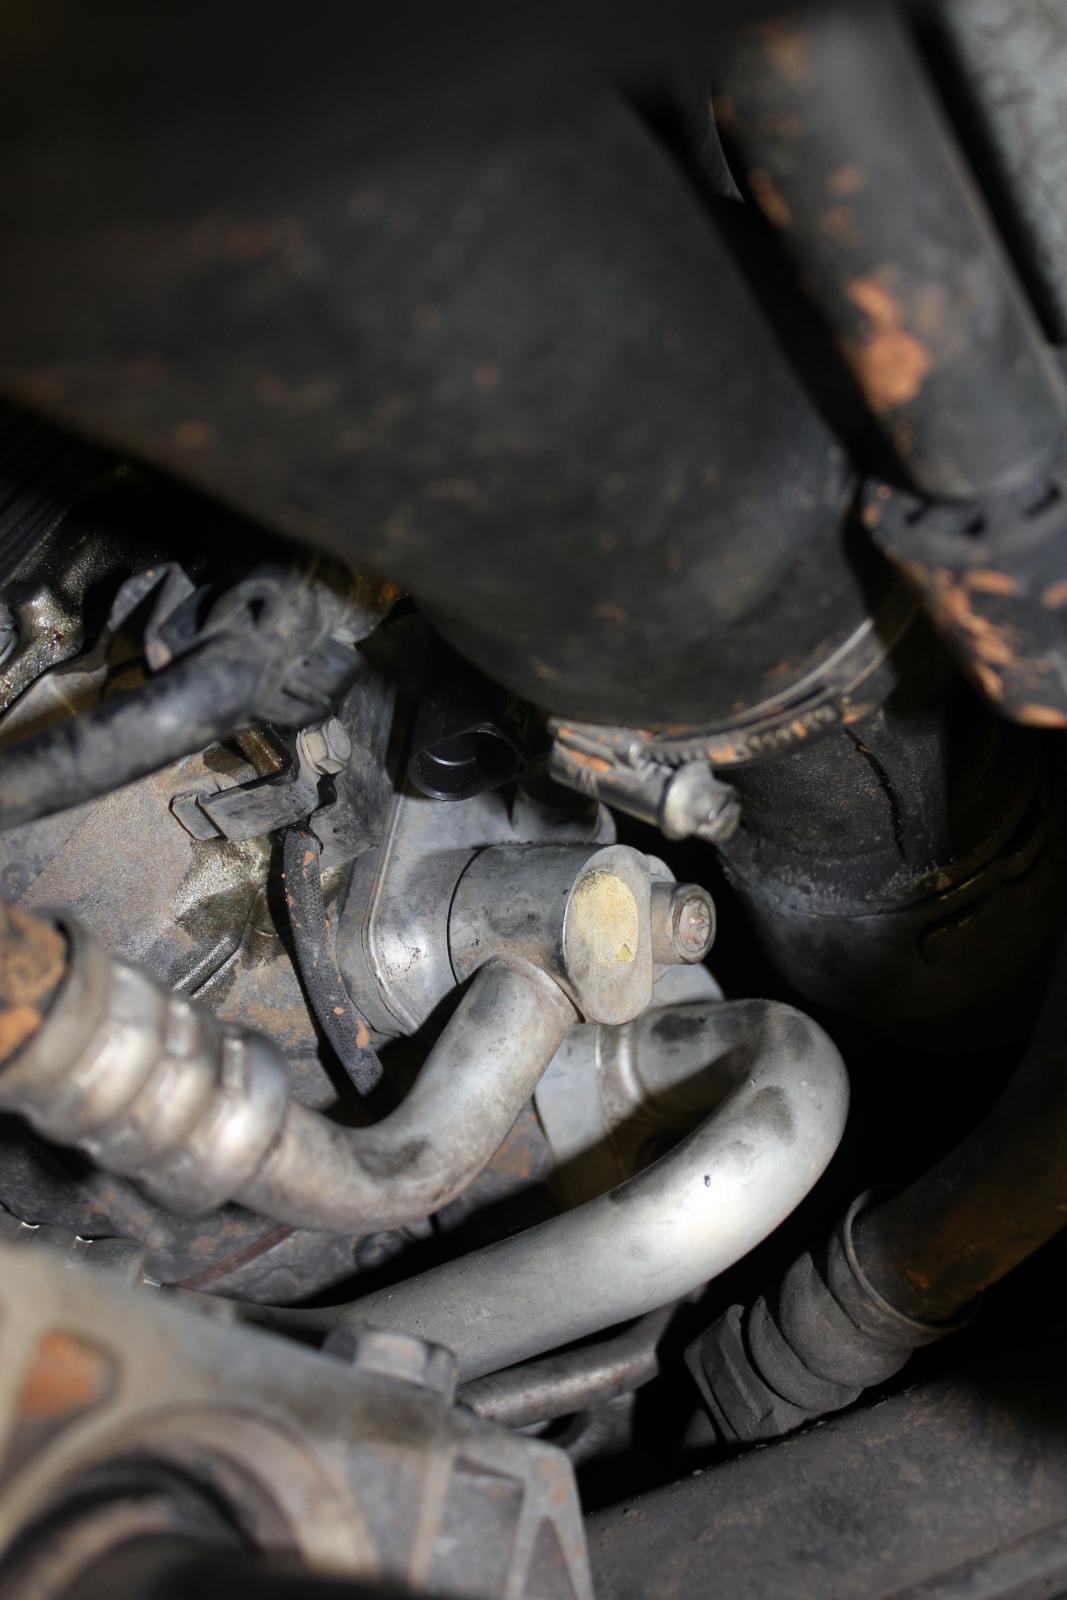
Sending a feeler on the auxiliary water pump. This is the pump that is located behind the left (driver's) side inner fender cover. It pumps water for the heater, basically. I've noticed it getting louder and louder so I'm guessing it is going out. I haven't heard or come up with much on a search. There is a TSB to add foam tape to quiet it down and I did a home-grown version to see if that would help but it didn't. But it really didn't make this much noise before. I was curious if anyone had replaced one before so I can guess how much coolant will need to be removed. Once you get to the pump it's pretty straight forward. Part number appears to be 95557215002.
-
Just to clarify, the heater hose in the pic above is for the Moroso catch can I have installed. You can see the broken end of the PCV tube laying next to the intake manifold at the top of the pic - that's what i replaced with heater hose.
-
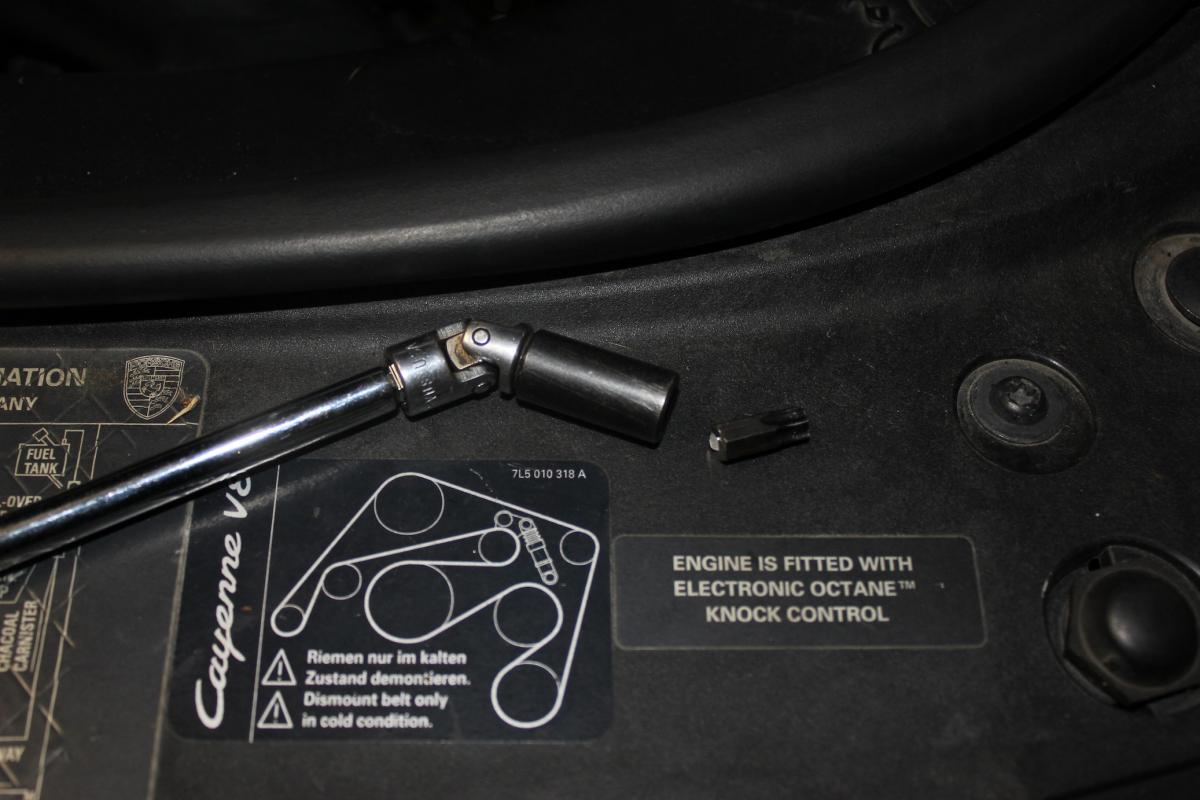
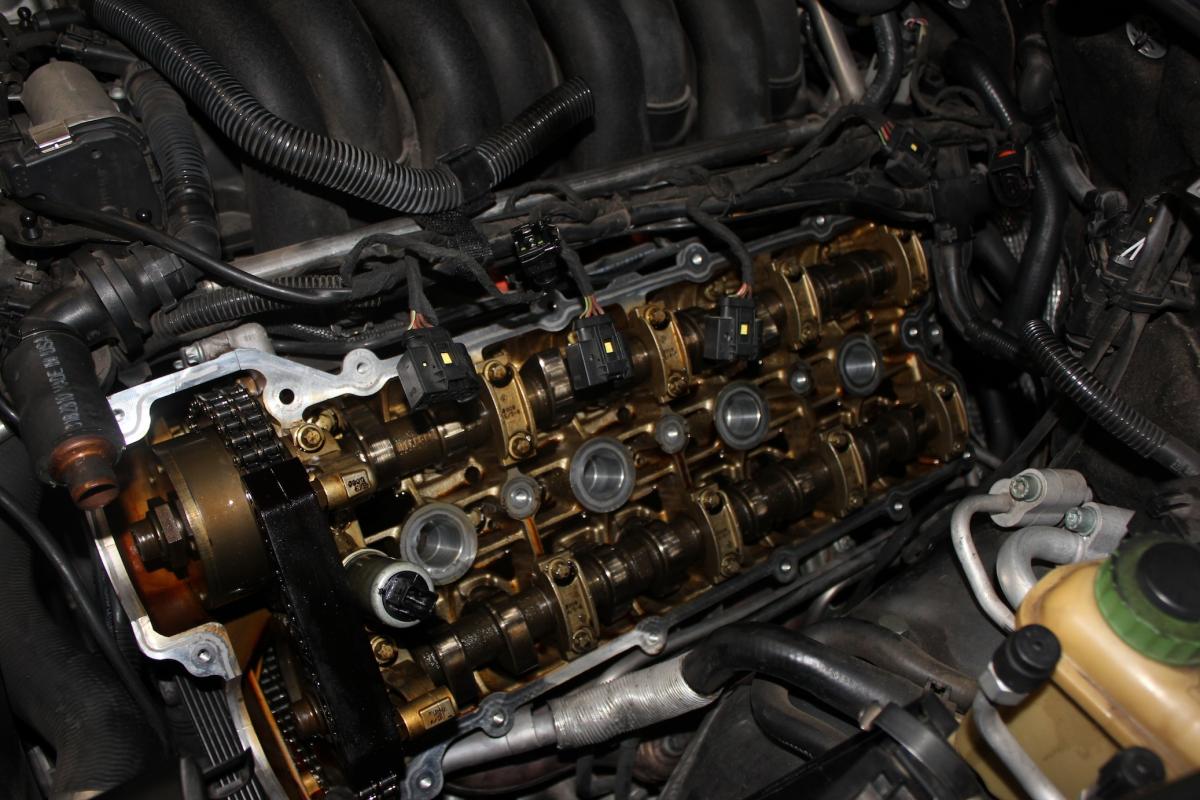
Pics as promised to get the rear, lower corner bolts off the covers. I also had to use it on the left (driver's) second-to-the-rearmost bolt as well. In the process of doing the valve covers I broke both sides of the crankcase vent tube(s). You can cut off the hard pieces with a razor and use 3/4" heater hose to re-plumb it. The fitings are already barbed to accept the hose. Some hints along the way: if it looks like something will be in the way, it will be so just remove it so you don't fight it later. Remove the lower engine cover just like you would if replacing the oil filter. That way if (when) you drop something you can get to it quickly. It's also necessary to remove the AC harness plug on the left side. I couldn't get it off without unplugging it. The trick with it is the tabs that hold it together are facing into the freon fitting. You need to slide the connector off the mounting boss (grooved) to get to the tab. Once you get it off, rotate it 180 degrees as shown in the pic so the tab will be on the "visible" side and be easier to get to. I did have to route the wiring differently putting it all back together but with a couple of zip ties it fit just fine. Of interest after taking the covers off, it appears that Porsche put the silicone RTV on the valve cover side of the gasket where the front cover and head meet. In the manual you put the RTV on that seam to make sure it seals and there was nothing there when I pulled them off. Weird. I did this over two separate weekend days. It takes a lot of time just to remove and bolt things back on.

-
It's a pain. I'm doing this right now. On the turbo (and I'd imagine on the S) I've pulled the air injection pumps and brackets and also removing the airbox cover, such as replacing the filter, have helped and quite frankly I'm stunned that isn't in the Porsche service manual. My symptoms were smoke from burning oil coming up from the passenger side. I've had to run the heater on recirc to keep from sniffing fumes from the burnt oil. Anyway, the gasket I removed broke and is very stiff. I have to give credit to the person who designed it. The rubber getting old and brittle is about the only way for this gasket to fail. Oh and I had to cut down a t-40 bit to fit a bit driver (1/4") with a universal joint and extension to reach and be able to loosen/tighten the lower back corner bolt off of the cover. The service manual warns about this. I'll post pics of that "tool" when I finish up.
-
Homelink question
the head replied to the head's topic in 9PA, 9PA1 (Cayenne, Cayenne S, Cayenne Turbo, Cayenne Turbo S)
That's how I did it. Everything was there (harness included). -
Homelink question
the head replied to the head's topic in 9PA, 9PA1 (Cayenne, Cayenne S, Cayenne Turbo, Cayenne Turbo S)
The wire for my V1 runs from the fuse panel on the left side of the dash, up the A-pillar and across the headliner. There is a key-on empty fuse spot there that I tapped with a spade terminal to get the power. -
Homelink question
the head replied to the head's topic in 9PA, 9PA1 (Cayenne, Cayenne S, Cayenne Turbo, Cayenne Turbo S)
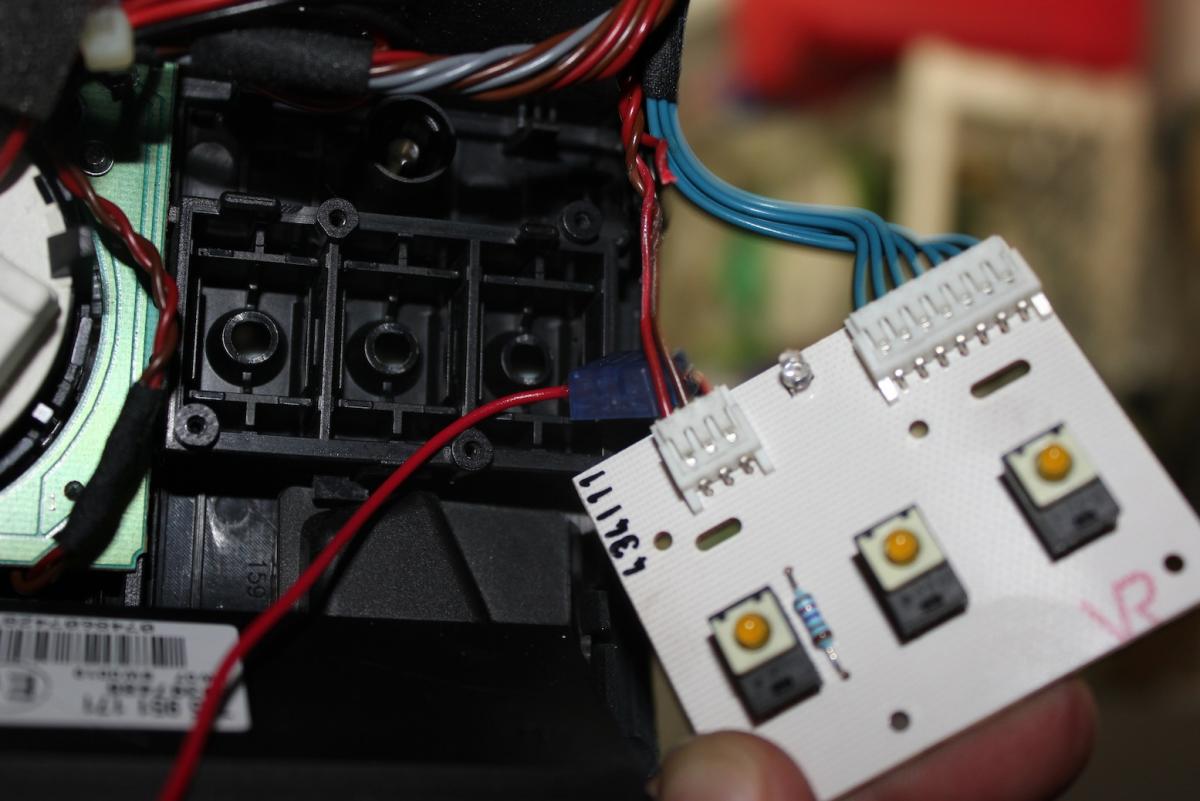
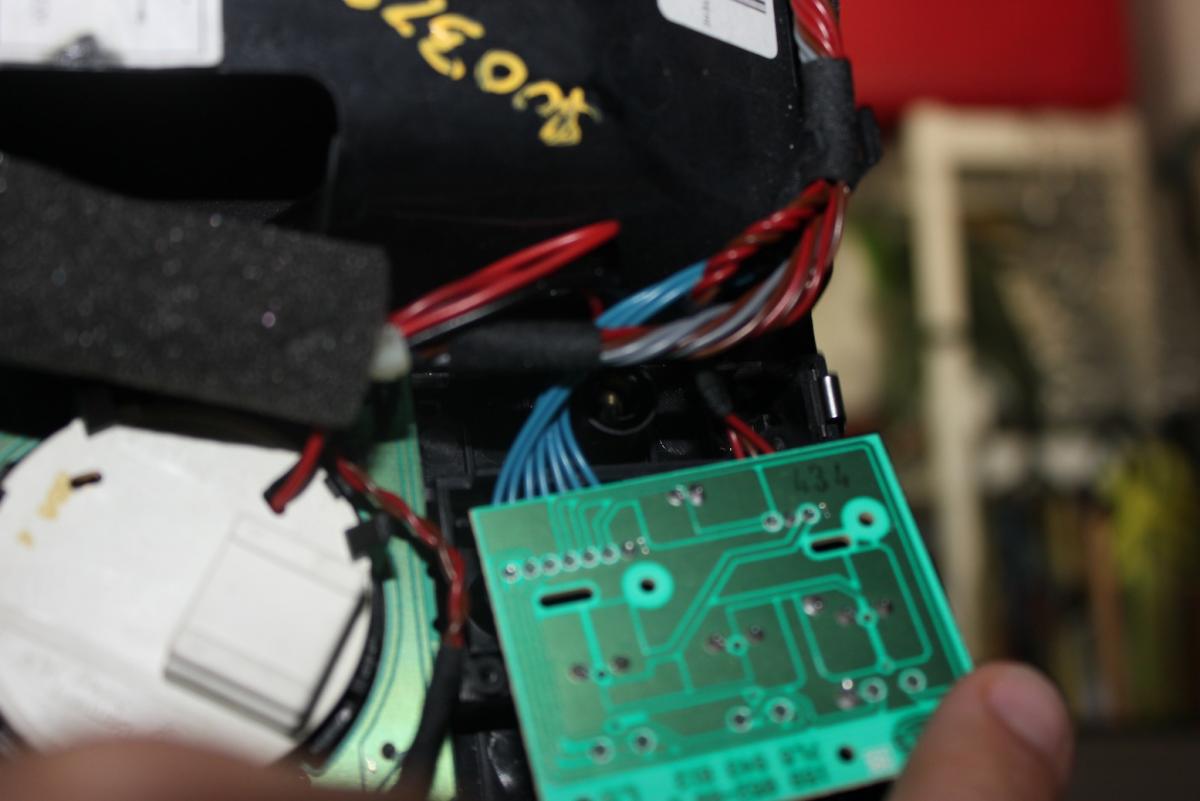
A couple of pics to help clarify. There are 4 screws that hold the circuit board in place. It was a T6 torx bit to remove them.
-
Homelink question
the head replied to the head's topic in 9PA, 9PA1 (Cayenne, Cayenne S, Cayenne Turbo, Cayenne Turbo S)
Actually I got impatient and figured out where the main power wire was on the 3-pin connector that goes to the buttons. I ran the same key-on power that I have my V1 radar detector on and it works fine. I did cut the wire. The instructions look to be a cleaner way to do it. The thing with the TSB is that on the 2004 like mine, it will get power to the switches by pressing on the brake pedal (when the CAN circuit power to modules comes on). If it took the key-on I'd feel safer on the nights my car has to sit outside. It'd be easy for someone to smash a window and then manage to operate the door opener. Maybe I'm just paranoid :eek: . I took pics and will post later on where I made the splice. But this is a real cheap way to add homelink. Just find a used overhead console with it in there and pop it in with just a little work. -
So I replaced the overhead console as part of the dome light repair - I got one off of Ebay and it was in better shape than my original one so I put it on. The main difference is that the one I bought has a homelink system installed. It doesn't seem to want to work for me - the LED doesn't light under any circumstances. I've read in other Porsche model forums that the PIWIS can do a reset and re-activate it (in cars that had it installed from the factory). Does this mean that I have to go to the dealer to unlock the use of this thing? I'm wondering how the homelink retrofit kit from Porsche works then. Is there a way to just hardwire the thing in without having the PCM "turn it on"?
-
No noise that I recall so there was no warning. I replaced it since the vanes that serve to move the air were all broken off. That price sounds good, I paid about $160 You can check the valve pretty easily - just disconnect the driver's side air hose from the pump there in the engine compartment. If it blows exhaust then it's bad. It's just a simple one-way valve so there is no power or vacuum required to actuate it. The air pump just overcomes the flapper and pushes air into the cat. I recall it took a universal joint and a lot of extensions to reach it and even then I had to get the socket into place by feel with my hand -it took some patience.
-
Changed the filter and fluid today. See what happens now... Hasn't done it for a few days.
-
Changed filter and fluid today. Did pretty much the same thing as described in DIY. Started and stopped the engine about 4 times before it stopped pulling down the fluid. After that I did the fluid fill with the engine running and it took the last two quarts then. Used the Durametric software for the temp reading. It took about 9 quarts. I bought 10 just in case and after a couple of spills I'm glad I did. I also used a brake bleeder as a pump - just changed the hose end with a cut piece of coat hanger in the rubber hose to get the curve on the end to bend it over the top of the fill port.
-
If this is the sensor that is reading the temp on the dash, it seems to be OK. When the weather is cold it does the standard thing of starting off in first gear and running the gears a bit longer. This feels different. I didn't see any codes in the Durametric - is there some other way to test it?
-
About a week ago I noticed that my 04 CTT didn't want to shift out of second right after leaving my driveway. It stayed in gear and after I got down the street a ways (at 3500 rpm) it shifted and never missed a gear after that. It has been several days but I noticed it again this morning. The best I can describe it is that it feels like it wants to shift (mild slip) but either doesn't or can't. It then locks back into second and then when it tried to shift again, I let off the gas and it went into 3rd gear. With everything after that shifting fine. This is all with pretty mild throttle, I'm nowhere close to even half throttle. I have almost 91k miles on it and as far as I know it has the original fluid and filter in it. So I'm thinking the first step is to change the fluid and filter. It doesn't exhibit the valve body issue of the higher gears shifting hard, so I'm not sure that the valve body is necessarily the problem. Anyone else have experiences like this? Thoughts?
-
Keep us posted - mine has been awful as well.
-
955-504-235-01 I got mine from Sunset Imports ($238). Freight was pricey ($50), but I got some other parts with it.
-
I'm at 90k miles on mine and they adjust with the electronic settings just fine. I can't tell a difference since I bought it up to now (60k miles ago).
-
Yep - one piece metal. It's painted black, not powdercoated in case you're wondering.
-
OK looking around I found this link with Arnott, who makes new air springs for the Cayenne. The piece in question that I'm seeing split is just a dust boot. Arnott doesn't even install or re-install one. Perhaps their design is more robust? In any event everything is still working fine - maybe I'm just being a little paranoid about it since Porsche put it there for a reason. Check out the install link - it appears getting the air strut out is a bit easier than what the Porsche service manual states you have to do. https://www.arnottindustries.com/ftpManual/A-2571%20RR%20Web.pdf
-
I had seen that, but there are no sharp edges coming out of it. It's just the plastic bellows that is torn.
-
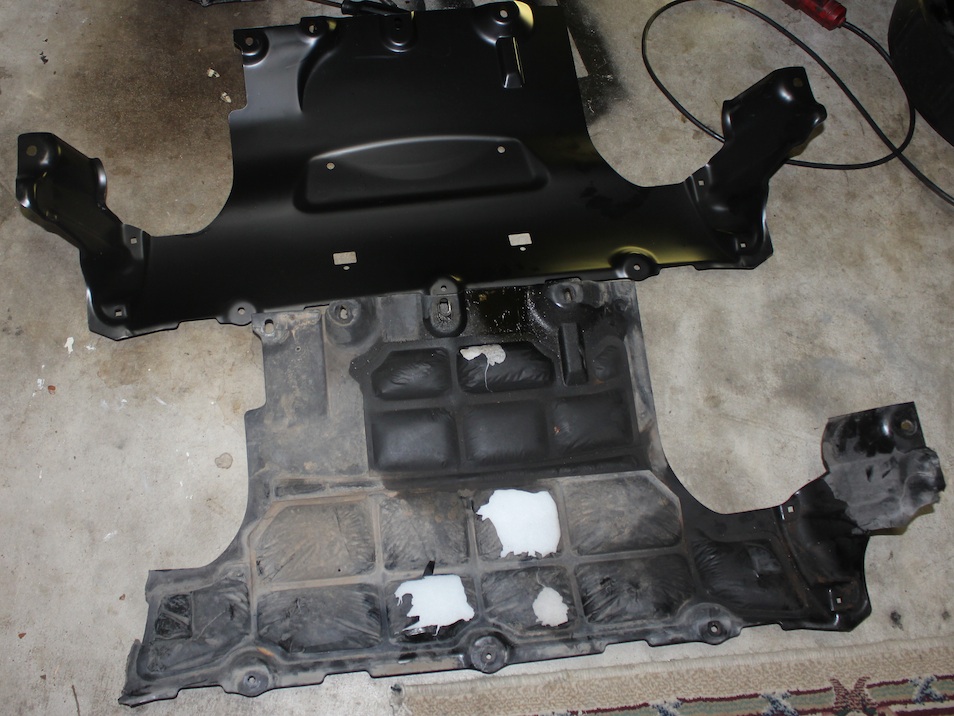
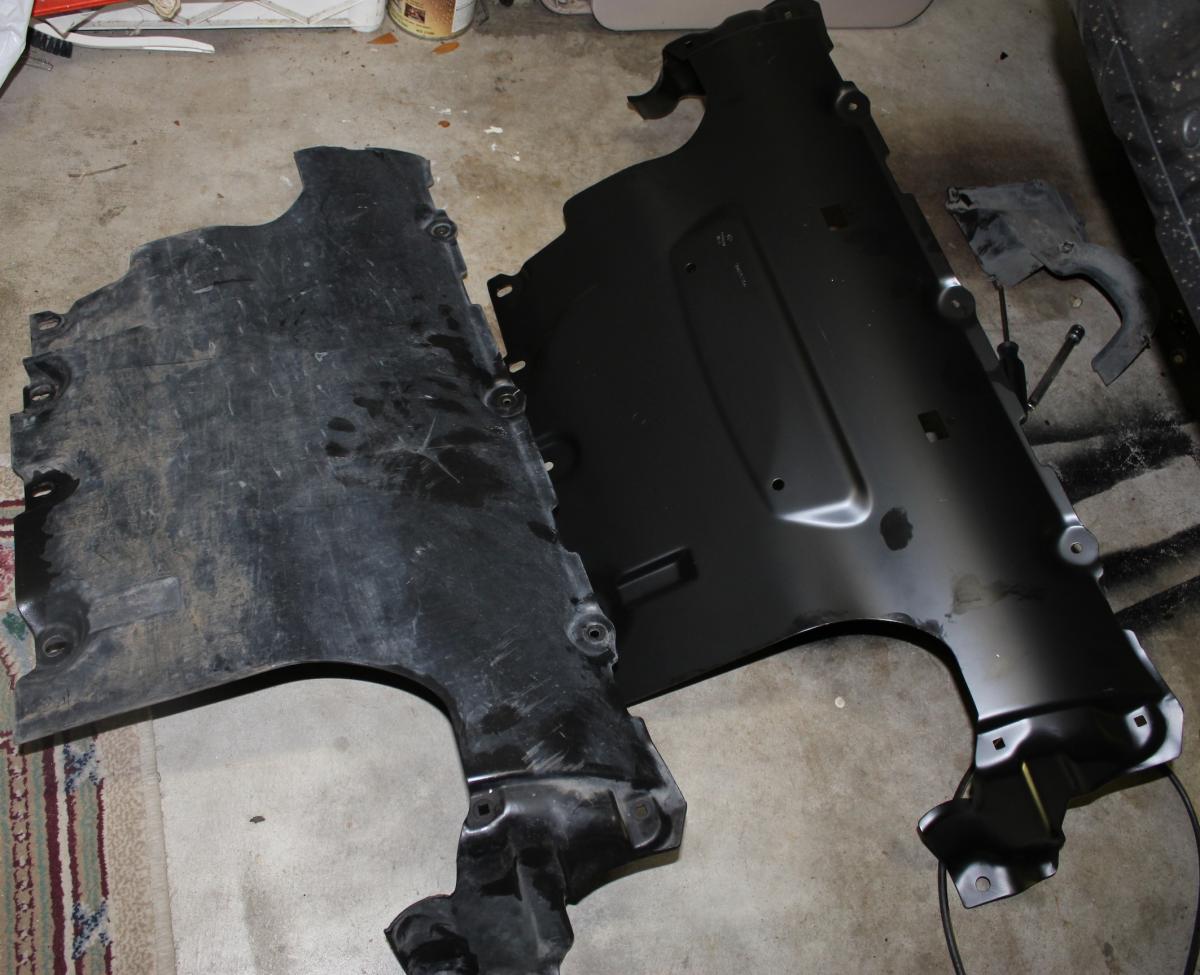
Installed this tonight while changing oil. Fits just like the stock plastic piece. Not quite as easy to fit into place but once you maneuver it into position it fits perfectly. I didn't have to push/pull or bend anything to make it fit and the bolt holes all line up. I'm not sure how thick it is, but it isn't too wimpy. As you can see, the stock one has one ear completely broken off and a rock tried to punch through (successfully I suppose) where the cracks towards the center are. It's much more solid. Yes, I see the oil that was leaking - I did replace both drain plugs and washers this time. I'm not sure what the square holes are for, though.
-
While changing my oil this evening, I raised the car up to the highest terrain setting and noticed the bellows/cover was split on both air struts. It's #13 on the attached pic. Is this something that I can replace myself? I was considering swapping in Turbo S lower control arms anyway and thought it would be a good time to do it all at once.Air strut.pdf
-
It's pretty involved. I've had to replace the door lock unit on the left rear door. If you can't reach it by removing the interior trim panel, then the inner door frame has to come out. This is the frame that holds the window, lock, and the window frame that goes on the "top" of the door. Realigning isn't too bad but I'll admit it took me about 3 tries to get it lined up where it was so the seals were all in place.
-
turn signal issue
the head replied to the head's topic in 9PA, 9PA1 (Cayenne, Cayenne S, Cayenne Turbo, Cayenne Turbo S)
No codes in the Durametric scan. I'll probably just have to take it apart and look. -
I'll start by saying it's not a bulb issue - I've had the socket problem before, but this is the switch I think. Indicators work normally for left turns. For right turns, every once and a while the left indicator lights (outside and on the dash) up instead! Also, I've noticed that every once and a while the right turn indicators stay on for three or so blinks after a turn is complete and the indicator stalk returns to the neutral position. Anyone else have this problem? Battery was replaced a year or so ago, but had completely different weird electrical problems leading up to that.