Welcome to RennTech.org Community, Guest
There are many great features available to you once you register at RennTech.org
You are free to view posts here, but you must log in to reply to existing posts, or to start your own new topic. Like most online communities, there are costs involved to maintain a site like this - so we encourage our members to donate. All donations go to the costs operating and maintaining this site. We prefer that guests take part in our community and we offer a lot in return to those willing to join our corner of the Porsche world. This site is 99 percent member supported (less than 1 percent comes from advertising) - so please consider an annual donation to keep this site running.
Here are some of the features available - once you register at RennTech.org
- View Classified Ads
- DIY Tutorials
- Porsche TSB Listings (limited)
- VIN Decoder
- Special Offers
-
OBD II P-Codes - Paint Codes
- Registry
- Videos System
- View Reviews
- and get rid of this welcome message
It takes just a few minutes to register, and it's FREE
Contributing Members also get these additional benefits:
(you become a Contributing Member by donating money to the operation of this site)
- No ads - advertisements are removed
- Access the Contributors Only Forum
- Contributing Members Only Downloads
- Send attachments with PMs
- All image/file storage limits are substantially increased for all Contributing Members
- Option Codes Lookup
- VIN Option Lookups (limited)


drem914
-
Posts
85 -
Joined
-
Last visited
Content Type
Profiles
Events
Forums
External Paint Colors
Downloads
Tutorials
Links Directory
Collections
Store
Posts posted by drem914
-
-
i know the parts are different, i can look them up. I'm wondering if the different parts will fit.
Anybody know?
Off the top of my hand, I believe the cats and O-2 Sensors are different. Simply swapping in a 3.2 Exhaust I don't believe will work. I "believe" (and I could be wrong) you'd have to also run new wires for new O-2 sensors. In addition, the MAF may need to be re-mapped as well as the ECU.
If I'm not mistaken. the 2.7 has 2 O-2 sensors, whereas the 3.2 has 4.
The cats for a 2.7 and a 3.2 through MY 03 are the same. part numbers are the same. 4 sensors from year 2000 on.
The O2 sensors from 02 to 03 have different part numbers which probably means the length is different.
I just swapped a full system (less sensors) from a 2002 3.2 into my 2001 2.7 because my header/cats were rattling.
I still have the secondaries that are in good shape if anyone is interested in them.
I also live in CA with terrible smog testing, so I didn't want to have any problems from installing after-market headers or cat bypasses.
-
Ekam,
Why is one of the shots in front of Toyota dealership?
Does anyone know if the carrera lights 18x8, 18x10's from an '05 997 will fit an '01 986 Boxster?
-
I wouldn't do anything too permanent that you might regret. I think within two years everyone will just be using the GPS on their phones, so all you'd need is a phone mount coming out of your cigarette lighter.
Already do and found a good use for the right side cup holder.
It is a perfect resting spot/slot for my Blackjack II Smartphone.
Keeps it in site for GPS and incoming calls and the power cord doesn't have to go to far to the cigarette lighter
-
I had the exact same symptoms, same speaker. In looking a the speaker itself, the line from the magnet to the paper cone had broken at the cone end just enough to lose contact at times. The speaker would sometimes connect/disconnect on turns. Did you carefully inspect that?
UPDATE: Today I lit a spark under my *** and went to troubleshooting. I pulled the dash speakers and swapped them. Right sie still does not work so the speaker is now known to b good. The only two things left are wiring and the amp. Can anyone tell me what pins to check at the amp connection to test for continuity so I can rule th wires out?
As Loren likes to say: "Have you used the search function on this site? it has been covered many times before."
http://www.renntech.org/forums/index.php?s...st&p=144770
Respectfully, after searching spark plug changes and reading mulitiple non helpfull posts, I must say the search function leaves much to be desired. However thank you for the reply. That was exactly what I needed. :-)
I know i get that too. The longer you are on the board though the more you know which are repetitive questions and how to filter for selections a bit more precisely.
-
I had the exact same symptoms, same speaker. In looking a the speaker itself, the line from the magnet to the paper cone had broken at the cone end just enough to lose contact at times. The speaker would sometimes connect/disconnect on turns. Did you carefully inspect that?
UPDATE: Today I lit a spark under my *** and went to troubleshooting. I pulled the dash speakers and swapped them. Right sie still does not work so the speaker is now known to b good. The only two things left are wiring and the amp. Can anyone tell me what pins to check at the amp connection to test for continuity so I can rule th wires out?
As Loren likes to say: "Have you used the search function on this site? it has been covered many times before."
-
I have a 99 Boxster that has the outside temp displayed in the instrument cluster. I just bought the stalk/switch for the On Board Computer (OBC). Does anyone know wheere or which plug in the steering column this switch should plug into.
Thanks in advance.
BillF.
Lexington KY
Do a search for OBC hack. You will have to make up a wiring harness that plugs the stalk/switch to the the white plug behind the instrument cluster and ground the switch. like this obc hack or this obc wiring.
-
Thanks to all. The last ones I want to touch are the doors. I want to do the fronts dash speakers first. I then will either replace the rear OEM speakers with new ones or just add a tweeter. I need to connect up an ipod cable to the aux out in the back of the becker radio and maybe I will change out the amp also.
As a new owner to a 2001 Boxster, I have a question? Are there speakers in the door? I see the grills....but I don't get any sound from that area
If you have the door grilles then you should have the speakers behind them. They are for the low frequency only as the dash speakers are the Mids and Highs. Do you have the rear speaker package behind the head rest in the storage compartment? if so your fad may be mis-adjusted. check your settings. Put your hand on the grill area and see if you feel anything as you turn up the volume. Remember the Becker radio stores different settings for radio, CD and aux.
-
I have the creases, but not the Fuzzy stuff.
What do you use to seal the top? I can't find anything specifically for rag-tops locally.
Use a product call Ragg-Topp from Hartz. You can order it from performance products or suncoast.
it comes in a 2 piece package with cleaner and sealer, or you can order the sealer only.
-
Hi All,
40k 2002 boxster engine has developed a rattle/rumble at the rear, very hard to tell exactly where from but it seems to be kind of erratic and not tinny like a heat shield.
Rattle is most noticeable when stationary and seems to go when engine is rev'd or when on the move. What is odd is that the rattle is distinctly worse when there is high electrical load i.e. it appears or gets more prolific if you turn the A/C on or if you press close on the electric window up switche when the windows are already closed.
Has any one got any ideas
Thanks
Edd
Check for a Cracked a/c pulley wheel or bad pulley bearing. Had the same thing. Went away when A/C was off and came back when the A/C was on.
-
Pin 1 goes to ground, when you move the switch, the contacts close and the different pins are now taken to ground. That is what triggers the response in the cluster. So connect your ohm meter to one of the pins on the gray cluster, the other to ground and push the switch in the direction that corresponds to the pin on the gray connector you are testing. The circuit should close, if it doesn't you have a problem with your wiring or with the switch.
-Todd
Thank you for the explanation. This weekend I'll pop off the cluster and check the wiring.
-
You don't need a tester, just pull the gray connector off of the cluster and check that the pins go to ground when you push the stalk in the direction the pin corresponds to.
-Todd
Sorry, but not sure what you mean by the "pins go to ground" when the stalk is pushed. Can you elaborate? Can I check this with a simple volt meter?
-
Try getting it hooked up to a PIWIS/PST2/Durametric tester. This will allow you to read the input signals from each movement direction of the stalk.
Next time at the shop I will have that done since I don't have access to a tester.
-
(update 06/01:) Now having installed the last wire from position #6 on the stalk harness to #25 on the gray connector. no change in function. I still am unable to reset the MPG display or mileage from the stalk. I can reset trip mileage using the odometer reset button, but that is it. any suggestions on resetting the the OBC without having to always disconnect the battery? That will get old real quick.
-
The factory wiring diagrams are wrong, there is no 'lever inside' connection. As Loren states, A1 goes from the stalk to ground, the other wires go to the cluster from the stalk.
-Todd
Thanks. Just picked up the extra wires at the local VW dealer to complete the connection from pin 6 on the stalk plug to pin 25 on the dash plug. Now that I have taken it apart before should be a snap to do this weekend.
(update 06/01:) Now having installed the last wire from position #6 on the stalk harness to #25 on the gray connector. no change in function. I still am unable to reset the MPG display or mileage from the stalk. I can reset trip mileage using the odometer reset button, but that is it. any suggestions on resetting the the OBC without having to always disconnect the battery? That will get old real quick.
-
Anyone know the interior diam on the exhaust headers for a 3.2 S motor vs. the 2.7 base motor? OR if there is any?
-
OBC retrofits to the dot matrix cluster using a switch work fine, but that's when it is to an existing cluster, and you get the old-type display.
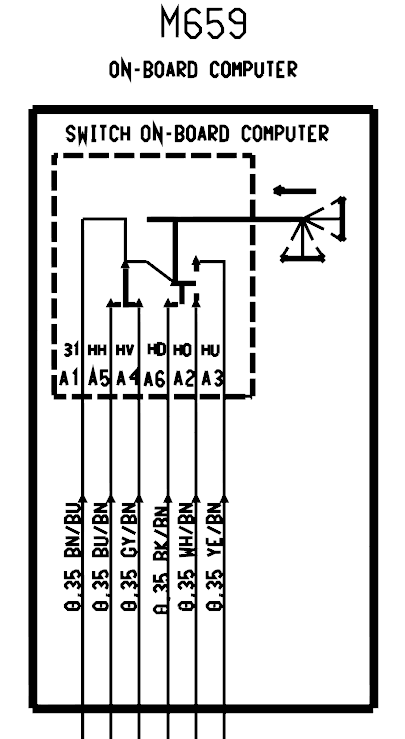
The pin connections on the wiring diagrams for the early and late clusters are:
Early Cluster:
White plug #II
Pin 20 - Lever up - stalk pin 2
Pin 21 - Lever down - stalk pin 3
Pin 22 - Lever front - stalk pin 4
Pin 25 - Lever rear - stalk pin 5
Late Cluster:
Grey plug C
Pin 21 - Lever front - stalk pin 4
Pin 22 - Lever down - stalk pin 3
Pin 23 - Lever up - stalk pin 2
Pin 24 - Lever rear - stalk pin 5
Pin 25 - Lever inside - stalk pin 6
Edit: Pin 1 on the stalk goes to ground.
Therefore, you have your switch connected to the correct pins - I just don't think you have enough controls to navigate the menus on the new cluster.
Pin 25 on the new cluster has always been a mystery to me. The stalks are all the same - new or old cluster - but the wiring diagram shows this extra connection. It doesn't seem to be connected inside the stalk though. If anyone else works out what this is for, let me know and put me out of my misery. :huh:
I am experiencing the same issue regarding not being able to rest the OBC.
I have control up and down as well as forward for the speed set control I just do not get a RESET on my mileage.
I have a 2001 MY 986. I have 5 wires from my harness connecting to the 4th stalk.
I know for sure that pins 22 & 23 control correctly and which ever pin is controlling forward motion on the stalk I don't know if that is considered front?
the issue seems to be with the opposing motion (that would control the reset.) Can anyone clarify the pin arrangement. it seems that everywhere I look I get the same pin wiring diagram.
Late cluster (MY01 and newer)

Loren are you saying that I need to have 6 cables coming from the stalk harness?
I understand lever right, left, front and rear, but what is meant by the description "Lever Inside". I don't have a switch on the end of the stalk and can't push it in.
-
OBC retrofits to the dot matrix cluster using a switch work fine, but that's when it is to an existing cluster, and you get the old-type display.
The pin connections on the wiring diagrams for the early and late clusters are:
Early Cluster:
White plug #II
Pin 20 - Lever up - stalk pin 2
Pin 21 - Lever down - stalk pin 3
Pin 22 - Lever front - stalk pin 4
Pin 25 - Lever rear - stalk pin 5
Late Cluster:
Grey plug C
Pin 21 - Lever front - stalk pin 4
Pin 22 - Lever down - stalk pin 3
Pin 23 - Lever up - stalk pin 2
Pin 24 - Lever rear - stalk pin 5
Pin 25 - Lever inside - stalk pin 6
Edit: Pin 1 on the stalk goes to ground.
Therefore, you have your switch connected to the correct pins - I just don't think you have enough controls to navigate the menus on the new cluster.
Pin 25 on the new cluster has always been a mystery to me. The stalks are all the same - new or old cluster - but the wiring diagram shows this extra connection. It doesn't seem to be connected inside the stalk though. If anyone else works out what this is for, let me know and put me out of my misery. :huh:
I am experiencing the same issue regarding not being able to rest the OBC.
I have control up and down as well as forward for the speed set control I just do not get a RESET on my mileage.
I have a 2001 MY 986. I have 5 wires from my harness connecting to the 4th stalk.
I know for sure that pins 22 & 23 control correctly and which ever pin is controlling forward motion on the stalk I don't know if that is considered front?
the issue seems to be with the opposing motion (that would control the reset.) Can anyone clarify the pin arrangement. it seems that everywhere I look I get the same pin wiring diagram.
-
Saw this on the 986Forum and wondered if anyone has tried it yet?
Not really, but it is supposed to sound like it.
-
Two very big thumbs up for Jamey Rawlings from me too, I consulted with him a lot when designing my system, he made door baffle boards for me and led me in the right direction in making my own sub box, similar to what he does.I have a custom 8" sub that was built by Jamey Rawlings who used to be with Paris Audio...It sounds awesome and I pound the h*ll out of it...e.g. mirrors vibrating, punchy bass (on the right song), seats vibrating, etc. It's really amazing. On the install, basically I drilled a screw right through the back of the speaker box into the floor board. E.g. remove the drive to access in the inside of the enclosure, drill the screw through, and replace the driver. Be careful not to use too long of a screw or you will go into the gas tank (not a problem unless you ever have to remove the gas tank or the the sub).Bhavesh
The 8" sub in the footwell is the real deal.
Do you have a photo of your sub installation?
-
The routing though the sill is not hard at all. One of the best things to do is use a fish line from the other end and just pull it though.
So is it better to put the fishline in the front section and pull the harness through from back to front, or would it be easier the other way, ie put fish line in from back of car, and pull harness from front to back.
With the sill route, the scariest part seems to be under the passenger footwell - allegedly the carpet there is attached with plastic cement glue, and I don't want to irreversibly damage anything... !
Is it possible to route the sill path, WITHOUT having to disconnect the battery?
You want to disconnect the battery so you do not activate the the air bags by mistake.
I found it easier to pull the wires forward. I've only done this once so I could be wrong (not the first time.) This way any slack is up at the head unit and not down behind the roll bars.
Getting the wire along the edge of the carpet along the passenger foot well was the hardest part. Take your time the glue will come loose and will re-stick after you press it back in.
You then run the cable under the foam dash cover and you are at the head unit.
Run the connector up to the head unit, insert correctly, hook your battery back up and reprogram the radio.
Check to make sure your left and right are hooked correctly, test the fade and your are golden. Enjoy.
-
Couple of sources listed here.
There is also an alternate route for the cabling going via the centre console which is allegedly much easier than the passenger sill..... see bottom of attached PDF (from another poster). I believe this won't necessitate disconnecting the battery, so no problems with airbag lights, electric window calibration etc.....
I am going to attempt this soon and must admit the instructions aren't very clear in describing the steps to get the harness routed from the clip on the roll bar, to under the carpet to the centre console. If anyone has some pictures that would be great!
Thanks for the instructions, I will be looking at theis this weekend. While I have the car apart I will check out the "easier softer way" to see if those instructions make sense while I'm sitting in the car.
Bill
The routing though the sill is not hard at all. One of the best things to do is use a fish line from the other end and just pull it though. To get from the back to the front should not take more than around a half hour in and out including, the removal of panels, plugging in the the connector to the head unit and putting back the panels. I was surprised how quickly it went.
-
You are in CA
what is going to pass their smog test? Don't they look for non-stock alterations there? Start pricing replacements off a wreck.
Yes they do, but only if it is obvious. If there are cats in place like the secondaries with proper sensor wires leading from them, there are no CELs going off on the car and the motor is operating within acceptable emission limits you will appear to be compliant.
-
Well I had and normal oil service yesterday (85,000 mi) and got a confirmation for the sound my exhaust was making. Apparently my front cat converters are going out. They have that rattling and sputtering sound. I don't have any codes coming up yet. I still have time for a solution and am trying to see what is the better way to go.
Since the fronts are part of the headers I have a couple of suggestions:
1. Replace the front cats and headers with clean stainless headers and hook them up to new rear cats and the existing.
2. Replace the front cats and headers with new cats and headers, install the rear cat bypass pipes and connect to the existing exhaust.
First of all can I do option one without error codes? That will let me know if this is even an option.
Any suggestions from the fine people on here if this is even a good idea or am I creating more problems for my self as far as performance issues, mileage or damage to the the exhaust. This is my daily driver and want to keep it as trouble free as possible. If option one is possible any recommendations on suppliers for new headers and the rear cats?
Thanks,
-
In RoW cars the radios for up MY03 would have been CR-22 as well as CDR-32.
So perhaps the original poster has a CDR-32 (more or less equal to a CDR-220).
I would suggest, if you have an i-pod, Zune or other mp3 player, that you will be much happier installing the adapter cable for it and the mp3 player instead of the cd-changer. To date, I have about half my audio library on a Zune connected to the aux cable for the CDR-220. I just set it on shuffle and have around 2000 songs in almost any rotation i want. It is like having your own radio station. It give you many more options of cds or songs to listen to 6+1 CD vs 200 CDs or more. It is also less expensive ($25 US) than tracking down a previously used CD changer (maybe $200US.) Also, you don't have to go into the front trunk to change discs. The quality of sound is comparable to having a CD playing.
'03 150,000 Mile Service Completed Today
in 986 Series (Boxster, Boxster S)
Posted
Bill, I'll have to look for you, too. I work in Foothill Ranch (Bake and Dimension), but live down near Antonio. I have a Seal Grey '01 986 with black top,
de-ambered rear lights, tinted windows and the rest of the turn signals and 3rd light are also grey.