Welcome to RennTech.org Community, Guest
There are many great features available to you once you register at RennTech.org
You are free to view posts here, but you must log in to reply to existing posts, or to start your own new topic. Like most online communities, there are costs involved to maintain a site like this - so we encourage our members to donate. All donations go to the costs operating and maintaining this site. We prefer that guests take part in our community and we offer a lot in return to those willing to join our corner of the Porsche world. This site is 99 percent member supported (less than 1 percent comes from advertising) - so please consider an annual donation to keep this site running.
Here are some of the features available - once you register at RennTech.org
- View Classified Ads
- DIY Tutorials
- Porsche TSB Listings (limited)
- VIN Decoder
- Special Offers
-
OBD II P-Codes - Paint Codes
- Registry
- Videos System
- View Reviews
- and get rid of this welcome message
It takes just a few minutes to register, and it's FREE
Contributing Members also get these additional benefits:
(you become a Contributing Member by donating money to the operation of this site)
- No ads - advertisements are removed
- Access the Contributors Only Forum
- Contributing Members Only Downloads
- Send attachments with PMs
- All image/file storage limits are substantially increased for all Contributing Members
- Option Codes Lookup
- VIN Option Lookups (limited)


voodoocat
-
Posts
57 -
Joined
-
Last visited
-
Days Won
3
Content Type
Profiles
Events
Forums
External Paint Colors
Downloads
Tutorials
Links Directory
Collections
Store
Posts posted by voodoocat
-
-
Durametric can pinpoint the faulty sensor. You will have to remove the bumpers to replace them, though not too difficult.
Get a spray paint in advance so you can spray paint the sensors to bumper color.
-
That is the t pipes. The rubber deteriorated so at low speed, coolant won't leak but as water pump pumps more fluid, will leak the coolant at the crack. There's two t pieces replace both. You can see it with inspection camera deep into drivers side firewall. if you changed coolant pipes you will see the right one will lead to the two ts.
You can look up from bottom, but you don't want to be under your car when running.
If you are going to pull the manifold, while out exchange the cam position sensors, that is bound to fail.
-
Have you checked expansion tank? It will leak down to pass side suspension area.
-
2004 TT
I don't know if the quality varies with the model year, but 2004 is the first real year for Cayenne.
-
Oh well the air spring did blow. Replaced with Arnott.
-
Hi, I had P0491 P0492, as well as other fault code indicating faulty cam position sensor. I have 04 CTT 60Kmi.
the 40A fuse in fusebox (next to brake fld reservoir) was blown. replacement resulted in another blown fuse.
so i removed and disassembled both secondary air injection pumps, those two things that look like oversized windsheild wiper motor.
The pump consist of motor and plastic vanes, that spin to pump air into the pipe/hose. the vanes have tight tolerance against the aluminum housing. i think over time, the motor bearing start to give, the vane (fin) contacted the housing, broke off and failed. the broken pieces were jammed all over inside the housing and motor wouldn't turn at all. Both pumps had same failure.
If this happened to you, i don't recommend to keep on replacing the fuse, or worse, put bigger fuse in it. you might overheat the motor and burn it up, or worse yet (if you put larger fuse), melt the wiring harness. 40Amps are a lot of current and can start a spark/fire.
Pump is about $150 a piece, but recommend to replace both. Don't recommend a used unit, you'll just get another failed pump soon. also note, the L and R pumps are different, don't buy 2 of the same. 7L5.959.253.A and 7L5.959.253.B
Durametric showed a lot of faults, initially cam position sensor fail. Some forums suspected diverter valve failure. I'm glad to check this and find the problem was easily accessible. You need to pull intake manifold to check CPS...
-
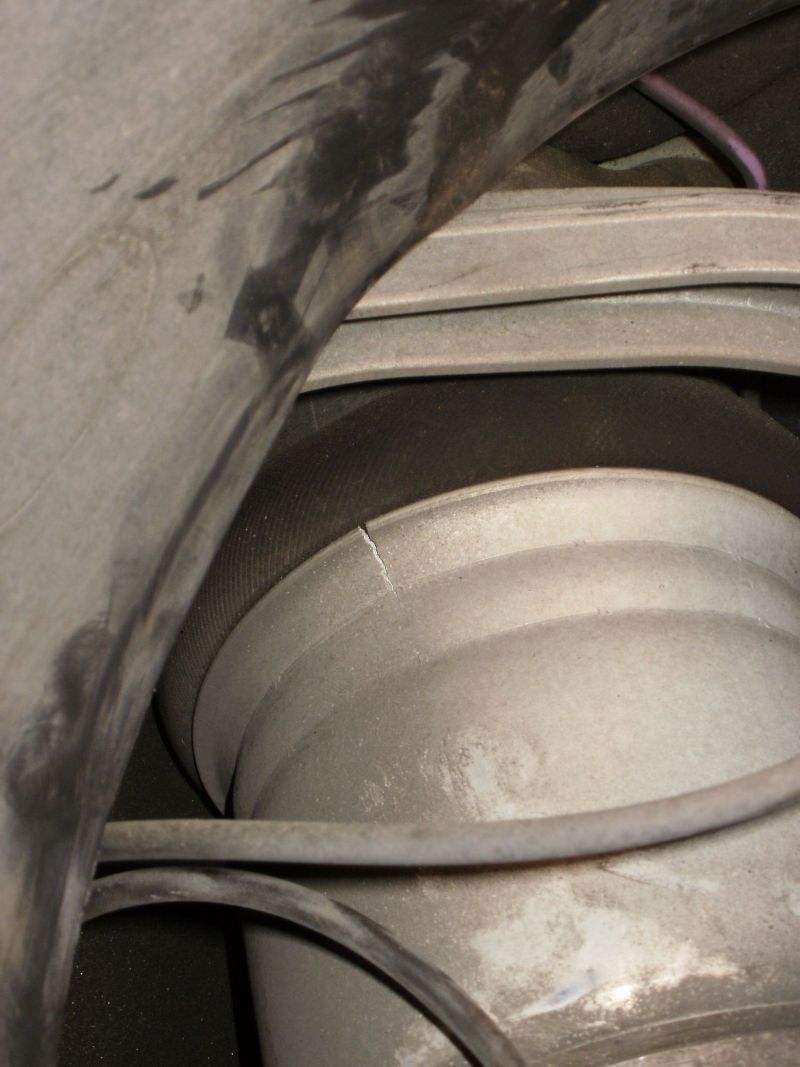
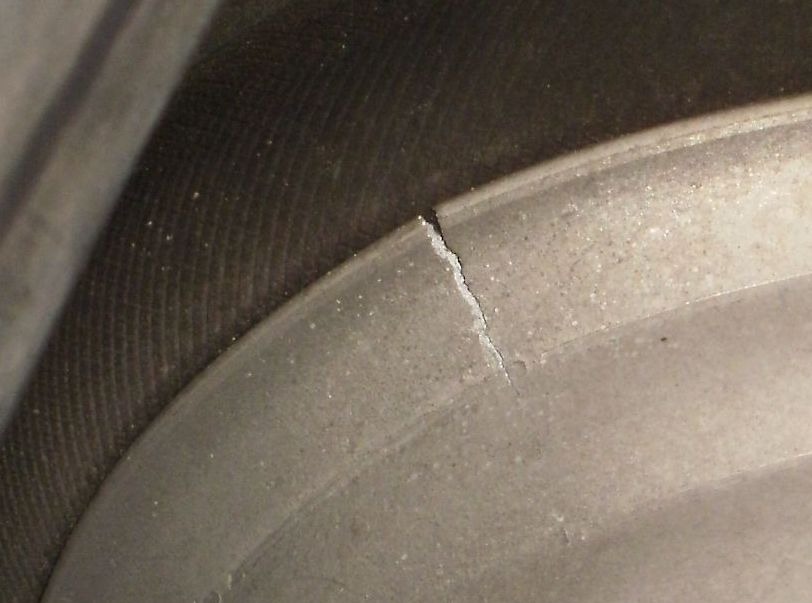
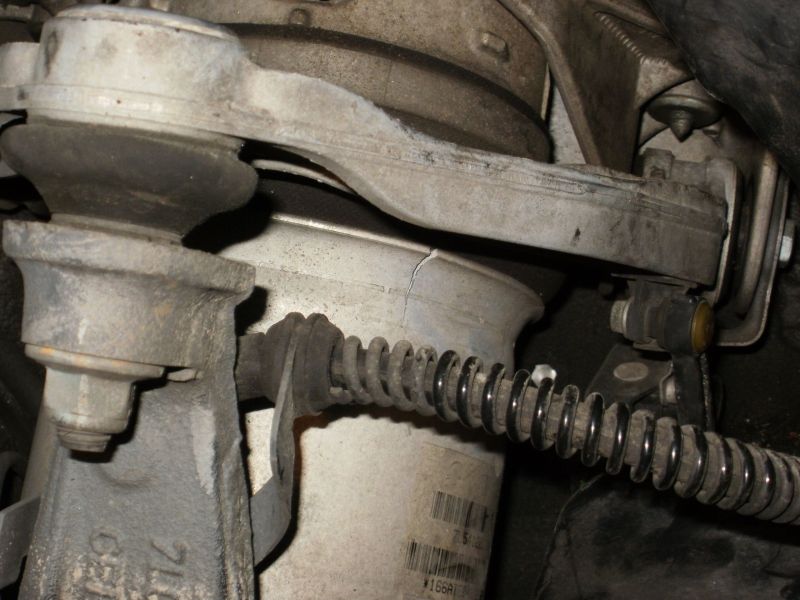
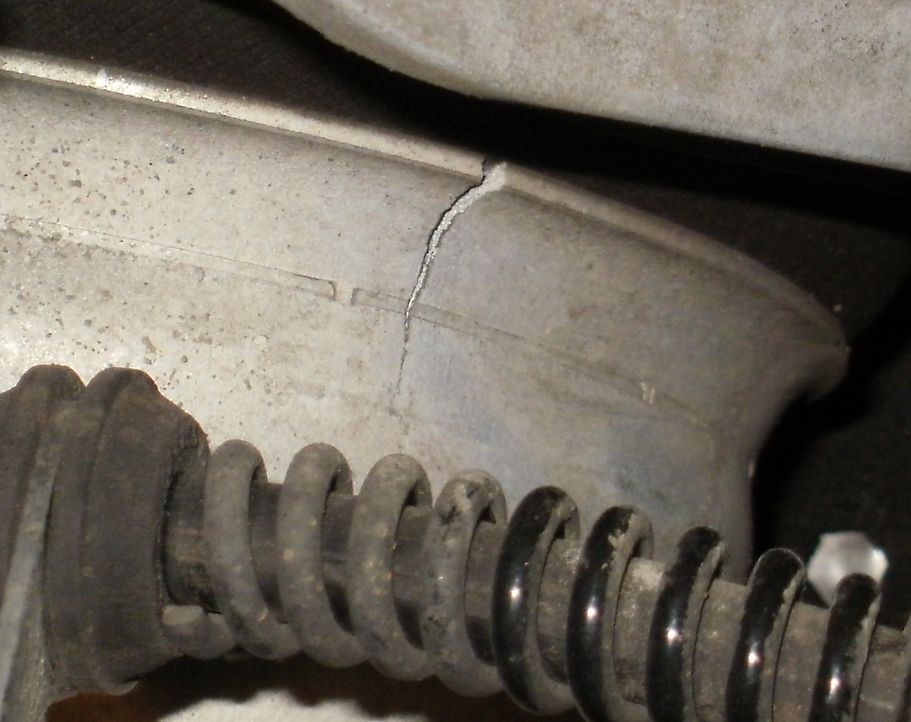
Hi I found 2 cracks on the drivers side front airsus housing. From what I understand this is a protective 'shell' but does not carry weight or hold pressure. Do I need to replace the shocks right away? Thanks in advance.

-
Sorry, I should have made that clearer. It's a 2005 4.5 S tiptronic
The mpg's you guys have quoted of 15 and 17-18 - is that US or UK?
Us 15mpg 04 Ctt when I drive gingerly. my wife has heavy right foot 13mpg.
Remember it's a 5000 lb vehicle. It's not a prius
-
To remove the Coolant tank it is in the service manual. You remove the bolt that can be seen by the Engine Tq. arm (may be easier with Tq Arm removed from body side and swung out of the way. Then you need to remove the right headlight to access the larger holding bolt with a socket & extension. Then there are the two hoses that need to be un-clamped when you get it loose.
I had the same problem, a slow leak at bottom of expansion tank and coolant ran down with a small puddle near right front suspension. I first thought it was trx fld because it's red, but coolant. Need to remove bracket that hold the to arm, and need HL out to access the 2nd bolt. Just loosen and swing up the tq arm no need to remove. It holds almost a gallon so order Porsche coolant (and new tank cap) when ordering the tank.
-
85w140 is too heavy, I used Redline
-
make sure to use triple square, not hex bolt. it is on very tight and the bolt is made of aluminum. hex will strip it.
-
Cayenne turbo cooling T pipe replacement
(disclaimer: not responsible if you damage your car) My 2004 CTT already had the aluminum cooling pipe, but recently it lost a lot of coolant as the T pipe broke. A steady stream of coolant flowed out. If your CTT is 50K+ miles, suggest to have them replaced. I think that part will eventually fail for everyone. Unlike breather / vacuum like breaking (that happens often too), the coolant T pipe will disable the car. Actually I was able to slowly drive it home after filling with distilled water,
-
Author
-
Category
-
Submitted01/19/2012 05:58 AM
-
-
Hi thanks for the article. I replaced the hatch strut 3 years ago, and it started to sag again so replaced the strut again.
This time, I replaced both hatch and glass struts, 4 struts total. I recommend to change all 4, because the hatch is actually held up by all 4 struts. Now the hatch practically flings open.
-
Hello,
I find that the Driver's side air intake pipe, after turbo, has a coating of oil and attracted dirt. I have a normal oil consumption for this car, maybe 1qt every 1000 miles.
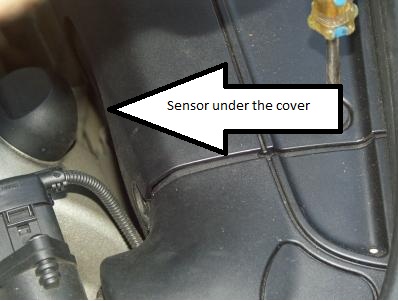
I also found that there is a minor oil seep from the sensor covered under the black plastic cover. Oil trails from this cover down to the mentioned intake pipe.
Maybe the seal for the sensor is leaking, or the sensor itself has a leak. What does the sensor do, and should I be concerned? Car runs fine.
Thank you
-
Durametric will pinpoint which one is defective
-
This is the support topic for the DIY Tutorial Cayenne Turbo - Removing and installing drive belt. Please post here if you have any questions or feedback.
Thank you loren for this information. This work is HARD!
It takes less than 5 minutes on other cars to change the belt, for TT it took me hours!
Step 17 is the most difficult. the '2' pressure pipe has an interlock connector. Unless you plan to destroy and replace, you have to see how that is interlocked and carefully undo the latches. The piece is small and too much force will break it. You need to pry open the '1' at collar. For some reason these 2 hoses cross the loop of drive belt so it need to be disconnected. Don't loosen the belt until you can separate these 2 pipes.
most of the vacuum hoses are rigid plastic type, if you force it'll crack.
all the photos show as if the engine is pulled. In reality there is extremely little space to work. to route belt, you need to have small arms and hands or your forearm may not reach the '4' pulley. Need to go from bottom.
Removal of Y pipe takes patience.
It is not possible to remove the 2nd screw of driver side pressure pipe (pipe that lead to Y pipe bellows, so don't bother removing the 1st screw. (fig. 16 is passenger side)
I didn't try removing the rigid pipe containing MAF. You will need to rotate to get access, so remove electrical connector as there's no slack.
Be very careful and don't drop anything. otherwise you'll have to take bottom cover off, and find what you dropped, if you're lucky.
Needless to say, quadruple-check the belt routing. You don't want anything running backwards.
-
I did just like the audi procedure below. worked out very well, with $10 in plumbing pieces from Home Depot, $6/qt Toyota T-IV ATF, gasket and filter (Thanks, sunset).
I used aquarium thermometer with remote temp sensor that i put in the pan during fill. I also measured the pan temp with infrared thermometer, and it's within 1c difference. Next time i'll just use the infrared thermo to measure pan temp. it will take 15 min or so from cold to 40c.
The fluid after 50kmi was red like blood, while new one is clear red like red wine. 6 magnets had thick coat of metallic crud. I would not leave that in for 160k miles.
one word of caution is not to overtighten the drain plug (the small one, not the 17mm allen). it's a 10mm aluminum torx screw, don't overtighten. Torque for pan and 17mm allen is available here, but could not find for the drain plug.
Here is a link to an Audi service procedure....I know, not the same car but the procedure is essentially the same. In the article they change the filter and pan gasket. When I did my Cayenne I used a laser thermometer to read the sump temperature. The temp is important as if the temp is too low you will overfill and too high you will under fill.....
http://www.audipages...nservicing.html
For the filler I used a garden sprayer attached to the copper fill tube shown in the article. I also put a shutoff valve in the line so that I could control the flow during the fill procedure.....
As Loren stated it is not a simple procedure but it can be done.....IMHO
Bob
Just one last note on this. I didn't touch the transmission cooler lines when I did my Cayenne.......
-
I have 2004 Cayenne with 78K miles and I would like to change the transmission oil and the differential oil. Has anyone done that? Also, what oil is recommended?
In the past I have found that Motul or Redline oil worked better in my Bimmers and Benzs then factory oil. So, any recommendations?
Also, should I change my fuel filter? Where is it located on the V8 Turbo??
Thanks in advance for your help.
Mitul
I think Porsche uses Mobil 1 ATF 3309 in all Cayenne's auto tranny based on my research.
However you have to idle the engine and make sure the tranny temp is 40C to get the correct fluid level
Too bad that I haven't found where to check the tranny temp in my Durametric software.
On many forums, I find that Toyota T-IV ATF is actually Mobil 3309. T-IV meets JWS3309 and it is for Aisin AW transmission.
The latest beta v.6 Durametric still does not measure ATF temperature.
-
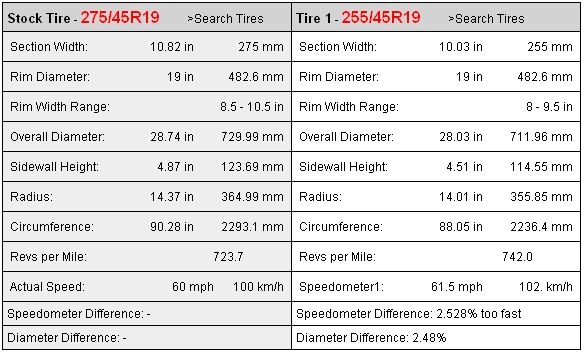
Hi, I think some people 'size up' from stock, but is there any problem going down in size?
The Porsche 19" wheel is 9.5 x 19 (275/45/19 stock), so fit to the wheel is ok, with slight speed difference. But is there a problem with fitting these tires on 04TT? I don't have TPMS. Thanks!
-
I suppose they did that at the dealer, but no result came up, as they said at that time the sensors were working just fine... at least that was the feedback.
Durametric will pinpoint the faulty sensor. I had intermittent problem, then eventually stopped working (red LED on parking indicator). Replaced the sensor and works fine.
You'll need to prime/paint/clearcoat the sensor, and need to take off the bumper to replace the sensor. also don't throw away the rubber ring that comes with new sensor.
-
04 TT, same fault, "brake booster warning".
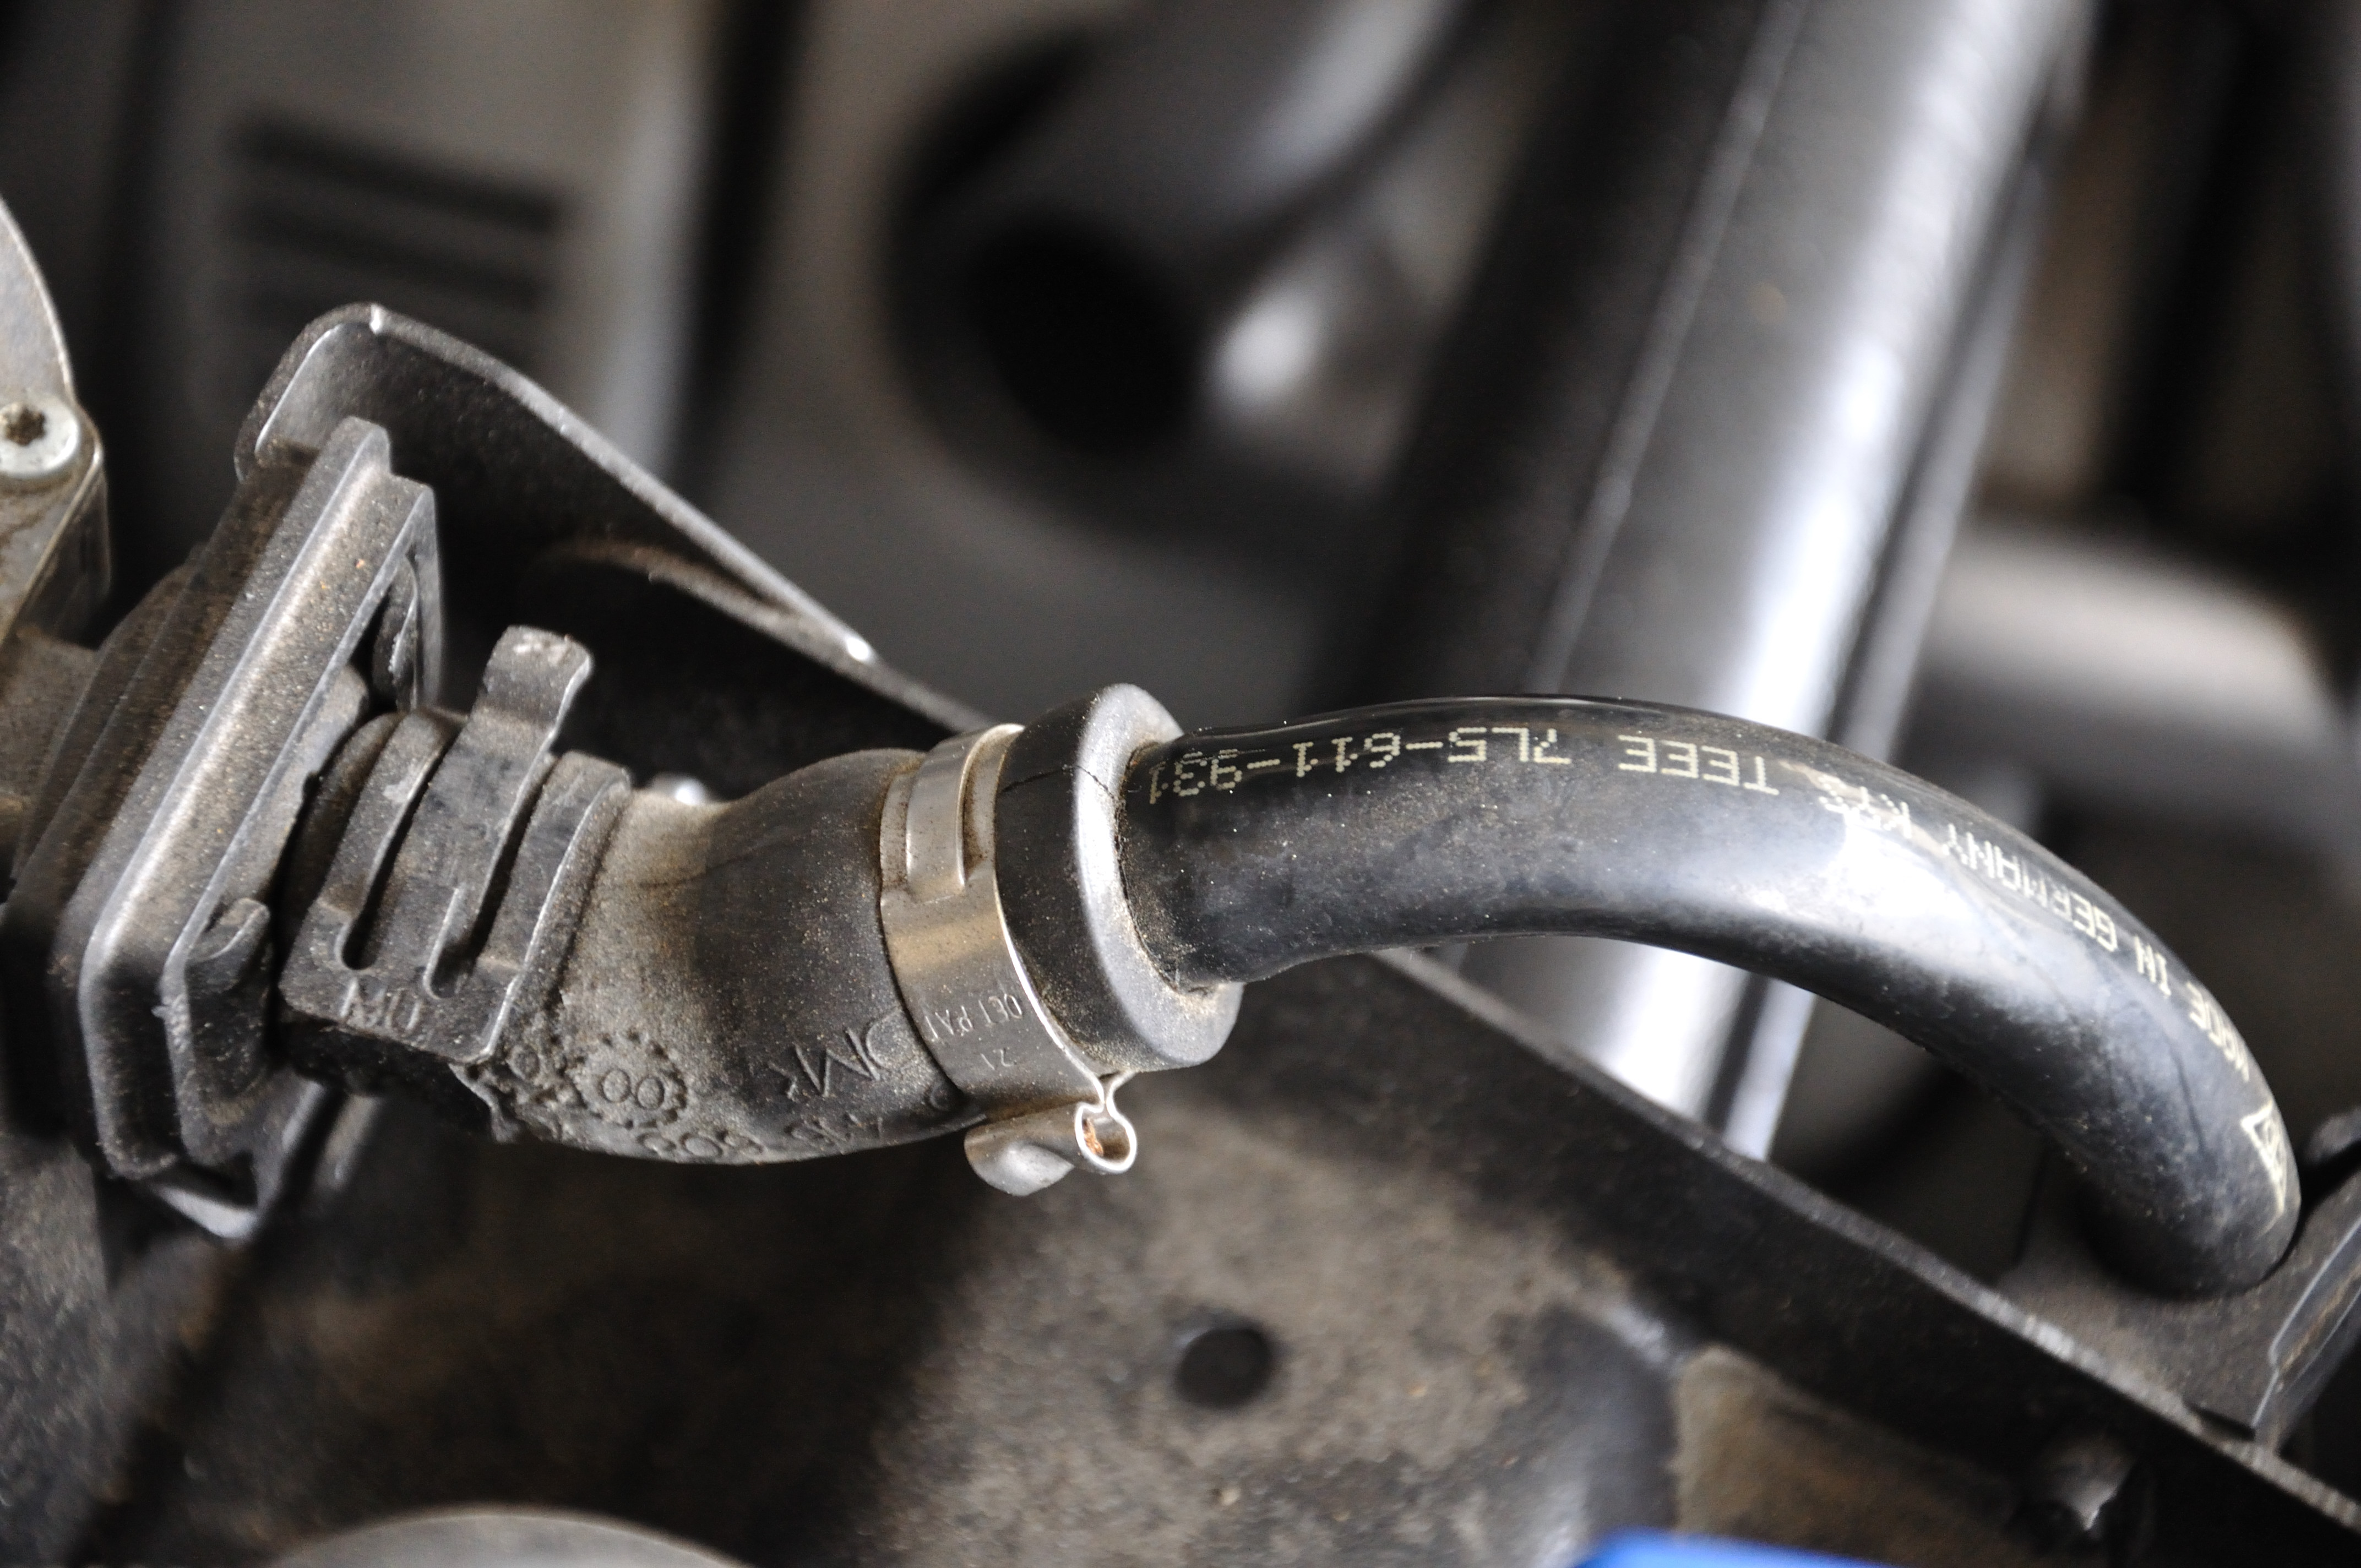
Same problem as TopGun2000. the hose/plastic pipe is cracked at the connection (bottom end). Most likely due to heat exposure. Wrapped electrical tape (for now), i guess 3/4" heatshrink will also do.
P/N is 7L5-611-931 G. Cleared code, seems ok.
it is under pass side engine cover (remove blue washer lid, remove torx screw at lid, loosen rubber gasket around, remove that "+" screw lock thingy, remove plastic cover, and it's right under the plastic cover.)
15 minute job total.
Thank you Renntech, thank you Durametric!
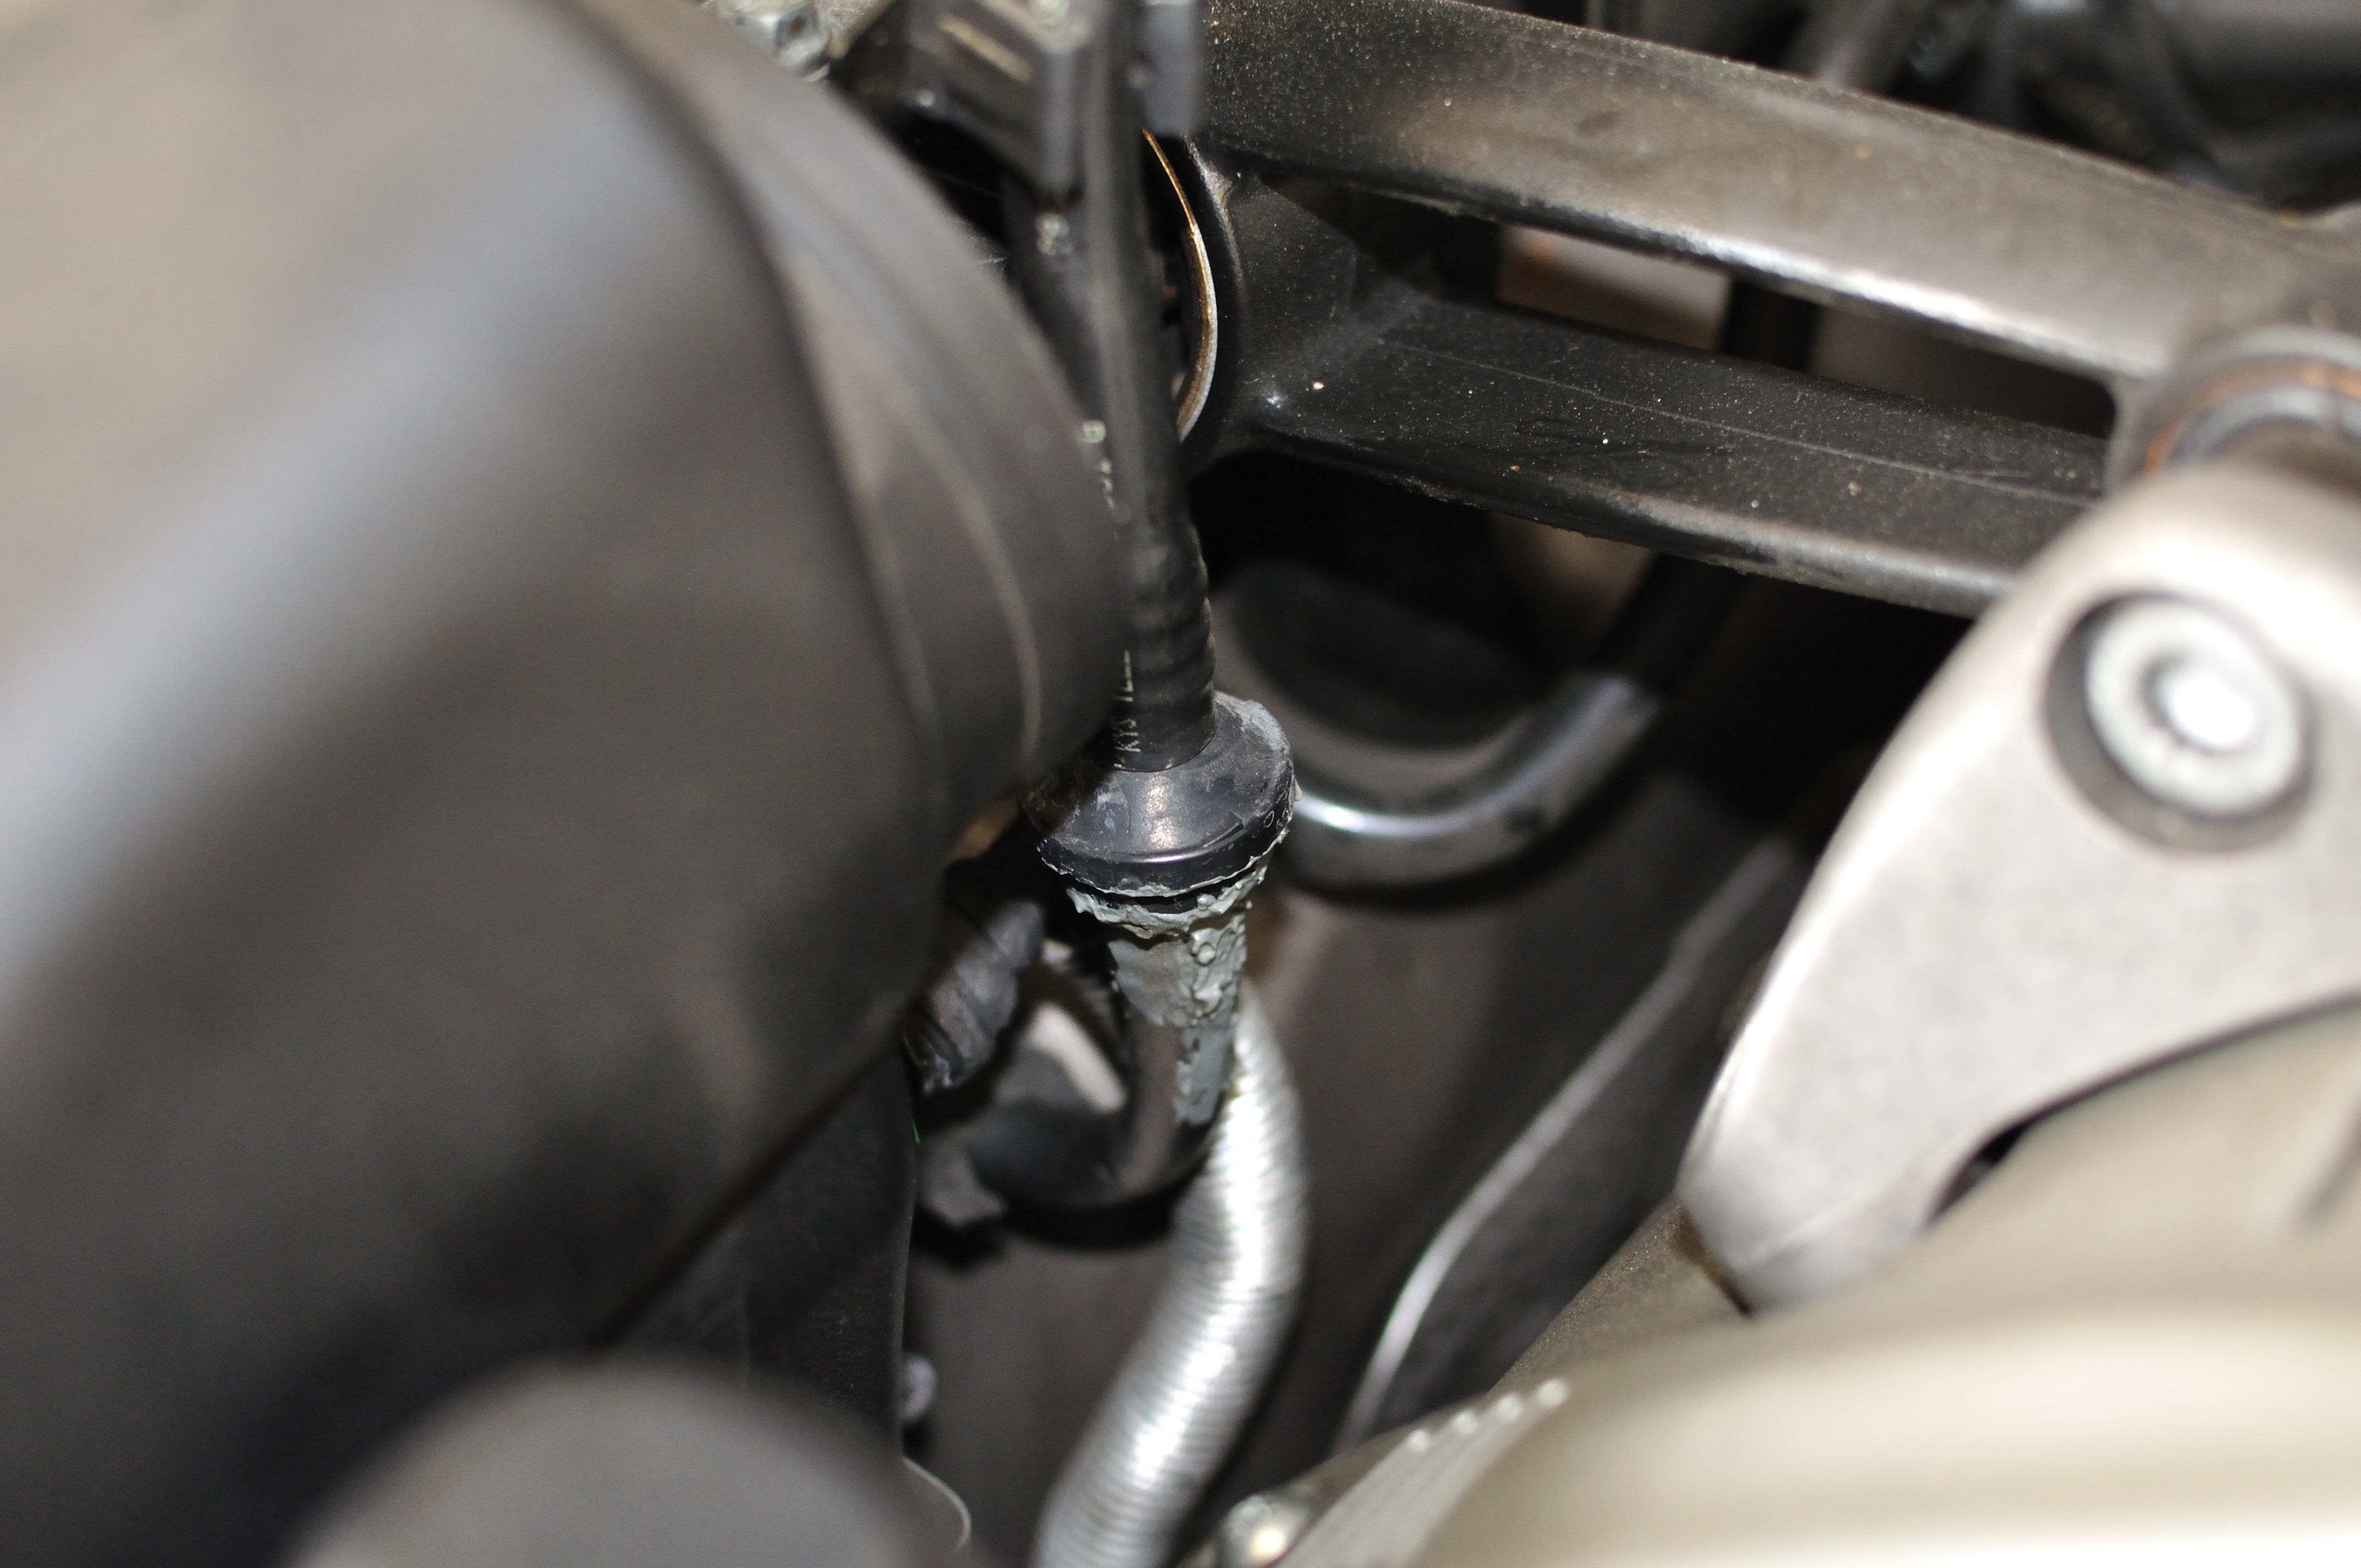
I found the problem: a cracked vacuum line (on the top of the hose at the "931" mark)!!! :cheers:
Obviously there was another old leak which was fixed by the previous owner in a JB Weld way. :jump:
:renntech:
-
Mine was locked in and could not open. Managed to open, by prying the door open pulling on the side, inserting credit card under to release the catch. Now it's open and won't close, same as your problem. Looks like ashtray exchange is more work than removing the bezel, so it's still open. Any info is appreciated.
-
I think it is M10. same as seat bolt (for battery change).
I used Denso Iridium stock gap, not Beru ($$$). No problems 6 months since I changed it; changed coil also.
When I changed coil as preventative measure, all 8 had hairline cracks.
Lastly removing the silver plastic cover on passenger side is challenging. Be patient or you'll scratch the (plastic) cover.
-
I get puddles in my garage every day, and today it was 60f day. Coolant is right level, have not lost coolant, and had coolant pipe replaced previously (2004). I think it's condensation.
The spot is right front area, right below front passengers foot will be. Smelling it will be the best way to tell. Try driving in ECON mode (no A/C) and see if it happens.
Intercooler boot
in 9PA, 9PA1 (Cayenne, Cayenne S, Cayenne Turbo, Cayenne Turbo S)
Posted
You should replace the gasket for intercooler pipe. Driver (left) side seem to have more issues. It is inexpensive.