Welcome to RennTech.org Community, Guest
There are many great features available to you once you register at RennTech.org
You are free to view posts here, but you must log in to reply to existing posts, or to start your own new topic. Like most online communities, there are costs involved to maintain a site like this - so we encourage our members to subscribe or donate. All subscriptions and donations go to the costs operating and maintaining this site. We prefer that guests take part in our community and we offer a lot in return to those willing to join our corner of the Porsche world. This site is 99 percent member supported (less than 1 percent comes from advertising) - so please consider an annual subscription or donation to keep this site running.
Here are some of the features available - once you subscribe RennTech.org
- View Classified Ads
- DIY Tutorials
- Porsche TSB Listings (limited)
- VIN Decoder
- Special Offers
- Paint Codes
- Registry
- Videos System
- View Reviews
- and get rid of this welcome message
It takes just a few minutes to register, and it's quality Porsche information at a low cost.
Contributing Members also get these additional benefits:
(you become a Contributing Member by subscribing or donating money to the operation of this site)
- No ads - advertisements are removed
- Access the Contributors Only Forum
- Contributing Members Only Downloads
- Send attachments with PMs
- All image/file storage limits are substantially increased for all Contributing Members
- Option Codes Lookup
- VIN Option Lookups (limited)


Izzy
-
Posts
740 -
Joined
-
Last visited
-
Days Won
6
Content Type
Profiles
Events
Forums
Exterior Paint Colors
Downloads
Tutorials
Links Directory
Collections
Classifieds
Store
Everything posted by Izzy
-
That is exactly the same problem I had. The sponges cleaned it up. Just follow the instructions on the label and you will see the sponge turn brown as it sucks the dirt out. You have to rinse the sponges to get the dirt off. I used Armorall after cleaning.
-
Right at our local grocery store (Harris Teeter), in the household cleaning aisle. It was with the sponges. I left a small section of my dash untouched to show some friends. It is like night and day. Izzy
-
Not sure if this information belongs in this forum or the product review, but wanted to share some findings from over the weekend. My 99 C2 Cabrios' vinly interior (doors, dash, backseat sides) are beige from factory. But I did not know what the real color was until Sunday, when I decided to clean it. As I was trying a bunch of automotive and household cleaners, my wife came by with a "Mr. Clean Eraser" sponge. I tried it, and to my surprise, it worked great. Truly unbeliavable. The "blackness" dirt from the vinyl crevaces simply came out on the sponge, leaving a perfect beige surface as if it has never seen the outdoors. I used 5 sponges, sometimes augemented them with "Mr. Clean" liquid, and the car interior looks brand new. The color is amazing. We emptied about a dozen buckets of dirty black water in the process of rinsing the sponge. The residue was removed with a clean wet hand towel. After dried, used Armorall for all the surfaces. Izzy
-
magnetic numbers for DE
Izzy replied to rjf123's topic in 996 Series (Carrera, Carrera 4, Carrera 4S, Targa)
I have used some from this website, no problems, works great and won't blow at high speed. http://www.ratracinggraphics.com/?referredfrom=NASASE -
This morning drained and fillled (almost 6 quarts out of the 9 needed for full capacity) of ATF. Follwed shop manual instructions of drain and filled. The old one, with only 13K miles, was pretty black. I am wondering if 10 track days (200-250 miles each) since last change puts more strain on the Tip. Codes are cleared, so will check daily to see if it recurs. The shifting was very smooth still, no issues on power, all else was perfect with the Tip even on a 100F day on track. Fluid was at 38C when changed, and a quick drive afterwards showed no difference in shifting, as measured by the "butt meter"
-
Pioneer AVIC-Z1 on a '04 C4S
Izzy replied to Michael_N's topic in 996 Series (Carrera, Carrera 4, Carrera 4S, Targa)
Did you see this in the DIY? Follow the link to the other site where the install is posted, it may work for you. http://www.renntech.org/forums/index.php?showtopic=10095 -
Removing rear glass window in a cab
Izzy replied to yan's topic in 996 Series (Carrera, Carrera 4, Carrera 4S, Targa)
Try this... Ever since I saw the commercial I was wondering if it did anything at all http://www.asseenontv.com/prod-pages/autov...gid=AUDIO_VIDEO And this is the claim, anyways: "AutoVent SPV silently and efficiently eliminates stale, stuffy air from inside your vehicle, even on the hottest summer days! While your window remain securely closed, this unique solar powered ventilator draws hot air and odors , including pet and tobacco odors, out of your vehicle and replaces it with fresh air form outside. Since AutoVent SPV runs directly on natural, FREE solar energy, there is no drain on your vehicle's battery and there are no batteries to replace or recharge...Ever! Installation is easy! Simply attach the included weatherproof fitting strips, place the unit on top of the window edge and roll the window closed that's it! AutoVent SPV helps to preserve and protect your vehicle's interior, valuable stereo and electronic equipment from the damaging effects of extreme heat build-up. AutoVent SPV also assists in reducing the strain on your air conditioning system during start-up." -
Removing rear glass window in a cab
Izzy replied to yan's topic in 996 Series (Carrera, Carrera 4, Carrera 4S, Targa)
I have use in my home a 3-M product that goes outside the window, and installed professionaly still looks perfect after 5 years. These windows are frrom a 2 story room, and take a beating all year from wind, sun, rain, insane birds. Not sure if they make something like it for automobile use..... -
Loren, 13K miles ago I did the filter, gasket and fluid. So I probably won't change filter again. Hopefully it was just low on fluid, but will track the code for the next few hundred miles. After adding more fluid last night, it doesn't "feel" to shift any different, still smooth as silk. Thanks Izzy
-
Results, Had to wait 4 hours for oil to cool down to 35C. Added with the pump about a quart of ATF before it began to spill, I was surprised. The older ATF looks pretty dirty, so will do a full drain and refill this weekend. Hope that is it and not a major mechanical issue. Will keep checking the codes and let you know. Thank you Izzy
-
Thanks for the info and education. I am going to hold off the bars. I do have 265's on the rear, not 285's. And 225's in the front. That is what the car had when I bought it (not new). It had not occured to me to use larger tires. I have 18 in wheels, "Turbo look". I haven't been doing this for long, do you need to get larger wheels for the larger tires? I would like to look further into that, getting wider rubber. Also, was thinking of lowering the car with a new coil over setup. So you did the ROW, thoughts about the PSS9? Eibach Pro-kit? Just looking for opinions of experience. I need to focus on the P0740 (Tiptronic issue) before track day Friday. Looks like I may be low on the fluid. But when I get back this weekend was thinking about tinkering in the garage. Your thoughts appreciated Izzy
-
Ouch. Thanks, I was affraid of that. Will check fluid and if that is not it, head for the dealer.
-
Loren, Just got the code P0740 (no CEL) in my 99 996 Tip. Would description be the same as the Boxter, torque converter clutch issue? The car seems to run perfect, and the transmission is smooth as silk. I am a bit perplexed and heading. Thank you Izzy
-
Loren, Just got the same code in my 99 996 Tip. Would description be the same? The car seems to run perfect, and the transmission is smooth as silk. I am a bit perplexed. Thank you Izzy
-
Squeeky wheel.......
Izzy replied to C4S Surgeon's topic in 996 Series (Carrera, Carrera 4, Carrera 4S, Targa)
I had a similar "squeal", high pitch when hot running and turning. Took it to the dealer and it was the rotors, the pads had created a "lip" on the outside circumference of the rotors due to wear. The pads would rub against that outer lip when hot and turning (not necessarily braking), and "sing". According to the dealer here a common problem, not threatening but annoying. New rotors cured it. Reach in the rotors and see if you have a lip developing or developed already. Just in case. -
CEL and OBD II Code P1123
Izzy replied to mumeh's topic in 996 Series (Carrera, Carrera 4, Carrera 4S, Targa)
Martin, thank you very much for your quick reply. Got the sensor on order.... Bank 1-3 is the left side, and the sensor before the cat. Just verifying. Thanks again Izzy -
I read the description of Eibach as "rear adjustable", Drivewire I think. Memory serves me right, same size as H&R. And they are red, pretty color (just kidding, I really wanted to know more about sway bars anyway) On the understeers, I was thinking more the 996 oversteers, pendulum effect with pivot point in the front but weight bias on the rear? Just borrowing from Vic Elford's book on 911 performance driving, and my multiple experiences spinning like a top on-track and scaring the DE instructors. I learned to drive while watching the "Dukes of Hazard". Let me know if I understood it wrong, as I was thinking about less oversteer in turn 14 of CMP, which is a tricky one for me.
-
CEL and OBD II Code P1123
Izzy replied to mumeh's topic in 996 Series (Carrera, Carrera 4, Carrera 4S, Targa)
Mumeh, If I follow this thread correctly, you changed both the MAF and the O2 sensor for banks 1-3? I am asking because I have the same code, P1123 only. At 60K miles I had the MAF code (not 1123), cleaned it (for the last time) and could not clear the MAF code. So changed it and all was clear. 500 miles later, I am getting P1123. Loren had mentioned it was a close possibility due to mileage that the 02 sensors would be next. Just wanted to verify that was your fix, and the CEL is gone for good? Thank you Izzy -
P1124, P1126 without usual suspects
Izzy replied to pwarner's topic in 996 Series (Carrera, Carrera 4, Carrera 4S, Targa)
As Loren told me recently, 60K is not too early to loose O2 sensor. There are two sensors per side. I got 60K and the MAF just got replaced. I have the Autoengineuity OBD2 for Palm Pilot, and can read the O2 waveform. That would tell for sure which ones are out. Last thing though, did you disconnect the battery while changing the MAF? If not, that is the last thing to try. -
Oil Pan gasket replacement...DIY?
Izzy replied to ScottArizona's topic in 996 Series (Carrera, Carrera 4, Carrera 4S, Targa)
Scott, I installed the same plate a few months ago. When doing my oil change after the install, left the plate in since it has a convinient hole for the drip plug. But then I could not remove the filter housing with my banana fingers, so had to remove the protection plate. To my surprise, a lot of oil was on the plate. From then on I remove the plate before oil changes. So I would guess previous owner did not remove the plate, and the oil had been sitting there for a while. Clean it up like Nick suggests, and drive for a while. Or just leave the plate off for a week and see if you can find the issue, if any. -
Have a performance question. During a track event last weekend, met some Porsche tuners (working on the race class Porsches). During a conversation, I asked about handling performance. One of the techs metioned that to change the front sway bar from stock to upgraded would make a great difference in my 1999 996 cabrio, and that it was an easy thing to do. I searched and found Eibach makes a decent looking kit, 24 mm front and 19 rear. Has anyone done this themselves, and is it worth doing? I do track the car every chance I get. Thank you Izzy
-
Tell me I'm just being paranoid!
Izzy replied to ScottArizona's topic in 996 Series (Carrera, Carrera 4, Carrera 4S, Targa)
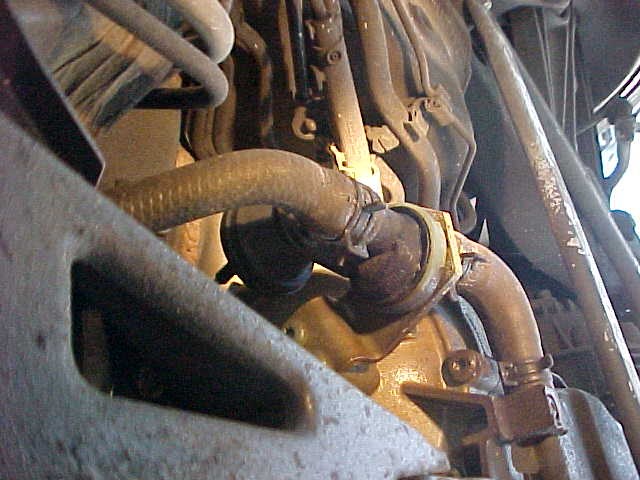
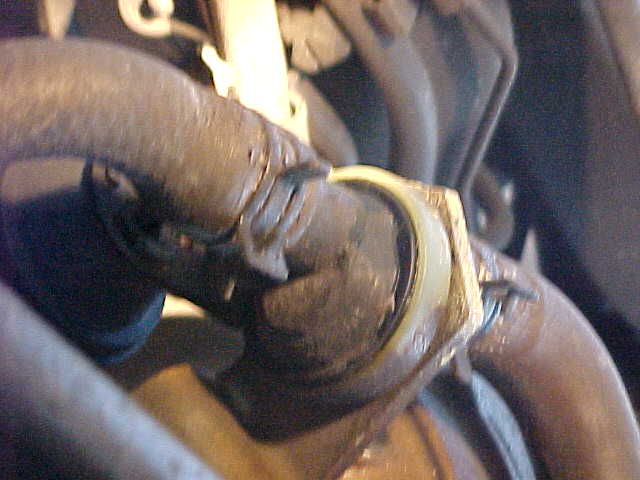
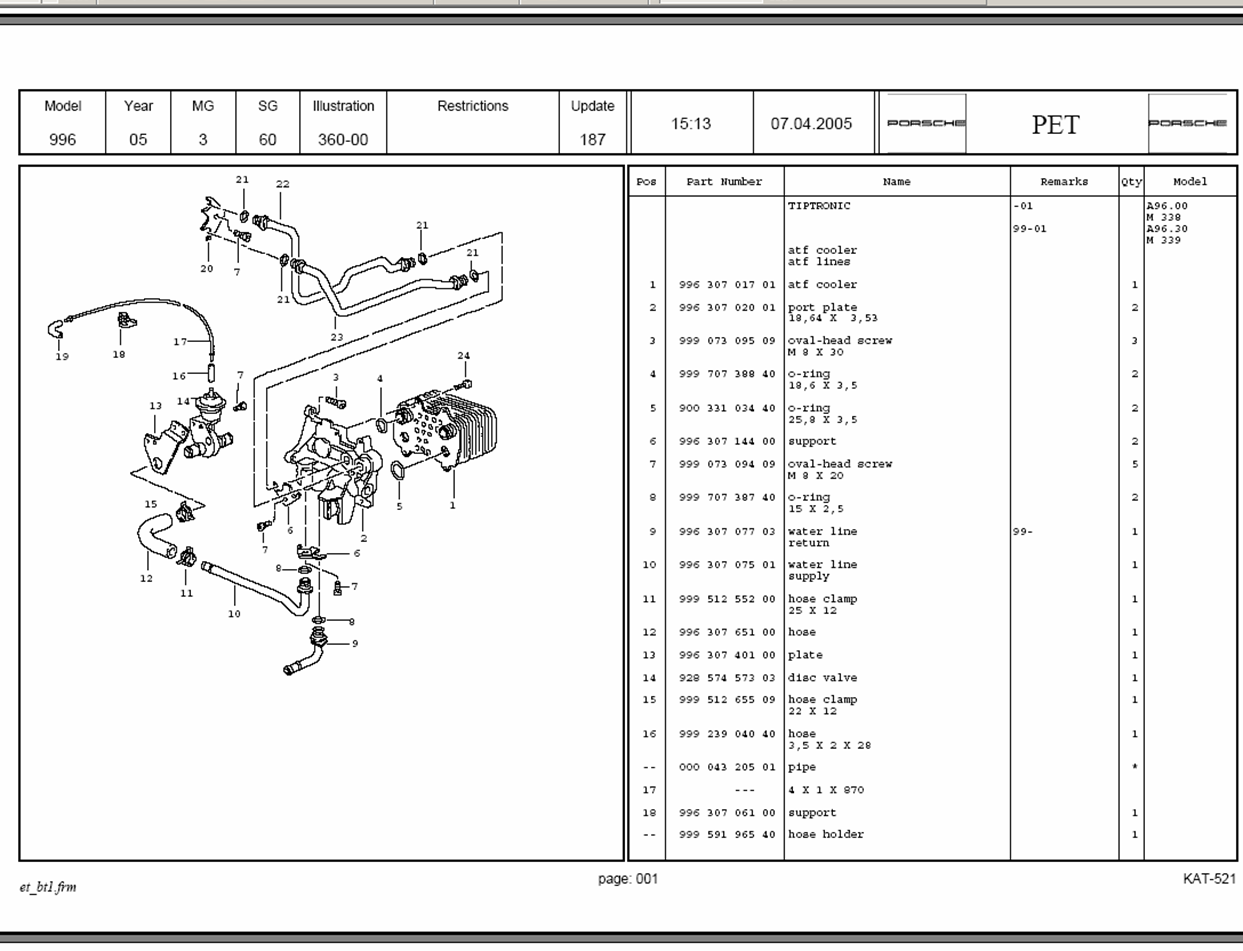
Could be the same culprit. It is the valve that lets coolant to the ATF cooling unit. It is a plastic body under the car, and the only way I found out it leaked was by compressing the coolant hoses in and out of the valve, then I saw some bubbles escaping, and rubbing my finger on it was wet with coolant. To get to it, get the car up on stands, and remove the rear most under body plastic panel. You will need a flashlight to see under there, but the valve is located in the middle, right were the coolant hoses come through from the tunnel where the gas filter is. Looks like this. The pictures are sideways, the floor is to the right of the picture. The crossmember seen in the top pic can give you a reference point: This is a closer up. You can't see the leak, but if you squeeze the hoses, the edge between the white and black parts ooze coolant. And it is part 14 in the diagram below. The valve comes off easily enough, two hoses -one in, one out. I clamped the hoses to prevent coolant drip, just used a couple of small "c" clamps and some old pieces of a garden hose cut to about 1 inch lenght, and then in half to form a U channel. Placed the rubber hose cutouts against the coolant hoses and then the "c" clamps compressing on the outside. Makes a nice seal. I think the valve is only held in place by a single phillips screw. Also, the air hose on the top simply pulls out. It is a vaccum hose that opens and closes the valve. Hope that is it for you, from memory it was about a $30 part, no more than an hour of work including getting the car off the ground. I reused all the clamps. Izzy
-
Tell me I'm just being paranoid!
Izzy replied to ScottArizona's topic in 996 Series (Carrera, Carrera 4, Carrera 4S, Targa)
Scott, Tiptronic or manual? If it is Tip, I have some suggestions where to look. I had the same problem and found the leak in the ATF cooling area, a small valve had a leak so small I never saw or smelled it. But coolant will dissapear very slowly. Changed the valve and situation resolved. -
That looks VERY nice. Is it flush with the rest of the trim pieces? Can I ask about cost/complexity? Thanks! Izzy
-
60000 mile maint.
Izzy replied to capt601's topic in 996 Series (Carrera, Carrera 4, Carrera 4S, Targa)
From memory, I remember no more than 1/2 cup of liquid. I did not see much, if any, fuel from the lines. Mostly from the filter body. I just got a medium size wide/flat tupperware type bottom under the filter, and simply put the filter there after removing. Can't remember what I did with the container afterwards though... Hope I cleaned it before sneaking it back to the kitchen withouth my wife seeing me.....