Jump to content

Welcome to RennTech.org Community, Guest

There are many great features available to you once you register at RennTech.org
You are free to view posts here, but you must log in to reply to existing posts, or to start your own new topic. Like most online communities, there are costs involved to maintain a site like this - so we encourage our members to donate. All donations go to the costs operating and maintaining this site. We prefer that guests take part in our community and we offer a lot in return to those willing to join our corner of the Porsche world. This site is 99 percent member supported (less than 1 percent comes from advertising) - so please consider an annual donation to keep this site running.

Here are some of the features available - once you register at RennTech.org

  • View Classified Ads
  • DIY Tutorials
  • Porsche TSB Listings (limited)
  • VIN Decoder
  • Special Offers
  • OBD II P-Codes
  • Paint Codes
  • Registry
  • Videos System
  • View Reviews
  • and get rid of this welcome message

It takes just a few minutes to register, and it's FREE

Contributing Members also get these additional benefits:
(you become a Contributing Member by donating money to the operation of this site)

  • No ads - advertisements are removed
  • Access the Contributors Only Forum
  • Contributing Members Only Downloads
  • Send attachments with PMs
  • All image/file storage limits are substantially increased for all Contributing Members
  • Option Codes Lookup
  • VIN Option Lookups (limited)

Izzy

Contributing Members
  • Posts

    740
  • Joined

  • Last visited

  • Days Won

    5

Everything posted by Izzy

  1. Look in the TSB section, there are actually a few of them dealing with cabriolet top noise and how to deal with it. You can try short term some petroleum jelly on the rubber. But the real fixes are in the TSBs
  2. Can't remember if it had a screw or not, I think it was just jammed in there, it was kind of hard to pull out, the needle nose pliers did work, fingers alone wouldn't budge it. Glad you got it to work, though. You may want to get the switch and keep it in the garage. Enjoy the driving! Izzy
  3. Wondering if anyone has tried to ground the parking brake wire for the cabrio control box to eliminate the need for pulling the handbrake when actuating the top.
  4. Sorry Capt'n, think it is a Porsche part. It is a common problem, so they should stock it. If the dealer is closed, and you are lucky enough to live in an area where you want the top down this weekend, try taking the switch out and cleaning it. It may be corroded and some "Autozone" electrical part cleaner may do the trick and extend the life. But you will need the new switch anyway in the future even if you get the old one to work again, don't rely on the short term solution. I know someone in the forum was trying to figure out which wire goes to the convertible top module and sends the signal "hand brake engaged". The idea was to get that wire to ground and see if you can fool the system, like you can do the speed wire (so you can open and close on the go). You may want to do a search and see if it worked. I may do the same, spring is coming soon to the Carolinas. Izzy
  5. The easiest way is to follow the center console delete instructions. As you are doing the center console removal, you will see the white connector and switch by the hand brake. You will need some needle nose pliers and screw drivers. And move the passenger seat all the way back and recline as much as possible. You will not need to remove the center console, don't go that far. But will have to move it sort of out of the way to reveal the switch. Piece of cake. Here are great instructions for a B&M short shifter, they have great pics too. B_M_Short__Shifter.pdf
  6. Well, if it doesn't operate from the inside but it does from the door, the likely culprit is the handbrake switch. See if when you pull the handbrake (emergency brake) the light does go on in the dashboard. If it doesn't, there is a small switch you can replace for a few bucks. The door-key operation do not need the handbrake to be engaged for the top to operate. Let us know if that is the case, easy fix. If not, it could be the dash switch itself (not likely but possible) or simply a low hydraulic fluid condition.
  7. If you need the starter switch, here is a choice for parts http://www.autohausaz.com/search/productx....nition%20Switch and if you are going to install it: http://www.renntech.org/forums/index.php?s...1941entry1941
  8. You are welcome. The real source is Tool Pants who sent it to me a while ago. This is a great community. Have fun taking it appart, keep some cleaning rags handy, you will be able to get to areas that probably have never been cleaned and remove all the dirt, etc.
  9. It worked for my 1999, so I would guess it is the same.
  10. Rob, just sent you a pm with the "how to". Easy job. You may be able to pop it back out when you get it off. Izzy
  11. Glad it did Jorge. The little side flaps, they can be a royal pain. I did some work on them and forgot to add it up. The pictures I took I could not read from the disk. But let me tell you what to do, because it was VERY simple and it saved me more headaches. What happens is that they need some lubrication. You probably notice that one flap moves at a different speed than the other, and when that happens, the top will neither open or close, or worse stay open. Here is what I did, at least in words, and it worked perfectly: 1. Remove the rear seat seatback cover (the 2 phillip head screws) 2. Look under the flaps, there is a threaded bolt that goes vertical, the only shiny part back there. The flaps have a plastic "carrier" that moves up and down the bolt as the bolt rotates. That is how they open and close. 3. Touch it with your fingers, they are probably dry. If so, just need some lubrication 4. I had a small foam paint brush, and some high temp grease. Just coat the bolt with some. No need to get all around, just up and down. When it spins, the carrier that moves the flaps will spread it. 5. Use a small quantity first, see how it works. All eyeball, but I think about 1/2 teaspoon is all I used. 6. Now open and close the top, the flaps should move at the same speed and no hang ups. Add more grease as needed to make sure the bolt is good to go. It should take 15 minutes, and avoid a that big dealer tag. I took my car to the dealer for the same problem 3 times (only paid the first time), and they never greased the bolt (known as ball screws) which surprised me. I was going to add some pictures later. But if you do it, and it works, take some pictures of the process if you got a digitial camera? Let me know how it goes. Izzy
  12. Jorge, A couple of things. 1. Open and close both front and back lids to make sure they are shut 3. Make sure the emergency brake light is on also, or it might be the switch. If that doesn't work: 3. In the owners manual, there is an emergency procedure for closing, I have been successful with it (before I added the hydraulic fluid). Remove the seat back cover from the rear seats (2 phillips head screws), and use the allen key that is stored there to turn the motor about half a revolution only. Then use the dash button to close. That worked every time for me. If that 3rd step does it, you may need to refill the hydraulic fluid reservoir, look in the DIY for the instructions. Good luck, send me a PM if you are still stuck. Izzy
  13. You said it all, The Collection in Miama, run away....... I am surprised they didn't ask for 8 hours of testing. Go up to Broward and get a second opinion
  14. Has anyone tried just disconnecting the center console lid wire connector and see what happens when you arm the alarm? Couldn't be that simple...... One concern though, the alarm "beeps" when you arm it if something is wrong. So if you have it beep all the time, you may miss a fault in the system.
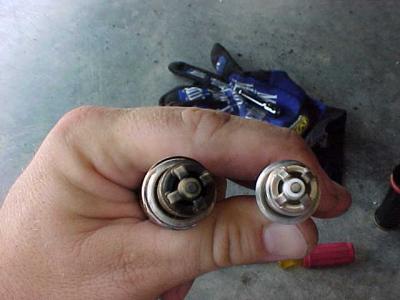
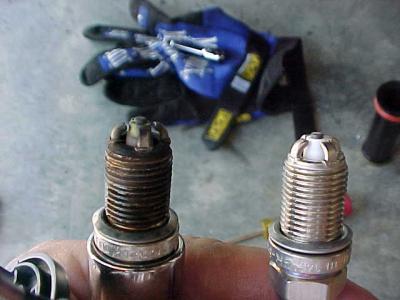
  15. Here are some pics I saved from last summer, the new and the old plugs close up. Worth a thousand words..... Izzy
  16. My pleasure, and you got it. I do go to San Fran to visit our data center. Will let you know. Izzy
  17. I should patent it, I have seen worse patents. Glad to make you laugh. I did use OEM, got everything from Sunset. I think they where Beru, in a Porsche box. On the other subject, UPS has the box of goodies, dropped off this morning at their facility.
  18. Hey Sean, I did my plugs at 36K, figure I would do it faster than the recommended, since you are tracking so much (you lucky dog!), it wouldn't hurt. And you have those shiny high performance mufflers coming. You can do it, anyone can do it if I can. The rearmost plugs are the hardest to remove. I think next time I will remove the rear wheels, bumper cover, and mufflers. It may add 30 minutes to the job, but I got fat fingers and need all the space. For the price of the plugs from Sunset, it is a pretty cheap job if you DIY. While I was doing the plugs, I also changed the tubes and o-rings. It added $20 to the job, but I have read how dealers change them all at the same time. I would hate to go through the contortions of changing plugs and then go back later and replace the plastic tubes. I thought the duty cycles must be pretty close anyway. It is analogous to Vegas and not putting your spare change in the slot machine you are walking by, know what I mean? This is a picture of the "tool" I used to remove the plugs. It is now patented. http://www.renntech.org/forums/index.php?showtopic=5818&hl= I think I did the whole thing from Sunset, somewhere in the $50 range for all parts. Took me about 2 hours. About 1 1/2 hour for the first side, 30 mins the other after I figure out the tricks. I did notice smoother idling after the job was done. And what the heck, it was fun anyway. Izzy
  19. Bill, A couple of thoughts, from 0-more expensive checks: 1. More air on the fronts tires (I run 36 in city, 41-42 on track) may help. It could be why they fell "better" when warm since they are tighter. 2. Have you changed front pads lately? Perhaps glazing on the rotors is causing the ABS early kick in. Some fine or ultrafine grit sand paper, sanding radially on the rotors may help remove it. 3. Finally, try new or different pads. Or see if you know someone with old or track pads you can do a swap test. What you describe doesn't seem normal to me. Only under very wet or icy conditions. Izzy
  20. I did remove the coarse plastic screen and left the finer metal in place. The plastic screen solid area, when added up, would seem to create a big restrictor to air flow. I am sure is there for a reason, but besides keeping wallabys from entering the engine, not sure what it would be.
  21. The Schnell cap does cover the existing muffler, so you keep the muffler in place. Their rationale is to prevent damaging backfires blowouts of the airbox (I had contacted Vertex to ask them about it). The Fabspeed kit removes the muffler and replaces it with a cap. I read on the PCA website that the pre-996 engines can backfire and cause major damage to the airbox, but not the 996. I have the Schnell cap on and have found the cap off the muffler after "spirited driving". Not sure if it was backfire or not since I was going fast on a track with the helmet on. Regardless, this is what I did a while ago for the Schnell to remove the cap that covers the small muffler: http://www.renntech.org/forums/index.php?s...6422&hl=schnell It is a low cost alternative if you want to try it, the intake sound level is slightly louder without it, specially when the engine is warm. Izzy
  22. Well, try the Search function on top of the page and to the right for combinations of words. But here are some primers: For remote control http://www.renntech.org/forums/index.php?showtopic=4958 Tail spoiler switch: http://www.renntech.org/forums/index.php?showtopic=7071 Side markers: http://www.renntech.org/forums/index.php?s...2912&hl=markers Daytime running lights: http://www.renntech.org/forums/index.php?s...=running+lights Check also the DIY section, there is a wealth of information about other modfications. Sometimes it feels to me like the cars are the equivalent of a Mr. Potato head, you can change pieces easily, as long as you have the instructions. Have fun with it. Izzy
  23. With a Tiptronic, I get about 17-18 city stop and go. Have seen 23-24 highway after changing to high performance muffler. About 21 with stock muffler. 50K miles on the car
  24. gcp, I don't have a picture. But this is what I did, go to the Home Depot (or similar store) hardware section, they have plastic "automotive" plugs in the hardware drawers. I picked up a few bags of round ones (they ranged from 39 cents to 89 cents a pair) all black in color. Then tried them on until one fit in diameter. I recalled I had to use a utility knife to cut the tip off so it fit lenghtwise. But once you put it in there, the black cap parts blends in perfectly with the black dome light cover. A beautiful thing, looks like part of the car if anyone ever notices it. In my opinion, I do not mind cutting the wire either, have done other mods that require other wire reconfigs as well. Just wanted to let you know of other options others have used and seem very pleased with as well. So you doing the daylight running lights next or the side blinkers? Or the decklid switch? How about the extended length remote? This is cool site, all that information can be found with explanations and pictures. Have fun, and take pictures for the rest of us.
  25. You can always operate the quarter windows regardless, even if you do not get a smarTop or cut the wire. With the top down, push in with a finger the hole where the cabrio top hook goes (by the dome light), and operate the rear windows at the same time. I had a small black plastic plug I inserted in there when the top was to be down for a long time, and can operate the rear windows anytime. Good luck with your decision, the smarTop does leave the car intact, and that is important to a lot of people.
×
×
  • Create New...

Important Information

We have placed cookies on your device to help make this website better. You can adjust your cookie settings, otherwise we'll assume you're okay to continue.