Welcome to RennTech.org Community, Guest
There are many great features available to you once you register at RennTech.org
You are free to view posts here, but you must log in to reply to existing posts, or to start your own new topic. Like most online communities, there are costs involved to maintain a site like this - so we encourage our members to donate. All donations go to the costs operating and maintaining this site. We prefer that guests take part in our community and we offer a lot in return to those willing to join our corner of the Porsche world. This site is 99 percent member supported (less than 1 percent comes from advertising) - so please consider an annual donation to keep this site running.
Here are some of the features available - once you register at RennTech.org
- View Classified Ads
- DIY Tutorials
- Porsche TSB Listings (limited)
- VIN Decoder
- Special Offers
-
OBD II P-Codes - Paint Codes
- Registry
- Videos System
- View Reviews
- and get rid of this welcome message
It takes just a few minutes to register, and it's FREE
Contributing Members also get these additional benefits:
(you become a Contributing Member by donating money to the operation of this site)
- No ads - advertisements are removed
- Access the Contributors Only Forum
- Contributing Members Only Downloads
- Send attachments with PMs
- All image/file storage limits are substantially increased for all Contributing Members
- Option Codes Lookup
- VIN Option Lookups (limited)


0Bosxter0
-
Posts
94 -
Joined
-
Last visited
Content Type
Profiles
Events
Forums
External Paint Colors
Downloads
Tutorials
Links Directory
Collections
Classifieds
Store
Everything posted by 0Bosxter0
-
Stuck again, This time its the Stereo!?
0Bosxter0 replied to 0Bosxter0's topic in 986 Series (Boxster, Boxster S)
So I charged the battery back up and now everything seems to work perfectly!! I guess the problem was that with the battery as low as it was the car was keeping power from the stereo to power other essential functions. But thats just my rookie opinion! Thanks for all the suggestions! -ben -
Clunking Noise From the back of the car
0Bosxter0 replied to 0Bosxter0's topic in 986 Series (Boxster, Boxster S)
Please let me know what you think, do you have them yet or did you just order them? -
Good to know! Ill order a set of the 7mm's. Did you get the Eibach? H&R? Did you have to buy longer wheel studs?? Thanks, -ben
-
Stuck again, This time its the Stereo!?
0Bosxter0 replied to 0Bosxter0's topic in 986 Series (Boxster, Boxster S)
Hmmm, if it is the ignition switch it would be a hell'ova coincidence. Everything worked perfectly before I put the car in stands. I think im gonna try and re-charge the battery and see what happens... -
Clunking Noise From the back of the car
0Bosxter0 replied to 0Bosxter0's topic in 986 Series (Boxster, Boxster S)
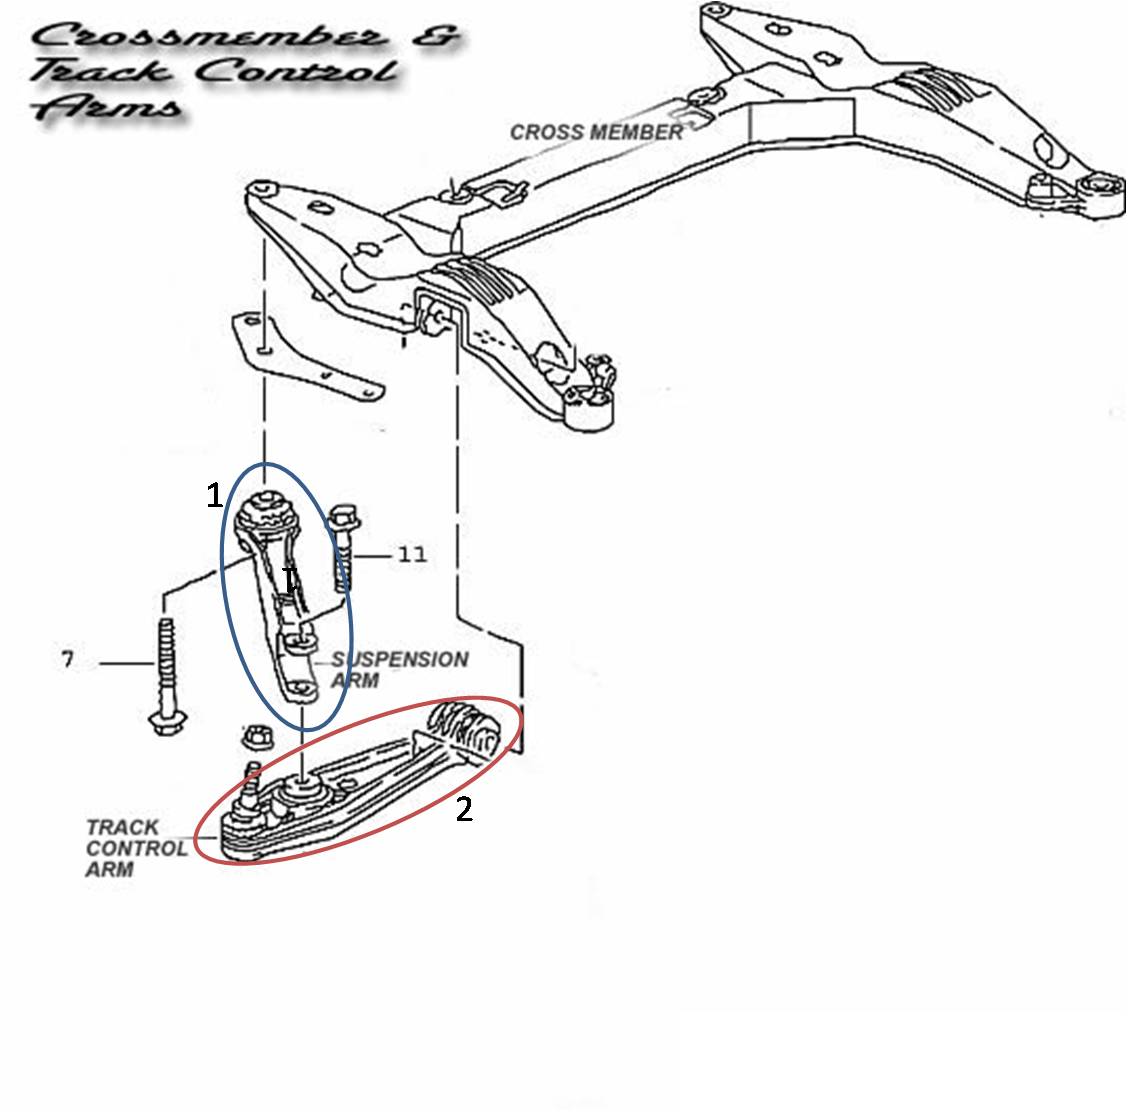
Boxsterfahrer, Can you ID the part that you replaced, ive heard "control arm" used interchangeably with a few different parts of the rear suspension... In the attached picture is it the one circled in blue (labeled 1) or the one circled in red (labeled 2)?? I think you are referring to the blue circled part, thats actually the piece that I originally thought was the culprit. It seems like its a fairly straightforward part to replace, did you change this out yourself or have the dealership do it? -Ben Picture you have is of the front suspension. Here is the rear. I believe Boxsterfahrer is referring to number 8. It is the one where you have to remove the plastic fender cover to see where it attaches. Tight squeeze up in there. ericinboca, Thats the item I originally thought was the trouble maker. Like you mentioned ill look a little closer into the swaybar and double check all the bushings for cracks/splits. If none of that works then thats the first part ill replace! Thanks again gentlemen! -Ben Yes, it is item #8 and I can almost guaranty that replacing these will get rid of your noise. I fixed mine temporarily by peening the bushing ( described in a previous thread ) but it lasted for only 6 month and then reared it's ugly head again. I did read that thread, I considered trying that myself but I really don't want to have take that sucker off more times than I actually need to! I have found a few local junkyards that are selling the rear control arm for around $150... But i'm a little wary of buying this piece used... Check out vertex automotive (google them) - they often have new and rebuilt parts - would be a littl e more than salvage, but rebuilt will be better than salvage and cheaper than new. I have no affiliation with vertex - probably others that can provide too, but I know of this one. I would be creful regarding any used control arms since you can NOT check the bushings without actually installing them in the car and test driving the vehicle. There is no perceptiple play even in the control arms that are making the noice. That is why I purchased new from Sunset Imports. Ya, thats my fear... I did so the Vertex Auto arms, they are $189 after a core exchange. Has anyone used these, or know anyone that has?? -
Stuck again, This time its the Stereo!?
0Bosxter0 replied to 0Bosxter0's topic in 986 Series (Boxster, Boxster S)
I added the Pioneer AVIC D-3 Double Din unit and kept the 4x40 AMP. I would check back with Crutchfields and recheck wiring schematic. Have you had any issues with your ignition switch prior to your HU upgrade? No, never had any issues previously. Im thinking that possibly the radio is struggling because the battery is starting to die. Ive had the car on jacks for over a week now and havent started it...?? Hopefully thats the issue. -
Ok, so not my issue is with the stereo. I just bought a JVC KD AVX77 single din wide screen touchscreen. I removed the original with the becker keys. I then removed the amp from the hood (4x40 Haes) Using the crutchfield wire harness I wired the new head unit. (crutchfield said to be sure and switch the yellow and red wires so i did) I then ran speaker wire from the new head unit to the old speaker wire harness in the hood and connected the wires correspondingly. When I turn the key one turn to the right (so the engine does not start but the electrical comes on) the stereo plays. If I turn it once more the stereo turns off? If I turn the key all the way (as if I was going to start the car) the stereo works as long as I hold the key in this position. As soon I release the key the stereo turns off. I tried switching the wires back (going against what crutchfield suggested) but it didnt fix the problem, in fact it didnt seem to change anything. Has anyone had this problem or know of a solution?? Thanks -Ben

-
Clunking Noise From the back of the car
0Bosxter0 replied to 0Bosxter0's topic in 986 Series (Boxster, Boxster S)
Boxsterfahrer, Can you ID the part that you replaced, ive heard "control arm" used interchangeably with a few different parts of the rear suspension... In the attached picture is it the one circled in blue (labeled 1) or the one circled in red (labeled 2)?? I think you are referring to the blue circled part, thats actually the piece that I originally thought was the culprit. It seems like its a fairly straightforward part to replace, did you change this out yourself or have the dealership do it? -Ben Picture you have is of the front suspension. Here is the rear. I believe Boxsterfahrer is referring to number 8. It is the one where you have to remove the plastic fender cover to see where it attaches. Tight squeeze up in there. ericinboca, Thats the item I originally thought was the trouble maker. Like you mentioned ill look a little closer into the swaybar and double check all the bushings for cracks/splits. If none of that works then thats the first part ill replace! Thanks again gentlemen! -Ben Yes, it is item #8 and I can almost guaranty that replacing these will get rid of your noise. I fixed mine temporarily by peening the bushing ( described in a previous thread ) but it lasted for only 6 month and then reared it's ugly head again. I did read that thread, I considered trying that myself but I really don't want to have take that sucker off more times than I actually need to! I have found a few local junkyards that are selling the rear control arm for around $150... But i'm a little wary of buying this piece used... -
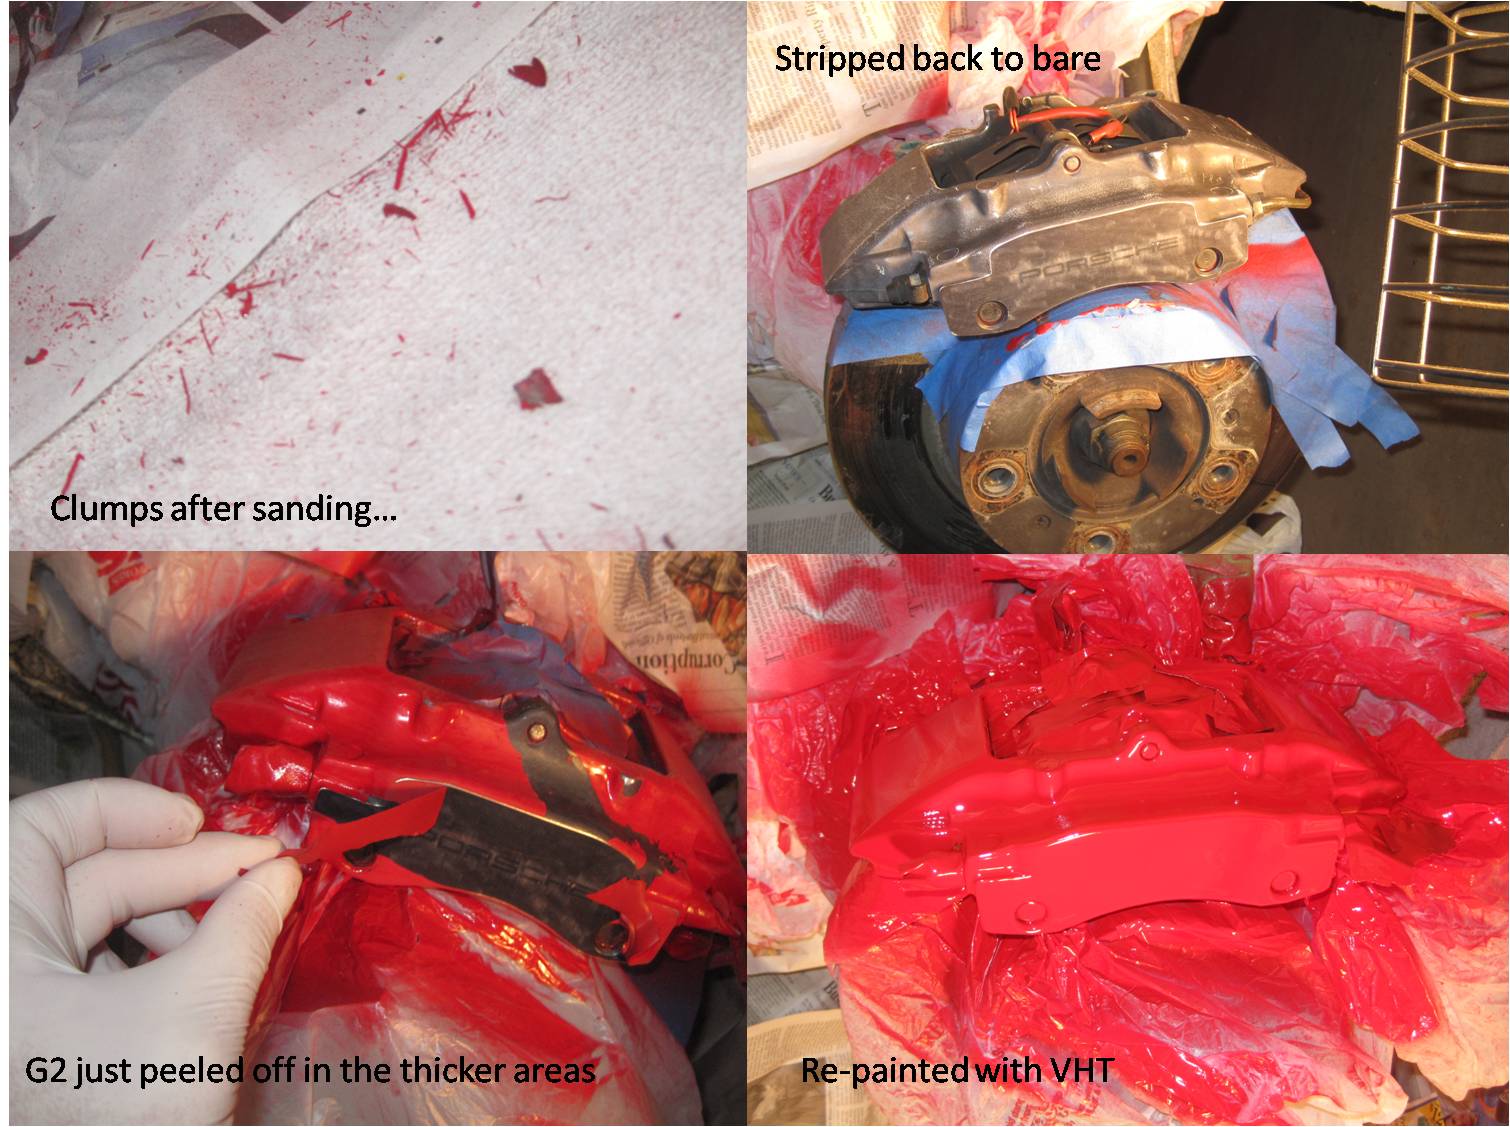
I think I will contact G2 and give them a heads up, im curious as to what their response might be. So, I've used two complete bottles of of the VHT paint, I think ive lost count of how many coats buts its probably over 10. Also, I ordered some clear caliper paint and Porsche decals, I hope they will be here by the end of week. Once its complete ill post a few final pictures. -Ben
-
I think you need to consder that the suspension noise you've been hearing might actually be these 19" tires hitting something on bumps. I suppose its possible, but the suspension noise has been relatively new, I've had these wheels/tires on the car since i purchased it two years ago. I will be putting the rear smaller stock rims and tires on the car while I wait for the new tires I ordered to get here. Ill see if I still hear the suspension noise with those on.
-
OK, sounds like a plan... Ill update as soon as i get the wheels back, should be sometime in the next few days.
-
Truth be told it could have been a number of things I suppose... I did allow the mix to set for 5 minutes. I originally only used the caliper cleaner provided with the kit and then re-sprayed after using the dremel. I didn't check the born on date.... I threw the box and paint away last night and i believe the garbage went out today so I may not get a chance to check that. I did attempt thin coats. You make a good point about the temperature, that may have been what kept the paint from self-leveling. I also think that using a better brush from the start would have made a positive difference. I did like the appearance of the G2 paint minus the wavy/poor adhesion it has a very rich, thick look to it. If you do use the G2 I think it would behoove you to remove the caliper.
-
hmmm, im unsure of my offset, is offset standard per wheel\car or specific to an individual car? I dont currently have the rims so I cant measure it out myself... Respectfully, -Ben
-
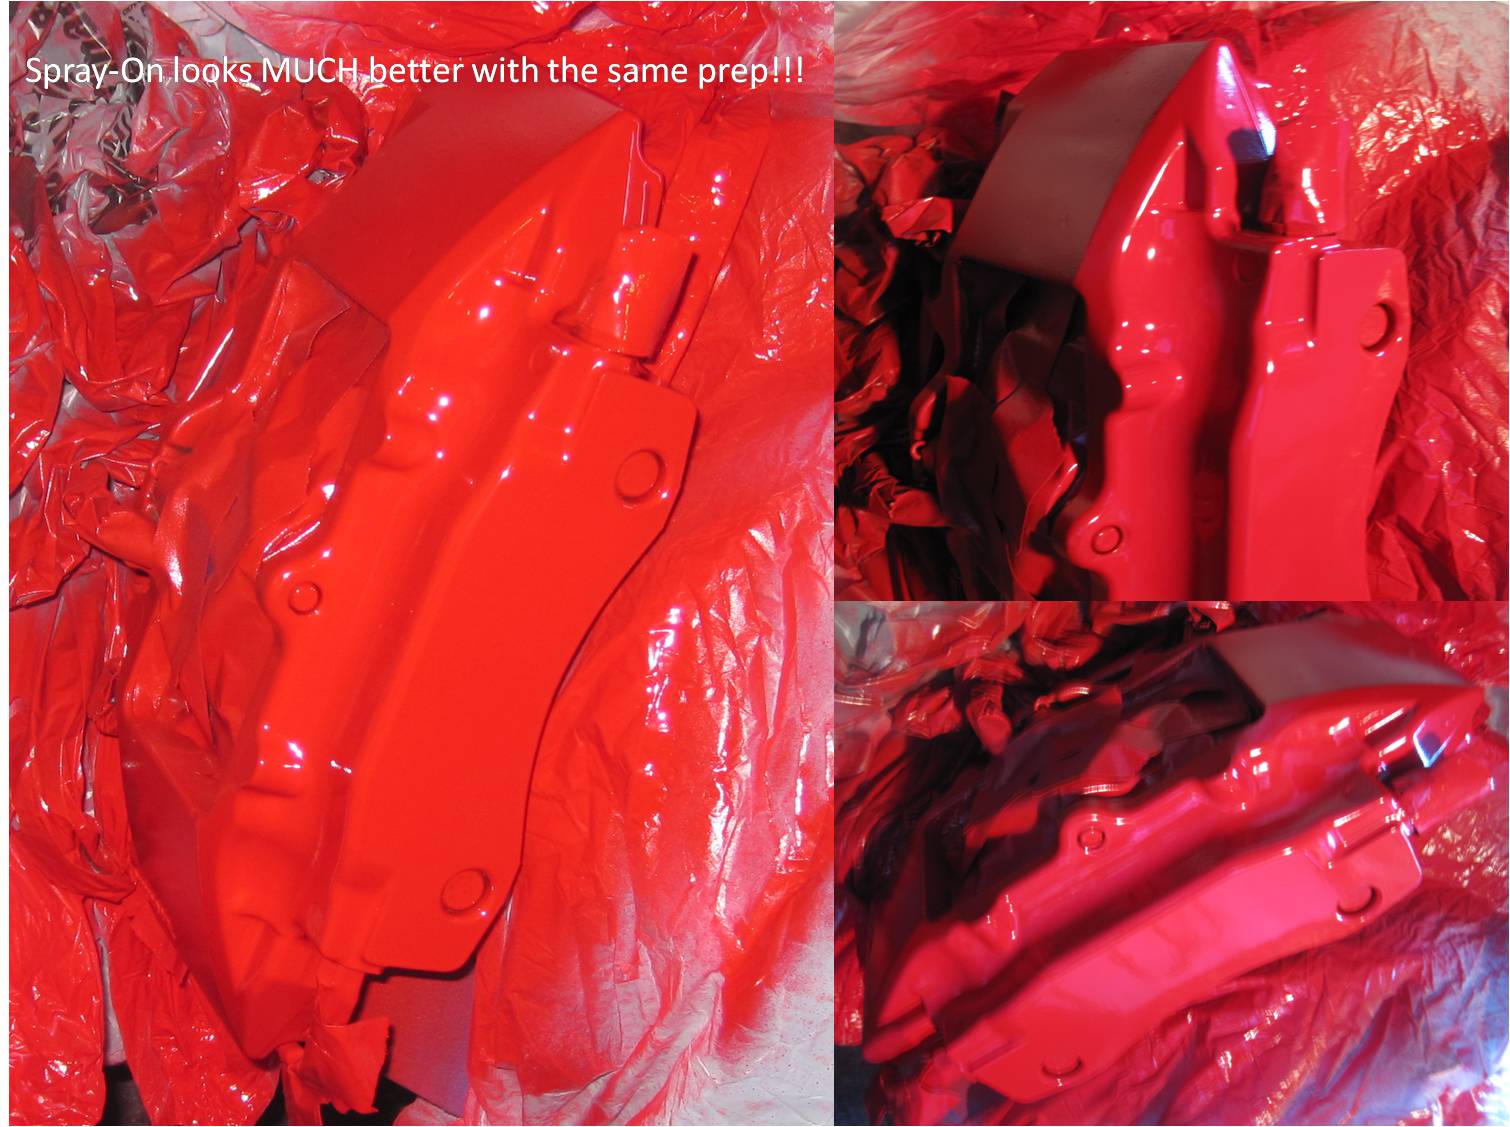
OK, so I take back my last post... I sat down determined to get the misshaped caliper painted with the G2 caliper paint looking as good as the others with the VHT paint. I started sanding with a medium grit sandpaper and instead of shavings and dust I got clumps (see attached pictures). I figured at this point it would be cured enough to sand...? Then much to my amazement it began to peel off (see pictures)!! It peeled off easily in places where it was thick but was to thin to peel off in places where I had sanded already. Getting frustrated I pulled out the handy dremel and wire brush attachment and sanded/peeled the whole thing back down to bare metal. I then re-cleaned with soap and water and brake cleaner, let dry for a few hours re-taped and painted with the VHT. Viola, perfection. I wonder if i just got a bad can of G2? I cant believe it would just peel off like that. Argggghhhhh, my recommendation... go with the spray on!!
-
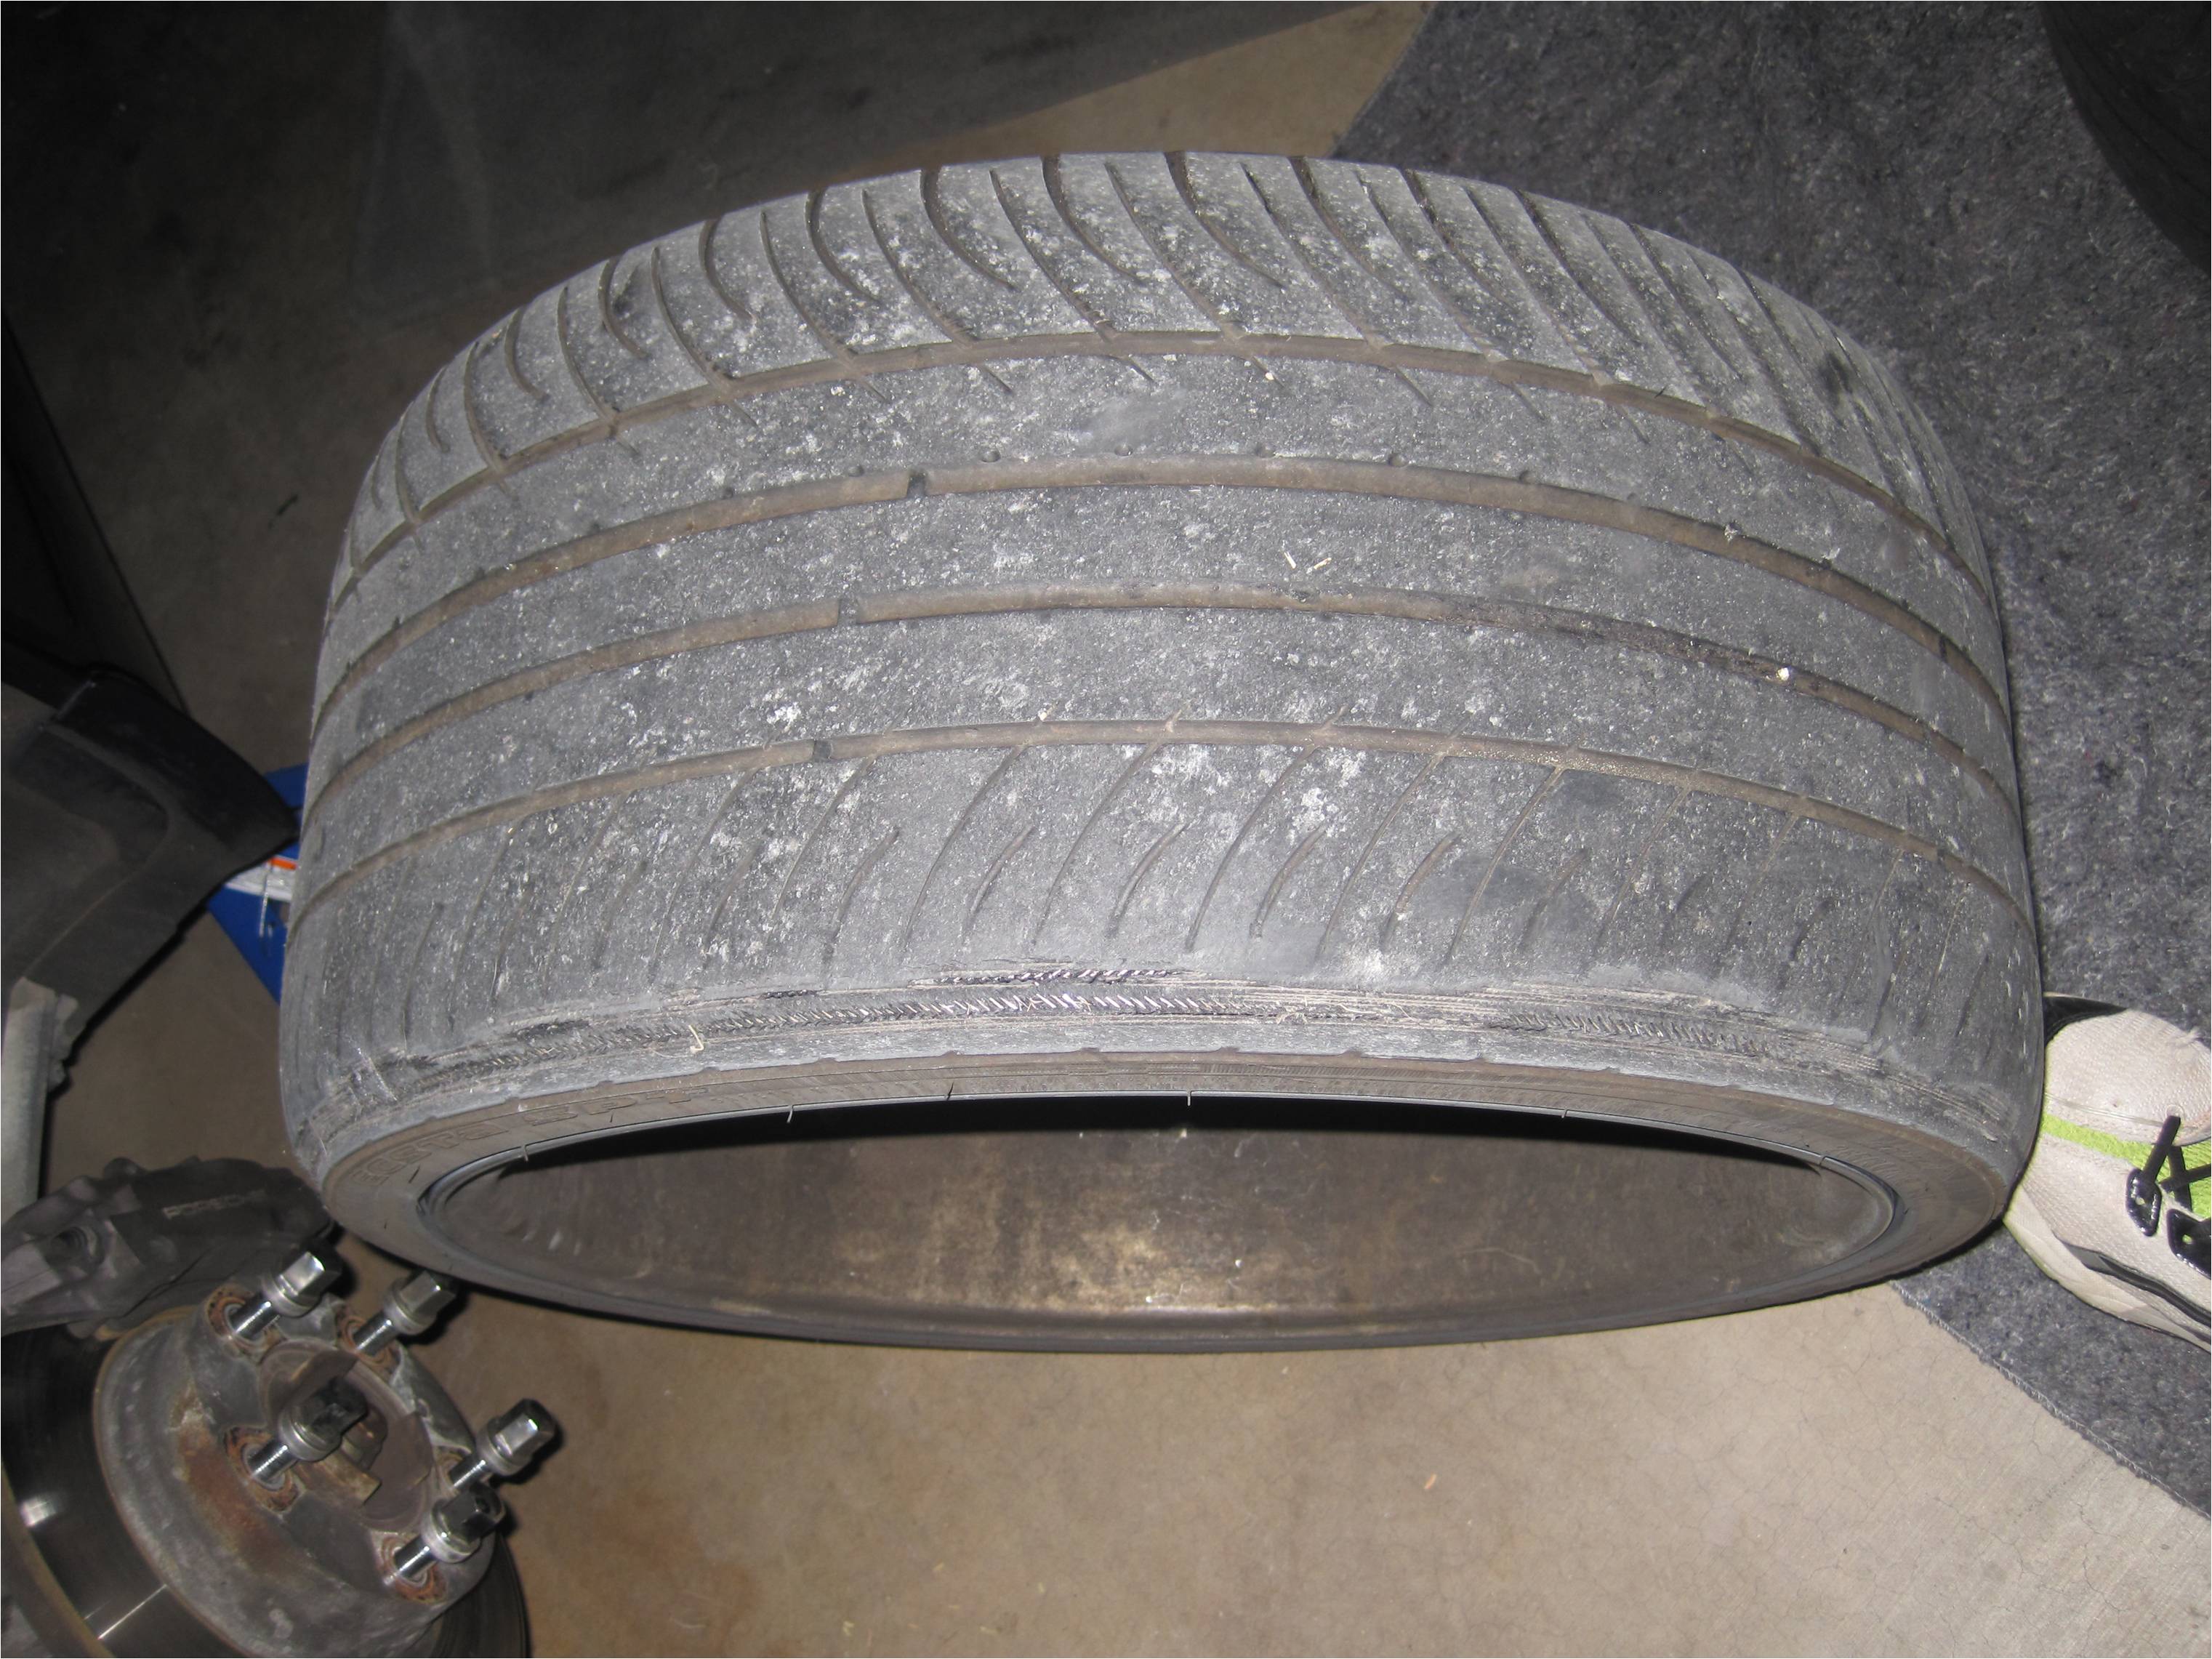
Loren, Interesting, I suppose this may be why Porsche doesnt recommend the 19"... The tires that were on the rims were actually 265/30! The previous owner may have installed the wrong size on the rim?? is the 30 instead of the 35 going to have an adverse affect? Also the tires mounted on the front were 225/35/ZR19, is that the correct size for the front? Would spacers help in eliminating rubbing under compression if that is in fact the issue? Thanks Again, -Ben
-
OK, so I have yet another issue... I have a 2000 Porsche boxster which I have recently took the 19" Lobster Claw wheels off of to have powdercoated. The rears had 265/30/ZR19 tires on them. The car had these wheels on it when I purchased it so it never occurred to me that i might need wheel spacers for these. However when I took the tires off they were worn to the wire on the inside but still fairly healthy on the outside (see pic). Originally I thought it was that the camber? was off angling the wheel inward at the top (I apologize for not using the correct terminology). But another user here on Renntech suggested it looked as thought the tires were rubbing something...??? I looked around the wheel well and didn't see anything that looked like it had been rubbed. Im also not sure I want to put wheel spacers on the car as the tires on it are already pretty wide and have the aggressive stance that i like... with spacers will the tires be too far outside the well?? And will the handling really improve? So I guess my question simply put would be, do these wheels require a spacer? Thanks again Renntech, I dont know what id do without you! -Ben
-
I will say this though... I ran a practice run on the G2 caliper paint this morning with some sandpaper... wow, that stuff is tough! it gonna take some work sanding that sucker smooth... So while the G2 Caliper paint didnt work for me as far as appearance it sure cured on strong!
-
I didn't specify it my post, but I actually did all the prep work one day, let the car sit overnight to dry then applied the paint the following day. I live in Arizona so I cant imagine the brakes didn't completely dry in a 100 degree garage in 12 hours time... To be honest was really surprised and very disappointed I was really looking forward to using the G2 system. On another note I was a little worried that the VHT was going to chip or fade in the long run so I did some searching and found that most people had pretty good results with it. Time will tell I suppose.
-
I don't have a picture with the wheels on the car yet because I haven't gotten the wheels back from the powder coating shop. As soon as I get them ill post some pics. I also just ordered some decals so ill be adding those along with a clear coat before I put the wheels back on. I had some really bad/weird tire wear so ill be getting new tires and I might throw some wheel spacers on when I do that. Respectfully, -Ben
-
Color Matched Paint, Does it look better?
0Bosxter0 replied to 0Bosxter0's topic in 986 Series (Boxster, Boxster S)
I think I agree for the most part, unless the car is black or silver the color can look a little "ricey". Although I like the custom look I want to keep the elegance if the car as well. For now I think im going to stick with the silver. *** I think I will paint the brake calipers though. I'm thinking ill paint a select few pieces of the interior as well... and suggestions? G2 brand caliper paint yields excellent results. My friend Boxtaboy and I did his calipers on his silver '01 986 in red and they came out so nice that G2 put his pics on their website. Did my '97 Ocean Blue Boxster in yellow and I like the look with dark blue Porsche lettering :jump: :jump: :jump: :jump: Regards, Maurice. Gents, Just tried the G2 Caliper paint with horrible results!!! i threw up a quick post on my experience... I couldn't believe how poorly the G2 turned out! I'm glad you didn't have the same experience i did.. -
Oh, be sure to click the pictures to get a good look...
-
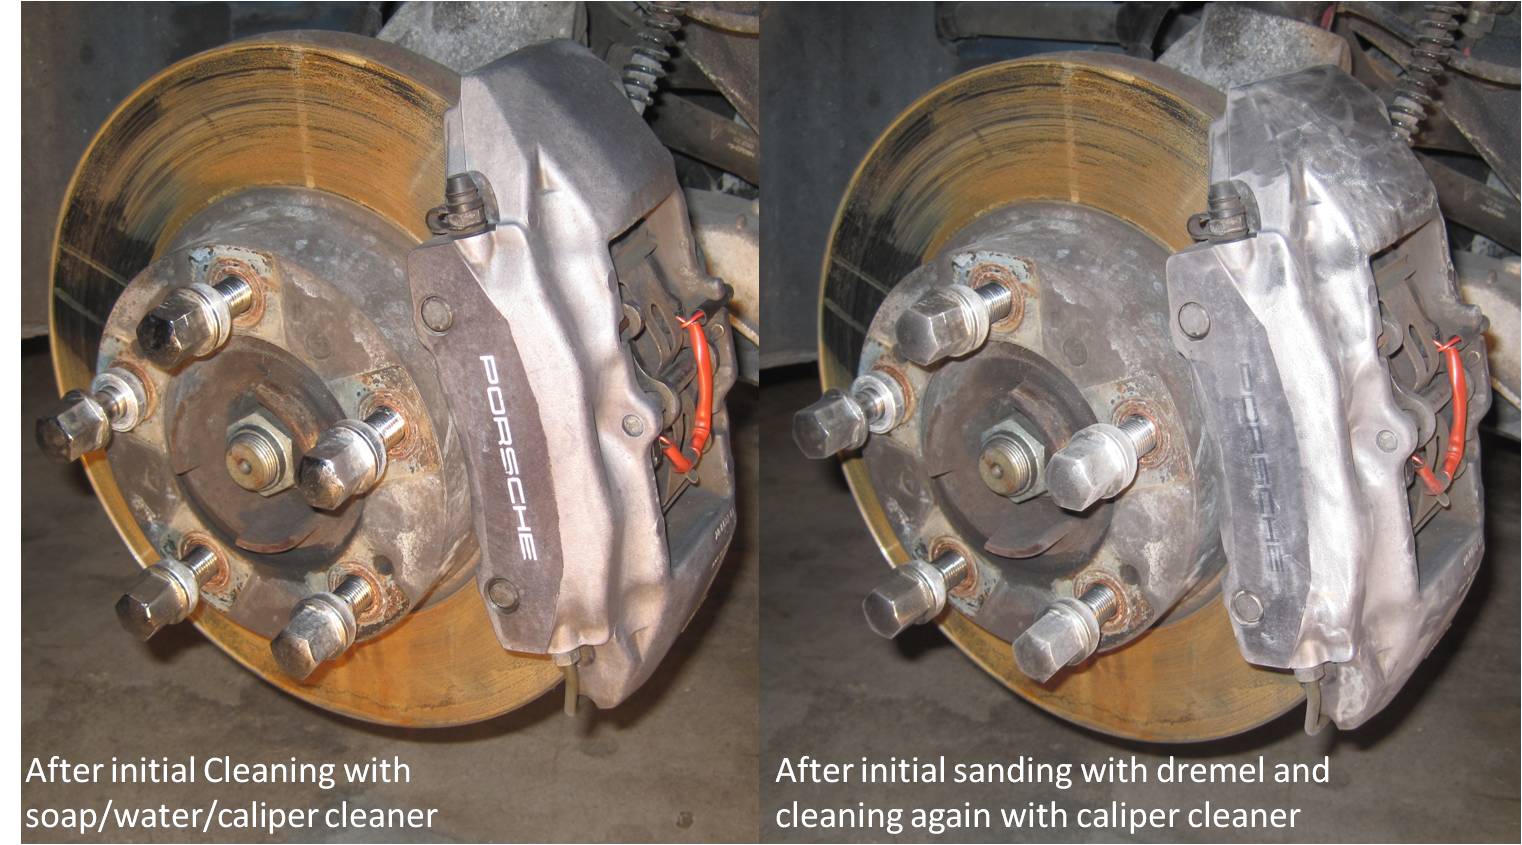
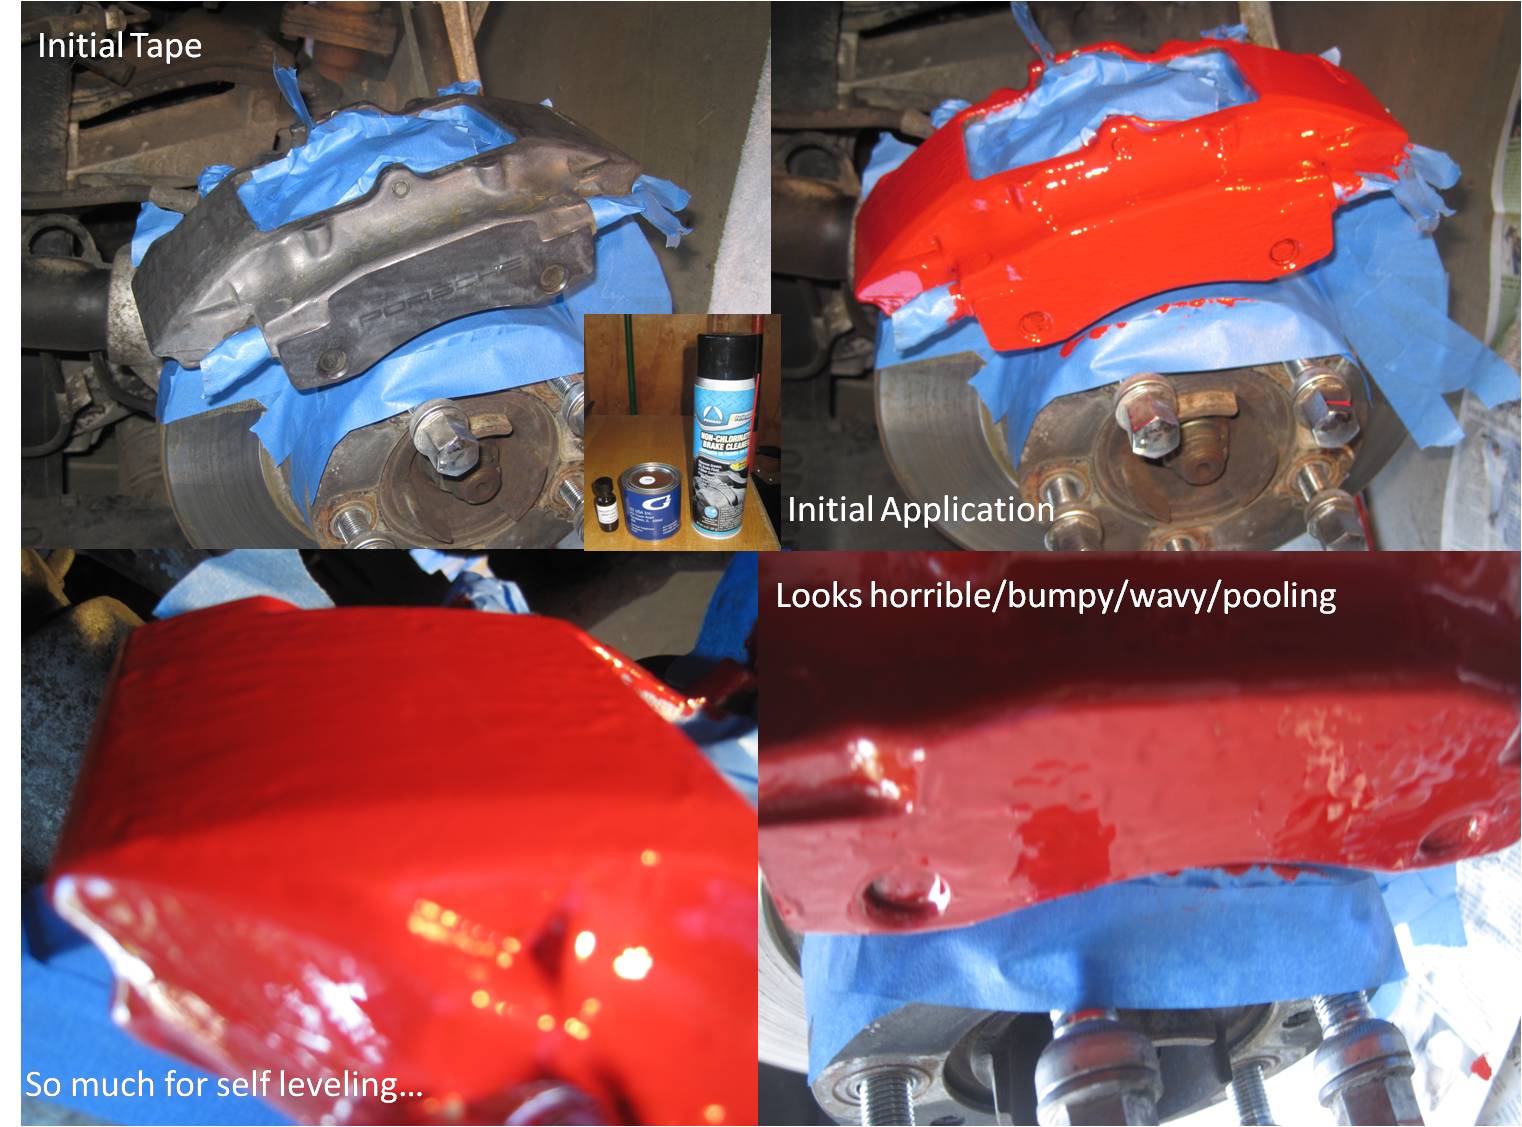
So I have been making a few cosmetic upgrades to my 00 Boxster. I just dropped the “lobster claws” off at a local shop to have them stripped and powder coated (a shop here in Scottsdale, AZ is chemically stripping then sandblasting and powder coating all four 19” rims for $325!) and thought that while I had the car on stands I would go ahead and paint the calipers. I just like the look of the red through the wheels. I did as much research as I could (even searching around renntech) and decided on G2 Caliper paint as it seemed like this was the best product on the market… Wrong. Everyone says preparation is key. I spent an entire day prepping! I first washed the calipers with soap and water using first a soft sponge, then a rough sponge and finally a brillo pad. I then sprayed and washed them with the caliper cleaner scrubbing them again with a new brillo pad as I went. Then I grabbed my handy dremel tool and threw a wire brush on the end and went over each caliper with the wire brush scuffing the surface of each caliper trying to get in every nook and cranny. I then rinsed the calipers with warm water and a wet towel and sprayed them one last time with caliper cleaner to ensure there was no residue. I then mixed the G2 caliper paint according to the directions and applied it with the supplied brush. Initially some of the paint didn’t stick and I thought I had failed to prep the calipers… How could I have failed when I went to such great lengths to ensure they were prepped perfectly?! Then it began to work… kind of. The paint was extremely thin and dripped everywhere, pooling in the gaps and crevices. Not to mention all the time spent picking bristles out of the drying paint left behind from the extremely poor quality brush. The “self leveling paint did not self level, it continued to look bumpy and wavy. Panicky I grabbed one of my art quality brushes and attempted to use that. While the paint applied with the $30 brush applied much more nicely the self leveling quality never took shape. Still panicky I called my girlfriend and begged her to run to AutoZone and grab me the best quality caliper paint they had in stock. Knowing I would pissy and crabby all day if this didn’t turn in my favor quickly she hurried to AutoZone. The G2 Caliper paint cures and hardens restricting it from future use. I needed to know if the problem in the paint was my mistake or the G2 paints mistake. Within 15 minutes she had VHT caliper paint in my hands. I quickly masked off the driver’s side rear well and applied the now VHT spray paint to the caliper. It applied perfectly! No bumps, no runs, no waves, no adhesion problems. I then did the other two calipers with the same effect. I suppose it’s possible that the passenger side rear caliper that I applied the G2 paint to may have experienced some anomaly… but I doubt it. All the calipers where prepared identically. Im unsure what the longevity of the VHT paint will be but it certainly looks muuuuch better than the much more expensive G2. I will now have to wait for the G2 paint to cure so that I can sand it down and re-paint it with the VHT, anothers day worth of work. If you still want to use the G2 paint the only suggestion that I can offer is that you invest in a new high quality brush, pray a little and have a back-up plan ready! Attached below are some pictures of the experience…. Ill update this in the next few months and let everyone know how the paint is holding up... Respectfully, -Ben C.
-
CJ, I know this is an old post but I wonder if you have any updates on the arms you installed? How are they holding up, have they needed any adjustment, reliability? I need to replace mine as im getting that same "clunk" from the back and am wondering if this is a better/less expensive alternative to OEM. Thanks! -Ben
-
Clunking Noise From the back of the car
0Bosxter0 replied to 0Bosxter0's topic in 986 Series (Boxster, Boxster S)
Boxsterfahrer, Can you ID the part that you replaced, ive heard "control arm" used interchangeably with a few different parts of the rear suspension... In the attached picture is it the one circled in blue (labeled 1) or the one circled in red (labeled 2)?? I think you are referring to the blue circled part, thats actually the piece that I originally thought was the culprit. It seems like its a fairly straightforward part to replace, did you change this out yourself or have the dealership do it? -Ben Picture you have is of the front suspension. Here is the rear. I believe Boxsterfahrer is referring to number 8. It is the one where you have to remove the plastic fender cover to see where it attaches. Tight squeeze up in there. ericinboca, Thats the item I originally thought was the trouble maker. Like you mentioned ill look a little closer into the swaybar and double check all the bushings for cracks/splits. If none of that works then thats the first part ill replace! Thanks again gentlemen! -Ben -
Clunking Noise From the back of the car
0Bosxter0 replied to 0Bosxter0's topic in 986 Series (Boxster, Boxster S)
Boxsterfahrer, Can you ID the part that you replaced, ive heard "control arm" used interchangeably with a few different parts of the rear suspension... In the attached picture is it the one circled in blue (labeled 1) or the one circled in red (labeled 2)?? I think you are referring to the blue circled part, thats actually the piece that I originally thought was the culprit. It seems like its a fairly straightforward part to replace, did you change this out yourself or have the dealership do it? -Ben