Welcome to RennTech.org Community, Guest
There are many great features available to you once you register at RennTech.org
You are free to view posts here, but you must log in to reply to existing posts, or to start your own new topic. Like most online communities, there are costs involved to maintain a site like this - so we encourage our members to subscribe or donate. All subscriptions and donations go to the costs operating and maintaining this site. We prefer that guests take part in our community and we offer a lot in return to those willing to join our corner of the Porsche world. This site is 99 percent member supported (less than 1 percent comes from advertising) - so please consider an annual subscription or donation to keep this site running.
Here are some of the features available - once you subscribe RennTech.org
- View Classified Ads
- DIY Tutorials
- Porsche TSB Listings (limited)
- VIN Decoder
- Special Offers
- Paint Codes
- Registry
- Videos System
- View Reviews
- and get rid of this welcome message
It takes just a few minutes to register, and it's quality Porsche information at a low cost.
Contributing Members also get these additional benefits:
(you become a Contributing Member by subscribing or donating money to the operation of this site)
- No ads - advertisements are removed
- Access the Contributors Only Forum
- Contributing Members Only Downloads
- Send attachments with PMs
- All image/file storage limits are substantially increased for all Contributing Members
- Option Codes Lookup
- VIN Option Lookups (limited)


Skip
-
Posts
101 -
Joined
-
Last visited
Content Type
Profiles
Events
Forums
Exterior Paint Colors
Downloads
Tutorials
Links Directory
Collections
Classifieds
Store
Everything posted by Skip
-
Not sure whether or not the issue could be related to the electrical portion of the ignition switch. You mentioned having changed the ignition switch (was that the hardware / key side or the electrical rear portion? I have recently replaced the key side, and realized that the electrical portion was loose as well, which would not allow the Acc posn to be accessed at all times. Once replaced, the problem disappeared - perhaps another option ($130 roughly I think). Skip
-
After replacement of cooler seals and others, no further leaks.
-
Final comment: With the replacement of both the flywheel and clutch (and after correcting an installation error), the car is up and running, with a much better feel on the clutch - does not appear to be sticking any longer, and with the replacement of most of the external oil seals, isn't leaking either, so hope to avoid future oil / burn on the flywheel.
-
To close off this issue and provide the result of further research, I can honestly say - user error. It appears that in my haste to replace the flywheel and clutch and get it reassembled, I failed to notice the ring gear on the old clutch - i.e. I didn't transfer it to the new clutch. I had thought that the starter engaged the flywheel vice the ring gear (apparently the flywheel teeth are only used for sensors in this case). So, remove engine, add ring gear, reassemble and reinstall engine, turn key - vroom. Problem solved (painful but very useful lesson). Thanks to everyone for your ideas and input. Skip
-
Well after all the efforts, rechecking all the numbers, the new and old flywheel have the same 930-103-233-0R on the back, although they are delivered under a 930.103-033-01 from the dealer - very odd I think, but. In the end the problem stemmed from failing to reapply the ring gear to the pressure plate (simple as that). Completely missed it obviously when reinstalling the new clutch. I had thought that the starter engaged the flywheel but guess that's only for the sensors at the back. Problem solved, and engine started instantly. Lesson learned about deliberate and slow process - don't let adrenalin and being anxious to turn that key again deter you. Thanks for the assistance. Engine came out and went back in a lot faster the second time around... Skip
-
Thanks Loren, Am researching the old flywheel numbers I have found and have to clean up the rusted numbers to be able to read them right. I'll post what I find. My alignment question was aimed at whether I could have a misaligned transmission to engine which could have the knock on effect to the starter as it's mounted to the bell housing. I'll post again with what I find. Thanks.
-
Based on all the feedback I've been getting (including the fact that I should have the right flywheel - 84 or 86 is the same), could it be an issue of alignment somehow? Either transmission to engine (4 bolts) or starter to transmission (2 bolts)? Not sure how I can check this myself without some fancy alignment tool of some sort.
-
Sorry, I mis-understood. Yes, the part I ordered was 930.102.033.01
-
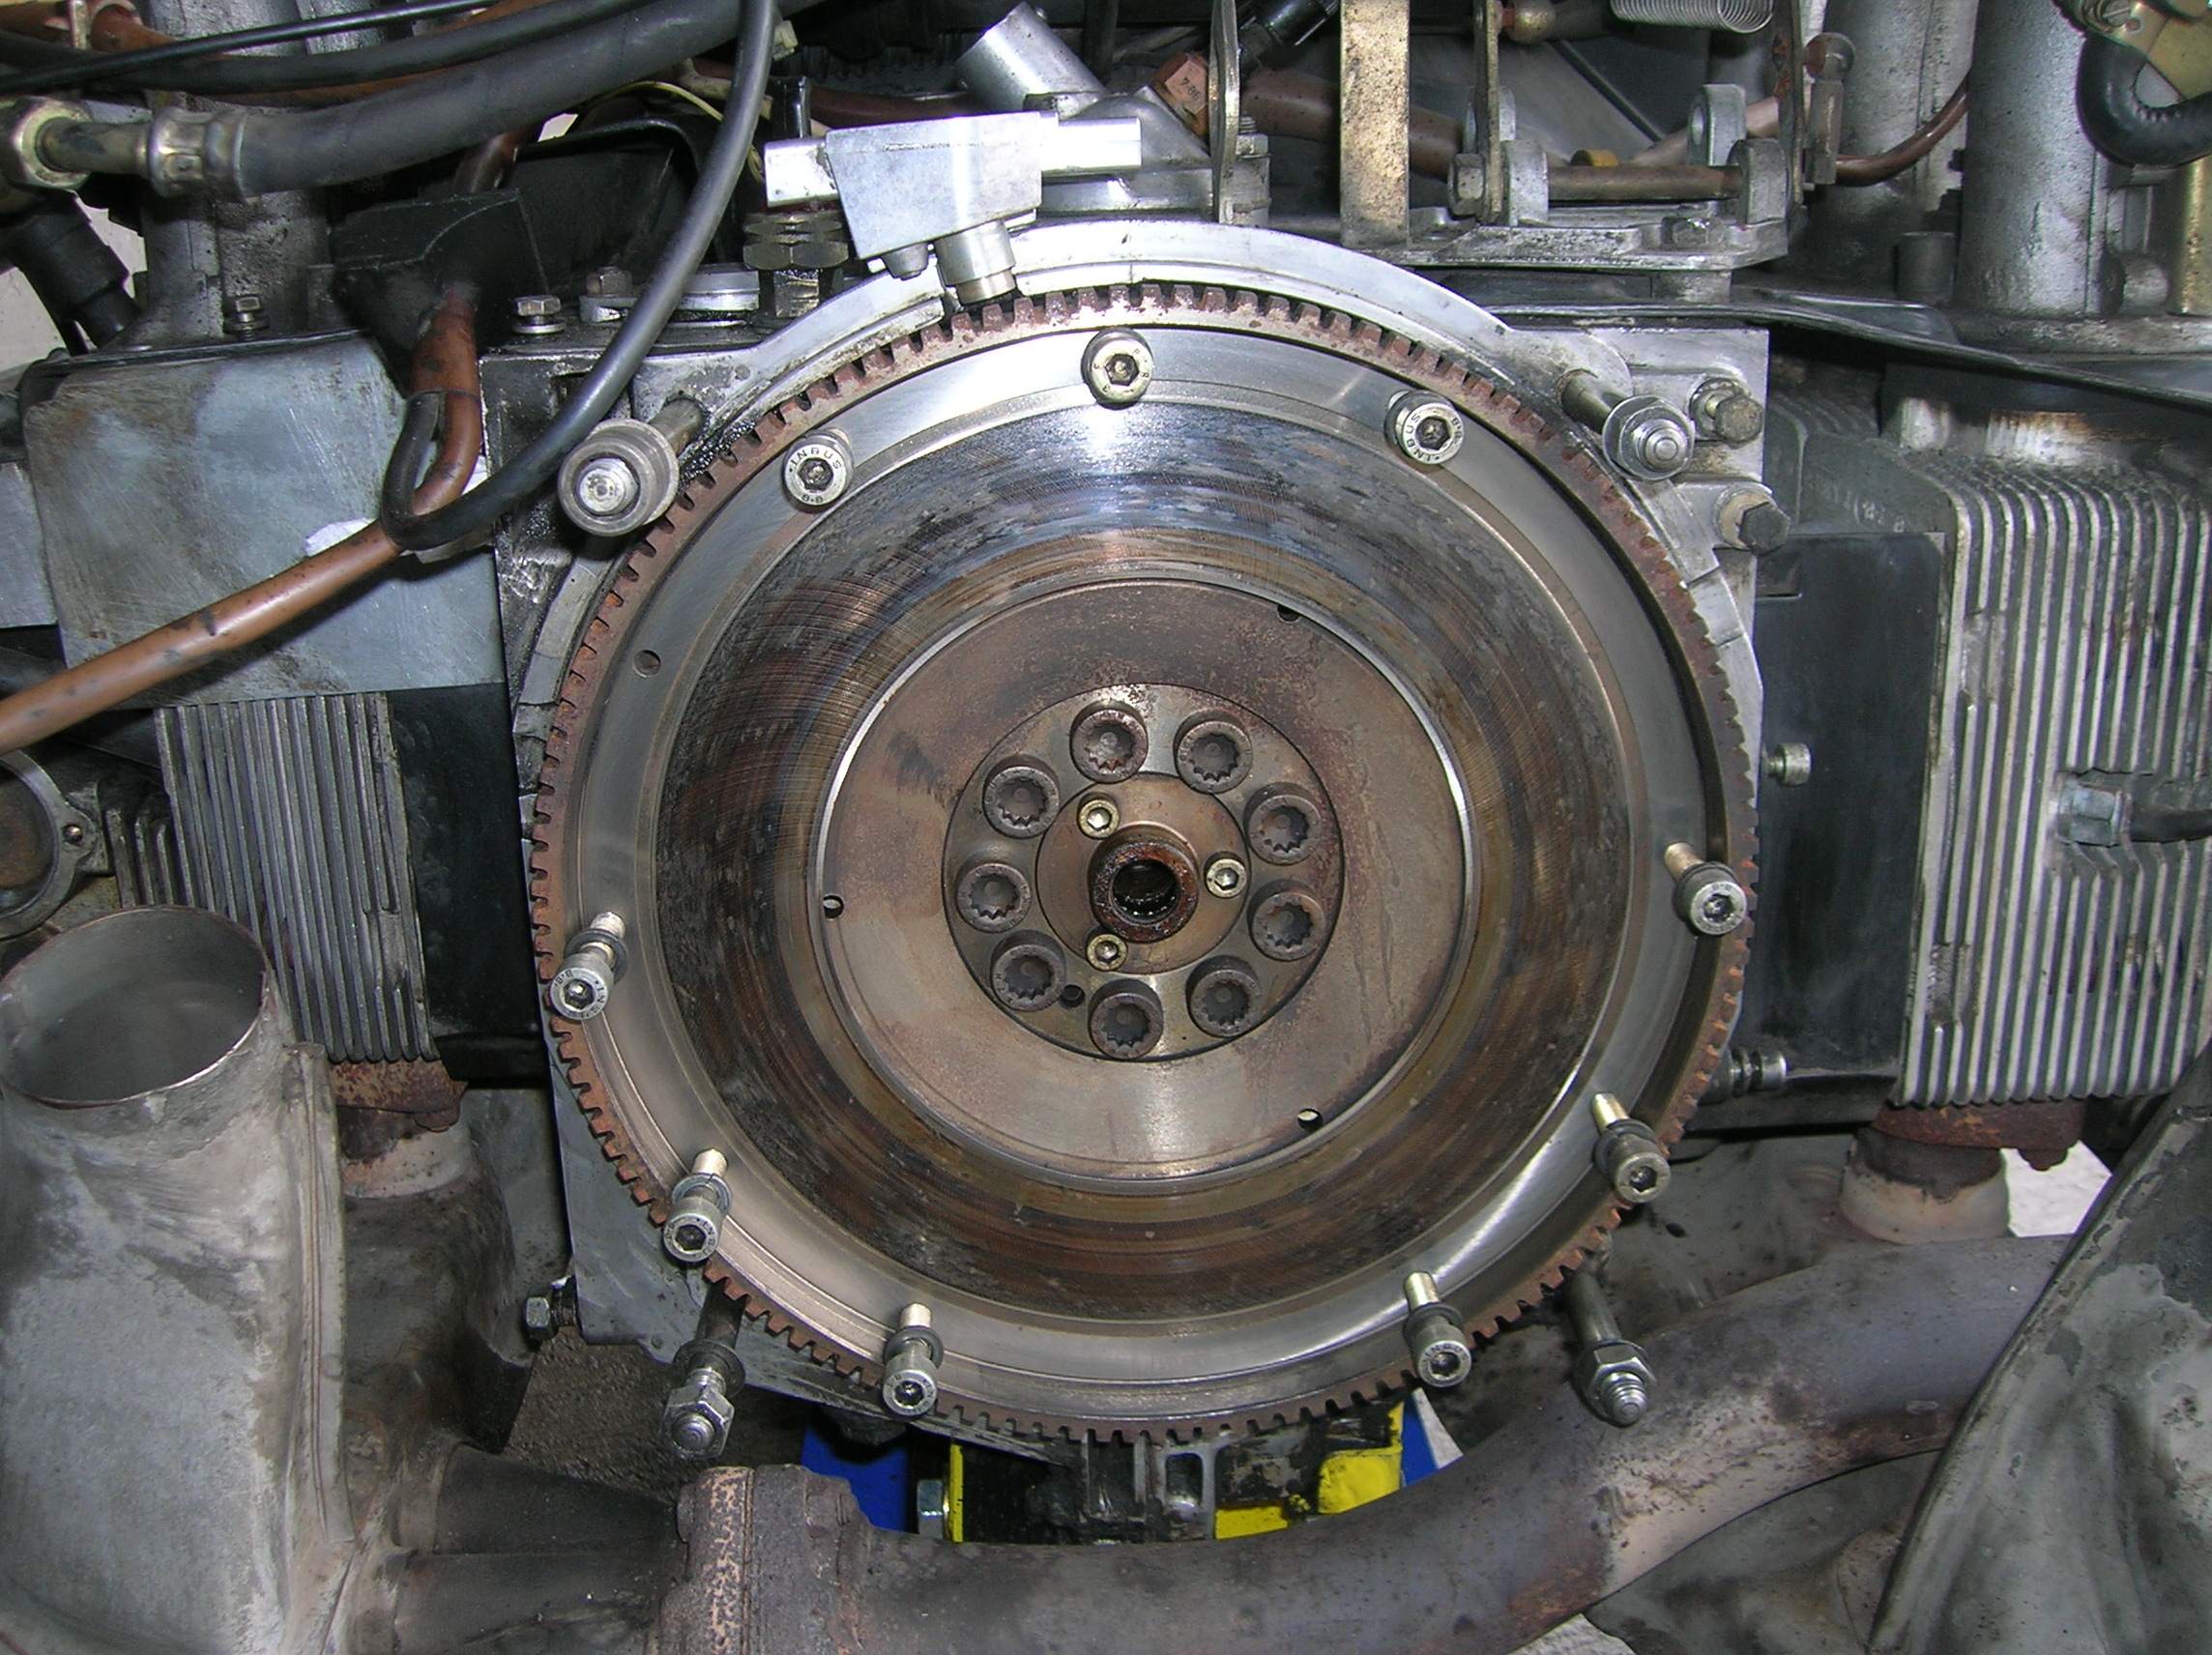
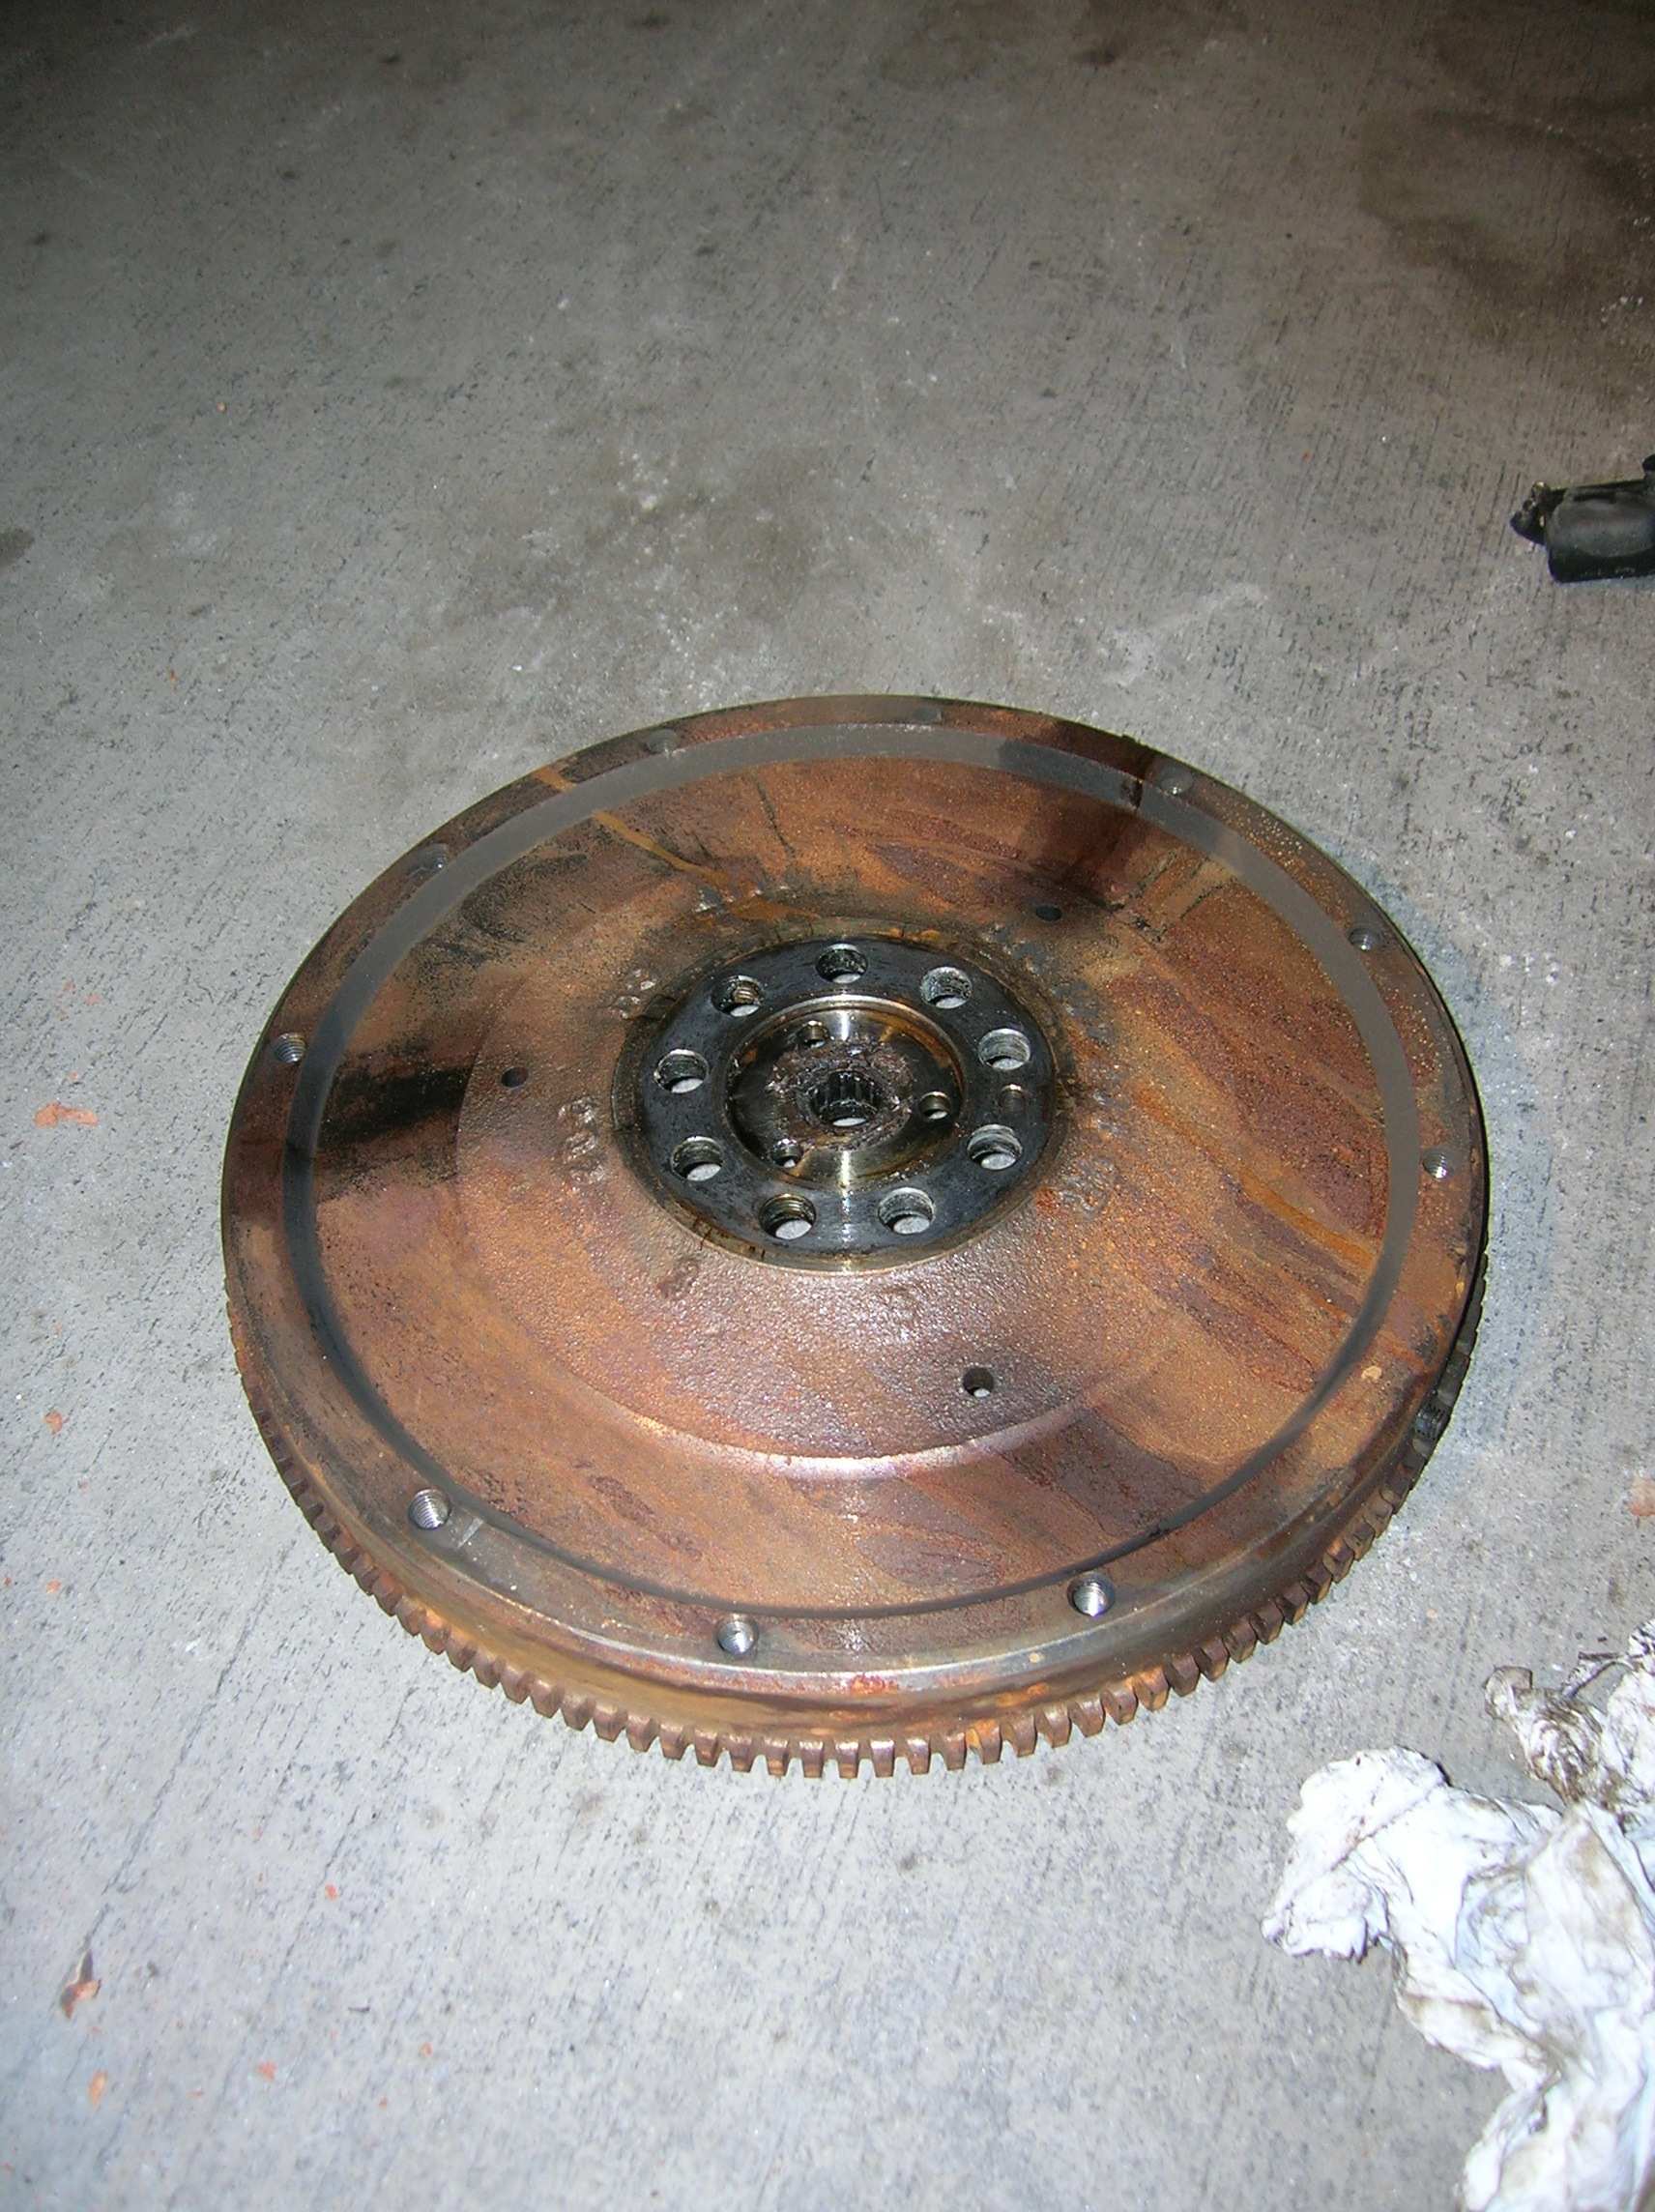
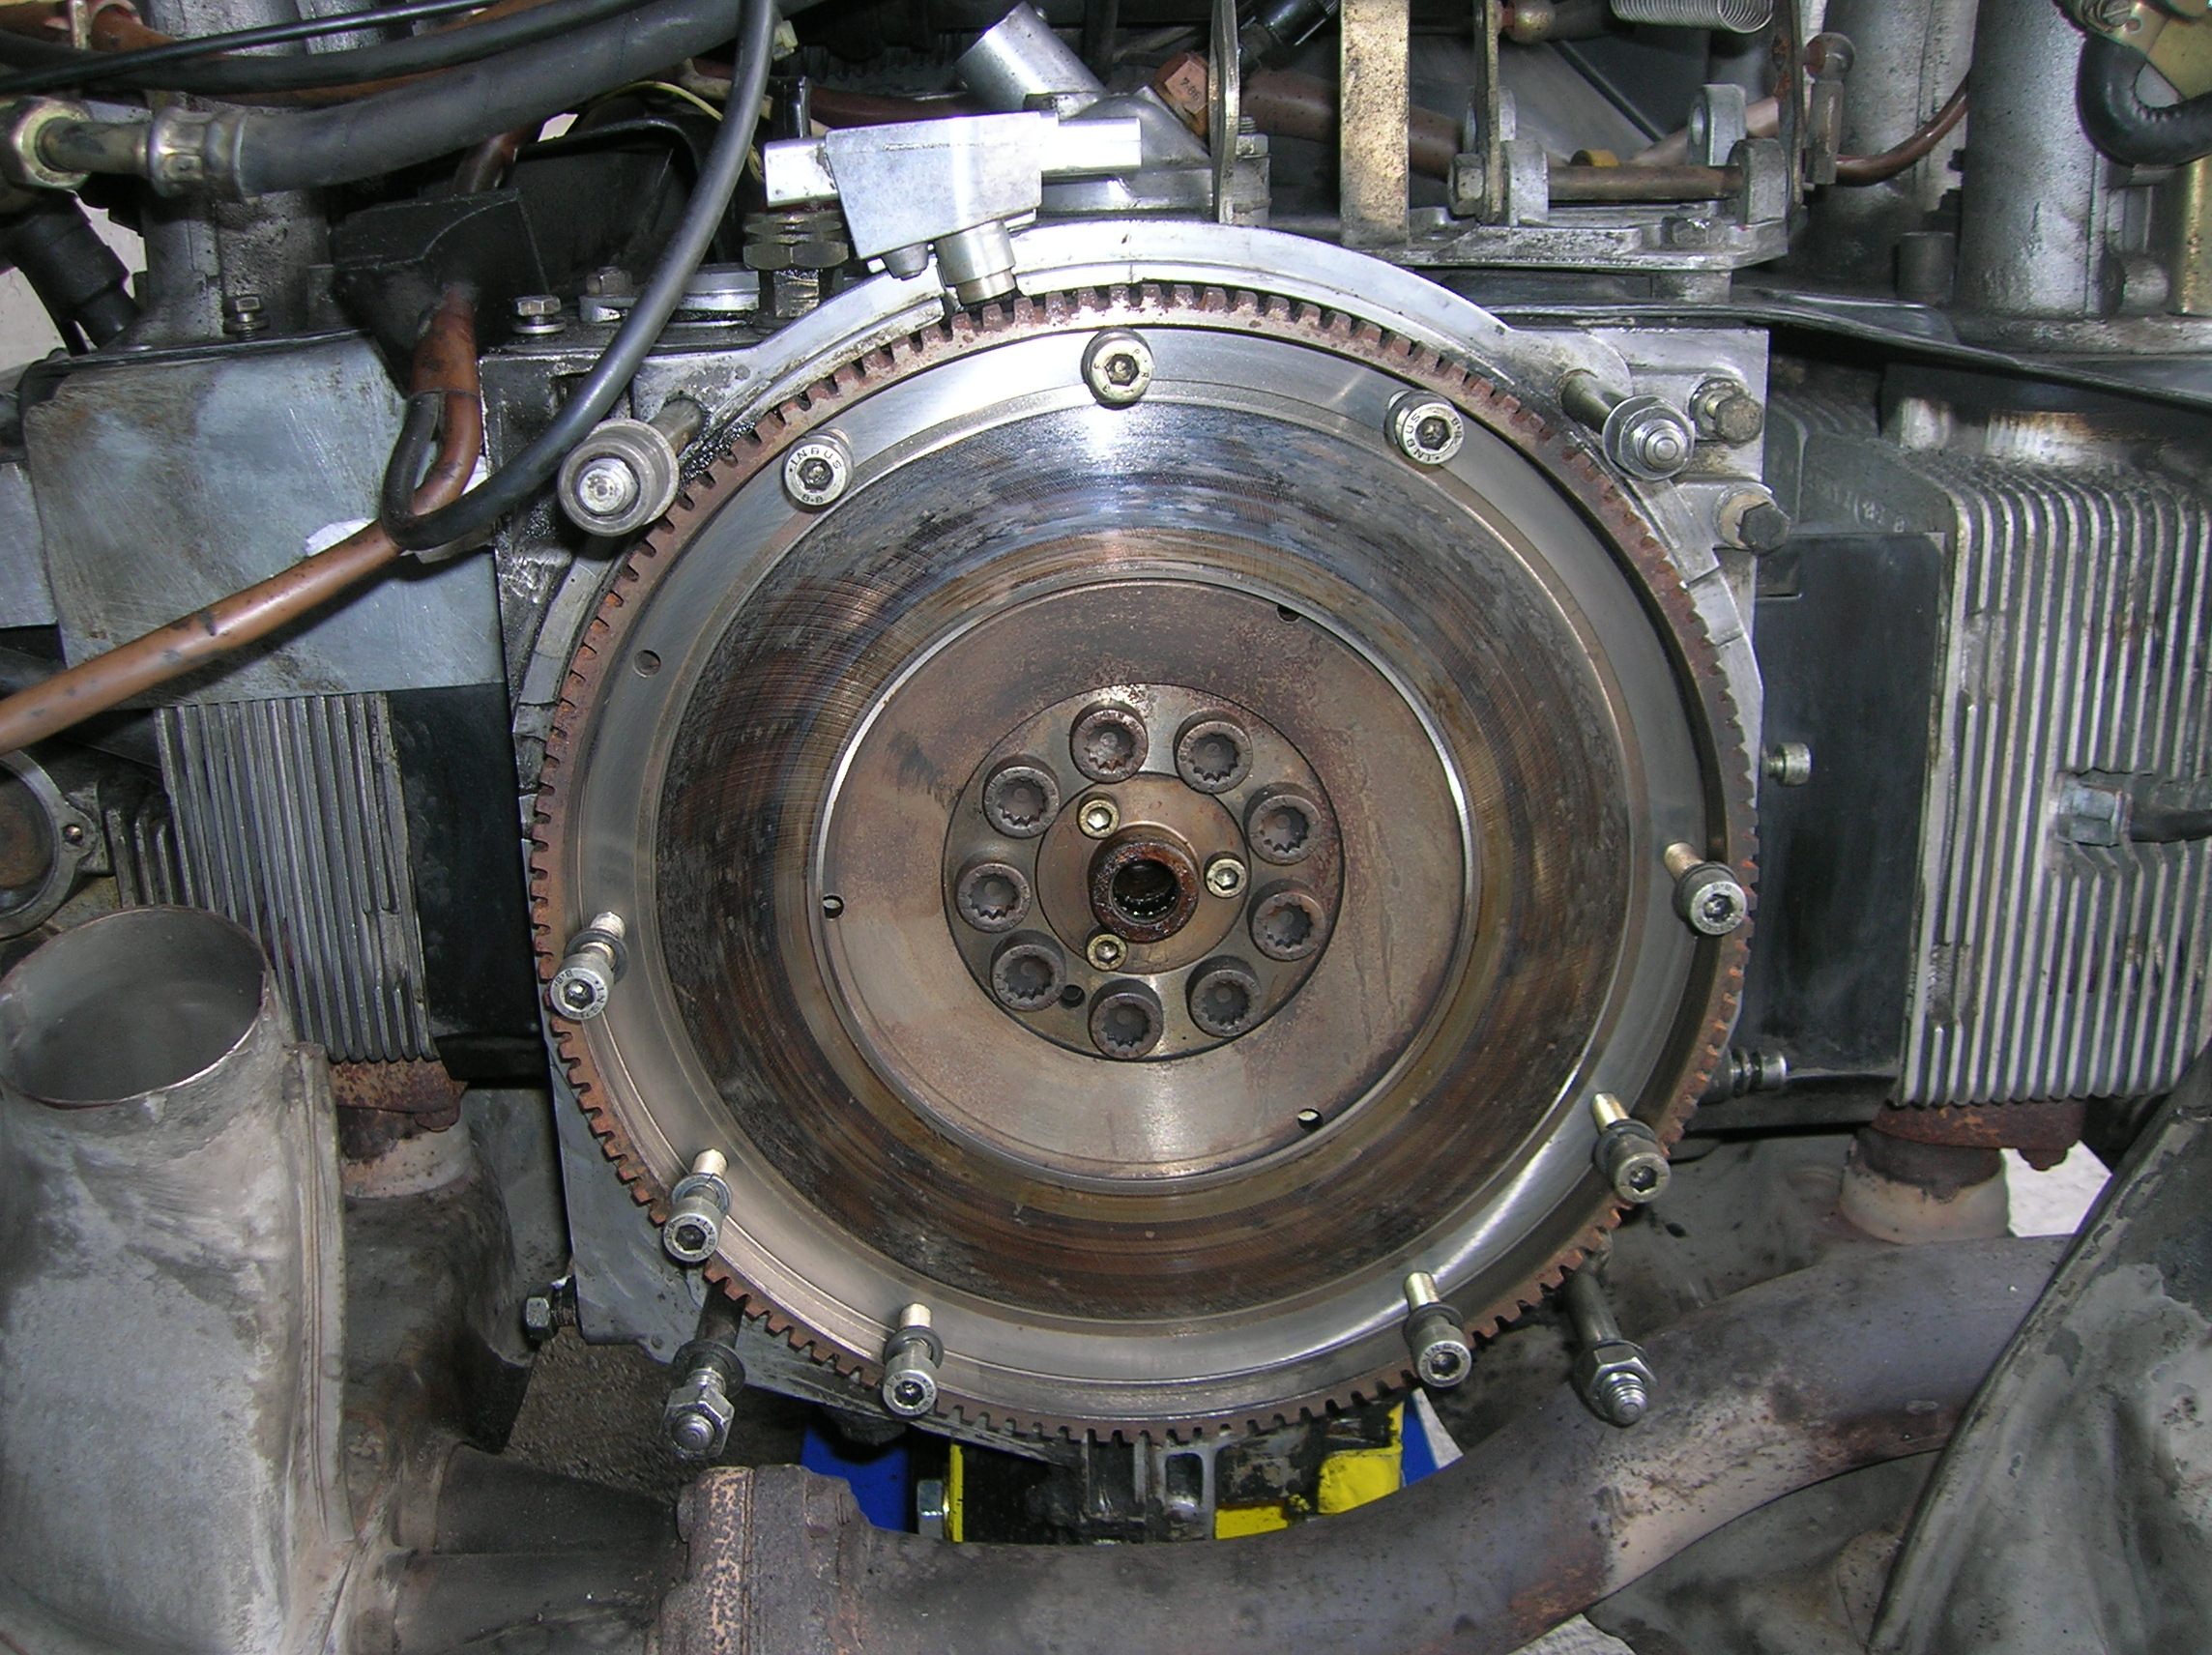
First two pictures are both sides of the old one, last picture is new one (transmission / clutch side). The front of the two are distinctly different. and the part number on the back of the old one, isn't the same.

-
As an aside, the engine number is 64G01144 and the transmission number is 74G01338
-
Thanks Loren - should have checked for a reply first before updating. The old flywheel doesn't look anything like the 930-103-233-01, but rather the 03 version. Am enclosing a picture of the old one (both sides) which to me makes little sense overall. The starter which worked with the old one, will not engage the new one at all - have even swapped it out with the same problem of the bendix pushing forward, spinning, but not turning the engine over. Bench tested it as well and both old and new starter have the requisite kick and spin. Looking at the teeth they seem shallower than the old flywheel.
-
Some further research through ZF Sachs in Germany has yielded the following cross reference data. The flywheel number 3082 087 031 is in fact a Sachs Part Number associated with the 930.21 engine between 10.84 --> 08.86 and identifies the following clutches/pressure plates as cross reference: 915.116.01.00 915.116.01.10 915.116.01.14 915.116.01.16 915.116.01.18 915.116.01.27 915.116.01.29 It also identifies the diameter of the flywheel as 225 mm with 20 teeth (although I expect the number of teeth is based on a particular distance as there are more than 20 teeth on the flywheel. What I'm still trying to figure out is the proper Porsche associated part number. It could be (only other type I see) 930-103-233-03, but want to confirm before I spend another $500. Thanks
-
I believe I may have bought the incorrect flywheel for my 1984 ROW 911. I came to the realization that its not the original engine, after having bought a 1984 flywheel. The engine number is 64G01144 which I decipher to be a 1986 930.21 engine has per another post. The problem I have is that it appears 1984-86 engines have the same fly wheel (930-103-233-01) which is what I bought, but the teeth look different and not as deep, so starter won't engage. Reading all the numbers that I can off the back of the old flywheel, I believe they are as follows: Part number: 930 102 233 0R - which I can't find anywhere, but it looks more like a flywheel on Pelican that ends in a 03 (87-89 version) Other numbers: CH PO2 3 (corrected numbers on flywheel) TYP: 6T13.5 3082087031 Made by Sachs - that's OEM I believe GMFZ225 (corrected numbers based on Sachs website) I want to get the car back on the road but now have to order another part, and now I guess I have to drop the engine again, any help in identifying this flywheel would be appreciated. Our local dealership says the part number is wrong, but that's what I can read. Thanks Skip
-
It is what it is. I reconfirmed the ground strap off the transmission was clean and secure. Also tested the yellow wire coming from the ignition switch to confirm it had appropriate voltage. It had 11.86 V when going from wire to body ground, so I think I'm good there too.
-
Well, it unfortunately appears that I may be one of the 25%. After removing the starter again, and cleaning it numerous times, drying it off and lubricating it numerous times, it did kick the gear out and spin much better, but it was sluggish still in its movement. It didn't have the kick that I believe it's supposed to (reinstalled it again, and still the same problem). I believe it may be the solenoid / forks not giving as much pressure as it should. I have confirmed with Pelican that my rebuilt starter is still under warranty, so have ordered a replacement (only the cost of shipping, so that's not as bad. Will post once again, once I get the new starter - hoping that solves my issue. Thanks again.
-
Managed to find the Dupont Teflon Spray at our local Lowe and I have spray penetrating oil, 's so will try this tomorrow night as I have to relocate the vehicle to be able to jack it up again to reach the starter - need some assistance with that part. At least it's easy to reach and get our (long arms and all. I bought the rebuilt starter through Pelican about 18 months ago, so technically it's still under warranty if this doesn't fix it - I'd rather it did though - takes a long time to get things up north here. Thanks again. I'll post how things go.
-
Interesting, I wouldn't have thought that with the force at which it pops out, that that was possible. Will pull it back out (not too difficult) and give it a try. Do you recommend Teflon because of the heat aspect of the spin? I obviously can't do the cleaning while it's extended and spinning, but I guess the penetrating oil will take care of that? Thanks much - hate to have to pull my hair out further.
-
So a bit of an update. I removed the starter and tested it's functionality off the battery hooking the positive terminal to the main bolt and the negative to the case of the starter, finally, connected another positive wire and touched the solenoid spade connector. The starter gear ejected and spun as I believe it's supposed top. I further cleaned off the wire connectors and grounds (main ground strap at the right of the transmission). Got someone to turn the pulley to see if the fly wheel spun, which it did. Reinstalled the starter and then got a friend to turn the key and the starter clicked and began to hum (I assume that it was spinning as I couldn't see it. The pulley doesn't spin, therefore I assume the fly wheel is not being engaged somehow. Not sure what else could be the issue while installed in the car (relay or electrical issue that actually doesn't allow it to engage perhaps? Seems like a straight forward process to me. This system worked before, so am at a loss. Any help would be appreciated. Skip
-
So, after having removed the engine, replaced gaskets etc on the valves, timing chain housing, breather cover and a couple of other minor things, I've reinstalled the engine, and gone through the full check list to ensure I didn't miss anything. Was reasonably straight forward, or so I thought. When I try to turn the car over to give it a whirl for the first time, it doesn't turn over, just a loud hum from the engine compartment (I assume it's from the starter solenoid, but not sure yet (on my own). The starter is rebuilt (Oct 10), so don't believe I have an issue there, and I thought I reconnected the wires as they were before. the thick black and red wires to the one bolt (believe it's no: 30) and the yellow thinner wire to the top spade connector which I believe is no 50. I've checked my Bentley manual, and it seems right. I've also rechecked all my electrical connectors and ground points and all seems good - even recleaned the ground wires and points. All the fuel lines are connected and the fuel pump does make it's appropriate noise as well. From my understanding, regardless of any other minor changes of gaskets etc, the starter should still engage and turn the engine, but don't even here what I believe should be a click of the solenoid throwing the gear forward to the flywheel. Any thoughts, was so looking forward to turning that key... Thanks Skip
-
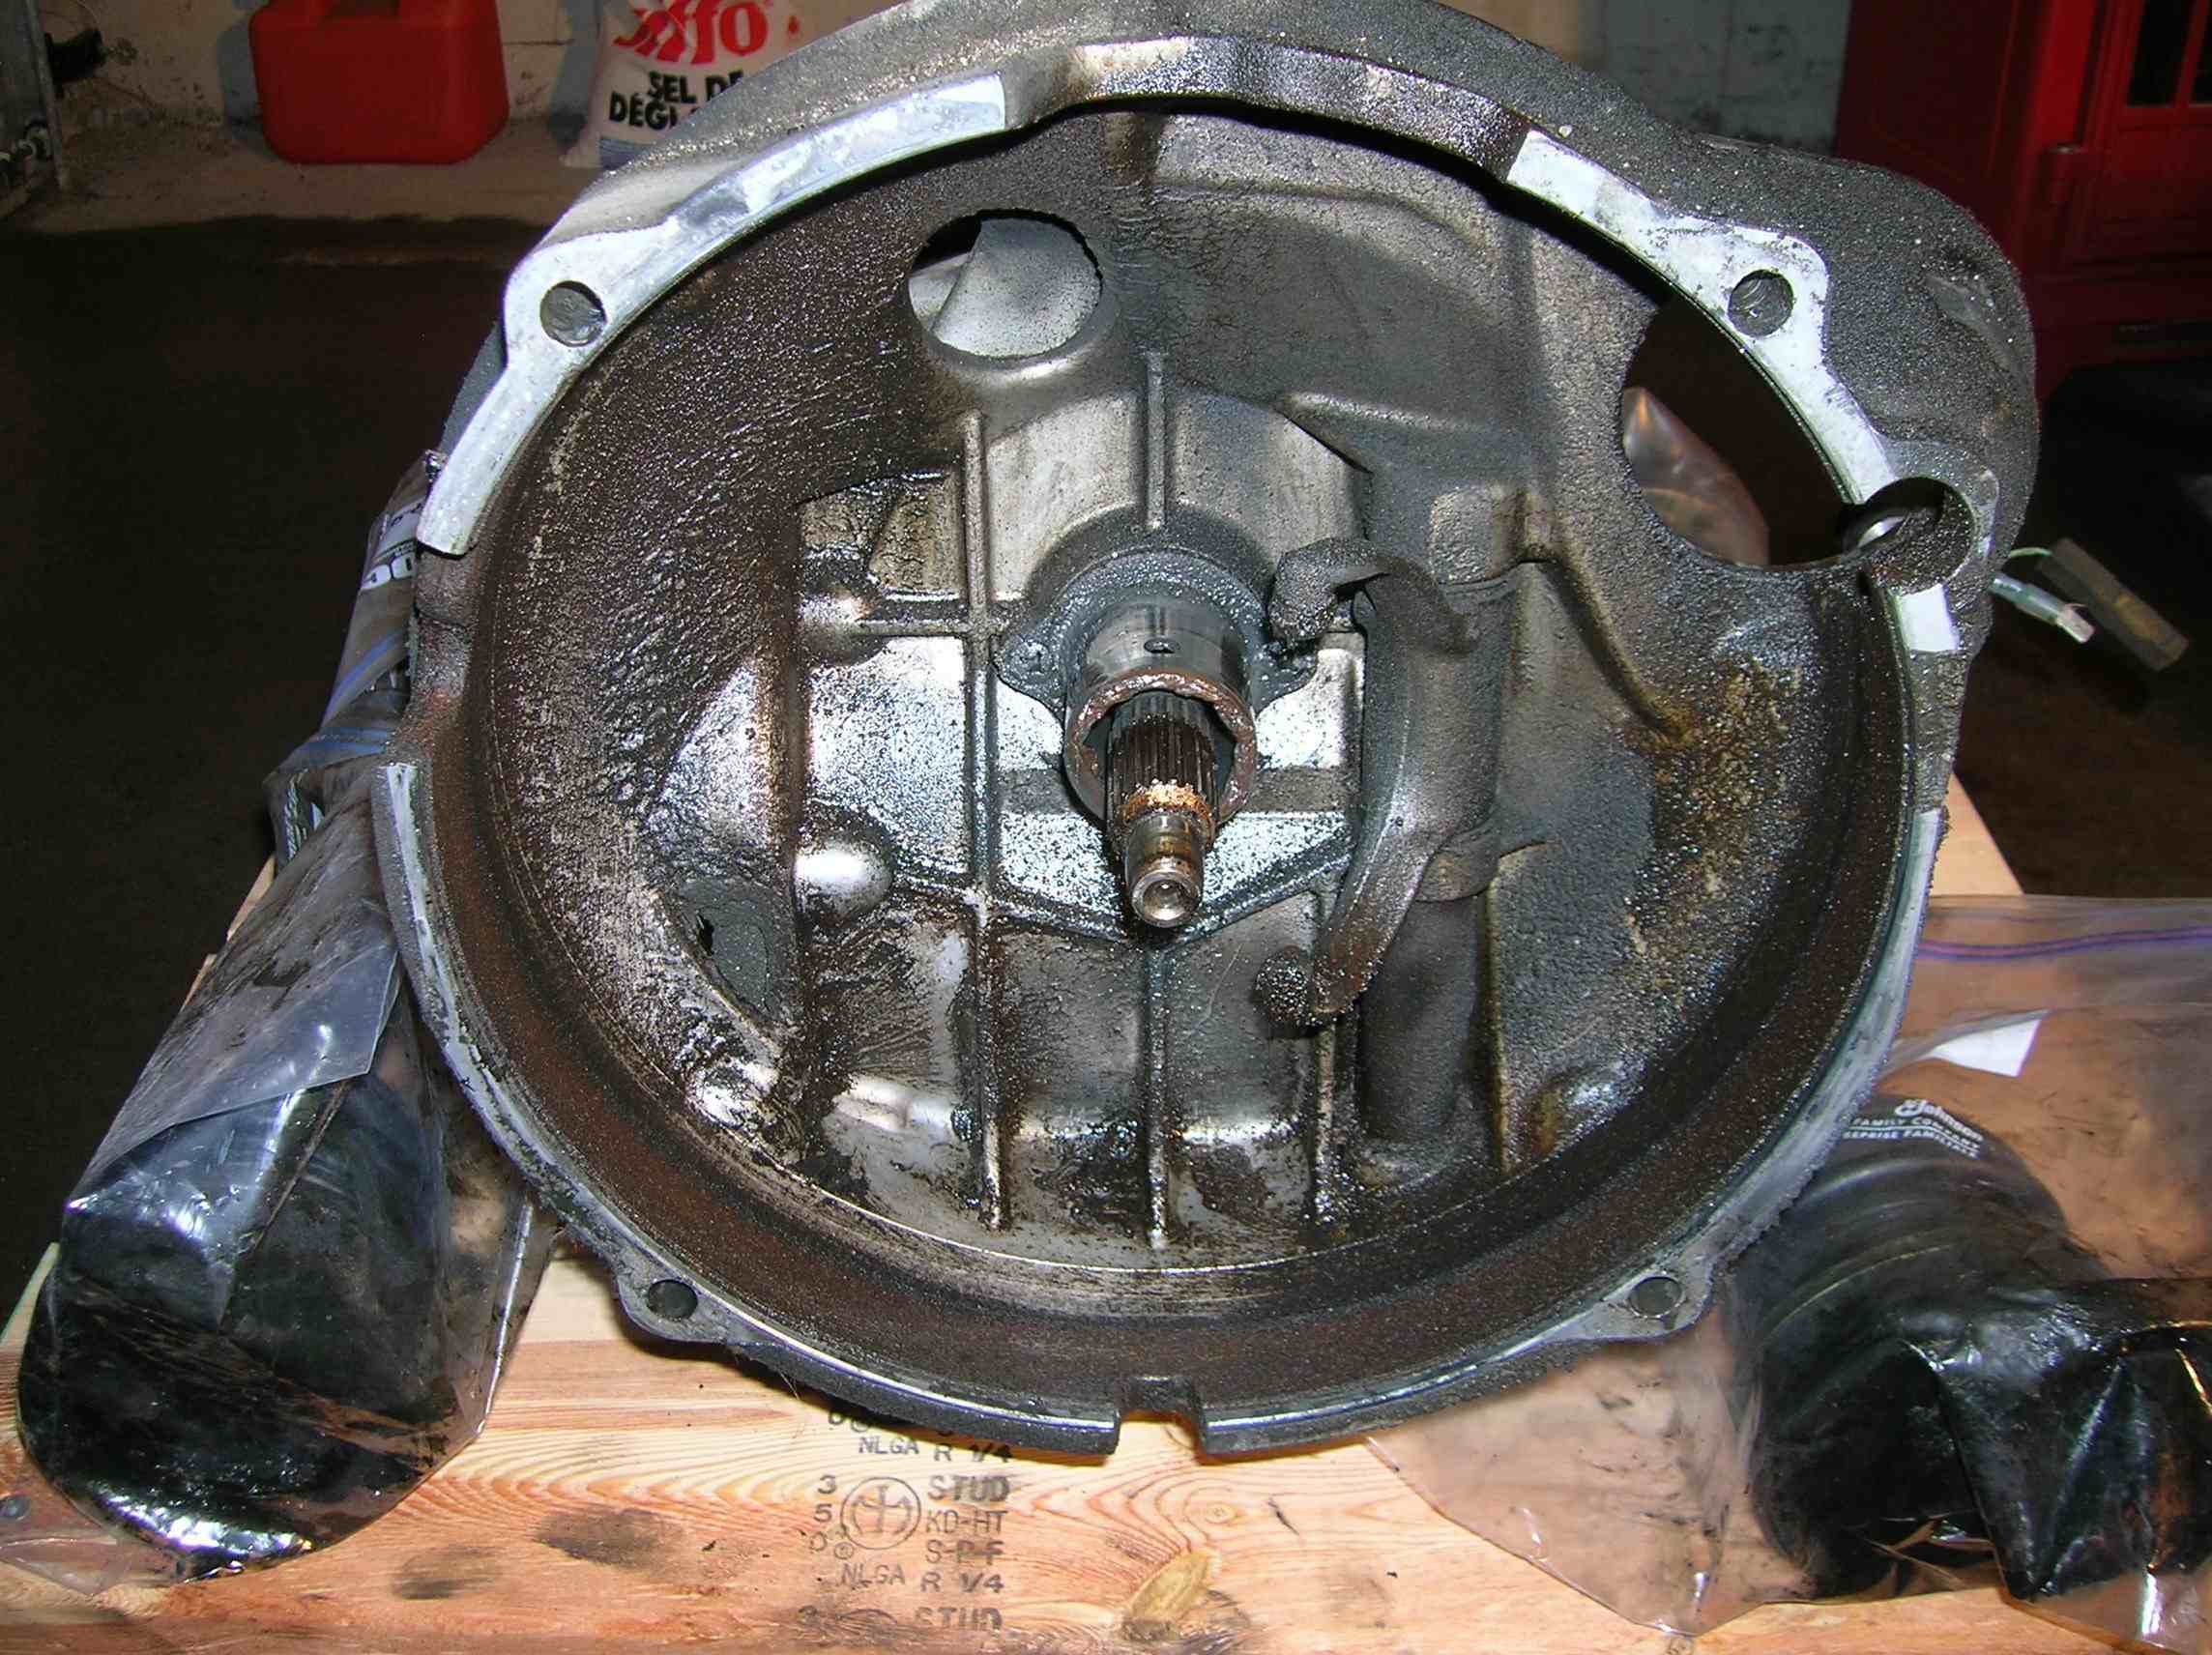
Just as a follow on to previous posts. I have recently dropped the engine and separated the transmission from the flywheel end. Hmmm, well the drive plate is worn (but not beyond use apparently), but the flywheel is blue with hot spots across it and the inside of the transmission housing (concave area where the release fork and shaft sit), are covered in oil and sludge as is the upper part of the engine. What I'm told by a mechanic friend is that it is quite possible that the oil seeped in behind the drive plate and onto the flywheel and burned the two pieces with continued leak and use. Recommendation was to try to use some steel wool in case it was just surface, but no, it doesn't come off and there are what appear to be hairline cracks in some areas. Solution - get a new flywheel. Getting a new Sachs Super clutch at the same time to eliminate any old parts issues. Also in the process of replacing all the valve cover seals, breather cover, flywheel etc etc, to try to avoid the problem down the road. I had already repaired the transmission fork cover leak some time ago, but couldn't clean the area out until I dropped the engine. Hope this helps others. Am enclosing a copy of two pictures for reference (the old flywheel and the transmission housing side). Cheers.
-
No problem - thanks for the comment anyway.
-
I guess I'm not that bendy would be the answer. I did drop the engine in the end - not too difficult considering it was the first time. Did buy a special bracket from Pelican designed to fit on a 3 ton jack and perfectly balance the 911 engine and transmission on the case (with padding). Didn't really need special tools less the metric wrenches and so on (which I do have). I managed to get to the cooler cover and the cooler and simultaneously took off the skirt parts to clean it up - cauusing further parts purchases with what I found, but well worth dropping the engine to replace seals and so on + clutch and flywheel which slips terribly.
-
Thanks to both for the replies. The joy of oil all over the engine from years of minor leaks makes it somewhat difficult to figure out, but slow and surely I'll give it a try.
-
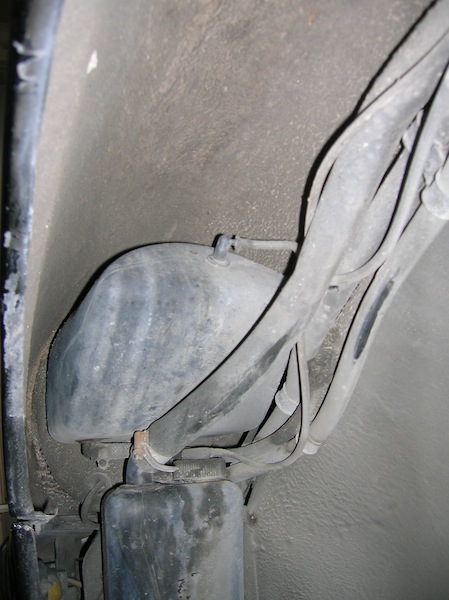
Makes sense I guess, as the base line comes from what appears to be a fuel tank overflow box (about 6 inches x 2 inches x 1 inch) between the stainless steel fill pipe and the fuel tank itself. The odd thing is that the line on the top, runs to the rear of the vehicle just below the engine. Skip
-
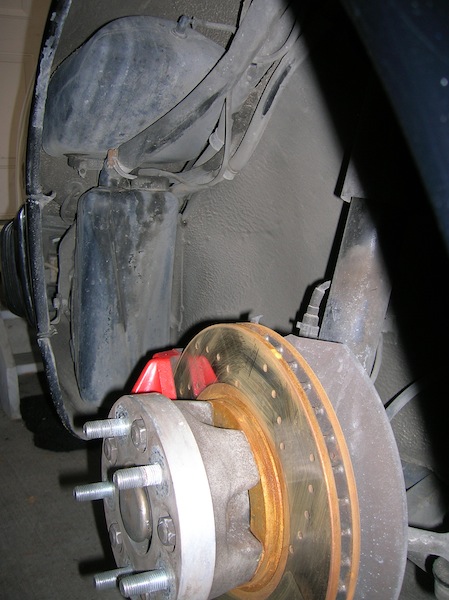
Hi, Am enclosing two pictures from what I believe to be the fuel evaporator (above the windshield washer reservoir. There is what appears to be a 1/4 inch vacuum line off the top of the evaporator which leads along the fender, down besides the A/C evaporator behind the driver front wheel, and down the left side of the car. It appears to randomly end near the rear driver tire. I've tried to locate where it should connect, but it's too short to go anywhere, and I can't find any points on the engine for this small tube to connect to. Any thoughts? Thanks. Skip