Welcome to RennTech.org Community, Guest
There are many great features available to you once you register at RennTech.org
You are free to view posts here, but you must log in to reply to existing posts, or to start your own new topic. Like most online communities, there are costs involved to maintain a site like this - so we encourage our members to donate. All donations go to the costs operating and maintaining this site. We prefer that guests take part in our community and we offer a lot in return to those willing to join our corner of the Porsche world. This site is 99 percent member supported (less than 1 percent comes from advertising) - so please consider an annual donation to keep this site running.
Here are some of the features available - once you register at RennTech.org
- View Classified Ads
- DIY Tutorials
- Porsche TSB Listings (limited)
- VIN Decoder
- Special Offers
-
OBD II P-Codes - Paint Codes
- Registry
- Videos System
- View Reviews
- and get rid of this welcome message
It takes just a few minutes to register, and it's FREE
Contributing Members also get these additional benefits:
(you become a Contributing Member by donating money to the operation of this site)
- No ads - advertisements are removed
- Access the Contributors Only Forum
- Contributing Members Only Downloads
- Send attachments with PMs
- All image/file storage limits are substantially increased for all Contributing Members
- Option Codes Lookup
- VIN Option Lookups (limited)


Ubermensch
-
Posts
81 -
Joined
-
Last visited
Content Type
Profiles
Events
Forums
External Paint Colors
Downloads
Tutorials
Links Directory
Collections
Classifieds
Store
Posts posted by Ubermensch
-
-
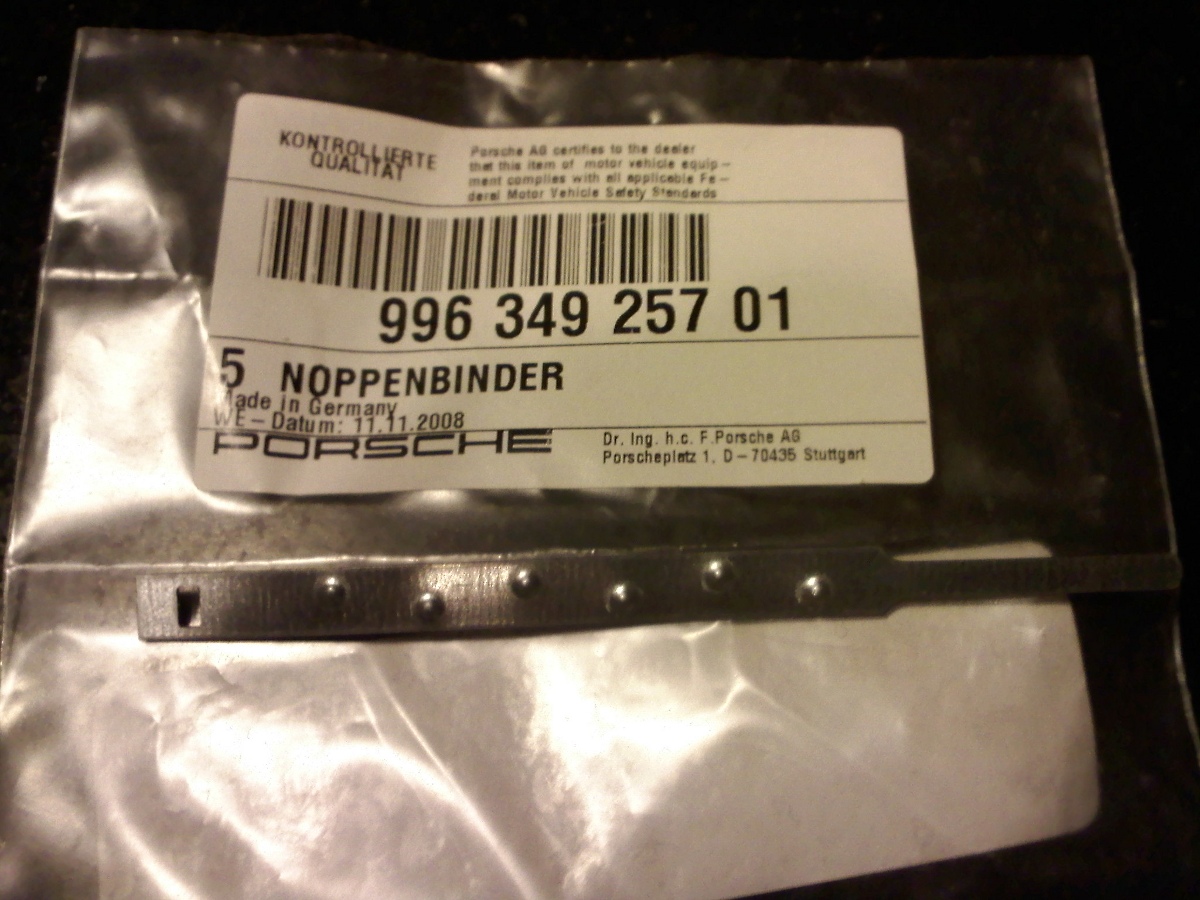
I've got my new boots and clamps and I'm ready to tackle the job on my 996 C4. Just one question: This is one of the clamps that arrived and I'm a little confused about how you tighten it. I've got CV boot pliers for eared and earless clampes which the other ones are. This one just looks like a metal zip tie. Do I just pull it through and bend it over?
Thanks,
S.

-
-
Here is the scoop on this:
First, I found what is probably the closest match to factory color you'll come across short of something not in a shake and shoot can. Its Dupli-Color 8801530 Silver(M).
I picked a 5 oz. can up at my local Advance Auto parts.
I went into this with the thought that I'd try it the easy way (levers attached) first, and then go to plan B (remove them) if I wasn't happy with the results.
My levers had several pretty good scuffs on the front (trunk) lever. I assume at some point the PO's wife had high heels on in the car because they were actually scratches not scuffs. Remember this point for later on in this post. ;-)
If you attempt this, remember you don't want to lift both levers at the same time (they interfere with each other). I am sure I read that in the owners manual somewhere and if you gently lift both just a tad at the same time you can see it's true. Force them both up at the same time and something will break. ;-)
So here is what I did:
1) I carefully placed absorbent towels under the levers, wet sanded out the scuffs/scratches until everything was smooth.
2) Carefully masked off under and around the levers (this is tricky as they only lift so far).
3) Masked off the rocker, seat and anywhere that overspray could remotely get in the repair area.
4) Shot the levers with 3 wet coats of the above.
Result:
1) The paint match is excellent.
2) Two of the scratches were deeper than they appeared and were not fully removed by a quick wet sanding.
As I told DL in a PM, they look okay, and most people would probably look at them and not notice, but... being the consummate perfectionist I'm not completely happy with the results as I can see the remnants of the deeper scratches under the right shading/light.
It's difficult to get a perfect surface on the levers with them mounted and the masking is a minor pain to do right.
I'm going to do some digging to figure out how to remove the levers and then go to plan B. If you want perfection I'd recommend you do the same. I'll document it all in case anybody wants to just wait and do it the right way. :-)
Edit: And of course 1 minute after I post this, I do a search on "trunk release" and find the following thread... :-)
God, I love this site!
I just wanted to follow up and say that I followed your technique and paint recommendation with good results. That color paint is a very good match. Thanks!
Shawn
-
I've located a bad heating element in my seat heaters and I'd like to see if it can be repaired or if I need to replace it. Does anyone have tips for removing the bottom seat cushion to access the heating elements?
Thanks,
Shawn
Disregard, I figured it out. For anyone wondering, there are two white clips under the front edge of the seat. There is a "pin" that goes through it into the base. Pull on the pin to release the rivet. Then pry the white clip away from the base and it will pop out releasing the front edge of the seat. The back edge is just wedge in and can be slid out.
Shawn
-
I've located a bad heating element in my seat heaters and I'd like to see if it can be repaired or if I need to replace it. Does anyone have tips for removing the bottom seat cushion to access the heating elements?
Thanks,
Shawn
-
DO NOT use a pickle fork.
Use the tool described here
Thanks, that's exactly the type of thread I was looking for.
-
I'm going to replace the lower control arms on my 2001 C4. Obviously I need to seperate the ball joint to accomplish that. Does anyone suggest a specific tool and I can pick up locally? I'm familiar with the seperator forks, but the manaul shows a lever type contraption...
Thanks,
S.
-
I'm getting ready to repaint the trunk/hood release levers on my MY99 996 that were scratched up from the prior owner dragging shoe's against them. I found a stock DupliColor color that looks like a perfect match to me.
If it would help you, I'll post before and afters and how I did the repair.
I'd be interested...
-
2001 C4 with 80k miles.
Replaced all six coil packs after four found bad (~55k miles)
Alternator replaced (-75k miles)
-
Remove bolt you've circled in green along with the pulley. Reinsert just the bolt and thread it in a ways. Now shoot some WD40 into where the bolt threads in at the rear of the alternator housing (you can see that its rusted in the picture). Take a hammer and hit the bolt( or place something like a socket over the head of the bolt if you dont want to mar it) and drive the bolt a few mm back. Whats holding you up is there is a bushing in the rear portion of the alternator housing which is pulled too tight for you to remove the alternator. Driving that bushing out a few mms will allow you to remove the alternator easily. This is the factory procedure by the way.
Thanks guys !! It's done !! The alternator was out, I accessed the tubes behind it.
I had to use a ton of WD40, a few cuts & bruises on my hands, a jammed finger, a ton of pushing, shoving, pulling, mallet hits, using screw drivers as levels etc to get the generator out. Nasty one - but done with no damage to the precious alternator (or around). At some point I felt the right side was probably welded in my case !!
I'm going to write a little DIY soon - taken snaps just for that.
Did you ever happen to copmlete the write up? I think my voltage regulator is on the way out and it would be helpful! Thanks,
Shawn
-
It looks like the factory stock cup holders.... Do the stock center console cup holder raise up just like the one in the link posted above or are the ones on the link newly designed?
If they're newly designed it's not the center section raising...mine do that from the factory. Look stock to me.
-
Purschased best cup holder ever from pcars.com. Goes in to th etop cubbt slot on my car and works like all of them should - price is right too!
http://pcars.com/shop.php/porsche/new-cool...01/p_46811.html
Am I missing something. That's the stock cup holder, isn't it?
S.
-
Tracked the problem to a broken heater element in the seat upright, right at the bottom of the cushion. Am going to cut the seat underneath and try to solder / fix together. Any body had a good / bad experience in either repairing broken elements or repairing the hole in the leather afterwoods?
Any luck with this? Do you have any details on removing the elements?
Thanks,
Shawn
-
Here's pics of my C2 install. The new amp is in the same general location as the old factory amplifier. http://www.renntech.org/forums/index.php?s...84&hl=audio
I have a C4 and the stock amp is located in the center section of the trunk. You need to remove most of the trim panels in the trunk to access it as they all overlap and the center section is the bottom-most.
Shawn
-
I recognize the factory fill recommendation is Mobil Mobilube PTX, but since I can't find that what are the boards thoughts on Mobil Gear Oil Fully Synthetic 75W90. It's a) synthetic, B) the correct weight, c) listed for use in GL5 and GL4 applications according to Mobil. Any reason not to use it?
Shawn
-
Are you sure it's not an ignition problem? I had a terrible idle when I had a cracked coilpack...I had no CEL but I was able pull misfire codes.
-
I can focus on fixing the trunk alignment
If that is the problem, you will want to adjust the front bumper cover not the front trunk lid.
Thank you Loren, as always! :cheers:
I did think about that same thing, adjusting the bumper cover.
Reason is, the dealer I bought the car from did some paintjob on the bumper cover.
I was wondering if he installed it a little off, it doesn't take much to disrupt that flush level.
Does anyone have a nice picture of the proper fit? I thought mine was fine but it sits at the same level as the bumper cover, not below it.
S.
-
Try JeffClark@sunsetimports.com
That's actually who I was working with. I mistakenly wrote SunCoast in my initial posts....
-
900.219.009.30 engine drain plug -- MSRP $3.10 (as of June 2006)
900.123.106.30 sealing ring -- MSRP $0.37
The parts list does not show either plug (fill or drain) on a 6 speed transmission.
900.124.025.02 front axle drain plug -- MSRP $4.90
Thanks! That was easy. I wonder why Suncoast had such a problem? What do you think about the transmission plug? Any suggestions on how to find the dimensions?
S.
-
I'm interested in changing out my drain plugs (oil, transmission, differential). When I spoke to Suncoast they weren't able to identify which parts I needed. They said they replace them so infrequently that they just measure the one they remove and find a replacement based on that. Does anyone know the dimensions so that I don't have to remove my plugs to get a replacement? I don't feel like draining these items by removing the plugs and having the car sit while I get the replacement....
Thanks,
S.
PS--2001 C4
-
Has any of you longtime 996 drivers experienced this before?
I'm hoping it's a common issue with an easy answer.
At around 60mph and up...I hear a whistling sound around the outside of my window area,
or it could be at the top of my windshield...I can't be sure. It's pretty annoying,
sounds like the antenna on a car if there is one.
On my 540i, there was the same sound that was caused by missing jack-points rubber pads.
It's strange how that was even possible if you have no clue...The rushing air at high speeds over the exposed hole under the car somehow "whistles" (like how you blow over an open bottle) and the sound is transmitted thru' the hollow framework right up to the windshield area!
I've had this problem for quite a while now (>1 year) and I haven't found a solution yet. In my case it's definitely the seal around the window. Opening any other window or the roof changes/eliminates the noise since the air flow in/out of the car changes. I've tried the side view mirror with no change. I've tried placing short lengths of rope in the seal to improve the seal with no change. I've tried applying vasoline at the apparent point of noise with no change. The seal looks perfect with no apparent defects.
I've heard from one member that they ended up locating the side of the loose fit, and then inserted shims under the seal to build it up in that area. I haven't tried that yet since I'm a bit concerned I'll do more damage to the seal removing it that I'll fix with the shims.
S.
-
As others have suggested you have a pretty classic problem: a sticking caliper. A rebuild is the solution (not a difficult proces on most calipers if you want to diy).
-
Agreed. I'd look at the coil packs. Their close proximity to the exhaust headers means they experience tremendous heat. Track time plus high temperatures most likely baked them....
S.
-
I don't own, and therefore am not as familiar with, the Tip transmission, but in my past ownership experience of automatic cars, a simple drain and fill was not every effective at replacing the fluid. In particular this does not change the fluid residing in the torque converter itself. I believe a drain and fill generally changes about 20% of the actual fluid in the system. Many people prefer a full flush which actually drains and fills the system while it's running and pumping to do a full change. Alternatively you can repeat the drain and fill procedure without it running multiple times to bring the old fluid to a dilution level you're comfortable with.
Shawn
Front end gets really light above 90
in 996 Series (Carrera, Carrera 4, Carrera 4S, Targa)
Posted
It's a fairly common complaint on the 996s. As was mentioned, the two best solutions are the aero front bumper and/or lowering the suspension a little.