Welcome to RennTech.org Community, Guest
There are many great features available to you once you register at RennTech.org
You are free to view posts here, but you must log in to reply to existing posts, or to start your own new topic. Like most online communities, there are costs involved to maintain a site like this - so we encourage our members to subscribe or donate. All subscriptions and donations go to the costs operating and maintaining this site. We prefer that guests take part in our community and we offer a lot in return to those willing to join our corner of the Porsche world. This site is 99 percent member supported (less than 1 percent comes from advertising) - so please consider an annual subscription or donation to keep this site running.
Here are some of the features available - once you subscribe RennTech.org
- View Classified Ads
- DIY Tutorials
- Porsche TSB Listings (limited)
- VIN Decoder
- Special Offers
- Paint Codes
- Registry
- Videos System
- View Reviews
- and get rid of this welcome message
It takes just a few minutes to register, and it's quality Porsche information at a low cost.
Contributing Members also get these additional benefits:
(you become a Contributing Member by subscribing or donating money to the operation of this site)
- No ads - advertisements are removed
- Access the Contributors Only Forum
- Contributing Members Only Downloads
- Send attachments with PMs
- All image/file storage limits are substantially increased for all Contributing Members
- Option Codes Lookup
- VIN Option Lookups (limited)


working4it
-
Posts
146 -
Joined
-
Last visited
Content Type
Profiles
Events
Forums
External Paint Colors
Downloads
Tutorials
Links Directory
Collections
Classifieds
Store
Everything posted by working4it
-
Hey All, Every so often my hatch would not open or close correctly. So I ordered a new lock actuator (from PelicanParts) and wouldnt you know it the last time i used it the hatch wont unlock. I removed the inside plastric trim piece, disconnected the lever and with a screw driver tried to move the latch. It will move a little bit but will not unlock....any thoughts?

-
fuel system upgrade?
working4it replied to Faceman's topic in 9PA, 9PA1 (Cayenne, Cayenne S, Cayenne Turbo, Cayenne Turbo S)
My drivers side went bad and I replaced that my self. Not hard but just a pain in the .... Now about a year later the other side went (I had my indie shop do it this time) and they said both are supposed to be replaced at the same time but said it shouldnt cause any issue. -
I am embarrassed to say this but I cant be the only one asking this. I have the Durametric cable and I know it can do a lot more than just finding faults and clearing them. I am hoping we can get a list of functions/uses/definitions going for everyones use (example resetting adaptations, live logs and interpreting the data etc). I found 2 links which were pretty good for the basics... http://www.planet-9.com/reviews/electronics/p383-durametric-tutorial-part-1-3a-the-basics.html http://www.planet-9.com/reviews/electronics/p384-durametric-tutorial-part-2-3a-advanced-functions.html (From planet-9) INTRODUCTION Durametric is a small company which produces a Porsche diagnostic tool for use by independent service shops or individual enthusiasts, and is as close as one can come to owning the equivalent of the PIWIS system that dealer service departments use, for thousands of dollars less. Unfortunately, Durametric provides very little in the way of documentation or tutorials in the use of their tool, which is part of the reason I have decided to write this primer. Some of the information on their website has not been updated for some time, however you can find some help at the following links as well:http://www.durametric.com/Durametric...stallGuide.pdfhttp://www.durametric.com/Durametric...ion_Manual.pdfhttp://www.durametric.com/Demos.aspxhttp://www.durametric.com/faq.aspx The Durametric Diagnostic Tool is comprised of 2 parts: the Durametric cable, and the Durametric software. The software is available for free and can be downloaded to your computer (Windows only) from their website here: http://www.durametric.com/versionhistory.aspx (Note: they are currently on Version 6.* of their software; they still offer 5.* also, for owners of one of their first generation cables. Version 5 will still run on newer cables, but this tutorial will primarily focus on Version 6 software). In order to run the Durametric software, you have to purchase one of their proprietary cables from them (or a 3rd party distributor, e.g. Softronic, Vivid Racing, etc). There are 2 types of cables: the Enthusiast and the Professional cable. The Enthusiast cable is limited to use on 3 different vehicles (by VIN number), and does not allow for Coding changes to the DME (ECU). The Professional cable has unlimited licenses, and can perform Coding functions almost identical to a PIWIS computer. It is also much more expensive than the Enthusiast version. The cable connects the OBDII port on your car to the computer via USB connector (it will usually be necessary to use a laptop to accomplish this). This image has been resized. Click this bar to view the full image. The original image is sized 800x600. This image has been resized. Click this bar to view the full image. The original image is sized 800x600. USING THE DURAMETRIC TOOL 1. Download and install the software on your Windows laptop as described in their instructions here: http://www.durametric.com/Durametric...stallGuide.pdf 2. Locate the OBD II port and plug in the cable connector - it can only fit one way, and there should be a little "click" from the retaining tab when you have pushed it in sufficiently. This image has been resized. Click this bar to view the full image. The original image is sized 788x591. This image has been resized. Click this bar to view the full image. The original image is sized 800x600. This image has been resized. Click this bar to view the full image. The original image is sized 800x600. 3. Connect the USB end of the cable to your computer. Turn on the car's ignition - it is not necessary to start the car (though you can if you are going to use the "Actual Values" function for real time data logging). A green indicator light should appear on the cable OBDII dongle to indicate it is connected. 4. Open the Durametric program; if your cable is authorized and connected properly, it will automatically determine the model/year/VIN info of your car. You should get a screen similar to below: This image has been resized. Click this bar to view the full image. The original image is sized 800x640. (I have highlighted Engine Module, because that is where we start in the next section)BASIC ENTHUSIAST APPLICATIONSNOTE: IMPROPER USE OF THIS TOOL COULD LEAD TO MALFUNCTION OF YOUR DME AND/OR OTHER FUNCTIONS OF YOUR CAR!1. Check Over-Revs - Useful to check on your car, or a car you are contemplating buying. Click on Engine Module (see above) and it will open up a submenu; select "Information", and you will see a screen with info similar to below: This image has been resized. Click this bar to view the full image. The original image is sized 800x591. This shows the so-called "over-revs" as number of ignitions in Ranges 1-6. Range 1 usually reflects hitting the redline, with Range 2 ignitions usually being attributed to "bouncing off the rev limiter". Range 3 and higher ignitions are a little more concerning (especially 4-6, which may indicate a significant over-rev event).2. Check and Clear Fault Codes - There are a couple of ways to check for existing fault codes (e.g. from a CEL or check engine light): under each module you will find a menu selection for "Fault Codes" and "Erase Fault Codes". If you click on a module which has a fault code you will see a report similar to below: This image has been resized. Click this bar to view the full image. The original image is sized 800x493. The red (!) usually indicates a fault which requires some kind of action to correct; the yellow (!) is more for information only. Fault codes can be erased by clicking "Erase Fault Codes", but a word of CAUTION: Do not erase the fault code if it is something you don't understand, or if you anticipate that you will be taking it to a dealer/service shop for, since that may affect their ability to diagnose the problem. This image has been resized. Click this bar to view the full image. The original image is sized 800x478. In the case above, my fault codes were related to disconnecting/connecting the thorax airbags on my seats, so I was comfortable in erasing the fault codes. Alternatively, you can check all the modules for faults by selecting "Short Test All Modules" under the Functions tab on the menu bar (see below); you can also select "Clear Faults in all Modules" to erase any fault codes present, but again, only if you are sure of what you are doing. This image has been resized. Click this bar to view the full image. The original image is sized 800x640. 3. Reset Service Reminder - if you do your own servicing (e.g. oil changes, etc.) on your car, you can reset the programmed Service Reminder that appears on the instrument display using Durametric. Go to the Instrument Cluster module and select "Commands" from the submenu, and you should see the following screen: This image has been resized. Click this bar to view the full image. The original image is sized 800x510. Click on "Reset Service Interval Display" - your instrument panel lights should go off for a few seconds and then return, indicating that it has been reset to the pre-programmed service mileage for your car. _________________________________________________ http://www.durametric.com/default.aspx
-
Update #4 Indie shop called and the car is running now. They kept it another day just to make sure it would start. They said they traced the issue to a dead Cam Sensor Bank1 that was not throwing codes. Thats interesting since I changed that part out myself with a brand new one. Official porsche part too. The car is still throwing the air temp code. They said they swapped the MAF's cleared and the code came back. They checked out the plug/cord and it looked okay. Is there a way to reset the DME or something specific with my Durametric? I am picking it up this afternoon as i need to let the bleeding of money wound heal....
-
Update#3 Just got off the phone with my Indie shop. Still nothing on my Cayenne. They verified injectors, verified electric/spark, verified compression, verified fuel/fuel pressure. No codes other than air/temp sensor. They "think" its an electric "timing" issue. They asked me to leave it so they can look into it. The tech is pretty good and only works on Porsches. He had his buddy from Hendrick Porsche come over and they supposedly looked at for over an hour and they were able to get it to backfire which leads them to think a timing issue. They said it does not look mechanical but electrical. What could cause it to turn over but not start?
-
Great question, don't know specifically. I will ask them. I do know they did mention that the plugs were wet after the multiple test of starting.
-
Update#2 Well I towed my Cayenne to my indie shop and they started by testing the fuel pumps since they just replaced them. They tested fine. Then they did a fuel pressure test and they said it was great (static and something else I can't remember. I thought they said it was at 55?). Then they inspected the coils( version ending 08), plugs and tested current and end spark. All tested fine. Then they did a cylinder pressure test and all tested within specs accept cylinder 5 which was slightly low but within tolerances. The car will turn over but not start. I have them putting in new plugs as it has been a couple of years. They are going to continue diagnosis but already up to $450. Any thoughts? Suggestions...btw the only code that it is throwing is the air temp sensor p0112.
-
Update... I have been able to get all of the codes go away and psm message but have one left P0112 temp sensor. The cayenne will turn over but will not start. I have replaced the MAFs(both), pedal sensor. i need some thoughts on what to do next...if I don't figure this out soon i am going to let it roll down the hill into the lake.. 'either that or i am going to go into the poor house.....
-
Yes, I am no longer throwing that code...Just be careful because of all the vacuum lines back their and remember to take your time i almost dropped the bolt a couple of times.
-
Yes, when the alternator was put in we checked everything out and all were good. Nice and tight no corrosion.
-
Thanks Loren...have you seen the P2186 fault?
-
That's what I thought...I couldn't find any switch other than the unit itself. Now the question is if you replace it do you have to program it to the car
-
What does it look like?
-
I am absolutely going nuts....I am getting ready to push my pig off the cliff. My 04 s has been pretty good but lately I have been bleeding money with it. Recently I had a PSM workshop message had a bad battery( replaced both for good measures) and a bad alternator. Replaced them. Then I had oil pressure switch go bad, then I started blowing a fuse from a faulty fuel pump. Replaced them. Then I had a cam sensor go bad replaced it. (not all at once but over 6 months)Now I am getting a PSM failure message with the following faults and the car will only turn over but will not start. P2186 Throttle peddle sensorswitch voltage correlation P2170 Throttlepeddle sensor d circuit below limit P2174 Throttle peddle sensor switch e circuit below limit P1514 Throttle adjust unit upper limit value exceeded P2186 terminal use 30 for vehicle electrical control module-upper limit exceeded. Test conditions not complet Do I put in a new throttle body? What's the P2186 code?
-
Not sure if this will help or not....
-
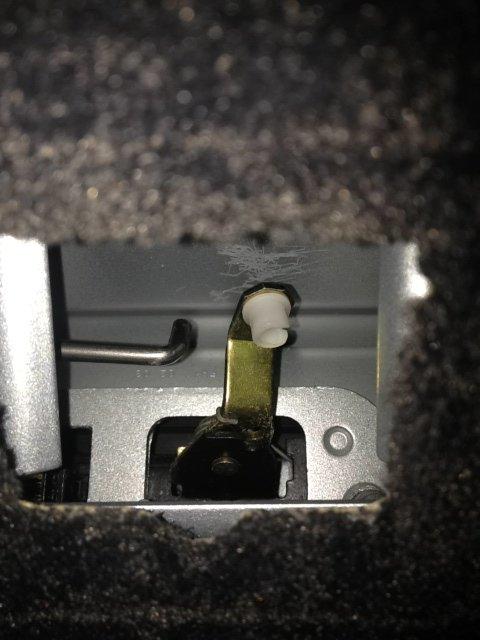
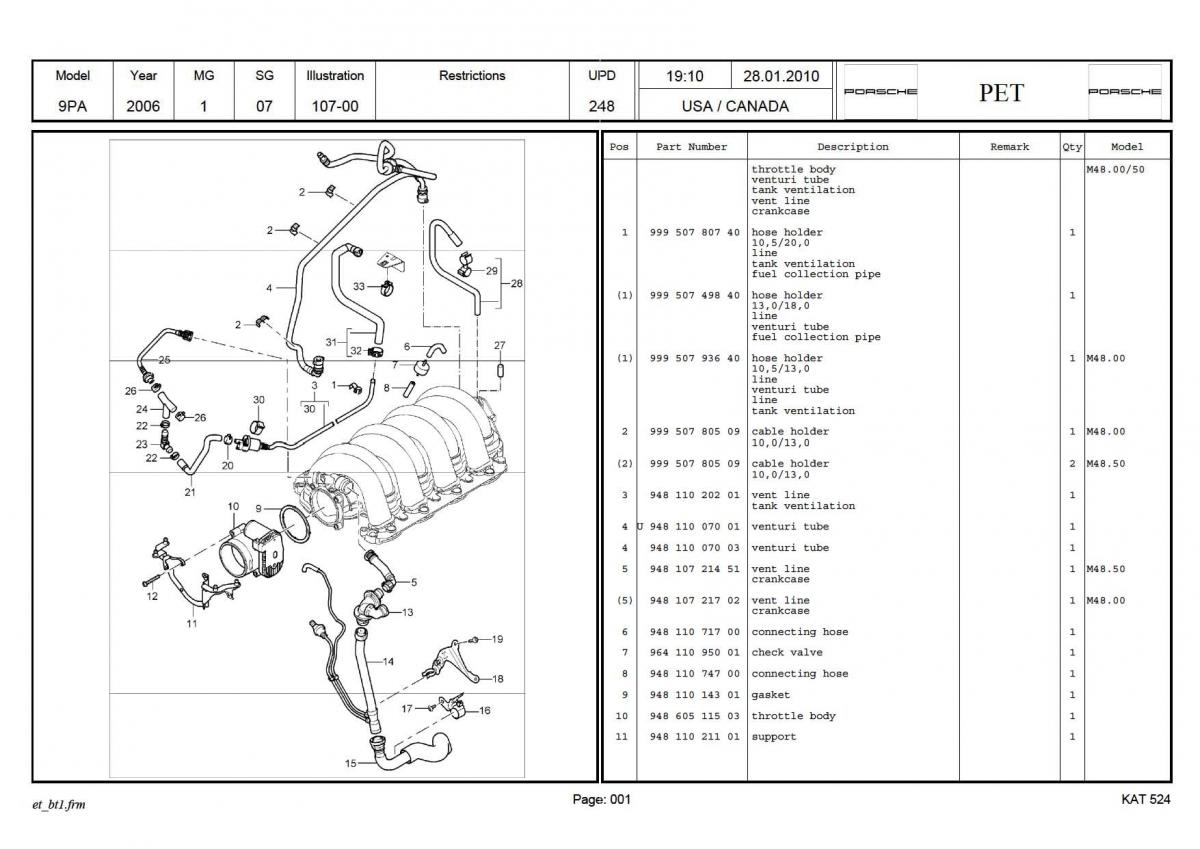
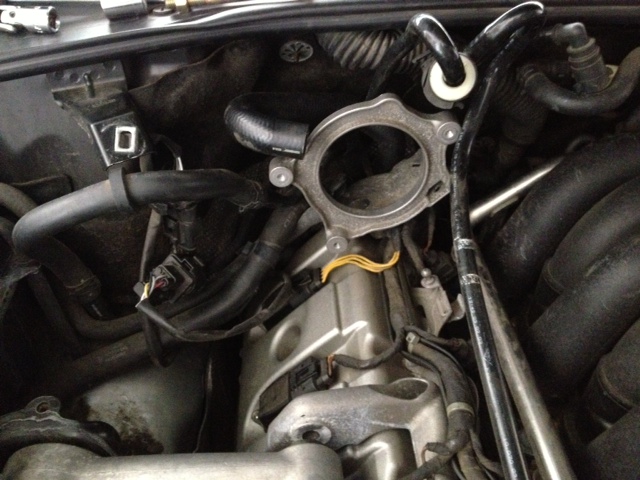
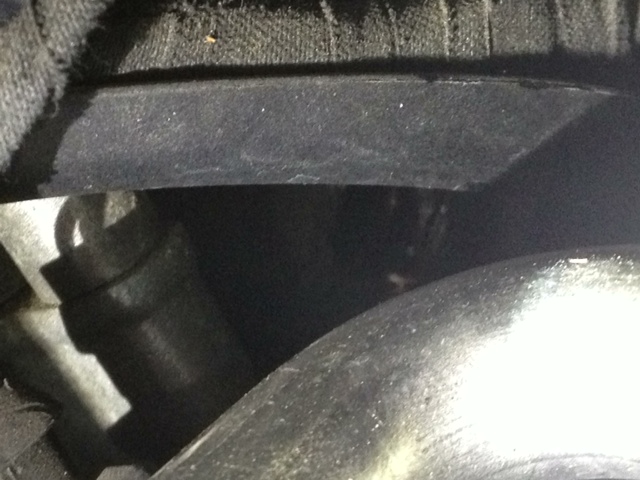
Thought I would share this with everyone...I know the pictures arent the best but may help someone...I have been having a ton of issues lately on my04 S and all of a sudden. I have had to replace the alternator(which is liquid cooled), both batteries, oil pressure switch, fuel pumps, filters, and after all of that I got the p0011 cam sensor code. The first thing i did was change the oil since dirty oil will usually cause this fault but no luck. So i replaced the cam sensor B1. I left the intake on First Step remove air pump Remove Coil covers Disconnect venturi tube from back of engine bay(easy connect-once disconnected you can move it out of the way) Disconnect cam sensor connector Loosen cam bolt (remove the bolt by hand otherwise you will drop it behind the bay) Pull sensor and reverse steps (engine diagram-the cam sensor is #17)
-
Defiantly check for codes. I would also check the gas cap seal ring along with the check valve line.
-
Update Okay, I cleared all codes checked the gateway and really couldn't find anything clear. I limped to my indie shop and they just let me know that they said its the primary fuel pump blowing a fuse and relay. In addition they said the o2 sensor is completely off line. They said due to these issues the psm was trying to compensate. He quoted me $1475 to replace the primary fuel pump, fuel filter, the secondary fuel filter since I didn't replace it when I changed out the pump a year ago, seal ring, relays, fuses, o2 sensor bank 2 before cat, reset and calibrate. I totaled up the parts and came close to 900 so what the he'll I will let them do it.
-
Big has got a good point, I had clunking when stopping hard or on certain turns. Took a look and you can definitely see them cracked/torn.
-
The fuel pumps are a DYI project and you can find them for less than $300 a piece...
-
Sorry, I am using the Durametric Enthusiast version. I am by no means the expert when using it. The most I do with it is the "short test" to pull codes and use the "Clear all faults".
-
Looked under the carpet everything looks good. Still getting 470 and 1314 dme
-
2004 S
-
Well, while driving home I got the PSM workshop message. After a couple of minutes of driving, when coming to a stop, it would go very slowly and then finally kick in. Once home, hooked up the durametric. Following codes 470 CAN comfort in signal wire operation 778 Steering signal sensor 1314 DME control module 819 air conditioning sensor open circuit 1336 can comfort off 470 can comfort off P0700. transmission control implausible signal P0050 heater control bank 2 sensor test not completed P2680 fuel pump control no signal P0011 cam position timing over P2186 throttle pedal implausible signal P2174 throttle position implausible I cleared all codes and only the 470 code remained. I disconnected the negative battery cable for a few minutes and declared using Durametric. Drove fine. After stopping at the store, turning off the car and then restarted the Psm code came back up. What the heck is going on?
-
Are you still getting the dipped beam error? If so, double check both wire harness connectors. I had to use a zip tie on both because they would wiggle loose or when I slid the headlight tray back in I think I loosened it. Additionally, when I get the error replacing the bulb, even when I thought it was a good one usually solves it.