Welcome to RennTech.org Community, Guest
There are many great features available to you once you register at RennTech.org
You are free to view posts here, but you must log in to reply to existing posts, or to start your own new topic. Like most online communities, there are costs involved to maintain a site like this - so we encourage our members to donate. All donations go to the costs operating and maintaining this site. We prefer that guests take part in our community and we offer a lot in return to those willing to join our corner of the Porsche world. This site is 99 percent member supported (less than 1 percent comes from advertising) - so please consider an annual donation to keep this site running.
Here are some of the features available - once you register at RennTech.org
- View Classified Ads
- DIY Tutorials
- Porsche TSB Listings (limited)
- VIN Decoder
- Special Offers
-
OBD II P-Codes - Paint Codes
- Registry
- Videos System
- View Reviews
- and get rid of this welcome message
It takes just a few minutes to register, and it's FREE
Contributing Members also get these additional benefits:
(you become a Contributing Member by donating money to the operation of this site)
- No ads - advertisements are removed
- Access the Contributors Only Forum
- Contributing Members Only Downloads
- Send attachments with PMs
- All image/file storage limits are substantially increased for all Contributing Members
- Option Codes Lookup
- VIN Option Lookups (limited)


1schoir
-
Posts
2,739 -
Joined
-
Last visited
-
Days Won
6
Content Type
Profiles
Events
Forums
External Paint Colors
Downloads
Tutorials
Links Directory
Collections
Classifieds
Store
Posts posted by 1schoir
-
-
My 987 fuse box has a small booklet that tells you what each fuse is for and it has clear identification on what each fuse is for. Check with the small booklet.
See post #3... Helen's fuse box diagram is missing from her car.
Scanning and posting the diagram would be appreciated.

Regards, Maurice.
-
Maurice,
Would you also send me the "independent source " for this part.
Thank you.
Sean
PM Sent.
Regards, Maurice.
-
I am in the process of sending back some "not OEM" Turbo style wheels. They looked great on ebay, and the seller had a very high rating, but the rear wheels had a thicker (by about 40%) outer rim face than the fronts. The factory Turbo wheels are not like that. So, trying to save some money has backfired and I take a bit of a loss with the shipping costs, thereby getting a reduced refund.
I'm interested in recommendations about wheel sellers that handle slightly used factory wheels. Finish Line Wheels looks great on the web but it is very hard to reach them, and the presence of a wheel on the web seems to have little to do with what's in stock.
Bob:
Be careful when buying used wheels on the net. IMO you are usually better off buying OEM used wheels than any type of "refinished" wheel.
Here's a thread that can serve as a cautionary tale, and one that is downright scary: http://www.6speedonline.com/forums/996-turbo-gt2/239523-kinesis-f110-wheels-cracked-must-see-19.html
Regards, Maurice.
-
I really dont know what to say - how kind of you! My fuse box looks like this - and lettering/numbering different...
We need a much higher resolution photo of your fuse panel.
My photos are from a 986, but I think that as of 2005, the top row is now for spare fuses, the gripper tool, and for the emergency unlocking of the front luggage compartment.
Perhaps somebody here with a 987 can post a pic of their fuse panel diagram from behind the fuse panel cover.
If your fuse panel is on the left side kick panel of the car, the relay tray with the convertible top double relay will be above the fuse panel. The convertible top relay is the only double relay in the tray.
Regards, Maurice.
-
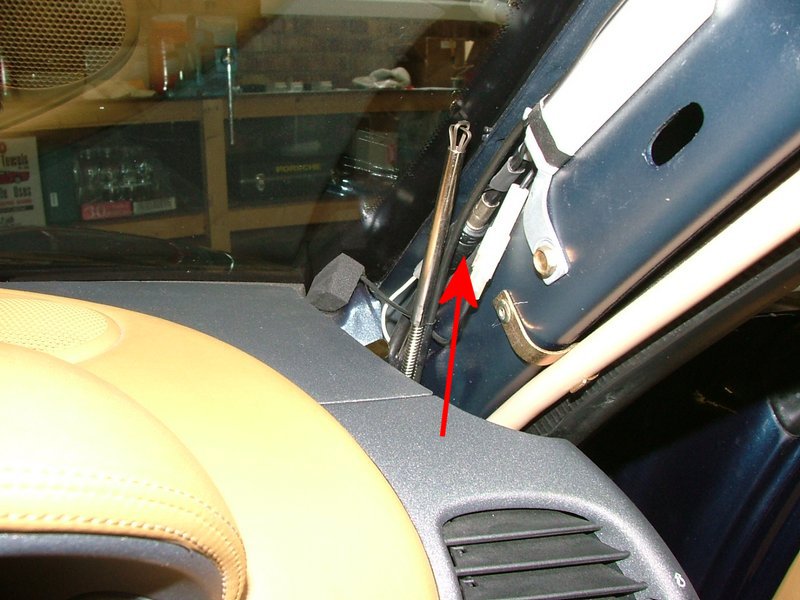
Same place on a RHD car:
Sometimes, cleaning up and/or improving the ground at the bolt directly to the right of the arrow in Richard's photo will improve reception and/or reduce static.
Unscrew that bolt, clean off any surface corrosion and coat the area with some dielectric grease to see if the situation improves.
Regards, Maurice.
-
Thanks Maurice. Yes, after I received their wording (in blue), I called up a local shop to perform a PPI on it (as I indicated in my reply to Rob). I asked the dealer to drop off the car with this indy shop (owner is a well respected PCA member), who I spoke to on the phone. I haven't heard back from either the dealer or the shop. The only money on the table is my $5000 deposit, which is on my credit card to hold the car. I haven't signed anything yet, so I'm assuming, as with all dealers I've dealt with, that my deposit is fully refundable. They said they needed $5000 and 2 pieces of ID to draft up the bill of sale.
Thanks for all your valuable advice. I'm a total noob when it comes down to buying used cars and this is my biggest purchase yet, so I'm super paranoid and want to make sure all my bases are covered.
Joe:
You are not being super paranoid.
You are following the "caveat emptor" doctrine and doing your best to avoid any surprises which would tend to seriously cut into your enjoyment of the car.
Regards, Maurice.
-
Joe:
If the dealer has any hesitation about adding a reasonable clause along the lines that we discussed, that would raise a red flag for me.
I know that you guys pay more for Porsches up in Canada, but there are lots of Porsches for sale all the time. It pays for you to get one that gives you that peace of mind, as that's one less thing to worry about.
When you finally get it (or another one) home, post some pics. We love pics!
Regards, Maurice.
So this what the dealer said they would add to the Bill of Sale:
As far as the inspection, the BOS will read like this
"Sold as Certified Pre-owned, fully inspected, full carproof disclosed and accepted by buyer, No undisclosed structural damage "
If your independant inspector finds Structural damage that has not been disclosed, then we will discuss how to remedy the situation so that you are happy and we are happy too.
Is that fair enough ?
Not even close.
In the first sentence, they are asking you to certify that you have made an independent decision to accept CarProof as a trusted source for anything that might be wrong with the car.
Nevertheless, all of that could be fixed with just replacing the language in the second part of the second sentence to read as follows:
"...then we will remedy the situation so that you are made whole."
That would not be my first choice if I were drafting the clause, but it's one that they should not have a problem with. By that language, you are only asking them to guarantee that what they are claiming they are selling to you is what you are actually buying. In other words, you would not be offering the price that you have agreed to pay if the car actually had "undisclosed structural damage".
Trust me when I tell you that in the unlikely event that the car does not check out, it is not legally possible for you to be happy when the dealer already has your money, with the language they are proposing.
Right now you have all of the leverage because they still don't have your money. If you are going to get some language in there that will protect you, you have to do it before you fork it over.
Don't get lost in the details. There are only two possibilities here: 1. If they have nothing to hide, they should not have any qualms about agreeing to this. 2. If they bought a car that may have sustained damage that they don't know about, that should not end up being your problem (or your loss).
You are not asking for anything that is commercially unreasonable.
Regards, Maurice.
-
thanks for reply...got the tool and can you please advise where I can hook it up on the porsche
It's the OBD II port under the dashboard, above and to the left of your left knee as you sit in the driver's seat.
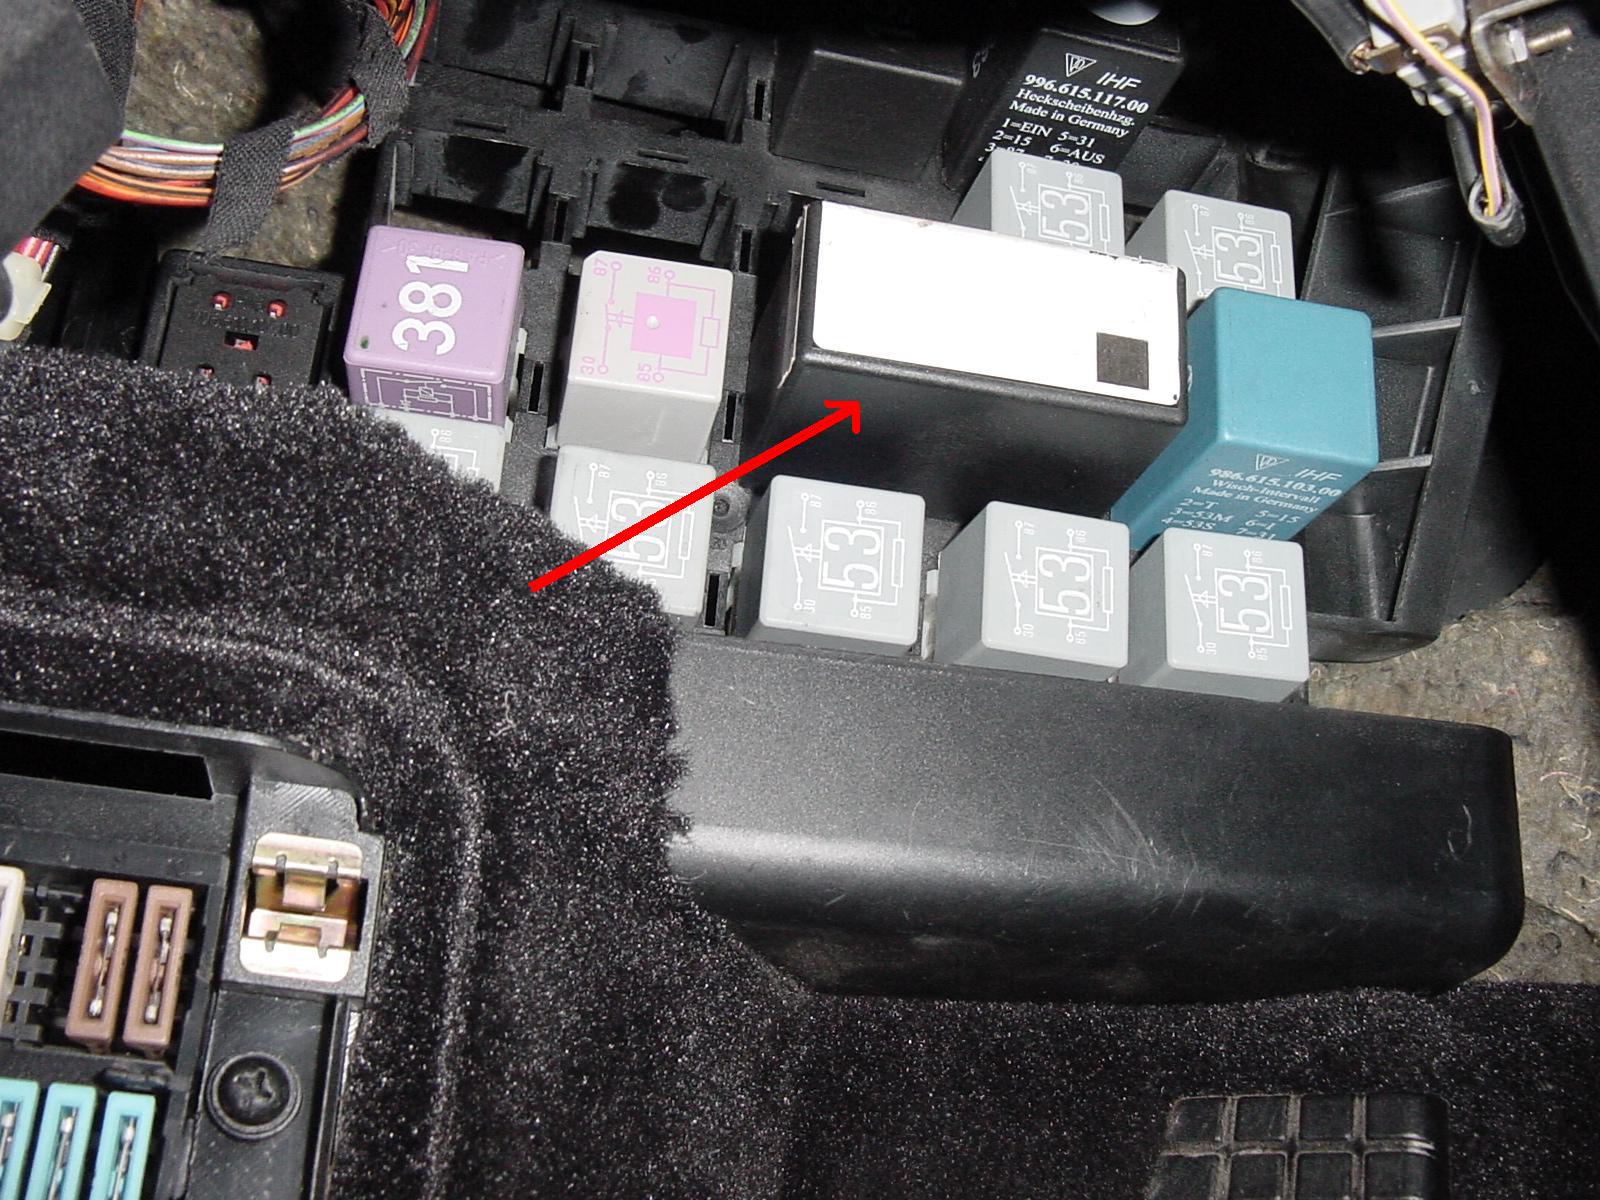
Here's a photo showing the location. In this photo, it's the purple part near the top left corner of the photo. You can see the fuse panel on the kick panel below it.
There is only one way to connect it, but make sure it is fully seated.
Regards, Maurice.
-
Wow, thanks! It (hopefully) sounds less pricey than a new motor... My fuse box diagram is missing off the fuse box - its 2 am ish in the UK, so will look tomorrow - but do the fuses have the names written on them when I remove the exterior cover? Oh, and parking light def on.
Helen (Slightly Inept Porsche Owner)!
Helen:
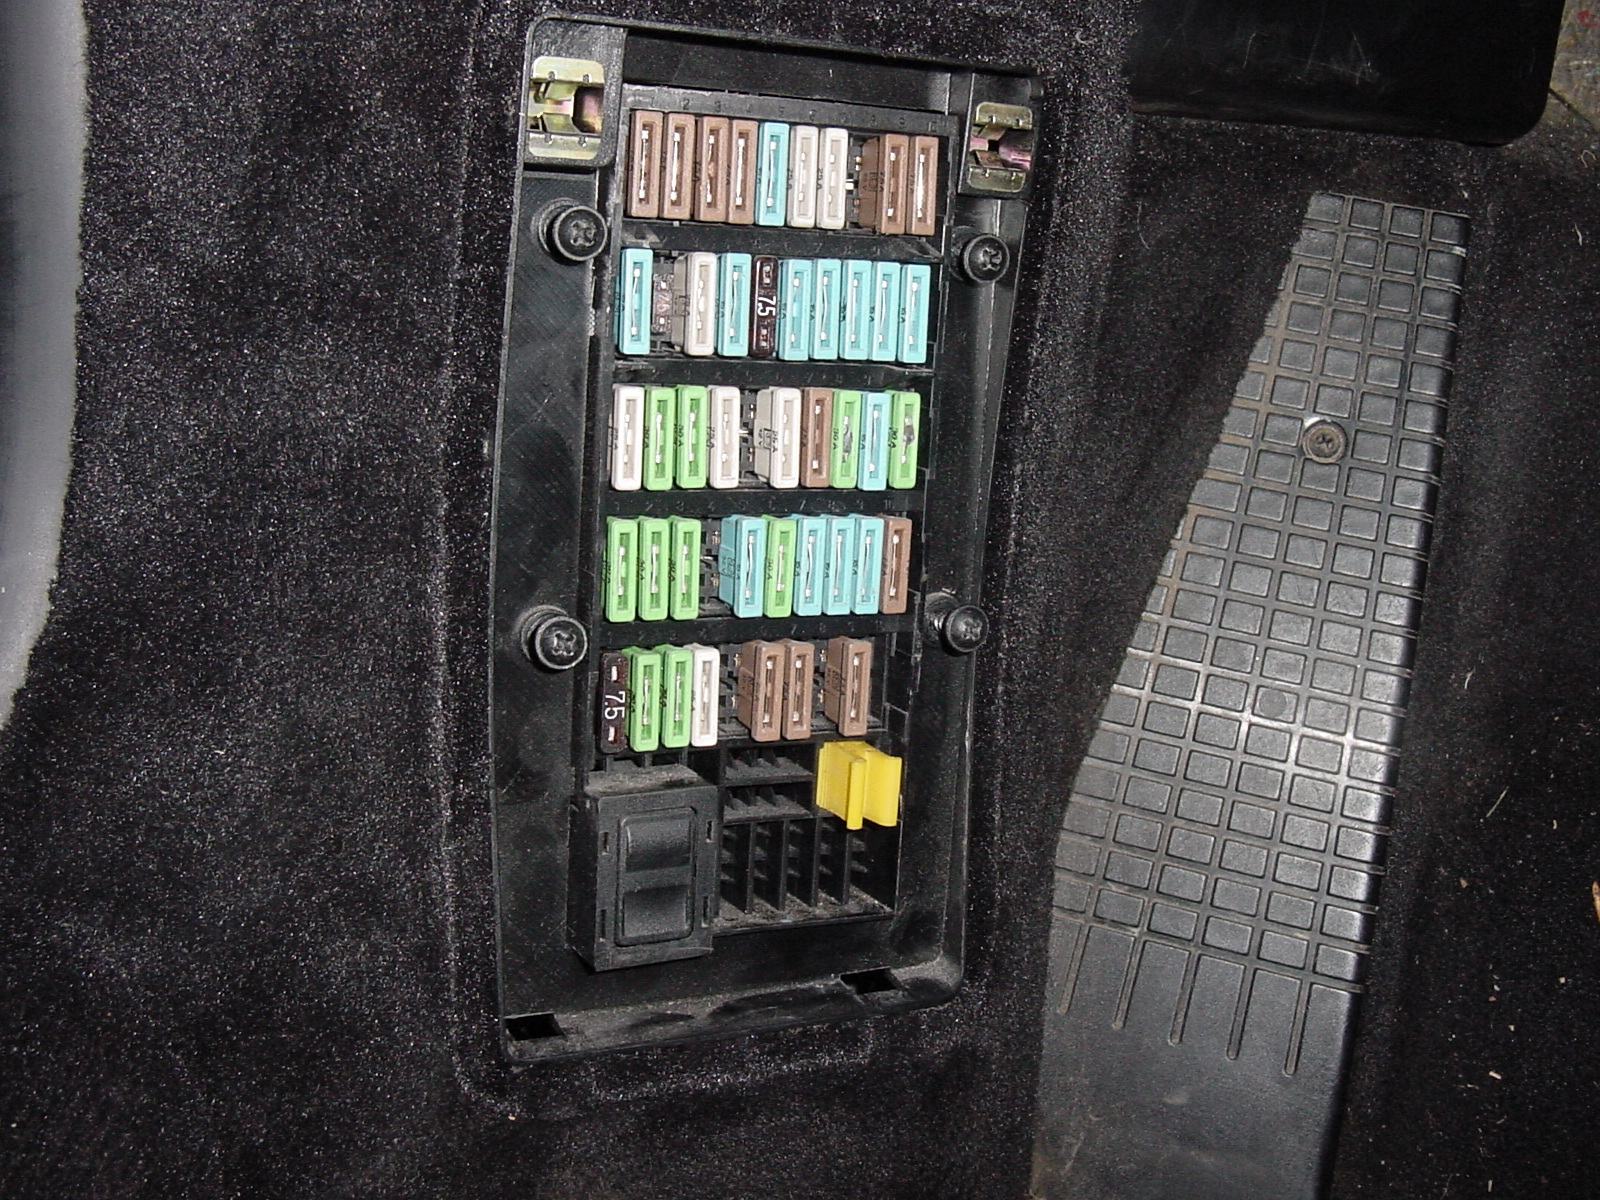
The fuse tray is labeled with numbers 1 to 10, running from left to right, but the numbers are tiny. (Click on the photo and you can see the numbers).
Row A is the topmost row, and Row B is below it, down to row E at the bottom, with a row of spare fuses beneath row E.
Here is a photo of the fuse tray location, Fuse A1 is at the top left, etc...
Note that this photo of the fuse tray is of a U.S. car, so I don't think that you will have the "dead pedal" there on your car.
Also, here is a photo of the the location of the double relay, located above the fuse panel and towards the front.
Regards, Maurice.
-
So, I have a 2005 2.7 Boxster.Towards the end of the summer last year(Sept), the roof got stuck half up and half down. No noise - ie no worrying noises, just wouldnt do anything! Left it overnight, and huge relief when close fine the next morning. It had been temperarmental before, but always operated in the end. It has never made any odd noises, smells or anything like that.
Stupidly left it over the winter and just dare not try to operate roof as nowhere secure to leave it if it stopped mid operation. So I tried it today... and nothing. Windows did not go down when I flipped the lever on the roof, and no noise at all when operating switch to bring roof down. The car has only done 40k miles .
Any ideas - would be very grateful!
Helen
Helen:
The "temperamental" nature of the problem that you describe points to either bad/degraded connections at a number of possible points, or a hairline crack at the parallel strips microswitch inside of the convertible top latch assembly or a deformed plunger-type microswitch, also inside that latch assembly.
You must first verify that the parking brake light on the dashboard is actually lit up when you pull up on the parking brake.
Then double check that your fuses at B6 (supplies power to the convertible top double relay) and at D3 (supplies power to the convertible top motor) are intact AND that there is no corrosion at their respective spades on at the female receptacles on the fuse panel into which they are pressed. You can clean up any corrosion in those areas with a small piece of fine emery cloth.
Next, double check for and clean up any corrosion on all of the male spades of the convertible top double relay, and the same for the female receptacles in the relay tray that accept the double relay spades.
You can also tap the double relay on the ground a couple of times sharply, as that sometimes "revives" a sticking relay.
If you have done all of the above and still get no reaction at all, you can then move to the convertible top latch assembly and its two microswitches.
When you unlatch the top, the latch releases the plunger type microswitch inside the latch assembly and that causes it to ground. When it is grounded, a signal is sent to drop the windows about 4 inches. Poke your finger or a pencil eraser into that depression in the latch assembly and see if you get any reaction from the windows. If you don't, you will have to open up the latch assembly to access the two microswitches.
Try the above steps first and report back. If there is no improvement, we can proceed with instructions on how to remove the latch assembly, etc...
Regards, Maurice.
-
 1
1
-
-
OK, had a good check over the hood this weekend and finally found the cause. There is a small piece of fabric that is sewn into the side of the hood by the sliding plastic quadrant, in this part of the fabric is what can only be decribed as a rubber tube, this tube slides in to the plastic and helps keep the hood in the right place ready for the cable to fit in to the channel. I had to remove the plastic quadrant to slide the fabric/pipe back in to place. Once reassembled everything worked as it should :clapping:
Thanks for the input Maurice, much appreciated
J:
Anytime.
Make sure that the little plastic pin is inserted into that tube. It helps to expand the mushroom end of the tube and keep it in place inside the slider.
Regards, Maurice.
-
Yup! It's Ocean Blue Metallic....you have the part? :)
I bought a clamshell and some associated parts from a guy who was parting out his car locally about three years ago. I'm not sure if I have an extra one of those parts and whether it's the right or left side. I have the parts stored and I can take a look this coming weekend to let you know.
Regards, Maurice.
-
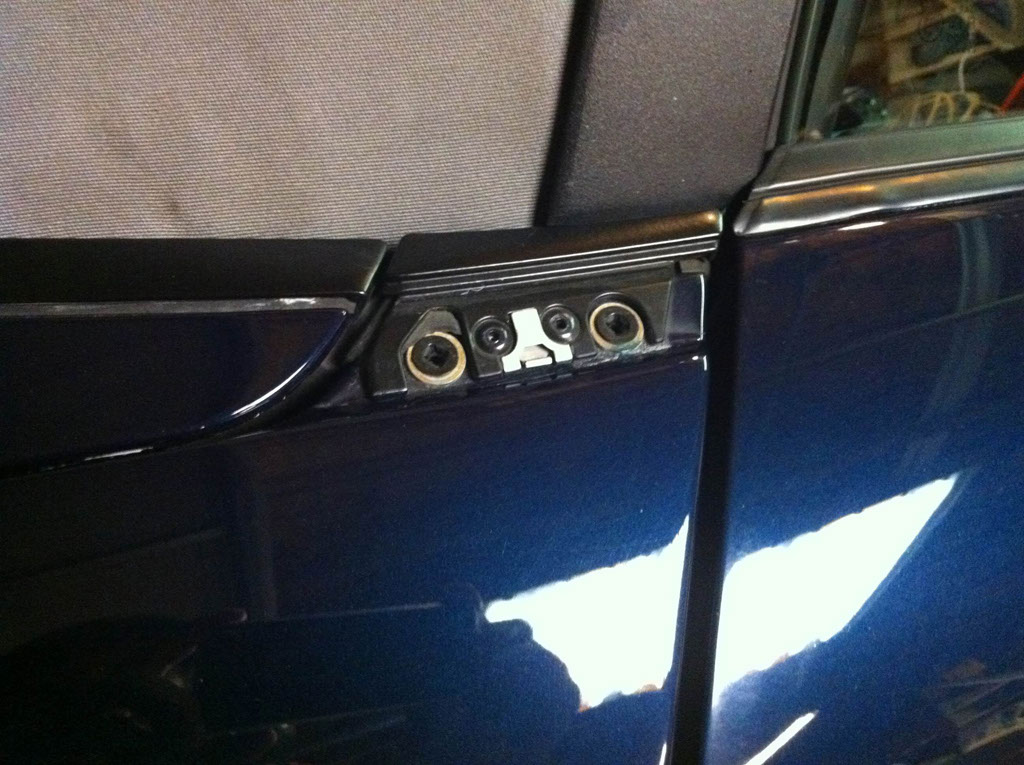
By the way, is this part number the right or the left side? I'm missing the one on the right side.Thanks!
The part number is 986 504 862 01 G2X - Cover ® at $31.68 plus tax. Comes painted in primer, sorry no pre-colored options.
Sorry.
Was there meant to be a photo?My wife came out of her work place and noticed that this was missing....What is it called and what's the part number?I'm so angry at the person who took it.....wtf!
Here goes....http://www.photoshop.com/users/westladog/assets/5427b30749bd4499b888ba7b2a2e1787
1999 BoxsterThe 862 denotes the right side (even part number before version of part). 861 is for the left side.You can order the part for a good price from one of the board sponsors, Sunset Imports (Just click on "Porsche Parts at Dealer Cost" near the top of every page, on the tab to the right of center).Is your car Ocean Blue Metallic?Regards, Maurice.
-
Ok....making progress again! Removed the 19mm bolt and discovered that all 3 nuts securing the transmission to the sidewall were loose (i.e. removable by hand) allowing the transmission to 'float' during operation, even to the point of snagging on the clamshell guide rail. This, I suspect, is causing the lag on the left hand side, as the gear itself was intact, not worn and very well greased. Now to refit, retighten and replace the ball cup...
You should probably also check the passenger side transmission's studs and nuts for tightness, to prevent something like that in the future.
Regards, Maurice.
-
Maurice, many thanks for taking time to reply. I'll definitely add that clause in the deal. Not sure what the reference to Canada meant, but ya, we definitely PAY more for our Porsche's here !
I can't imagine them putting up a stink about this, since they should be confident that there has been no structural damage after their 'extensive' CPO process. There was an insurance claim for $3000 on the carfax (car-proof in Canada), but it doesn't have any details about the incident. For all I know, it was just a paint job for a scratch or something, which is what they suspect.
Joe:
If the dealer has any hesitation about adding a reasonable clause along the lines that we discussed, that would raise a red flag for me.
I know that you guys pay more for Porsches up in Canada, but there are lots of Porsches for sale all the time. It pays for you to get one that gives you that peace of mind, as that's one less thing to worry about.
When you finally get it (or another one) home, post some pics. We love pics!
Regards, Maurice.
-
I put a deposit for a 997 Cab from an authorized Porsche dealer in another province (in Canada). They are going to shipped it across Canada over to my house. CarProof looks ok, and It is certified CPO. The dealer is on an island, so there isn't many indy shops I can take it to for a PPI. I have a new 2 years on the CPO, so I'm not too concerned about the engine, etc. But structural damage I'm a little worried a bit.
Do you think it's safe to buy unseen, or is it worth the $1200 6-hour flight to check it out ? They seem reputable, but even if I went there, I don't even know what to look for.
If you did physically go there to look at the car, you would not necessarily have to know what to look for yourself. If your only concern is whether there has been a major accident, you could take the car to any body shop with a lift and have them check the undercarriage. If there is anything suspicious, they will spot it pretty easily, and, if necessary, they can also take measurements and compare them with the figures published by Porsche.
Another approach might be to tell the dealer your concern and to draft a side agreement to the contract that specifically provides that you will be afforded five days after delivery during which you can have the car inspected for any hidden major body damage. If such damage is found, you can be required to document the damage (with photos and a sworn affidavit from the body shop guy) before you are allowed to return the car, at the dealer's expense.
Since it's a 997, and it's a Cab, AND you are in Canada, I'm sure we are not talking about a minor purchase here, so it might be a wise idea to act with deliberation.
Regards, Maurice.
-
I've made a replacement cord/rope from a black shoestring and a piece of elastic cord from my surf board in the middle - works fine!
Thanx for the technical help!
Regards, Maurice.
-
Oh dear, this isn't getting any easier! I thought I'd re-synched the V-levers by measuring the clamshell above the boot lid and was about to work on the shut off problem. I brought the hood forward on the dashboard switch and the left hand side (UK passenger's side)seemed to be lagging behind the right. I tried this a few times, re-synching as accurately as I could, but each time the left side was a problem, occasionally popping the clam shell ball joint from it's runner. Unfortunately, as I tried to push back with the dash switch, the front left push rod shattered my (new) ball cap again. Now the clamshell won't sit evenly with the rear push rods disconnected and needed some gentle 'encouragement' on the right side to sit in the closed postition - I hope I haven't twisted it, or the brackets.
There is definitely some play on the left hand V-lever mount - I'm thinking now that the gear is partly stripped or worn? Gently pulling the semi-circular plastic shroud from below the centre nut allows around 3-5mm of play on the left, but the right side is completely solid. With all push rods disconnected, the hood moves freely and I don't suspect that to be the root cause of the problem.
Definitely sounds like there is a problem with the left side transmission. You can remove the 19mm bolt that holds the V-lever onto the transmission and remove the three nuts that hold the transmission onto the studs that are mounted on the inner quarter panel. Then you can open up the transmission to determine what is causing the excessive play. Make sure that you note and mark the position of the female keyway and its relation with the V-lever because it can be mounted two ways: the correct way and 180 degrees off.
Here is what it looks like when you have taken it apart:
Did you "tweak" the clamshell? If you did, and it's not severe, you can pull off the clamshell and, with the help of a friend, you can bend it back into place. There is a thread here somewhere by "Tool Pants" that shows you how to do that.
The body-colored brackets don't bend easily. They are either okay or they crack.
Regards, Maurice.
-
I can see very clearly that the cord/rope has to go over the soft top frame. Thanx.
On the 987 model there is a sleeve of channel on the bottom of the outer roof skin where the cord/rope is going through. I think the tension on the cord/rope must be zero to none when the soft top is up. And the cord/rope must stretch and give tension when you put the soft top down in order to make it fold inwards. Am I correct?
You are correct about helping it to fold inwards, but there must also be some tension on the looped strings to help guide the tension cables into the channels (so that the tension cables don't fall outside the guide channels).
So, the elastic band in the center has to provide a little tension on the looped strings just before the top nears the completely closed position.
Regards, Maurice.
-
I am in Toronto Canada and due to the cold weather here, my 02 Boxster is in dormancy during November to April, that left her in commission six months per year. This is also my leisure vehicle and i rack up approximately 5000 to 6000 km per year. My dilemma is, should i change the engine oil on a yearly basis anyway or i can do it once every two years ? Also, my last brake fluid flush was three years ago, and the owner's manual recommends to replace it every two years, i checked the brake fluid reservoir and the brake fluid looks very clear still, should i replace it ? Thanks for advices in advance.
A good practice is to change the oil once a year, regardless of mileage (if you don't drive much).
The reason brake fluid is supposed to be replaced every two years is not so much because it gets dirty or cloudy. It's because brake fluid is hygroscopic, meaning that it absorbs water from the atmosphere. That degrades seals and hastens rusting of the caliper pistons, slave and master cylinder pistons, etc., and it reduces the performance of the brake fluid by lowering its boiling point.
Regards, Maurice.
-
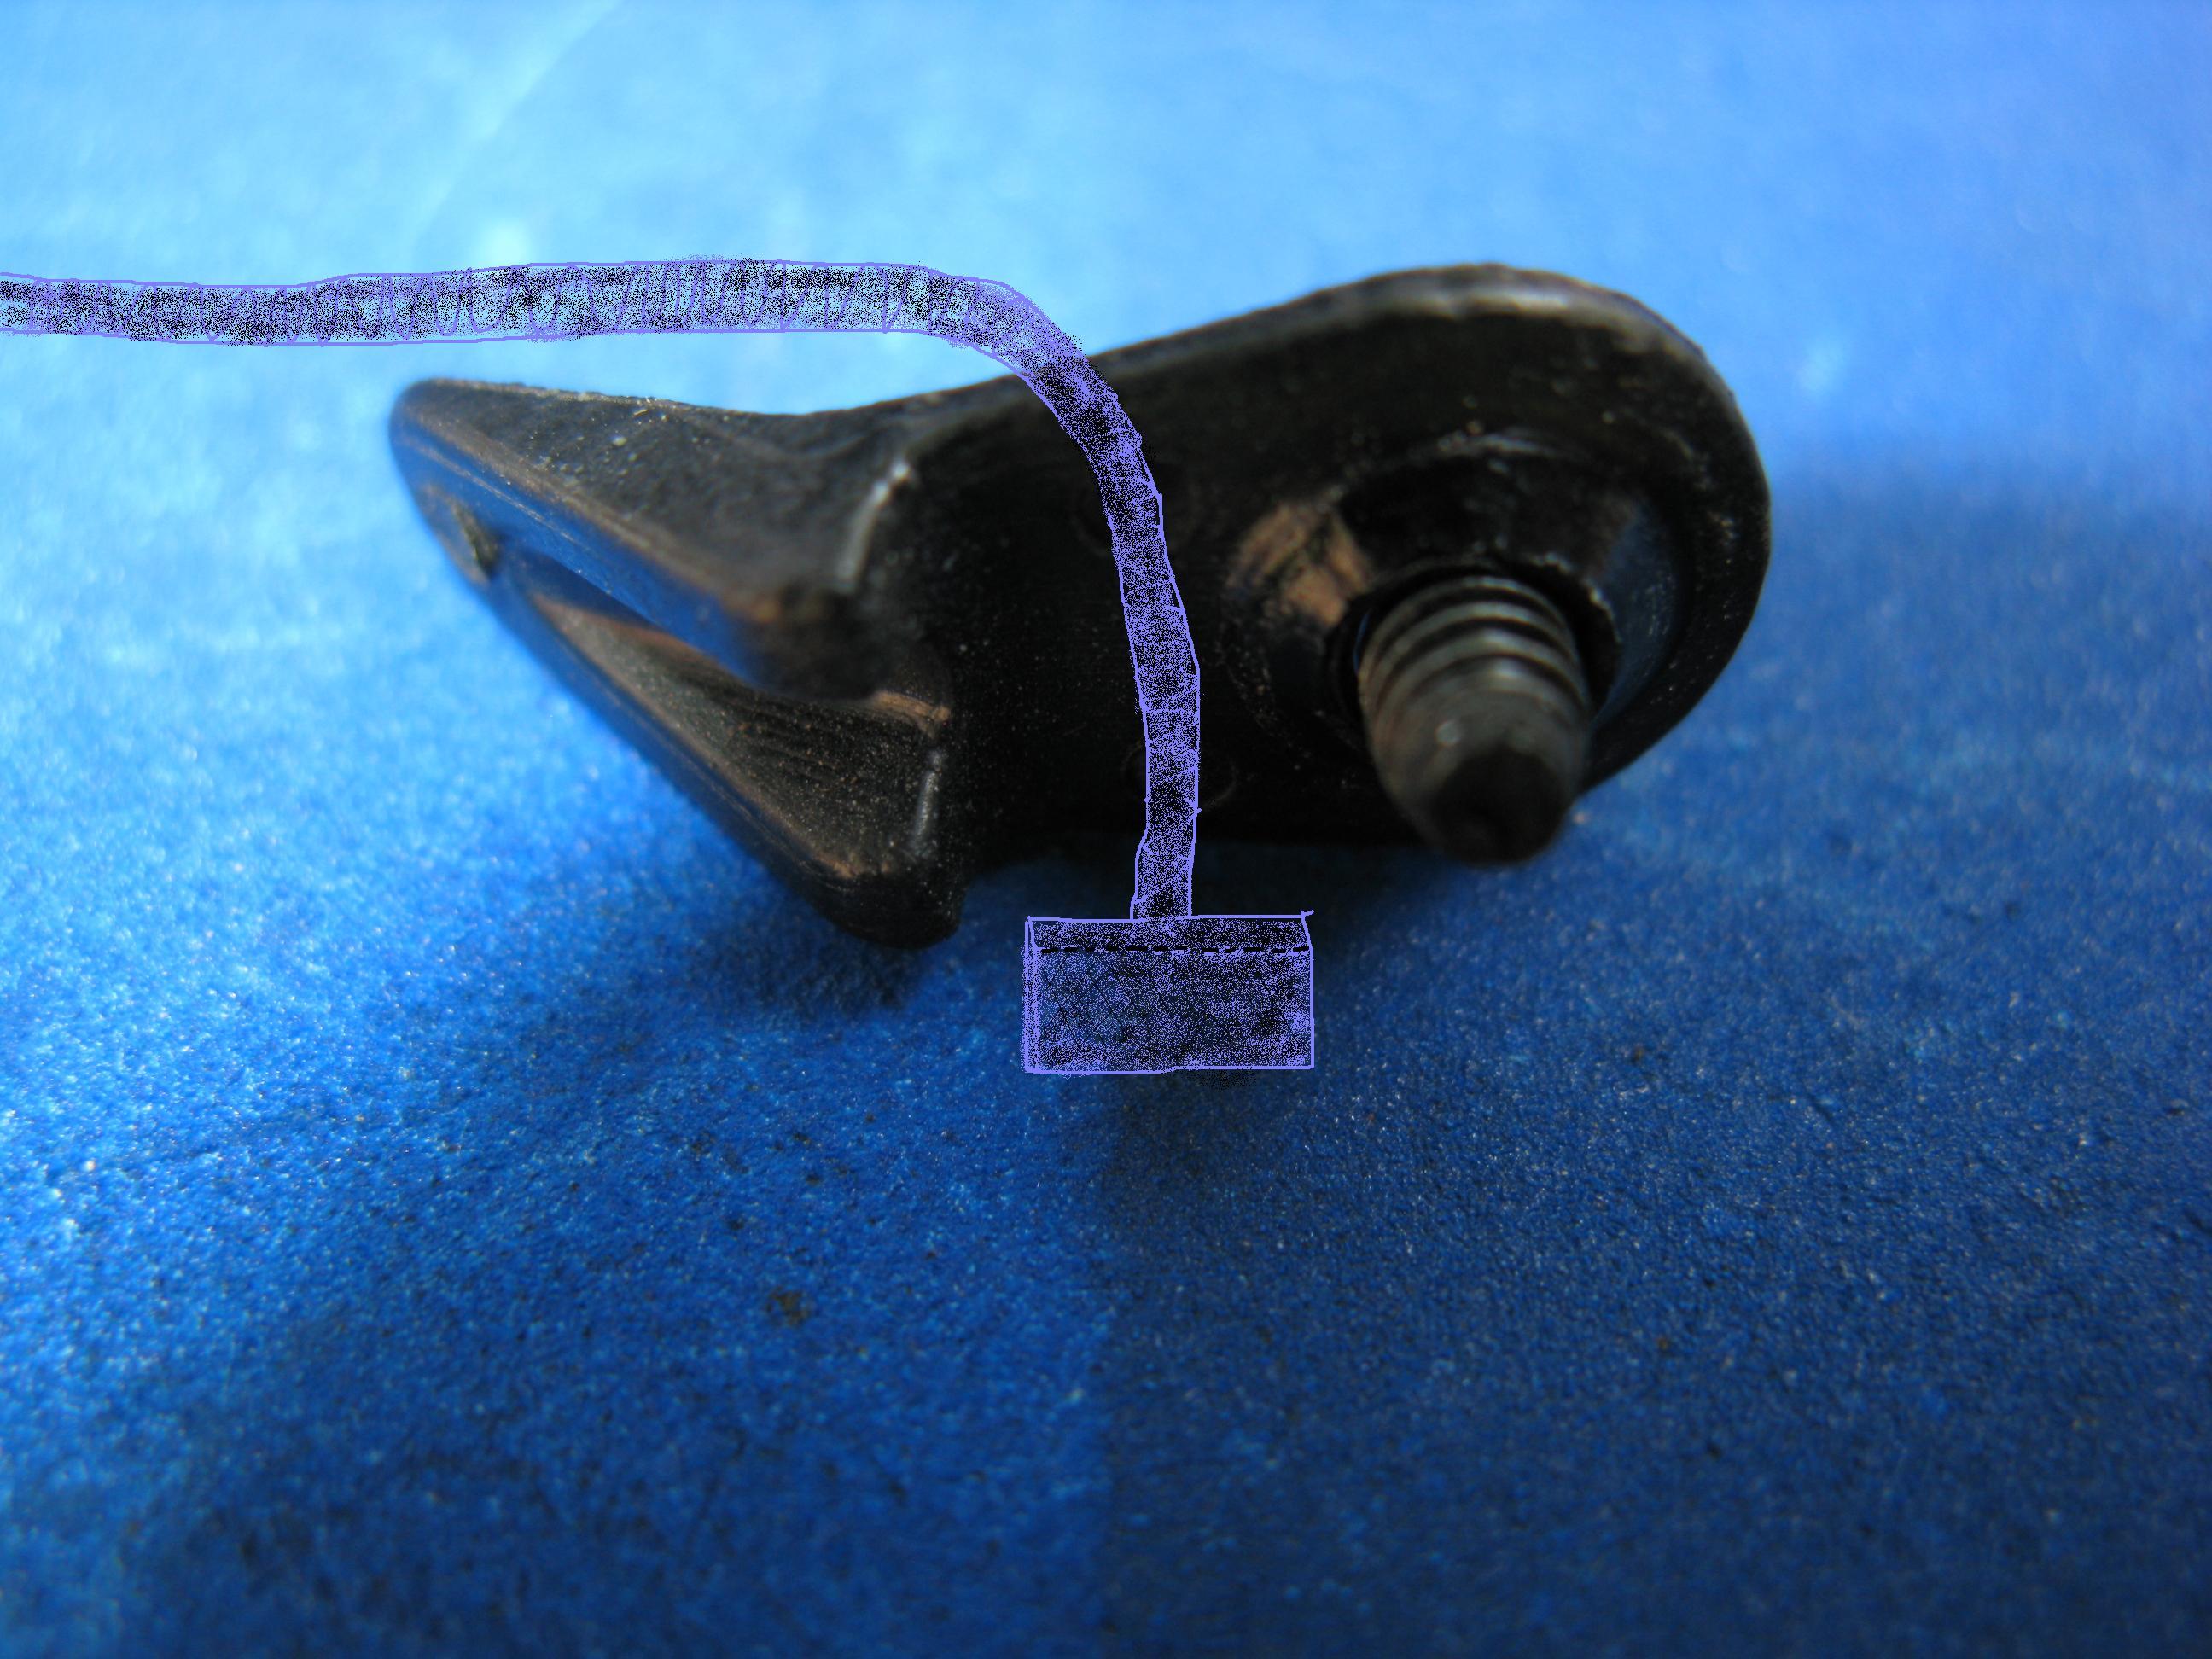
The elastic cord/rope within the soft top which runs from left to right is broken. The cord is connected on either side of the soft top frame with a screw. The screws are located on the soft top frame at the place where the roof folds above the headrests. Not a big problem to fix the broken cord/rope, but how is the cord/rope supposed to run exactly?
1. Is it going - starting from the screw - under or over the metal frame bar of the soft top?
2. Is it going through the the fabric tunnel in the outer skin to the other side?
Many thanks in advance for helping...
I have a Porsche Boxster 2005 (type 987).
mjk:
The following are from a late model 986, for reference. The set up should be the same, but you might double check:
In this one, I drew in the orientation of the string over the plastic ear.
.
.
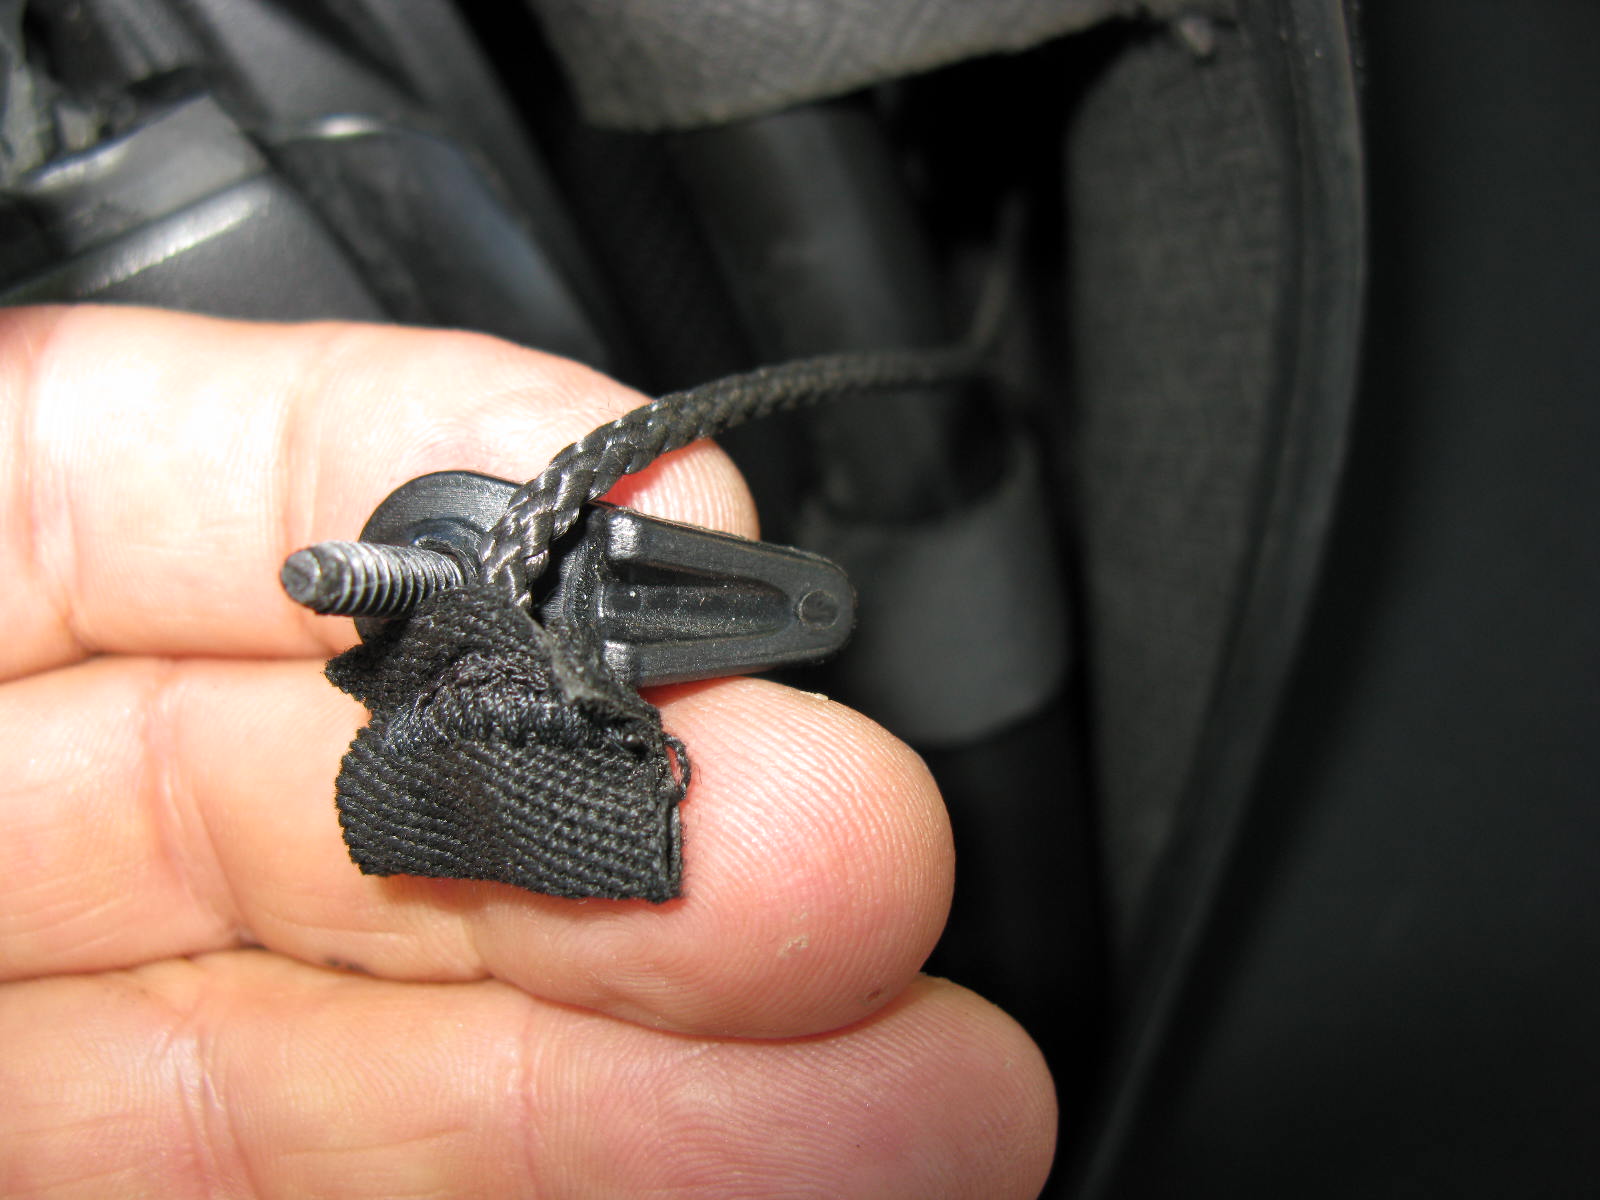
Here's the real thing
.
.
.
.
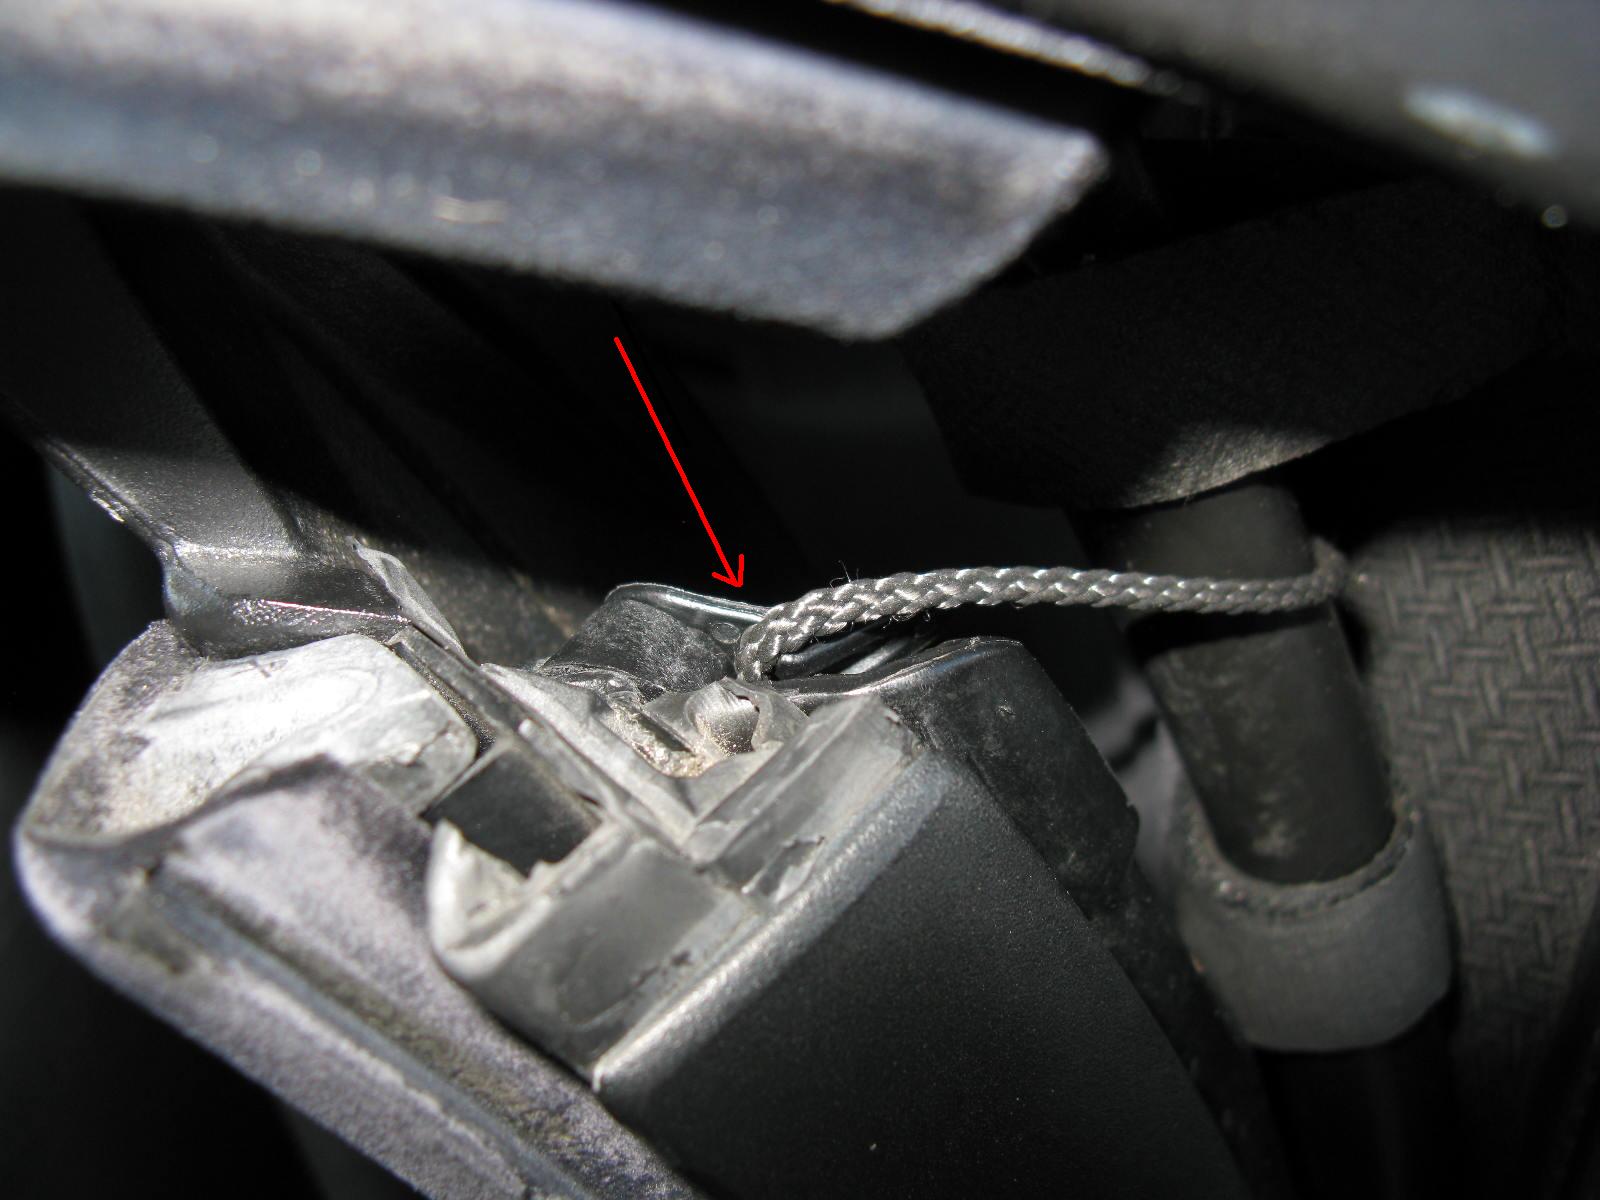
A view of how it is routed over the tubular part of the frame
.
.
Overall view.
.
.
Make sure that there is still some elasticity in the center elastic band so that it can maintain the proper tension to guide the tension cable into the guide channels. If it has lost all of its elasticity, you can replace it or patch in a short elastic band on each side (to which the looped strings attach).
Regards, Maurice.
-
 1
1
-
-
Hi All
I have an issue with the cable on the nearside of my roof. Offside works just fine. When I close the roof, the nearside cable fails to locate in the runner, so I have to help it in by hand whilst closing. I have adjusted the metal spring plate and this seems to work for one close only so I gues it's not that. From what I have read on here, I have the later cables fitted, i.e. they have a ribbed/diamond pattern to the covering. Other than that the roof operates fine, could this be a stretched cable causing the issue?
I have checked the velcro strap and this is attached to the roof material and wraps around the frame fine, if a little loose but I guess that allows it to slide. Also, the cable gives the impression it hasn't snapped as there does appear to be tension in it
J.:
Swap the finger spring from one side to the other and see if the problem follows the spring.
If the problem remains, there are a couple of possibilities other than the velcro straps. It's possible that the tension cable (that runs inside the sheath on the side of the top) has either stretched, or become unscrewed from its anchoring point under the B-pillar or detached from or has stretched the spring by means of which it is attached onto the aluminum shoulder plate.
You also have to make sure that your slider has not seized or is not binding (explained in the DIY linked below).
You don't say what year your Boxster is, so there is also the possibility that your year might have the looped string that is attached to a plastic ear on each side of the convertible top frame (over the top rear of the window) and to an elastic band that runs from side to side straddling the centerline of the roof. If that's the case, that side may have broken off or the elastic has stretched beyond serviceability.
Take a look at the following DIY for some photos, explanations, and the measurement of the tension cable: http://sites.google....fallintoguidech
Regards, Maurice.
-
'99 US Boxster 2.5
I started having some unusual electrical problems a few weeks ago... the passenger window was not dropping, manual lock light going on, etc. As I had done a number of years ago, I replaced the plastic part of the ignition switch under the dash. Last time that solved my issues, this time with no luck. With Maurice's help I diagnosed and replaced a bad passenger side locking mechanism. The window drop when activating both the inner and out handles is perfect now, thanks Maurice. At first, the intermittent lock light on the dash mounted rocker switch stayed off. Great, two birds with one stone. But today the lock light is back on... In the 10 years I've had this car I probably have used this manual lock switch less than a dozen times.
Here are the symptoms;My key fob button went out years ago, I've been opening the car manually for years with no problem.
When the car first starts, the "lock light" may self illuminate, it may not.
After driving a while the light will come on for sure.
While running, touch the unlock side of the switch and the light tuns off briefly, you hear the door locks cycle through twice, the horn beeps twice and the lock light re-illuminates.
When locking with a key (the only way I can) the driver's door locks, but the passenger side doesn't.
The alarm does not arm.
The windows now work perfectly.If you happen to turn the car off when the rocker switch light is not illuminated, both doors will lock and the alarm will arm.
The only other repair I did recently was replace the steering wheel air bag frame.... the horn was "going off on its own". This door lock issue started before the horn issue, and has continued after the new frame was installed.
Thanks in advance for your input.
Steve
Steve:
Thanks for the kudos.
The following is assuming that your immobilizer has not gotten wet, and that there is no water or moisture under the driver's seat.
What may be going on now is that your driver's side lock assembly is on the fritz. More specifically, either the microswitch INSIDE the door lock assembly is bad, or, more likely there is a loose/broken or intermittent connection from the wiring harness at that point to the assembly's microswitch.
When it is acting up (i.e., the light goes on by itself, you press the button to turn it off and it turns itself back on, etc.) , if the driver's side window drops the 1/2 inch when you pull on the door handle but then sometimes goes up while the door is open and you let go of the inner door handle, that is very likely the problem.
You're going to have to take off the door panel, but you may not have to take apart (or replace) the door lock assembly. With the door panel off, jiggle the wires going into the door lock assembly, press them into the connector, pull on them, etc. and see if that has any effect on the operation.
Some guys have had luck with heating up the connections with a soldering iron, just enough to flow solder onto the wires and that has solved the problem permanently.
If I find a photo of how that was done, I'll post it here.
Regards, Maurice.
-
their is a little moisture under the driver seat but the black box under the seat is dry the fuse look good and I gave the relay a good thump on the ground but nothing happened :huh:
You are not lost yet...
Now that you have eliminated those possible causes (although the double relay is not completely eliminated), disconnect the connector to the electric motor and apply 12V to it directly. Sometimes a dead spot develops and you will get no reaction at all when you press the button.
If the motor is good, you have to check one of the two microswitches inside the latch assembly. There is a plunger-type microswitch in there, and another one on the right side of the assembly, and that is the one that activates the convertible top double relay.
If the latter switch is faulty the double relay will not get power, even though it may appear to be intact when you visually inspect it, and sometimes even when you test it with a multimeter. Specifically, take a close look at the solder joints where the leads attach to the plug. This can be hard to detect, so check it with a magnifying glass for hairline cracks in the solder joint and for corrosion. If necessary, heat up the connections with a soldering iron and flow a tiny bit of solder onto the suspect joint(s).
Believe it or not, the temperature (sun light, A/C blowing on it, etc...) can affect it to the point where the connection is broken and then re-established.
To gain access to the microswitch you have to remove the latch plate at the center of the windshield frame. Pop out the two little black plastic "eyes" by carefully prying them off with a very small flat blade screwdriver or borrow one of those "orange sticks" that women use on their fingernails to pry them out. Remove the small torx bolt that you will find under each one of the two eyes. Remove them and then pull down the latch plate carefully until you can see and access the wires for the switch and for the light. Unplug the wires and the latch plate will come off. You will find two fragile retaining clips that attach the switch to the underside of the latch plate. These are easy to break, so use a pair of small needle nose pliers to pull them off, very gently. You can reuse these if you are careful by squeezing the cross sections that are located at the center of the clips until they are flattened.
Let me know if that doesn't work and I will look for an electrical troubleshooting guide that will help you pinpoint the problem. You will need a multimeter and some probes.
Regards, Maurice.


stolen part...need name and part number
in 986 Series Part Number Requests
Posted
Dog:
I couldn't find it over the weekend, but I just went in there after seeing your message and remembered I had another box of parts.
I found it and it is for the correct side that is missing from your Boxster.
Here are a couple of photos of it.... It's not perfect, it has a tiny bit of crazing on the very rear edge of the surface and it's missing a nub on the underside.
I see from your photo that you don't need the black support part, so if you want the Ocean Blue Metallic part and you want to pay for postage, I'll send it to you for free.
I think you can install it with the one nub and maybe some silicone sealant or double sided tape.
A small USPS priority mail box is $5.20, plus ?? for delivery confirmation.
PM me your name and address and I'll get it in the mail tomorrow. Again, it's not perfect, but it can hold you over until you decide whether it's worth getting another one, etc...
Regards, Maurice.