Welcome to RennTech.org Community, Guest
There are many great features available to you once you register at RennTech.org
You are free to view posts here, but you must log in to reply to existing posts, or to start your own new topic. Like most online communities, there are costs involved to maintain a site like this - so we encourage our members to donate. All donations go to the costs operating and maintaining this site. We prefer that guests take part in our community and we offer a lot in return to those willing to join our corner of the Porsche world. This site is 99 percent member supported (less than 1 percent comes from advertising) - so please consider an annual donation to keep this site running.
Here are some of the features available - once you register at RennTech.org
- View Classified Ads
- DIY Tutorials
- Porsche TSB Listings (limited)
- VIN Decoder
- Special Offers
-
OBD II P-Codes - Paint Codes
- Registry
- Videos System
- View Reviews
- and get rid of this welcome message
It takes just a few minutes to register, and it's FREE
Contributing Members also get these additional benefits:
(you become a Contributing Member by donating money to the operation of this site)
- No ads - advertisements are removed
- Access the Contributors Only Forum
- Contributing Members Only Downloads
- Send attachments with PMs
- All image/file storage limits are substantially increased for all Contributing Members
- Option Codes Lookup
- VIN Option Lookups (limited)


1schoir
-
Posts
2,739 -
Joined
-
Last visited
-
Days Won
6
Content Type
Profiles
Events
Forums
External Paint Colors
Downloads
Tutorials
Links Directory
Collections
Store
Posts posted by 1schoir
-
-
all of the basic things work the top stop working when the car get washed or it get wet from the rain any idea whats going on whth that because i'm lost
Hotrod:
Check for moisture/water in the foam lining of the carpet under and behind the driver's seat. Your drains (either front or rear) are either clogged and not draining the rain water or the car wash water out and the water is finding its way to the immobilizer under the driver's seat, or there is a rip/tear in one or both of your drain trays in the convertible top well. The immobilizer has some control over the windows, so, if your windows are no longer dropping the 4 inches when you pull the latch, it may be affecting the operation of the top.
If your immobilizer is wet, you MAY be able to take it out, take it apart and dry it with isopropyl alcohol before it does permanent damage, but you have to get it pronto.
You did not say whether your emergency brake idiot light goes on when you pull up the emergency brake, and that it a pre-requisite for power to the top.
We need more details and a history of how this problem developed.
Regards, Maurice.
-
Hi all new to this forum and have a odd question/problem.
Last week I purchased a one owner 2003 996 coupe with 33k miles from a non Porsche dealer in Memphis, tenn. I finally took delivery tonight.
One odd issue The car came with two keys. Both the keys remotely lock and unlock the car, open the hood and engine compartment. And both keys lock and unlock the doors manually. However only on key will crank the motor but both keys will go into ignition and turn.
Any ideas. The car is in excellent shape. And I absolutely love it but I hate to just have one working key.
Thanks for any help.
The problem may be with the transponder "pill" inside the key that will not crank the motor.
The fact that both keys turn the lock just means that the blade one each key is correctly cut.
Try to start the car with the key that does not normally crank it by keeping the other key near the ignition switch while you try to crank the engine with the "bad" key.
If that works, the transponder pill in the "bad" key is broken, missing, or the immobilizer under the seat has not been correctly programmed for that key's transponder.
Regards, Maurice.
-
click is def. from the center i know about streched cables ect.. but i was more wondering how to open the clamshell up.. to asses what else has gone bad... if i look down behind the plastic trim behind the seat i see a ball thats not attached.. also see signes of improper wearing on the tracks.. the rear window is not in at all this i can see where it was all folded up.. anyways if i could get the clam shell off than take a better look at the whole picture .. like i said for the days i plan on driving it will be hard top or no top but just incase it would be nice to throw the softie up gotta love new england weather can be raining here two min down the road dry and sunny
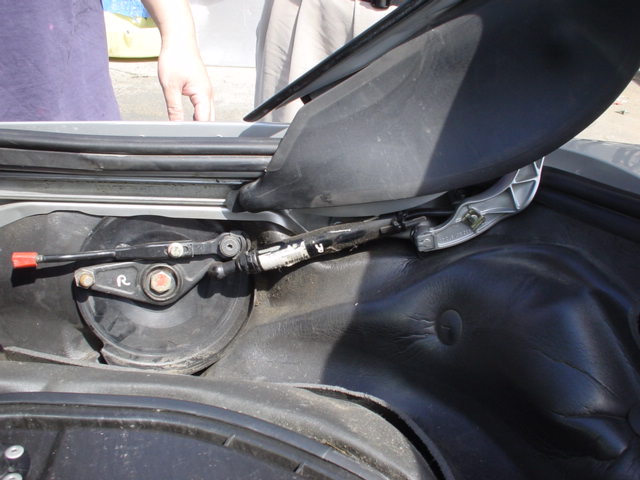
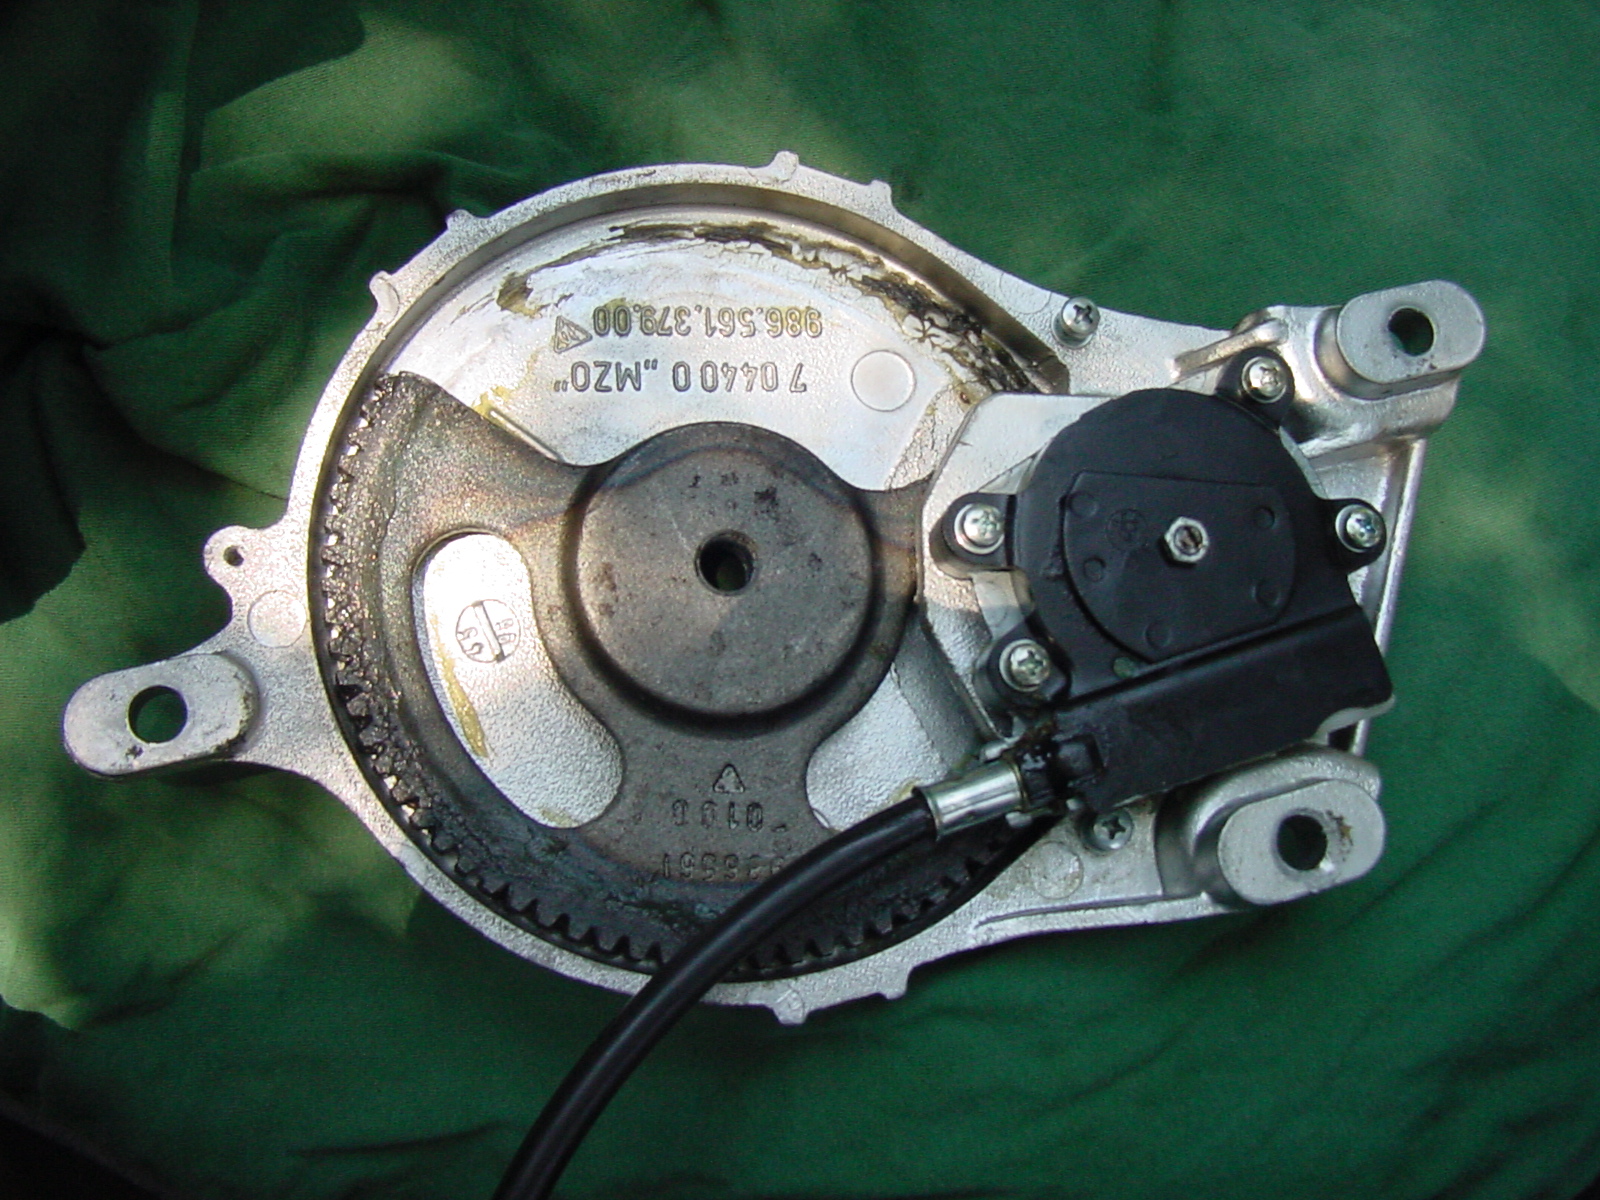
You have to release the clamshell by either popping off the little clips at the rear of the "hydraulic" pushrods or pop them off their steel ball at the front of the hydraulic pushrod. That will allow you to move the clamshell manually. The only problem is that it's very difficult to access those when the clamshell is completely closed tight.One way that I have been able to gain access is by unbolting the 19mm bolt that holds the V-lever in position against the transmission on each side of the car. It's tough to get a socket in there, but if you use an offset box-end wrench you can do it. Be careful, though because the V-lever is under pressure, as it is being pulled REALLY tight by the "hydraulic" pushrod when it's in that position (all the way closed).You want to be able to pull the black cables out from the sides of the electric motor so that you can spin the cables with a cordless drill (on the lowest torque setting) until the half-moon gear becomes engaged again. Make sure that you spin them an equal amount so that the clamshell and the canvas top go up and down in an even manner, left side to right side.Note that the 19mm bolts are on there with loctite, so they will seem very tight.Here are two photos that show you what the 19mm bolt looks like, and its location, along with the inside of the "A Version" transmission showing the half-moon gear. That will give you an idea of what you are doing when you are spinning the cables with the cordless drill.
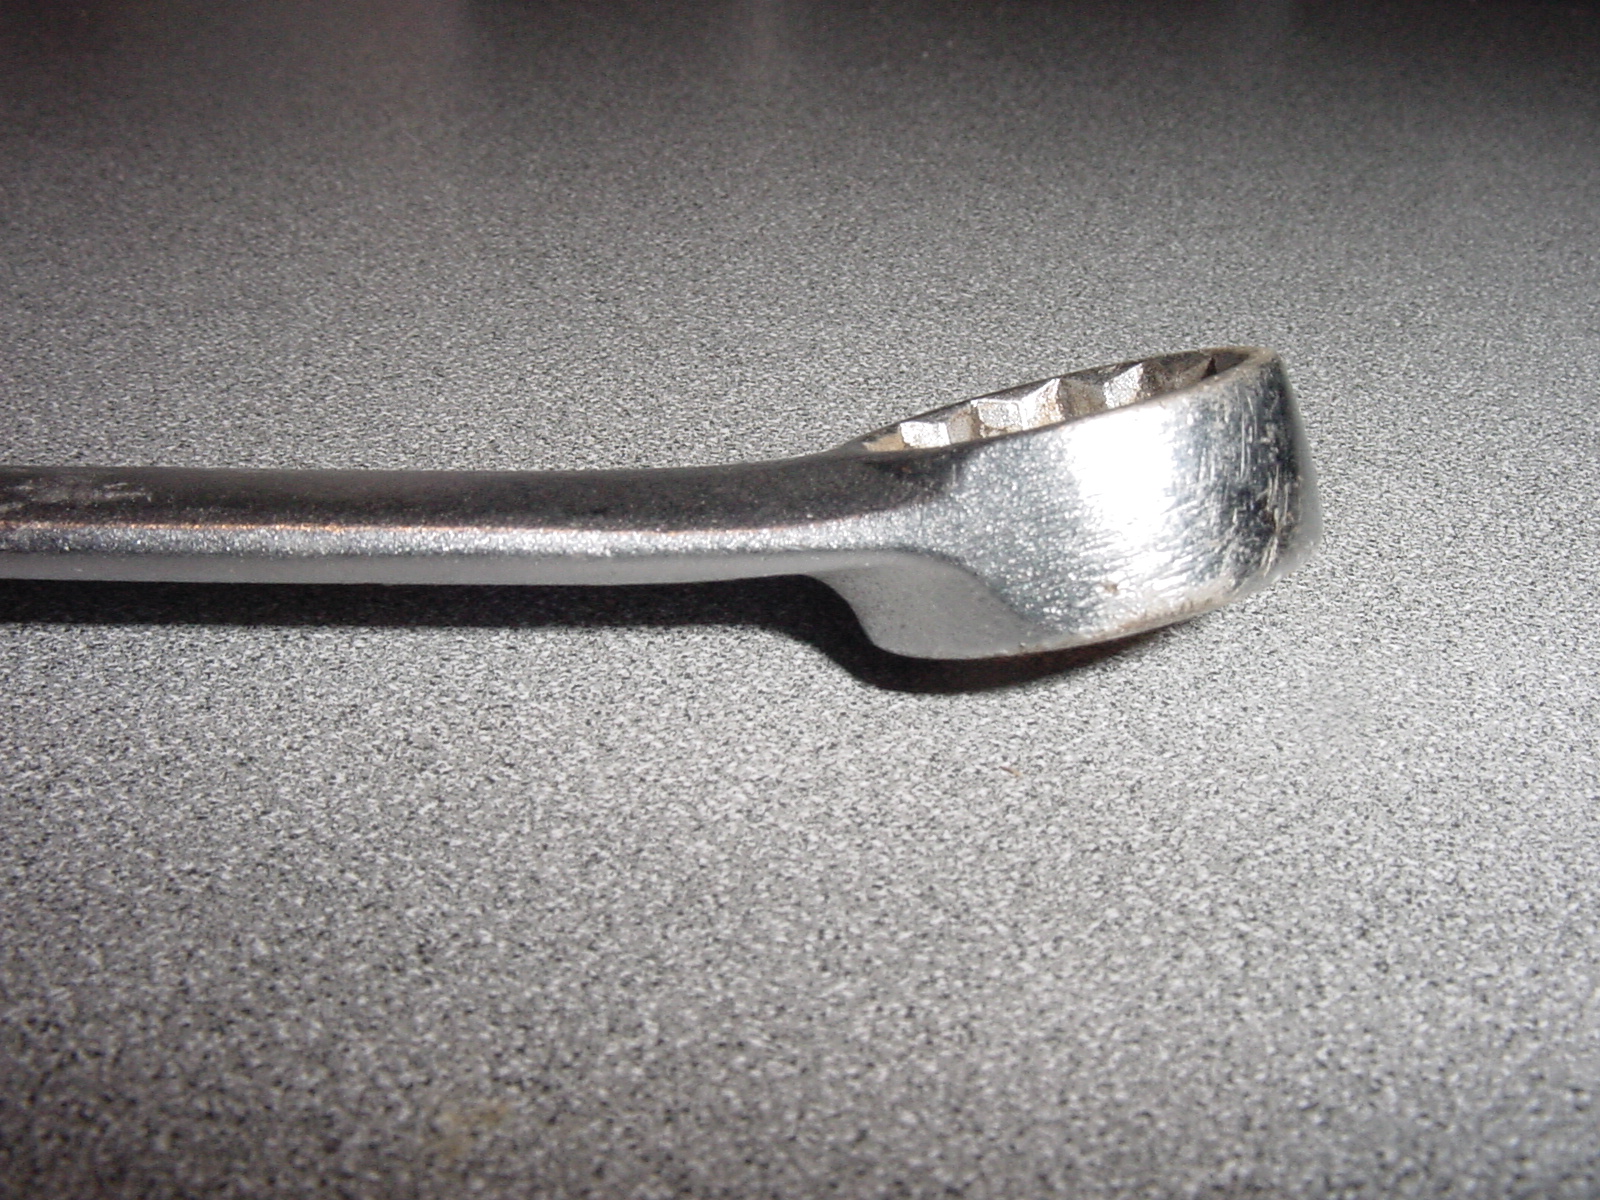
 In the first photo, you can see the 19mm bolt in the middle of the V-lever. When you stand beside the car, just to the rear of the door, and you look straight down, in between the forward part of the clamshell and the folded down B-Pillar, you will see the top surface of the V-lever.Here is a photo of a Sears offset 19mm wrench that works well in this instance:NOTE: BE CAREFUL to take note of the position of the V-lever on the transmission male key so that you can re-install it the same way. There is a key on the back, so it can be installed the correct way and 180 degrees off. So again, take careful note of the position of the V-lever so you don't reinstall it upside down.Regards, Maurice.
-
 1
1
-
-
Hi all! love the forum so far so here goes i recently picked up a 97 boxster which i couldn't not buy its almost summer i needed another convi.. well i knew the top didn't work but i could just pull the hard top off and was good to go.. today i decided to try my hand at figuring out why she wouldn't go up.. well there is some signs she is completly how you say @$%#&*... so how do i remove the clamshell so i can then remove the top and get a new one installed it is nice to have a working soft one just incase it rains while i'm out hammering the corners.. i looked in dyi sections ect. but i can't even getit to service mode.. hand brake up push the button all i hear is a click from rear middle of the clam...thanks in advance
It is rarely the convertible top frame assembly and canvas that need replacing (except for the vinyl window). Almost every time it is one or more of the other components, such as the double relay, the B-pillar microswitch, the black lever microswitch, either one or both transmissions (since yours is an "A Version" transmission Boxster), the drive cables, one of two fuses, one of two microswitches in the latch assembly, a dead spot on the electric motor, the emergency brake microswitch and idiot light on the dash, etc, etc...
If you car had a hardtop on it, the canvas top and frame assembly should still be there, tucked under the clamshell.
When you press the button, are you sure the clicking is coming from the center, under the clamshell, or is the noise coming from one or both sides, where the transmissions are located?
If it is coming from the middle of the clamshell, it is probably a case of your drive cables' outer sheath(s) having stretched, and thus not allowing the inner speedometer-type cable to be driven. That is turn will prevent the transmission on that side (or both sides) from rotating the V-levers.
Need a little more detailed description.
Regards, Maurice.
-
1
-
-
Frustrating day...the bolt and fat washer had 'drained' through and were under the car. I reconnected everything, synchronised the V-levers (or so I thought!) and hit the switch. The hood retracted and closed OK a couple of times but when I bought it fully forward, the gears overran again and I'm right back to square one! The clamshell is very slightly raised on the passenger side till, so I assume I wasn't fully synchronised. The idiot light has stayed on too. The rubber bushes on the front push rods are badly perished, so I'm going to order some new ones to see if that helps. Not sure whether it's significant, or not, but there does appear to be a couple of millimetres play on the left hand V-lever. Any ideas as to why I'm still over rotating? With the push rods disconnected, everything is very smooth.
Anyone know the part numbers for the bushes?
Darren:
The part number for the rubber bushes where the front pushrods connect to one arm of the V-lever are 986.561.881.00. The new rubber bushes will make the operation a little quieter, but it won't have any effect on the timing.
The power to the electric motor is cut off after it receives signals from two microswitches: The B-pillar microswitch (which is depressed/released by a part of the B-pillar frame itself) and the black lever microswitch (which is located on top of the electric motor and is depressed by the clamshell). After both of those are tripped, there is an "after-running time" of a little less than one second, after which power is cut to the motor and the idiot is shut off.
It's possible that since the clamshell did not close evenly (because the transmissions were not synchronized properly) it did not depress the black lever microswitch soon enough to stop the V-levers from rotating and thus you got the over-rotation again.
There is also a simple way of tripping the black lever microswitch a split second earlier and thus "fooling" the system to achieve your desired result. You can add a small 1/4 inch thick foam spacer by sticking it on the underside of the clamshell at the spot where it contacts the clamshell, and successively add one or two more pieces until you get the desired result. That will set off the "after-running time" a split second sooner and may be enough to fix the over-rotation.
Start by synchronizing the transmissions by operation the clamshell up and down a few times (with the electrical switch) while you measure the distance between the lower lip of the
rear of the clamshell and the top of the forward edge of the trunklid. Once it's one or two or three inches away from completely closed you can get pretty accurate measurements that should match a spot on the left side of the rear of the clamshell with an equivalent spot on the right side.
As to the "play" on that one V-lever, it may be wear on one of the teeth of the half-moon gear of that transmission, and that little play or slop may affect the timing slightly.
Regards, Maurice.
-
Hi Maurice:
I just changed the belt and applied force to the 15 mm bolt that is a part of the arm attached to the tensioner, I suspect this is the purpose of the 15 mm bolt. It all went well but oddly enough it was harder to get the old belt out than it was to get the new one in.
Thanks again for the help. It was greatly appreciated.
Mike
Mike:
Good work! I think next time you'll be able to do it with your eyes closed!
Make sure to check that the belt is correctly seated in all the correct grooves on each of the pulleys.
A couple more of these DIY's under your belt and it'll be just like the 1970 MG Midget!
Regards, Maurice.
-
Hi Maurice:
Thanks for the answer. I will twist on the 15 mm bolt and move it out of the way.
Mike
Mike:
Most people apply torque to the big nut (22mm, IIRC) in the middle of the pulley to move the spring-loaded arm. I'm not sure if the same would work with the 15mm bolt, but that may be an alternate way to release the tension on the belt.
Regards, Maurice.
-
Ok...progress! Ball caps arrived from Belgium within 3 days - thanks Martijn! Everything opened up, loosely synchronised and ball caps replaced, carefully marking up the push rod lengths,lubricated everything. Right push rod refitted - although I found it really tricky to get the cups back onto the ball! Is there an easy way? I went to refit the left push rod and dropped the 10mm bolt and fat washer - you've guessed it, down the drain hole in the tray! Aaaaagggghh! It's getting dark and cold now, so I've curtailed my repairs until the morning. Do I have any chance of recovering the boltt and washer? Where will it end up?
Darren:
Sorry...I forgot to tell you about the magnetic quality that the drain hole acquires whenever you are working near it!
You can absolutely recover the bolt and fat washer, but it depends on how far you are willing to go. If you remove the foam drain tray, you will expose the little plastic cup that has a hose pressed onto its underside, but you may not have to go to that extreme. You can also pull the outboard side of the foam drain tray out from under the lip of the sheetmetal that holds it in place and see if you can reach under the drain tray with a magnet leading the way.
If you haven't moved the car, take a look around the inside and the front of the rear tire on the passenger side. There's a remote possibility that the bolt and/or washer "drained" through the hose. If you don't find them on the ground, take a length of wire hanger and attach a powerful magnet to the end of the hanger wire that is in your hand and fish the other end down into the hole. Make sure that whatever you fish down there does not have a sharp end or you will run the risk of tearing the foam drain tray or the plastic cup under it. BE CAREFUL NOT TO TEAR ANYTHING or you may end up with water under the front seat.
You also should make sure that any water that drains into the foam drain tray actually empties completely out of the bottom of the drain pipe (and does not back up or end up in the cabin) in case one of those two parts is blocking the drain.
Regards, Maurice.
-
So I apply force to the 15 mm nut shown next to the tensioning roller shown in the top left photo in the DYI section, right? Is it spring loaded so it will snap back? I want to make sure so I do not break something?
Thanks again for the help. I really appreciate it.
Sometimes I miss my 1970 MG Midget. Sure I had to fold myself in half to get in it and it might do 100 mph downhill but one could work on it (as I had to often) with a screwdriver and an adjustable wrench (and a hammer). Actually what I miss is a Haynes manual for the Porsche.
Mike
Mike:
It is spring loaded and it will snap back. When you put pressure on it, it relieves enough tension so as to enable you to pull off the belt. When you re-install, you again have to relieve the tension by pulling on it so that you can install the new belt.
Regards, Maurice.
-
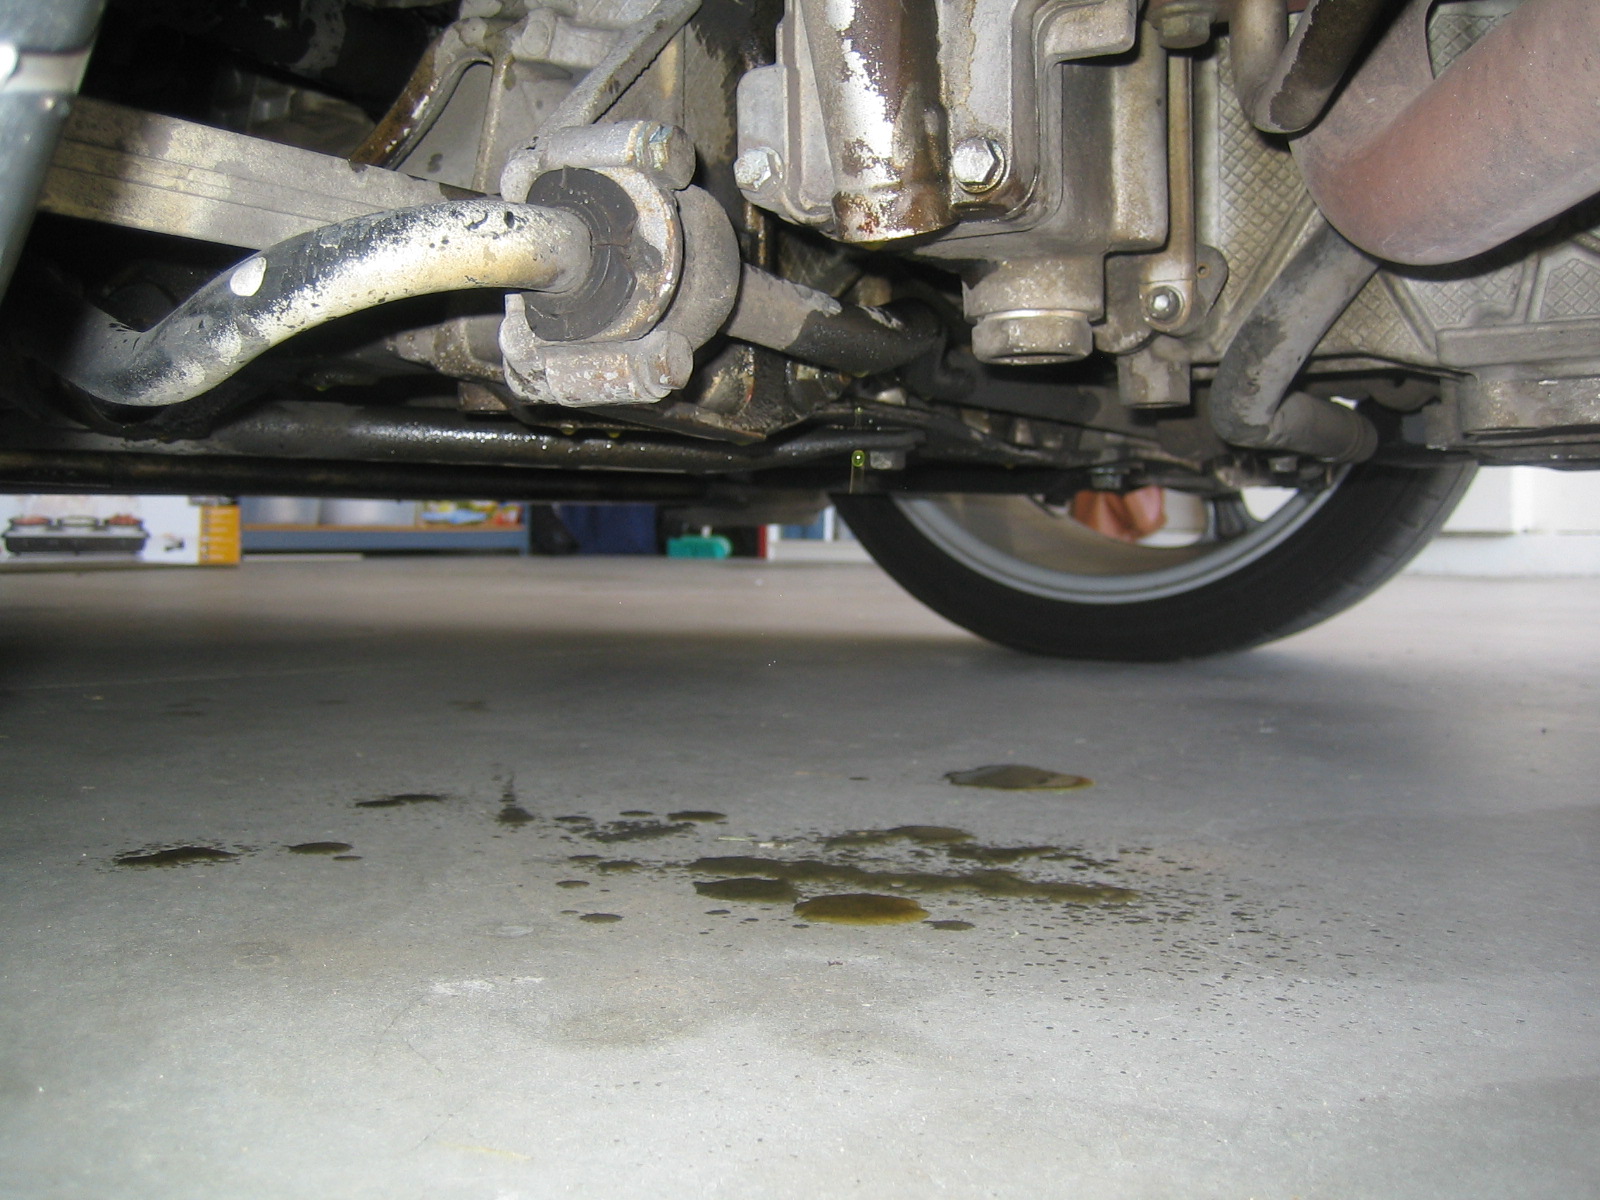
Last night, in the dark, I thought I had an oil leak. Turns out it is water aka coolant. I raised the car up and could not find the source.
I started the car everything sounded fine. No leaking let it idle for 10 minutes still no leak. Drove it around the block and looked again and it was raining coolant from what looked like the front of the left side of the motor. The heat shields were in the way so I could not get a good look. I took a couple of pictures.
Any thoughts as to next steps before I blow my bonus over at the dealer service department?
Glad it's coolant!!!
Take a look at the DIY so that you can get an idea of the location of the coolant reservoir and the hoses around it so that you can isolate the source of the leak: http://www.renntech.org/forums/index.php/tutorials/article/232-diy-replace-coolant-reservoir/
Regards, Maurice.
-
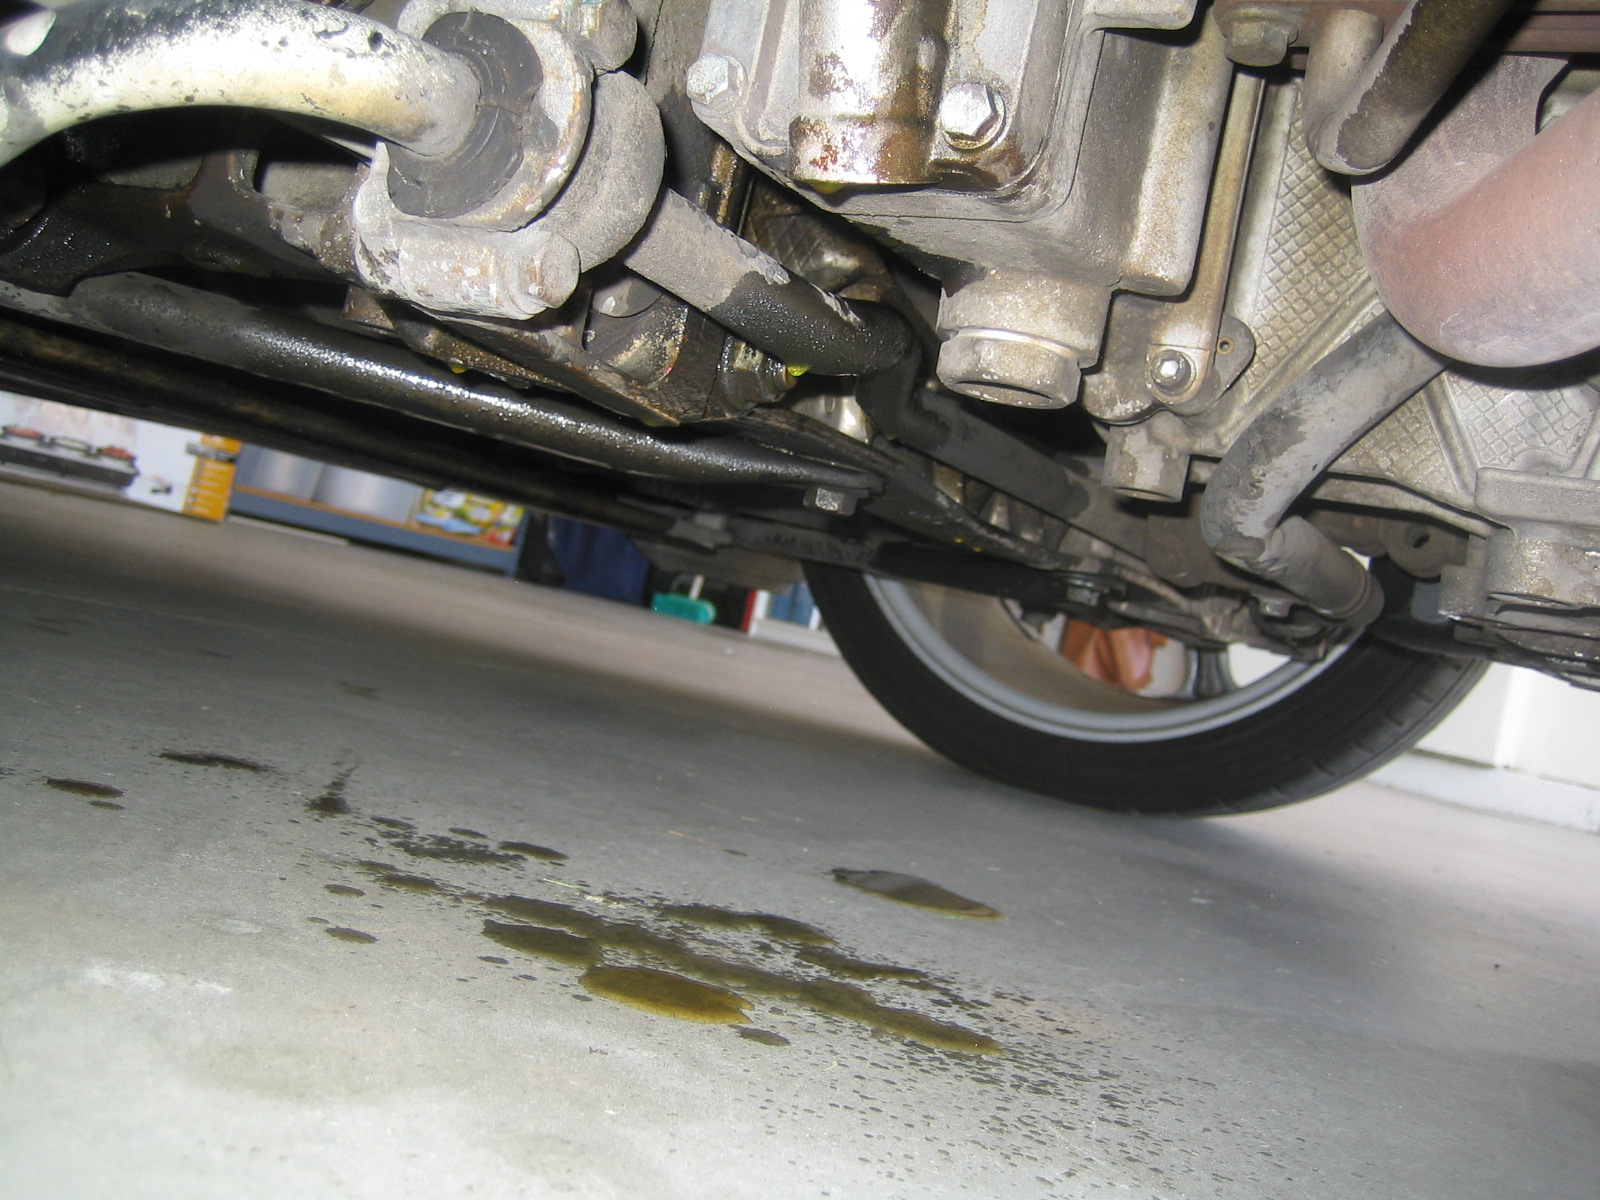
Puddle is directly under the oil filter, near as I can tell...I gave it a quick look on my way out the door today.
Appears the puddle might be water with antifreeze. Could explain the oily feel last night when I dragged my hand through it. Nothing conclusive yet. I will jack up the car tonight and crawl under it for a closer inspection.
Sure hope this amounts to something trivial <fingers crossed>
Good news if the puddle is directly under the oil filter.
If it's oil, it may just be the large o-ring seal on the oil filter, or that the oil filter housing somehow got loose or cracked.
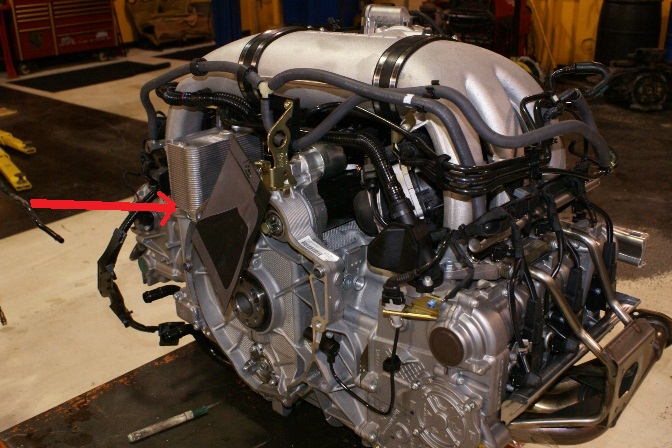
If it's antifreeze, it may be coming from the oil cooler, which is on top of the engine, but almost directly over that area.
The oil cooler has four o-rings (two for the coolant passages, and two for the oil passages). I would check to see if it's any one of those, which would show up at the point where the oil cooler mates with the top surface of the block.
Here is a photo of the oil cooler on a 3.8 X51, with the arrow pointing to the mating surface:
This should give you an idea of where to look.
Regards, Maurice.
-
Heart break comes to mind....
I went off to enjoy a great spring day, run to the gym etc. later tonight I see I have a fresh puddle of oil under the car (i am guessing 1/2 qt) . Any suggestions what I might begin with looking for?
Car seems to run fine with no abnormal symptoms.
A 1/2 quart of oil all of a sudden is a LOT of oil for a leak with no prior history of leaking.
First try to determine if it is engine oil ( and not power steering fluid, for example).
If it is engine oil, and you can determine that it is coming from the point at which the transmission is bolted to the engine, then it is either your RMS or your IMS.
The RMS does not usually leak that much all of a sudden.
If the leak is coming from your IMS, proceed with caution as that could be a sign that your IMS bearing or flange is failing. If it does fail and you run the engine, the engine can self-destruct.
I don't want to be an alarmist, but you should carefully explore the possibilities and determine the source of the leak.
Regards, Maurice.
-
Boxster '00 S.
I pulled into my garage this evening after driving 10 miles and had a puddle of water directly below my coolant reservoir. It was dripping while I watched (as best I could).
I filled it to below the max line just this morning. I did so because the coolant showed 1/4 inch below the minimum line.
Is there an overflow tube there?
Sound like a leak. I replaced that tank 4 years ago. Sheesh
Kent:
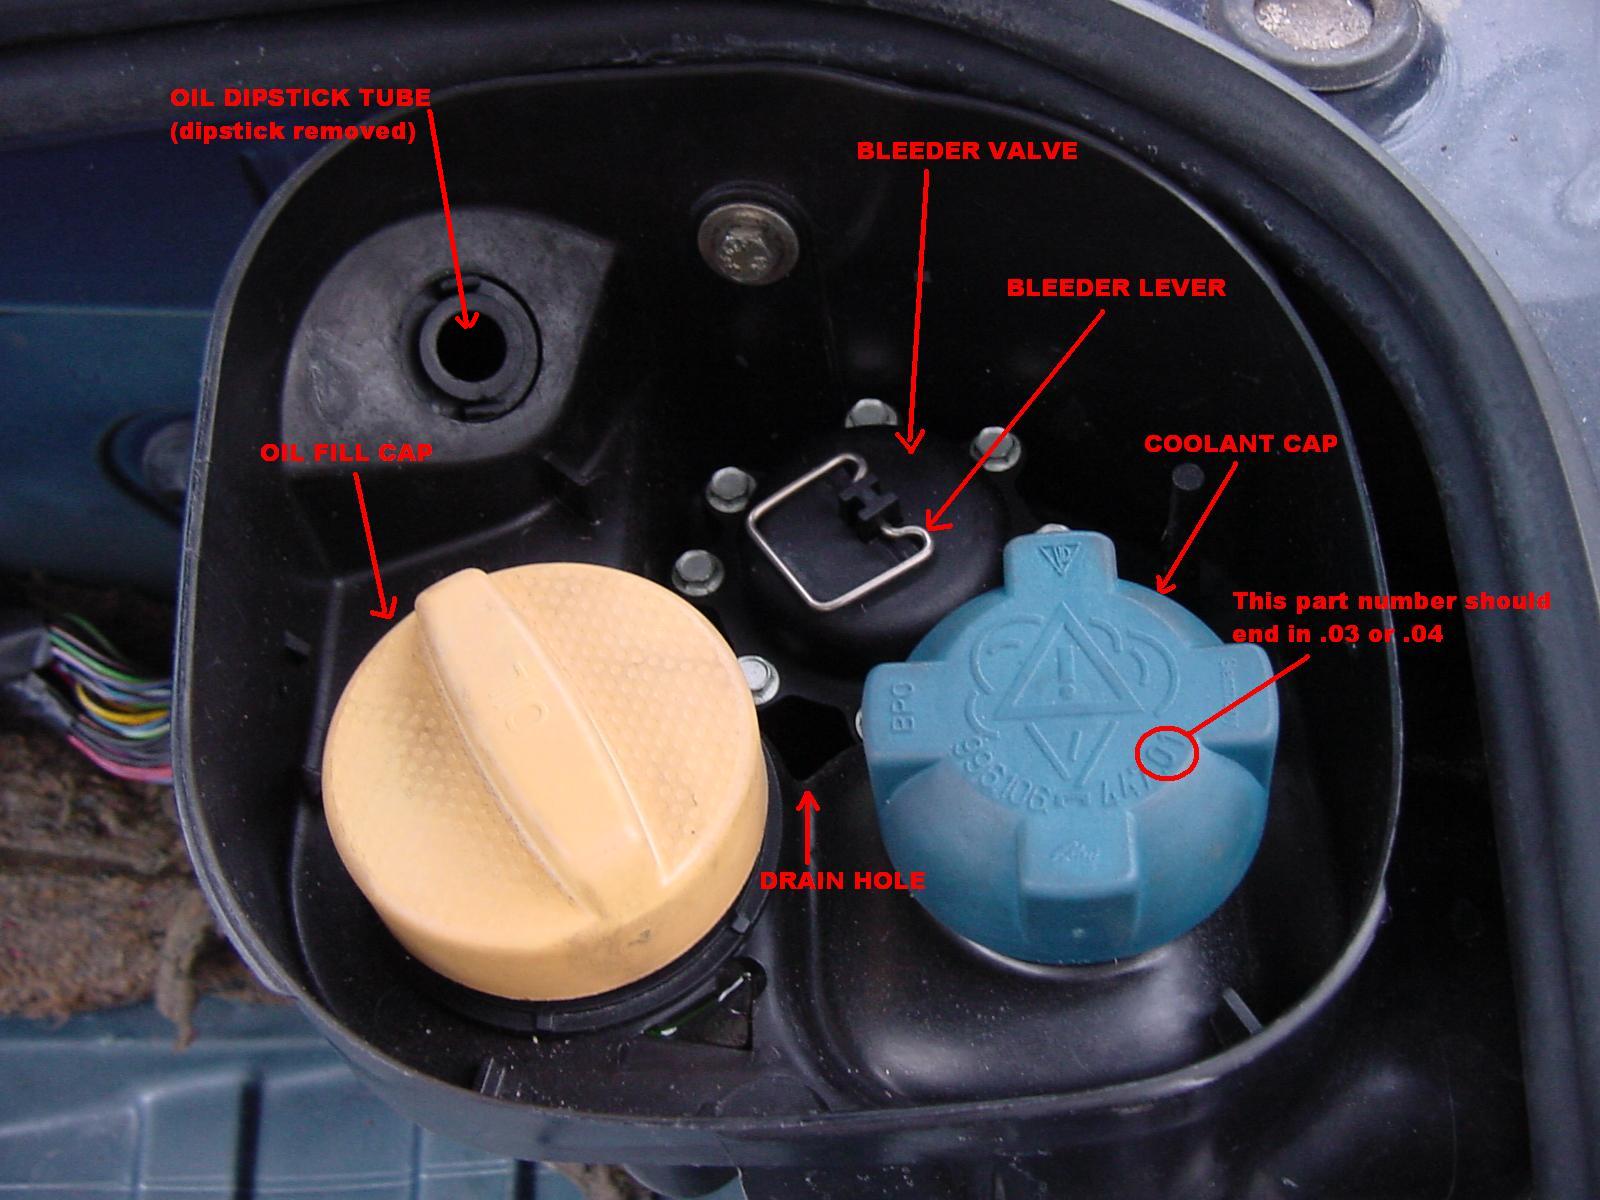
There is an overflow tube that runs from underneath the drain hole which at 9 o'clock when looking at the coolant cap (with the thin black plastic cosmetic cover removed), goes through the rear firewall and is then routed to an area just inboard of the right rear wheel well. The overflow will usually end up dripping onto the ground just inside the right rear wheel.
Since you just filled it, I would first check whether any coolant has indeed overflowed by pulling the small black plastic cover off (after removing the coolant cap and the oil fill cap).
Here is a photo of where the drain hole is located (disregard the other labels):
Regards, Maurice.
-
1
-
-
I think JFP is right, as usual...
Here is some information I had gathered about three years ago:
Cost of replacement Heater Blower Motor for 986 Boxster at dealer (part #996-624-107-01-M262; OEM part #1J1 819 021 A): $317.50.
Cost of same replacement Heater Blower Motor for Volkswagen Jetta Wagon 2.8 at VW dealer (part #VAG-15418-M177; OEM part #1J1 819 021 C): $121.
I have compared the photos at Pelican Parts with the actual blower motor from my Boxster and they are the same.
BTW, the Boxster part on my '97 has a prominent "VW" logo on it.
Regards, Maurice.
-
Does anyone have access to a shop manual or a link to a Porsche 996/986 6-speed schematic with part numbers? I can't get my 99 C4 into reverse because a white "L-shaped" plastic piece on the left side of shifter that engages the reverse gear has completely disintegrated...need that part number! Cheers!
Do you see it here?:
Regards, Maurice.
-
Maurice
Thanks! I see from the other threads that you may have a contact to supply the ball cups. Would you be able to send me the details please?
Thanks
Darren (matspart3)
Darren:
PM Sent.
Also, remember to NOT operate the top while the front pushrod(s) is/are dangling and not attached to the steel balls, as they can dig into the foam drain trays and rip or tear a hole in them. Considering that you get lots of rain over there, it wouldn't be long until the water would find its way into the cabin and promptly fry the central alarm computer under the left seat.
Regards, Maurice.
-
Thanks Maurice
Everything was going fine! I followed your (excellent) instructions to the letter, reconnected the cables with the clamshell in the 45 degree position then moved to the dashboard switch.
The roof began to retract normally then, about 2 feet into the process, there was a loud crack from the passenger side and the hood fell forward. The clamshell was still up and, on the passenger side, I could see that the red plastic cup had broken in half. The V-levers are also in very different positions, as shown in the pictures.
I've closed the clamshell by using the drill and cable method but, after I've found a new cap, what's next?!?
Mat:
Either the two sides of the top were not synchronized (thereby putting more pressure on one side) or the plastic ball cups are brittle from age. Since your plastic ball cups are red in color, they are the originals that came with the car. The red ones were replaced with white ones that are more flexible and less prone to breaking from age, so you should replace the other, still intact, red ball cup and keep it as a spare.
Once you replace the ball cups, you must synchronize the top so that both sides operate simultaneously. Take a look at the instructions at the bottom of page 38, and the photo at page 39 of the Part III PDF file on Mike Focke's website, here: http://sites.google.com/site/mikefocke2/installinga'03-'04glasstopandframeona'97 to get a starting point for synchronizing the transmissions.
Once you have the V-levers rotated to the correct position and you have re-connected the plastic ball cups onto their respective steel balls, carefully observe the operation of the top and of the clamshell until you are sure that the transmissions are synched. A good way to double check is to eyeball (or measure) the clamshell while standing behind the car. When it gets to about 1 or 2 inches away from completely closed, it is easy to judge whether the clamshell is level (which means that the V-levers are at the same degree of rotation and the transmissions are synchronized).
Regards, Maurice.
-
Hi all
I've managed to confuse the hell out of myself reading various threads on here, so I started a new one!
My 1998 Boxster roof won't open and today is the first (and probably last - knowing the UK weather - blue sky day)
When I unlatch the top with the handbrake on, the windows drop a few inches. When I press the dashboard button the lights dim, the motor clicks briefly and I can feel the cables tensing in their sheaths under the clamshell. That, however, is as far as it goes; there is no further movement. Keeping the button depressed makes the motor click at intermittent intervals and both windows drop fully. The idiot light stays on permanently.
From reading previous threads, I guess the V-levers have over rotated but what is my next step? Thanks in anticipation
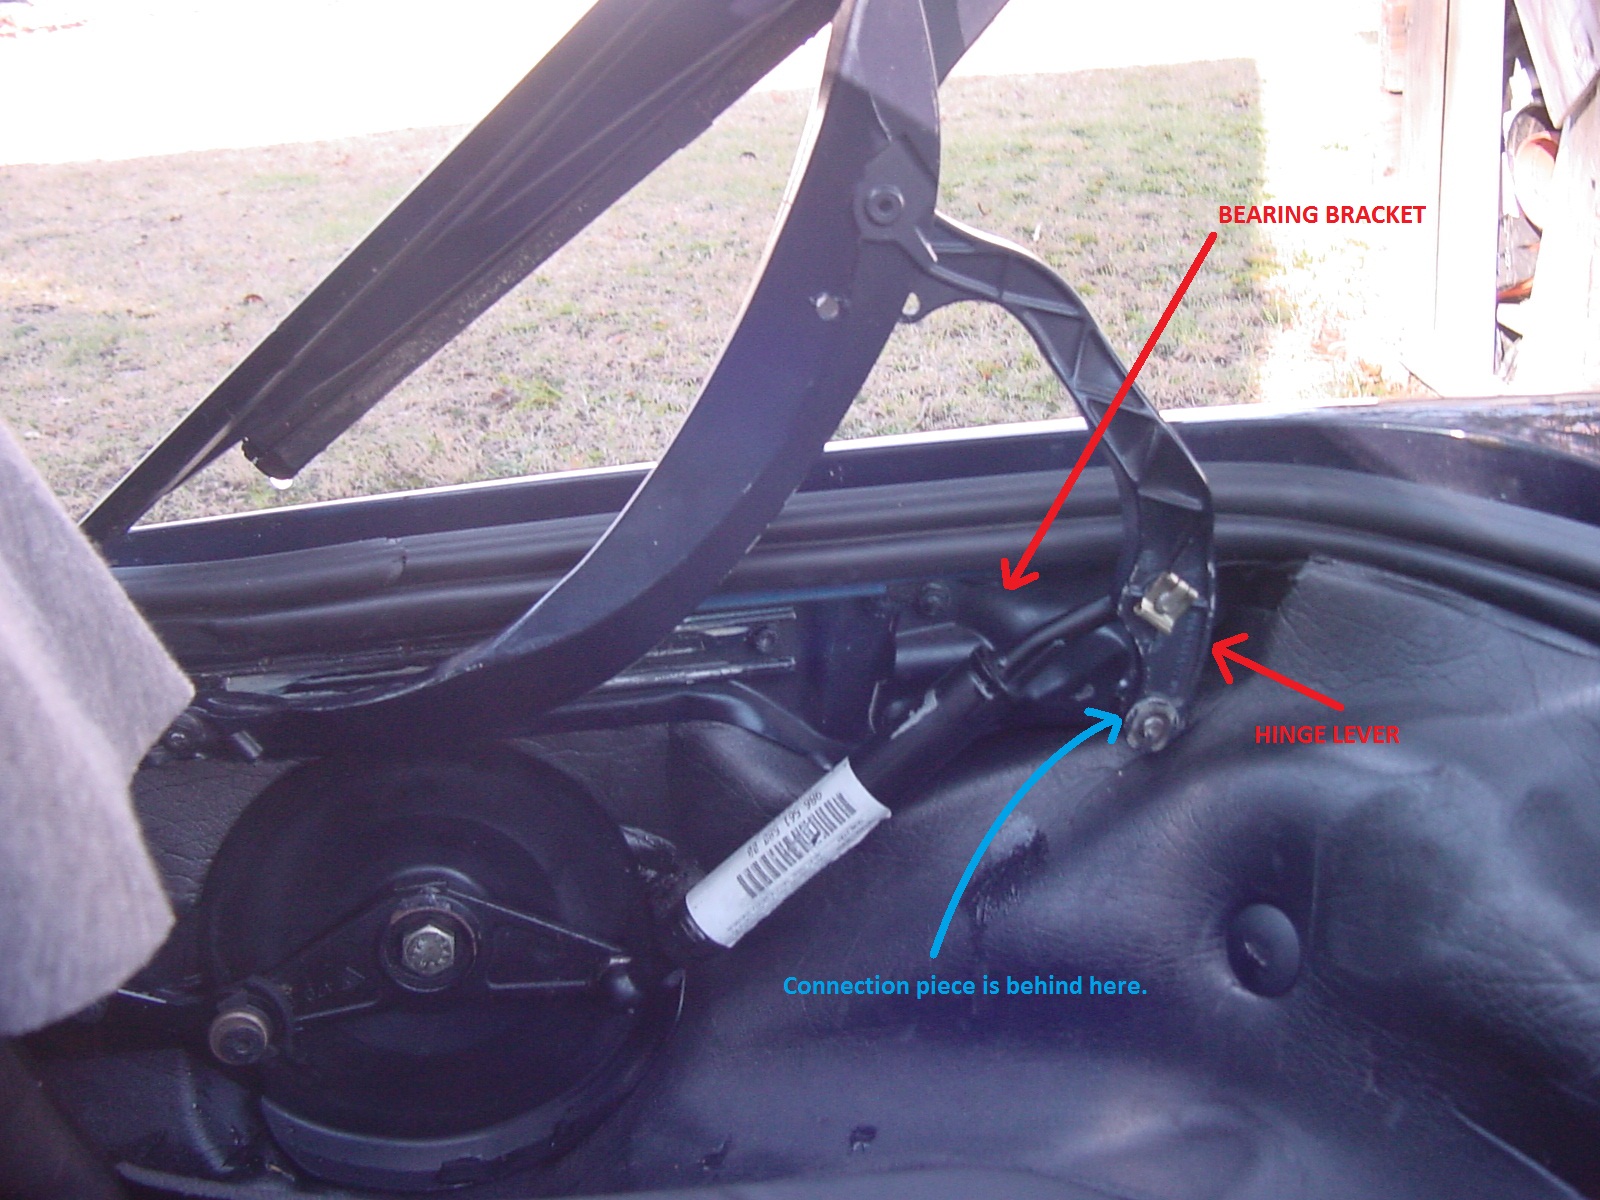
Edited to say that whilst feeling around the sheaths, I found the part shown
Mat:
The little plastic piece that you found fits in between the bearing bracket and the hinge lever which is connected to the body-colored support arm of the clamshell. That piece is not the cause of your malfunctioning top. Here is a photo showing where it is located:
From your description, and because you have the "A Version" transmissions on your '98, it does indeed sound like your V-levers have over-rotated and thus cannot go in the other direction.
Your next step is to disconnect the two cables at each side of the electric motor and spin the V-levers by using a cordless drill. By doing so, you will "un-pretzel" the position that the V-levers have gotten into by virtue of the over-rotation.
Here are instructions that I had written up some time ago:
The easiest way I have found to access the 'works' if the top is stuck in the closed position is to partially and gradually open the top by using a cordless drill. Since you described the power drain and the loud cracking sound, your drive cables are probably intact and thus you can use this method after unlatching the top latch.First, reach under or through one of the roll bar hoops so that you can grab the thin metal bar that runs from left to right and that is attached to the rearmost edge of the black vinyl apron under the rear bow of the convertible top frame. That long bar (flat metal bar with a 90 degree bend, about 2 1/2 feet long) is attached to the rear firewall in the convertible top well by means of two small plastic brackets or receptacles, one on each side, about 1 foot to each side of center, 8 to 10 inches from the level of the clamshell when it is in the closed position. Reach for one side at a time and twist it off the brackets by turning it down and rotating it towards you. That will free the vinyl apron from the firewall and give you access to the sides of the electric motor.
The electric motor is located exactly in the center of that rear firewall and, in a '97 also has a small lever mounted on the top of it. You will see the black vinyl sheath of each of the two drive cables going into the sides of the electric motor. There is a brass colored upside down U-shaped clip preventing each cable from being pulled out of the side of the electric motor. The U-shaped clip has a little tiny shelf at its top surface and that is what you should push upwards on to remove the clip. Once you have pushed the clip up and off, grab the cable where it goes into the side of the electric motor and pull it in an outboard direction. Do that on each side.
Once you have pulled the vinyl sheath off, you will see the inner steel (speedometer-type) cable sticking out by about 3/4 of an inch.
Put one of the inner cables into the drill chuck and set the power drill on a LOW TORQUE setting. Now operate the drill while observing the direction of rotation of the V-lever on that side. The V-lever is located just behind the base of the B-pillar, below the level of the top surface of the rear-quarter panel. If you are spinning the drill in the wrong direction, you will hear that loud cracking noise again as the black "hydraulic" pushrod pulls the half-moon gear past its last (50th) tooth and the top will NOT start to open. In that case, spin the drill in the opposite direction and you will see the top start to open slowly.
Just spin that side for a few seconds, then disconnect the drill from that side and insert the other drive cable into the chuck. Repeat the same procedure as above until the other side of the front edge of the top has reached the same spot at the side you did first. Then go a little further with that side.
Now just repeat, alternating each side and that will allow you to open the top until you get the clamshell in the 45 degree position. That will give you clear access to the electric motor so that you can re-insert the drive cables and then install the U-shaped clips to lock them in.
That should do it. Keep us posted.
Regards, Maurice.
-
Hi folks! 1997 Boxster, 2.5L. Standard issue, nothing aftermarket. 105K on the miles.
Two weekends ago, had a friend help me change out the rear main seal. Enough evidence to prove it was in fact leaking. No problems with the change out. Actually went a lot smoother than I expected and the entire job was finished in about 4.5 hours.
The following week, I notice oil on my carport floor. Crap! Start to investigate, and I find oil had pooled on top of the engine block, mostly on the right (passenger side) from the throttle body area forward. Lots of oil. Enough to fill the casting divets on top of the block and overflow to the sides of the block. Soaked it all up with some paper towels, cleaned as best I could with some brake parts cleaner. I also drained about a quart of oil thinking maybe there was too much in there. I had added some Lucas stop leak to slow the main seal leak temporarily until I could get to it. That was about a week before I changed the seal. I was thinking I had added too much and caused a little (some) oil to blow out??!! Obviously, I'm no mechanic or expert. The dip stick read about a 1/4 quart below max after I drained some.
Drove the car, and yes, lots of oil on top the block again. To add to the pain, my starter died. So, I pull the starter, and while I'm at it, I pull the housing between the two intakes, and loosen the passenger side intake. Didn't remove it, just loosen it so it could move a little for me to see around it.
I see nothing obvious that would cause a leak. Check all that was visible for tightness and for cracks, etc. Nothing obvious to me. So, what next? I have no idea where to start looking. Any help is greatly appreciated!
Thanks
Brian
Brian:
Taff has covered most of the possible sources of oil that might end up on top of the block.
I would add the little o-ring that is at the base of the dipstick tube, and the larger o-ring that is at the base of the oil fill tube (where each one meets the block).
A good way to locate the source of the leak would be to clean the top of the engine again and monitor it at short intervals to see where it is originating.
Regards, Maurice.
-
Proud owner of a '99 Guards Red Boxster. Thanks to excellent instructions on this website I completed a brake fluid flush using a motiv power bleeder and I also cleaned out my radiator ducts. I removed the bumper cover and pulled out probably 3 lbs of various trash, leaves, cig butts, grass, rocks, etc.
Now for the is it normal question, last summer I noticed while sitting in traffic that the normal stable temp gauge (right between the 8 and the 0 of 180) was climbing steadily up. This occurred on several occasions but the temp always came down once moving down the road. I read about the clogged up radiators and could see junk down in the ducts that I couldnt reach with the crevice tool on the shop vac. So I planned the cleaning for this spring which I did. I drove it the next day and it was about 72F out (Not hot) and while sitting at a traffic light the temp starts climbing. Is the temp climbing normal? Should I be checking the radiator fans? At what temp do they normally turn on?
Lumpy:
Congratulations on your new ride. Drive it in good health!
Here is a recent thread on the topic of cooling fans and some of the likely causes of failure: http://www.renntech.org/forums/index.php/topic/37254-radiator-fan-question/page__p__197445__fromsearch__1#entry197445
Regards, Maurice.
-
1
-
-
Have a 2000 C4 Cab. Searched and read topics on this issue - Opening Driver Door, window starts to come down but not enough to clear the top (maybe 1/4"). I can manually push it down the extra 1/4" and reclose door and window will move up automatically for a tight fit. I used the forum and did the test of raising the window to top and trying to push down and it was firm. So I'm thinking its the window regulator (please confirm diagnosis). My secondary question I didn't see answered is the cost/part number. Is this really the $250'ish part that needs replacing - noticed it comes without motor. Do I need a new motor too? (seems to be working fine). re: part number - can't seem to find one for a 2000 (found 2002)?
Thanks
gmorris:
The most likely cause of the "slack" that you found by being able to press the window down the additional 1/4 inch that you described is a worn, frayed, or stretched cable in the window regulator assembly, or wear/ crack in one of the plastic parts through which the cable runs. Because of the extra slack, the window does not retract the full normal distance of 13mm (1/2 inch).
To diagnose it more definitively, observe the window closely (i.e., listen intently) when it drops down upon pulling on the door handle...if you hear the electric motor engaging a split second before you see any movement, that will mean that there is slack (which must be taken up before there is movement). You can compare it with the action on the passenger door so that you can see what the normal condition looks (and sounds) like. If your passenger door regulator is intact, the window should start to move at the exact same time as you hear the electric motor engage.
The part number for the window regulator is 996.542.075.04, and it does cost around $200. Check with board sponsor Sunset for a decent price.
I think that the listing that you may be looking at shows the part as "-02", which means "up to 2002", i.e., not just 2002.
The electric motor is a separate part, but these motors are not known to frequently fail. It is almost always the regulator that fails.
Also, be aware that the part for the window regulator is the same for Boxsters and 911's, but that you must adjust a small insert at the bottom of the forward leg of the regulator to make sure that the window goes down to the right level depending on your model. That small issue is dealt with and illustrated in another thread. If I find it first, I'll post a link to it.
Regards, Maurice.
Update: Here is the link for removing the door panel of a 996: http://www.renntech.org/forums/index.php?/tutorials/article/31-door-panel-removal-install-instructions/
Here is the link that deals with the correct bump stop position for a 996: http://www.renntech.org/forums/index.php/topic/16646-window-bump-stops/page__hl__regulator
-
It is the German way to make the difference between the number O and the letter O in electric diagrams, terminal 38 does not exist on such relay, according DIN standards.
RFM:
Thanks for the clarification!
Regards, Maurice.
-
As I promise my Porsche already hybernate, the winter is gone here in Michigan. I just want to follow up my thought about the coolant smell thru air conditioner and in fact was true. My heater exchanger was leaky as I check thru the proper steps. Here I include few pictures. I will order the Heater core today as I don't think Porsche have in stock, I'll try pelican parts first. As you can see in the pictures there is evidence of deposit residue and the bottom of the heater exchanger.
Well, that's all.
:thankyou: B)
Jose:
Looks like you definitely found the problem.
You might want to consider taking your heater core to a radiator shop and to have them evaluate whether it's possible to seal it. They can usually turn that around in a few hours and it's going to cost a lot less than a replacement from Porsche.
Thanks for posting your progress and the photos.
Regards, Maurice.
-
Contact Actron, they have two testers for fuel that retail for around $40, and ask if they have the correct adaptor for this application. If they do, that will probably be your cheapest out as everyone else is way over $100 for what you need. And don't even think about buying tools from Porsche, they are just plain nuts on pricing.......
Thanks again JFP. I finally got a proper tool to test the fuel pressure. This is good to eliminate a bad fuel pump or a rupture U pipe in the tank located on the pump canister. The Actron fuel pressure gauge is good Fuel pressure gauge # CP7838 but all the adaptors in the kit are useless for a Porsche. You have to get at the same time for less than $4.00 the right angle adaptor # 01800-000-1299. Just connect the adaptor and the gauge to the port beside the fuel filter and if you got 43.5 to 58 psi it is a good news ;-) (repair manual page 544). Of course you have to activate the fuel pump relay with Durametric to check the fuel pressure without starting the car. Or remove relay #13 from relay carrier #1 above the fuse panel and jump terminal 30 and 87.
jpflip:
The terminals that you have circled look like number 38 and 87 in the diagram.
Thanks for posting the tool and procedure.
Regards, Maurice.


top Issues
in 986 Boxster Convertible Top Issues and Solutions
Posted
Do you have water/moisture in the foam carpet pad under and behind the driver's seat?
Also, check fuses B6 (supplies power to the relay) and D3 (supplies power to the electric motor.
If those two are okay, take out the double relay and give it a couple of sharp raps on the ground. That will sometimes "wake up" the relay.
Regards, Maurice.