Welcome to RennTech.org Community, Guest
There are many great features available to you once you register at RennTech.org
You are free to view posts here, but you must log in to reply to existing posts, or to start your own new topic. Like most online communities, there are costs involved to maintain a site like this - so we encourage our members to donate. All donations go to the costs operating and maintaining this site. We prefer that guests take part in our community and we offer a lot in return to those willing to join our corner of the Porsche world. This site is 99 percent member supported (less than 1 percent comes from advertising) - so please consider an annual donation to keep this site running.
Here are some of the features available - once you register at RennTech.org
- View Classified Ads
- DIY Tutorials
- Porsche TSB Listings (limited)
- VIN Decoder
- Special Offers
-
OBD II P-Codes - Paint Codes
- Registry
- Videos System
- View Reviews
- and get rid of this welcome message
It takes just a few minutes to register, and it's FREE
Contributing Members also get these additional benefits:
(you become a Contributing Member by donating money to the operation of this site)
- No ads - advertisements are removed
- Access the Contributors Only Forum
- Contributing Members Only Downloads
- Send attachments with PMs
- All image/file storage limits are substantially increased for all Contributing Members
- Option Codes Lookup
- VIN Option Lookups (limited)


1schoir
-
Posts
2,739 -
Joined
-
Last visited
-
Days Won
6
Content Type
Profiles
Events
Forums
External Paint Colors
Downloads
Tutorials
Links Directory
Collections
Store
Posts posted by 1schoir
-
-
I search the whole list and did not see this request...........
Can I get a number for the fabric top? and the liner (i think was added in 2000). Has anyone added the liner to their pre 2000 boxsters?
Can the seat leather be purchased from porsche? If so, what are the part numbers (driver, passenger)?
Thanks.
SGG
There are two different part numbers for the liner, depending on whether it's up to and including MY02, or from MY03 on.
Up to MY02 is 986 561 025 02
From MY03 on is 986 561 025 03.
So, unless you are doing a complete top replacement (including the frame mechanism) so as to get the "real" glass window convertible top, you are looking at the first part number (that ends in "02").
The convertible top part # is 986 561 915 03 (again, up to and including MY02) and part # 986 561 915 05 for MY03 on.
Not sure about the seats.
As for adding the liner to a pre 2000 Boxster, I read that it has been done but cannot find the link.
Regards, Maurice.
-
Hello all,
I've been reading here for about 5 months and have learned a lot. This is my first post and don't know what I'm doing.
2 days ago, something (car/suv with a trailer hitch or something) backed into the front bumper of my 02 Boxster, just above the license plate. The mark is about 2 inches wide and 4 inches long and rectangular and left about a 1/2 inch depression (dent).
I don't know anything about anything so please bear with me. Can this be fixed? Is it plastic or fiberglass? Do I have to replace the whole bumper cover?
I love my car so much and it hurts me to see this damage. I literally squint every time I look at it, so as not to look at the whole ugliness. Any help? suggestions? recommendations? where to send it? Any idea how much it will cost?
I don't know what to do, and out of desperation, decided to post this PLEA here. Everyone here seems knowledgeable and helpful so, here it is.
aaaaaaaaaaaargh!!!
I live in New York City area, but also have access to the surrounding area, NJ and thereabouts.
Please help. I am not even sure how to see if any, responses to this post, so if there is anyone nice enough to help or suggest, you can also e-mail me at.... email-jr@hotmail.com
Thanks
J.R.
:(
J.R.:
In many cases, the type of damage that you describe can be repaired without a complete bumper cover replacement. The bumper cover is not made of fiberglass. Fiberglass does not dent, it cracks.
Any competent body shop could handle this job, as there is no specific Porsche cars knowledge required for this kind of repair. The most critical parts are that the color match be done properly (and the most demanding test of this is by looking at the repair under fluorescent lights after you have inspected it in bright sunlight, from different angles) and to insure that high quality base coat and clear coats are used with sufficient (no skimping) amounts of flex agent mixed in so that you don't end up with a paint job that is inflexible and will thus crack easily.
Remember, the bumper cover is flexible and the paint must flex along with it, or it will produce cracks or spider web-like concentric circles when pressure is applied.
If you are going through insurance, let your body shop show the damage to the insurance appraiser and let the body shop negotiate for the cost of the repair. Do not do this part yourself.
If you would like the name of a reputable body shop on Long Island (Nassau County) that will guarantee the work, drop me an e-mail and I will supply it to you.
Regards, Maurice.
-
Finally got the chance to look at removing some of these parts so far I have removed the door handle covers and it wasn't easy at all just like Chris mentioned. I managed to broke one of tabs and saved the other.
2: Do I need to remove the door panel in order to remove the door pull (or grab bar) "yellow highlight" ?
Panameras:
The door panel does NOT have to be removed in order to remove the grab bar.
Since you have already removed the door handle covers, you will have already exposed one of the two large torx screws that must be removed to get that grab bar off.
To access the other screw, you must remove the small vinyl/plastic semi-circular ring that is located just forward of your yellow arrow. Just slip in a small PLASTIC blade under the left side(as you are facing the inside of the drivers' side door) near its uppermost portion (just below that left corner) and then rotate the top of the part towards you with some friction. That semi-circular ring is flexible and has an "up" position that is indicated with an arrow on its underside, so you can't put it back wrong.
Once you have both large torx screws removed, just grab a hold of the grab bar and pull it towards the front of the door and it will slide right off. To re-install, you will see it has two hooked tabs on the bottom rearmost surface of the grab bar that fits into two slots on the top of the door pocket.
Regards, Maurice.
-
I've been trying to figure out why my floor carpet padding has continued to get wet when it rains even though I know that all of the drains (3 front, two in each door and four rear) are clear and all of the top and window seals are intact and mating properly. The water was worse in the rear, and I suspected that the water in the front had migrated forward beside the seats. After reading here and at 986forum.com, I suspected a possible breach in the foam top well drip pan, probably in one or both of the forward corners behind the seats.
I found a fairly significant tear in the foam behind the passenger side, where the various plastic fittings for the top structure secure. I patched it with a comination of waterproof gorilla tape and silicone sealant.
The only other breach I found which did not appear to be part of the design was in the front left corner at the bottom behind the driver side door jamb, where the foam was split as if something about the size of my finger had torn through it. I sealed that corner with silicone.
Before sealing the corner, I traced the path back to figure out what had torn the foam. I found that the plastic ball fitting on the rod which connects the top to the rotating plate for raising and lowering the top on the driver's side had sheared at the base of the ball. The rod was lying in the base of the foam drip pan, where it had apparently been sliding back and forth each time the top was raised or lowered and the jagged plastic had torn a hole in the corner of the foam.
I removed the rod from the rotating plate.
Here are my questions:
1. The plastic fitting which covers the ball on the top strut appears to screw onto the rod. Can the plastic fitting be purchased separately and be replaced without replacing the rod?
2. The end of the rod which attaches to the rotating plate has a rubber bushing which (based on the intact rod on the passenger side) looks like it is supposed to have two joined pieces which cover either side of the flat part of the rod under the torx bolt and over the connection point to the plate. The connection of these two sides of the bushing has torn and the bushing appears to need replacement. Can that part be purchased separately?
3. The rod is two pieces with a sliding fitting in the middle and an adjustment nut for the length of the rod. How do I determine the correct length for the adjustment of the rod?
4. Can I do this repair myself?
5. I assume that I should not operate the top until I do this repair (or have the repair done), in order to avoid strain from the imbalance of forces on the top structure and on the one operating rod on the passenger side. I have raised and latched the top. Is this the best way to protect the top until the repair can be effected?
Thanks.
Bob
Sorry -- forgot to add: 1999 US Spec Boxster
Bob:
1. The plastic cup fitting cannot be purchased separately, but, if you can, if you want to unscrew the old one and screw on the new one once you get the complete push rod replacement part.
(Part number is 986 561 279 02, same part number for both sides, about $50 from Sunset). Original plastic cup was red and the new ones are white and less brittle.
2. The rubber bushing is one piece, and can be purchased separately. Part number 986 561 881 00, about $3 each.
3. Use the length of the old rod as a guide to determine the length of the new rod ( If you only replace the plastic cup, just make sure that you count the number of turns that the white plastic cup is turned onto its threaded rod). If you make this overall push rod too short or too long, it will have an effect on how the two tongues on the front of the convertible top lines up with their receptacles in the top of the windshield frame.
4. Can definitely do this yourself. Also, if you replace the entire rod, make sure that you use blue loctite on the allen key bolt that fastens the push rod onto the V-lever.
5. Keeping the top closed is the best way to avoid aggravating the problems you might experience with the top. If you replace the parts above as explained, you shouldn't experience any additional problems for now. I say for now because the early tops and early versions of the transmissions and associated parts (e.g., the cables) have been prone to more frequent breakdowns, but if you catch them early enough you can usually fix them without too much difficulty.
Keep us posted on how you make out, or if you have additional symptoms.
Regards, Maurice.
-
Maurice, do you know what this microswitch does? we know what the handbrake and top latch microswitches do. is this the one that senses the transmission cycle and activates/shuts off the conv top dash light?
Chris:
I do know that as of production date May 1999 (which I believe affected MY 2000 and later) the B-Pillar Microswitch was moved from its left (driver's side) B-Pillar position to the right (passenger's side) transmission.
The B-Pillar microswitch is tripped when the top reaches it almost closed (1 to 2 inches from top of windshield) position, and that it is released on the return trip when the top is about 1-2 inches along its travel towards the completely open position. The B-Pillar microswitch is tripped (pressed in on the way to completely closed and then subsequently released just after starting its open travel) by a black metal arm that rotates around the same axis as the (black) round knuckle at the base of the B-Pillar. The confusion arises (for me too) because the motor and the direction of the top react differently to the two positions of the B-Pillar microswitch depending on what the position of the clamshell microswitch is (either up [with its spring action] or down [when the clamshell presses down on it]).
I have not yet definitively figured out what action or combination of actions actually cause the "top open" warning light to go out. I need the help of someone who is much more electrically inclined than I am with respect to switches and relays. (JPorter comes to mind on this board).
I have the mechanical part and all its components completely figured out as well as how each one affects the travel and position of the top, but have not figured out 100% of the electrical/relay part.
Regards, Maurice.
-
Thanks Loren and David,
Sorry for the late reply, been on vacation and busy with some stuff. Finally got back to this business.
Ordered the oil filter, crush ring, engine air filter and cabin airfilter from Sunset Porsche early this week, should get them next week. I was tempted to do the first oil change myself but I thought may be I can watch my local mechanic do it first. Maybe next time I can do it. I guess I can jack up the car and put 4 jack stands or use the two 2x10 method.
I printed the instructions just in case if the mechanic needs it. My friend reccommended this guy who has worked on Porsches before. I wonder if he has the right oil filter wrench. I will try to look for one myself, in case I will do this in the future. I saw that some others are having trouble getting a metal one from the dealer. I will call my local dealer or visit my local auto part stores. I think a metal one is probably better, right?
I will try to locate some Mobile 1 0W-40. I actually have a lot of 0W-20, is that good? I live in New Jersey, most drivings are in nice warm weather, local leasure driving, about 4000 miles/year.
Any help with the engine and cabin oil change is appreciated. My 97 Boxster has about 29,000 miles. According one maintenance schedule I saw, I suppose to change both the cabin and engine filters. The cabin filter is over $55, I probably don't need to change it because most of my driving is with the top down anyway. I don't need to filter the air coming into the cabin, right? Anyway, I will do it this time.
Again, thanks for you help.
A new Boxster owner.
Mustang66:
From what you describe as your previous experience with maintenance items and oil changes on front-engined cars, you are probably wasting your money paying a mechanic to do this oil change the first time. There is nothing magical about changing the oil on your boxster, with the exception of the care you must take when jacking up a Boxster.
Once you have the right tools (for the oil filter plug, for the oil filter housing and a torque wrench), it's as easy as any other car, and actually a lot easier than some cars I have done where it is exceptionally difficult to access the oil filter.
Follow the directions in that DIY link and you will not have any surprises.
The caution that David gave you about the oil coming out fast and furious and splashing is one that you should definitely heed, because it will surprise you. It surprised me the first time I did it, and I have changed the oil and filter on other cars more than 100 times.
As to the proper weight of the synthetic oil, the conventional wisdom on this board and on PPBB is that you should stick with Mobil 1 0W-40. Also, since you only do 4,000 miles per year, you should change your oil based on a time schedule (at least once a year) rather than on the mileage interval recommended.
If you drive with the top down most of the time, you are right, you don't need to filter the air coming into the cabin.
Regards, Maurice.
-
I've cleared the fault codes repeatedly. Sometimes the error is on one bank, after I clear, it can come back on the other bank, etc. Is there a wiring harness that could be the problem? Where should I look?
There are two cam sensors, one per cylinder bank, and they can be accessed from the top of the engine.
The location of the cam sensors is as follows:
One is located at the rear of cylinder head, bank 1-2-3 (passenger/right side), behind cylinder 3.
The other is located in front of cylinder head, bank 4-5-6 (driver/left side), in front of cylinder 4.
Hope this helps.
Regards, Maurice.
-
This morning I removed the ignition switch from under the dashboard and while the switch was still connected to the harness, I turned it to the "on" position with a screwdriver and the horn worked. I reinstalled the switch in the dash and when I turned t to the "on" position with the key, the horn did not work. I have a known good switch, so I replaced the ignition switch with the known good unit and again, before the switch was put up under the dash, the horn worked when I turned the switch to "on" with a screwdriver. When I mounted the switch under the dash and turned the key to the "on" position, again no horn. Does the key do something to the switch other than turn it to the "on" position? I made sure the switch was mounted tight against the tumbler mechanism and that the connections were all tight. I also tried a different relay in the No. 10 position with no luck. Any ideas on what to try next?
Linklaw:
Do you think the cause of the horn not working when you mount the switch related to the "grounding" of the switch when it is mounted? If so, is there a way to isolate the switch so that it does not get grounded when it is mounted? If you can though, I don't know what that would do, if anything, to the rest of the functions of the ignition switch. Just an idea.
Regards, Maurice.
-
It's been great being here, but after my 996 caught fire, I felt it was time to use the insurance payoff to move into the TT world, so tonite I finalized the deal on an 02 midnight blue/black interior... 996TT X50 with 19K miles and the aero kit. It also comes with a one year CPO so I feel a bit more confident about the deal. I will of course post appropriate pictures when I get the car and am looking forward to finally getting the TT I've wanted all along. I wish you all the best of everything and will be dropping in now and then.
Regards,
Chuck
Congratulations, Chuck. Perfect example of turning a negative into a positive. And what a positive it is!!!
Regards, Maurice.
-
I'm having the same problem. It started when I tried to turn the key while outside of the car, so I must have used a little too much force.
Anyways, when I turn off the car, the accessories stay on, aka the stereo. Also I when I turn on the car, the headlights go into parking mode, and don't turn on all the way.
I've figured out how to fix it...kind of, its more like tweaking where the key goes, but it works, for now. Basically when I start the car, I click the key a milimeter backwards, while makes it go back into normal position allowing my headlighs to work. When I turn off the car, I turn it all the way off, then click it to the left again so the accessories turn off. 90% of the time it works, other times, I have to reinsert the key and try turning the car off again. Its kind of annoying, and I worry if someone else like a valet drives my car they will leave everything on and run the battery.
Any one have any thoughts on this?
It is not unheard of for a "brand new" one of these switches to be defective right out of the box. I have read of more than one case where this was found to be the fault immediately after replacement.
It will be annoying if that is not the case, but since it's a relatively easy and inexpensive DIY, it might be worth a shot. The reliability and durability of these switches is so poor that, if that does not turn out to be the problem, you will probably be happy to have a spare.
Keep us posted.
Regards, Maurice.
-
It does puzzle me as to why there is a heated rear switch that even illuminates when pressed on a car
without heated rear screen tho?
Lloyd:
The reason there is a heated rear switch (in early cars with plastic windows) that even illuminates is because the switch (and the associated harness and plug that is shown in the photograph by Tool Pants) was provided for the factory Hard Top that could be fitted on the car.
Regards, Maurice.
Hey Maurice,
Never got a chance to thank you for holding my hand staight through my top sychronizing woes. What friggn' delight to use now! THANKS!!!
Peter
Peter:
I'm very gratified that we were able to figure it out and get it to work, and especially that you stuck with it so that you could still enjoy it for a few more weeks (before the cold weather).
Regards, Maurice.
-
It does puzzle me as to why there is a heated rear switch that even illuminates when pressed on a car
without heated rear screen tho?
Lloyd:
The reason there is a heated rear switch (in early cars with plastic windows) that even illuminates is because the switch (and the associated harness and plug that is shown in the photograph by Tool Pants) was provided for the factory Hard Top that could be fitted on the car.
Regards, Maurice.
-
When the 2003s came out I was told that it would. But I do not know anyone who has actually done the swap due to the cost.
the top is gonna run 800...so it is worth doing i think
Are you talking about the entire top WITH the frame and mechanisms included or are you talking about the canvas top part with the glass window only?
If it's the former, it sounds like a great deal and, if you search for a recent post by "rsfeller" you will find his explanation of how easy it was to remove and replace his complete top and frame. Just a few bolts on each side.
Regards, Maurice.
-
Hey Tool Pants, thanks for the advice about the 2 TSB's, Brake Booster Seal at Firewall Changed and Brake Booster / Spare Parts Requirements. I've read them both and they give really good detailed information. ;) I will look into checking the availability of a second hand booster, failing that, I'll just have to order these parts new.
CarMan356:
Terrific, detailed write-up with excellent photos. Thanks for taking the time to share your DIY with us.
Regards, Maurice.
-
Sorry but I forgot to reply that when both inside or outside door handles are pulled, there is no noise like the regulator is trying to work the window (but isn't due to stretched cable). As in my last Email, the microswitches are working as they should (ie they are making and breaking the circuit)
Dennis
Dennis:
From your further description, it sounds as if you need a new window regulator (part # for driver's side is 996 542 075 04, about $160 from Sunset Imports).
Since you have the door panel off, check to see if the black plastic sheath that leads to the regulator/motor assembly has "crumpled" (If it has, it will look somewhat similar to when you push up the sleeves on a long-sleeved shirt past your forearms). An undamaged plastic sheath should be smooth, with no circular "wrinkles".
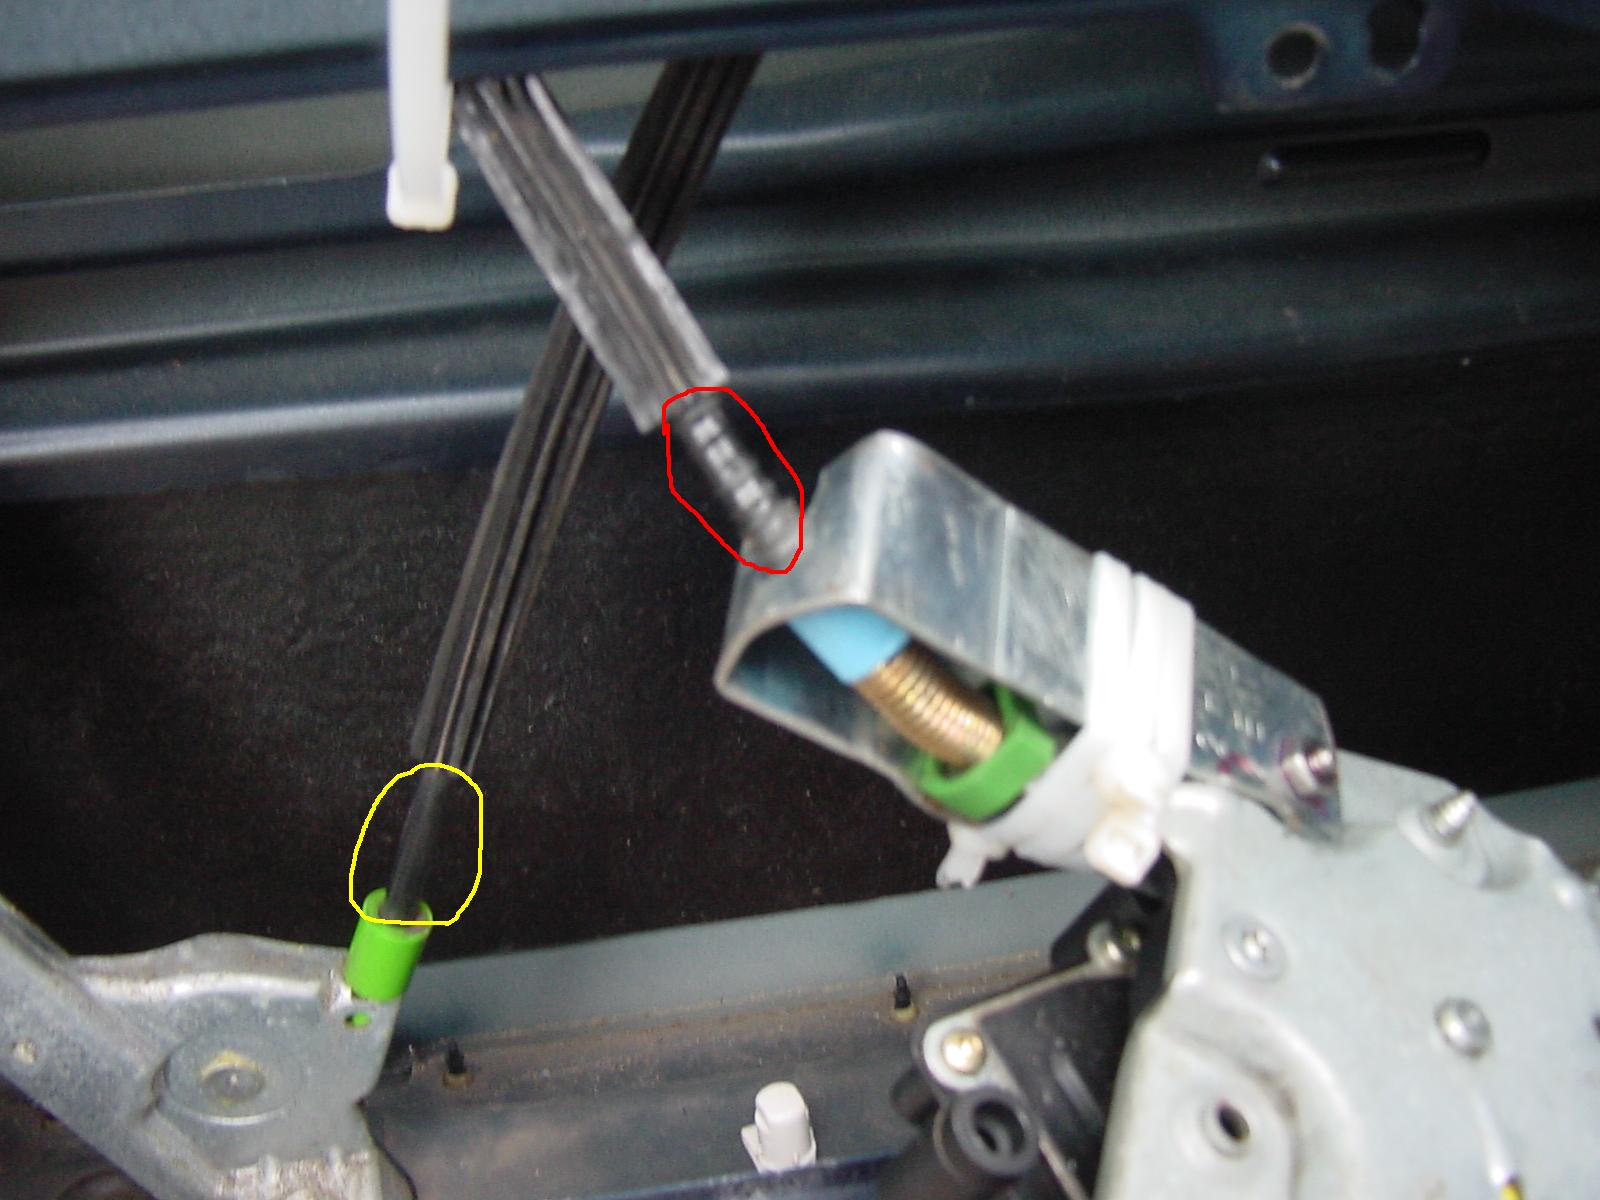
To get a good look at it, you will have to remove the three nuts that hold the motor in place and push the motor towards the outside of the door so that you can wiggle it down. Look just to the left of the (green on my 97) plastic sleeve on which the large brass-colored spring sits and you will see the 2 to 3 inch section of black plastic sheath that I am referring to.
Here is a photograph showing the "crumpled" section:

The defective (crumpled) section is circled in red. What a normal section would look like is circled in yellow in the other part of the window regulator cable black plastic sheath.
Disregard the silver metal clamping piece I installed around it to try to repair the problem. It fixed the problem for a few months, but then the problem came back when it crumpled a little more. Not worth doing, IMO.
If that is what you have, then the overall cable acts as if were stretched (although actually it is the black plastic sheath that has shrunk from being compressed) and that is enough to not give you the 1/2 inch drop when you pull on the handle. This is the case when, as you describe, you hear the window motor being activated, but there is no corresponding movement at the window.
Regards, Maurice.
-
My car's passenger window does not lower out of the rainchannel when the door is opened. Does anyone have any tips on how to troubleshoot and fix this?
Thanks
Dennis
Dennis:
Do you hear the window motor/window regulator mechanism operating when you pull on the handle but the window does not move down the 1/4 inch that it used to?
Or, do you hear nothing when you pull up on the handle?
Also, do you get the same or different result when you pull on the outside versus the inside door handle?
If you hear nothing, it's most likely the microswitch, as Loren pointed out.
Regards, Maurice.
-
I doubt there is such a "hack". In the previous year my top motor drive has overdriven the top and bent the left main transmission arm twice. I am in the process of getting a third arm for the drive transmission as the top system seems to lose its sense of position. As an interesting side note, my dealer insists that I replace both drive transmissions ($1500) to correct the problem. Neither transmission has any electricals (mircroswitch), only mechanical gearing, so it appears this issue is more software (sequencing?) related.
Jerry :o
Jerry:
In Boxsters with the newer style transmissions (after May 99), the B-pillar microwswitch was moved to the psgr side transmission.
Regards, Maurice.
-
Hello Maurice. Dealer charged 600 euros-about 790 USD- to install the top. They kept the car in for three days and they may be responsible for bending the frame. The cost of the top with shipping and customs duties was 815 euros-about 1075 USD. There is only one official dealership here in Greece. Also I haven't found any independent porsche mechanics and porsches aren't so rare here. That's why when you have to do any dealer work you have to make an appointment at least 3 weeks before. And the techs over there they don't know nothing. They drive their civics or focuses or corollas and they treat porsches like ****. Anyways I followed your suggestion and shortened the push rods as far as they would go. I noticed at first that the front part of the top came way back from the windshield but with some force the latch would engage and the top could close. Then when I tried to open the top it did not touch anything (that's excitement) but at the the lowest postition I heard a dreadfull crack and the passenger red ball joint broke. I was going to replace them with the new white ones anyway so that did not bother me so much. Now off to the dealership to order those. And now the questions. Is part number 986-561-279-02 correct? Do I also need the part 986-561-881-00 as another thread suggested? Must I replace the entire push rod or I just unscrew the broken part and screw the new white plastic? If I have to remove the push rod how do I remove the edge that attaches to the V-lever? When I remove them will the synch be kaput? Please help.
Greetings from sunny Athens Greece.
Kostas:
Sorry about your red plastic ball cup breaking, although it sounds as though you may have been on the right track. Thanks for the info on the cost of those repairs in Greece.
Perhaps you should try an intermediate position before trying the extreme shortest position, now that you have established that with the shortest position the latch clears the windstop. When you install your white plastic ball cups, start again with the original length that you had and try to shorten the push rods in small increments until it just clears. Of course, you now should pay extra close attention that when you have the push rods shortened so that they just clear, watch the mechanism when it gets near the lowest position to see if it is getting too much stress.
Remember what I said in my earlier post, that those push rod adjustments affect how the front of the convertible top aligns with the top edge of the windshield frame, that is why it was a little harder for you to close and latch the top after you shortened the push rods to their maximum. The key is to find the right length that will work at both critical points.
You don't have to replace the entire push rod, but you have to buy the entire push rod. Porsche does not sell just the white plastic ball cups separately (surprise, surprise!). It is easier to replace just the front part of the push rod (where it is fastened by the 10mm bolt and fat washer), but you can also replace the entire assembly. That part number 986 561 279 02 is correct.
When you remove them, it will not affect the synchronization, unless you operate the switch without everything connected.
If you wnat to replace the entire push rod, you can. Where it attaches to the V-lever, there is an allen key bolt in the middle that you can remove (there is blue loctite on the original threads). While you have it apart, make sure that your rubber bushings ("buffers") and the metal bushing insert in that joint are in good shape. The rubber bushings are what that other thread refer to. They are part number 986 561 881 00 and Porsche calls them "cabrio rubber buffers") and cost about $3.00 each. The metal bushing insert is part number (Porsche calls them "metal sleeves") 999 924 039 00 and cost about $6.00 each.
Come to think of it, if the above mentioned rubber buffers and/or metal sleeves are missing or worn out, that could affect the alignment of the top, albeit slightly.
Try the above and let us know how you make out. Kali mera!
Regards, Maurice.
-
It is my understanding that the two adjustment screws can be accesed on the bottom of the respective door, without the need to remove the side panels.
Ryan:
There are two adjustment screws (E6 Torx) that are accessible trhough two holes in the bottom of the door. The holes are positioned near the bottom of the window regulator rails, fore and aft.
The problem with this approach is that if your "misalignment" occured suddenly, it was most likely caused by a loosened clamping jaw, and that can only be remedied by removing the door panel.
I assumed from your original post that it just happened, not that it gradually got worse, although even that can sometimes be attributed to a loosening clamping jaw.
You have nothing to lose by attempting to turn the height adjuster screws through the two holes in the bottom of the door first.
Here are some photos that should help orient you if you are going to attempt the adjustment without removing the door panel:
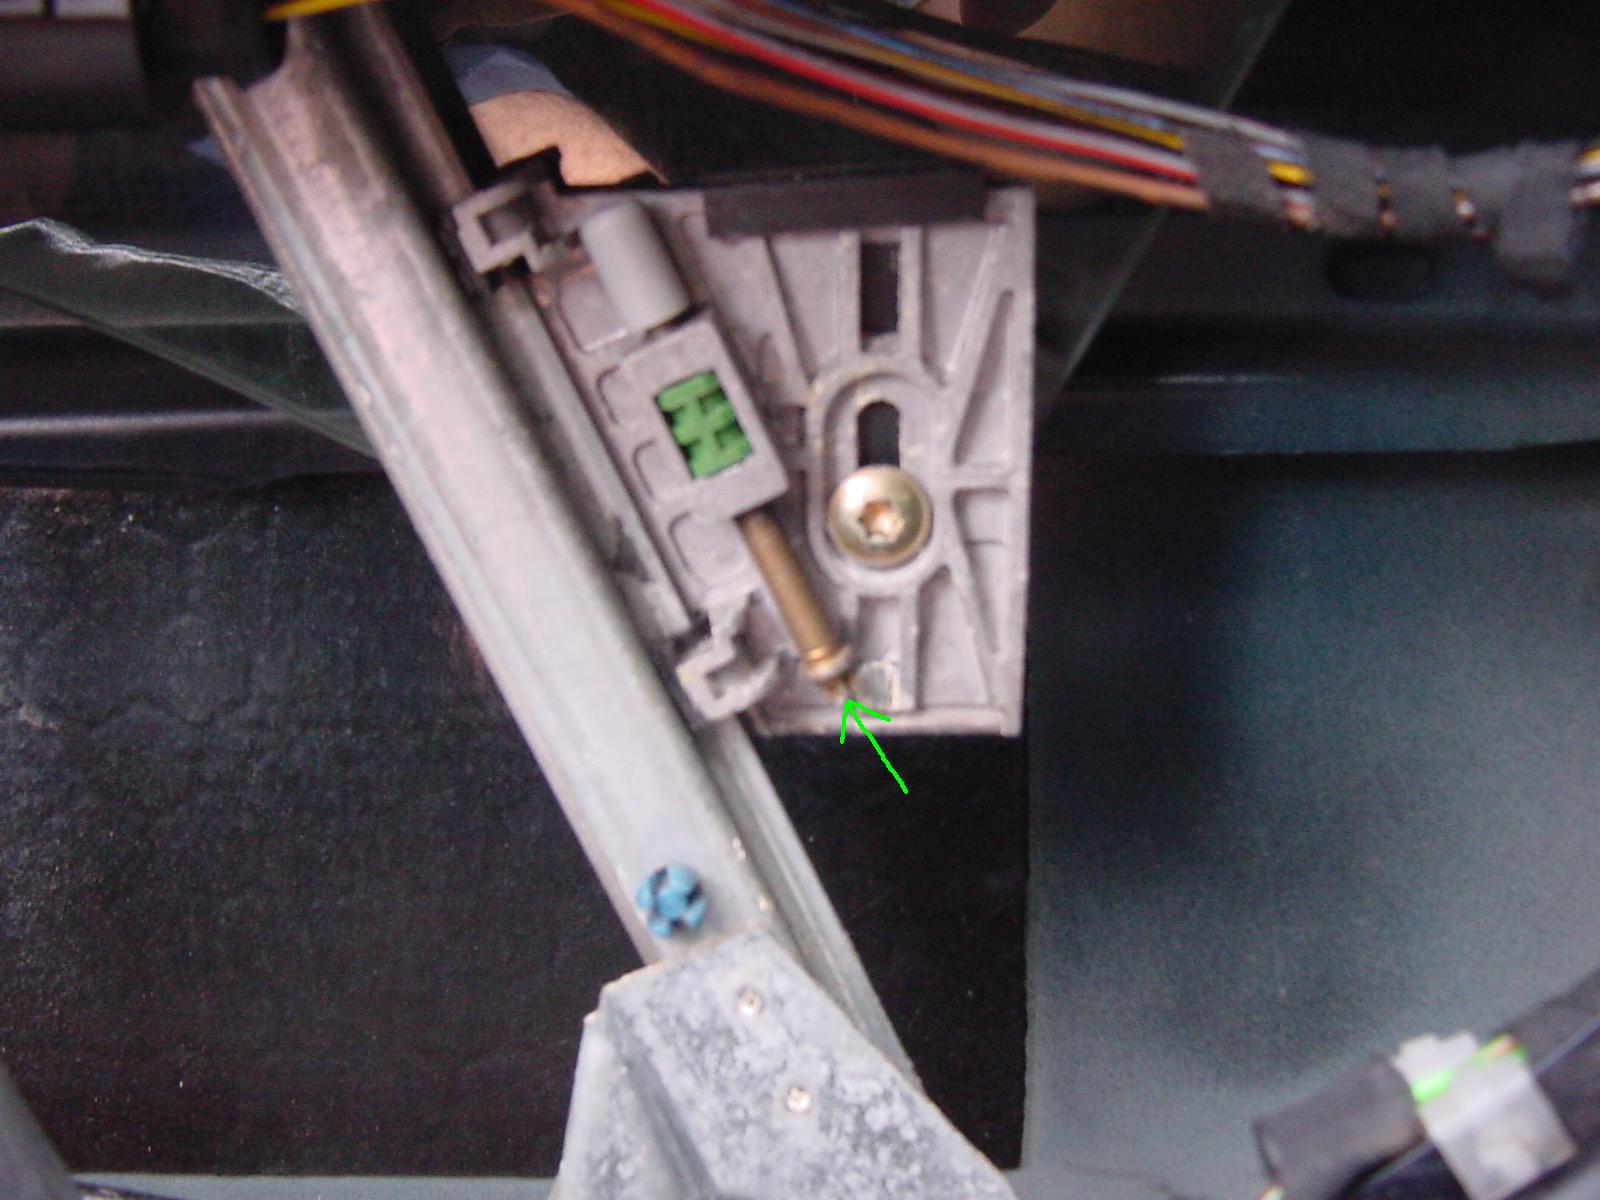
NOTE: The height adjuster screws are not perpendicular to the door sill, rather, they are slanted at an angle similar to the rear edge of the door. The green arrow is pointing to the head of the screw in this photo of the front window regulator rail and clamping jaw.
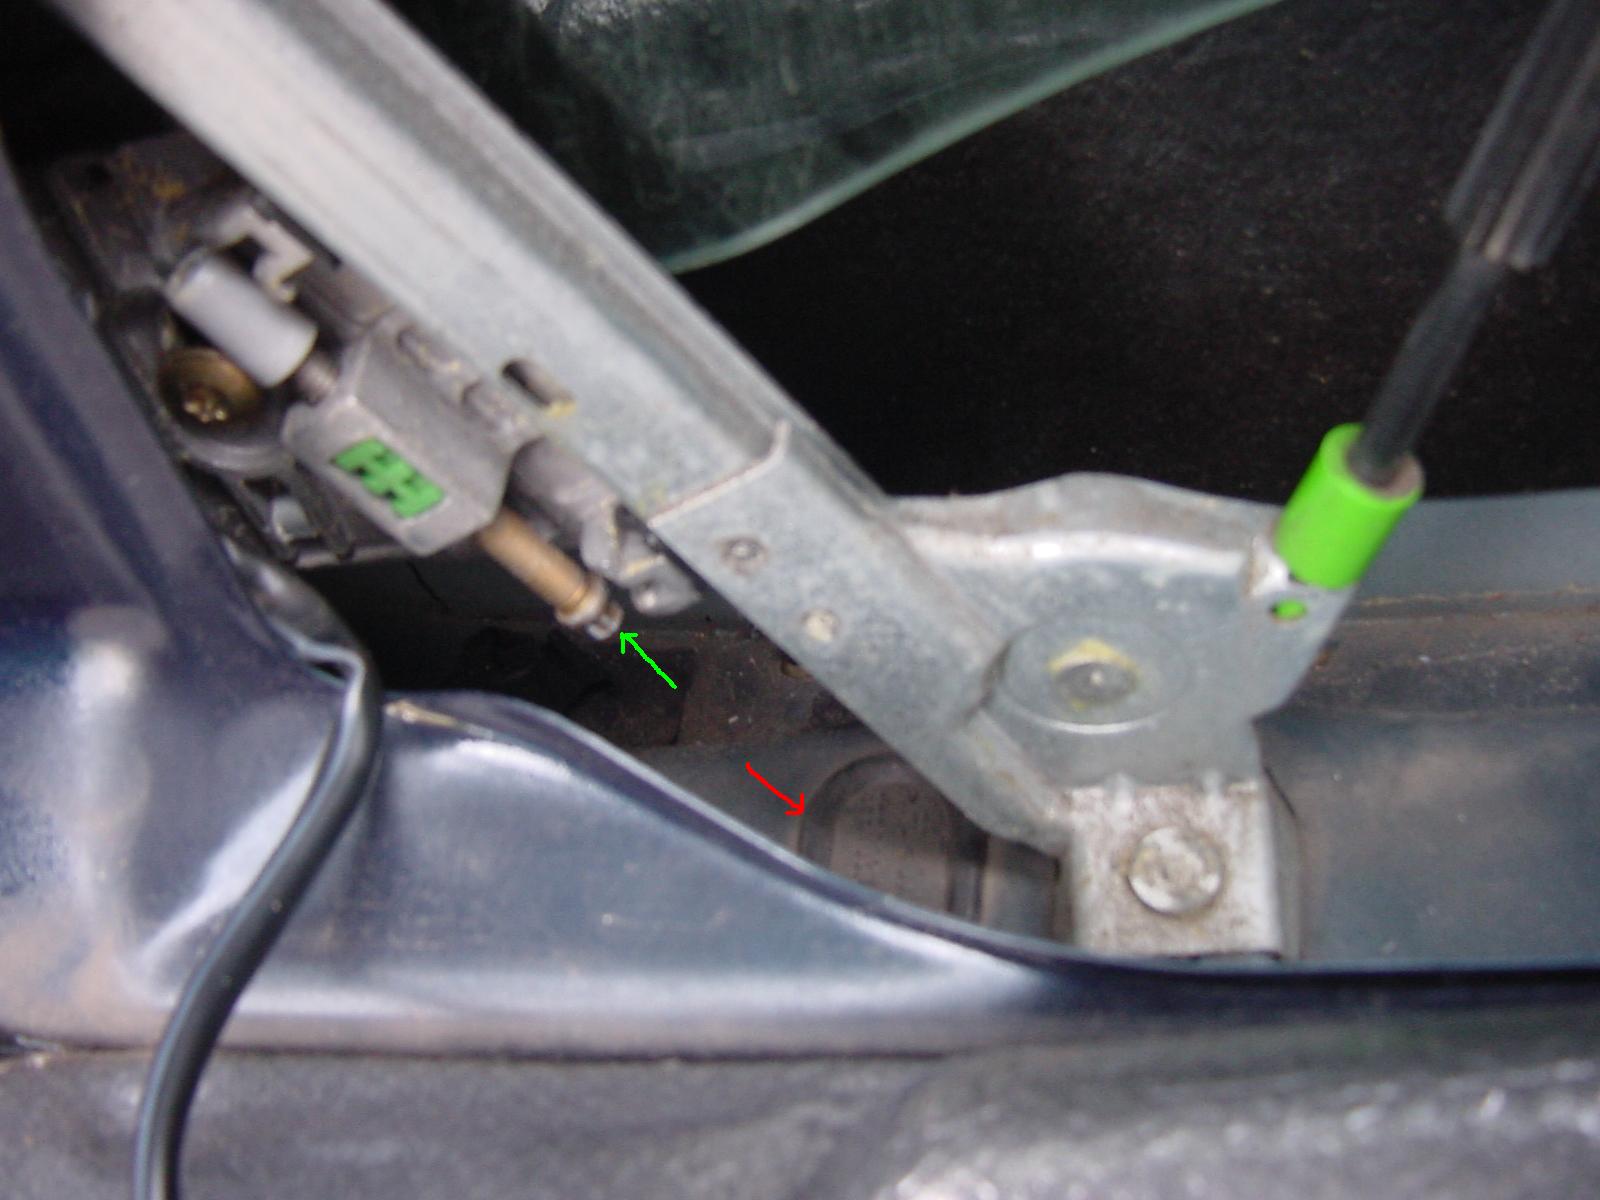
Here is a photo of the rear window regulator rail and clamping jaw:
Again, the green arrow is pointing to the screw. The red arrow is pointing to the black rubber plug that must be removed to access the screw with your torx screwdriver.
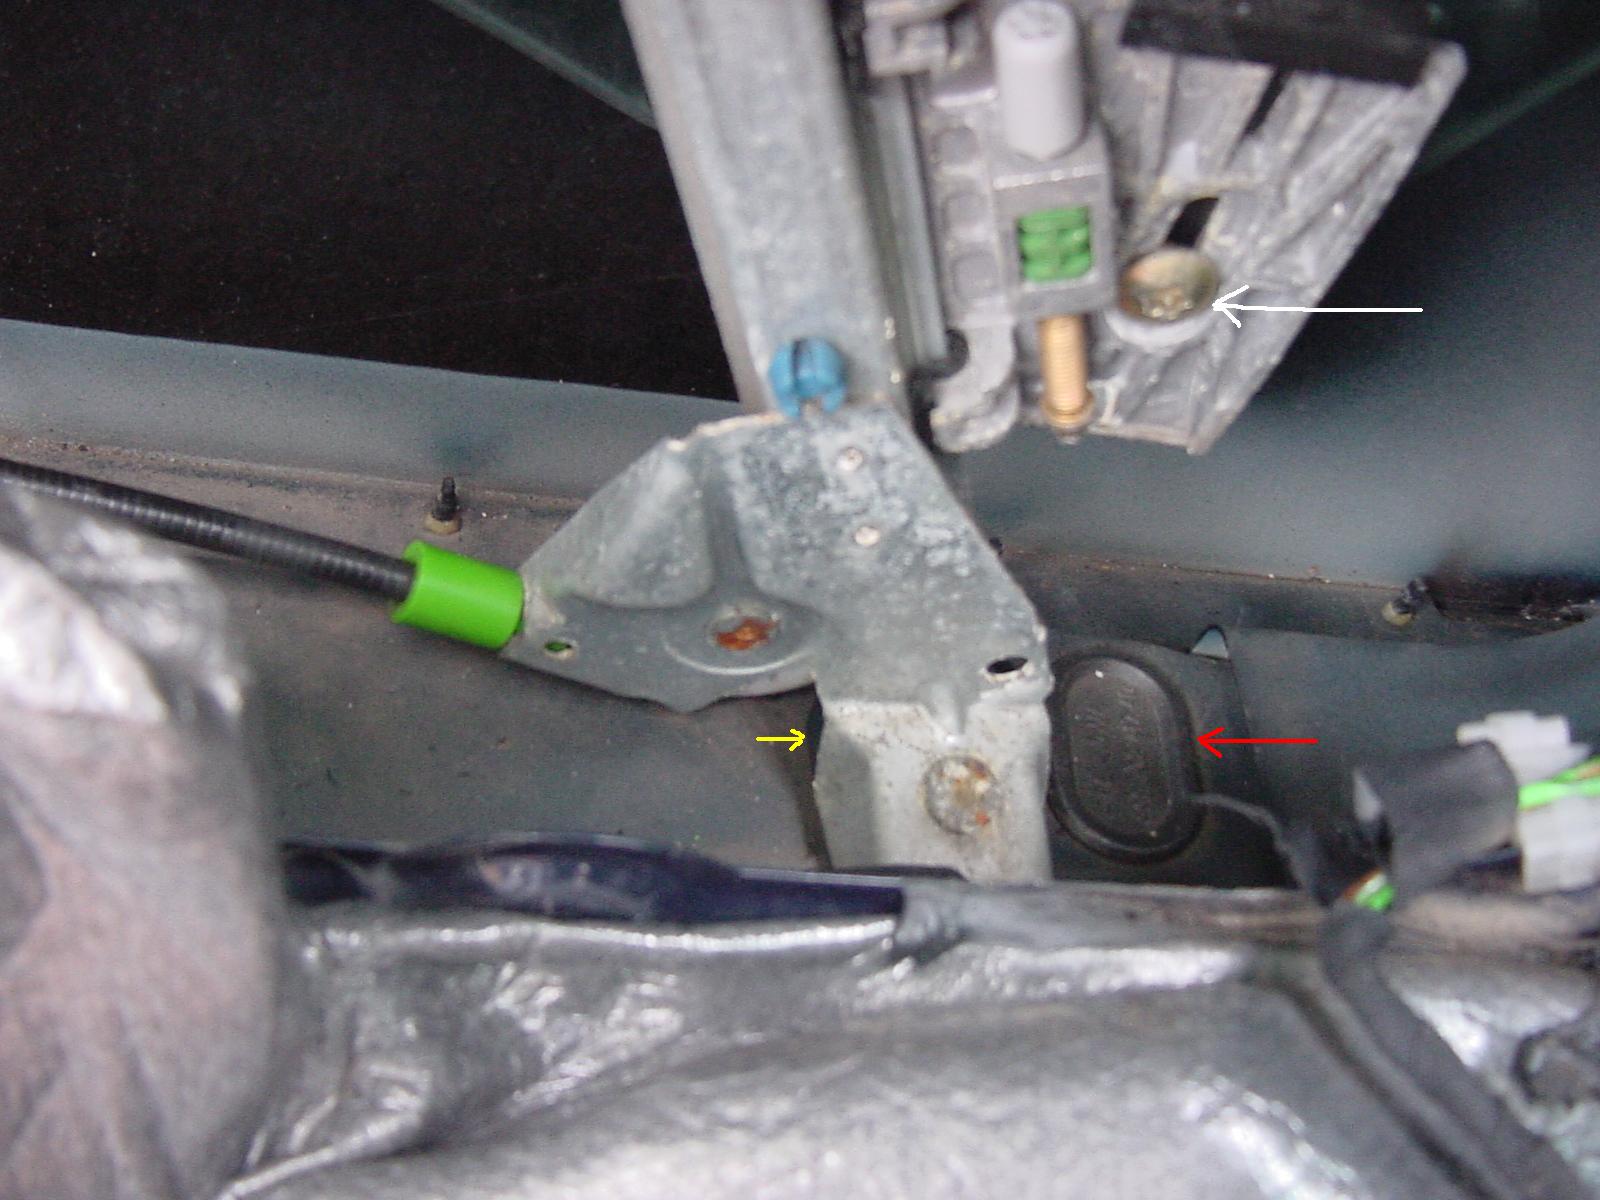
Here is a photo of the front window regulator rail, clamping jaw and rubber plugs at the front of the door:
The red arrow is pointing to the black rubber plug at the front that must be removed.
The yellow arrow is pointing to the edge of the "other" black rubber plug which is for accessing the bottom leg of the window regulator rail which is used if removing/replacing the complete regulator assembly.
The white arrow is pointing to the clamping rail screw (in case the adjustment screws don't solve your problem and you should end up removing the door panel).
NOTE: There are four (4) black rubber plugs under the door. The ones you want to remove are the two most outboard ones (as shown by the red arrows), NOT the one shown by the yellow arrow (There is another "yellow arrow" one at the rear that is not in any of the photos..
The correct ones are also closer to the outside door skin.
One last note: To access the adjustment screws, make sure that the window is completely lowered. At that point, each adjustment screw will be about 3 inches away from the access hole. In the last photo, the window has been lowered.
Regards, Maurice.
-
Is that like "Farfik Nugen" (the old VW ad) ?
That's great news! ...On your car, does that light go on when the top first starts to open and also when it first starts to close (from the completely open position with the clamshell down on it) ?
As far as the hack that you did on the relay, or how you deduced that was the problem, it would be useful if you could post the details when you have a chance. I can't tell you how helpful I have found even the most obtuse sentence that someone posted about their solution to be. Sometimes I find myself reading one sentence over and over (like my law books) and then it just clicks.
Anyway, great job and I'm sure that with the help of others on this board we can figure it out to a successful (and rewarding) conclusion.
Regards, Maurice.
Farfik Nugen :D LOL... Think I recall that that was deemed the most unsuccessful, annoying add campaign of it's time.
Thanks for the encoragment. Latest wrinkle; I've gone back and checked my relays with the exception of 2 on the "lock" mechanism (the handle latch thing above the windshield). My top up light is permanently on. Sticking my finger in there doesn’t do anything, I'm going to check them but I wont be surprised if they both work.
There's a lot of little nuances the circuit board on the double top relay (as I recall reading somewhere), for instance, that in the top up cycle, it actually keeps the motor running for a split second or so longer after release of the button to further cinch the clam shell down. Don.t really think that's happening here.
With the light on always, my remote not working and, no noticeable movement in the clamshell after the buttons released, I'm kind of thinking there's damage on the circuit board as there doesn't seem to be any logic or intelligence apparent in it's fiuntions. I think fixing the subcomponent part (relay)of it allows it to function sans any bells and whistles.
Regards,
Peter
Maurice, while you said an my manual confirmed it, the light on the dash just tells you when stop pushing the button only. I responded to somebody’s post, forget the subject, who mention in passing that his top automatically stops when the light goes out. Seems totally logical, if your circuitry can turn out a light it can turn of a motor. I wonder if this was a feature in later models. Further wonder if a newer dbl. relay would work in an older car and provide this advance capability... wonder if theirs a hack that someone as ignorant as I could whip up…requisite signals are sure all there…
P.S. Do you think my conv. top relay hack warrents a post?
Peter:
I think that the light on the dashboard goes out after the two microswitches (B-Pillar and Lever on top of motor) send signals to the Convertible Top main relay, which then processes them and, turns it off following the "after-running" time (that is also provided by the relay).
I think that the automatic stopping of the motor with the turning out of the light is a feature that is on all of the model years, not just the later ones, but I am not 100% positive. I do know that the relays for MY 97 to 99 are different than the later ones, but that may be because the B-Pillar microswitch was moved to the driver side (left) side transmissions (even though the factory manual says the passenger side) with the newer (B Version ) style transmissions that were introduced in May of 1999.
Your convertible top relay hack definitely warrants a post. You never know who it might help understand this whole process down the line.
Regards, Maurice.
-
The driver side window on my newly purchased '02 TT is settling toward the back of the car. When driving above 40, there is wind noise between the front portion of the window close to where the top of the mirror meets the A pillar. The gap between the front side window and rear side window on the passenger side is 1/4" and on the driver side its 1/8". This causes the top portion of the two windows to hang up on each other when opening the door. I believe if I were able to get into the door and move the window forward it would aleve the issue. Porsche wants $350 to do it. Any tips are greatly appreciated.
Ryan
Ryan:
If your '02 TT has similar door panels to a Boxster, check out the following link. It has some very excellent photographs and detailed steps on how to remove the fasteners to get the door panel off.
The trickiest one is the plastic cover that is around and forward of the door latch. I found that in addition to the illustrated instructions on that point, that, once you have that piece off at the forwardmost portion of it, if you press down hard on top of the rearmost part and then rotate the piece, it will easily come off without breaking off that little tab. Study the photos and you will understand that little part and how it comes off.
Here's the link: http://www.ecoutez.net/boxster/door-panel-removal/
Good luck!
Regards, Maurice.
Muchos Gracias Compadre. I am thinking this may just be something I let Porsche do. I can't tell if its adjustment screws on the bottom of the door, or something I need to behind the panel. Again, thanks for the help. Any other tips or links or appreciated.
Ryan
Ryan:
From what you describe, it sounds as if all you need is to adjust the window angle. Adjustment is provided by means of two clamping jaws that hold the window, one fore and one aft. Once you take off the panel, it's an easy matter to access both of the clamping jaws (by lowering the window [for the front] or raising [for the rear] to the appropriate height so that the clamping jaws sit where you can see them and adjust them). It's just a matter of loosening one torx screw and it gives you 4/10 of an inch of adjustment.
When you re-tighten the Torx screw, the torque setting is 7 ft./lbs.
Once you remove the door panel, it will be easy to assess whether one of these clamping jaws has gotten loose and is the cause of your problem. If not, you could button it back up in 5 minutes.
Removing the door panel and the speaker and peeling back the sealing membrane is not nearly as difficult as it sounds. I removed my first door panel in about 30 minutes, the second one took my 5 minutes to remove and 3 minutes to re-assemble.
Note: When I peel back the sealing membrane, I leave the bottom edge still fastened (with its original glue/black goo) and just let the upper four fifths of the membrane drape down. That eliminates having to line it up again when done.
You could save yourself $350 plus the time of going to and waiting at the dealer, it just depends on your preference, amigo.
Regards, Maurice.
-
The driver side window on my newly purchased '02 TT is settling toward the back of the car. When driving above 40, there is wind noise between the front portion of the window close to where the top of the mirror meets the A pillar. The gap between the front side window and rear side window on the passenger side is 1/4" and on the driver side its 1/8". This causes the top portion of the two windows to hang up on each other when opening the door. I believe if I were able to get into the door and move the window forward it would aleve the issue. Porsche wants $350 to do it. Any tips are greatly appreciated.
Ryan
Ryan:
If your '02 TT has similar door panels to a Boxster, check out the following link. It has some very excellent photographs and detailed steps on how to remove the fasteners to get the door panel off.
The trickiest one is the plastic cover that is around and forward of the door latch. I found that in addition to the illustrated instructions on that point, that, once you have that piece off at the forwardmost portion of it, if you press down hard on top of the rearmost part and then rotate the piece, it will easily come off without breaking off that little tab. Study the photos and you will understand that little part and how it comes off.
Here's the link: http://www.ecoutez.net/boxster/door-panel-removal/
Good luck!
Regards, Maurice.
-
Peter:
The top only opening and not closing (together with the dash button only spinning the motor in one direction) sounds like a problem with either the B-Pillar microswitch or the Main Relay, or a combination of the two...Believe it or not, you can operate your top that way to its complete open or closed position so that you can function on a temporary basis.... It's amazing how something that appears so simple when everything is working properly can get so complicated when even one of its components gets out of whack, but I guess that's the price we pay for the "automatic" versus manual operation.
Regards, Maurice.
More great advice...
Eetz Feegkzed! (Germ-english for, it's fixed!!) It was the double relay up above the fuses on the driver-side. ( I won't bore you with details of how deduced this) I will tell you that I "hacked" it thoug, in the crudest sense of the word.
Unlike every other relays I've messed with (an electromagnet and a couple of electrical contacts) this had a circuit board and two tiny little un-openable boxes inside. I surgically cut them partially open. They were tiny relays. I measured some voltages, cleaned some contacts with a sliver of sand paper. Popped it back in and VIOLA!! IT WORKS!!
Need to fiddle with relays as it doesn't seem to really stop itself in either the full-up or full-down positions. Thought I had checked them... maybe I need a new double relay for the circuit board part that does all the magic, but for now, the relay part works and for the first time in years my top goes up and down. Yeah!
The thing seems to be synced just fine, adjusted the tie rods a bit, pretty much maxed out there length with center bolt, that's it.
Small disappointment is that my remote doesn't work for the top (works for the locks though). The light blinks on my key and on the dash, it just doesn't do any thing.
Anyway (Maurice), thanks a TON for all your patience and great detailed advice! Stay tuned cause I'm not done yet (sorry).
Regards, Peter
P.S. Should the top open and close with "one-touch" or do you have to hold it down through the whole cycle?
Peter:
Is that like "Farfik Nugen" (the old VW ad) ?
That's great news! I admire your persistence and your ingenuity and I am glad I was able to contribute to the solution.
You do have to hold the open/close button down through the whole cycle.
You are supposed to stop pressing the button when the "convertible top up light" on the dashboard goes out.
On your car, does that light go on when the top first starts to open and also when it first starts to close (from the completely open position with the clamshell down on it) ?
As far as the hack that you did on the relay, or how you deduced that was the problem, it would be useful if you could post the details when you have a chance. I can't tell you how helpful I have found even the most obtuse sentence that someone posted about their solution to be. Sometimes I find myself reading one sentence over and over (like my law books) and then it just clicks.
Anyway, great job and I'm sure that with the help of others on this board we can figure it out to a successful (and rewarding) conclusion.
Regards, Maurice.
-
I am a new poster to your board. My 2000 911 Millineum edition has chrome five spoke wheels that are peeling. After one contact, Porsche Cars has declined to repair them. I am seeking advice on A. contacting Porsche, B. Determining if I'm the only one with the problem.
I am the only owner. It has 22,000 miles, is on the second set of dealer installed tires, has only been washed by myself and the dealer, with no wheel cleaner other than soap, has only been in Georgia, South Carolina and North Carolina, i.e. no road chemicals. It has one curb ding, but that's not where the chrome is peeling. No track use or excessive brake heating. It has been garaged most of the time, but did sit outside some.
It has a large flake on one front lip, a couple of small flakes on spokes on rear tires, and one on the inner rim.
I could understand a manufacturer not wanting to stand behind some parts and finishes after seven years. Seems to me that wheels, absent any abuse, however, should be more durable. I have owned several Porsches in the past and had no particular issues.
Thanks for any assistance you can provide.
Jim
Jim:
If your wheels are actually chromed for some reason (as opposed to the polished ones that Loren describes), then you will find that the areas where the flakes have come off will be a sort of copper/orange color.
That happened to me about a year ago, although I was not the original owner of the chromed wheels. I got estimates on repairing (rechroming) them and they ran about $200 each. Haven't had them done yet.
Regards, Maurice.
does anyone supply just the glass for a convertible top?
in 986 Series (Boxster, Boxster S)
Posted
Shawn:
A friend of mine had a new tinted vinyl window sewn in for $200 in the New York area. He did the removal and re-install himself in about 6 hours, but he had done it once before on another Boxster.
With respect to your idea of the glass window, in order for the bigger glass window to fit, you have to have the 2003 or 2004 convertible top frame (that has 4 bows instead of 3), otherwise you will hear a crunch the first time you lower the top.
If you have a vinyl window sewn in, make sure they use black thread and that they glue it in as well as sew it in. It sounds though as you have that covered pretty well with the experienced guy that you have been dealing with, but you can never be too careful when you are investing 6 plus hours of labor.
Regards, Maurice.