Welcome to RennTech.org Community, Guest
There are many great features available to you once you register at RennTech.org
You are free to view posts here, but you must log in to reply to existing posts, or to start your own new topic. Like most online communities, there are costs involved to maintain a site like this - so we encourage our members to donate. All donations go to the costs operating and maintaining this site. We prefer that guests take part in our community and we offer a lot in return to those willing to join our corner of the Porsche world. This site is 99 percent member supported (less than 1 percent comes from advertising) - so please consider an annual donation to keep this site running.
Here are some of the features available - once you register at RennTech.org
- View Classified Ads
- DIY Tutorials
- Porsche TSB Listings (limited)
- VIN Decoder
- Special Offers
-
OBD II P-Codes - Paint Codes
- Registry
- Videos System
- View Reviews
- and get rid of this welcome message
It takes just a few minutes to register, and it's FREE
Contributing Members also get these additional benefits:
(you become a Contributing Member by donating money to the operation of this site)
- No ads - advertisements are removed
- Access the Contributors Only Forum
- Contributing Members Only Downloads
- Send attachments with PMs
- All image/file storage limits are substantially increased for all Contributing Members
- Option Codes Lookup
- VIN Option Lookups (limited)


1schoir
-
Posts
2,739 -
Joined
-
Last visited
-
Days Won
6
Content Type
Profiles
Events
Forums
External Paint Colors
Downloads
Tutorials
Links Directory
Collections
Store
Posts posted by 1schoir
-
-
Then you are #4. http://986forum.com:80/forums/showthread.php?t=11615
That is not good. This is why, when I saw the male ball in Mark's hand, I asked him to check to see if the mounting lug had broken off, because that is something that could not fix at Henry's house.
Next time I'm at the dealer I'll ask the mechanics I know what kind of fixes are available, but I already think I know what they will say.
I have never removed the complete top/frame from the car, but the mechanics have. They say it is just removing a few bolts on each side, disconnect the push rods, then lift it out of the car. If you have the broken piece and if it can be welded back on, then that will be a first to me.
yeah when mark and checked it, it was okay that's why we were able to reattach the ball....don't know if using a larger bolt and possibly it being too tight could have caused the break...it's on the driver side....
Mike:
I spoke to and went to see a friend of mine who works in the parts department of a local Porsche dealer here in NY and this is what we were able to come up after also talking to the techs at that dealer:
It looks like the part is one component of the "Main Folding Top Bow" and has a part number of 986 561 037 0070C and that it sells for over $2,000. I checked with Sunset, and their price is $1,594.56. The smaller part (where your steel ball broke off a little "ear") does not have a separate part number that we could locate on the system. OUCH!!!
I asked my friend to let me know if they get a top in that they have to remove as I would like to have a look at that individual part directly and see if it has a part number that can be looked up.
Sorry I don't have better news.
Regards, Maurice.
-
Not surprised at your experience with the body shop(s). Usually, they see Porsche and, if you look in their eyes, you will see the $$ signs there, like in the cartoons. LOL.
That's exactly right! As soon as they see a Porsche all pricing methods fly out the window and the 'custom' (read EXPENSIVE) quote is given...
The job should be based on their hours of labor, not the fact that you brought in a Porsche.Yup, I am still hoping I can find a small shop with a reasonable, experienced welder. They're out there, but it takes a while to find the right place. It's even harder to find someone since it is such a custom job. Phone conversations lead nowhere, I have to be there in person and show them what I mean most of the time.
Julian:
It's worthwhile to wait for the right shop. You only want to do this job once.
Regards, Maurice.
-
I am still searching for a shop that won't charge me an arm and a leg to do the repairs, but as Maurice noted, I think I found the root of my problem. Was your car in an accident? Have you checked the sheet metal behind the transmissions for cracks? Are the transmissions flexing when the top is moving?
To look behind the transmissions take the side vents down and pull the rubber cover down. You will then have a clear look. I can take the vents off again and post pictures, if needed.
I will keep updating my thread as soon as I make any progress, but for the time being I am looking for a reasonable shop. Until I find one I will continue to operate the top in semi-automatic mode (clamshell opens / closes OK, but I put the top up / down manually).
Julian:
Not surprised at your experience with the body shop(s). Usually, they see Porsche and, if you look in their eyes, you will see the $$ signs there, like in the cartoons. LOL.
Maybe you should try to have a shop that does welding (look in the yellow pages or try to get a recommendation for a local shop) give you an estimate. One thing you can generally be sure of is that the guys who have been doing welding for a number of years will be able to come up with a solid solution. The job should be based on their hours of labor, not the fact that you brought in a Porsche.
Regards, Maurice.
-
Hello all,
Synopsis: Newly synchronized transmissions after 2 years disassembled & non operational. Tried to sync today. Top goes down but not up, problem apprears to be electrical, motor will not reverse with all the tie-rods etc. disconected (99', 5 spd, 2.5L) Originally I had issues with re-synchronizing my transmissions (type "A"). Synchronized them individually by aligning "V" arms to notches on the trans. Case. Whille not working quite corectly, the solution is at hand (i sycncronized the "V" arms beatifully...180 degrees off.)
Now the big pain, the top will open but won't close. With tie rods and the like disconnected from the transmission, the motor will only turn in one direction (open). Pushing the closed button does nothing.
1) took out the big relay, opened it up, little circuit board inside (surprise), cleaned of a little surface corrosion, cleaned contacts on plug, Gave it some fairly hearty taps, and drove it in and out of its socket several times.
2) Did the same with plugs on the up/down (or close/open) switch. Also swapped in 2 other switches, & jumped the plug, still no go.
3) Fiddled with the switch positions of the b-pillar micro switch and the switch, nothing.
4) WERDNESS: pushing the "close/up" button while holding the switch over the drive motor down makes the drive motor run in the wrong direction (like when opening the top) but it does run????
5) Probably irrelevant but an apparent, remote control button for top on my key does nothing. ( Other button works with locks though)
6) NOTE OF HOPE AND CONFUSION: I found by tapping the up/close button the drive motor would turn in the wrong direction in little fits and spurts. It also on rare ocasions runs for 4 seconds or so
7)I can hear a "click" definitely from the relay when swithch is pushed either "open or " close".
8) More weirdnes: Stabing arond blindly at the 4 wires that lead to the motor, I found a pair the lit up 12v. on my v. meter by pushing the open but ...and... the close button ! (later discovered these are the only 2 leads of 4 that go to the motor. the other 2 go to the micro switch above it)
9)Nrew wrinkle today: removed drive motor and jumped it runs great on 12v., swithch polarity runs to reverse it. did, as I'd expect. But hecked voktage off the plug for motor. +12v with the switch in either up or down positions, no -12 reading????
So, an obvious solution for the "gear run-out" is rotate the gear to "v" arm 180 and realign it to the cover notches (the later orientation). May also install and adjust top tie-rods with the top in more of a complete "closed/up" position. Are "v" arms supposed to be perfectly flat? or is a littl bent in them O.K
As to the up/close situation, weird circuit board relay sounds like a candidate, but I bet Porsche doesn't give them away, a pricey experiment. It also makes the right noise and I have nocked the thing around a bit (works for som here). If there's a work around I'd love to hear about it. If eliminating added complexity due to handbrake and speed overrides helps, I'm ready to say ba-bye to them .
I have factory wiring diagrams, but there a bit confusing. Write now I could mickey mouse the thing to work, but not with the sophistication it's supose to have. I also found a PDF here describing how to test the micro switches through the top relay socket. Does anyone know where I can measure other voltagess I can check to Isolate the problem?
Other tips, clues, insight greatly apreciated!!
thanks, P.K.
P.S.This the continuation/ branch of a thread started between "mark in sunnyvale" a "1schoir" (http://www.renntech.org/forums/index.php?showtopic=15249&st=0&p=75978entry75978 ).if you want backround .
Peter:
The top only opening and not closing (together with the dash button only spinning the motor in one direction) sounds like a problem with either the B-Pillar microswitch or the Main Relay, or a combination of the two.
Once you have the top in the open position, try this to reverse the direction that the motor spins and the related direction of travel of the V-Levers: Pull off the carpeted plastic panel that covers the seat belt spoon and the B-Pillar microswitch. Then, using either a small hook tool or a small piece of wire that you can wrap around the back of the small metal lever of the microswitch, pull and hold the small metal lever forward (so that it trips the microswitch [you should be able to hear the mair relay click in the driver's side footwell]) and then press the open/close button on the dash. That should reverse the direction of travel of the motor. Keep an eye on the V-lever on the driver's side and note its direction of rotation while the top is traveling down to the open position. When you pull the small metal lever forward and hold it, the V-lever should start to spin in the opposite direction. Believe it or not, you can operate your top that way to its complete open or closed position so that you can function on a temporary basis.
Let us know what results you get with that.
As far as the cost of the convertible top relay goes, it's about $75 from Sunset. The B-pillar microswitch is about $50. (both plus shipping). Let me know if you need part numbers.
As I mentioned in another post, the V-levers are supposed to be completely straight and true. A bend could impact the white plastic cups popping off.
As far as testing the motor wiring, what you described sounds like a properly working motor. With the main relay installed on its receptacles, open the clamshell and pull off the electrical plug that is plugged in to the side of the motor.
Connect the positive lead of your voltmeter ot the black wire and the negative lead to the green wire. Then connect a jumper wire between terminals 2 and 3 at the plug connection. Switch on the ignition and press the "open" button. You should get a reading of about 12 volts (battery voltage).
Now reverse the connections to the green and black wires, with everything else the same. Switch on the ignition and press the "close" button. You should get a reading of about 12 volts again.
You may recognize these two steps as the end of the PDF document you mentioned, and I was able to successfully perform those two tests a while ago on my top.
As to the rest of the tests described in that PDF document, I did not understand the basic concept of how to perform those tests, so perhaps you can educate me on that.
Lastly, as to the initial position of the V-Levers, I mentioned in an earlier post on the predecessor thread, that if you "draw in" extending lines to the marking notches, you will see the correct position of the "V" as it will not then cross "over" the lines formed thereby.
Hope this helps, although I know you also will have to resolve the issue of the orientation of the transmissions in your other thread.
It's amazing how something that appears so simple when everything is working properly can get so complicated when even one of its components gets out of whack, but I guess that's the price we pay for the "automatic" versus manual operation.
Regards, Maurice.
-
Peter:
The V-Levers are not supposed to have any bend in them at all. They are supposed to be completely flat and true. A bend, depending on the severity, could contribute (in conjunction with too much pressure either pulling or pushing) to the white plastic ball cups popping off.
Best to heat them up and hammer them straight.
Regards, Maurice.
Hey Marice,
Discovered something else that dosn't look so great. The transmisions, when cinched down are not really horizontal from the ground. That is if you look straight down into the convertable top comaptment they appear to be tweaked, the bottom bumped out. I guess the eastest way to describe it is tha the exsposed faces of the transmisions are in no way parralell to each other in any direction, allong any axis.
If I didn't know better, I would say the transmision had been tugged weird by unsychronization and pulled the sheet metal they mount to katty-wampus. Should they be fairly straight looking (front to back, top to bottom)?
Thanks as always
Peter
Peter:
It looks like you have run into a similar problem recently discovered by another member of this forum (Azzar0). After much wrangling with his top problem, he got most of it resolved by replacing the Version A transmissions with Version B transmissions and associated parts that he bought on eBay. He remained with a persistent problem which manifested itself by the white plastic ball cup popping off at the very end of the cycle after the top reached its "closed" position. He noticed that at that point the transmissions would move with what appeared to be a "flexing" of the sides where the transmissions were mounted.
So, in answer to your question, they should be straight front to back and top to bottom. See if they move or if the sides flex.
If they do, you may have to go down the same road as Azzar0. He was able to remove the air intake covers on the side of the car and pull some material back in order to have a look at the backs of the transmissions. He discovered that that area had tears and holes in the sheet metal that were the cause of his transmissions ending up in a less than vertical position.
The last time I posted back and forth with him, he had contacted a body shop that was going to devise a solution by welding additional support pieces behind the transmissions to keep them rock steady and aligned. I asked if he could try to post photos of the job so that it might help others on this forum in the future, but I had no idea someone would run into this so soon. I know he is in the process, so you may have to wait to see how he works it out. To his credit, he has been very diligent and I am sure he will have his top completely fixed at the end of all of this.
I guess this may become a more common occurence as the early (MY 97-99) boxsters get older.
I will also try to answer some of the questions in your other "new" thread on the "Convertible Top Woes" saga.
Regards, Maurice.
-
Thank you very much Chris for your answer. I took off the plastic piece at the driver's side to free some space in between because it would hung up on the tension cable. I thought that maybe there was something that could be adjusted. The top was installed by the Porsche dealer and I 've had the problem with the latch when the car had the factory top. About the possible bent where should I look for it? When I examine the top at the part where it touches the windshield frame I can see it is perfectly aligned with it. That's why I am going crazy. I have been through all the posts you mention and many more from other forums with no luck. As for your suggestions for the engine you can be sure I will follow them. Cheers.
Kostas:
I am not sure whether this might solve or ameliorate your problem with the top latch hitting the windstop on the way down, but it might be worth a try.
The push rods (or "joint arms") that connect each V-levers to the metal ball on the bottom of the B-pillar on each side have an adjustment that affects the way the front of the convertible top aligns its two tongues with the two receptacles on the top edge of the windshield frame. AFTER YOU MARK THE ORIGINAL POSITIONS AND LENGTHS OF THESE PUSH RODS, loosen the 10mm nut (with thick washer) and try in turn to elongate or shorten overall length of each push rod and see if that has any effect on any clearance between the top latch and the windstop. If it does, you might be able to fine-tune it so that it clears the windstop and also still engages the receptacles on the top of the windshield frame.
Just a thought, since you say you are going crazy, and it might help.
Regards, Maurice.
P.S. Curious as to how many Drachmas or Euros the dealer charged for that job.
-
Is there a DIY guide for removing interior plastic pieces for 986?
I want to paint all the black plastics in the cabin, door pocket lids, speaker grilles, ignition key trim, center dash trim, aircon vents and etc.
Thanks
Here is a link that will guide you on door panel removal, with some detailed photos and instructions. This should help you with the door pocket lids, and speaker grilles, along with the door handle pull trim "surround" and that little half-circle piece just forward on the door pocket lids. http://www.ecoutez.net/boxster/door-panel-removal/
Regards, Maurice.
-
The pictures are not my car. They are local cars we have worked on over the years. http://www.renntech.org/forums/index.php?showtopic=1666
Hell, Those are quite dramartic. My v arms are just not flat...slight bend. do I need to bother? I'm going to say I'm off 3/16 or so of being completly flat. I don't even know if they are not supposed to be off a bit/
Thanks Peter
Peter:
The V-Levers are not supposed to have any bend in them at all. They are supposed to be completely flat and true. A bend, depending on the severity, could contribute (in conjunction with too much pressure either pulling or pushing) to the white plastic ball cups popping off.
Best to heat them up and hammer them straight.
Regards, Maurice.
-
My convertible top broke today and i find out its the part that the red/white ball joint attaches to. It the part with the ball screw and nut attaches to. Sorry don't know what its called...if anyone has a part number for this that would be great...thanks.
Mike:
One other thing I forgot to mention. From your brief description, it sounds like only one pushrod broke. Be VERY CAREFUL after you install the new pushrod to verify that both sides did not get out of sync. If the sides are out of synch you could cause major damage (read $$$$) , including bending the clamshell. Don't operate the top by the button for more than a second at a time until you have verified this.
Regards, Maurice.
hi, unfortunately its not the push rod.... i replaced that last month because it broke... the new one was the one with the white top... the reason why the first one broke was because the metal ball that it attaches to fell off because the bolt on the back came lose... this time the piece that holds the metal ball broke off... check the white push rod and for some reason its still intact... i need to find out the part that the metal ball screwed into because that's the part that broke....help please...
Mike:
Sorry I misunderstood what the problem was. I don't know that part number, but I will try to find out and let you know. Did the psgr side or driver's side break?
Regards, Maurice.
-
O.k. Maurice,
Thanks again for all your advice.
My tie rods came in today and I have read your thread upside-down and backwards several times. So tomorrow I'm jumping in. Plan in a nutshell is as follows:
1)Take the transmissions out
2)Check cable ends at motor (to short or unwound)
3)Take of the back covers off transmissions
4)Rotate the gear around with a drill drive so that the teeth face primarily towards cable thing (see pics)
5)Push v bar on and further drive the cable to align v bar with notches on housing face.
6) Snug screws of little black housing down
7) Reinstall back panel and reinstall transmission assems.
8) Re-attach cables to motor
9) Put tie rods on while loosened at middle joint. Top should be about 4-12in from at this point
10) Adjust pushrods crudely with middle joint and fine tune by rotating white, thread ball ends to line up each side of the front edge of the convertible top so that the two tongues fit into the slots onto the top frame of the windshield.
Few little grey areas…
1) The center screw indicated with one of the red arrow in your last illustration looks like a nut with a slotted, threaded, headless screw in the middle. Is this cinched down as a single unit (screw and nut rotated together), or just the center headless screw that’s twisted?
2) Do I need to ad grease to gear, if so, anything special?
3) Still a little fuzzy as to where the gear should be when the v bar/ gear is right. As I understand it there are 2 possible positions 180 degrees from each other, both of which would allow for the v-bar to be aligned with the notches on the housing. It may be obvious when I open the transmission up.
I've run a few "assembly in motion" scenarios thru my head, If you can, please see the attached images and tell me which on is closest to the approximate correct position: A, B or C.
Your feedback is appreciated, correct me where I’m wrong & I'll assume your "good luck" .
Regards, Peter
Peter:
From the list of steps that you made, it looks like you have everything covered.
1) The center screw. Just make sure it is snug. I would hold the center shaft steady with a small regular screw driver and tighten down the nut.
2) Add White Lithium Grease to the parts that mesh: Half-moon gear tooth surfaces will transfer the lithium grease onto the worm gear.
3) The way to tell that you are not 180 degrees off is by making sure that the V-lever arms are lined up (and that each edge of each side of each V-Lever arm is) parallel with the marking notches. In other words, if you are 180 degrees off, the arms of the V-Lever will cross the marking notches, not continue along them. Try to picture extending the marking notches towards the middle and towards the edges of the transmission housing. If you do that, you will see that you cannot put them in upside down. Again, make sure that the tabs on the back of the center of the V-Levers are temporarily SEATED into the slots in the center of the half-moon gear part that shows through the transmission housing.
Looking at your images, it's definitely not "A", and will end up, I believe, somewhere between "B" and "C". But again, don't try to judge it from the half-moon gear side, look at it from the marking notches perspective with the V-Levers temporarily installed. I say temporarily installed because you will have to remove the V-Levers to press the foam lining and the black plastic (round) friction plate back in position before installing the V-Lever in its final position.
Finally, be careful not to overtighten the 3 nuts that hold each transmission in place on the body. The correct torque is only 16 ft/lbs. The torque value for the 19mm bolt that fasten the V-Levers onto the center of the half-moon gear is 59 ft/lbs and originally had (blue ?) loctite.
Regards, Maurice.
-
My convertible top broke today and i find out its the part that the red/white ball joint attaches to. It the part with the ball screw and nut attaches to. Sorry don't know what its called...if anyone has a part number for this that would be great...thanks.
Mike:
One other thing I forgot to mention. From your brief description, it sounds like only one pushrod broke. Be VERY CAREFUL after you install the new pushrod to verify that both sides did not get out of sync. If the sides are out of synch you could cause major damage (read $$$$) , including bending the clamshell. Don't operate the top by the button for more than a second at a time until you have verified this.
Regards, Maurice.
-
My convertible top broke today and i find out its the part that the red/white ball joint attaches to. It the part with the ball screw and nut attaches to. Sorry don't know what its called...if anyone has a part number for this that would be great...thanks.
Mike:
The parts (left and right side are the same) are called push rods (or joint arms to differentiate them from the black hydraulic pushrods that operate the clamshell).
Part number is 986-561-279-02 for Boxster MY97-04.
Cost between about $40 to $75 each, depending on where you get them. Must buy the whole pushrod, they won't sell just the white plastic ball cup (used to be red plastic in the early years).
PM me if you want address and phone number of where I found reasonable price.
Regards, Maurice.
-
Ordered a new tube today so hopefully once that's in it will be over.
Good luck with the filler tube. The connection at the trunk side is hard to reach. I did the trunk side from underneath as I had the big parts out of the way, but still have the wounds on my wrist from rubbing against all the hoses in the way.
I recall someone mentioning that you could get to this connection by working from the coolant reservoir in the trunk. I replaced a leaky coolant reservoir earlier this summer and the oil filler section of the reservoir is a separate part that can be removed, but it will take some effort to do this as you will have to unbolt and disconnect some parts to get enough play to disengage the oil filler section of the reservoir. I believe the oil filler section of the reservoir is the part that the oil filler tube attaches to with a spring clip in the engine compartment.
Although I hope I don’t have to replace the filler tube for another 9 years, I would think others will appreciate any insight you gain on how to make what should be a simple procedure easier.
You can gain some additional access (and viewing) through the large round opening in the trunk firewall that has a large rubber plug going through it. It's located just to the left of the coolant tank. There is a bundle of wires routed there to the computer which is mounted on the driver's side top of the firewall. If you pull that plug (including the wires) rearwards, you can see and you can reach in there if your hands are small enough. It's an additional access that helped me when removed/replaced my coolant tank.
Regards, Maurice.
-
Thanks to this board for providing the basics on the pushrod fix for my '99 Boxster top. Worked beautifully, fixed in 1 h for the cost of a small part. Where did all the "top fix" posts go?
Got a new problem that I'd love to post, complete with pics, but I'm wondering before I do if someone could direct me to a manual that will describe top (and all the rest of the car?!?) anatomy/physiology so I can speak intelligently about the issue, using a common vocabulary.
Thanks so much to all who continue to educate.
masterbm
The Porsche Factory Technical Manual, in its volume called "Group 6, Body Equipment, Exterior" has some detailed diagrams, but the language is somewhat arcane and overall not too clear in its instructions.
The Bentley Manual, although not as detailed, is an excellent place to start in understanding the various components of the convertible top (see, for example, p. 354). It has some good terminology in referring to the various components of the top.
This forum has some posts that discuss/use various terms for the parts, and although there are some terms that are possible to interpret as referring to two different parts (example: pushrods [referring to the black hydraulic cylinders that operate on the clamshell] [["convertible top compartment lid" in Bentley]] and pushrods (referring to the two-part black joint arms that operate on the canvas part of the top), you can generally be understood. You get the idea...
Regards, Maurice.
-
I have a 2001 Boxster. My key is stuck in the ignition. I cannot remove the key. Does anyone have any suggestions alternatives. I'm told by dealer that i need to replace the switch on block housing (ignition lock housing) for $430.
I would not rely on the dealer's word in this instance.
This is a common problem with Boxsters. It is the exception rather than the rule to the entire housing to have to be replaced. 99% of the time it is only the switch itself, and it can be bought from any Audi dealer for less than $30 to $40. It is Audi part # 4A0 905 849 B.
It is an easy DIY, except that you have to be nimble and be able to do contortionist tricks to get into the proper position under the dash.
There is an excellent write up at this link with detailed photos: http://industryfigure.com/berkeley/Porsche...itionswitch.htm
Good Luck!
Regards, Maurice.
-
Julian:
To the best of my knowledge, there is no TSB on this particular problem. I remember looking through all the TSB on convertible top related issues and there was nothing on this one.
Maybe your body shop guy will get lucky if the dealer can point him to whoever it is that they refer these types of job to. I'm pretty certain that a dealer would not do this kind of work themselves without some kind of a kit from Porsche.
That $44/hr rate looks pretty good to me from up here in New York.
As far as geting upset, look at it this way: There is no way that you could continue with your top with the present condition of the transmission supports, so that's definitely the best way to proceed. With any luck, that will also be the end of it.
Oh, one last thing. It would not hurt to get a "maximum" price from the body shop guy before he starts. And remember the caution about disconnecting the battery before any welding takes place.
Regards, Maurice.
I didn't think there was an TSB on this issue either. The guy told me he'll give me a price range with a low and a high, depending on what he thinks needs to be done, etc.
Thanks for the battery reminder - I'll tell them when I drop the car off.
Julian:
Sounds good.
Any possibility of taking photos of the repair for the board's future reference?
As these early Boxsters get older, I'm sure there will be others who will run into this situation and it would be invaluable to them.
Regards, Maurice.
-
Hello Maurice,
Thanks a ton for your prompt and insightful reply. I’m hoping to put this baby to rest this weekend.
I believe I have the “a” type transmissions because it has the alignment marks for the v arm (unlike the “B” ?). Also, when I had one out and was messing around with it, I felt that dead spot…real head scratcher at the time. Oddly though, I believe I have later model cables in that they have a bumpy surface texture which, as I read here somewhere, is indicative of reinforced sheathing that doesn’t get stretched.
One other point (in my favor I hope), my top worked fine after the accident. It was my putting it back together (when the body shop didn’t) that I got in a pickle. Trying it out revealed a fundamental problem - a teeth nashing “thunk” and growl…with the top going nowhere. (probably the sound you were alluding to in your description of the misalignment of v bar)
The good news is I think that I could only bear the horrible sounds a couple of times. Hopefully I gave up before I could damage anything.
Half moon gear: In other words, your picture shows the gear approximately 180 degrees from where it wants to be (to be in the “Initial position”) for a ballpark alignment of the v arm with the notches. Or, to put it another way that single centered spoke should be point somewhere towards the black cable socket assembly thing. (I’m assuming that the slot for the v arm is permanently fixed, or part of, to the gear (no?)).
Also, walking through this thing in my mind, is that gearbox you have exposed actually the back side of the front cover? That is. the other side of that gear/case assembly pictured would face the inside of the conv. top compartment?
Roadblock potentials:
I unfortunately only have one of the original (albeit broken red socket) pushrods to reference the final, installed length of 2 new ones. Do you think its length would be representative of both sides? If not, any idea how to “tune” the lengths to operate right (maybe the stuff of another thread…dun-no).
What signals the top to stop moving (either up or down). I guess the door jam micro would be one. Another switch looking thing is above the drive motor (?). I also read there were 3 in total. Would they generate for mentioned stop signals? any adjustments there?
I’d kinda like to put this right without taking anything apart. As I recall, the manual says to disconnect the cable for one side (at the motor ) to align the opposite side and transmission/v arm. Once the v bar is aligned, how man degrees in each direction should it rotate without it leaving the gear and freewheeling (indicating gear misalignment)?
Anyway, I really appreciate your input. Read your whole thread (among others) and admire your methodical persistance in you're diagnosis.
Regards, Peter
Peter:
The slot in the V-lever is actually the center of the back part of the half-moon gear. Don't worry about which position the slots are facing, because when you temporarily install the V-Lever and its base sits in the slots, having the V-Lever positioned between the marking notches (by rotating each cable in turn) the slots will also be positioned correctly.
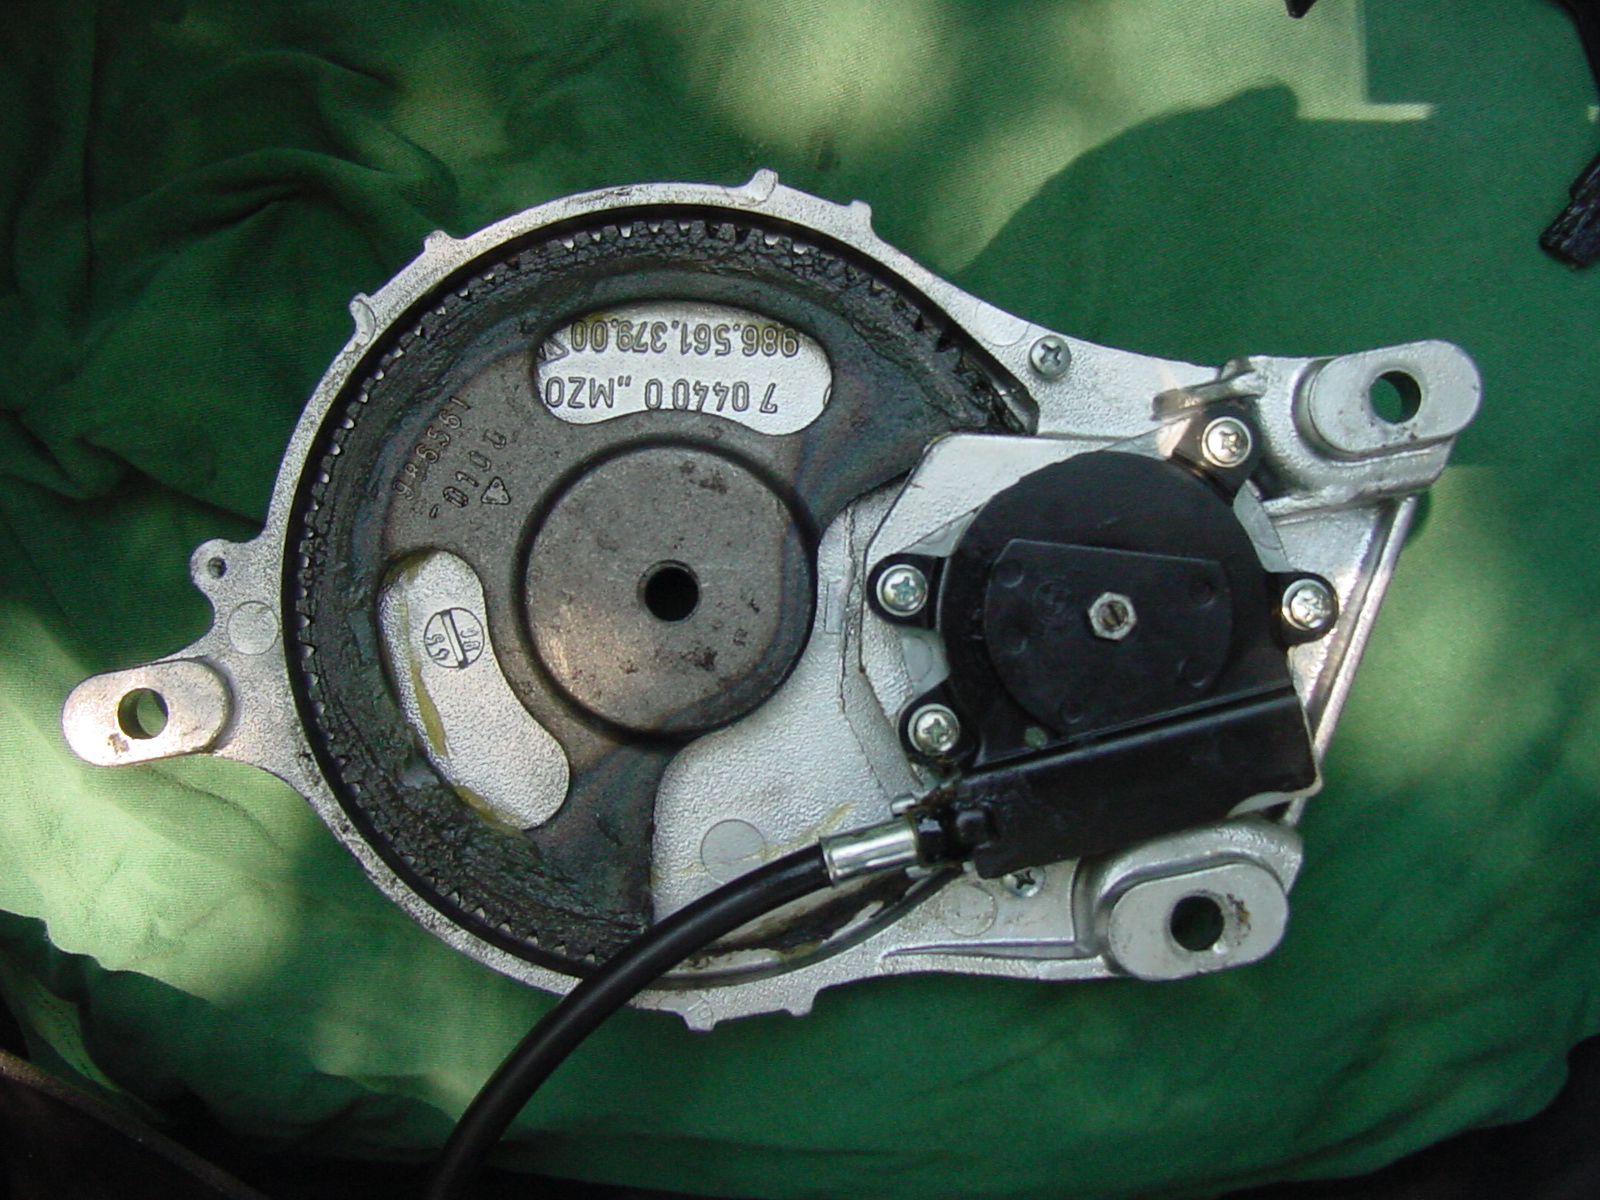
The photo that shows the half moon gear exposed is actually the back side (outboard when mounted in the car) of the transmission after a black plastic cover is removed (with three small screws). Here's a photo of the the back side with the cover still on:

The three small phillips screws with no arrows pointing towards them are the ones that hold the half moon cover on. If you unbolt the transmissions from the car, and inspect the back of each one, make sure that you snug up the five other phillips screws to which the red arrows are pointing. If those screws (with the red arrows) are not tight, the worm gear under that cover can skip. The yellow arrow is pointing to the housing for the worm gear that is turned by the other end of the cables. The white arrow shows a BMW emblem embossed into that small plastic cover. I have wondered if this mechanism is used in BMW convertibles but don't know yet.
The one broken red plastic ball cup push rod should be adequate to use to approximate the length of the two new (white plastic ball cup) push rods you will have to get. They can be adjusted for length with the 10mm bolt and thich washer that holds them together. You can also make a fine adjustment by turning the plastic ball cup on its threaded rod (but not more than 1 1/2 to 2 turns). As I posted before, that adjustment will come last and it allows you to line up each side of the front edge of the convertible top so that the two tongues fit into the slots onto the top frame of the windshield.
The movement of the convertible top is controlled by the main relay that is located in the relay carrier above the fuse box in the driver's side footwell. It controls the top stopping and starting through the tripping of the microswitches in the B-Pillar and in the lever over the motor (under the clamshell). There are two other microswitches that are located in the latch mechanism, and one of those two controls the "dipping" of the windows when the latch is unlocked. The main relay also causes a short period of "after running time" which briefly continues after the clamshell presses down on that lever on top of the motor. A poster named JPorter posted a detailed procedure, with photographs, on how to adjust this pre-programmed after running time by adding some custom-made electronic components but I don't think you are in a position to consider that yet. It does make for some educational reading though.
There are no adjustments in the B-pillar microswitch or in the microswitch above the motor, but the small metal lever arm of the B-Pillar microswitch can bend and that will cause the switch to trip earlier or later, and that will in turn change the direction of travel of the top.
I'm not sure about how many degrees the half moon gear will rotate before it "falls off" at the last of its 50 teeth, but if you align the V-lever between the marking notches it should have enough teeth on each side to operate properly.
If you disconnect the cable for one side (at the motor), as the manual says, I believe it refers to the fact that the opposite side can then be aligned by pushing the button on the dash board. I have found it more accurate to use a drill (lowest torque setting) to spin each cable in turn. It also doesn't drain the car battery.
Regards, Maurice.
-
Wow Chuck sorry to hear that. Glad you are ok. Air bags can be very dangerous. I have heard that couple of years ago Porsche tech got killed by one of those. TT will make up for all your troubles. I'm glad to see that you are a true Porsche guy.
Chuck:
So sorry to hear about your unfortunate event. Glad that you weren't banged up any worse than the shot you got from the airbag. Fire is a very scary thing, and the advice you give about having a halon fire extinguisher is worth its weight in gold.
What's the situation with your insurance?
As the other members have said, can't think of any better therapy than a TT.
Regards, Maurice.
-
I'm with TP, the factory tool doesn't fit as well!
Me Three.
Regards, Maurice.
-
Hello,
Any body had the unfortunate occasion to refinstall the convertible eclectic top mechanism? My car was t-boned and in the process of rectifying the smash, my body shop disconnected one of the push rod things. Messed every thing up. Put the two sides out of sink...unusable.
...Ideas ? tips? Experience to share?
P.K.
(I chose not to take my car back to the body shop,,,no confidence there…quiet awhile ago any way)
First place to start is definitely by checking to make sure that both of the drive cables (on the side that goes into the motor which is in the center, under the clamshell,...If both sides appear to be operating in the opposite direction from each other as you describe, is it possible that you installed one of the V-levers 180 degrees off. With the keyed cutouts, it is possible to install the V-levers in only two positions: either the correct way or 180 degrees off.
Regards, Maurice.
Hi Maurice
Thanks for the quick reply. I did stumble on that thread and, it and others were extremely helpful. Told me a lot, I almost took this post down. 1 point, even after the wreck, the top still worked just fine. Currently I’ve disconnected the tie rods. Opening and closing is purely manual (lift the hatch, undo the latch & pull the top back and down, hatch back down).
As to your questions, my drive cables appear to be the “new” (bumpy) variety. That is the variety where sheathing presumably doesn’t stretch. Also, as I recall (when I attempted to fix this thing a couple years ago) there was no obvious “shortcoming” in the cable length and they did definitely drive the transmissions…aggressively.
The car is a 99. As far as the version of the transmission, my manual describes versions references both “A” & “B”. By extrapolation I think I have an “A” in that it has raised bumps for aligning the “drive lever”, whereas in the “B” model, they talk about measuring down to the ball on the drive lever (illustrations are inconclusive).
As to the steps I followed: I’ll try to attach them…makes it look so easy. As to the transmissions running in reverse to each other, that’s just what it sounded like might be happening, it would just make a grrrr -( painfull, loud:)-THAaUNK!-grrrr… with the top going nowhere. Needless to say I didn’t’ try it many times.
Having seen on some thread here, the guts of the type “A” transmission, I guess what had me vexed, that’s the free wheeling section of the half moon gear…just couldn’t visualize it. That may help me visualize it into the correct position.
Aside from ineveditable pratfalls, it really seems easy. But with so many threads on this topic . I anticipate I’ll be around this forum for some time while I try to get this thing working.
Questions: Assuming I have all my ducks in a row after aligning drive levers into position, how should the rear clam-shell/cover and convert top be positioned for attachments of tie rods? Also why, how, and when do I adjust the length of these rods? Feel free to comment or impart any tidbits of wisdom.
Thanks, Peter
Peter:
I'm familiar with the description in the manual that talks about measuring down to the ball on the drive lever. You can also use that measurement to double check (after getting the V-Levers into position with the marking notches) that both V-levers are in the same position relative to that rail. Again, if you have the half moon gears, you definitely have the "Version A", early style transmissions.
The clamshell pushrods are not adjustable, but they do extend when they are under pressure from the V-levers. That is what keeps the clamshell down tight on top of the open and retracted convertible top. That is also why it is sometimes incredibly difficult to separate the pushrods from the corresponding metal ball on the V-Levers.
So, once you align the V-levers into position, start out with the clamshell almost closed and then pull on the arms of the clamshell in either direction until you can get the ball cup on each pushrod to pop onto the metal ball on the V-Lever. Once you do both of them, the clamshell can only be in one position with the V-levers rotated at that starting position.
Again, you cannot adjust the length of those (black hydraulic tube) pushrods, but you can adjust the other pushrods that operated on the base of the B-Pillar of the convertible top. Be sure to mark the length with which you start out so you can re-assemble them to that length as a starting point. The reason I dissassemble them is that it is much easier to pop those on (the white plastic ball cup part) that way when the top is almost completely up. Then you can re-assemble them with the 10mm bolt and thick washer. In time sequence, this is the last step before you try to operate the top.
The adjustment that those pushrods (with the white plastic ball cup) provide is to adjust where the two tongues on the front of the convertible top engage the receptacles in the top frame of the windshield.
When you have everything together, if you can have someone else push the button with you standing behind the car, you will easily be able to judge is the two sides are synchronized, especially from the motion of the clamshell.
Regards, Maurice.
-
Julian:
Glad to hear that it looks like you found the root of the problem. At the very least, getting the two sides reinforced will only help ensure a more permanent and trouble-free repair.
As far as the body shop you use, after you explain (and show them) the way the original sheet metal is cracked and has holes, any competent body shop welder will be able to reinforce that area, and it will probably end up as overkill.
I don't think that you should have to remind them, but be very sure that they are aware to disconnect the battery before any welding is performed. The electronics can fry in a split second if they don't take that precaution.
If you can take photos of the repair, it might help some people in this forum down the line.
Regards, Maurice.
Maurice,
I went to a body shop today and the guy I talked to said he was going to contact Porsche and find out if they have a TSB out for this issue or if there is a known procedure for reinforcing the sides. He said if he can't find out anything from Porsche he'll take the car in and scratch his head and try to come up with a best procedure. He will call me tomorrow and let me know. They charge $44/hr; with no real parts cost, I think I am looking at anywhere between $150 - $350 (3 - 8 hours of work / best case - worst case scenarios). I'll keep you all posted. I don't mind spending that much (on top of the ~ $600 already spent on transmissions, push rods, cables, etc) as long as the top will work without any more problems. I would be very upset if I put $400 more into it and still be where I am now though. But we'll see...
Julian.
Julian:
To the best of my knowledge, there is no TSB on this particular problem. I remember looking through all the TSB on convertible top related issues and there was nothing on this one.
Maybe your body shop guy will get lucky if the dealer can point him to whoever it is that they refer these types of job to. I'm pretty certain that a dealer would not do this kind of work themselves without some kind of a kit from Porsche.
That $44/hr rate looks pretty good to me from up here in New York.
As far as geting upset, look at it this way: There is no way that you could continue with your top with the present condition of the transmission supports, so that's definitely the best way to proceed. With any luck, that will also be the end of it.
Oh, one last thing. It would not hurt to get a "maximum" price from the body shop guy before he starts. And remember the caution about disconnecting the battery before any welding takes place.
Regards, Maurice.
-
I'm glad that helped. Keep us posted. I think Tool Pants was the first person to tell me that the dealer's tech used those markings for synching. I screwed up my timing so badly the first time, no amount of reading those instructions could get me to a good starting point until I did the all the way down, then up approach. If you're using a drill to sync, make sure that the torque setting is at the lowest setting.
Mark:
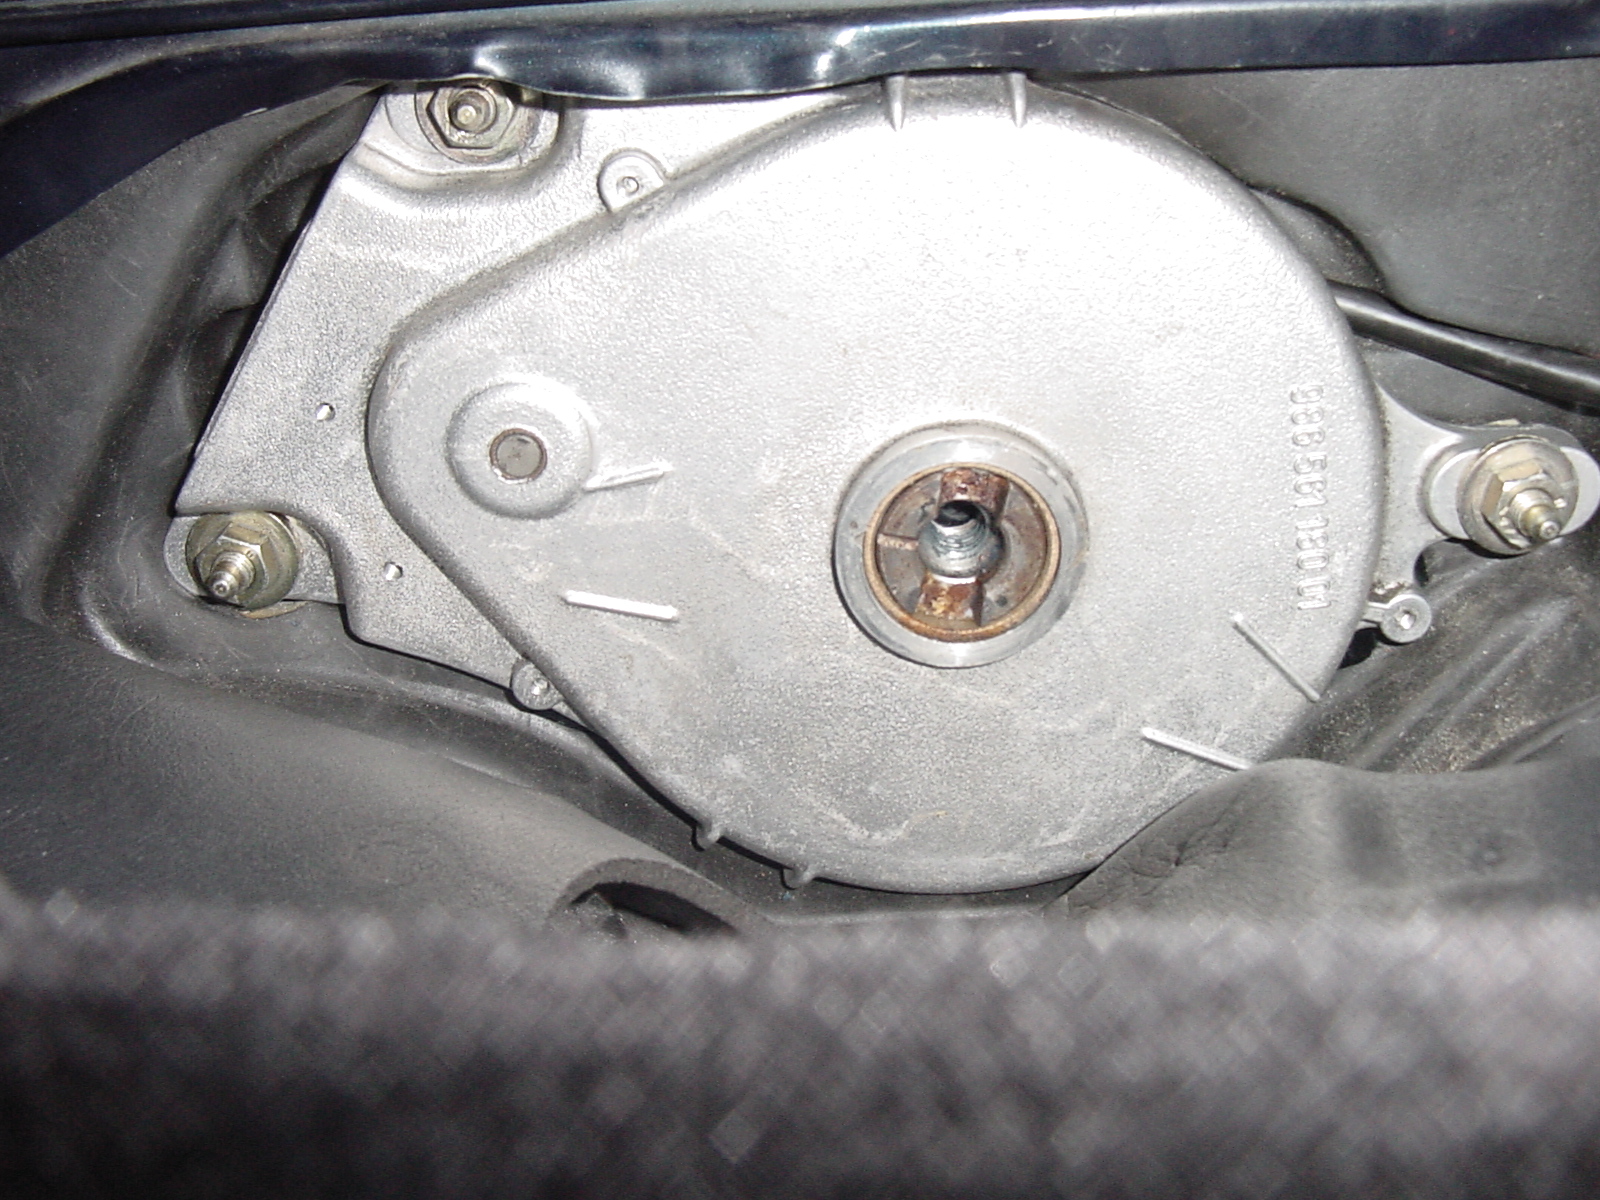
Well, that was the key but in a roundabout way!...
Here is a photo of the half-moon gear in the transmission. From this postion, you have to spin the cable so that the half-moon gear is near the middle of its travel. Then, when you install the transmission and install the V-lever (with the 19mm bolt torqued to 59 ft/lbs) you don't have far to go to line up the V-lever with the marking notches .
Here is a photo of the transmission showing the marking notches. The notches, in the way they are slanted, help you to make sure that you don't have the V-lever installed 180 degrees off.
Without RennTech Forums, I was looking at a big $$ repair, (to say nothing of the feeling of accomplishment). :renntech:
Regards, 1schoir.
Hello,
Sounds like you’ve grappled with a problem that’s vexed me for years. My Boxster was T-boned awhile back. The body shop neglected reattach some of the opening and closing mechanism (just as well I suppose…reading this thread)
Question, in your half moon pic, do you mean that unlike the image, the half moon gear should be centered, that is, it would rotate equal distances cw or ccw before it hits it’s stop? And, at this point, the arm will be roughly in the proper position?
If so, what position is the top in (I think you mention 12 in. form the windshield?) If all those ducks are in a row and the pushrods etc. are in place, should the top be good to go? Also, the micro switch, is their only one on the drivers side?
Thanks in advance for your reply. It’s really great to find a place where Porsche people aren’t afraid to get there hands dirty + have the smarts!
Thanks in advance.
Peter
P.S. PM me if you’d like.
Peter:
I noticed in your other post that you stated that you have a MY99. The first thing you have to determine is whether you have the original style transmissions (Version A). Porsche changed over to "Version B" in May of 1999. If you have the half-moon gears, you have the "Version A", early style transmissions. Unfortunately they are the more troublesome ones, but they can be made to work properly.
In response to your questions:
1. The photo of the inside of the transmission showing the half moon gear shows the half moon gear before it has been rotated to its initial position, which is only used as a starting point. To get it to the initial position, you must temporarily install the V-Lever, making sure that the arms of the V-Lever are located in between the "marking notches", after you have seated the back of the V-Lever in the two slots provided for that purpose on the CENTER exposed section of the half-moon gear (after it has been re-assembled). Here is a photo of the marking notches with the V-lever sketched in:
In this photo, you can also see the two slots that I am referring to, (although they may not be in the proper position of rotation). (Note: this is photo of psgr side transmission).
Also, there are no "stops" for the half-moon gears. If they are out of adjustment, they will keep rotating, until they "pop" with a loud click or crunch. When all the pushrods are connected, if the half-moon gear goes past its last tooth, it goes off with that pop and then gets pulled back with the tension from the clamshell hydraulic pushrod, and then pops off again, and goes on like that until and unless you operate it in the opposite direction.
2. When you are in the initial starting position with the V-Levers in between the marking notches, the front of the convertible top should be positioned so that it is almost closed, between 2 to 12 inches from the top of the windshield. You will be able to assess this when you snap the white plastic ball cups (you may still have the earlier red plastic ball cups) onto the metal ball which is below the B-Pillar part of the convertible top frame. I found it easiest to dissassemble those pushrods at the middle, where they are held together by a 10mm bolt with a thick washer. Before you unscrew the 10mm bolt, mark the position of the front part onto the part that is attached to the V-Lever so that you have a point of reference. Once you press the white plastic ball cup onto the metal ball, you can then re-attach that front part to the part that is attached to the V-Lever and you should then find the front of the convertible top in the correct position.
3. There is only one microswitch in the B-Pillars, which is only on the driver's (left) side on the MY 97-99. On the later cars, or the ones where the transmissions have been replaced with the Version B transmissions, the microswitch is in the psgr (right) side transmission.
Make sure to also first verify that your drive cables are okay, as that is usually the initial cause of all of the problems on the cars with the early style transmissions. You have to pull the cables out from where they are inserted into the sides of the motor. Just pull the small metal clip upwards and pull the cable out. Then verify that you have 3/4" of the inner metal (speedometer type) cable sticking out. If you don't have that much sticking out of the outer black plastic sheath, the inner cable (when inserted) will not be engaged and the motor will not spin that side to rotate the transmission.
You also have to make sure that the inner cables have not become "unwound" or broken apart inside the black platic sheaths. If you spin each metal cable by inserting it in a drill (lowest torque setting), you will be able to tell if it's operating the transmission because the half-moon gear will rotate.
There is an excellent post by Tool Pants, with photos and a procedure for repairing or replacing the cables.
All of this should give you a place to start. Let us know how you progress or what roadblocks you run into.
Regards, Maurice.
-
Hi,
Can anyone confirm that all porsche paint has a thickness reading of 4.5?
So, if the car has been repainted, it would have a higher reading.
Would the paint meter be a good way to decide if I should buy the used Cayenne?
Can a porsche tech guy be able to tell if the frame has been damaged? Or is that pretty much impossible.
Any competent body shop can generally tell if a car (Porsche or not) has been involved in a major collision that reults in frame damage.
A "repaint" would not necessarily result in higher thickness readings. A proper repaint involves sanding down the finish, which will remove several mils of thickness before re-applying either color coat and clear coat(s) or primer, primer-surfacer, sealer, then color coat and clear coat(s).
A paint meter can be a useful tool, but I would not rely on it exclusively.
Regards, Maurice.
-
Hello,
Any body had the unfortunate occasion to refinstall the convertible eclectic top mechanism? My car was t-boned and in the process of rectifying the smash, my body shop disconnected one of the push rod things. Messed every thing up. Put the two sides out of sink...unusable.
Even following the factory manual to a tee, it wound up sounding and behaveing like on side was closing and the other was trying to open. Seasoned factory trained Porsche mechanic say their a b_tch…estimate 6 hours ($600)
I’m pretty clever and can figure out most stuff out. But this one has evaded me. Thinking of taking the whole mechanism out and trying to synchronize the 2 sides on a bench, or, trying to open it up and down one side at a time and synchronize that way.
Ideas ? tips? Experience to share?
P.K.
(I chose not to take my car back to the body shop,,,no confidence there…quiet awhile ago any way)
First place to start is definitely by checking to make sure that both of the drive cables (on the side that goes into the motor which is in the center, under the clamshell, just forward of the third brake light) are sticking out of their black plastic sheaths by 3/4". You can check them by pulling off (up) the small brass clip that is holding each metal ferrule end into the side of the motor. If either one is not sticking out or sticking out by less than that, that cable may not be able to be inserted or stay inserted into the motor's drive on either side of the motor and therefore will not operate the convertible top transmission on that side. Depending on what you find, you may able to repair the cables or you may have to replace them. Look at this thread for a detailed explanation by Tool Pants, with photos on this issue: http://www.renntech.org/forums/index.php?s...pic=68&st=0
What year is your car? Do you have the old style (97-99) transmissions ("Version A" in the factory manual) or the newer style ("Version B") or a combination of the two?
Could you describe what specific steps you took when you followed the manual and what results/symptoms you got. Are you referring to using the "marking notches" with the V-Levers positioned in between those notches as a starting point?
If both sides appear to be operating in the opposite direction from each other as you describe, is it possible that you installed one of the V-levers 180 degrees off. With the keyed cutouts, it is possible to install the V-levers in only two positions: either the correct way or 180 degrees off.
Regards, Maurice.


CEL On and Off
in 986 Series (Boxster, Boxster S)
Posted
Pretty outrageous story.
Considering the cost of all new 02 Bosch Brand sensors (i.e., no wiring modifications of any kind needed) is about $150 X 4, or about $600....
The really outrageous part is that he would be charging you $600 more dollars to essentially unscrew and rescrew the equivalent of four threaded bolts. I guess screw is the operative word.
It sounds like this certified Porsche mechanic has not only been working on P cars since 1980, but that he has been working them over as well.
Good job on figuring out and doing the repair yourself.
Regards, Maurice.