Welcome to RennTech.org Community, Guest
There are many great features available to you once you register at RennTech.org
You are free to view posts here, but you must log in to reply to existing posts, or to start your own new topic. Like most online communities, there are costs involved to maintain a site like this - so we encourage our members to donate. All donations go to the costs operating and maintaining this site. We prefer that guests take part in our community and we offer a lot in return to those willing to join our corner of the Porsche world. This site is 99 percent member supported (less than 1 percent comes from advertising) - so please consider an annual donation to keep this site running.
Here are some of the features available - once you register at RennTech.org
- View Classified Ads
- DIY Tutorials
- Porsche TSB Listings (limited)
- VIN Decoder
- Special Offers
-
OBD II P-Codes - Paint Codes
- Registry
- Videos System
- View Reviews
- and get rid of this welcome message
It takes just a few minutes to register, and it's FREE
Contributing Members also get these additional benefits:
(you become a Contributing Member by donating money to the operation of this site)
- No ads - advertisements are removed
- Access the Contributors Only Forum
- Contributing Members Only Downloads
- Send attachments with PMs
- All image/file storage limits are substantially increased for all Contributing Members
- Option Codes Lookup
- VIN Option Lookups (limited)


1schoir
-
Posts
2,739 -
Joined
-
Last visited
-
Days Won
6
Content Type
Profiles
Events
Forums
External Paint Colors
Downloads
Tutorials
Links Directory
Collections
Store
Posts posted by 1schoir
-
-
Make sure to also check that the area around the pressure relief valve housing is completely dry and that it does not show any dried up residue. The O-rings and the rubber gasket under the pressure relief valve are also known to fail on occasion.
You can check on this by removing the thin black plastic cosmetic cover that sits on top of the coolant tank. The pressure relief valve housing is just forward of the coolant cap and, if it's leaking, there will be residue at the base of the housing and/or around the screws that fasten it in place.
Regards, Maurice.
-
I need some programming help. I have the following:
1) Original second key for my Cayenne with a destroyed fob.
2) A good used fob from another Cayenne, to whcih I have transferred the original cut key.
3) A PST2 computer tool.
4) My car's code # from the dealer
5) One good orginal first key + fob.
Still, I seem unable to program the second fob to this car. I've tried "teaching" just the new key/fob, and I've tried "teaching" both the original first key/fob along with the second key/fob, and whatever I do, the second key/fob still trigggers the immobilizer. The PST2 says "programming key failed" or something to that effect. What am I doing wrong?
There are two issues that it appears you still have to deal with in your case:
1. You must remove the transponder pill from your destroyed fob and transfer it to the new "used" remote that you bought.
2. You will only be able to program the new "used" remote that you bought if you also obtained the 24 digit Bar Code number with that used key. The Bar Code usually comes on a little cardboard tag attached to the key or it's on a sticker on the small plastic parts bag that contains the key when it is delivered new. Without that bar code, you will not be able to program the remote.
Regards, Maurice.
-
Thanks for posting the details of what you have learned. I'm sure it will help the next person who comes along with this problem. :thumbup:
Regards, Maurice.
-
It's definitely a case of too much friction, with the solution being along the lines of what RFM describes.
If you look at the video closely, you can see that the seal starts to get pulled into the window glass at the middle of the seal and then it pulls the rest of the outlying edges of the seal in. That middle is where there is the most friction.
Similarly, at the end of the video, you can see the middle of the seal releasing and then it starts to "unfold" out gradually towards the sides.
Gummipflege, which I think is a BMW-endorsed product or a similar product made by Sonax, here: http://www.sonax.de/Autopflege/Produkte/Felge-Reifen-Gummi/(so)/6/(node)/12977/340200-SONAX-GummiPfleger
don't attack rubber and are worth a shot to solve the friction of rubber on glass issue. You'll also get the (advertised) benefit of extending the life of the rubber seal and improving its appearance.
Regards, Maurice.
-
There is a hack developed by Pedro that allows the top to be operated while moving in a 986 Boxster which involves bending up one of the spades (pin #18) on the convertible top double relay. Porsche incorporated this feature in the later 987's, but this hack works on 986's.
I don't know if you could do the same hack on a 996, but you can check this out if it interests you: http://pedrosgarage....-in-motion.html
Regards, Maurice.
-
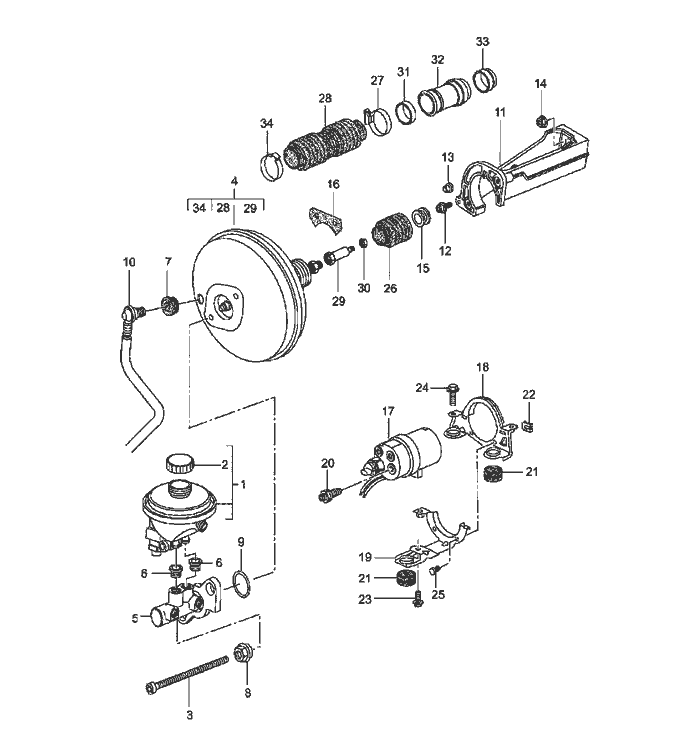
Here is a diagram of what the brake booster looks like on your car...It's part #4 and looks like a big black flattened metal drum:

On your UK car, it's on the right side, in the front trunk compartment, sort of in line with where your brake pedal is, ahead of part #11, which is a heavy aluminum bracket.
Regards, Maurice.
-
The best option, which also involves minimal labor, is to replace the entire top with a used OEM convertible top and frame from a 2003 or 2004 Boxster. Since your Boxster is a 2001, it would take less than an hour to swap the tops.
Here are instructions and the pros and cons of doing the conversion: https://sites.google.com/site/mikefocke2/installinga'03-'04glasstopandframeona'97
As mentioned in the DIY, search on car-part.com for tops.
Regards, Maurice.
-
:clapping: :clapping: :clapping:
Regards, Maurice.
-
While you are at it (cleaning the drains), make sure that the drain for your A/C is not clogged either. That will get you water in the passenger compartment, to the right side of where the console meets the front firewall by your feet.
Regards, Maurice.
-
The same Stabilus brand struts are on AutohausAZ.com for $19.63 each: http://www.autohausaz.com/search/product.aspx?sid=l0qmd1e2pvbiauvezyo5g445&makeid=800019@Porsche&modelid=1317203@BOXSTER%20&year=1998&cid=13@Body,%20Trim%20%26%20Lighting&gid=13761@Shock/Strut,%20Decklid
Plus, you get free shipping for any order over $50.
Regards, Maurice.
-
Here's the link to one of the threads: http://www.renntech.org/forums/topic/41273-passenger-door-sticking-window-alignment-issue-not-regulator/page__hl__+window%20+and%20+leg#entry219547
Regards, Maurice.
-
The info is on this site, but not in either of those two places. Do a search for posts and you'll find the specifics, with photos.
There was a recent thread (within the last three months) when this was discussed, in detail.
If I find it first, I'll post the link.
Regards, Maurice.
-
+1!
Regards, Maurice.
-
You can purchase a "freon" recharge kit at any chain auto parts store such as Autozone, Pep Boys, Advance Auto Parts, etc...
If pumping in the additional refrigerant helps you pinpoint the source of the leak, then do so, but you don't want to be putting in refrigerant and having it escape into the atmosphere continuously. You definitely have to determine and seal the source of the leak asap.
Regards, Maurice.
-
It's perfectly okay to hose down the radiators and condensers with a garden hose if they are already cold.
You can also use compressed air if you have that available to dry them so that you can pinpoint the source of the leak.
Regards, Maurice.
-
Brief update: It's been almost 2 years since I did this repair, and the stitching is holding up very well.
Do you have photos of the stitching? I'm a bit afraid to go that route without seeing how it might look.
With a good needle and (a lot of) patience, you can actually sew the stitches exactly into the original stitch holes and it will be completely undetectable.
Regards, Maurice.
-
Thanks for the update. Sure is another cautionary tale about parts not manufactured by a known entity!
Glad you got it sorted out.
Regards, Maurice.
-
Thanks for the update.
I'm sure that someone will come along for whom this information will be helpful.
Regards, Maurice.
-
Lee:
From the symptoms you describe, it sounds like there are either gum deposits or dirt interfering with the proper operation and movement of the idle control valve and of the butterfly valve inside the throttle body.
It would be a good idea to remove and clean your throttle body and to do the same with the idle control valve on your '99.
Here is a detailed DIY on how to do both: http://pedrosgarage....ottle_Body.html
Regards, Maurice.
-
Anytime. If you do get to look at one up close, take some pictures and keep us posted, as I am curious to see the answer.
Regards, Maurice.
-
Thanks for the reply but the issue is with the size of the holes the elstic would need to pass through. To get the string out I could only tape another piece of string side by side with it as even a knot was to large to pull through! Why are these things never straight forward??
Cuz:
I have an old convertible top and frame in the garage. I think it's from a '99. I will try and take some parts of it apart this weekend so that I can see how the fabric channel is constructed in that one. Maybe it will yield some clues that might help you fashion a solution.
Regards, Maurice.
-
"Oh well" is correct! The good part is that you got it done and it's all back together.
Thanks for the update.
Regards, Maurice.
-
Interested in the same thing. Anyone confirm 3 or 2 button remotes working for 1999?
My '97 Boxster has a two button remote that locks/unlocks the doors with one button, and opens the rear trunk with the other button.
Regards, Maurice.
-
I don't have a photo of an intact cable/string. The only ones I have ever seen have the elastic band in between the two sections of "shoelace" string. It's possible that Porsche changed the design (without telling anybody or updating the parts diagrams :cursing: )
The cable/string does serve the additional function of keeping the canvas tight towards the frame member ("bow") of the roof near the middle and stops it from "inflating" or flapping when at speed.
I would note the overall length of the string you have removed, then cut it in half, remove about an 18" section (9" from each of the two halves) and replace the 18" with as wide a band of elastic as you can fit in there (about 1 1/2 inches to 2 inches wide would be ideal).
Then sew the three pieces together before reinstalling the entire unit, making sure that the ends of the "shoelace" strings are routed correctly over the plastic ears when you refasten them.
Let us know how that works out, and maybe post some photos for future posters. This problem has come up many times before and is sure to come up again, frequently.
Regards, Maurice.
Couldn't locate the crank position sensor for 99 Boxster
in 986 Series (Boxster, Boxster S)
Posted · Edited by 1schoir
Steve:
The flywheel housing is the part of the transmission case that extends forward (in the case of a Boxster) of the actual transmission and covers the flywheel, clutch and pressure plate, etc... As such, it's not on the left or right side of the car, but rather sits in the middle of the engine bay. At the forward end of the transmission (again, in a Boxster), the flywheel housing mates up to the rear of the engine and, around its circumference, you can see the heads of a number of bolts that hold it snug to the rear of the engine. It is below the bottom of the AOS.
Here is a photo of an engine removed from the car. To help orient you, the AOS is circled in red, the AOS bellows has a blue arrow, and the yellow arrow points to the crankshaft position sensor.
Since the transmission is not mated up to this engine in this photo, you won't see the rear face of the engine. However, if you look for the bolt heads I mentioned earlier, you can locate the CPS in between two of those bolt heads. You can clearly see the threaded holes for those two bolt heads immediately above and below the CPS (click on the photo to enlarge). In your case, those two holes will have the bolts in them as the transmission is still bolted in place.
Regards, Maurice.