Welcome to RennTech.org Community, Guest
There are many great features available to you once you register at RennTech.org
You are free to view posts here, but you must log in to reply to existing posts, or to start your own new topic. Like most online communities, there are costs involved to maintain a site like this - so we encourage our members to donate. All donations go to the costs operating and maintaining this site. We prefer that guests take part in our community and we offer a lot in return to those willing to join our corner of the Porsche world. This site is 99 percent member supported (less than 1 percent comes from advertising) - so please consider an annual donation to keep this site running.
Here are some of the features available - once you register at RennTech.org
- View Classified Ads
- DIY Tutorials
- Porsche TSB Listings (limited)
- VIN Decoder
- Special Offers
-
OBD II P-Codes - Paint Codes
- Registry
- Videos System
- View Reviews
- and get rid of this welcome message
It takes just a few minutes to register, and it's FREE
Contributing Members also get these additional benefits:
(you become a Contributing Member by donating money to the operation of this site)
- No ads - advertisements are removed
- Access the Contributors Only Forum
- Contributing Members Only Downloads
- Send attachments with PMs
- All image/file storage limits are substantially increased for all Contributing Members
- Option Codes Lookup
- VIN Option Lookups (limited)


1schoir
-
Posts
2,739 -
Joined
-
Last visited
-
Days Won
6
Content Type
Profiles
Events
Forums
External Paint Colors
Downloads
Tutorials
Links Directory
Collections
Store
Posts posted by 1schoir
-
-
Thanks for the info, mine is a 2007 C4S, it has the plastic guides and they are intact. I have lubricated all the usual creak suspects, and the top used to be rock solid. At the end of fall it started creeking, and it seems to be the front edge moving side to side.
Have you noticed whether there is less tension on the latch when you pull the top closed (i.e., it's easier to lock the latch shut) than it used to be ? If so, there is a possibility that the canvas of the convertible top has stretched slightly, thereby causing a looser fit than before.
If that's the case, you could try adjusting the tension ropes which are under the rear main bow of the convertible top frame. There is an adjustment there that allows you to have the rear main bow pull the canvas back slightly so that there is more tension on the latch when it is pulled shut. That might get rid of the rattle.
Regards, Maurice.
-
I'm not sure whether this applies to a 997, but on 996's and 986's, there is a black plastic/rubber cap that fits over what Porsche calls the "centering journal" which is located on the left and right side of the leading edge of the convertible top. They are the "tongues" that protrude from the leading edge of the top and help to guide the top into the receptacles located on either side of the horizontal top edge of the windshield frame.
When either one of the two (or both) are missing, that can cause creaking, especially when the weather turns colder.
For reference, on a 996, the part number for those plastic caps is 996 561 705 01 for the left side and 996 561 706 01 for the right side.
Regards, Maurice.
-
Jim:
Here is a diagram showing the neutral safety switch on the side of the Tiptronic. Access is relatively easy, with only a couple of bolts and the electrical connector to contend with.

Regards, Maurice.
-
Jsebastian and otisdriftwood:
Here is a diagram showing the location of the neutral safety switch, a drawing of what it looks like and how it is attached:
Regards, Maurice.
-
Bryan:
Take a look at post #4 in this thread for instructions and photos on how to remove the transmission. Once you take it off and take it apart, you should be able to verify the cause of the inner cable not driving the transmission. Take some photos and post them here with what you find.
Used transmissions, as long as they are the "B Version" (manufactured by "Stehle") are fine if you can find them, as the problem you are having (i.e., not strictly cable related) is relatively rare.
If you can visit a forum for Spec Boxster Racing, you should be able to get one (or both sides) at a very reasonable price, as those guys remove the transmissions and the top when they are converting their cars to Spec Racers.
Regards, Maurice.
-
Pierre:
That adjuster is meant for adjusting the position of the two black metal parts of the frame on the edges of the convertible top relative to each other.
You might try to adjust the position of the window by means of the adjustment screw and/or the adjustment provided by the base of the legs of the window regulator. You can perform either of those adjustments without removing the inside door panel, by means of the access holes provided under the door.
If you want to try those adjustments, do a search here for an explanation and photos that I posted about two years ago. If I find the posts, I'll post the links here.
Regards, Maurice.
-
Blang:
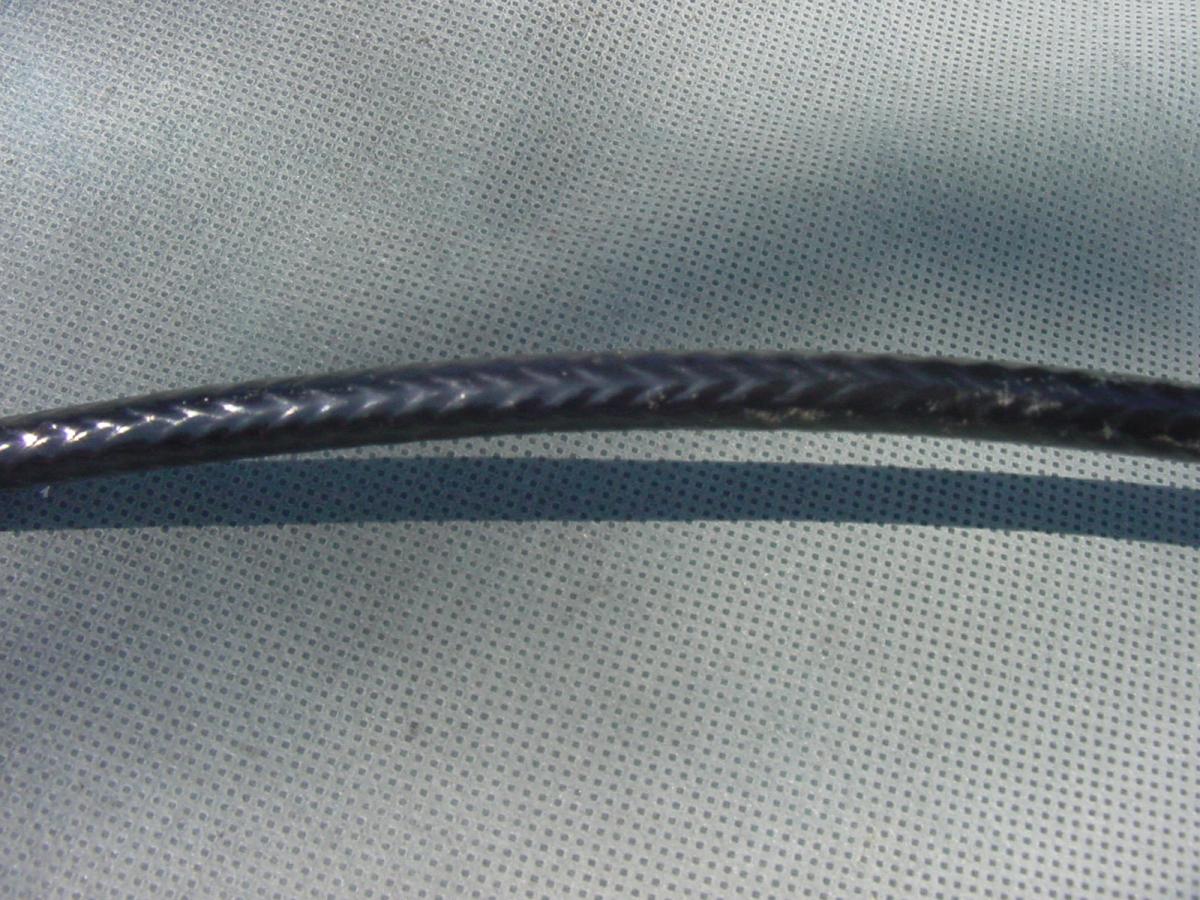
First verify whether you have the older, smooth sided cables that came on 1997 to late 1999 Boxsters, or whether you have the new "improved" cross-hatched surface on your faulty cable. The cross-hatched ones look like this:
If you have the cross-hatched version, you can usually pull out and insert the inner speedometer-type cable without having to remove or replace the outer (cross-hatched) black vinyl sheath. If that's the case, push the inner cable all the way into the sheath, forcing it towards the transmission as you turn it by hand to see if you can get it to "catch".
Verify that it is installed properly by inserting the end (the end closest to the electric motor) of the inner cable into the chuck of a cordless drill, then set the cordless drill on the LOWEST torque setting and spin the cable by operating the drill. Before you turn on the drill, verify and mark (and photograph for reference) the position of the V-lever. You can use white out and mark the position of the two arms of the V-lever on the black plastic round cosmetic dust cover that is directly outboard of the V-lever.
Now, observe the V-lever to see if it is rotating. It will rotate very slowly with the drill but it should move in both directions, depending on the forward or reverse setting on your drill.
If it does not rotate, and you are sure that your inner cable is intact, you will have to remove the transmission and open it up to see if the worm gear is worn or broken. Porsche does not sell parts for the transmissions individually, only complete units, but the worm gear is rarely at fault. It is usually because the cable is broken or not properly engaged.
Try that and report back with what you find.
The black "hydraulic" pushrods are under a great deal of pressure because there is a very large spring inside the black cylinder which pulls the clamshell down tight when the top is in the completely open or completely closed position. The ball cups on the end of the black pushrods are not under pressure when the clamshell is in the 45 degree position.
Be very careful not to "tweak" the clamshell by rotating one side a lot more than the other, either with the drill or with the electric motor.
Regards, Maurice.
-
You can buy the window regulator from your local Porsche Dealer, or get a better price from board sponsor Sunset Imports (see the tab at the top of the screen entitled "Special Offers", then go to "Porsche Parts at Dealer Cost").
You can also try AutohausAz.com, where it's available for about $250, with free shipping, here: http://www.autohausa...dow%20Regulator
Regards, Maurice.
-
 1
1
-
-
I just began my tour in Afghanistan 3 days ago and my wife drove my car to work for the day...
When she came back after the car had been sitting for 12 hours, she went to start the car and it "leaped" forward. (It was in 1st gear) The car did the same thing when it was in reverse except it "leaped" backwards. She had the clutch pressed all the way to the ground. She then tried to put it in neutral, and the car started and idled perfectly.
She is unable to put the car in gear when the car is running.
Any suggestions?
First check to make sure that the floor mat has not slipped forward to the point where it does not allow the clutch pedal to be fully depressed.
Then check the brake fluid level in the brake fluid reservoir in the front trunk. If it's too low, you will not get the proper action when depressing the clutch pedal.
Also check for any traces of brake fluid under the car, especially under the clutch slave cylinder location.
Regards, Maurice.
-
Mark:
The particular type of difficult starting that you describe is often a result of loose or corroded connections between the starter and the battery and/or ground.
Verify that all of the connections are tight there and also verify that your battery connections are tight and secure at the terminal posts and that the negative cable also has a good, secure ground.
Regards, Maurice.
-
Brian:
Your description of the problem does not make clear exactly what happened.
Is it the canvas portion of the convertible top that has become twisted or the clamshell cover?
Also, are you saying that the steel balls that are normally pressed into the black plastic sliders located inside the metal tracks that are on the inside of the rear quarter panels cannot be put back into the black plastic sliders?
Did you check to see whether those tracks are lubricated?
When looking at the convertible top, keep in mind that the front pushrods are what drives the canvas part of the convertible top and the rear (black "hydraulic") pushrods are what drives the clamshell part of the convertible top mechanism.
If you can take a couple of photos of the damage and post them here, I'm sure we could get it sorted out.
Regards, Maurice.
-
Maurice
thanks for the info. Checked the cable and it had disintegrated at the motor. Managed to pull the square driver out. I removed cable sheeting and attached drill, looks like cable is twisted since there was no movement at transmission.
Suppose I have to remove v-lever to get the cable out on the trans side. Is it ok to just remove the bolt or do I need to worry about anything internal, ie, hold the v-lever in place as the bolt is removed?
I plan on getting a replacement cable and than check the trans again.
Best, Bud
Bud:
You can unbolt the V-lever without worrying about anything popping off. Just be sure to either photograph or document the position of the V-lever (or both), as it is possible to install the V-lever 180 degrees off (i.e., upside down).
The V-lever is only held on with one 19mm bolt, but there is loctite on that bolt which requires some force. Once you have the V-lever off, you will have to remove three more nuts (13mm) before being able to pull the transmission off its three stud mounts. You will see the three nuts after you have peeled away the foam liner on that outside wall of the quarter panel. There are some photos of the procedure, here: http://sites.google.com/site/mikefocke2/installinga'03-'04glasstopandframeona'97 . Specifically take a look starting at page 18 of the Part II PDF for instructions and photos.
Regards, Maurice.
-
Bud:
Since you have a '99, first take a look at whether you have the original, smooth sided, cables or whether you (or someone else) has installed the later, improved, cross-hatched cables.
If you have the smooth-sided cables, it's likely that the one on the driver's side has stretched such that the inner, speedometer-type, cable is no longer being driven by the output flange on that side of the electric motor.
To determine whether that is the case, pull the driver's side cable out of the side of the electric motor by first removing the upside-down U-clip by pulling straight up on the clip, then pulling the end of the cable outboard. You should have between 1/2 and 3/4 of an inch of the inner cable sticking out of the sheath. If there is less than that, the cable will not be driven by the electric motor.
To cure that problem, you can either replace the cable with the updated version, or you could shorten the outer sheath of the cable by an appropriate amount by cutting away some of the vinyl material (after you remove the metal ferrule that is attached to the end).
To determine whether your transmission on that side is working properly, you can then stick the end of the speedometer cable into the chuck of a cordless drill, set it on the LOWEST torque setting, and then spin the cable with the drill. While the cable is spinning, observe the position of the V-lever on that side for any movement. If there is no movement, your cable is either broken or frayed and must be replaced. There is also the possibility that the small worm gear (where the end of the cable goes into the transmission housing) is worn or has been allowed to move out of position by the warping of the outer plastic cover.
Before you spin the cable in the drill, be sure to carefully document the starting position of the V-lever so that you can minimize the amount of time you will spend on re-synching the transmissions.
Always be careful to insure that any of the pushrods which you may have disconnected DO NOT DIG INTO THE FOAM DRAIN TRAY while you are rotating the V-levers, whether by means of the drill or of the electric button.
If you do a search here, you can find photos of what the end of the cable is supposed to look like. If you can't find them, let me know and I'll post some more.
Regards, Maurice.
-
1
-
-
Hi Everyone:
I'm ready to tackle my first brake job (in my life) on my 2000 C4. I've read the DIY and it looks pretty straightforward. I'm confident that I won't go crashing off the highway once I'm done. I'll be going with OEM pads and shouldn't need to replace the rotors, no real lip there yet. The brakes squeal a little when stopping but no light has ever come on inside.
My question is sort off stupid but should I just jack up each corner at a time or should invest in a pair of stands and get one half of the car in the air for the job. If so, where do I place my jack as to get, say the front or rear wheels, off the ground.
Thanks for the clarification!
Jimmy:
Congratulations to you for diving right in. I'm sure your experience in changing brake pads will encourage you to try more projects in the future.
When jacking up the car, you should NEVER rely on the hydraulic jack as the sole means of supporting the car and ALWAYS have the car resting on one or more jackstands. Another safe practice after you have one jackstand in place and then have removed a wheel, is to place that wheel on its side under the car in the area near the jack stand (being careful not to scratch the rim in the process).
To do your first brake job, you could do one wheel at a time in the following order and by the following method:
1. Jack up the car by the right rear jacking point, until you are able to place a jackstand under the right front jacking point.
2. Lower the hydraulic jack slowly until the right rear tire is on the ground, leaving the hydraulic jack in place under the right rear jacking point.
3. Remove the right front wheel and place it under the car, just to the rear of the jackstand that is now supporting that side of the car by means of the right front jacking point.
4. Place a wheel chock behind the left rear tire.
5. Test that the car is securely supported by pressing on the right front of the car. (The A-Pillar is a good place to press).
6. Once you are satisfied that the car is securely supported, work on the right front brake pads.
7. Next do the left front brake pads by repeating the same process on the left side.
8. Then, jack up the car by using the hydraulic jack on the right front jacking point and placing the jackstand under the right rear jacking point, etc..., ending by placing the wheel chock behind the right front tire.
9. Repeat the same process on the left side.
10. When reinstalling the wheels, after the car is on the ground, be sure to use a torque wrench set to 96 ft. lbs. on the lug bolts.
Regards, Maurice.
-
I recently purchased rubber bushings for my V levers. It is the rubber bushing in between the V lever and the push rod (which holds the plastic ball joint at the other end). My problem now is what exactly is the correct placement for these black rubber bushings on my V levers since my old rubbers are already totally torn off.
Please provide me with pics and some instructions on the correct fitting or replacement position for these.
Thank you guys for all the help.
John
John:
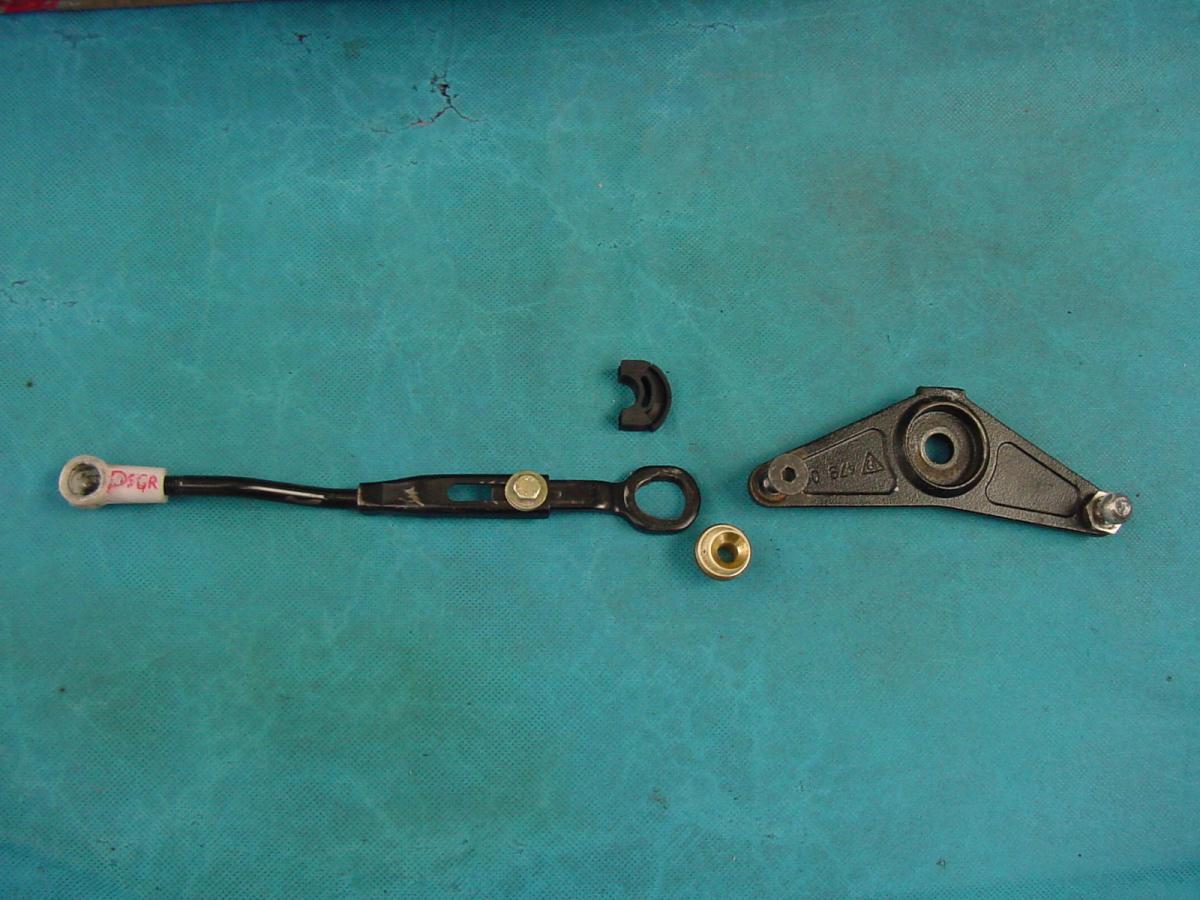
Here you go (click on the photos to enlarge):
Here you have, from left to right, the pushrod (with plastic ball cup), the rubber bush (oriented in the correct position before insertion into the tail of the pushrod), the guide sleeve, and the Allen head countersunk screw temporarily located in the forward arm of the V-lever.
Here is what they look like after assembly.
Regards, Maurice.
-
http://www.photoshop...4a9f64e2b259562
1999 Boxster
Manual Tranny
71,000 Miles
I purchased this boxster 11 months ago when it only had 50k miles. It's been great. No issues.
I'm not sure what to make of this recent finding.
Thanks
At the very least, the prudent thing to do would be to remove the oil filter, cut it open, and examine for any metallic bits.
You can remove the filter without having to drain the oil completely.
Regards, Maurice.
-
On 11/12/2011 at 10:23 AM, infocusf8 said:
What's a good way to check and or clean those drains out?
To verify that none of the water is going into the cabin, you can do the following test.
Place a drain pan under the car, directly under the rocker panel just forward of the left rear wheel. Any water that drains from the convertible top foam drain tray on that side normally exits from a tube that is hidden behind the small wheel well liner that is bolted onto the front of the rear wheel well (on that same side). The water will drain from behind and under the wheel well liner.
Then, pour a carefully measured pint of water and pour into the foam drain tray on the left side and collect and measure the volume of water that you have collected.
If you have the same amount as you poured in, that is a good indication that the water is not going into the cabin, at least for that volume of water.
You can then pour more water in and observe that the water is draining freely, and not pooling over the drain hole at the bottom of the foam liner.
Repeat the same procedure on the right side.
If the water is draining slowly, you can clear the drains with some compressed air. Do not use a wire hanger or anything with a sharp point as you risk puncturing the drain tube or separating the drain tube from its little funnel directly under the foam drain tray.
Also be sure to verify that the other small drain (one on each side), which is located at the front outboard corner of the metal channel at the top of the rear quarter panel, also drains freely. You can see that small drain if you look in the outboard corner of the top of the rear quarter panel, directly under the very forward tip of where the clamshell would be if it were in the completely closed position. That drain (again, one on each side) also empties from a separate tube which exits behind the forward wheel well liner.
Regards, Maurice.
-
 1
1
-
1
-
-
Hello guys,
I have a 97 Boxster. I left the car outside while it was raining and later found out that the interior carpet was a bit flooding inside. Mostly under the driver's seat carpet, and of coruse this will ruin my already ruined module that controls the locks under driver's seat.
I have read somewhere long ago that there is some kind of a drainage system in the front (or rear) of the car that might be clogged that is causing flooding problems in the carpet area but I cant find it.
Does somebody know where I could find this drain of some sort and instructions on how to clear them? To stop these leaks inside the car. Or maybe a solution to my problem?? I cannot avoid rains.
I desperately need your help on this guys, if this continues it will definitely cause more trouble.
Thank you for your support my dear friends.
The Boxster has two drains in the convertible top well, one left and one right, located in the foam drain trays, below the location of the V-levers. One or both of these are probably the cause of your water intrusion.
There are also two drains under the front trunk, to the sides of and at the rear of the battery tray.
For photos and diagrams, take a look at Mike Focke's Boxster Pages, here: http://sites.google.com/site/mikefocke2/drainsdiagram
Regards, Maurice.
-
1
-
-
Many thanks Maurice, very comprehensive reply. I should have remembered that we don't all speak the same kind of English. Do I take it that there is no actual adjustment of the latch itself? If so then I presumably need to lengthen the push rods by unscrewing the ball joint. Perhaps I should have said that the noise I get is from the front of the hood/convertible top where it attaches to the windscreen frame.
Timbo:
There is no actual adjustment of the latch itself.
If you don't get the desired result from adjusting the length of the front pushrods, try one turn CCW at a time on each of the 14mm adjusting bolts for the tension ropes. Again, that will pull the rear main bow downwards and increase the tension on the canvas top when you are closing the latch.
Regards, Maurice.
-
1
-
-
Hi, does anyone know if there is any adjustment in the catch that pulls the hood towards the front screen? Rattling hood is starting to bug me, and it doesn't look as though the catch pulls the hood up tightly enough.
Timbo:
Since you are posting from England, I'm assuming that by "hood" you are referring to the convertible top.
There is an adjustment that you can make which will pull the top back by means of pulling pressure on the rear main bow of the top.
There are two "tension ropes", as Porsche calls them, one left and one right, and they are anchored on their upper end to the underside of the rear main bow and on the lower end to a steel ball.
The adjustment is made by turning the 14mm bolt head that is part of the small mechanism to which the steel ball is attached. Turning the bolt counterclockwise will add to the tension (i.e., pull the rear main bow down further and thus increase the tension on the forward edge of the top).
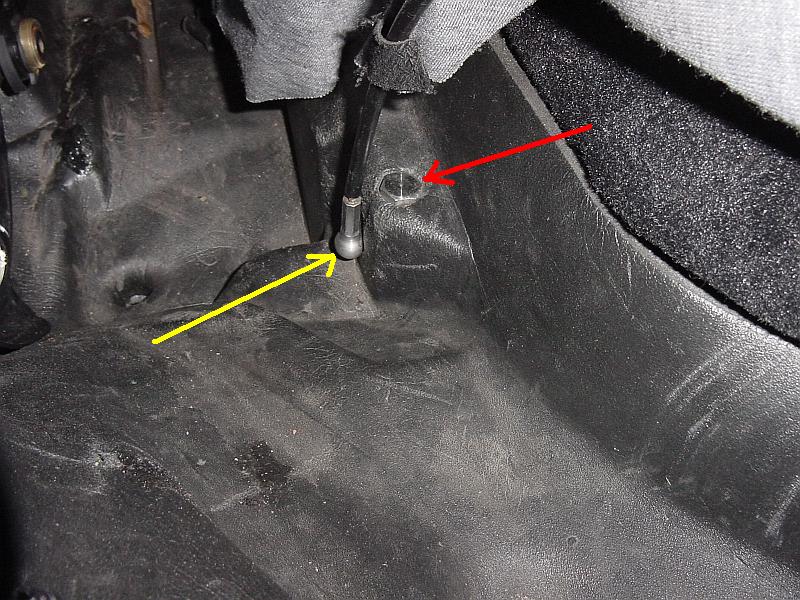
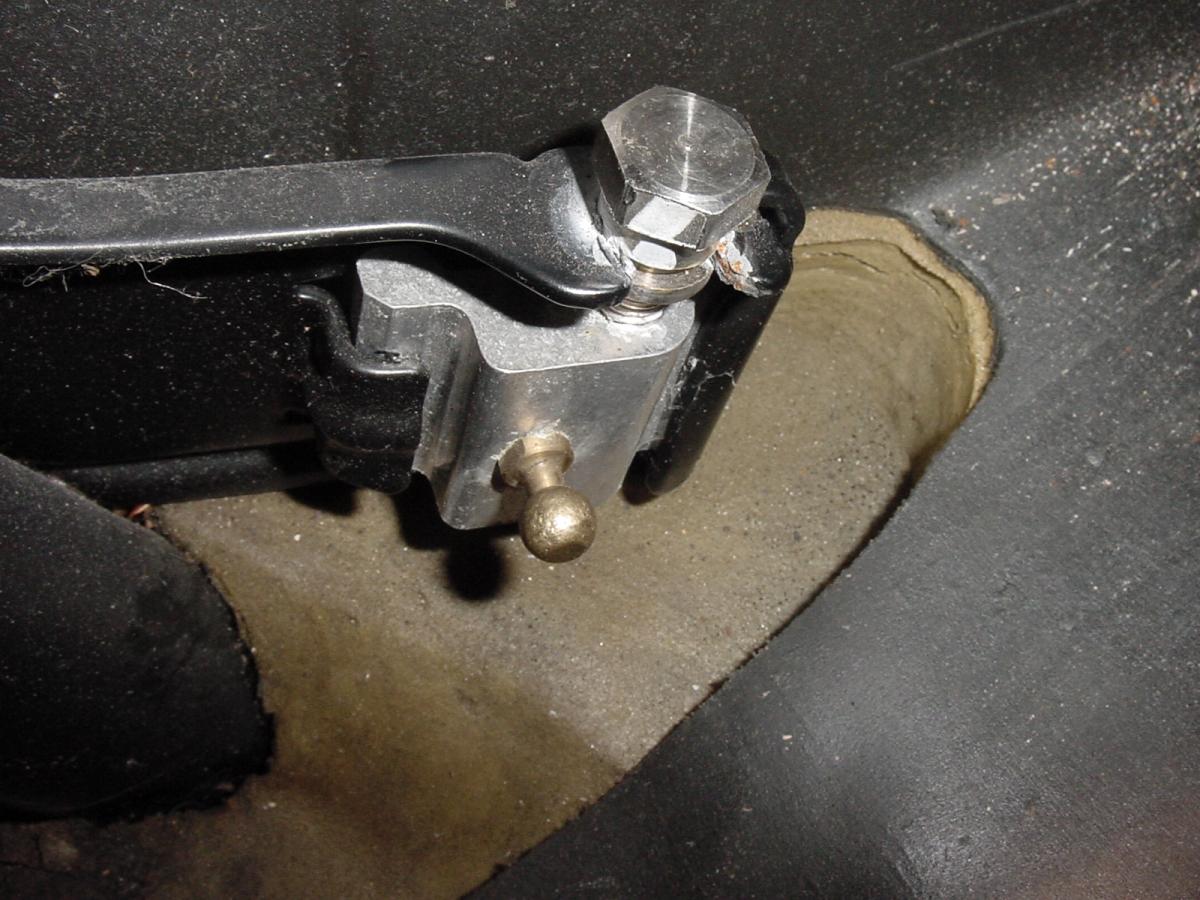
Here are two photos of where each of the two 14mm bolts are located, one to the left and rear of the engine compartment cover and the other to the right and rear. Each of the two bolts are down below the surface level of the engine compartment cover by about 6 or 8 inches:
The red arrow points to the 14mm adjusting bolt, and the yellow arrow points to the lower steel ball cup of the cable, here pressed onto (and hiding) the steel ball.
This is a look at the mechanism, with the foam drain tray material pulled away from it, and showing the steel ball exposed.
As the 14mm bolt is turned CCW, the steel ball goes down and thus increases tension on the top.
Another means of adjustment is by lengthening (or shortening) the front pushrods on the V-levers. You can perform a fine adjustment by popping off the plastic ball cup from the steel ball at the base of the B-Pillar and then screwing in the plastic ball cup by one turn. If your top started out even on both sides, then perform the same adjustment on the opposite side.
Screwing in (or out) the plastic ball cups effectively shortens (or lengthens) the overall length of the front pushrod, and that affects the distance that the leading edge of the top ends up when it is fully closed, before the latch is used to lock it shut.
One caveat: With either of the two adjustment methods above, make sure that you mark the position of the 14mm bolt or of the plastic ball cup before you start the adjustment, and then keep track of the number of turns that you move them to make the adjustment. It's easy to lose track of the original position, and you always want to be able to return to that position if necessary.
Regards, Maurice.
-
Adam:
Check for moisture or water under the driver's seat and in the foam underpadding of the carpet behind the driver's seat. If the drain holes in the convertible top well are clogged or the door seal in between the door panel and the door skin is not sealed properly, you will get water under the seat and that can cause many problems. IIRC, the central alarm control unit under the driver's seat can affect the window operation.
Regards, Maurice.
-
Hi Peter, It is the original top (I've purchased the car new in 2002). I have never changed the cables and suspect it is broken and not simply disconnected. However, I am trying to figure out how to access the top of the cable to see what's going on. I downloaded the Group 6 996 exterior manual but can not find how to get at this cable ending. Does anyone have a manual that shows or has anyone had experience checking/fixing it?
Tom:
If it's not any of the elastic straps that are supposed to pull the tension cable inboard, then the tension cable itself is either broken (unlikely) or has come undone from one of its two attachment points: one near the front of the roof, under the canvas, and the other all the way to the rear, behind or under the B-Pillar.
I'm not familiar specifically with the way it's fastened on a 996 top, but you can have a look at how it's fastened on a Boxster top, here:
http://sites.google.com/site/mikefocke2/replacingthetop-adiy
Specifically look at the photos and text at paragraphs numbered 5 and 6.
Regards, Maurice.
-
Hi Maurice,
Thanks for getting back to me on this. I checked the straps and everything appears to be identical on both sides. The place where the "gap" is being created has a strap (that stretches) which is the one pulling the tension cord. It goes all the way to the other side and the pressure appears to be about the same on both sides. The one on the drivers side fits down in the groove but the other side does not. That's why I assumed that the cord on the passenger side was loose or something. I found where it is anchored in the back, and it is tight when I pull on it so I don't think it is broken. Any other ideas, I hate to have to take it some place for something that seems pretty simple?
Thanks again,
Tom
Tom:
Some of these tensioning straps are attached to elastic bands that have adjustment holes spaced about every inch along their length, as in the one in the link that I posted above.
If there are no adjustment holes (whereby you could effectively "shorten" the strap, i.e., thereby increasing the tension), I would try to shorten that side of the strap by an inch or so at a time to see if it pulls the cable into the groove. You could temporarily shorten the strap by pulling a small length (1/2 inch on each side) loop together and tying it up with some thread. By observing it while the top is going up and down, you will be able to see if it is improving or if that fixes it, and make a permanent repair accordingly.
A lot of these elastic straps inside the convertible tops tend to lose their elasticity over time. If there is still some elasticity left, you could compensate for it this way. If all of the elasticity is gone, the entire strap can be replaced with material from a fabric or craft store.
Regards, Maurice.
-
Hi Guys, I'm a newbie to the forum. I searched but can not find a solution to my issue.
Yesterday I noticed a small gap on the passenger side top where the tension cable is being pulled towards the middle leaving a small gap. Does anyone know to properly tighten this cable so it will stay in the "groove" where it belongs when the top is up?
Thank you
toma:
It is usually not a matter of tightening the cable, but rather making sure that the various straps that pull on the edges of the top to bring them towards the center are intact and attached.
Open the top a little less than half way, and check the "tubular" rods that are part of the frame mechanism to make sure that the velcro straps have not torn away from where they are stitched into the canvas top edge. If they are intact, make sure that they are wrapped around the metal tube that is almost vertical when the top is about half way open. There are usually two sets of velcro straps on each side. For reference, you can take a look at the side that is functioning properly.
If the top is similar in construction to that of a 987, also check out this post for another two possibilities: http://www.renntech.org/forums/topic/39764-new-convertible-top-problems/page__fromsearch__1
Specifically look at post #6 in that thread.
Regards, Maurice.


My roof wont close in my boxster. Need a little help :(
in 986 Boxster Convertible Top Issues and Solutions
Posted
If "one side was working more than the other", more than likely either one of your plastic ball cups has broken apart and/or popped off its steel ball, or one of your drive cables has come apart or frayed inside its sheath. The first possibility is the most likely.
Although the canvas part of the top can operate with only one ball cup, the telltale sign will be that one side is lagging behind the other on the way up and lurching ahead of the other side on the way down. Once that happens, it's only a matter of time until the other plastic ball cup breaks from the added stress.
If both ball cups are broken, you can operate the canvas part of the top manually after moving the clamshell part into the rearmost (45 degree) position. This is assuming that the electric motor is still driving the cables, which in turn rotate the V-levers and the black "hydraulic" pushrods then move the clamshell.
If there is no motion at all (either from the clamshell or the canvas top) and you don't want to try to diagnonse and repair the mechanism, it's difficult to release the pushrods when the top is in the completely open position as it involves unbolting the V-levers with an offset 19mm box-end wrench.
If your '01 Boxster still has the black plastic cosmetic covers installed over the body-colored support arms of the clamshell, you will have to remove them to expose the 19mm bolts that hold the V-levers in place against the transmissions. Here is a link to an earlier thread that deals with that situation: http://www.renntech....__1#entry212760
That thread also has a link to another site that contains photos of all of the components I am referring to here. If you want to try to get the top working again, let me know and we can diagnose it if you supply more details.
Also, if it's really cold there, start the car and let the engine warm up for a while as the heat from the engine will soften up the plastic window and prevent the possibility of cracking as you raise the top.
One word of caution: If one (or both) of your plastic ball cups has broken apart, the front pushrods will be dangling as the V-levers are rotating. That will cause the front pushrods to dig into and tear the foam drain trays. Any rip or tear in the drain trays will allow water to enter the cabin, where it will promptly find its way under the driver's seat (U.S., left side) and fry the immobiliser. Make sure to check for dampness or water behind and under the seats, as the thick foam rubber will absorb a lot of water before it continues to under the seat.
Regards, Maurice.