Welcome to RennTech.org Community, Guest
There are many great features available to you once you register at RennTech.org
You are free to view posts here, but you must log in to reply to existing posts, or to start your own new topic. Like most online communities, there are costs involved to maintain a site like this - so we encourage our members to donate. All donations go to the costs operating and maintaining this site. We prefer that guests take part in our community and we offer a lot in return to those willing to join our corner of the Porsche world. This site is 99 percent member supported (less than 1 percent comes from advertising) - so please consider an annual donation to keep this site running.
Here are some of the features available - once you register at RennTech.org
- View Classified Ads
- DIY Tutorials
- Porsche TSB Listings (limited)
- VIN Decoder
- Special Offers
-
OBD II P-Codes - Paint Codes
- Registry
- Videos System
- View Reviews
- and get rid of this welcome message
It takes just a few minutes to register, and it's FREE
Contributing Members also get these additional benefits:
(you become a Contributing Member by donating money to the operation of this site)
- No ads - advertisements are removed
- Access the Contributors Only Forum
- Contributing Members Only Downloads
- Send attachments with PMs
- All image/file storage limits are substantially increased for all Contributing Members
- Option Codes Lookup
- VIN Option Lookups (limited)


1schoir
-
Posts
2,739 -
Joined
-
Last visited
-
Days Won
6
Content Type
Profiles
Events
Forums
External Paint Colors
Downloads
Tutorials
Links Directory
Collections
Store
Posts posted by 1schoir
-
-
While Porsche may feel that their cap screws with the beefier head will last as long as the exhaust manifold, real world experience shows that this is simply not the case. In a '97 Boxster with only 22K miles on it, five of the cap screws were frozen stuck in the exhaust manifold in 2010. This car had not been driven much in the winter and had not been exposed to road salt, etc... Unless I am misunderstanding and Porsche means that as long as you don't have to remove the exhaust manifold you'll be okay.
IMO, the best course of action is to remove the cap screws and replace them with studs and to then use lock washers and nuts made of a material that will not rust solid onto the stud. Even if you have to ever have to cut off the nuts, you can still remove the exhaust manifold and then more easily access the remaining part of the stud using the same method as that recommended by the tech.
Regards, Maurice.
-
I forgot to mention that after you diagnose and fix the possible problem, there is a method to adjust the position of the window when it is completely up. The final position can be adjusted up, down and inboard or outboard by means of a torx-head adjusting screw which can be accessed from one of the holes under the door (up, down and tilting adjustment) and by the bolts anchoring the window regulator legs to the bottom of the door (inboard outboard adjustment).
These adjustments can be made without removing the door panel but, since you have to remove your door panel, you can look at those adjusting points to get familiar with them for later adjustment, if necessary. If you do a search here, you will find some posts and photos that I posted for these adjustments about three years ago or so.
Regards, Maurice.
-
Since you are hearing the electric motor and the window may be dropping 1 or 2 mm, all of the symptoms that you describe still point to the window regulator (except for the fact that you are not able to manually push the window up or down AT ALL).
I just went through the same problem with my Boxster's passenger window and I suspected the window regulator. It turned out to be a very small plastic part of the window regulator, which in my experience is the problem 90% of the time.
You can more accurately diagnose this if you remove the door panel and observe the inside of the door and the two criss-cross sections of the window regulator. Once you have the door panel off, with the door open, trip the door latch mechanism in the side of the door with a screwdriver (to simulate a closed door). Then, pull up slightly on the door handle while looking at the inside of the door. If the electric motor makes a noise and you see the cables FLEXING, it's most likely the most common fault (i.e., the window regulator).
The flexing shows you that the inner metal cable is traveling but not having the desired effect of dropping the window the normal 3/8 to 1/2 inch. To rectify the situation you have to either replace the window regulator or install a device to take up the slack. Taking up the slack produces the desired effect where as soon as the electric motor turns the cable acts on the window, causing the drop. If you repair it, you will notice that the cables don't flex nearly as much, showing only a very slight flexing movement.
I repaired my window regulator for exactly $1.00 by installing a bicycle brake adjuster in line at the base of the front window regulator leg, next to/on top of the small green plastic bushing. I can't take credit for that repair as a poster on 986forum came up with the rather ingenious (and cost effective :lightbulb: ) solution.
If you open the door panel and find you cable flexing as I described and you want to try the bicycle brake adjuster fix, let us know and I will write-up more details for an easy DIY.
Regards, Maurice.
-
...
My question - I noticed that the latch hook is actually hitting its hole somewhat to the left of where it should, and this is probably what caused the latch cover to break. So when I replace the latch hook cover, I would like to remedy the offset position of the hook. Is there any method to adjust the hook left-to-right so that it hits the hole on target? The centering pads at each end of the leading edge of the top align the whole top correctly, but the hook itself is well off-center. Any advice would be appreciated.
I am not sure that the convertible top on the 996 operates the same way as a Boxster, but you might want to check this out to see if it solves your problem.
On a Boxster, the overall length of the front pushrods regulate how the leading edge of the convertible top lines up with the top horizontal frame of the windshield. You can get the leading edge to move to the left or to the right by adjusting the overall length of these front pushrods.
You could see if you can locate an equivalent mechanism on your 996 and make an equivalent adjustment.
Failing that, you could try to loosen the bolts that hold the B-pillar part of the convertible top frame to the body (on the left side) and push or pull that bracket forward slightly before re-tightening those bolts. That might give you the desired effect. Note that moving that bracket even 1 or 2 mm would have a much more pronounced result at the latch, where the top meets the receptacle.
Regards, Maurice.
-
Earlier versions of the coolant cap were also blue so you have to verify that the part number on the cap ends in .04.
Regards, Maurice.
-
:drive: :cheers:
Regards, Maurice.
-
....
Make sure your blue cap is the updated version ending in part # "04".
I recently bought an updated .04 coolant cap from Sunset. To my surprise, it was black.
Regards, Maurice.
-
Hi Maurice,
This ones a bit of give and take. 18-8 stainless also known as type 304 is an austenitic, passive alloy which in the absence of an electrolyte will not corrode aluminum. The copper antiseize is just insurance. But, You are right in that some stainless steels like type 410 will corrode the crap out of aluminum. The cap screws are failing because of stress corrosion cracking. Plain steel is more likely to do this than 18-8. Stress corrosion cracking is not galvanic. Yes, plain steel and aluminum have almost the same anodic activity and are less likely to cause galvanic corrosion in contact with each other.
Brass, bronze and copper are much more cathodic than steel thus in the presence of an electrolyte the steel will melt away not to mention the ongoing stress corrosion cracking. You are better off using galvanized steel nuts and washers and changing them when they start corroding. The bottom line is that no matter what you use you are going to have to replace the parts once in a while, sooner better then later. No where is this more important than with exhaust headers where the difficult high temperature environment puts expensive cylinder heads at risk.
Thanks for the detailed information. I think that Maryland Metrics does sell type 304 stainless metric fasteners, so that would be helpful.
Removing the factory bolts early on and replacing them with studs is by far the best approach, IMO. The factory bolts are like a ticking time bomb, and it ticks louder where they are exposed to harsh winters where roads are salted. If the bolts are removed early on and replaced with studs, it's a relatively simple matter to remove the nuts and washers (no matter what condition they are in) compared to extracting broken studs from the cylinder head.
Regards, Maurice.
-
Hi Maurice,I have a 08 997 with 38k miles and I drive it every day in Michigan where the roads are salted. I'm replacing all the rusted bolts and I'm wondering if I should attempt the exhaust bolt replacement. I feel that if I swap bolts now and it's successful, any downstream removal will be an easy task.
 What do you think?When your Boxster bolts broke off there they in this shape?Also, how did you extract the bolts? EZ-out plus a rig?the alternative is that I do nothing and just worry about it 100k miles later during engine rebuild.Thanks,Ken
Ken:
Seven years of driving on winter salted roads can cause a lot of corrosion on those parts and, to answer your question directly, my bolts did not look quite as rusted and toasted as those on your 997. My Boxster only had about 25K miles on it but was 12 years old at the time I did the header install.
Extracting the bolts that snapped off was quite a challenge and I did it using a variety of tools, including a torch and an electrical inductive tool that can make bolts red hot in about 15 seconds. If a bolt snapped off, I marked the center of the broken bolt in the cylinder head with a center punch and then proceeded to drill out the center of the bolt, starting with a 1/16 inch bit. I progressively increased the bit size until I could determine how close to dead center of the bolt I was. If I was off center by even a little bit, I used a dremel tool with a carbide cutter tip to hollow out the hole so that I could end up with a hole in the dead center. Once I established that, I used progressively larger size reverse drill bits until either the bolt became "unscrewed" by the action of the reverse drill bit or I ended up with just shards of the bolts still in the threads and picked those out with small picks. Using a magnet will confirm that you are only drilling out parts of the bolt and not parts of the aluminum cylinder head. You can then chase the threads with the correct size tap and some thread cutting oil.
If you want a more detailed account, you can go to PPBB.com's archives for photos and an in-depth explanation. Do a search there under my handle "Maurice on Long Island" and exhaust headers. If I find the link I'll post it here.
My solution to not having to repeat that experience was to source some proper fasteners from Maryland Metrics, which included new coated studs (not bolts), phosphor bronze lock washers and brass nuts. Now I can change out my headers in little more than an hour and don't have to worry about snapping bolts.
BTW, although I love stainless steel fasteners and use them everywhere I can, I specifically did not use stainless studs because stainless can "weld" itself to aluminum and cause an even bigger problem. Antiseize can minimize that possibility but it's not foolproof, especially where you are driving on salted roads.
Regards, Maurice.
-
...
>> I think it may be 9/32 - which is of course the one wrench I don't own!.
...
Sounds like a perfect
excuseopportunity to buy a couple of more sets of tools, with their own little cases! :wrench: :jump: :wrench:Regards, Maurice.
-
If you have one inch of clearance in front of that Phillips head screw, you can easily use a small ratchet with the correct size Phillips head bit. The bit fits inside the recessed ratchet heat and the resulting length is the length of the bit. Here is one I have used many times in situations like this: http://www.eastwood.com/bit-ratchet-set-29-piece-eastwood.html
For the other side, since 7mm is too small and 8mm is too big, you might get lucky with an S.A.E. size. I would guess slightly bigger than 1/4 inch, such as 9/32 or 5/16ths.
Regards, Maurice.
-
Hi Maurice, today after putting the top in service position for a no start when engine is warm issue; the top would not go closed. When I pressed the button the motor would activate for down but in the up toggle nothing. Did this once last week, and after removing cables from motor I noticed the left one ( that I did not replace) sticking out about 3". I shoved it back and then the top worked perfectly. Today no dice. I closed it with my drill. Fuses ok.
I did not notice the sensor by the motor that the Bentley shows. Seems weird that everything functions in down toggle and totally dead in up.
Any ideas?
Also do you know if a crank position sensor will allow a car to start and run but die upon reaching 180? Then will not restart till cold again?
Thanks,
Garry
I would first check the switch on the dashboard itself to see if one side is not showing conductivity or is intermittent.
A defective crank position sensor often will cause the engine to stall after the car is warmed up and then start again after a cool down. Not sure about the 180 degree specification, more like when the engine gets to operating temperature. My friend and I just replaced his cps when his car was exhibiting those exact symptoms and it seems to have fixed the problem.
Be very careful to not strip the 5mm allen head bolt that holds the cps in place. It's a real bear.
Regards, Maurice.
-
Need to fix mine. It's making clicking and hesitation when it goes up and down.
Trey:
Start by lubricating the channels in which the black plastic sliders ride back and forth. You can find the channels by following the body-colored clamshell support arms down to where they terminate, where there is a steel ball that is pressed into each black plastic slider.
You can use white lithium grease, or, if you want to splurge, you get some Dupont Krytox, which does not attract dirt at all.
Once you have lubricated the channels, you will be able to eliminate whether that is the cause of the clicking, etc. and to determine whether you have to investigate further for other possible causes.
Regards, Maurice.
-
I installed a set of stainless steel bolts about four years ago and have been running them on my Boxster since then with no problems.
I had read about the potential problem of the bolts loosening over time, etc., and at first was checking the torque on the lug nuts on a regular basis, especially after removing and reinstalling the wheels. I never found that any of the bolts had loosened up. The bolts were one piece, but I believe they now come in the two-piece design, with the floating collar.
The set of stainless bolts I purchased were from MaxSpeed Motorsports and the owner of the concern was very accommodating, responsive and an enthusiast as well.
Here is a photo of what they look like, taken two years ago, after about two years on the car:
Regards, Maurice.
-
Sounds good. Looking forward to the update as it may help pinpoint that type of problem for other members in the future.
If you do end up removing one (or both) of the V-lever(s), remember to take plenty of photographs before unbolting each from its transmission and note that it is possible to install a V-lever in two positions: the correct orientation and 180 degrees off.
Regards, Maurice.
-
Hi Maurice, I spent a bit of time checking the pushrods, etc as you suggested before taking out the drivers side transmission and I have found that there appears to be a very strange bolt fitted to the control lever on the transmission and also the bolt on the push rod appears to be loose as I was able to move this by hand and this bolt also appears to be at a different spacing from the same bolt on the passenger side push rod.
I've attached some pictures with comments showing what I have found tonight between the driver & passenger side mechanisms. It also appears that the push rod maybe fouling on the control lever and this maybe stopping the roof from fully closing.
To answer your question the roof closes perfectly fine with no issues, its just the last 1" when opening the roof appears to be the issue.
Looking at the parts list (picture attached) it appears that I need to order item no 7 (part no 987-561-919-00 Assembly Kit) and possibly a new push rod Item 4 (Part no 987-561-279-00 / 01) for the drivers side in case this is slightly bent and is fouling on the control lever and replace these item's and adjust the bolt on the push rod to the same as the other side and see what happens?
Best Regards
James
James:
Excellent photo with notes... It makes it much easier to see what may be going on. I think you may have found the problem, as the front pushrod, which is made up of two separate metal parts (they move closer or further apart from each other in order to adjust the overall length of the pushrod) appears to be completely pushed together such that the overlapping part may be getting jammed against the circular protrusion near the center of the V-lever. That would lock and stop the V-lever from rotating that last few degrees and that would result in the clamshell not being pulled completely down.
Normally, the front pushrod, which is supposed to be held together with a 10mm bolt with a fat washer, is pulled apart enough such that the non-overlapping part is long enough to not interfere with the V-lever. The overall length of the front pushrods affect how the leading edge of the convertible top lines up with the top horizontal part of the windshield frame.
On a 986, the front pushrod should look like this:
The 987 pushrod is a little different and has a different fastener holding the two parts of the pushrod together. Here they are side by side, 987 on top:
I think that it's also possible that either one or both parts of your front pushrod is bent and/or that that side of the V-lever is bent. Although the V-lever is cast iron and ribbed, the electric motor and transmissions are powerful enough to bend the V-lever. You may just be able to straighten either one of them or both out so that you don't get that interference.
For your reference, here is what a seriously bent V-lever looks like:
Yours may not be that bad, but out of line enough to cause the pushrod to get hung up. Also, make sure that the 19mm bolt in the center of each V-lever is tightened securely as that could cause some wobble.
If you have to remove the V-lever, note that the 19mm bolt in the center of the V-lever is on with loctite from the factory. The torque value to re-install it is in the write-up I linked for you earlier.
You should replace the loose or incorrect screw(s) with the correct ones and tighten them securely. If those parts wobble they can get hung up on the V-lever.
Regards, Maurice.
-
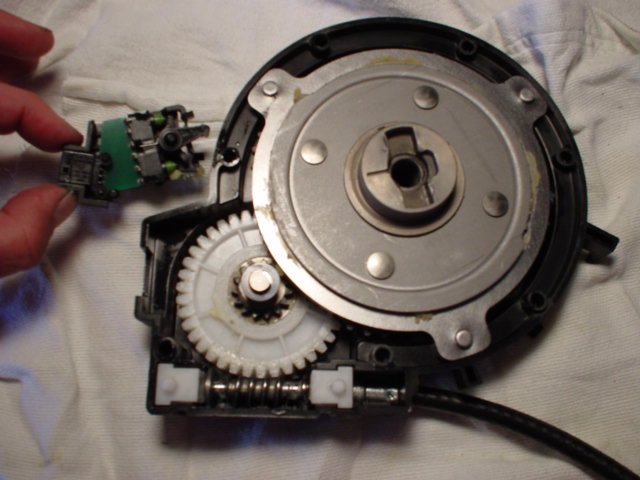
Porsche does not sell the microswitch apart from the full transmission but you may be able to find another source for the microswitch.
Once you open it up you may find that whatever little part it is that trips that microswitch may have broken off or come loose or moved from its original location such that it causes the cut off of power to the electric motor a second too soon.
Along the lines of a component of the convertible top mechanism being broken, is it possible that one (or both) of your black "hydraulic" pushrods is broken and that it may not be apparent from a visual inspection? Each black "hydraulic" pushrod is actually a hollow tube with a very large spring inside, and its function is to exert pulling pressure on the clamshell to keep it locked down tight when the top is either all the way open or all the way closed. I'm just thinking that if the springs are broken inside that might prevent the black pushrod from pulling the clamshell down tight. Just a thought about something to look at before delving into the transmission.
BTW, does the clamshell now not go all the way down flush when the top is all the way up and latched closed?
Keep us posted with the outcome.
Regards, Maurice.
-
James:
I am much more familiar with the two versions of the transmissions and set-ups of the 986's, but I believe that the 2005 Boxster is similar (if not identical) in design with the B Version transmissions of the later 986's.
First double check that the steel ball at the lower end of each body-colored clamshell support arm is firmly pressed into its respective black plastic slider and that there is nothing restricting the movement of each of the two (one on each side) black plastic sliders in their respective metal channels, especially at the ends of the each channel.
If those are okay, you have to investigate further.
Since your clamshell is not closing down flush with the surrounding panels (and you have presumably now determined that the clamshell support arms are okay), it sounds like the signal to your convertible top relay to turn off the electric motor is being sent a split second too early. Once that signal is sent, the power to the electric motor is cut off, the transmissions stop turning the V-levers and the clamshell (and the canvas top) stop moving.
If the system is like that in the B-version transmission and set-up of the later 986's, there are two sensors INSIDE the driver's side (left side in U.S.) transmission. One of them replaced the B-Pillar microswitch in the early 986's and the other replaced the black lever microswitch that was located on top of the electric motor. The clamshell would press down on that black lever microswitch and, following what Porsche called an "after-running time" that microswitch would cut off power to the electric motor and turn off the "convertible top open" light on the dashboard. The microswitch inside the driver's side transmission that replaced the B-lever microswitch is the one that you will have to determine whether it is faulty or not.
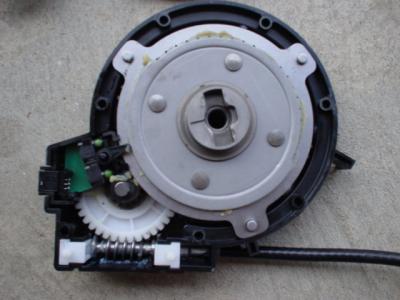
Here is a photo of what the microswitches look like inside the driver's side transmission:
Removing the transmission is a straighforward job. You can find instructions here, starting at paragraph 4 on page 18 of the Part II pdf:
https://sites.google.com/site/mikefocke2/installinga'03-'04glasstopandframeona'97
Note that the procedure is for 986's but that it should be similar or identical for removing a 987 transmission.
If you can get your hands on a driver's side transmission that is known to be good, you could test this diagnosis by swapping it out temporarily with the one in your car.
Regards, Maurice.
-
Although the photos you have provided are not that clear, it appears that your black "hydraulic" pushrods, your front pushrods and plastic ball cups, your V-levers and your drive cables appear to be intact, contrary to what your dealer is suggesting.
How did this problem first manifest itself? Did it appear suddenly or did it develop over time?
Regards, Maurice.
-
Thank you for all of the replies!
The mechanics has previously used smoke machines to no avail. However, when I first got the car I had an issue with it rejecting gasoline at the pump and the dealer under warranty said a tube had slipped and they had to tie it back up into place. I would imagine that could be one of the things JFP in PA has suggested above.
Perhaps that could be causing the P0455 HVAC code, which appears in turn to be a possible cause of all these other codes, is that a fair assessment?
I always go back to the last thing touched when codes sudden show up. As mentioned, P0455 is the "large leak" EVAP system code, which obviously includes the gas tank; one neat trick in this department: Jury rig a rubber stopper or something similar to replace the gas cap (we actually took a new cap, drilled and tapped a hole in it that we then screwed in a threaded fitting to connect to a vacuum gauge) and check for a steady low vacuum on the tank with the car idling. If it is intermittent, or non existent, or worse yet there is pressure, there is a leak somewhere that has to be tracked down. (Emphasis added)
You can still have a loose connection on the O2 sensors as a vacuum leak is more prone to cause the car to throw overly lean O2 codes rather than a poor electrical connection code.
Simply ingenious! Thanks for the tip. I'm going to add it to my limited diagnostic bag of tricks! :thankyou:
Regards, Maurice.
-
Which of the purge valves are you referring to: the one by the EVAP cannister under the right front fender, the one at the end of the line there, or the one under the intake runner in the engine compartment?
Regards, Maurice. -
In a Boxster, you can remove the driver's seat without having to disconnect the electrical connector under the seat, thereby avoiding setting off the airbag light, which can then only be reset with a PST2, PIWIS or Durametric. The wire under the seat is long enough to allow you to unbolt the four bolts that hold the seat rails in place, pull it out and set it on a platform that you can set up next to the door sill.
You could also just unbolt the four bolts that hold the seat rails in place, operate the seat back so that it's leaning as far forward as possible and then tilt the whole seat backwards. Then you just put a wood block under the inboard (now unbolted) seat rail and you can have pretty good access to the immobilizer. Aside from inspecting the fuse, which is at the rear of the unit installed on the short vertical face, you should check for moisture or corrosion on the circuit board inside.
Since your car is operating sort of intermittently, it's not likely the fuse that would be the source of the trouble in the immobilizer. If you find corrosion on the circuit board and it hasn't been a long standing problem, you may be able to clean it with isopropyl alcohol and get it back to operating condition.
Regards, Maurice.
-
Okay, I spoke to the Pcar dealership this morning about the cost of an IMS replacement.
The Pcar specialist asked me if I had a triptronic, and I said yes, he proceeded to tell me that my car would *not* be covered by the lawsuit because I have a different IMS than the cars with a manual tranny...... :huh: !! He said that TripTronic equipped cars did not experience the failure for 2004.... :huh: .
I asked him directly, "So, the cars with an Automatic trans were built with a different IMS?" Porsche Specialist "Yes, thats correct.". WTF? Seriously?
He also told me to call the lawsuit and they will tell me the same.
You should call the Pcar specialist back and ask him if he could give you the part number for that IMS assembly so that you can compare it to the non-TipTronic IMS assembly. I say "assembly" because Porsche only supplies the IMS bearing as part of the complete intermediate shaft.
Tell him you want to educate the lawyers who extracted a settlement from Porsche.
I'd like to hear back about the response he gives you because I'm reasonably certain it will be entertaining. :jump:
Regards, Maurice.
-
 1
1
-
-
Thanks, JFP. Excellent, detailed information as usual!
Regards, Maurice.


Window drop passenger side
in 996 Series (Carrera, Carrera 4, Carrera 4S, Targa)
Posted · Edited by 1schoir
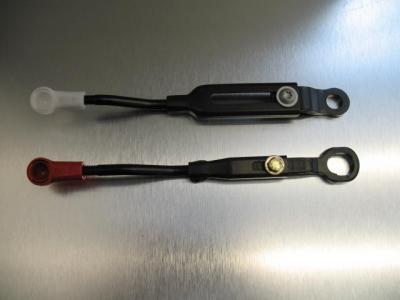
Here is what the $1.00 fix looks like, at the base of the front leg of the window regulator:
If you slice the bicycle brake adjuster and its nut longitudinally as you see in the photo, you can just slip it in place over the cable without having to disassemble anything. The sliced part of the nut is 180 degrees opposed to the slice on the adjuster tube (so you can't see it in this photo).
Thanks to DaveS of 986forum, I have to say this was one of the most satisfying repairs I've ever done on the Boxster.
Regards, Maurice.