Welcome to RennTech.org Community, Guest
There are many great features available to you once you register at RennTech.org
You are free to view posts here, but you must log in to reply to existing posts, or to start your own new topic. Like most online communities, there are costs involved to maintain a site like this - so we encourage our members to donate. All donations go to the costs operating and maintaining this site. We prefer that guests take part in our community and we offer a lot in return to those willing to join our corner of the Porsche world. This site is 99 percent member supported (less than 1 percent comes from advertising) - so please consider an annual donation to keep this site running.
Here are some of the features available - once you register at RennTech.org
- View Classified Ads
- DIY Tutorials
- Porsche TSB Listings (limited)
- VIN Decoder
- Special Offers
-
OBD II P-Codes - Paint Codes
- Registry
- Videos System
- View Reviews
- and get rid of this welcome message
It takes just a few minutes to register, and it's FREE
Contributing Members also get these additional benefits:
(you become a Contributing Member by donating money to the operation of this site)
- No ads - advertisements are removed
- Access the Contributors Only Forum
- Contributing Members Only Downloads
- Send attachments with PMs
- All image/file storage limits are substantially increased for all Contributing Members
- Option Codes Lookup
- VIN Option Lookups (limited)


John V
-
Posts
182 -
Joined
-
Last visited
Content Type
Profiles
Events
Forums
External Paint Colors
Downloads
Tutorials
Links Directory
Collections
Store
Posts posted by John V
-
-

For completeness, here is mine. I have only owned the car since 22,000 miles and didn't do an analysis on the first oil change.
The latest sample had a lot of very hard use on it.
-
Hey guys,
I just recently upgraded the suspension on my 01 Boxster by going to H & R sport springs and the front and rear sway bars from the Boxster S. Obviously I need an alignment. I am also getting 19" rims to go with the upgrade. My question is twofold.
One, should I get the alignment after the wheels go on or before?
Two, what should the new alignment settings be if they are going to differ from stock?
The specs on the wheels are below...
WHEEL SIZE 19X8.5 ET45/ 19X10.5 ET52
BOLT PATTERN 5X130
TIRE SIZE INCLUDED IN PACKAGE Toyo 235/35R19 FF & 315/25R19 RR
Also, I'm thinking I may need a minimum of 5mm spacers front and rear. Anyone know where I can get these with the longer bolts? I know suncoast has a package but I'd like to source them locally in Canada.
Sunny
Doesn't matter when you get the alignment (before or after the wheels). Wheels don't affect alignment.
I will be shocked if those wheels fit. The fronts you may be OK, but the rears, a 315 is way wide to fit on a Boxster. GOod luck...
-
You don't have to drop the sub frame. There are "boomerang" shaped pieces. Remove the bolts in the ends and loosen the one in the middle. Then, it will pivot to where you can access the bushing mounts and drop the swaybar out. You will have to drop the swaybar to change the bushings. The bushings are very beefy, and I have not had any problems with my swaybar bushings (using GT3 or TRG bars), but I have had the bolts work loose. You could just check those, and if they are loose, I would recommend Loctite which is what I did to mine.
The endlinks aren't the strongest and I suspect they are the source of the clunk up front. Everything else in the front end is pretty sturdy.
The endlinks are pretty cheap and relatively easy to replace. I would check them first.
-
Hi- 97 base boxster w/40K miles. Ignoring costswhich would be a better choice for a street only shock- Bilstein HD or the OEs?
thanks chuck
Go with the Bilstein HDs. They are the same shock as OE (shhhhhh) but without the Porsche markup, they are much less expensive.
Added bonus, the Bilsteins have a lifetime warranty. No-brainer.
-
Hi this is the first time i have ever written here! but i just wanted to say thanks a million in sticking with resolving your issue. I have had this noise for two months and its driving me crazy! I downloaded your sound file and its the same noise as mine down to a T! As soon as its daylight i will get out there and check the plugs, i am sure that will cure the noise! god its cost me so much time and money trying to resolve this noise.
Thanks again!
Lee
Silver 2.5, with my04 full upgrade!
Glad I could help. Let us know if that was the problem. Loose plugs suck!
-
Thanks very much for the tips, guys. This should be next weekend's project - once the parts come in from Sunset.
I'll post some pictures and procedure if I discover anything beyond what you all have already mentioned. Thanks again!
-
How much of that lower seal is visible with your new AOS installed?
I did mine by feel and I think I covered the seal - just barely - I hope. There were 2 small shoulders on the top and the bottom of that portion of the AOS and I could not get these to be flush with the surface. I just put everything back together last night so it will be hard to get a good look at the seal, but I'll try and let you know if I can see the seal or leaks - nothing on the floor yet.
Thanks for the input. I guess I did get my AOS installed all the way, but it's tough to tell and I was second guessing myself when I saw oil leaking.
As it turns out my leak was caused by the oil filler pipe. It appears to be cracked at the interface just before it goes into the engine. It's causing a small oil leak (but even small ones make an unholy mess on the engine) down the passenger's side of the motor. Ordered a new tube today so hopefully once that's in it will be over.
-
Cleaning up the mess left from the leaking oil and accumulated dirt represented about half the time. Getting the new AOS seated was the next most time consuming part as the new seal on the tube that attaches to the side of the crankcase has a significant amount of interference.
I have a question for you about this part of the AOS installation. I know exactly what you mean about getting the AOS seated - that lower-most connection to the crankcase was a major PITA for me. In fact, I'm not sure I even got it fully seated. I'm seeing a little bit of oil seepage from up there and I suspect I didn't get it seated enough. My bellows is sealed and not leaking.
How much of that lower seal is visible with your new AOS installed? I'll try to take a pic of mine tonight to get your opinions. Thanks.
John
-
The check engine light came on and got the code P1119. I understand it to be the pre cat O2 on bank 2.
It is actually the heating of O2 sensor, not that it makes a huge difference. :P
I just had that replaced yesterday. I had a intermittent CEL with same code.
Tomorrow we have a little trip to Mammoth Lake, CA, with local PCA. It is gonna be a blast. :cheers: :drive:
I had an intermittent P1119. Replaced both pre-cat O2 sensors (left and right cylinder banks) and it went away for a while, but it's back now. Anyone else have this issue?
-
I had a leak in the exact same spot and it was from a torn boot on the bottom of the AOS. No code had been thrown. After 10 years the boot has just deteriorated.
Good Luck,
Brent
Thanks for the heads-up, brent, but my car has a new AOS. :(
-
I don't notice it in your picture, sorry but mine came from a scan of bently pub. here is a photo I took it was dripping a small amount from both sides of the exhaust the other side that doesn't look as wet I had wiped clean earlier.
Late reply, but did you ever figure this out? To me it appears as though the oil is coming from up higher and dripping down from the lowest point, which is that hex nut / bolt.
I have a similar oil leak, but I can't figure out where it's coming from. It's definitely working its way down the side of the engine and collecting on that hex bolt.
Thanks for any insight...
John V
-
i can actually go as high as -3.0 deg in back and as high as -1.75 up front. strange. i even loosened all of the left rear suspension components and physically moved the wheel to max toe out. still can't get less than -2.2 deg camber on the left. looks like i'm in the market for some tarrett arms....
i wound up setting the rear at .1 deg total toe in at -2.2 deg camber. the front is now at .2 deg toe out and -1.2 deg camber. it turns out you can move the front towers quite a lot without affecting toe much.
It sounds like your car is abnormally low. For a track car with no rules, you can easily solve the problem.
-
I could probably get -2.0 if I wanted more negative.
john -
do you have aftermarket toe links? i was aligning my car yesterday and am unable to run less than -2.2 deg camber in back and still meet my toe requirements. at -1.8 in back, i can't get less than 13/16 toe in (the left side is at max out). i do run RoW ride height, but i didn't think that would matter so much....
No aftermarket toe links. I have to remain stock (no RoW stuff either) for my autocross class. It surprises me that you can't get zero toe with that much negative camber. I cannot believe the RoW lowered you that much. The rear toes in as the suspension drops and obviously camber increases as the suspension drops, but that is a lot. I can't comment on the cause... sorry.
This is an autocross only car, and low-speed handling behavior is important. If I run more rear toe or more rear negative camber, the car becomes pushy at low speeds, so I set it up to be a bit loose at high speeds. Probably if I were doing track work I would want more rear negative camber, and maybe some rear toe. Tire wear is pretty much nonexistent with my setup.
-
as for camber, it seems odd that you're only able to get -1.0 to -1.2. maybe i'm misunderstanding. isn't the factory setting between -1.6 and -1.8?
I could probably get -2.0 if I wanted more negative. I want less negative camber in the back (or ... "most positive"). Increases in rear camber only make the car unpredictable at the limit, especially in transitions, and make the car more "pushy" in low-speed corners. I also do ProSolos in this car, and it maximizes the launch if the camber is minimum. I run 245/35/18 fronts and 285/30/18 rears so there is some understeer built-in as a result of that, but removing all the rear camber and toe makes the car very well balanced.
-
wow; good to know. maybe i just got lucky; 5/32 is a lot. why are you toed all the way out in back? is the car lowered a lot? tarrett arms? out of curiosity, when you string your car, do you just do parallels on each side of the car, or do you use a center line for thrust angle?
The car is set up for minimum rear camber and zero rear toe. To acheive zero toe you set the toe adjusters to as low as they go and then dial in negative camber until the toe actually reaches zero. If you were to set the camber adjusters to "max positive" rear camber (about -1.0 to -1.2 degrees) and then set the toe you would not be able to get out all of the toe-in. Make sense? :)
To string the car we set the strings to be parallel to one another, then measure how much the car is misaligned between the parallel strings and adjust the strings (equally on each side obviously) to compensate. That leaves you with parallel strings and a car which is parallel to them.
HTH,
John
-
Unfortunately because those eccentrics have so much slop in them, this in no way guarantees that you're at the same alignment as when you started. If you've ever aligned one of these cars you know that if you turn the eccentric, often no change in alignment will occur for the first 1/16 of a turn!
this is partially true for the toe eccentrics, but not the camber eccentrics on the lower control arms. i have a SmartCamber guage that i use to verify camber after this type of work. i've had the rear control arms removed four or five times. if i set the eccentric to its previous position, the camber doesn't change at all.
I just verified that this is not true (at least for my car). I strung up the car last night to verify the toe prior to the ProSolo this weekend. The right rear was off because when I did the last suspension swap I removed the camber eccentric. Even though it was marked and put back to the same location, it caused the toe to be off. 5/32" in on the right rear.
I should add that my toe eccentrics are set to as much toe-out as possible - so there is no more range of adjustment there - hence why I had to make the adjustment at the camber eccentric.
I put the car on the slip plates and loosened the camber eccentric. I verified that there is about 1/16 of a turn of "slop" in the camber eccentric which makes sense - the camber eccentric is "captive" but it can still move laterally a bit once loose. Depending how the bolt is loaded (which is basically saying depending on which way it was last turned) you can get +/- changes in toe and camber. I tweaked it out and tightened it once the toe reached the right location.
Camber change was minimal - I gained a slight bit of negative camber but really the goal was to get rid of the toe-in.
-
Put it this way, I painted all my interior with Alumilook paint, and applied a very high gloss coat. If you could see mine you would be impressed, but at the end of the day, its your choice
Ditto. I think lots of people don't take the time to wetsand the color properly to eliminate any orange peel, and some don't even clearcoat the paint! In that case, yes, it looks very cheap.
I spent the time to paint my trim properly, and applied seveal coats of clear which I then wetsanded and buffed to a high gloss. It makes a huge difference and looks worlds better than the stick-on stuff.
-
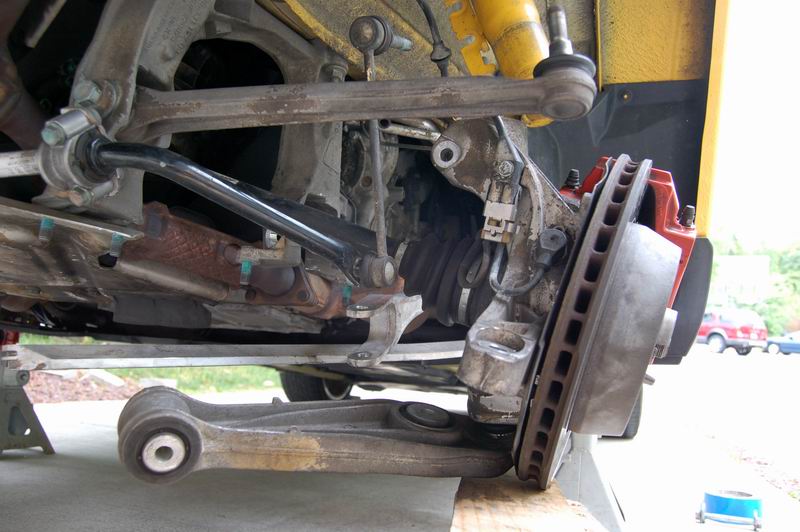
We found it to be much quicker and easier to do the rear by disconnecting the rear camber eccentric bolt. If you do this, you don't need to remove the lower ball joint, you don't have to pry the control arm, you don't have to remove the axle and you don't have to remove the brake calipers.
that's definitely the way to do it. i've done several of these and never removed the axles. it's actually possible to split the ball joint and still remove the strut assembly with the axles and lower control arm in place. it's FAR easier, though, to remove the entire lower control arm and leave the ball joint in tact. three hours must be some kind of record! the best i can do is four, but that's just one man.
Yeah, after doing it this way I can't imagine why anyone would remove the axles, calipers, etc.
I did the front without cracking the ball joints or control arm or caliper as well - but it's kind of a wash as to whether that method is easier or not.
-
A buddy and I just did another M030 install. Three hours start to finish, both ends of the car. I found that the biggest pain in the a$$ in this job is removing and reinstalling the rear axle. So this time, we didn't do it.
We found it to be much quicker and easier to do the rear by disconnecting the rear camber eccentric bolt. If you do this, you don't need to remove the lower ball joint, you don't have to pry the control arm, you don't have to remove the axle and you don't have to remove the brake calipers.
Attached is a pic showing what I mean. I'm sure some of you knew this but nobody ever attached a picture.
-
Graeme,
I recently completely changed my suspension over to the ROW M030 setup. It was the first time I have ever worked on Porsche suspension, and I used your guide. It was a great help to me during the process. Good illustrations and clear instruction.
Thanks for taking the time to put such a great guide together. :thumbup:
One note to potential users: When you get to the rear suspension, I found it much easier to unbolt the lower control arm at the chassis, than to split the lower ball joint - even though I have the Porsche type splitter tool. Just clean the adjuster cams good with brake cleaner first and let them dry, then mark the cam positions with a sharpie before loostening the bolts. Then its easy to put them right back in the same positions.
Unfortunately because those eccentrics have so much slop in them, this in no way guarantees that you're at the same alignment as when you started. If you've ever aligned one of these cars you know that if you turn the eccentric, often no change in alignment will occur for the first 1/16 of a turn!
You may be fine - but I'd suggest getting an alignment.
Quick question - did you still have to disconnect the axle doing it your way (removing the eccentric bolt)?
-
do you mean for the spark plug tubes?
Go buy yourself a snap-ring pliers. You'll need them sometime if you keep working on cars, and they're cheaper than the Porsche tool.
Alternatively, you can use an allen key to remove the tubes. Find an allen key whose small end will snugly wedge into the tube, and use a locking pliers to pull out the tube. Either method works very easily. And cheaply.
Thanks for the idea's. I willl try the allen key. Keep fingers crossed i don't break the tubes.
If you break the tubes, no big deal. You're replacing them, remember?
-
do you mean for the spark plug tubes?
Go buy yourself a snap-ring pliers. You'll need them sometime if you keep working on cars, and they're cheaper than the Porsche tool.
Alternatively, you can use an allen key to remove the tubes. Find an allen key whose small end will snugly wedge into the tube, and use a locking pliers to pull out the tube. Either method works very easily. And cheaply.
-
Why do you want to add another step to starting your car?
Doesn't make any sense to me. You still have to put the key in and turn it - why add a button press to the process? :rolleyes:
-
How much play is allowable in a stock shifter setup, Currently i have nearly a half inch of play (side to side) in my shifter. Is that too much play?
Yes.
Unfortunately, not much you can do about it. The side-to-side pivot mechanism uses plastic for the pivot joints. It wears out.
A friend and I are working on a solution to repair the older, worn-out shifters, as well as tighten the action on newer cars. Stay tuned.

Front Suspension Diagram... Camber components specifically
in 986 Series (Boxster, Boxster S)
Posted · Edited by John V
Well, the rear suspension arms have eccentrics that allow you to adjust the camber of the rear wheels since the rear strut towers are not slotted. Given that the rear lower control arms are the same as the fronts, I suppose you could adapt the rear eccentric bolts and nuts to work up front as well. I haven't looked closely at the lower control arm mounts in the front and rear to be able to tell you what you have to do. I suspect it would not be a simple solution.
I would be more concerned why your camber isn't coming into spec. What are your numbers exactly? Do you have any suspension modifications (lowering springs, etc)? It sounds like the car may be tweaked.