Welcome to RennTech.org Community, Guest
There are many great features available to you once you register at RennTech.org
You are free to view posts here, but you must log in to reply to existing posts, or to start your own new topic. Like most online communities, there are costs involved to maintain a site like this - so we encourage our members to donate. All donations go to the costs operating and maintaining this site. We prefer that guests take part in our community and we offer a lot in return to those willing to join our corner of the Porsche world. This site is 99 percent member supported (less than 1 percent comes from advertising) - so please consider an annual donation to keep this site running.
Here are some of the features available - once you register at RennTech.org
- View Classified Ads
- DIY Tutorials
- Porsche TSB Listings (limited)
- VIN Decoder
- Special Offers
-
OBD II P-Codes - Paint Codes
- Registry
- Videos System
- View Reviews
- and get rid of this welcome message
It takes just a few minutes to register, and it's FREE
Contributing Members also get these additional benefits:
(you become a Contributing Member by donating money to the operation of this site)
- No ads - advertisements are removed
- Access the Contributors Only Forum
- Contributing Members Only Downloads
- Send attachments with PMs
- All image/file storage limits are substantially increased for all Contributing Members
- Option Codes Lookup
- VIN Option Lookups (limited)


John V
-
Posts
182 -
Joined
-
Last visited
Content Type
Profiles
Events
Forums
External Paint Colors
Downloads
Tutorials
Links Directory
Collections
Store
Posts posted by John V
-
-
Hi Johny,
Yup I completely agree, But you can create the 555 timer circuit to be completely flip flop so there is no way of getting up and down activation simultaniously. Also, you can IC filter it to prevent premature activation.
I would be interested in reviewing your design if you have any left?
Russ
Russ,
It's John V, not Johny. ;) We do have a couple left. If you would like one, just PayPal $99.00 to "onetouchtop@hotmail.com" and we'll get one shipped right out to you.
Thanks,
John V
-
Received my one-touch top device yesterday...thanks John! Unfortunately, the car won't see the mod until spring when the weather warms up. Other than a big snow storm in early December, northern Chicago suburbs have experienced a mild winter; still too much salt on the roads, though.
No problem, and be sure to let me know what you think once it's installed!
-
Well i shouldnt have anything to worry about since 1) it wasnt flaking when i painted it. and 2) its painted over and therefor protected from the elements and shouldnt age anymore from the original surface area anymore.
Maybe, maybe not. Mine wasn't flaking either, but my first couple trials of painting showed that the stock finish does not play nicely with other paint and primer. It was not a durable finish. Yours may very well be different, but I think it's a "better safe to remove it than sorry you didn't" scenario.
-
Guys,
A friend and I came up with an easy-to-install device that allows one-touch operation of the convertible top on a 986 Boxster. We've been selling them for a few weeks now and our customers have been very happy. Here's a Renntech link describing our OneTouchTop. One click raises or lowers the top. It can be stopped mid-stroke by clicking the switch the opposite direction. Simple! We would like to offer these for sale to 996 convertible owners but neither of us has access to a 996 convertible so we can't verify that the application is identical.
Are there any owners that would be willing to meet up with us for about a half hour or an hour so we can check out the operation of the 996 top electronics? All we would need is to pop off the panel which houses the top up/down switch and probe a couple leads with a multimeter. There would be no risk of damage to the car and you're welcome to supervise us. :)
In return, we're more than willing to offer one of our devices at a 50% discount ($49.50) and we'll install it for you!
If you're interested, just send me a PM and we can set something up. Thanks!
-
what exact sandpaper did you use and steps if you dont mind
I dont remember at all, it wasnt the finest stuff pepboys sells but i think the packaging said that for sanding primer... i sand the base coat anyway.... I would buy the variety pack if i were to do it again. The Steps are "removal, prep(wipe down), sand, Wipe Down, primer, primer, sand, primer, paint, Sand, paint, paint, clear coat, clear coat, clear coat and reinstallation"
I would advise anybody wanting to paint their console to let it dry at least 24 hours before any sanding. The paint will not have even fully cured after 24 hours but it is good enough to sand. If you sand too quickly after painting the whole job will be ruined. With metallic colors you can sand the metal flake right off if you are not careful because it tends to float to the surface.
I did not sand the base coat of my console at all. I used very light coats up until the last coat of color which I left glossy and let dry overnight before clearing.
I used 400 grit wet paper to remove the factory finish down to the plastic, 800 grit to smooth the plastic, 800 grit after the high-build primer, and 1500 grit to sand the clear before buffing.
The reason i sand the primer once and the base once was to only sand off excess and allow little deposits to settle in the pits that the plastic originally has. I pretty sure its ok to sand a single coat of primer or paint after about 15-20 minutes on a low humidity day
The pits are a big problem. The stock finish settles in there and part of the problem with the original finish is that it isn't well bonded to the plastic, so it flakes off due to age, UV, sweat, sunscreen, whatever. I would never want to paint over that stuff primarily for that reason. Sand, sand, sand until all those pits are gone, then sand with the 800.
You MAY be able to get away with sanding after a half hour, but I would not risk it. Let the paint cure 24 hours (longer if you can wait) and the end result will be much more consistent.
-
what exact sandpaper did you use and steps if you dont mind
I dont remember at all, it wasnt the finest stuff pepboys sells but i think the packaging said that for sanding primer... i sand the base coat anyway.... I would buy the variety pack if i were to do it again. The Steps are "removal, prep(wipe down), sand, Wipe Down, primer, primer, sand, primer, paint, Sand, paint, paint, clear coat, clear coat, clear coat and reinstallation"
I would advise anybody wanting to paint their console to let it dry at least 24 hours before any sanding. The paint will not have even fully cured after 24 hours but it is good enough to sand. If you sand too quickly after painting the whole job will be ruined. With metallic colors you can sand the metal flake right off if you are not careful because it tends to float to the surface.
I did not sand the base coat of my console at all. I used very light coats up until the last coat of color which I left glossy and let dry overnight before clearing.
I used 400 grit wet paper to remove the factory finish down to the plastic, 800 grit to smooth the plastic, 800 grit after the high-build primer, and 1500 grit to sand the clear before buffing.

-
Hi Guys,
. . . this is actually a very simple circuit to make. You can do it using a 555 timer circuit on both the open and close lines on the switch. This simple keeps the switch on for around 13 - 15 seconds after touching the switch once, very very simple. Also, if you need to service the engine, you simple press the button once, and turn off the ignition ocne the top if at the service position which automatically stops power to the top.
I just want to clarify a few things. First, it is a bit more complicated if you want to implement the ability to stop the top mid-stroke by pushing the button the opposite direction - negating the need to turn off the ignition. Second, when you consider the safety interlocks that you might want to include (you wouldn't want a situation in which the top is trying to go up and down simultaneously...) it gets more complicated again. We spent a lot of time designing something that would have the functionality we wanted plus have absolutely no risk of causing damage to the car. For someone experienced in building electronics it can be done. At the same time it's not so simple that I would trust a complete beginner to build it from scratch, especially if it's to be small enough to fit inside the dashboard. What we offer is a complete plug and play solution for a cost that is much less than the other packaged solutions out there.
We still have a few left from our initial build. If anybody is interested, please don't hesitate to contact us at onetouchtop (at) hotmail (dot) com
-
At long last our One Touch Top units are ready to ship. The price is $99 shipped. If you would like one, drop us an email at onetouchtop (at) hotmail (dot) com.
Several of you have already expressed interest and given us your contact information. We'll be contacting you soon.
Instruction manual:
-
I live in Maryland and Maine. When it is time to replace suspension you can read about it here.
Thanks to all reaponders.
How convenient! I'm in Maryland as well. :)
-
Swap springs and shocks. The Anniversary Edition is just a Boxster S with the 987 intake.
You can put on 17" wheels.
Slight omission - the Anniversary Edition is just a Boxster S with the sport suspension (M030) and the 987 intake.
Where are you located? I would be more than willing to swap my "standard" Boxster S suspension for your Anniversary edition suspension.
-
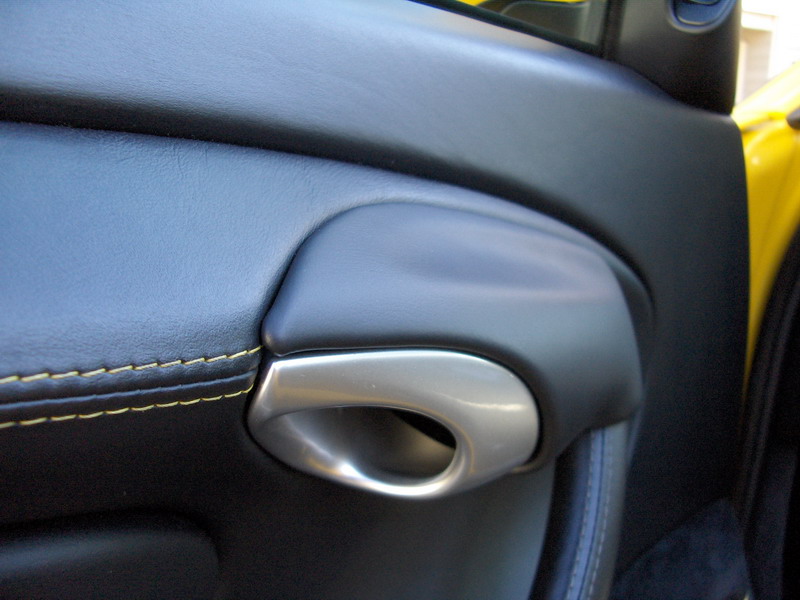
The reason they do that is because people inharintly never look where they are grabbing for the door handle, and always have other things in their hands at the same time (keys, etc) and if that were covered in leather originally it would get horibly scratched from people who are not paying attention (which is a lot of people) and look horible. If your careful it will never be scratched but can you image it like that in cars for the masses? THey would look horible.
Hm, interesting. Your hand is nowhere near this part when you're opening the door. Actually, one would be much more likely to scratch the panel *behind* the door handle, which is already leather in my car (and shows no damage I might add). Hey, this is an option on the 987 from the factory!
-
Looks very nice! Where did you purchase the leather and what type of adhesive did you use to attach it to the piece? I'd be interested in doing my door pocket covers in leather.
eBay. I took a chance and just bought some. It was $20 shipped for a roughly 2' by 2' section. Easily enough to do two cars worth of door pull covers and door pocket covers, which is the plan.
The grain is almost identical to the factory full leather doors, but the color is slightly less glossy. Over time, I'm sure it will get glossier.
-
I bought some leather with the intention of covering the armrest lids similar to what was done on Rainy Day Garage's website - but after thinking more about it I decided to cover these with leather as well. It was kind of a pain but I think it turned out pretty well. Why Porsche chose to use so much cheap, badly painted plastic in these interiors is beyond me.
Complements a full leather interior very well, I think.
Okay, on to the armrest lids! :)
-
Powdercoating doesn't affect the strength of the wheel. Not one bit.
There are a couple concerns with powdercoating that could maybe lead someone to that conclusion, though. First, you have to be careful to remove any powdercoat that gets in the lug bolt seating areas and the hub mating surface. Second, powdercoat can mask cracks that form in wheels, which ultimately could lead to a failure. But honestly, how many of you check your wheels for cracks?
It's weird how incorrect information seems to permeate the internet. :rolleyes:
-
Go to this thread:
http://www.renntech.org/forums/index.php?s...op+plastic+trim
write down the TSB number and go to the members area to download the TSB.
John V
-
i wouldnt powdercoat them, the strength goes down.
Oh my goodness. Where in the world did you hear this?
-
Those are twp piece wheels and the outer rim is not painted - nor are the bolts. To paint it properly the wheel needs to be disassembled, painted and then re-assembled with the proper torque sequence on each bolt (IMHO).
Loren is correct. The outer lip is not painted, but it is clearcoated. It would be very difficult to paint those wheels properly with them assembled.
I have painted alloy wheels in the past and had very good results, even using just rattle cans of color and clear.
-
i have a plastic top too
Good morning. I am interested in the one touch top control, however at times the lip on the passenger side does not always catches the groove on the frame so it is inside the frame I have to guide it as I close the top. This always happens when I "karate chop" the plastic rear window so it lays down smoothly. Has anyone experience the same thing.
Ben
Ben,
There is a way to fix that and it was at Porsche TSB I believe. There is a tension spring (looks like a tiny leaf spring) that forces that lip inside the groove. If yours aren't following the groove, you need to remove and reverse the tension spring. It worked for me!
Do a search, it's been covered before. Good luck!
John
-
So how can I order one?
RichS
Rich (and everyone):
We did an initial small run of boards because we weren't sure there was much interest. The circuit boards are supposed to arrive next week at which point we can start assembling. The goal is to have them completed so they can ship before the holidays.
We're not taking orders until we have them ready to ship out. We will post here (as well as e-mailing directly the people who have requested to be put on the list) when everything is good to ship out. If you would like, you can PM me your e-mail address so you don't have to check this thread.
Thanks for the interest,
John V
-
We put together a short video showing the installation from start to finish. The final version will be slightly different in that the wires be color coded to avoid confusion. Of course full installation instructions with detailed pictures will be included as well.
-
i thought i read on the last forum (can't name forum dam) that i came from that there was
a bit of soldering to be done. did you some how elminate this or
did i read wrong. that was the only reason that i stayed away from
commenting if i wanted one or not. i stayed away because i'd have
do more then just plug and play.
Surreal,
Nope, no soldering of any kind needs to be done to install our one-touch top. It is completely plug and play and always has been. It takes no time at all to install and no tools are needed.
Thanks,
John V
-
I think your right, If anything, This should be made into a DIY mod, not a closely held secret for something that would be equevalent to auto-up passenger window on a MY97 boxster, I would never pay $100 for that. I would rather find a DIY, If one exsists.
Thanks for your input. Implementing the basic functionality we wanted, to wit, a plug-and-play solution for one-touch operation coupled with the ability to cancel and restart, is actually a bit more complicated than one would think. Once you've factored in the cost of a small run of PCBs, components, assembly, packaging, shipping and the time involved with everything this is the price we felt comfortable charging.
Since there was enough e-mail interest to justify it we ordered the goods and will have something for sale shortly. Still, we encourage other enthusiasts who think they can do a better job on their own to go for it and post a DIY! :thumbup:
-
i have a plastic top too
Well some people are lazier than others I guess, and I'm certainly one of the laziest. Give me convenience or give me death. :)
-
100 bux is not that bad, but it really doesnt bother me whatsoever to hold the button, i think this is as useful as s2000 start button
It's really convenient for folks like me who have the plastic window and have to get out to chop the top. I can just hit the button, hop out, chop, and by the time I get back in the top has finished moving.


Sway-bar recommendation..?
in 986 Series (Boxster, Boxster S)
Posted
Upgrading the sway bars will make the body roll less through the turns, but there is a good chance you won't have more grip.